Best Cauliflower Pizza Crust Recipe That Won’t Fall Apart

cauliflower pizza crust

You can make the best cauliflower pizza crust recipe that will not fall apart after baking. Slice it, hold it, eat it–it keeps its shape–and it actually tastes like pizza! This cauliflower crust pizza is gluten free, healthier than bread dough, and definitely worth trying.  And this recipe freezes well too so why not make 2 crusts?

All You Need To Make a Cauliflower Crust Pizza

2 cups of grated CAULIFLOWER
1 cup of freshly grated PARMESAN CHEESE
1 EGG beaten
PARCHMENT PAPER to line your baking sheet
PIZZA SAUCE, your choice   [see below for an easy, delicious tomato-based pizza sauce recipe]
PIZZA TOPPINGS, your choice

gluten free pizza crust
The best and easiest cauliflower crust pizza recipe. This cauliflower crust is delicious, holds its shape, and will not fall apart.

How To Cook A Cauliflower Crust Pizza Recipe

Cut And Dry Out The Fresh Cauliflower:

  • Grate fresh cauliflower florets into granules resembling “poprocks”
  • Heat the grated cauliflower in a skillet.  Don’t add oil or water–use medium heat, not too hot. Stir until the cauliflower has dried out somewhat. It won’t dry completely, but the dryer, the better. Heat at least 10 minutes, just enough to evaporate the moisture, not enough to color or cook down.
  • Remove skillet from burner and set aside to allow cauliflower to slightly cool.

Prepare and Cook the Naked Crust:

  • In a bowl, beat 1 egg.
  • Add grated Parmesan cheese to the egg. You can substitute, asiago or romano cheeses, just be sure you use a hard cheese for best results.
  • Add the cauliflower to the bowl and mix well with the egg and cheese and form into a ball.
  • Spread parchment paper onto a baking sheet. DEFINITELY USE PARCHMENT PAPER, otherwise your crust may tear when you try to pick it up. If you’re out of paper, here’s some current parchment paper prices on amazon.
  • Place the balled cauliflower and cheese onto the parchment paper and spread out into a pizza shape about ¼ inch thick. The crust will be about 10″ across.
  • Do not make the edges of the crust too thin; keep the size of the crust uniform for even cooking. The cauliflower will darken quite rapidly around the edges if too thin.
  • Place crust into an oven preheated to 400 degrees Fahrenheit and cook approx. 15-20 minutes until the crust has colored and firmed up.

Add Your Favorite Pizza Toppings and Finish Cooking:

  • Remove cauliflower pizza crust from the oven and top with your favorite pizza sauce. Use a marinara sauce, pesto, white sauce, or whatever. Top with your favorite pizza toppings.
  • Return pizza to the oven and continue to cook at 400 F for about 10 minutes until the toppings are done, watch the edges of the cauliflower crust; the edges will darken too much if overcooked.
  • Remove the pizza from the oven and set on a cooling rack –or don’t– this step isn’t make or break.

And that’s it!  Eat and enjoy. Check here for current prices for a pizza pan on Amazon.

A cauliflower pizza crust will not rise since there is no yeast involved, and since the crust is entirely cauliflower, cheese, and egg, it will not achieve the same crispness as a thin dough pizza. But the pizza will stay together just fine, and will taste very much like a pizza.

cauliflower pizza crust
Cauliflower pizza crust after cooking about 20 mins. in a 400 F oven. Crust should be cooked firm with a nice, golden color.

Tips For Making A Cauliflower Pizza Crust That Will Not Fall Apart

  • Use fresh cauliflower, and only use the florets.
  • Don’t allow overly large pieces of cauliflower into the “dough” — keep the vegetable pieces reasonably uniform.
  • The dryer the cauliflower pieces the better, but don’t be obsessed!
  • Use only a hard cheese like Parmesan or Romano in the crust mixture, this helps make the crust stable.
  • Don’t make the crust too thick, around ¼” is ideal.
  • Make the crust a uniform size all the way to the edges so that it will cook evenly.
  • Cook the cauliflower crust on parchment paper! otherwise the crust will stick and break apart when you try to remove it from the pan.
  • Spread your pizza sauce almost to the outer edges of the crust; your pie will look better. The cauliflower pizza crust is a healthier choice, but it is not the prettiest pizza crust.
best cauliflower pizza crust
This cauliflower crust is healthier than a bread dough, with more nutrition and less empty calories.

Is A Cauliflower Pizza Crust Healthy ? …well

  • It provides more nutrition.
  • It adds less empty calories.
  • It’s gluten-free.
  • And it works. It’s a great alternative to a bready pizza crust that will satisfy your pizza needs.
pizza sauce recipe
Any pizza sauce will work with a cauliflower crust pizza, so use your favorite, but homemade is always best!

How to Make an easy Homemade Pizza Sauce

A good pizza needs a good sauce. It’s easy to make a simple pizza sauce at home that will suit your tastes exactly.

The key to a great homemade pizza sauce is making it at least a day in advance. Keep a jar of sauce in your fridge. You can use it on pizzas, but also on sandwiches, as a dip, or part of a marinara sauce for any Italian inspired dish.

You’ll need:
1 15oz can of TOMATO SAUCE
dried THYME dried OREGANO
dried BASIL
GARLIC POWDER or fresh chopped GARLIC
SALT and PEPPER
and for a little kick, add a little fresh or dried HOT PEPPER

Add the seasonings to taste. If you’re just getting started cooking at home, here are current prices for Spice Starter Sets on Amazon.

Are There Other Ways To Use A Cauliflower Pizza Crust?

For a tasty twist on this pizza crust variation, try using it as a Cauliflower Crust Burrito. Seriously, a burrito has tons of flavor, so it’s a great way to use this kind of recipe.

cauliflower pizza crust recipe
This is a nice variation on a burrito recipe and a great way to use a cauliflower crust.

Thanks For Checking out our Recipes

We hope you love this cauliflower pizza crust recipe! Sign up for our mailing list so you’ll never miss a new recipe. Also click a button below and share the dishes with your friends. You can also follow Chef Buck on Youtube. We appreciate all the kind comments and support, and we’ll see you next time in the kitchen!

If you like what CG and I do, support us on Patreon, or throw us a tip in our Paypal Tip Jar. We’ll happily enjoy a coffee on the road – Thanks! We appreciate all the support, and we’ll see you next time in the kitchen!

We include affiliate links for products on our website. Making a purchase after clicking on our links and we may earn a commission which helps us produce more videos and drink more coffee :^) We participate in the Amazon Services LLC Associates Program, which is an affiliate advertising program. It provides a means for us to earn fees by linking to Amazon.com and affiliated sites, so we can make more videos.

Share and Enjoy !

Cook a Sirloin Steak Like a Restaurant Pro

american kobe top sirloin steak

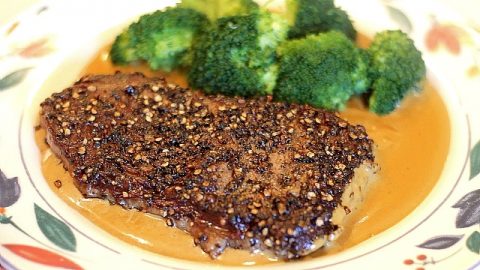
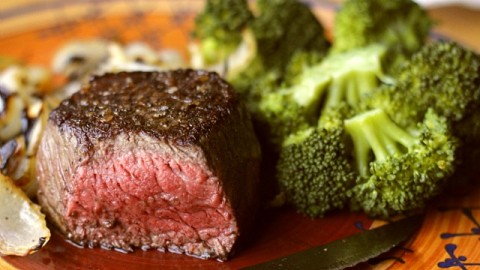
Cooking the perfect steak is easy. Sear the outside of the steak in a hot skillet to add color and flavor, and then simply finish the steak to desired doneness in a hot oven. This cooking preparation is especially ideal for thick cuts of steak.

How To Cook The Perfect Steak Filet

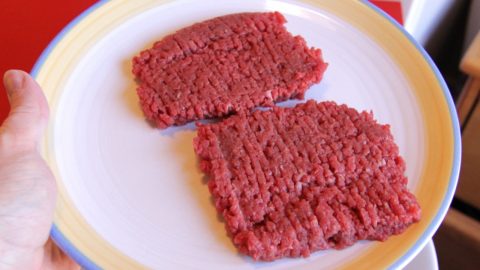
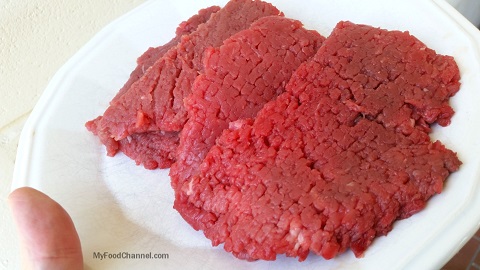
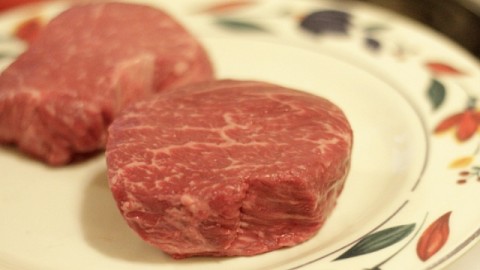
  • Choose a good cut of beef. The perfect steak is never the cheapest steak!
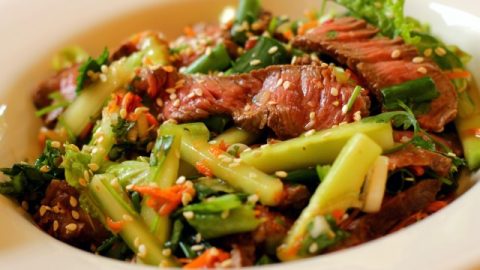
  • I’m using a Top Sirloin Steak for this video, but any good cut of steak will do (and remember, marbled steak makes a juicy steak!)
  • Let the steak come to room temperature before cooking.
  • Season the steak well, on both sides, with coarse salt and pepper.
  • Preheat your oven to 500 degrees Fahrenheit.
  • On the stove top, heat a little oil in a heavy-bottomed, oven safe skillet. You’ll want a nice skillet that’s great on the stove top and in the oven, here’s a deal if you want to check current prices for a cast iron skillet on Amazon.
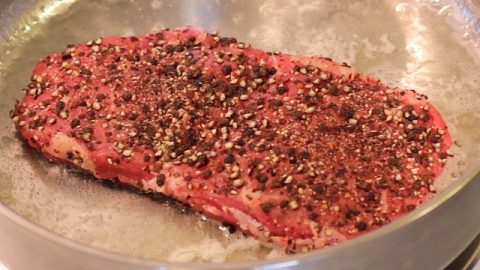
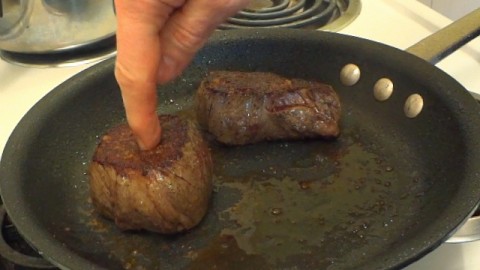
  • Add steak to the hot skillet.  The beef should sizzle when it hits the pan.
  • Sear on medium high heat for approx 2 minutes.
  • Turn steak with tongs and sear other side for 1 minute.
  • Slide the skillet into the oven and continue cooking steak to the desired temperature.
  • Test the doneness of the steak by pressing on it with your fingers. Steak becomes firm as it cooks. A well done steak is very firm, and a rare steak very malleable. Poking or slicing the steak to check for temperature will result in loss of juices, so this should be avoided.
  • When steak is almost cooked to desired doneness, remove the steak from the oven and skillet and place on a plate to rest for 5 minutes. The internal temperature of the steak will continue to rise for a few moments after leaving the oven.
  • Allowing the steak to rest for 5 minutes before serving will preserve the juiciness of the cut.

sirloin steak
For a simple steak preparation, always choose a great cut of beef

Best Steak Cuts for a Great Dinner

A simply prepared steak can taste terrific, but it requires a good cut of meat.  The cheapest meat never makes the best steak.  Less expensive cuts of beef can be great as roasts, in stews, fajitas, or marinated, but spending a little more will make all the difference when cooking a nice steak dinner.

  • Ribeye Steak – This is a well-marbled and tender cut of steak, and also my favorite.
  • New York Strip or Strip Steak – marbled and tender, but comes in 2nd behind the ribeye in my book.
  • T-Bone – This cut is a T-shaped bone with a strip steak on one side of the bone and a partial cut of the beef tenderloin, or filet mignon, on the other side of the bone. It’s a big steak, not as big as the porterhouse, but still more than I want to pay for.
  • Porterhouse – this steak is really two steaks, it includes the strip steak and the entire filet mignon hugging a T-shaped bone between them. It looks great and tastes great, but it’s pretty pricey, and since it includes even more of the tenderloin than the T-bone steak, it isn’t a cut of steak I buy unless it’s a crazy deal.
  • Top Sirloin Steak – sirloin steak can be divided into “top” and “bottom” cuts. TOP SIRLOIN steak like I cooked in the video above makes a nice steak, but anything less than top sirloin can be a little tough for a simple steak preparation.
  • Filet Mignon or Tenderloin – I almost hate to include this cut, since it’s the priciest steak by cost per pound, and also the steak I’m least likely to buy, but lots of people love it. It’s lean and tender, but too lean for my taste. In my book Fat = Flavor.

sirloin steak
Test the temperature of a steak with your finger. Steak becomes more firm as it cooks.

How To Test When A Steak Is Done

A steak is done when it’s done to your liking.
I like my steak cooked medium rare.
To test the doneness of a steak, simply press down on the beef with your fingers. The more give there is in the steak, the less cooked it is.
As a steak cooks it becomes firmer, so as the meat becomes more done, it becomes less pliable. This is something that is easy to figure out as you cook more steaks and test them for doneness in this manner.
It is the best way to check for doneness; avoid cutting the steak open or puncturing it to test for temperature. Slicing or poking the steak before it rests will result in a loss of juices, which is really another way of saying a loss of flavor, which defeats the entire point of buying a nice cut of steak

Try This Top Sirloin Steak preparation

american kobe top sirloin steak
Cook a thick steak filet on high heat. Sear the outside for awesome taste and color, and then finish to desired doneness in the oven.

Give this top sirloin steak a try, or any kind of steak you like, just keep it simple and buy a nice cut of beef.

If you liked the video and recipe info, click some of the buttons below to share this post with friends and family. And for another tasty dish, try this Fantastic Stove Top Pot Roast Recipe.

pot roast recipe
Throw your chuck roast in a pot on the stove and it practically cooks itself.

Thanks for checking out the recipes. Be sure and sign up for our mailing list so you’ll never miss a Chef Buck cooking video, and click a button below and share the dishes with your friends. We appreciate all the kind comments and support, and we’ll see you next time in the kitchen!
–Chef Buck

Share and Enjoy !


Mango Curry, Chana Masala, & Gobi Matar Indian Cooking

mango curry

Let’s cook a complete Indian meal in real time. For this dinner, I’m cooking chana masala, mango curry, and gobi matar. These dishes work well together. All recipes are posted below, but Indian cooking is all about flexibility and taste, so tweak these recipes and make them your own, or follow them exactly, and then experiment at a later time.

Ingredients for Mango Curry Recipe

4 large, very ripe and juicy MANGOES
1 cup YOGURT
1-2 Tbsp CUMIN SEEDS
dash of ASAFOETIDA
¼ cup CURRY LEAVES chopped well
4-5 Tbsp GINGER finely chopped
2-3 Tbsp CHICKPEA FLOUR a.k.a. besan
2 Tbsp OIL for cooking
SALT to taste

Check out current prices for Indian Cooking Spices on Amazon.

How to Make Mango Curry

Use super-duper ripe mangoes to make mango curry. The mangoes should be VERY RIPE, soft and juicy.
Peel and pit the mangoes and place the fruit in a bowl. Crush the mango until it’s a wet, semi-lumpy mess.

Add in about 1 cup of Greek-style yogurt and mix well.
In a large pot, heat oil on medium high heat.
Add cumin seeds and asafoetida and cook 30-40 seconds.
Add curry leaves, half of the ginger, and chickpea flour. Stir and continue cooking about 2 minutes.
Add mango mixture and 1 cup of water and stir well with ingredients in pot.

Bring to a bubble, then reduce the heat, cover and let simmer about 10 minutes.
Stir occasionally and add more water to the mango curry as desired.
After 10 minutes, add the remaining ginger, cover and let cook another 5 minutes.
That’s it! Serve mango curry over rice, and enjoy!

mango curry
A complete Indian meal with mango curry, chana masala, and gobi matar.

Chana Masala Recipe

Many chana masala (chickpea curry) recipes include onion; sometimes I use onion, sometimes I don’t, it mostly depends on the other dishes I’m serving with the chana masala.

I do often include asafoetida and chick pea flour. If not using besan, just add ½ cup of water instead of 1 cup. The asafoetida is wonderful. It stinks, but ti’s still wonderful. Asafoetida is also called “devil’s dung”, but that’s just when it’s raw, once you toss it into a simmering skillet, it transforms into a sharp, oniony weirdness that will pleasantly remind you of your favorite Indian restaurant.

I’ve only been able to find asafoetida at international food markets, but it’s worth acquiring, especially if you want to make a habit of cooking great Indian dishes at home. If skipping the asafoetida, try adding 1 finely chopped medium-sized onion between the cumin seeds and the tomatoes.

Chana Masala Ingredients:
1 15 oz can CHICKPEAS (or 2 cups)
1 15 oz can DICED TOMATOES (or 2 fresh diced)
1 tsp GARLIC (minced)
1 tsp GINGER (minced)
1 HOT PEPPER (minced)
1-2 Tbsp OLIVE OIL
1 Tbsp CHICK PEA FLOUR (also called besan)
1 tsp CUMIN SEEDS
1 tsp CHILI POWDER
1 tsp GARAM MASALA
1/8 tsp ASAFOETIDA (optional, also called hing)
½ tsp TURMERIC
SALT (to taste)

Check out current prices for Indian Cooking Spices on Amazon.

In a skillet, heat oil on medium high heat. When the oil is heated, add the cumin seeds and asafoetida. Stir and allow to simmer for just a few moments. Once the seeds begin to crack, add the chick pea flour and continue stirring. The flour will absorb the oil. Stir for approx. 1 minute and then add the diced tomatoes. Mix well and allow the tomatoes to bubble.

As the tomatoes cook down, you can crush them with your stirrer for a smoother chana massala. Add the minced ginger and garlic and hot pepper. Add the chili powder and turmeric. After the tomatoes have cooked 4-5 minutes, add the chick peas, garam masala, and salt to taste. Mix well and add 1 cup of water. Bring the dish to a bubble, then reduce to a simmer, cover, and allow cooking for 10 minutes.

After 10 minutes, the chick peas will be soft. Use a fork or potato masher to smash some of the chick peas, this will help thicken the chana masala along with the chick pea flour added earlier. Simmer uncovered to the desired consistency, remove and serve. Garnish with fresh coriander leaves. Serve with rice or on its own.

Gobi Matar Recipe

Cauliflower is good and good for you, especially if you curry it up–and this Indian-style cauliflower curry recipe will help.

Ingredients:
1 med CAULIFLOWER (cut into florets)
1 15 oz can DICED TOMATOES (or 2 med tomatoes)
1 8 oz can GREEN PEAS
1/8 tsp ASAFOETIDA (optional, also called Hing)
1 large ONION (chopped)
1 HOT PEPPER (finely chopped)
1 tsp GINGER (finely chopped)
1 Tbsp GARLIC (finely chopped)
1 tsp CHILI POWDER (sub cumin powder for less heat)
1 tsp CUMIN SEEDS
½ tsp TURMERIC POWDER
1 tsp CORIANDER POWDER
1 tsp GARAM MASALA
2-3 Tbsp OLIVE OIL
¼ cup WATER
SALT (to taste)

How to Make Indian Gobi Matar

In a skillet, heat olive oil on medium high heat. Add cumin seeds and asafoetida. Seeds will brown and crack quickly. Add onion and stir. Cook 1 minute and then add ginger, garlic, and hot pepper. Continue cooking until onions are soft. Add turmeric, chili, and coriander powder and mix well.

Stir in tomatoes and continue cooking 4-5 minutes. Add salt to taste. As the tomatoes cook down I like to crush them with a spoon. Stir in cauliflower florets. Add water and bring dish to a bubble, then reduce heat to a simmer, cover, and let cook 4-5 minutes. I say 4-5 minutes, but cook it however long you like…I should say 1-10 minutes.

I don’t want to cook all the nutrients out of the cauliflower, and I like my florets to still have a bit of crunch to them, so I simmer my cauliflower for only a few minutes. When the cauliflower is almost cooked to your liking, add garam masala and green peas. Mix and continue cooking until peas are heated through. And that’s it—your cauliflower and peas will be transformed into something delicious (I know it’s hard to believe, but trust me).

Make these dishes and try them out. The mango curry is a sweet, delicious treat, the chana masala is an Indian foods must, and the gobi matar tastes great and is great for your health.
Give Indian cooking a go, and bon appétit!

If you’re new to home cooking, get a bunch of spices, pots and pans, and start experimenting with different recipes. It’s a healthy hobby that will save you money in the long run. Check out current prices for Complete Kitchenware Sets on Amazon as well as Complete Starter Spice Kits. Or go to a thrift store! I’ve found some of my favorite kitchen gear at second-hand stores.

For another Indian favorite, try this Indian spinach recipe called Chole Palak.

chole palak chickpea spinach

Thanks for Watching Our Indian Cooking Videos!

Be sure and sign up for our mailing list to never miss a new cooking video, and also click a button below and share the dishes with your friends, and follow Chef Buck on Youtube. We appreciate all the kind comments and support, and we’ll see you next time in the kitchen!

If you like what CG and I do, support us on Patreon, or throw a tip in our Paypal Tip Jar We’ll happily enjoy a coffee on the road, or maybe even pay a bill or two!–Thanks! We appreciate all the support, and we’ll see you next time in the kitchen!

We include affiliate links for products on our website, so if you make a purchase after clicking on our links, we may earn a commission which helps us produce more videos and drink more coffee :^) We participate in the Amazon Services LLC Associates Program, which is an affiliate advertising program providing a means for us to earn fees by linking to Amazon.com and affiliated sites, so we can make more videos.

Share and Enjoy !

Make the Best Bean Soup Today !

bean soup

This bean soup recipe is super tasty and easy to make. Doesn’t bean soup sound delicious? Especially if you’re a kid. I use cannellini beans and black beans in this recipe, but you can use whatever beans you like. Ham or sausage is great in bean soup, too, and it doesn’t have to be a lot; just a little meat adds great flavor to bean soup. If going meat free, be sure to add lots of spice and maybe and extra veggie or two…beans need all the excitement they can get.

Bean Soup Recipe Ingredients:

2 15oz cans CANNELLINI BEANS
1 15oz can BLACK BEANS
2 medium sized ONIONS chopped
4-5 cloves GARLIC finely chopped
some leftover SAUSAGE or HAM (cooked)
32 oz BROTH (or ½ water ½ broth)
a little HALF AND HALF if you want
1 tsp CHIPOTLE POWDER
(or use some other kinda heat)
SALT and PEPPER to taste
1-2 Tbsp Oil
chopped PARSLEY if you want

bean soup
adding a mix of beans will add color and texture to your soup

Bean Soup Recipe Directions:

Heat 1 to 2 Tbsp of oil in a soup pot.
Add the onion and garlic and saute for several minutes.
If you’ve got fresh chili or jalapeno peppers, dice and add a little of that, too…if you want.
Add seasoning. I use salt, pepper, and chipotle powder in this recipe. Chipotle is awesome in bean soup. It adds great flavor
and a little heat. Don’t have chipotle powder? Add chili powder or chili/garlic paste instead, or anything you like, soup is all about
improvising.
Cook the spices and onions together for a few minutes and then add broth (meat or veggie broth, whatever, dude).
Toss in a bay leaf and bring the pot to a bubble.
Add in beans. I like to use a mix of cannellini and black beans.

If you have some sausage or ham on hand, chop and toss a little into the soup.
Reduce the heat down to a low simmer, cover and let cook 30-45 minutes.
After simmering, remove the bay leaf.
Use a hand blender to blend the soup to desired consistency. Check here for current prices on Hand Blenders at Amazon.

bean soup
use a hand blender to make a soup creamier

I like to add a little half and half for added creaminess; not a lot, just a little does the trick, around ½ a cup.
Turn off the heat and stir in a little chopped parsley or cilantro, and that’s it!
If you can make it a day ahead, all the better; soup only gets tastier with time!
Hope you love it!
Give Bean Soup recipe a try and let me know what you think, and bon appétit.

And for more bean fun, check out this crazy awesome Vegetarian Chili Recipe that even the meat lovers in your family will enjoy.

vegetarian chili
pot o’ meatless chili for good times

Thanks for Watching our Videos!

Thanks for checking out our bean soup recipe. Sign up for our mailing list so you’ll never miss a new recipe. Also click a button below and share the dishes with your friends. You can also follow Chef Buck on Youtube. We appreciate all the kind comments and support, and we’ll see you next time in the kitchen!

If you like what CG and I do, support us on Patreon, or throw us a tip in our Paypal Tip Jar. We’ll happily enjoy a coffee on the road – Thanks! We appreciate all the support, and we’ll see you next time in the kitchen!

We include affiliate links for products on our website. Making a purchase after clicking on our links and we may earn a commission which helps us produce more videos and drink more coffee :^) We participate in the Amazon Services LLC Associates Program, which is an affiliate advertising program. It provides a means for us to earn fees by linking to Amazon.com and affiliated sites, so we can make more videos.

Share and Enjoy !

Easiest Fruit Fly Trap to get rid of Fruit Flies

fruit fly trap

5 Simple Ways to control fruit flies:

How to get rid of fruit flies? Just build a simple fruit fly trap. All you need is a bottle, paper to make a funnel, a piece of tape, and some bait. The bait can be anything that draws fruit flies; a little vinegar or just a slice of fruit are the easiest things to use.

Fruit flies are not pretty. No one wants fruit flies in the kitchen, but they love kitchens! Or at least they love things in the kitchen. What kinda things? Anything sweet, or rotten, or fermented; basically anything smelly. Even if you can’t smell it, they can.

1) Make a fruit fly trap! Don’t wait until there are lots of fruit flies. Make a fruit fly trap right away. Fruit flies reproduce quickly, so nip the problem in the bud.

2) Keep over-ripe fruit and vegetables in the fridge.

3) Wipe down food prep areas after every use.

4) Empty your garbage regularly, and keep perishable garbage bagged and in the fridge.

5) Keep your recyclables clean. Dirty cans and bottles attract flies, especially soda and alcohol containers.

fruit fly trap
doesn’t a wine bottle make a classier trap?

How to Make a Fruit Fly Trap

To make a fruit fly trap, you’ll need a bottle. Any bottle will do, but I prefer a darker bottle; it just looks classier.

fruit fly trap
Use a little vinegar or slice of fruit to draw fruit flies.

Place a little vinegar in the bottle, just enough to cover the bottom.
Construct a funnel using a magazine page. Put a piece of tape at the bottom of the funnel to hold it in place.

fruit fly trap
Make a loooong funnel to go deeeeep into the bottle, this will prevent fruit flies from escaping.

The funnel should be long and narrow. You want the end of the funnel to go deep into the bottle; this will prevent the flies from getting out.
Push the funnel into the bottle and set the bottle in a corner out of the way.
Fruit Flies will be drawn to the vinegar and become trapped in the bottle.
It’s simple and effective.
Once you’ve caught some fruit flies, you can do whatever you want with them, cause that’s the law of the jungle.

And check out another kitchen tip: 5 Common Uses For Baking Soda

Share and Enjoy !


Baked Tomatoes Recipe with Basil, Cheese, and Walnut

baked tomatoes recipe

This is a terrific baked tomatoes recipe. I love tomatoes roasted and topped with garlic, bread crumbs, and butter, but I think this toasted walnut, basil, and cheese topping has it beat. These roasted plum tomatoes make an awesome vegetarian dish with more than enough substance to satisfy even the most carnivorous craving.

Baked Tomatoes Recipe Ingredients:

4 PLUM TOMATOES (roma is a type of plum tomato)
½ cup toasted WALNUTS
½ cup fresh BASIL
½ cup ROMANO CHEESE (or sub Parmesan cheese)
2-3 cloves GARLIC
some OLIVE OIL, dude
SALT and PEPPER (to taste)

baked tomatoes
Slice off the bottom of the tomatoes so they sit flat on the baking sheet.

Baked Tomato Recipe Directions:

Slice tomatoes lengthwise in half, and then slice a sliver off of the rounded backside so that the tomatoes rest flat.

Using a fork, tenderize the tops of the tomato halves, but do not poke the fork all the way through.
Arrange tomatoes on a baking sheet.

Season tomato tops with salt and pepper, and then coat the tomato tops lightly with olive oil.
Bake in an oven preheated at 500 degrees Fahrenheit for 10-15 minutes, or until the edges of the tomatoes begin to brown.

While the tomatoes bake, place chopped basil, toasted walnuts, shredded cheese, fresh ground pepper, and garlic in a food processor and pulse conservatively until the topping ingredients resemble tabouli. Check current prices for food processors on amazon.

baked tomatoes
Use about equal parts of toasted walnut, cheese, and basil…and garlic to taste.

Remove tomatoes from the oven. Add any oil and juices on the baking sheet into the blended basil/walnut/cheese topping. Also add ½ to 1 tsp olive oil if desired. Mix ingredients and then mound the topping evenly over each tomato.

Return tomatoes to the oven and continue baking at 500 degrees F for another 5 minutes.

After 5 minutes, turn oven to broil and let tomatoes broil 1-2 minutes longer, or until tops have browned; watch them closely!

And that’s it. Let them cool for a few minutes and serve. It’s a great appetizer, side, or can even be the main course of a vegetarian meal. The blended topping has a terrific, meaty texture. The baked tomatoes are quite filling, and delicious. I hope you like it!

Baked Tomatoes
This baked tomato recipe is beyond delicious…definitely give it a try!

Definitely give this Baked Tomatoes Recipe a try and let me know what you think, and bon appétit!

And for another great vegetarian dish, try this Baked Jalapeno Poppers Recipe.
jalapeno poppers

Thanks for Watching our Baked Tomatoes Recipe

Sign up for our mailing list so you’ll never miss a new recipe. Also click a button below and share the dishes with your friends. You can also follow Chef Buck on Youtube. We appreciate all the kind comments and support, and we’ll see you next time in the kitchen!

If you like what CG and I do, support us on Patreon, or throw us a tip in our Paypal Tip Jar. We’ll happily enjoy a coffee on the road – Thanks! We appreciate all the support, and we’ll see you next time in the kitchen!

We include affiliate links for products on our website. Making a purchase after clicking on our links and we may earn a commission which helps us produce more videos and drink more coffee :^) We participate in the Amazon Services LLC Associates Program, which is an affiliate advertising program. It provides a means for us to earn fees by linking to Amazon.com and affiliated sites, so we can make more videos.

Share and Enjoy !

Egg Bake Recipe … or giant oven omelette!

egg bake recipe

Give this easy Egg Bake Recipe a try. Or is it an oven omelette recipe? Or just a fancy-pants egg casserole? Whatever you want to call it, it’s delicious and nutritious and super easy to prepare.
The leftovers make a terrific breakfast on the go, and it’s a great recipe for using up odds and ends in your refrigerator, so definitely give this brunch / breakfast dish a try.

Egg Bake Recipe Ingredients:

10 EGGS
1 cup MILK
1 cup GREEN ONION chopped
3-5 cloves GARLIC finely chopped
1-2 cups shredded CHEESE …I like gruyere and monterey jack best
1 cup MUSHROOMS sliced
½ cup BELL PEPPERS chopped
½ cup ARTICHOKE HEARTS chopped
½ cup TOMATOES
HOT PEPPERS chopped, to taste
SALT and PEPPER to taste
OIL for cooking
add CILANTRO, PARSLEY,
or any chopped HERBS
you like!

Egg Bake Recipe Directions:

My favorite part of this dish is the leftovers. It’s great cold for a tasty and nutritious breakfast on the go, so make a batch at the beginning of your week, and you’ll have a quick snack whenever you like.

Step 1:
Saute your veggies. Use the suggestions in my recipe, or better yet, use whatever you have on hand. I NEVER make this dish with the same ingredients, because it’s the perfect opportunity to clean out the refrigerator. Add salt and pepper as desired.

egg bake recipe
use lots of fresh veggies –and ham or cooked sausage if you’re feeling carnivorous.

Step 2:
In a bowl, whisk together the eggs and milk. Add some fresh herbs if you like. Chives and basil are awesome in this mix.

Step 3:
Lightly grease an oven safe baking dish, about 8 X 10. Check here for current prices on a Pyrex Baking Dish on Amazon.

Step 4:
Line the bottom of the dish with freshly shredded cheese. I like gruyere and monterey jack the best, but use your favorite cheese.

egg bake recipe
layer a lightly greased baking dish with cheese

Step 5:
Evenly spread the sauteed veggies over the cheesy bottom. If you have extra cheese, sprinkle on top.

egg bake recipe
spread sauteed veggies evenly over cheesy bottom.

Step 6:
Pour the egg/milk mix gently over the veggies. The egg will soak to the bottom and cover the top.

egg bake recipe
Completely cover dish with egg mix.

Step 7:
Bake in an oven preheated to 350 degrees Fahrenheit for 40-50 minutes. Add a sprinkling of cheese to the top during the last 10 minutes, if desired.
Remove from the oven and allow the egg bake to rest 10 minutes before slicing.

egg bake recipe
Serve hot or cold, and make a bunch, because the leftovers are twice as good!

This dish makes a terrific breakfast for a family gathering, it’s awesome over salad greens, and the leftovers are perfect for a quick snack or breakfast on the go.

Give this easy egg bake recipe a try and let me know what you think…and bon appétit!

And for another tasty breakfast recipe, check out this Complete Huevos Rancheros from Scratch Recipe.

huevos rancheros
Huevos Rancheros is a flavorful, classic mexican dish…delicious!

Thanks for checking out the recipes. Be sure and sign up for our mailing list so you’ll never miss a Chef Buck cooking video, and click a button below and share the dishes with your friends. We appreciate all the kind comments and support, and we’ll see you next time in the kitchen!
–Chef Buck

Share and Enjoy !


Broccoli Cheese and Cauliflower Gratin Recipe

broccoli cheese

Try this easy, semi-healthy broccoli and cauliflower gratin recipe. A gratin is typically a bready-cheesy-toasty topping, and it’s a great way to jazz up broccoli and cauliflower. Just broccoli cheese is nice, but adding cauliflower kinda smooths out the taste. This is a cheesy dish without being overly cheesy, and not overcooking the vegetables will add awesome texture.

Broccoli Cheese Cauliflower Gratin Recipe Ingredients:

2 cups BROCCOLI FLORETS
2 cups CAULIFLOWER FLORETS
1 cups MONTEREY JACK (shredded)
½ cup ROMANO or PARMESAN cheese (shredded)
½ cup GREEK YOGURT
3-5 cloves GARLIC (finely chopped)
1 cup PANKO BREADCRUMBS
2 Tbsp BUTTER
SALT and PEPPER to taste

broccoli cheese
Mix panko bread crumbs with garlic and butter for a tasty gratin topping.

Broccoli Cheese Cauliflower Gratin Recipe Directions:

Grate the cheese. I like the Monterey Jack and Romano cheese combo, but any kind of cheese or cheeses will do, so use your favorite. In a small bowl, combine the cheese and yogurt, and add salt and pepper to taste. Mix well.

Trim fresh broccoli and cauliflower into similar sized florets so they will cook evenly.

In a small skillet, melt butter and saute garlic for about 1 minute.
Stir bread crumbs into the garlic and butter; I like panko bread crumbs for gratins.
The bread crumbs will soak up the butter. Mix well and set aside.

Steam veggies on the stove top in a steaming basket, or just add ½ inch of water to the bottom of a pan and steam. 4 to 6 minutes of steaming is generally what I like; veggies with a bit or crunch are more vibrant, soggy veggies are sad.

Drain broccoli and cauliflower well and place steamed veggies into a baking dish. Check here for current prices for a casserole baking dish on Amazon.

Add salt and pepper.
Top the veggies with the cheese and yogurt topping, then top the dish with the garlic and butter bread crumbs.

Bake in an oven preheated to 450 degrees Fahrenheit.
Bake until the breadcrumb topping is toasted. This will only take a few minutes, so watch the dish closely.

That’s it. Serve hot, dude.
Give this Broccoli Cheese Cauliflower Gratin a try and let me know what you think, and bon appétit!

For another tasty and good looking dish, try out this Fancy Baked Tomatoes Recipe.

Baked Tomato
This baked tomato recipe is beyond delicious…definitely give it a try!

Thanks for Watching our Broccoli Cheese Gratin

Sign up for our mailing list so you’ll never miss a new recipe. Also click a button below and share the dishes with your friends. You can also follow Chef Buck on Youtube. We appreciate all the kind comments and support, and we’ll see you next time in the kitchen!

If you like what CG and I do, support us on Patreon, or throw us a tip in our Paypal Tip Jar. We’ll happily enjoy a coffee on the road – Thanks! We appreciate all the support, and we’ll see you next time in the kitchen!

We include affiliate links for products on our website. Making a purchase after clicking on our links and we may earn a commission which helps us produce more videos and drink more coffee :^) We participate in the Amazon Services LLC Associates Program, which is an affiliate advertising program. It provides a means for us to earn fees by linking to Amazon.com and affiliated sites, so we can make more videos.

Share and Enjoy !

Popcorn : How To Cook Popcorn On The Stove Top

how to cook popcorn on the stove

90% of all U.S. households have a microwave oven, but we don’t, so when we make popcorn, it’s on the stove top. Generally we buy the store brand, it’s considerably cheaper than name brand popcorn, and we find it offers the same result.
We cook popcorn in coconut oil. Coconut oil has a high heat point and retains it’s nutritional value when heated.
We like to add flavorings, too. My favorite is grated Parmesan cheese. Of course we always add butter and salt, but I’ve found that fresh ground black pepper is a great addition as well.

How to Cook Popcorn on the Stove top:

1) On Medium Heat, add 2 Tbsp of coconut oil in a heavy bottomed pot.

2) Add a couple of test corn kernels into the pot.

3) When the oil heats through, and the test kernels have popped, add ½ cup of popcorn kernels.

4) Shake the pan to distribute the kernels along the bottom of the pan. They should form a single layer.

5) Cover the pot with a lid, but don’t cover tightly, leave the lid slightly ajar to allow steam to escape; this will keep the popcorn from tasting stale.

6) Allow the kernels to pop until the popping sound almost completely subsides.

7) Once popped, removed pot from burner and pour popcorn into a bowl.

8) While hot, add melted butter and salt and whatever seasonings you desire.

and that’s it!

Below is a video we made experimenting with bacon, but I think I prefer basic popcorn, although the fresh ground black pepper tasted awesome.

Fun Facts:

–Two tablespoons of unpopped corn kernels produce a quart of popcorn for about 25 cents.
–In movie theaters, for every dollar spent on popcorn, about 90 cents is profit.
–A cup of plain popcorn contains about 31 calories.
–Americans eat more popcorn than any other country.
–About 70% of popcorn sold in America is eaten in the home.
–By volume, popcorn is America’s most popular snack food.

For another tasty snack idea, check out these Cashew Coconut Lemon Bites

energy snack
power snack in a yummy treat!

Share and Enjoy !


Garlic Quinoa Recipe …instead of garlic rice

garlic quinoa

This garlic quinoa recipe makes a terrific side dish. I use quinoa often to provide the protein in vegetarian meals, but quinoa is also a smart choice to serve with other proteins. This garlic quinoa side is filling and tasty, and a great accompaniment for many meat and fish dishes.

Garlic Quinoa Recipe Ingredients:

2 cups QUINOA
3 cups WATER
3-4 cloves GARLIC (finely chopped)
2 Tbsp OLIVE OIL
SALT and PEPPER to taste
and add chopped PARSLEY …if you like, man

garlic quinoa
garlic quinoa makes a great side dish

Garlic Quinoa Recipe Directions:

In an oven proof dish, add 3 cups of water.
Add in the olive oil, or melted butter.
Add the quinoa.
Add finely chopped garlic. I find 3-4 cloves to be plenty (this is one of those rare dishes where I have found too much garlic to be too much).
Add salt and pepper to taste.
If you want to add a little heat, add some finely chopped red chilis (it adds a nice color, too), or just a little cayenne pepper.
Stir the ingredients together well and place top or foil covering over the baking dish.
Bake in an oven preheated to 350 degrees Fahrenheit for 90 minutes. No attention to the dish is required while baking.
After 90 minutes, remove the dish from the oven, uncover and let set for a few minutes.
Fluff with a fork and serve.
It’s a great side dish for meat, fish, and vegetarian meals.
Any leftovers can be used to make quick quinoa salads.
Give this Garlic Quinoa Recipe a try and let me know what you think, and bon appétit!

raw quinoa
uncooked quinoa…looks like a grain, but it’s a seed.

Quinoa is a terrific ingredient to incorporate into your diet for many reasons, here are a few:
1) It is a complete protein (provides all essential amino acids).
2) High in fiber and nutrition.
3) High in magnesium and iron.
4) Is low on the Glycemic Index, making it a good choice for blood sugar regulation.
5) it can easily be substituted for rice in many recipes

For more quinoa inspired recipes, check out my QUINOA PLAYLIST.
spanish quinoa

Share and Enjoy !


The Best Garlic Shrimp Recipe You’ll Ever Eat

garlic shrimp recipe

Try this super-quick and delicious garlic shrimp recipe. Lots of olive oil and garlic add great flavor, especially when served with fresh sliced bread. Cook the shrimp quickly in a hot skillet, but don’t overcook, because over cooked shrimp get rubbery. The total cooking time for this dish start to finish should be about 5-7 minutes.

What you need for Garlic Shrimp

2 lbs SHRIMP
½ cup OLIVE OIL
½ cup GARLIC …or as much as you like (finely chopped)
½ tsp RED PEPPER FLAKES
½ tsp PAPRIKA
SALT and PEPPER to taste
3-5 Tbsp LEMON JUICE
some PARSLEY (chopped)
sliced BREAD for sure!

How to make this Garlic Shrimp Recipe

  • Peel and devein the shrimp (save the shells and heads to make a stock!)
  • Heat olive oil in a skillet on medium high heat. Check current prices for a non-stick skillet on Amazon.
  • When oil is hot, add red pepper flakes. Red pepper flakes add a nice heat, but substitute fresh peppers, or even a little cayenne if you like.
  • Add garlic and saute for 1 minute. Use as much garlic as you like. I prefer lots of garlic. I literally used an entire bulb. It seems like a lot, but the oil and garlic taste great with thick slices of fresh bread.
  • Add the shrimp, and continue sautéing on medium heat.
  • The shrimp only take about 3-5 minutes to cook depending on the size of your shrimp. Don’t overcook the shrimp; they will become rubbery if cooked overly long.
  • Add paprika, and salt and pepper to taste. If you’re just getting into home cooking, here are current prices for starter spice sets on Amazon.
  • Saute shrimp until JUST cooked, when shrimp begin to color and curl, then remove the skillet from the heat.
  • Add lemon juice and fresh chopped parsley.
  • Mix well and serve in a bowl with thick slices of fresh bread. Or serve over rice…but this oily, garlicky shrimp is GREAT with thick slices of tasty bread.
garlic shrimp recipe
lots of garlic + lots of shrimp = delicious

Give this garlic shrimp recipe a try and let me know what you think…and bon appétit!

If you want another tasty shrimp idea, one of my favorites is this Spicy Tempura Shrimp Recipe.

spicy fried shrimp

Thanks For Watching Our Recipe Videos!

Thanks for checking out this cool carrot soup recipe, and all of our recipes. Sign up for our mailing list so you’ll never miss a new recipe. Also click a button below and share the dishes with your friends. You can also follow Chef Buck on Youtube. We appreciate all the kind comments and support, and we’ll see you next time in the kitchen!

If you like what CG and I do, support us on Patreon, or throw us a tip in our Paypal Tip Jar. We’ll happily enjoy a coffee on the road – Thanks! We appreciate all the support, and we’ll see you next time in the kitchen!

We include affiliate links for products on our website. Making a purchase after clicking on our links and we may earn a commission which helps us produce more videos and drink more coffee :^) We participate in the Amazon Services LLC Associates Program, which is an affiliate advertising program. It provides a means for us to earn fees by linking to Amazon.com and affiliated sites, so we can make more videos.

Share and Enjoy !

Fried Catfish Recipe without the Mess

fried catfish recipe

Here’s a faux fried catfish recipe that’s not fried, but tastes just as good as fried catfish and with a lot less mess. Cornmeal is essential for the breading, but along with flour you can also add crushed saltines or panko breadcrumbs. Catfish tastes best with tartar sauce, so we’ll throw together a simple tartar sauce, too.

Better Than Fried Catfish Ingredients

1 lbs. CATFISH
½ cup CORNMEAL
½ cup FLOUR
1 cup SALTINE CRACKERS (crushed) *optional
OLIVE OIL
SPICES…whatever you like
…in this video I use:
1 tsp PAPRIKA
1 tsp GARLIC POWDER
½ tsp CAYENNE PEPPER
1 tsp OREGANO
1 tsp THYME
1 tsp SALT
1 tsp BLACK PEPPER

also add 1tsp TURMERIC POWDER for great color

Tartar Sauce Ingredients:
1 cup MAYONNAISE
about 1/3 cup SWEET RELISH
1 tsp PICKLED JALAPENO (minced)
1-2 Tbsp JALAPENO PICKLING SOLUTION
(or sub lemon juice for the pickling juice)

Not Fried Catfish Recipe Directions

Catfish and tartar sauce are like Ying and Yang, so first things first, make the tartar sauce.
In a small bowl, combine the mayonnaise, sweet relish, jalapeno slices, and a little of the pickling solution. Ideally you do this a day ahead of time, or at the very least, a few hours; it’ll have a lot more flavor.

Not a fan of jalapeno peppers? Leave the peppers and pickling juices out, and substitute lemon juice instead. Mix well and refrigerate.

fried catfish recipe
Catfish tastes best with tartar sauce (and coleslaw!)

In a bowl, crush the saltine crackers, or you can substitute your favorite bread crumbs. Add the corn meal, all-purpose flour, and whatever spices and herbs you love.

The breading I use in this video is super tasty. Sometimes I use curry powder, which tastes fantastic, and also adds great color because of the turmeric. Whatever spices you use, be generous; catfish should be super flavorful! Remember, whatever spice you use will be balanced by the creamy tartar sauce.

On a baking sheet, generously coat the catfish with olive oil. Check current prices for baking sheets on Amazon. Coat both sides of the fish, and the pan. Dredge the fish in the breading, coating both sides.

Coat the fish well, and press the crumbs into the fish. Place on the baking pan and cook in an oven preheated to 375 degrees Fahrenheit. You can up the oven temperature to 400 degrees F and shorten the cooking time.

Cook until the fish is well-colored and bounces back when pressed. The fish in this video cooked for 45 minutes, but the pieces were quite large.

Make Your Side Dishes as the Fish Bakes

Fried catfish, and this not quite fried catfish recipe, go great with coleslaw, greens, and hush puppies. I’m usually too lazy to make all of that, and often I’ll just serve catfish with coleslaw and garlic toast.

For the perfect catfish dinner side dish, try this Classic Coleslaw Recipe.

crunchy slaw
classic coleslaw recipe

Thanks For Watching Our Recipe Videos!

Thanks for checking out this easy catfish recipe, and all of our recipes. Sign up for our mailing list so you’ll never miss a new recipe. Also click a button below and share the dishes with your friends. You can also follow Chef Buck on Youtube. We appreciate all the kind comments and support, and we’ll see you next time in the kitchen!

If you like what CG and I do, support us on Patreon, or throw us a tip in our Paypal Tip Jar. We’ll happily enjoy a coffee on the road – Thanks! We appreciate all the support, and we’ll see you next time in the kitchen!

We include affiliate links for products on our website. Making a purchase after clicking on our links and we may earn a commission which helps us produce more videos and drink more coffee :^) We participate in the Amazon Services LLC Associates Program, which is an affiliate advertising program. It provides a means for us to earn fees by linking to Amazon.com and affiliated sites, so we can make more videos.

Share and Enjoy !

Coleslaw Recipe a Classic Southern Dish

crunchy slaw

Here’s a simple, no-frills coleslaw recipe, which means it’s delicious, because nothing tastes great like a classic coleslaw, especially if you’re pairing it with catfish or fried chicken. Coleslaw can also be used as a sandwich topping, perfect for burgers, or anything BBQ.

Coleslaw Recipe Ingredients:

1 sm. CABBAGE (shredded)
3 med. CARROTS (shredded)
¼ cup ONION (minced…or chopped if using green onion)
1 cup MAYONNAISE
1-2 Tbsp fancy MUSTARD
2-3 Tbsp LEMON JUICE (or vinegar)
LEMON ZEST (if using fresh lemon, why not!)
1 Tbsp CELERY SEED check current celery seed price on Amazon
1 tsp SALT (or to taste, man)
1 tsp BLACK PEPPER

fried catfish recipe
Catfish tastes best with tartar sauce (and coleslaw!)

Coleslaw Recipe Directions:

Shred the cabbage and carrot and combine in a large bowl.  Sometimes, for a more rustic coleslaw, I’ll chop the cabbage with a knife for chunkier pieces, like in this slaw video, but that’s a different kinda dish, and not what I think of when I want a basic coleslaw to pair with traditional southern-style dishes.
Add onion to the bowl. I’m using about 3 chopped green onions, but use any kinda onion you like.
For the dressing, combine the rest of the ingredients in a smaller bowl and mix until smooth and creamy.

crunchy slaw
classic coleslaw recipe

I like using fresh lemon juice and zest, but use vinegar if you prefer; I like a mild rice vinegar with coleslaw.
My measurements for salt and pepper are only suggestions, so definitely adjust to taste.
And don’t use plain-Jane yellow mustard, spring for a fancy dijon or grey poupon!
Combine the dressing with the cabbage, carrot, and onion and toss well.
And that’s it.
Coleslaw is a must-have for fried catfish or chicken. Gotta have it with ribs! And coleslaw makes an excellent sandwich topping, too; add to hamburgers, sloppyjoes, or any kind of BBQ sandwich.

For an Asian twist on slaw. try this Crunchy Ramen Noodle Slaw Recipe.

crunchy slaw
Crunchy coleslaw or noodle salad? What sounds tastier?

Have fun in the kitchen. Get a bunch of spices, pots and pans, and begin experimenting with different recipes. home cooking is a healthy hobby that will save you tons of money in the long run.
Check out current prices for Complete Kitchenware Sets on Amazon. Or go to a thrift store! I’ve found some of my favorite kitchen gear at second-hand stores.

Thanks for checking out our coleslaw recipe, and all of our recipes. Be sure and sign up for our mailing list and never miss a new Chef Buck cooking video, and also click a button below and share the dishes with your friends. We appreciate all the kind comments and support, and we’ll see you next time in the kitchen!
–Chef Buck

Thanks for watching our recipe videos!

We include affiliate links for products on our website, so if you make a purchase after clicking on our links, we may earn a commission which helps us produce more videos and drink more coffee :^) We participate in the Amazon Services LLC Associates Program, which is an affiliate advertising program providing a means for us to earn fees by linking to Amazon.com and affiliated sites, so we can make more videos.

Share and Enjoy !

Roasted Garlic Recipe …and make a Fancy Crostini

roasted garlic

This roasted garlic recipe is easy to prepare and there are a zillion uses for roasted garlic, like a spread for bread, which I do in this video for a quick crostini idea.
Roasted garlic makes a great addition to rice, potato, and quinoa dishes, jams, salad dressings…most things are better with a little garlic.

Roasted Garlic Recipe Ingredients:

GARLIC
SALT
PEPPER
OLIVE OIL
…plus herbs and spices if you like

For Crostini:
BREAD
FETA CHEESE
CAPERS
KALAMATA OLIVES

roasted garlic recipe
use roasted garlic to make a quick crostini

Roasted Garlic Recipe Directions:

When buying, choose garlic bulbs that are firm and have an intact “papery” outer covering. Avoid soft bulbs, or bulbs that have give and seem overly dry and desiccated. Buy bigger bulbs with bigger cloves! Peeling garlic is a semi-pain, so make it easier on yourself and choose the largest cloves available.

Remove the papery outer covering and separate the cloves.
Do you have a secret tip (that really works!) for quickly peeling garlic cloves? If so, please let me know! I’ve found that the best way for me is the tried and true one-at-a-time method: just give each clove a gentle whack, enough to break the peel, and then remove the skin.
Place peeled cloves on a sheet of aluminum foil.

Drizzle with olive oil. It doesn’t have to be a lot, just enough to coat the cloves.
Add salt and pepper to taste, and any dried herbs or seasonings you like. I usually add a little thyme.
Stir and coat the cloves in the oil and seasonings and then close up the aluminum foil like a Hershey’s Kiss.
Place on a baking sheet and slide into an oven preheated to 400 degrees Fahrenheit.
Bake 30-40 minutes and they’ll be soft and ready for use.

Raw garlic is super strong with a burning bite, but roasting mellows out the bite and transforms the garlic into a tasty treat that can be popped into your mouth whole. I usually eat a handful of cloves when they’re right out of the oven–I can’t help myself!
Warm roasted garlic is great on a crostini, which is really just a fancy piece of toast.
Toast slices of French bread and smear on the warm garlic cloves like butter. Top with feta cheese, capers, and kalamata olives for a quick treat.

Use roasted garlic as a spread for sandwiches.
Mix into mashed potatoes or rice dishes (or quinoa).
Add roasted garlic to salads or mash into salad dressings.
Add to jams, and gravies, and guacamole.
Mix with butter for garlic bread.
Add roasted garlic to anything; it’s a great item to have in the fridge.
Store refrigerated and it will keep several days, store in a jar refrigerated and covered with oil, and it will keep a little longer,but there are so many uses for roasted garlic, it will be very easy to find ways to quickly use it up.
Give this roasted garlic recipe a try and let me know what you think, and bon appétit!

And for another simple and versatile recipe dish, try this Pickled Daikon and Carrot Relish.

Vietnamese Pickled Daikon and Carrot Relish
click pic for Vietnamese Pickled Daikon and Carrot recipe

Share and Enjoy !


Fish Chowder Recipe …New England Style

fish chowder recipe

Try this creamy, New England-style Fish Chowder recipe. I use half and half in this dish, but use heavy cream if you like. I also use cod as the primary ingredient, but add additional seafood and you’ve got seafood chowder!

Fish Chowder Recipe Ingredients:

2½ lbs. COD…or some kinda fish (skinless, boneless, and chopped into chunks)
3 med. POTATOES (peeled/cut into ½ inch pieces)
4-5 slices BACON (chopped)
1 Lg ONION (chopped)
1 cup CELERY (chopped)
½ cup CARROT (chopped)
HOT PEPPER (as desired)
8oz CLAM JUICE
2 Tbsp FLOUR
1 tsp dried OREGANO
1 tsp dried THYME
1 BAY LEAF
1 Tbsp BLACK PEPPER (fresh ground)
SALT (to taste)
½ cup HALF N HALF or HEAVY CREAM (add more for more creaminess)

fish chowder recipe
New England-style Fish Chowder

Fish Chowder Recipe Directions:

Heat a large pot on medium heat. Check current pricing for a soup pot on Amazon.

Add bacon. When bacon is cooked, add onion, celery, and hot pepper (optional) and saute for 2-3 minutes. Add black pepper (fresh cracked is ideal), oregano, and thyme. Mix ingredients and cook another minute.

Add chopped potato and carrot, cover with water (use half water half chicken or veggie stock if desired), and add bay leaf. Stir, cover and raise pot to a boil, then reduce and simmer approx. 10 minutes, or until the potatoes soften (but not mushy!).

Add fish (or a variety of seafood if you like). Cod or halibut are commonly used fish in chowders.
Return pot to boil, then reduce and simmer about 5 minutes.
In a small mixing bowl, add clam juice and flour and mix well.
Stir this into the pot and cook 2 minutes until chowder thickens.

Turn off the heat and add half and half or heavy cream. I don’t put too much in myself, cause I don’t like my chowder too milky,but add a little extra if you like.

And that’s it. Top with a sprinkle of parsley or chives and serve with crackers or thick-sliced bread.
Ideally it’ll sit a few hours before you eat it, or even the next day–soups and stews are always better the next day,although I rarely plan that far ahead–still it’s a lot of chowder and you might have leftovers since it’s a big pot.

And for a less creamy seafood dish, try this Seafood Stew Recipe.

seafood stew

Thanks for checking out the recipes. Be sure and sign up for our mailing list so you’ll never miss a Chef Buck cooking video, and click a button below and share the dishes with your friends. We appreciate all the kind comments and support, and we’ll see you next time in the kitchen!
–Chef Buck

Share and Enjoy !


Israeli Couscous Recipe for Pasta Salad

pasta salad

This Israeli couscous recipe, also called pearl couscous or ptitim, makes a great pasta salad. It’s called “couscous”, but isn’t what I think of when I think of couscous, because it boils up into tiny pasta balls about the size of a blueberry. Toss pearl couscous into a salad with your favorite dressing and some fresh veggies and it makes a quick and healthy side dish, or even a full meal if you throw it on a bed of greens.

Israeli Couscous Pasta Salad Ingredients

1 pkg ISRAELI COUSCOUS (8.8 oz)
1 lg ENGLISH CUCUMBER (sliced)
1 CARROT (strings?…whatever, man)
2 cups PARSLEY (chopped)
TOMATO (sliced)
….and whatever’s in the fridge you need to get rid of.
dressing:
¼ cup OLIVE OIL
3 Tbsp LEMON JUICE (or vinegar)
2 tsp LEMON ZEST
2 tsp GARLIC (minced)
2 tsp GINGER (minced)
SALT and PEPPER to taste
(plus whatever you want)

pasta salad
Israeli couscous is also called pearl couscous or ptimim.

Israeli Couscous Recipe

Bring 3 cups of water to a boil and add in the Israeli couscous. Check current prices for Israeli Couscous on Amazon. Salt and oil are not needed. Reduce heat down to a simmer, cover, and let cook for 10 minutes. After 10 minutes, remove the pot from the heat and strain the couscous. Rinse with cold water to halt the cooking process and to keep the pasta from becoming too soft.

Slice fresh veggies. Use the ones I have listed above or use your favorites; and especially use whatever veggies you have in the fridge that you need to get rid of. Whenever I make a big salad, it’s almost always to utilize ingredients that are gonna go bad if I don’t do something with them soon–it’s a win-win, I end up not wasting food and getting something healthy to eat.

pasta salad
uncooked Israeli couscous

In a small bowl, combine the dressing ingredients. I like to use fresh lemon juice because it’s awesome. but it’s also great to keep lemons on hand for the fresh zest–lemon zest adds a nice zing to salads and dressings. If you don’t have fresh lemon on hand, substitute vinegar.

In a bowl, toss together the couscous, veggies, and dressing. If you’re going to be serving and eating it all right away, go ahead and add tomato, but if you’re going to refrigerate some or all of the salad for later, just wait and add the tomato when you’re serving (refrigerated tomatoes are no fun).

Israeli (pearl) couscous is great in these kinda salads. I often use quinoa in these types of dishes, but this couscous makes a nice change of pace, so give it a go if you’re regularly eating salads and need to mix things up a bit.

Give this Israeli couscous recipe a try and let me know what you think, and bon appétit!

And for another tasty salad idea, try this Southwestern-Style Quinoa Salad Recipe.

southwestern quinoa salad
a southwestern quinoa salad makes a tasty and healthy dinner choice.

Thanks for Watching our Couscous Recipe Video!

Click a button below and share the dishes with your friends. You can also follow Chef Buck on Youtube. We appreciate all the kind comments and support, and we’ll see you next time in the kitchen!

If you like what CG and I do, support us on Patreon, or throw us a tip in our Paypal Tip Jar. We’ll happily enjoy a coffee on the road – Thanks! We appreciate all the support, and we’ll see you next time in the kitchen!

We include affiliate links for products on our website. Making a purchase after clicking on our links and we may earn a commission which helps us produce more videos and drink more coffee :^) We participate in the Amazon Services LLC Associates Program, which is an affiliate advertising program. It provides a means for us to earn fees by linking to Amazon.com and affiliated sites, so we can make more videos.

Share and Enjoy !

Chocolate Cake Recipe – Gluten Free

chocolate cake recipe

This is a great gluten free chocolate cake recipe. It’s super easy, moist, and tasty; and kinda cool to bake, too, since the main ingredient is beans! What!? Garbanzo beans! Which are also called chick peas. So besides being a delicious cake, it’s a flour less, gluten-free cake. This cake is especially tasty with cream cheese frosting.

Chocolate Cake Recipe Ingredients:

2 15 oz cans GARBANZO BEANS
2 cups semi-sweet CHOCOLATE CHIPS
4 EGGS
1 cup SUGAR
¾ tsp BAKING POWDER
1 Tbsp VANILLA EXTRACT
2-3 Tbsp BUTTER
½ cup DRIED CHERRIES (or other dried fruit)
1 cup toasted NUTS (chopped)
POWDERED SUGAR (for dusting)
fresh BERRIES (for topping)

…or top with CREAM CHEESE frosting

Cream Cheese Frosting Ingredients:

8oz CREAM CHEESE, softened
¼ cup unsalted BUTTER, softened
2 cups POWDERED SUGAR
1 tsp VANILLA EXTRACT
1 Tbsp MILK

cream cheese frosting recipe
Cream cheese frosted cake

Chocolate Cake Recipe Directions:

  • Butter up a baking dish; 8X10 or 9X11…about the size of a human head. If you need a decent baking dish, check out some current pricing for a Pyrex dish on Amazon.
  • Rinse and drain garbanzo beans.
  • In a food processor, combine eggs and beans and blend until smooth.
  • Transfer beaten bean mixture to a large bowl and add baking powder and sugar and stir until well combined.
  • On the stove, set up a double boiler and melt the chocolate chips. Add butter to the chocolate as needed to keep the chocolate smooth.
  • Once melted, add the chocolate to the cake batter mix and stir until incorporated.
  • Stir in vanilla extract, your favorite dried fruit (I prefer cherries or cranberries), and chopped nuts.
  • Mix well and pour into buttered baking dish.
  • Bake for 45 minutes in an oven preheated to 350 degrees Fahrenheit.
  • After 45 minutes insert a knife or toothpick into the cake to check that it is done; if wet batter sticks to the toothpick, let it cook a few minutes longer.
  • Allow cake to set and firm up 10 minutes before removing from the baking dish.
  • After 10 minutes, turn cake onto a baking rack and continue to let cool.

Once the cake cools, it’s ready for the next step, whatever that is…
This chocolate cake recipe is a perfect match for a cream cheese frosting, but it tastes great with just a sprinkling of powdered sugar and fruit, or believe it or not,
it tastes great plain! It’s incredibly moist, and the nuts and fruit make it almost like a brownie.

Cream Cheese Frosting Directions:

  • About an hour ahead of time, set out the cream cheese and butter to soften.
  • In a bowl, combine cream cheese, butter, and vanilla extract and blend with hand mixer.
  • Once ingredients begin to come together, add in the powdered sugar. Add the sugar a bit at a time to avoid a sugary blending mess.
  • Mix until the frosting is smooth. To thin the frosting add a small amount of milk–no more than a Tablespoon at a time! For a thicker frosting, just add more powdered sugar.

And that’s it.
Spread on your dessert and eat away!

Give this flourless, chocolate cake recipe a go and let me know what you think!

And for another tasty dessert idea, check out my Death by Scone Recipe …it’s one of my favorite all-time treats.

scone recipe
best scone ever…really

Thanks for Watching our Chocolate Cake Recipe Video!

Click a button below and share the dishes with your friends. You can also follow Chef Buck on Youtube. We appreciate all the kind comments and support, and we’ll see you next time in the kitchen!

If you like what CG and I do, support us on Patreon, or throw us a tip in our Paypal Tip Jar. We’ll happily enjoy a coffee on the road – Thanks! We appreciate all the support, and we’ll see you next time in the kitchen!

We include affiliate links for products on our website. Making a purchase after clicking on our links and we may earn a commission which helps us produce more videos and drink more coffee :^) We participate in the Amazon Services LLC Associates Program, which is an affiliate advertising program. It provides a means for us to earn fees by linking to Amazon.com and affiliated sites, so we can make more videos.

Share and Enjoy !

Hearts of Palm Recipe with Beans …healthy and tasty!

hearts of palm

Hearts of palm are often used in salad recipes. Heart of palm is literally the edible core of a palm tree stem. It’s easily found sold in cans, but CG scored a fresh heart of palm, so we’ll take a look at this weirdo veggie and make a simple, but very tasty salad. Canned hearts of palm are not as crunchy as fresh heart, so be sure and add CELERY to this recipe when using canned hearts of palm.

Hearts of Palm Recipe Ingredients:

1 heaping cup sliced HEART OF PALM
15oz can MIXED BEANS
1 tsp GINGER (minced)
½ cup CILANTRO
½ cup GREEN ONIONS (chopped)
dressing:
2 Tbsp LEMON JUICE
½ tsp LEMON ZEST
1 Tbsp RICE VINEGAR
1 Tbsp heavy OLIVE OIL
2 tsp SOY SAUCE
SALT and PEPPER to taste
if using canned hearts of palm, add ½ cup chopped CELERY
(and toasted nuts are never a bad idea, either)

hearts of palm
Fresh heart of palm and salad.

Hearts of Palm Recipe Directions:

If using fresh heart of palm, slice away the bamboo-like outer hull and remove the heart. fresh heart of palm has a great texture, a little crunchy with a creamy after taste; this slight crunch makes fresh heart of palm ideal for salad–canned hearts of palm are not as firm, so be sure to add ½ cup celery to this recipe if using canned hearts of palm.
In a bowl, combine the beans, heart of palm, cilantro, ginger, and green onion. A mix of beans is ideal…different beans will add a variety of textures.
In a smaller bowl, combine the dressing ingredients and whisk well–super well!
Add the dressing to the salad and toss.
And that’s it.
We found this simple combo to be quite tasty. You can always add more ingredients, but sometimes simple is best.
Be sure to add celery for crunch if using canned hearts, and toasted nuts are always a great crunchy element for salads–plus they add protein to the dish as well.

Hearts of palm
Hearts of palm in a can

Give this heart of palm recipe a try and let me know what you think, and bon appétit!

And for another tasty salad idea, check out this Black-eyed Pea Salad.
black eyed pea salad
Click on Pic for Recipe

Share and Enjoy !


Cream Cheese Frosting Recipe for Cakes…and cupcakes

cream cheese frosting recipe

Need an easy, super tasty cake frosting? This cake frosting recipe is ready in minutes and makes the perfect icing for cake (and cupcake!) perfection! It’s an especially great balance for a chocolate cake. You can make this frosting as thick or thin as you like, just add more powdered sugar to thicken, and more milk to thin, but add the milk just a wee little at a time–it doesn’t take much.

Cream Cheese Frosting Recipe Ingredients:

8oz CREAM CHEESE, softened
¼ cup unsalted BUTTER, softened
2 cups POWDERED SUGAR
1 tsp VANILLA EXTRACT
1 Tbsp MILK

cream cheese frosting recipe
Make this tasty frosting super quick!

Cream Cheese Frosting Recipe Directions:

About an hour ahead of time, set out the cream cheese and butter to soften.
In a bowl, combine cream cheese, butter, and vanilla extract and blend with hand mixer.
Once ingredients begin to come together, add in the powdered sugar. Add the sugar a bit at a time to avoid a sugary blending mess.
Mix until the frosting is smooth. To thin the frosting add a small amount of milk–no more than a Tablespoon at a time! For a thicker frosting,
just add more powdered sugar.
And that’s it.
Spread on your dessert and eat away!

cream cheese frosting recipe
Add milk to thin, or more powdered sugar to thicken the frosting.

Give this cream cheese frosting recipe a go and let me know what you think, and bon appétit!

And for more tasty dessert ideas, check out these tasty treats:

baked pears
click the pic for more desserts!

“Life is uncertain. Eat dessert first.” ~Ernestine Ulmer
“If you want to make an apple pie from scratch, you must first create the universe.” ~Carl Sagan
“Seize the moment. Remember all those women on the Titanic who waved off the dessert cart.” ~Erma Bombeck

Share and Enjoy !


Onions – Which Type of Onion Should You Use?

types of onions

Different onions have different uses. What is the difference between types of onion? Bulb onions, like red, white, sweet, and yellow onions are similar, but have their own individual traits. All onions can be eaten raw, or cooked, but some are better suited for specific culinary uses.

Yellow Onions:

Strongest flavor
Great for soups, stews, roasting, and sauces
Best for long cooking times.
Most popular onion (more than 80% of onions grown are yellow onions…so often economically the best buy)
High in sulphur and sugar content, so best for caramelizing
Also called brown onion

Sweet Onions:

Strong flavor
Great for roasting dishes, frying (onion rings!)
Are generally named for the region they are grown.
Examples include the Vidalia, the Walla Walla, and Bermuda onion.
They are high in sugar, but contain less sulphur than yellow onion.
Good for caramelizing and cooking.
They have a high water content and a relatively shorter shelf-life.
To extend the onion, wrap in a paper towel and store in the refrigerator

Red Onion:

Milder flavor
Best onion for raw applications
Excellent for slicing thin and adding to salads or sandwiches
Great for pickling
Best for Grilling
Lower sugar and sulphur makes them poor for caramelizing

White Onion:

Strong flavor
Great for cooking, and raw uses
Thinner onion layers, crisp
Favored onion for salsas, chutneys, guacamole, and most Latin recipes
Best pizza topping

types of onions
What is the difference in white, yellow, red, and sweet onions?

When buying, choose an onion that is firm, and heavy for its size. Avoid ones that are bruised or showing signs of mold. Store in a well ventilated, dry, cool area. Do not store onions with potatoes–this will reduce their shelf-life. Sweet onion is highest in water content and will spoil more quickly than dryer onions; to extend life, wrap a sweet onion in a paper towel and store in the fridge. Price onion storage ideas on amazon.

Cut onions when you are ready to use them. Onion flavor intensifies quickly after being cut, and once cut, can become overly strong over a short period (old onions!–blech!)

Nutritionally, onions are awesome. They provide vitamin C and valuable nutrients, are high in fiber, lower the risk of some cancers, promote heart health, and act as an anti-inflammatory. The greatest concentration of nutrition is in the outer layer of the onion, so peel away as little of the onion as possible when using–why waste it?

If you’re new to home cooking, just get a bunch of spices, pots and pans, and start experimenting with different ingredients and recipes. It’s a healthy hobby that can save a lot of money in the long run. You can check out current prices for Complete Kitchenware Sets on Amazon or just go to a thrift store! I’ve found some of my favorite kitchen gear at second-hand stores.

Here’s one of my favorite ways to use onion: Check out this Pork Loin Chop with Onions Recipe.

pork loin chop

Thanks For Watching Our Recipe Videos!

Thanks for checking out our beet green recipes, and all of our recipes. Be sure and sign up for our mailing list so you’ll never miss a new recipe. Also click a button below and share the dishes with your friends. You can also follow Chef Buck on Youtube. We appreciate all the kind comments and support, and we’ll see you next time in the kitchen!

If you like what CG and I do, you can also support us on Patreon, or throw us a tip in our Paypal Tip Jar. We’ll happily enjoy a coffee on the road – Thanks! We appreciate all the support, and we’ll see you next time in the kitchen!

We include affiliate links for products on our website. So, if you make a purchase after clicking on our links, we may earn a commission which helps us produce more videos and drink more coffee :^) We participate in the Amazon Services LLC Associates Program, which is an affiliate advertising program. It provides a means for us to earn fees by linking to Amazon.com and affiliated sites, so we can make more videos.

Share and Enjoy !

Thai Rice Recipe …but with Quinoa!

thai rice

What is more awesome than a Thai rice recipe? Thai quinoa! Quinoa provides a complete protein, so you’ll get more bang for your buck by substituting quinoa in this simple, yet delicious Thai-style dish.

>

Quinoa Thai Rice Recipe Ingredients:

1 cup QUINOA …check quinoa prices on Amazon
1 can COCONUT MILK
1 ONION (chopped)
2 Tbsp GINGER (minced)
1 Tbsp CHILI-GARLIC SAUCE
1-2 tsp LEMONGRASS (minced)
4-6 cloves GARLIC (finely chopped)
2 Tbsp OLIVE OIL
½ tsp TURMERIC
CILANTRO (chopped)
ENGLISH CUCUMBER (chopped)
ROMA TOMATO (chopped)
2-3 Tbsp RICE VINEGAR
SALT and PEPPER to taste

thai rice
Thai-Style Quinoa Recipe

Quinoa Thai Rice Recipe Directions:

Heat olive oil in a large skillet on medium high. Add chopped onion, garlic, and ginger. Saute for 3-4 minutes until ingredients begin to soften. Add chili-garlic sauce, turmeric, and salt to taste. Mix well and continue sautéing for another minute.
Add quinoa and stir well. Check here for current prices for quinoa on Amazon.

In a measuring cup, add one can of coconut milk, and then add additional water to bring the liquid to 2½ cups. Pour the coconut/water mixture into the skillet and mix well with the quinoa.
Stir in the minced lemongrass.

Raise the skillet temperature and bring ingredients to a boil.
Reduce heat to a simmer, cover, and let dish cook undisturbed for 15 minutes.

Thai rice
Pair a simple salad with Thai Quinoa for a complete meal.

While the quinoa cooks, chop cucumber and tomato into a bowl.  Use a cucumber with a thin, edible skin, it’s a great texture for this dish. Add fresh chopped ginger and cilantro, salt and pepper to taste, and a generous amount of rice vinegar; the tartness of the vinegar adds a great contrast to the coconut creaminess of the quinoa. Thoroughly mix the salad ingredients and set aside.

Once the quinoa has simmered for 15 minutes, remove from the heat and let sit 5 to 10 minutes. Fluff the quinoa with a fork and add fresh chopped cilantro; if you’re not a fan of cilantro, basil makes an excellent substitute.
Serve quinoa in a bowl with the cucumber/tomato salad.

It’s a crazy creamy and awesome recipe. So simple and delicious, and makes a great meal. Definitely give this Thai rice quinoa recipe a try and let me know what you think, and bon appétit!

And for another healthy Thai-inspired recipe, try this Quinoa Thai Curry Recipe.
quinoa thai curry

Thanks for Watching Thai-Style Quinoa Recipe

Click a button below and share the dishes with your friends. You can also follow Chef Buck on Youtube. We appreciate all the kind comments and support, and we’ll see you next time in the kitchen!

If you like what CG and I do, support us on Patreon, or throw us a tip in our Paypal Tip Jar. We’ll happily enjoy a coffee on the road – Thanks! We appreciate all the support, and we’ll see you next time in the kitchen!

We include affiliate links for products on our website. Making a purchase after clicking on our links and we may earn a commission which helps us produce more videos and drink more coffee :^) We participate in the Amazon Services LLC Associates Program, which is an affiliate advertising program. It provides a means for us to earn fees by linking to Amazon.com and affiliated sites, so we can make more videos.

Share and Enjoy !

French Toast with Cream Cheese Filling

french toast

Why have Plain French Toast when you can have French Toast with a cream cheese filling? A little creamy cheese and cinnamon ginger apples can transform your breakfast into a 10-year old’s dream breakfast.

French Toast Ingredients:

BREAD (sliced, stale)
1½ cups MILK
4 EGGS
BUTTER for frying, and apples
APPLES (peeled, sliced)
CANDIED GINGER (sliced)
WALNUTS (toasted)
8 oz CREAM CHEESE (soft)
15 oz RICOTTA CHEESE
CINNAMON (to taste)
optional: sugar and vanilla

french toast
Stale bread makes the best french toast! –slice ahead of time!

French Toast Directions:

Stale bread makes great French toast, so slicing bread ahead of time is a great idea; at least a few hours ahead of time, but ideally overnight. Stale bread will soak up the French toast batter without becoming overly soggy and falling apart, especially if you’re using thinner slices of bread, and the thinner or thicker the slices will depend on your particular tastes. This French toast recipe doesn’t need thicker slices, since you’re basically building a French toast sandwich; I’m using thicker slices of challa bread for this video, but I often use regular slices of Hawaiian sweet bread, which works great.

Mix the cream cheese and ricotta cheese together. Be sure to set your cream cheese out ahead of time to soften, this will make mixing it with the ricotta cheese much easier. I’ll often mix these ingredients ahead of time. If making a smaller amount, the cheese mix is about a 2 to 1 ratio of ricotta to cream cheese. I sometimes add a tsp. or two of sugar to the cheese mix, but this is optional; I prefer it without the added sugar, since the apple mix will be quite sweet.

Any leftover cream/ricotta mix can be used as dessert topping, and makes a tasty filling for omelets. I generally make too much apple mix, but that’s a good thing, too. I’m generous with the apple topping, and any leftover apple mix is a perfect topping for oatmeal or ice cream.

french toast
Creamy cheese filled French Toast

To make the apple mix, peel, slice, and remove the cores of the apples. Apples vary quite a bit in size, but I usually end up with about 4-6 cups of apple slices, and I generally use gala or Fuji apples, which take little time to cook down.

Melt about 2 Tbsp of butter in a pot and add apples. Mix with butter and cook over medium heat. Add candied ginger slices; I think ½ to 1 cup is a good amount of candied ginger, but there is no wrong amount, follow your gut. Add 1-2 Tbsp of sugar and cinnamon to taste, Mix and cover and cook about 20 minutes, until apples soften and get juicy. For extra liquidy goodness, stir in about ¼ cup water. You want the apples to be a little syrupy, that way you won’t have to use any maple syrup with the French toast. Once the apples are cooked to your liking, cover and set aside.

Mix the French toast batter. A basic batter is eggs and milk, and I’m also adding cinnamon, but often folks will add a little sugar or vanilla extract. I don’t add vanilla or sugar to the batter with this particular dish, because the creamy cheese center and apple-ginger topping will add more than enough flavor. In a bowl, combine the milk, eggs, and cinnamon to taste (½ tsp is a good amount). Whisk together well and then pour some into a shallow bowl–or all–it depend on the size of your shallow bowl; you don’t want the batter to be so deep that it runs into the cheesy part of your French toast sandwich.

To build the French toast sandwich, simply spread the cheese mixture onto a slice of bread and top with another slice, making a basic cheese sandwich.

You can also add toasted walnuts into the sandwich for a nice crunch, or simply top the toast later with toasted nuts, but definitely add nuts at some point, cause the crunchy contrast makes the dish perfect, and toasted walnuts are awesome.
To toast the walnuts: spread walnuts on a baking sheet and roast at 350 degrees Fahrenheit for 5-7 minutes. It won’t take long. As soon as the nuts begin to color up, remove them from the oven; they will burn if ignored, so set a timer and watch them closely. Taking the time to toast the walnuts is well worth the effort…it’s a great taste.

Once you’ve constructed the cheesy French toast sandwich, heat a little butter in a non-stick skillet on medium heat. Check current prices for a Non-Stick Skillet on Amazon.
Place the sandwich in the batter and let soak a moment and then turn and batter the other side.
Place sandwich in the skillet and cook on medium heat until golden brown, turn and cook other side and remove from the heat.
Slice French toast and then top with apples and walnuts (a dusting of powdered sugar is optional). For a splash of color, add fresh berries or mint.

Serve this cheese stuffed French toast with maple syrup, or without–I find the cooked apples to be syrupy enough, and the warm cheesy center keeps the French toast from being too dry.

It’s a super delicious dish and a great treat for company.

Give this fancy pants Cream Cheese French Toast recipe a try and let me know what you think, and bon appétit!

And for another fancy pants breakfast dish, try this Pancake Recipe.

Fancy pancakes are easy to make.
Fancy pancakes are easy to make, and better looking, too.

Thanks for Watching our French Toast Recipe Video!

Click a button below and share the dishes with your friends. You can also follow Chef Buck on Youtube. We appreciate all the kind comments and support, and we’ll see you next time in the kitchen!

If you like what CG and I do, support us on Patreon, or throw us a tip in our Paypal Tip Jar. We’ll happily enjoy a coffee on the road – Thanks! We appreciate all the support, and we’ll see you next time in the kitchen!

We include affiliate links for products on our website. Making a purchase after clicking on our links and we may earn a commission which helps us produce more videos and drink more coffee :^) We participate in the Amazon Services LLC Associates Program, which is an affiliate advertising program. It provides a means for us to earn fees by linking to Amazon.com and affiliated sites, so we can make more videos.

Share and Enjoy !

New York Strip Steak Recipe with Cream Sauce

steak recipe

Cook up a New York strip steak recipe French bistro-style with this easy, creamy, peppercorn steak recipe. Use fresh cracked peppercorns for ultimate satisfaction!–it seems like a lot of pepper, but the cream sauce balances it out nicely.

New York Strip Steak Recipe Ingredients

NEW YORK STRIP (10-12 oz)
1 Tbsp PEPPERCORNS (crushed)
1 Tbsp BUTTER
2 Tbsp OIL
¼ cup WINE (red or white wine)
¾ cup HEAVY CREAM
1 clove GARLIC (minced)
SALT to taste

steak recipe

How To Cook a New York Strip Steak

I’m using a New York Strip Steak for this dish, but any good cut of steak will work.

  • First thing, trim the steak of excess fat and coat both sides of the steak with fresh cracked and crushed peppercorns. Use a course grinder, rolling pin, or something out of the toolbox. Check here for current prices for a pepper grinder on Amazon. It seems like a lot of pepper, but the rich and creamy sauce will balance the dish out nicely.
  • Add salt to taste and set the steak aside.
  • Heat a skillet on medium heat and add butter and oil. Ideally you want to not use a non-stick skillet.
  • Once the skillet is hot, add the steak. It should sizzle straight away, sealing in the flavors.
  • Cook steak to desired doneness, turning halfway through the cook time. I think medium rare (pink inside) is perfect.
  • When the steak is cooked to your liking, remove it from the skillet and cover on a plate to rest.
  • Leave the skillet with juices, butter, and oil on medium heat.
  • De-glaze thee skillet with wine.
  • Add the cream and garlic and continue stirring 3-4 minutes. Be sure to return any juices from the plate with the resting steak!
  • Stir sauce until it reduces to a creamy thickness. Add salt as desired.
  • Pour sauce onto a plate and top with steak and desired sides–steamed broccoli or asparagus are my favorites.

Serve with thick slices of bread to sop up the delicious, creamy sauce!
Give this New York Strip Steak Recipe a try and let me know what you think, and bon appétit!
And for another tasty entree, check out this delicious Pork Loin Chop Recipe.

pork loin chop

Thanks for Watching our NY Strip Steak Video!

Click a button below and share the dish with your friends. You can also follow Chef Buck on Youtube. We appreciate all the kind comments and support, and we’ll see you next time in the kitchen!

If you like what CG and I do, support us on Patreon, or throw us a tip in our Paypal Tip Jar. We’ll happily enjoy a coffee on the road – Thanks! We appreciate all the support, and we’ll see you next time in the kitchen!

We include affiliate links for products on our website. Making a purchase after clicking on our links and we may earn a commission which helps us produce more videos and drink more coffee :^) We participate in the Amazon Services LLC Associates Program, which is an affiliate advertising program. It provides a means for us to earn fees by linking to Amazon.com and affiliated sites, so we can make more videos.

Share and Enjoy !

Baked Pears Recipe … An Easy Dessert Idea!

baked pears

This Ginger Baked Pears recipe is a simple and delicious dessert idea. It’s easy to prep and put together. Just throw it together, throw it in the oven, and forget about it…well, almost forget about it–you’ll need to baste the pears a couple of times while they bake. This baked pear dish will be a crowd pleaser for any fancy meal.

What you need for Baked Pears

3-4 ANJOU PEARS (or bosc pears)
BUTTER for greasing baking dish
1½ cup HEAVY CREAM
¼ cup BAKER’S SUGAR (superfine ground sugar)
½ tsp CINNAMON
½ tsp VANILLA EXTRACT
1 heaping Tbsp grated GINGER
ORANGE ZEST
optional:
top with toasted nuts
and whipped cream!

baked pears
Use firm pears for baking, ideally and anjou or bosc pear.

How to make this Baked Pears Recipe

Use a firm pear ideal for baking, like an anjou or bosc pear.
Peel the pears and slice in half lengthwise and remove the core–use 3-4 pears, depending on need and the size of your baking dish. If you need a decent oven-safe baking dish, check out some current pricing for a Pyrex dish on Amazon.
Lightly butter the bottom of your baking dish and place the pears sliced side down.

In a bowl, combine the cream, sugar (use superfine baker’s sugar, or regular sugar that has been ground in a food processor), cinnamon, vanilla, ginger, and orange zest. Whisk ingredients together and pour over the pears. The top half of the pears should still be sticking out of the cream.

Slide the dish into an oven preheated to 375 degrees Fahrenheit.
Remove the dish every 15-20 minutes and baste the tops of the pears with the cream.
Cook 45-55 minutes or until the pear tops are a golden brown.

baked pears
Baked pears with Cream Sauce!

The cream will be thin when hot, but as it cools it will thicken. Serve pears with a topping of the cream sauce.
For a crunch, add toasted nuts–and a little whipped cream on top would be quite decadent.
I threw maraschino cherries on top for color, but a little more orange zest on top would work, too.
Give this Baked Pears recipe a try and let me know what you think!

And for another tasty dessert, check out this Easy Apple Crisp Recipe.

Thanks for Watching our Baked Pear Recipe!

Click a button below and share the dishes with your friends. You can also follow Chef Buck on Youtube. We appreciate all the kind comments and support, and we’ll see you next time in the kitchen!

If you like what CG and I do, support us on Patreon, or throw us a tip in our Paypal Tip Jar. We’ll happily enjoy a coffee on the road – Thanks! We appreciate all the support, and we’ll see you next time in the kitchen!

We include affiliate links for products on our website. Making a purchase after clicking on our links and we may earn a commission which helps us produce more videos and drink more coffee :^) We participate in the Amazon Services LLC Associates Program, which is an affiliate advertising program. It provides a means for us to earn fees by linking to Amazon.com and affiliated sites, so we can make more videos.

Share and Enjoy !

How to Eat Pomegranate Fruit — great nutrition!

how to eat pomegranate

How to eat pomegranate. First off, Pomegranate is a weird, messy fruit.

When selecting a pomegranate, choose a fruit that is heavy for its size; like with most fruits, this signifies that it is fresh and juicy. The skin should be firm.

How to Eat Pomegranate

Pomegranate juice can be quite messy, and will easily stain clothing. It is a good idea to slice and prepare pomegranate in a large bowl or kitchen sink where the juice splatter can be contained.

The edible part of the pomegranate are the red “seeds” within the fruit. These seeds are called arils. Inside the arils you’ll find an inner seed that is a little gritty, but it is edible and contributes to the overall texture of the pomegranate, which is…interesting. Pomegranate is a food folks tend to love or hate, but whichever camp you fall into, pomegranate will provide an attractive and nutritious experience. Pomegranate is high in fiber, antioxidants, vitamins C, and potassium.

pomegranate
arils from pomegranate

To remove the arils, slice the pomegranate in half, and then into wedges. The arils are held firm by a membranous inside that is bitter and not to be eaten. The arils can be easily pulled away from the membrane. There are quite a lot of arils in a pomegranate, so this can take a little time…playing some cool jazz will help.

Some folks like to remove the seeds while holding the pomegranate beneath a bowl of water…this will cut down on the splatter, but it will also dilute any of the juice within the fruit.

How to eat pomegranate? Pomegranate can be eaten raw, juiced, or cooked.

Pomegranates keep for a week at room temperature, or up to 3 weeks if refrigerated.

Pomegranate is often referred to as “the food of the Gods”. Give ’em a go. You’ll either love it or hate it.

And for another interesting fruit experience, give DRAGON FRUIT a try.

Share and Enjoy !


Black-Eyed Peas Recipe w/ Jalapeno and Bacon

black-eyed peas recipe

This Black-Eyed Peas Recipe is yummy anytime, and a particularly delicious way to get your black-eyed peas fix on New Years Day. Bacon, jalapeno, and black-eyed peas are a tasty combo that cooks up super simple, and adding a touch of flour gravies up the dish nicely. It makes a great side dish.

Black-Eyed Peas Recipe Ingredients:

15 oz can BLACK-EYED PEAS
3 slices BACON
JALAPENO SLICES (to taste)
1 tsp FLOUR
1 tsp BUTTER (if lean bacon)
¾ cup WATER

Black-Eyed Peas Recipe Directions:

First thing, fry up the bacon. I like to use 3 strips of bacon for each 15 oz can of beans (black-eyed peas are beans, dude).
Use only 2 strips if you like–but I like mine bacon-y, and I bet you will, too.
Once the bacon is cooked close to your liking, remove from the skillet and slice into bite sizes.
Return bacon to the skillet, and add jalapenos to taste. Saute bacon and jalapenos for about 1 minute.
If there is a tsp or more of bacon fat in the skillet, add flour…if the bacon is lean, with little grease, melt 1 tsp of butter and then add flour.
Stir ingredients for about 1 minute.
Add 15 oz. can of drained and rinsed black-eyed peas to the skillet. Mix with ingredients and let cook 1 minute.
Stir in ¾ cup water. Bring skillet to a bubble, then reduce to a simmer and cook uncovered for about 5 minutes.
Add additional water as needed, but not too much.
The flour will thicken into a gravy.
And that’s it!
This dish makes a great side for pork chops, fish,–you name it! I like to pair it up with liver and onions–super delicious!

This is a super simple dish to prepare. You can check here for current Black-Eye Pea Prices on Amazon. Canned beans are already cooked, but dried black eyed peas will have to be cooked before adding to the recipe, just prepare the beans according to the package directions.

Give this black-eyed peas recipe a go and let me know what you think, and bon appétit!

And for another tasty black-eyed peas recipe, try out this Black-Eyed Pea Salad Recipe.
black eyed pea salad

Thanks for checking out the black eyed peas recipe. Be sure and sign up for our mailing list so you’ll never miss a Chef Buck cooking video, and click a button below and share the dishes with your friends. We appreciate all the kind comments and support, and we’ll see you next time in the kitchen!
–Chef Buck

Thanks for watching our recipe videos!

Thanks for watching. We include affiliate links for products. If you make a purchase after clicking on our links, we may earn a commission which helps us produce more videos and drink more coffee :^)
We are a participant in the Amazon Services LLC Associates Program, an affiliate advertising program designed to provide a means for us to earn fees by linking to Amazon.com and affiliated sites.

Share and Enjoy !

Parsnip Recipe — Creamy Mashed Parsnips

Parsnips are delicious and can be cooked into a great mash, just like potatoes. You can make this parsnip recipe as smooth or chunky as you like; I like it a little chunky–and I throw in a potato, too, with the skin on! The skin adds a great texture. Mashed parsnips make a nice change from the same old potato dish.

What You Need For This Parsnip Recipe

2 lbs. PARSNIPS
1 lb. POTATOES
3-4 Tbsp BUTTER
3-4 Tbsp OLIVE OIL
HALF N HALF, CREAM, or MILK as desired
SALT and PEPPER to taste
½ cup PARSLEY (chopped)
and enough water or broth to
cover the simmering parsnips

parsnip recipe
A delicious and creamy parsnip recipe. It’s a perfect side for a meaty entree or a filling addition to a vegetarian meal.

If you’re new to home cooking, get a bunch of spices, pots and pans, and start experimenting with different recipes. It’s a healthy hobby that can save a lot of money in the long run. Check out current prices for Complete Kitchenware Sets on Amazon as well as Complete Starter Spice Kits. Or try a thrift store! I’ve found some of my favorite kitchen gear at second-hand stores.

How to Make a Mashed Parsnip Recipe

Wash the parsnips and potato.
I don’t peel either!–the skin adds great texture and nutrition (but you can follow your own heart).
In a mid-size pot, heat butter and oil.
Chop the parsnips and potatoes into chunks roughly ½ inch in size–they don’t have to be perfect, close
is close enough.
Add chopped parsnips and potato to the pot, mix with butter and oil and let cook 2-3 minutes, stirring as needed.
Add water to the pot, just enough to cover the parsnips. Sometimes I use broth instead of water–give it a go sometimes,
but it’s delicious either way. Add salt and pepper to taste. Bring the pot to a simmer, cover, and let simmer about 5 minutes.
Uncover and continue simmering until the liquid is reduced and parsnips are soft and break apart.
Add a little milk, cream, or half n half. This will make the dish super creamy; add to taste, but don’t add so much that the dish becomes soupy.
Stir over heat a minute or two until the dish reaches desired consistency; you can use a hand blender to puree the mix or leave it chunky
like a home-style mashed potato dish…it’s great both ways.

parsnip recipe
Here I’m serving parsnips with a country fried steak and fresh veggies.

Give this Mashed Parsnip recipe a go and let me know what you think, and bon appétit!

And for another delicious parsnip dish, try this Parsnip Curry Soup Recipe.
curry parsnip soup

Thanks For Watching Our Parsnip Recipe Videos!

Thanks for checking out this quinoa salad recipe, and all of our recipes. Be sure and sign up for our mailing list so you’ll never miss a new recipe. Also click a button below and share the dishes with your friends. You can also follow Chef Buck on Youtube. We appreciate all the kind comments and support, and we’ll see you next time in the kitchen!

If you like what CG and I do, you can also support us on Patreon, or throw us a tip in our Paypal Tip Jar. We’ll happily enjoy a coffee on the road – Thanks! We appreciate all the support, and we’ll see you next time in the kitchen!

We include affiliate links for products on our website. So, if you make a purchase after clicking on our links, we may earn a commission which helps us produce more videos and drink more coffee :^) We participate in the Amazon Services LLC Associates Program, which is an affiliate advertising program. It provides a means for us to earn fees by linking to Amazon.com and affiliated sites, so we can make more videos.

Share and Enjoy !

Pork Tenderloin Recipe with Beans

pork tenderloin

You’re gonna love this pork tenderloin recipe. As the name suggests, pork tenderloin is a very tender cut of meat. It’s super flavorful, moist, and delicious, and easy to prepare. Leftover tenderloin is perfect on a sandwich, so cook up enough to leave leftovers…you’ll be glad you did. I’m cooking this pork tenderloin with onions and beans and it’s a great dish –definitely give it a try.

Pork Tenderloin Recipe Ingredients:

2½ lbs PORK TENDERLOIN
1½ Lg ONION
15oz can PINTO BEANS
5-7 cloves GARLIC
fresh HOT PEPPERS to taste (or use red pepper flakes, or nothing…it’s all optional, baby!)
OLIVE OIL (as you like…I oil the meat, the skillet, and then throw a little olive oil on the onions)
SEASONING for meat
(1 tsp salt, ½ tsp black pepper, 1 tsp cumin, 1 tsp chili powder,
1 tsp Italian seasonings, etc…experiment, or use your own favorites)
½ cup dry WHITE WINE (optional)
½ cup CHICKEN BROTH

pork tenderloin
trim silver skin from tenderloin and sear 3 minutes each side before roasting in oven

Pork Tenderloin Recipe directions:

  • Trim the pork tenderloin of the sinewy silver skin.
  • Coat the pork in olive oil and seasonings. I’m using a rub of chili powder, cumin, salt, pepper, and Italian seasonings…but use whatever flavors you like, or just keep it simple with basic salt and pepper–there’s no wrong way to do it; as long as you don’t overcook the pork, it’ll be awesome!
  • Pre-heat your oven to 425 F. Cooking the tenderloin at a high temperature for a short time will keep it from drying out.
  • While the oven heats, sear the tenderloin on the stove top. In a heavy, oven safe skillet, heat a little olive oil on medium high heat. After the skillet and oil are hot, add the tenderloin–it should sizzle and cook right away. Check current prices online for an oven safe skillet.
  • Sear for 3 minutes and then turn and sear the other side.
  • Add thick sliced onion to the skillet. Do this after the tenderloin has been turned.
  • Add a little oil and seasonings to the onion.
  • After 3 minutes, remove the skillet from the stove top and place in the oven at 425 F. (be sure to use an oven-safe skillet!)
  • Cook for approx. 20 minutes. If using a meat thermometer, cook until the internal temperature of the pork is 145 F.
  • Remove the skillet from the oven and return to the stove top.
  • Remove the pork loin from the skillet and set aside 10 minutes to rest. It is very important to rest the meat before slicing. This will preserve the juiciness and flavor of the pork. If you slice the tenderloin right away, the thin juices will run and much of the flavor and moisture will be lost!
pork tenderloin
let pork tenderloin rest before slicing

While the pork tenderloin rests, we’ll complete the onion and bean side dish.

  • On medium heat, continue cooking the onions in the skillet. The liquid in the pan will reduce as it cooks. Add garlic–a lot is good!–and if desired, throw in a little fresh chopped hot peppers.
  • Add the pinto beans
  • After a few minutes, if you like, add a little wine. It’s optional, but adds a great flavor.
  • Simmer about 2 minutes and let the wine cook off.
  • Add chicken broth and continue simmering until the liquid cooks down. And that’s it!
pork tenderloin
pinto beans and caramalized onion

By now the pork tenderloin has rested enough and is ready to slice.
Serve the tenderloin with the beans and onion side, and maybe a little steamed broccoli or salad–and boom!–you got a complete fancy-pants pork tenderloin dinner!

pork tenderloin
Pork tenderloin dinner with caramelized onion and beans

Give this pork tenderloin recipe a try and let me know what you think, and bon appétit!

And for another great meal idea, try this Delicious Cornish Hen Dinner.

cornish game hen

Thanks for checking out our pork tenderloin recipe, and all of our recipes. Be sure and sign up for our mailing list and never miss a new Chef Buck cooking video, and also click a button below and share the dishes with your friends. We appreciate the kind comments and support, and we’ll see you next time in the kitchen!

Thanks for watching our recipe videos!

We include affiliate links for products on our website, so if you make a purchase after clicking on our links, we may earn a commission which helps us produce more videos and drink more coffee :^) We participate in the Amazon Services LLC Associates Program, which is an affiliate advertising program providing a means for us to earn fees by linking to Amazon.com and affiliated sites, so we can make more videos.

Share and Enjoy !

Beet Greens Great over Quinoa or Rice

beet greens recipe

Try this easy beet greens recipe. I almost always buy beets with the beet greens still attached–you’re getting two great ingredients in one! Beet greens are quick to cook up, full of nutrients, taste great, and look great, too. Serve this recipe over rice or quinoa as an entree, or serve it all on it’s lonesome as a side dish.

Beet Greens Recipe Ingredients:

1 bunch BEET GREENS
1 bunch GREEN ONIONS (chopped)
1 can diced TOMATOES
4-5 cloves GARLIC (finely chopped)
2 Tbsp VINEGAR
1-2 Tbsp OLIVE OIL
SALT and PEPPER to taste
HOT PEPPERS (chopped, to taste)
serve over QUINOA or RICE

beet greens

How to cook Beet Greens

Wash beet greens well and then separate the stalk from the leaves. Chop the stalk into bite-sized peices, and then rough chop the greens.
Heat olive oil in a skillet on medium heat. Check prices for a new skillet on Amazon.
Add garlic and, if desired, a little fresh hot pepper.

Let these ingredients cook for about a minute, and then add chopped green onion bottoms (reserve chopped green onion tops to add later)
Cook for 2 minutes and then add the chopped beet stalks.
Saute for 1-2 minutes and then add diced tomato. Bring the skillet back up to a simmer. Add salt and pepper and simmer for approx. 5 minutes.

Add in a little vinegar. I’m throwing in 2-3 Tbsp by the time the dish is complete, but adjust to taste. Add vinegar incrementally–it’s a lot easier to put in than to take out!
Simmer dish another 2 minutes.

Add in the leafy greens and most of the green onion tops–I reserve a little of the green onion tops for a garnish.
Cover and simmer 2 minutes.

And that’s it! Adjust the seasoning as desired, and get it off the heat. Serve the greens over rice or quinoa as an entree, or a side dish. Check current prices for quinoa on Amazon.

Give this beet greens recipe a try and let me know what you think, and bon appétit!

For another great greens dish, try this Creamed Kale Recipe.

kale
A lot of kale isn’t always a lot, kale contains a high water content and will cook down quite bit.

Thanks for checking out our beet greens recipe, and be sure and sign up for our mailing list so you’ll never miss a Chef Buck cooking video, and also click a button below and share the dishes with your friends. We appreciate all the kind comments and support, and we’ll see you next time in the kitchen!

We appreciate you watching our recipe videos!

We include affiliate links for products on our website, so if you make a purchase after clicking on our links, we may earn a commission which helps us produce more videos and drink more coffee :^) We are a participant in the Amazon Services LLC Associates Program, which is an affiliate advertising program that provides a means for us to earn fees by linking to Amazon.com and affiliated sites.

Share and Enjoy !

Cook Quinoa with Roasted Vegetables Recipe

how to cook quinoa

How to cook quinoa with beets; a simple recipe that pairs quinoa with delicious roasted root vegetables. For this quinoa recipe, I roasted beets, carrot, and onion, but any root vegetable will do. I also added a little RAW ginger and garlic, to provide a flavor punch along with excellent nutrition. A complete protein, quinoa makes this dish an ideal vegetarian recipe. It’s a perfect side dish or main course.

Quinoa and Root Vegetable Recipe Ingredients:

1 cup QUINOA
2 med. BEET ROOTS
1 med. ONION
1-2 Lg CARROTS
2 Tbsp GARLIC (minced)
2 Tbsp GINGER (minced)
½ cup PARSLEY (chopped)
HOT PEPPER (to taste)
2 Tbsp OLIVE OIL
4-6 Tbsp VINEGAR
SALT and PEPPER to taste

how to cook quinoa
Chop root veggies into bite-size pieces (but big bites!)

How to Cook Quinoa and Root Vegetable Recipe

Wash and then chop beet bulbs and carrots into roughly ½ inch pieces–bite size, but not too small.
Chop onion into similar sizes. Place chopped veggies in a bowl and toss with olive oil, salt and pepper.

On an ungreased baking sheet, spread veggies out into a single layer and then roast approx. 30 minutes in an oven pre-heated at 400 degrees Fahrenheit. Halfway through the roasting, give the veggies a stir and return to the oven.
While the root vegetables roast, prepare the quinoa.

If you’ve ever wondered how to cook quinoa …it’s just like rice: 1 part quinoa to 2 parts water. Most quinoa sold in stores throughout the USA has been pre-washed, but check packaging for details. (Check current prices for quinoa on Amazon.)

If desired, add a little chopped hot pepper in with the quinoa. Bring the pot to a boil, reduce heat, cover and simmer quinoa for about 15 minutes, or until all of the water is absorbed. Remove pot from the heat and set aside for 5 minutes. Fluff with a fork.

Transfer quinoa to a bowl and season with salt, pepper, and vinegar to taste. Mix well, and then add the roasted vegetables. Add the raw, minced ginger and garlic, and the parsley. Toss until all of the ingredients are well combined. Taste and adjust seasoning as needed.

This recipe makes an awesome side, but it also works well as an entree. Give this quinoa and beet recipe a try and let me know what you think, and bon appétit!

For another recipe featuring beets, Check out this Fresh Beet Greens Recipe.

beet greens recipe
Buy beet roots with the greens for two great ingredients.

Thanks For Watching Our Recipe Videos!

Thanks for checking out our beet and quinoa recipe, and all of our recipes. Be sure and sign up for our mailing list so you’ll never miss a new recipe. Also click a button below and share the dishes with your friends. You can also follow Chef Buck on Youtube. We appreciate all the kind comments and support, and we’ll see you next time in the kitchen!

If you like what CG and I do, you can also support us on Patreon, or throw us a tip in our Paypal Tip Jar. We’ll happily enjoy a coffee on the road – Thanks! We appreciate all the support, and we’ll see you next time in the kitchen!

We include affiliate links for products on our website. So, if you make a purchase after clicking on our links, we may earn a commission which helps us produce more videos and drink more coffee :^) We participate in the Amazon Services LLC Associates Program, which is an affiliate advertising program. It provides a means for us to earn fees by linking to Amazon.com and affiliated sites, so we can make more videos.

Share and Enjoy !

Salmon Burger Recipe Using Canned Salmon

salmon Burger recipe

Use canned salmon to create this simple and satisfying salmon burger recipe. Canned salmon is perfect for making salmon patties, and salmon patties are an ideal stand-in for a hamburger when you’re hamburgered out –plus it’s a healthier choice.

Salmon Burger Recipe Ingredients:

14oz canned SALMON (red or pink)
¼ – ½ cup ONION (finely chopped)
HOT PEPPER (finely chopped, to taste)
2 EGGS (beaten)
SALT and PEPPER to taste
OIL for sauteing (3-4 Tbsp…salmon will soak up the oil)
1 Tbsp CURRY POWDER (optional, check current curry prices online)

salmon Burger recipe
Canned Salmon makes tasty burgers!

Salmon Burger Recipe Directions:

I love canned salmon–red or pink–although I prefer pink canned salmon when making burgers since the pink salmon is much cheaper to buy. I use the more expensive red salmon for making salmon salad.

Salmon in the can is already cooked–in fact it is part of the canning process that cooks the salmon.
Open the the can and drain off the liquid–you don’t want the salmon patties to be too wet when you form them.

salmon burger recipe
Canned Pink Salmon …traditional style means skin and bones are still intact

Traditional canned salmon will come with skin and bones still intact . The skin and bones are soft and edible. You can remove the skin and bones if you like; I used to remove them, but now I’m too cheap, and I don’t want to miss out on the extra nutrition, either.

  • Place drained salmon in a bowl.
  • Add ¼ – ½ cup onion depending on how much you like onion. Make sure the onion is finely chopped; smaller pieces will help keep the patties from falling apart. If desired, add some finely chopped hot pepper. If you don’t have fresh pepper, add a little chili powder or hot sauce.
  • Add salt and pepper to taste.
  • Add one or two beaten eggs. I like to use two beaten eggs because it helps to keep the patties together better; I don’t like my burgers to fall apart while I’m eating them.
  • Mix all the ingredients together well.
  • Shape into patties. I usually get 4 patties out of a 14oz can, but make as many as you like–bigger or smaller–depending on how big you want your burger to be. Here’s some current prices for canned salmon if you like to do your fishing on the internet.
  • Heat oil in a skillet. I like medium heat. You want the oil to be hot enough to sizzle when you add the patties, but not so hot that the patties will cook too quickly; you want the patties to get a nice cooked side before turning them, this will keep then from breaking apart.
  • Cook 5-7 minutes and then turn gently when the patties are golden brown.
  • Cook another 3-4 minutes and then remove from skillet and drain salmon patties on a paper towel.

I like to serve salmon patties on a toasted bun with sliced tomato, onion, lettuce and mayo.
It’s a nice break from hamburgers, and just as tasty.
Sometimes I’ll add a Tbsp of curry powder into the mix to make Curried Salmon Burgers, which you should definitely try sometime.

Give this salmon burger recipe a try and let me know what you think, and bon appétit!

And for another alternative take on a burger dish, try one of my favorite vegetarian burger ideas, A Super Eggplant Burger Recipe.

veggie burger recipe
Best veggie burger? Looks like it.

Thanks For Checking out our Recipes

We hope this info is helpful for the next time you’re out buying crab meat at the supermarket. Sign up for our mailing list so you’ll never miss a new recipe. Also click a button below and share the dishes with your friends. You can also follow Chef Buck on Youtube. We appreciate all the kind comments and support, and we’ll see you next time in the kitchen!

If you like what CG and I do, support us on Patreon, or throw us a tip in our Paypal Tip Jar. We’ll happily enjoy a coffee on the road – Thanks! We appreciate all the support, and we’ll see you next time in the kitchen!

We include affiliate links for products on our website. Making a purchase after clicking on our links and we may earn a commission which helps us produce more videos and drink more coffee :^) We participate in the Amazon Services LLC Associates Program, which is an affiliate advertising program. It provides a means for us to earn fees by linking to Amazon.com and affiliated sites, so we can make more videos.

Share and Enjoy !

Biscuit Recipe – Best Southern Biscuits

It’s easy to make friends with this easy, awesome tasting biscuit recipe. You biscuits in all manner of meals. Serve them alone as a breakfast side, pile them up into the perfect breakfast sandwich, ladle them with gravy for a wholesome entree, or top them with whipped cream and strawberries for a decadent dessert!

Buttermilk Biscuit Recipe Ingredients

4 cups ALL PURPOSE FLOUR
1 Tbsp BAKING POWDER
1 tsp BAKING SODA
1 tsp SALT
1 Tbsp SUGAR
1 cup BUTTER (diced, chilled)
1½ cups BUTTERMILK (chilled)
(plus buttermilk for brushing biscuit tops)

Buttermilk Biscuit Recipe Directions

In a bowl, combine flour, baking powder, baking soda, salt, and sugar (optional). Mix ingredients together well. Add diced butter. For best results use chilled butter –keep the diced butter in the refrigerator until needed. Cut butter into the flour using a pastry cutter or knives. Check here for current prices for a pastry cutter on Amazon.

Butter should be cut into pea-sized bits, but there’s no reason to be militant about it…nice chunks of butter are nice. Once the butter is cut into the flour, add buttermilk. Keep the buttermilk chilled until you are ready to use it–cold butter and buttermilk are best for this recipe.

Pour the buttermilk into the bowl, and using a spatula (or your hand), roll the flour around the edge of the bowl until the buttermilk is absorbed and the dry flour begins sticking together. Roll until there is very little loose flour…add a drop more buttermilk if needed, but do so sparingly–you don’t want the flour to be “wet”.

On a lightly floured surface, empty the bowl and press the flour together, knead once or twice and then spread the dough out into a flat, ½ inch thickness. Do not knead or “handle” the dough too much.

Flour the edges of a biscuit cutter or drinking glass and cut out biscuits. I like my buttermilk biscuit about 2″-3″ across, but make whatever size you like. Giant biscuits can be fun :^) Cut the biscuits closely and get as many out of the first press as you can. Once all of the biscuits are cut from the first press, bring the dough together again and cut out remaining biscuits–again trying to handle the dough as little as possible.

Arrange the biscuits touching side by side on a lightly greased pan or on parchment paper. Lightly brush the tops of the biscuits with buttermilk or melted butter–this will help them to brown nicely. Place biscuits in the oven and bake at 425 degrees Fahrenheit for approximately 15 minutes, or until biscuits are golden brown to your liking.

Give these biscuit recipes a try and let me know what you think, and for another breakfast bread dish, try this Egg Bread Recipe.

egg bread
Fancy baked eggs to impress friends and family

Thanks for checking out our biscuit recipe, and all of our recipes. Be sure and sign up for our mailing list and never miss a new Chef Buck cooking video, and also click a button below and share the dishes with your friends. We appreciate all the kind comments and support, and we’ll see you next time in the kitchen!
–Chef Buck

Thanks for watching our recipe videos!

We include affiliate links for products on our website, so if you make a purchase after clicking on our links, we may earn a commission which helps us produce more videos and drink more coffee :^) We participate in the Amazon Services LLC Associates Program, which is an affiliate advertising program providing a means for us to earn fees by linking to Amazon.com and affiliated sites, so we can make more videos.

Share and Enjoy !

Whipped Cream -how to make dessert topping

whipped cream

Give up the cool whip, ’cause whipped cream is super easy to make at home. If you’ve got heavy whipping cream and a little powdered sugar, you can whip up your own topping –and if you’ve got some leftover biscuits, then you’re just one step away from a fantastic dessert –that one step being fresh fruit– ideally strawberries; Biscuits topped with strawberries and homemade whipped cream make a helluva tasty treat!

Homemade Whipped Cream Recipe Ingredients:

1 cup HEAVY WHIPPING CREAM
½ to 1 tsp VANILLA EXTRACT (to taste, really…it’s semi-optional, but do it)
1 Tbsp POWDERED SUGAR

whipped cream
Heavy Whipping Cream

Homemade whipped Cream is best made in a chilled, metal bowl–and if you’re using a hand mixer–chill the mixing paddles as well! –for scientific reasons involving temperature transference and passive ambient cooling, chilling these tools will assist in the “whippification”.
Into the chilled bowl, add cream.
Using a smoothie or hand mixer–or even a hand whisk!–whip the cream until it begins to thicken (but before it begins to peak). Once the cream begins to thicken, add in the powdered sugar and the vanilla.
Continue whipping until the cream thickens and forms “peaks”, i.e., turns into whipped cream.
At this point, it’s ready to use (if you refrigerate the topping, the cream will eventually break down and have to be re-whipped).

whipped cream
Strawberry Shortcake knock-off using leftover biscuits

Strawberry Biscuit Dessert Directions:

We like to pair this whipped topping with leftover biscuits to create a faux strawberry shortcake:
Take 1lb. of fresh strawberries and slice them into a bowl, add 1 to 2 Tbsp Sugar and mix. Refrigerate for 2-3 hours or overnight.
Slice biscuits in half and toast under a broiler.
Spoon the chilled strawberries over the toasted biscuits and top with homemade whipped topping.
Boom. It’s perfecto.

Give this homemade whipped Cream and strawberry biscuit dessert recipe a go and let me know what you think, and bon appétit!

And for a quick biscuit tutorial, check out the Buttermilk Biscuit Recipe.

Buttermilk Biscuit Recipe
Easy Buttermilk Biscuit Recipe

Share and Enjoy !


Pesto Recipe and Perfect Pesto Pasta

pesto recipe

This pesto recipe is crazy delicious, and makes a perfect sauce for pasta. I like my pesto pasta to have a thick sauce with lots of flavor!–a thin, watery pesto pasta is not for me; if you feel the same way, then give this pasta dish a go–and use a hearty pasta that will hold lots of pesto sauce, something like a penne or rotini pasta.

What You Need for Pesto Recipe

¾ cup PINE NUTS, toasted (or substitute almonds or walnuts)
2-3 cloves garlic
2 cups (packed) fresh BASIL leaves (or substitute 1 cup for SPINACH leaves)
[4oz grocery basil = approx 2 cups]
zest & juice from 1 small LEMON
½ – ¾ cup OLIVE OIL (darker the better)
½ tsp SALT and ¼ tsp PEPPER to taste
¼ tsp crushed RED PEPPER FLAKES
½ cup (to taste) freshly grated PARMESAN CHEESE (or asiago or Pecorino)

16oz PASTA (I prefer pene or rotini for this dish)

pesto recipe
Fresh ingredients make the best pesto

How to Make Pesto Recipe

Toast the pine nuts at 400 degrees Fahrenheit for approx 3 minutes–but watch them like a hawk!–they will toast fast and you DO NOT WANT TO OVER-TOAST OR BURN them ’cause they cost way TOO MUCH MONEY! Check here for current pine nut prices on Amazon.

Place pine nuts and garlic in a food processor and pulse/chop.
Season with salt and pepper and red pepper flakes.
Into the processor, add basil (when buying basil, choose basil that has NOT flowered yet–or only a little–basil loses sweetness as the plant flowers), spinach, lemon juice and zest.

Process until the greens are shredded.
Add olive oil incrementally and process until fully incorporated and to desired smoothness and consistency.

Transfer the pesto to a serving bowl and mix in the freshly grated Parmesan cheese.

And that’s it–your pesto sauce is complete! Use it however you see fit!

For pesto pasta:
In a pot, cook 16oz of pasta according to package directions.
I recommend a pasta that is thick and hearty, with lots of surface area for the pesto sauce to cling to; I lprefer a penne or rotini pasta.

When pasta is cooked to desired consistency–al dente is best, I think–reserve 1 cup of the pasta water, then drain the pasta–DO NOT RINSE!–this washes away flavor.

Immediately return drained pasta to the pot and add in the pesto. Mix with the noodles. Add some of the reserved pasta water until the sauce is as desired. Add pasta water SLOWLY! You DO NOT want to make your pesto sauce TOO THIN! Or at least I don’t–I like a lot of pesto flavor with my pasta.

Top with freshly grated Parmesan cheese and serve.

pesto recipe
Pesto Pasta Recipe

Give this pesto pasta recipe a go and let me know what you think, and bon appétit!

And for another fantastic pasta dish that’s incredibly healthy and NOT EVEN PASTA, try this Spaghetti Squash Pasta Recipe.

best spaghetti squash
just a few simple flavors and ingredients will make the best spaghetti squash recipe

Thanks for checking out the pesto pasta recipe. Be sure and sign up for our mailing list so you’ll never miss a Chef Buck cooking video, and click a button below and share the dishes with your friends. We appreciate all the kind comments and support, and we’ll see you next time in the kitchen!
–Chef Buck

Share and Enjoy !


Best Green Beans Recipe

green beans

I’m not a lover of green beans, but sometimes green beans insert themselves into your life and then you just have to deal with them. Seeds and garlic and ginger are 3 friends that will help in this fight. This is a quick recipe, very tasty, and an effective way to deal with the green bean “problem”.

Green Bean Recipe Ingredients:
1 lb. GREEN BEANS
3 ROMA TOMATOES (chopped, or substitute 15oz can diced tomatoes)
2 Tbsp GARLIC (finely chopped)
2 Tbsp GINGER (finely chopped)
HOT PEPPERS (finely chopped, to taste–sub chili paste, hot sauce, sriracha, etc.)
½ tsp FENNEL SEEDS
1 tsp CUMIN SEEDS
SALT and PEPPER to taste
2-3 Tbsp OLIVE OIL
1-2 Tbsp BALSAMIC VINEGAR

green beans
Choose green beans that are firm and crisp!

Check current prices for a Non-Stick Skillet on amazon.

Green Bean Recipe Directions:
When buying, choose green beans that are firm and crisp, meaning that when you snap off the ends, they’ll make an actual “snap”. Which is the first thing you’ll do–snap off the ends and discard them. Wash your beans–and then blanch them.
To blanch, place beans into a pot of salted, boiling water and let them cook for 3-4 minutes, then remove beans from the hot water and transfer to an ice bath. Blanching prepares the beans so that they will cook easier and more quickly in the skillet.
Drain the beans and set aside
In a skillet, heat olive oil on medium heat. Add cumin and fennel seeds and allow to cook for just a few moments (10-20 seconds). Seeds add great flavor and texture–do yourself a favor and stock your kitchen with seeds! Add garlic (lots of garlic!) and continue cooking. Add a little fresh, diced hot pepper if you like–jalapenos or chili peppers are nice–or if you like, just add some chili paste, or hot sauce later.
Cook garlic and peppers for about 1 minute and then add in the chopped tomatoes and ginger, and let cook another 2-3 minutes.
Stir green beans into the skillet.
Add salt and pepper to taste.
Cook 3-5 minutes until the green beans are cooked to your taste, and that’s it.
Add a splash of balsamic vinegar if you like–I do–the tang is quite nice with this dish.

Give these green beans a try and let me know what you think, and bon appétit!

And for a green beans with an Asian flair, try this Asian-style Green Bean Recipe.

Green Bean Recipe
Green Bean Recipe

Thanks for Watching our Bean Recipe Video!

Click a button below and share the dishes with your friends. You can also follow Chef Buck on Youtube. We appreciate all the kind comments and support, and we’ll see you next time in the kitchen!

If you like what CG and I do, support us on Patreon, or throw us a tip in our Paypal Tip Jar. We’ll happily enjoy a coffee on the road – Thanks! We appreciate all the support, and we’ll see you next time in the kitchen!

We include affiliate links for products on our website. Making a purchase after clicking on our links and we may earn a commission which helps us produce more videos and drink more coffee :^) We participate in the Amazon Services LLC Associates Program, which is an affiliate advertising program. It provides a means for us to earn fees by linking to Amazon.com and affiliated sites, so we can make more videos.

Share and Enjoy !

Watermelon Salad Recipe –or how to save a sad melon

watermelon salad

Watermelon Salad is simple to throw together and a tasty way to save a crappy melon. CG loves watermelon, but once in a while she brings home a dud that just doesn’t make the cut; so what does one do with an unsweet, flavorless melon? Turn it into a savory salad dish!

Watermelon Salad Recipe Ingredients:
6 cups crappy, unsweet, seedless WATERMELON
1-2 Tbsp fresh MINT (chopped)
¼ cup RED ONION (chopped)
¼ cup FETA CHEESE crumbles
½ cup toasted ALMOND SLIVERS

dressing:
¼ cup BALSAMIC VINEGAR
2 Tbsp OLIVE OIL
1 Tbsp DIJON MUSTARD
1 Tbsp MAPLE SYRUP (or substitute honey)
1 clove GARLIC (minced)
SALT and PEPPER to taste

watermelon salad
Turn crappy watermelon into happy watermelon! (sorry)

Watermelon Salad Directions:
This salad works best with a seedless melon–’cause it’s a salad–and no one wants to dig seeds out of a salad.
Wash your melon and cut away the rind. Slice the red flesh into hearty, but mouth-sized pieces. If it’s sweet–then you’re set! Chow down, because that’s what a melon is for! –but if it’s not sweet, if it’s a flavorless lump that sits in your mouth like play-doh, then don’t despair…it’s salad time.
First thing, make the dressing.
In a small bowl, combine the balsamic vinegar, olive oil, dijon mustard, maple syrup (or substitue honey), garlic, salt, and pepper. Mix together and set aside.
In a larger bowl combine cut watermelon pieces, mint, red onion, feta cheese, and almond slivers. I’ve suggested some ingredient measurements–but that’s just a loose guildeline, man. It’s a salad…follow your heart (and taste buds).
Add salad dressing to taste and toss.
Boom.
That’s it, dude.
Your crappy melon has been transformed into a delicious salad.

Give this Watermelon Salad recipe a try and let me know what you think, and bon appétit!

And for another tasty salad recipe, try this Black-eyed Pea Salad Recipe.

black eyed pea salad

Share and Enjoy !


Bok Choy Recipe for Healthy Bok Choy Soup

bok choy recipe

This bok choy recipe is one of my favorites. Bok choy is a type of cabbage, and quite versatile. It’s easily found in markets and is sold in several shapes and sizes under the name bok choy ranging from dinky baby bok choy to the larger size cabbages that I like to use for soups.

Bok Choy Recipe Ingredients

1 large BOK CHOY (rough chopped)
2 medium SWEET POTATOES (cubed)
1 medium ONION (chopped)
CHILI PEPPERS (to taste)
2 Tbsp GINGER (sliced, minced)
5-7 cloves GARLIC (chopped)
1 Tbsp CORIANDER POWDER
1 tsp MANGO POWDER
1 tsp LEMONGRASS POWDER (or fresh lemongrass)
1 can COCONUT MILK
½ cup fresh BASIL (chopped)
SALT and PEPPER to taste
WATER enough to cover ingredients

bok choy recipe
bok choy cabbage

How to make Bok Choy Soup

If you need a nice soup pot for your kitchen, you can check here for current pricing for a soup pot on Amazon.

In a soup pot, heat oil on medium high heat and add the ginger, garlic, chili peppers (or jalepenos, or whatever your favorite heat is–or no heat if you wanna skip the bite), and onion.
Saute for a minute or two and then add in the coriander, mango powder, and lemongrass powder (if using fresh lemongrass, add in with onions). Mix well and saute for another minute.

Add in sweet potatoes, skinned and cubed into ½ inch peices.
Add one 13.5 oz can of coconut milk and 1 can of water.
Bring pot to a boil, then reduce to a simmer and let cook for 5-6 minutes.

While pot simmers, separate the bok choy stalks from the leaves and wash well.
When the 5-6 minutes are up, add in the bok choy stalk bottoms and mix well. Add more water if needed. The water should be just enough to cover the soup ingredients, add sparingly.
Bring pot back to a simmer, cover and let cook for another 2 minutes.

Add salt and pepper to taste.
Stir in the bok choy leaves and cook for 1 minute.
Stir in the fresh chopped basil and remove from the heat.
And that’s it.

Soup is a great opportunity to clean out the fridge, so experiment with adding other veggies. I often add carrots and bell pepper. Give this bok choy recipe a try and let me know what you think, and bon appétit!

And for another Asian inspired dish, try this Spicy Chinese Eggplant Recipe.

Chinese Eggplant Recipe with Sweet Sauce

Thanks for checking the recipes out! Subscribe to our mailing list and never miss a new recipe video, we appreciate it.
–Chef Buck

Share and Enjoy !


Fried Quinoa Recipe — Quinoa Fried “Rice”

fried quinoa recipe

This fried quinoa recipe is a quick and tasty take on Chinese fried rice. Quinoa makes a great substitute for rice in many recipes, especially quinoa fried “rice”. Quinoa is a complete protein, which makes this dish a complete meal, even if you leave out the egg–which is an easy way to make this a vegetarian recipe. Of course you can go the other route and throw in a little diced pork chop or ham if you like, but I’m quite happy with just a couple scrambled eggs thrown in.

Fried Quinoa Recipe Ingredients:
1 cup QUINOA (before cooking)
1 cup PEAS
1 CARROT (diced)
4-6 GREEN ONIONS (chopped, tops separate)
3-5 cloves GARLIC (finely chopped)
2 Tbsp GINGER (finely chopped)
HOT PEPPERS (as desired, finely chopped)
2 EGGS (scrambled)
2-3 Tbsp OIL for sautéing
SOY SAUCE as desired
SESAME OIL 1-2 tsp
SALT and PEPPER to taste

fried quinoa recipe
Quinoa Fried “Rice”

Fried Quinoa Recipe Directions:
This is a great dish for leftover quinoa. The next time you’re making a pot of quinoa for another recipe, just make a little extra for this fried rice recipe knockoff! But if you don’t have any leftover
cooked quinoa handy, just prepare this quinoa a little ahead of time to give it time to cool down–this will keep the quinoa from easily overcooking and becoming mushy.

Quinoa is easy to prepare–just like rice, in fact! Rinse the quinoa if needed (many brands come pre-rinsed). In a pot, add 1 cup quinoa to 2 cups water. Bring the pot to a boil, reduce pot to a
simmer, and then cover and let cook 13 minutes (this will result in slightly al-dente quinoa, which is what you want for frying). Remove the quinoa from the heat and let sit for 10 minutes.
Then fluff with a fork and allow to cool completely (salt if desired).

For fried rice, I like to scramble my eggs first and then set aside. I Use two eggs for this recipe, but feel free to use 1, or 3, or none if you want a vegetarian fried quinoa. Whisk the eggs (add a
splash of milk if desired–makes scrambled eggs smoother). Heat oil in a skillet and quickly scramble eggs on med-high heat and then set aside for later.

In a large skillet, heat 2-3 Tbsp oil on medium.

Add raw, diced carrots (should be about pea size). Add chopped hot peppers, too–if desired. I like adding a little fresh red chili peppers for taste, but jalapenos would work just as well, or red
pepper flakes, or even just a little sriracha later, if desired–or no heat at all–it’s up to your tastes; follow your heart, but spicy food is good for you, right?

Sauté the carrot and peppers for a minute and then add the ginger, garlic, and chopped green onion bottoms (reserve the chopped tops for a flavorful garnish).

Continue sautéing another minute and then add in the quinoa. Stir fry until heated through, this won’t take very long.

Add sesame oil and peas. I like to use frozen peas (thawed), because they hold their texture better than canned peas. Stir until mixed. Add soy sauce to taste. Add fish sauce if desired. The
sauces will provide plenty of salt, but if you want a little black pepper, go ahead and throw that in now.

Mix up and then add the scrambled egg. Mix and fry for another minute and then remove from the heat.

That’s it.

This dish is ready pretty quick. Top the fried quinoa with chopped green onion, crushed peanuts, or both. Serve fried quinoa it’s own or with a veggie side (broccoli or bok choy or Thai eggplant
are nice).

Give this Fried Quinoa recipe a try and let me know what you think, and bon appétit!
And for more tasty quinoa dishes, check out my Quinoa Video Playlist.

quinoa salad

Share and Enjoy !


Boiled Peanut Recipe – A Southern Tradition

boiled peanut recipe

This boiled peanut recipe is a southern tradition and a delicious mess. You can readily find boiled peanuts sold along roadsides throughout the Southern USA. Boiled peanuts are a messy treat–and a little bit of work to eat–they’re kinda like eating pistachios in a soggy shell (not taste-wise, just work-wise). I love ’em–I don’t make them, ’cause I’m too lazy–but I’m always happy to eat them when CG boils up a batch, especially if she’s digging them out of the shells for me.

Boiled Peanut Recipe Ingredients

3 lbs RAW “green” PEANUTS
½ cup SALT
optional:
BAY LEAVES
CHILI POWDER
GARLIC fresh or dried
HOT PEPPERS fresh or dried
HOT SAUCE
flavored BOULLION (broth)
…pretty much any seasoning that you like!

southern boiled peanuts
southern style boiled peanuts

How to make a Boiled Peanut Recipe

Ideally you want to use raw “green” peanuts. Green peanuts are not green, that just means they’re minimally processed–pretty much just out of the ground. Use green peanuts quickly, because they will not keep long and are prone to mold. Green peanuts are ideal because they will more quickly and most readily absorb the seasonings during the boil. You can use peanuts that have been dried in the shell, but don’t use roasted peanuts.

Wash and rinse the peanuts thoroughly, and then place them in a large pot and cover with plenty of water.

Place on the stovetop, cover and bring the pot to a boil, then reduce the heat to medium and allow the peanuts to cook for 2 hours. Add more water to the pot as needed. The peanuts should always be covered in plenty of water. At first the peanuts will float, but after time, the peanuts will sink.

After 2 hours, add seasonings (it’s in the latter part of the boil that the peanuts absorb the most flavor). Add salt, which is the primary ingredient–in fact salt is all you need; many folks JUST USE SALT–they’re plenty tasty that way, but we prefer to add other seasonings as well, which is generally called “cajun boiled peanuts”. For this batch we added several cloves of raw garlic, dried chili peppers, and ½ cup chili powder. But you can add whatever seasonings you like.

If you’re just getting into home cooking and don’t have a lot of seasoning choices, you can check out current pricing for a Complete Starter Spice Set on Amazon.

Cover, and allow the peanuts to continue bubbling on medium heat for 30 more minutes.

After thirty minutes, remove the peanuts from the heat and allow to sit in the seasoned water until they reach the desired flavor, anywhere from 2-5 hours. The longer they sit cooling in the pot, the more seasoned they will become. Give them a try every half hour until you’re happy with the flavor.

They are a mess to eat, but delicious and addictive. Once you start eating them, it’s hard to stop–they will go quickly! If you have leftovers, just drain them and store them in the fridge in ziplock bags. You can also freeze them in ziplocks for longer storage.

Give this Boiled Peanut Recipe a try and let me know what you think, and bon appétit!

Thanks for watching! Click a button or two and share the dish if you like it.
And for another tasty southern style treat, try this Country Fried Steak Recipe.

country fried steak
Cube steak is a hammered and tenderized cut of round or top sirloin steak

Share and Enjoy !


Buffalo Chicken Pizza Recipe — Quick and Easy

buffalo chicken pizza

I love buffalo chicken dishes whether they’re wings, casseroles, salads, and especially if it’s a buffalo chicken pizza. The combo of chicken, hot sauce, celery, and blue cheese is absolutely perfect, and a buffalo chicken pizza can be prepared super quick, especially if you’re lazy like me and skip the making a pizza crust part. I prefer flat bread for a pizza crust. If you’ve got leftover chicken and you’re the kinda person who likes hot wings with blue cheese, then you’ll probably enjoy this buffalo chicken pizza recipe.

Buffalo Chicken Pizza Recipe Ingredients

I won’t suggest specific amounts…it’ll all depend on the size of your pizza!
FLAT BREAD (pita bread, etc.)
leftover CHICKEN (cooked, chopped)
HOT SAUCE (whatever)
BLUE CHEESE DRESSING (good kind…don’t be cheap)
BLUE CHEESE CRUMBLES (crumbled)
CELERY (chopped)
MOZZARELLA CHEESE (shredded)

Spicy Buffalo Chicken Pizza
Buffalo Chicken Pizza …quick and easy!

Buffalo Chicken Pizza Recipe Directions

As far as the amounts of ingredients goes…just follow your heart. I suggest going heavy on the toppings. A lot of celery doesn’t sound fun, but the overall contrast of tastes and textures is what makes this pizza delicious, so use lots of everything–including hot sauce–the hotter the better! The dairy in the blue cheese chunks and dressing will balance the heat.

Chop up some cooked chicken–use leftovers or just cook up a breast or two for topping. I like nice chicken chunks, about ½” square–but shred it if you like–it’s your pizza, man.

Drench the chopped chicken in hot sauce and set aside.

Chop up celery into ¼” thick pieces.

In a bowl combine a nice blue cheese dressing with blue cheese crumbles, about a 50/50 mixture. The result should be the consistency of a cottage cheese.

If you wanna make a pizza dough from scratch, God bless you. CG does, and it’s nice. I’m too lazy, and I actually prefer flat bread. I like pita bread–or any kind of flat bread. I’ve never tried naan, but it sounds good to me.

Spread the blue cheese dressing/crumbles over the flat bread. Spread it thick and even, almost to the edge–leave about a ¼” for a crust.

Generously top pizza with the hot sauce chicken chunks and celery, and cover with shredded mozzarella cheese.

Place on an ungreased baking sheet and cook in a pre-heated oven at 400 degrees Fahrenheit for 10-12 minutes, or until the edges of the flat bread are crisped to your liking. You can check here for current prices for baking sheets on Amazon. And that’s it! Hope you like the pizza!

For another party foods recipe idea, try these Crispy Baked Chicken Wings.

wings recipe
Oven baked wings are healthier than deep fried, and less messy to make!

Thanks for Watching our Buffalo Chicken Pizza Recipe Video!

Click a button below and share the dishes with your friends. You can also follow Chef Buck on Youtube. We appreciate all the kind comments and support, and we’ll see you next time in the kitchen!

If you like what CG and I do, support us on Patreon, or throw us a tip in our Paypal Tip Jar. We’ll happily enjoy a coffee on the road – Thanks! We appreciate all the support, and we’ll see you next time in the kitchen!

We include affiliate links for products on our website. Making a purchase after clicking on our links and we may earn a commission which helps us produce more videos and drink more coffee :^) We participate in the Amazon Services LLC Associates Program, which is an affiliate advertising program. It provides a means for us to earn fees by linking to Amazon.com and affiliated sites, so we can make more videos.

Share and Enjoy !

Buttermilk Biscuit Recipe with Country Gravy

Easy Homemade Buttermilk Biscuits Recipe

Buttermilk biscuit and gravy are pretty easy to make at home, and biscuits are great for any meal–not just for breakfast. I’m using mushrooms for this gravy recipe, but sausage can easily be substituted if you’re in a meaty mood.

What you need to make Biscuits

4 cups ALL PURPOSE FLOUR
1 Tbsp BAKING POWDER
1 tsp BAKING SODA
1 tsp SALT
1 Tbsp SUGAR
1 cup BUTTER (diced, chilled)
1½ cups BUTTERMILK (chilled)
(plus buttermilk for brushing biscuit tops)

Buttermilk Biscuit Recipe
Easy Buttermilk Biscuit Recipe

How to make a Buttermilk Biscuit

In a bowl, combine flour, baking powder, baking soda, salt, and sugar (optional). Mix ingredients together well.

Add diced butter. For best results use chilled butter –keep the diced butter in the refrigerator until needed. Cut butter into the flour using a pastry cutter or knives. Butter should be cut into pea-sized bits, but there’s no reason to be militant about it…nice chunks of butter are nice.

Once the butter is cut into the flour, add buttermilk. Keep the buttermilk chilled until you are ready to use it–cold butter and buttermilk are best for this recipe.

Pour the buttermilk into the bowl, and use a spatula (or your hand), roll the flour around the edge of the bowl until the buttermilk is absorbed and the dry flour begins sticking together. Roll until there is very little loose flour…add a drop more buttermilk if needed, but do so sparingly–you don’t want the flour to be “wet”.

On a lightly floured surface, empty the bowl and press the flour together, knead once or twice and then spread the dough out into a flat, ½ inch thickness.

Do not knead or “handle” the dough too much!

Flour the edges of a biscuit cutter or drinking glass and cut out biscuits. I like my buttermilk biscuit about 2″-3″ across, but make whatever size you like. Giant biscuits can be fun :^) Cut the biscuits closely and get as many out of the first press as you can.

Once all of the biscuits are cut from the first press, bring the dough together again and cut out remaining biscuits–again trying to handle the dough as little as possible.

Arrange the biscuits touching side by side on a lightly greased pan or on parchment paper. Check Parchment Paper prices on Amazon

Lightly brush the tops of the biscuits with buttermilk or melted butter–this helps them to brown nicely. Place biscuits in the oven and bake at 425 degrees Fahrenheit for approximately 15 minutes, or until biscuits are golden brown to your liking.

Easy Homemade Buttermilk Biscuits Recipe
Homemade Buttermilk Biscuits

Mushroom Gravy Recipe Ingredients

oil/butter for sauteeing onion/mushrooms
½ cup chopped ONION
8 oz sliced MUSHROOMS
½ cup BUTTER
½ cup ALL-PURPOSE FLOUR
2 cups MILK
about 2-3 tsp SALT (or to taste)
1 tsp BLACK PEPPER (or to taste)
½ tsp ground SAGE
2 tsp WORCESTERSHIRE SAUCE
1 tsp HOT SAUCE
1 tsp dried THYME
….experiment with whatever seasonings you like

Mushroom Gravy Recipe Directions

Heat 1-2 Tbsp oil in a skillet on medium high heat. Add onions and saute for 2 minutes. Add mushrooms and continue sauteeing until browned. Stir in a little salt and pepper. Remove onions and mushrooms from skillet and set aside for later.

Return skillet to the heat and add ½ cup butter and melt. Once melted, add in a little of the ½ cup flour. Stir until smooth, and then continue to slowly add and stir the flour into the butter until the entire ½ cup of butter and ½ cup of flour have been incorporated –this is a roux, a traditional thickener for sauces.

Continue stirring the roux and slowly add milk over several minutes until the the gravy is smooth and creamy. I use almond milk in this recipe, but most any kind of milk will work. Return the mushrooms and onion to the mix and continue stirring with the burner still on med to med-high heat.

Biscuits with Gravy
Biscuits with Mushroom Gravy

Add sage, thyme, worcestershire sauce, salt, pepper, and hot sauce –or anything else you’d like to try. Add more milk as needed to achieve the desired consistency. And that’s it.

If the gravy sits around for a bit, just heat and stir in more milk–you can do this the next day, too, if you have gravy leftover.

This gravy is great over a buttermilk biscuit, but it can also be used for many entrees.

This gravy is great on country fried steak or meatloaf. If you’d rather have sausage gravy than mushroom gravy, then make it exactly the same way, but substitute sausage for mushrooms, and be sure to thoroughly drain the grease from the cooked sausage before adding it back into the skillet.

Give this Buttermilk Biscuit and Gravy recipe a try and let me know what you think, and bon appétit!

And for another awesome breakfast dish, try this fancy-pants Omelet Recipe.

omelet recipe
Lamb and Cream Cheese Omelet

Thanks for Watching our Biscuit Recipe Video!

Click a button below and share the dishes with your friends. You can also follow Chef Buck on Youtube. We appreciate all the kind comments and support, and we’ll see you next time in the kitchen!

If you like what CG and I do, support us on Patreon, or throw us a tip in our Paypal Tip Jar. We’ll happily enjoy a coffee on the road – Thanks! We appreciate all the support, and we’ll see you next time in the kitchen!

We include affiliate links for products on our website. Making a purchase after clicking on our links and we may earn a commission which helps us produce more videos and drink more coffee :^) We participate in the Amazon Services LLC Associates Program, which is an affiliate advertising program. It provides a means for us to earn fees by linking to Amazon.com and affiliated sites, so we can make more videos.

Share and Enjoy !

Cashew Coconut Energy Balls — Power Bars in a Ball!

Cashew Coconut energy Balls

Cashew Coconut Lemon Bites! or Balls! A quick energy bar in a ball snack recipe! Very easy to make, and super flavorful.  These power balls are like a mini desert, but full of semi-healthy stuff that will put a little pep in your step.  And you get the extra energy without the drastic sugar crash.

Cashew Coconut Energy Balls Ingredients:

2 cups raw CASHEWS
1 cup pitted DATES
1 Tbsp COCONUT OIL
1 Tbsp MAPLE SYRUP
1 tsp VANILLA EXTRACT
¼ tsp SALT
½ cup SHREDDED COCONUT
juice and zest of 1 small LEMON

energy snack
power snack in a yummy treat!

Cashew Coconut Energy Balls Directions:

You’ll need a food processor for this recipe. In fact, you can do the entire recipe in a food processor.  However, my processor is pretty small, so I just use it for chopping up the cashews and dates.  I do the rest of the mixing in another bowl.

Place the raw cashews in a food processor and chop for a few moments. Your cashews should be chopped fine. Then, add pitted dates and chop to same size.
Add coconut oil, maple syrup, vanilla extract, and salt to the cashew/date mixture.
Zest one small lemon. Now, mince the zest and add it to the mixture.
Slice the lemon and squeeze all of the juice into the mix.
Mix thoroughly.
Shape the mixture into ball shapes. Make whatever size you like for snacking! I think grape size is best.
Next, roll the balls in shredded coconut to coat the outside.
And that’s it! Snack away!
The balls can be stored in the fridge until desired.  In fact, they taste best right out of the fridge!

This super easy recipe makes a tasty treat. And it’s a great alternative to sugary candy bars and ice cream.

Keep Checking Back For New Recipe Ideas:

So, give this Cashew Coconut Energy Balls recipe a try and let me know what you think, and bon appétit!

And for another tasty, sweet treat, try this semi-healthy and awesome BERRY COBBLER RECIPE

blackberry cobbler
blackberry cobbler

Share and Enjoy !

Baby Back Ribs Recipe Slow Cooked in the Oven

Baby back ribs recipe in the oven

This baby back ribs recipe is super easy to prepare at home in the oven. This rib recipe takes a little time, but slow cooking pork ribs is always a tasty idea. The oven does the real work and before you know it, you’ll be up to your elbows in moist, delicious baby back ribs.

What you need to make this Baby Back Ribs Recipe

3 lbs PORK LOIN RIBS
some BBQ SAUCE
rub ingredients:
2 tsp SALT
2 tsp PAPRIKA
2 tsp GARLIC POWDER
2 tsp CHILI POWDER
1 tsp BLACK PEPPER
½ tsp CAYENNE PEPPER

baby back ribs recipe
Baby Back Ribs and rice…mmmm!

How to make this Baby Back Ribs Recipe

Take your ribs out of the fridge and let them sit for about 15 minutes.
Pre-heat oven to 250 degrees Fahrenheit.
While the ribs sit, make your rub.

Baby back ribs benefit from a generous rub. Use the ingredients I have listed above–or make your own with your favorite seasonings. I used to put brown sugar in my rub, but I don’t anymore. I find that the BBQ sauce makes the ribs more than sweet enough for my taste, but use a little brown sugar in your rub if you like.

Before applying the rub, remove the filmy skin from the bone side of the rack. Using a knife, cut the thin membrane away from the bone at the narrow end of the rack. Lift the silvery skin away from the bone and pull it off in a long strip. This step only takes a moment and it will help your ribs to reach their maximum flavor potential!

Now generously apply the rub to the entire surface of the rib rack –top, bottom and sides.

Wrap the ribs tightly in aluminum foil and place bone side up on a baking pan.
Slide the ribs into the oven at 250 degrees and let them cook for 2½ hours.
After 2½ hours, remove the ribs from the oven.

Raise oven temperature to 350 degrees F.

Carefully remove the foil from the ribs and drain the liquid from the pan.
Place the ribs on a baking rack, meat side down.Generously apply BBQ sauce to the bone side and along the edges of the rack.  You can use a spoon, or check current prices for a silicone basting brush on Amazon.

Turn the rack over so that the bone side is down, and generously apply BBQ sauce to the meat side, and edges.

Return the ribs to the oven (now heated to 350 degrees F). Let cook for 15 minutes.

Remove ribs from the oven and apply more BBQ sauce to the meat side and edges (no need to apply more to the bottom bone side). Return to the oven for a final time and allow to cook another 15 minutes.

After 15 minutes, remove from the oven, slice, and serve with your favorite sides –for me that means white rice, white bread, and maybe a salad –plus extra BBQ sauce for the rice!

This recipe is for 3 lbs. of pork loin ribs–adjust the cooking time a little more or less depending on how much ribs you’re cooking.  For 2lbs of ribs, I usually cut the cooking time to 2 hours at 250 degrees F, plus another 30 minutes at 350 degrees as I apply the BBQ sauce.

You’re going to love this ribs recipe, so definitely give it a try!

For another meaty meal, check out this tasty Beef Tenderloin Recipe.

pot roast recipe
try a juicy pork tenderloin for your nexy great family meal.

Thanks for checking out the baby back ribs recipe. Be sure and sign up for our mailing list so you’ll never miss a Chef Buck cooking video, and click a button below and share the dishes with your friends. We appreciate all the kind comments and support, and we’ll see you next time in the kitchen!
–Chef Buck

We appreciate you watching our videos! We include affiliate links for products. If you make a purchase after clicking on our links, we may earn a commission which helps us produce more videos and drink more coffee :^)
We are a participant in the Amazon Services LLC Associates Program, an affiliate advertising program designed to provide a means for us to earn fees by linking to Amazon.com and affiliated sites.

Share and Enjoy !

Homemade Guacamole Classic Recipe

easy guacamole recipe

The guacamole you make at home from fresh ingredients will always be superior to store-bought guacamole–and it’s such a quick and easy dish to prepare!–so why wouldn’t you?

Classic Guacamole Recipe Ingredients

3 AVOCADO (ripe, pitted and skinned and diced)
1-2 Tbsp LIME JUICE (or sub lemon juice)
¼ cup ONION (chopped)
2 ROMA TOMATO (chopped)
1 clove GARLIC (minced)
1-2 Tbsp CILANTRO (chopped)
½ tsp CUMIN (optional)
dash of CAYENNE or HOT SAUCE as desired
½ tsp SALT …adjust to taste

How to make Homemade Guacamole

Choose ripe avocados!–an avocado is ripe if it’s soft (not too soft and not too firm–right in the middle) …a ripe avocado will give slightly when pressed. If it feels hard like a rock, then it’s not ripe…if it feels mushy, then it’s overripe. If the skin feels papery and dry (crackly)–then it’s too old. It’s not rocket science–just go through the avocados at the market and pick whichever one Goldilocks would pick.

Run a knife around the center of the avocado and pull it apart to reveal the pit. Remove the pit, cut the halves into quarters and peel away the skin. Dice the avocado and place in a bowl.
Quickly add the lime or lemon juice and toss well, coating the avocado–this will add a great flavor and more importantly keep the avocado from browning!

Add salt. If desired, add a little cumin, cayenne pepper, hot sauce for bite–but this is optional.

Mix the ingredients well and, with a fork, smash up the avocado–but not too much–the ideal guacamole is lumpy, not smooth.

Add chopped roma tomatoes, onion, cilantro, and garlic. Use fresh ingredients! –the key to a delicious guacamole is fresh ingredients.

Toss everything together and then cover and place the guacamole in the refrigerator until needed.

easy guacamole recipe
guacamole recipe

Give this guacamole recipe a try and let me know what you think, and bon appétit!

Guacamole is the perfect accompaniment for this fantastic Family Style Burrito recipe.

cauliflower pizza crust recipe
click pic for video recipe

If you’re new to home cooking, get a bunch of spices, pots and pans, and begin experimenting with different recipes. Cooking is a healthy hobby and skill that will save you money in the long run. Check out current prices for Complete Kitchenware Sets on Amazon as well as Complete Starter Spice Kits. Or go to a thrift store! I’ve found some of my favorite kitchen gear at second-hand stores.

Thanks for checking out the recipes. Be sure and sign up for our mailing list so you’ll never miss a Chef Buck cooking video, and click a button below and share the dishes with your friends. We appreciate all the kind comments and support, and we’ll see you next time in the kitchen!
–Chef Buck

Share and Enjoy !


How to make a Fancy Herb Omelet

How to make an omelette

This is how to make an omelette recipe the easy way…it’s simple and cheap, and throwing in a few chopped herbs makes it super delicious –a fancy-pants omelette! Do you spell it omelet or omelette ? it’s a perfect egg dish for breakfast, brunch or a lazy man’s dinner. I like to use tarragon, parsley, and chives, but sage and basil are great choices, too.

Omelette Recipe Ingredients:

2 EGGS
1 Tbsp PARSLEY (chopped)
1 tsp CHIVES (chopped)
½ tsp TARRAGON (chopped)
¼ cup HAVARTI CHEESE (shredded)
BUTTER enough to cover the bottom of the pan
SALT and PEPPER to taste
—the cheese and herb measurements are
just suggestions…follow your heart.

Omelette Recipe Directions:

In a skillet, heat butter on medium heat. Check here for current pricing for a non-stick skillet on Amazon. Use enough butter to coat the bottom of the skillet. Medium is a good heat–not too hot, not too cold–enough to allow the eggs to cook and set without overcooking; an omelet should be soft, not crusty and overcooked–avoid too high a heat and browning the eggs!–that’s my preference of course, but give it a try. Don’t rush an omelet!–hell, it doesn’t take long anyway.

In a small bowl, crack two eggs. Add chopped herbs. I like to use tarragon, parsley, and chives, but sage and basil are great choices, too. Mix and match herbs and amounts and find your favorite combo. Adding fresh herbs to an omelet is great way to add flavor without adding complication to the omelet making process, which is especially nice if you’re making multiple omelets for hungry folks looking for breakfast.

How to make an omelette
omelet recipe

Whisk the herbs and eggs together and pour into the skillet. Give the skillet a shake to spread the egg out.
And then leave it alone.
The eggs should cook gently.
Sprinkle salt and pepper to taste.
Let the eggs set and cook around the edges until the eggs move easily in the pan–this will take 1-2 minutes depending on how hot your skillet is.

Once the omelet can be moved easily, flip or turn the eggs over gently with a spatula. Immediately turn off the heat, the pan will be hot enough to finish off the omelet.

Add a little shredded cheese to one side and fold the eggs in half over the cheese, making a half moon. I prefer havarti cheese, but any creamy, easily meltable cheese will be ideal.
And that’s it–a super easy and delicious omelet!

Give this omelette recipe a try and let me know what you think, and bon appétit!

And for another eye-popping breakfast dish, try this Fancy-Pants Baked Eggs Recipe.

baked eggs
Baked eggs are an easy way to impress folks for breakfast.

Thanks for checking out the recipes. Be sure and sign up for our mailing list so you’ll never miss a Chef Buck cooking video, and click a button below and share the dishes with your friends. We
appreciate all the kind comments and support, and we’ll see you next time in the kitchen!
–Chef Buck

Share and Enjoy !


Best Burrito Recipe – Family Style

Cheesy baked burritos

Try this family-style burrito recipe–it’s enough for a family or perfect for anyone who loves leftovers. We like to use roasted peppers in the filling, which is optional, but well worth the effort.

What You Need To Make The Best Burrito Recipe

TORTILLAS (about 7″ diameter)
2 cups SHREDDED CHEESE
¾ lb GROUND BEEF
1 can KIDNEY BEANS (15oz)
1 can REFRIED BEANS (15oz)
3 Lg ROASTED PEPPERS (chopped)
2 cups ONION (chopped)
4-5 cloves GARLIC (finely chopped)
1 Tbsp CHILI POWDER
2 Tbsp CUMIN
SALT and PEPPER (to taste)
OIL (for greasing pans)
1 cup SALSA for topping
and some HOT SAUCE (optional)

Is this the best burrito recipe ever? It sure looks like it!

Baked burrito recipe
Family-Style Baked Burritos

How to Make A Family-Style Burrito Recipe

You don’t HAVE TO roast peppers for this recipe–but it’s tasty if you do.

We like to use 3 large peppers, get whatever kind you like–we usually use two poblano and one green bell pepper for a mix of flavors. Slice the peppers in half lengthwise and remove the ribs and seeds. Place the peppers cut side down on a greased pan and bake uncovered in the oven at 400 degrees F for 30 minutes. As the peppers roast, they will darken and begin to bubble.

After half an hour, remove the peppers from the oven and cover the pan while the peppers are still hot. Let the peppers steam in their own heat for 10-15 minutes–this will loosen the skin and make it easy to peel away. Once the skin is removed you’ll have roasted peppers! They’re a tasty ingredient for many dishes; since we’re using all three peppers for the burrito filling, dice them all and set aside.

Heat a large skillet on medium heat and brown the ground beef. As the beef begins to cook and release it’s fat, add the onion and garlic (if it’s too fatty, drain a little of the grease). Stir until the beef is lightly browned–no need to overcook, ’cause the beef will continue to cook in the oven.

Remove the skillet from the heat and add the kidney beans and re-fried beans. Add ¾ of the diced roasted peppers and reserve ¼ to use later as a topping.

Add the salt, pepper, cumin and chili powder–and if you want some heat, throw in a little hot sauce to taste.

Mix ingredients well, and that’s the burrito filling!

Cheesy baked burritos
Awesome Burrito Recipe

Grease an oven safe baking dish.  If you don’t have a good-sized dish, here are some current prices for Pyrex baking dishes on Amazon.

We use medium size tortillas, about 7″. Put as much filling as you think is appropriate–we like two heaping spoonfuls–top the filling with cheese and roll the burrito up and place in the baking dish; repeat until the baking dish is full.

If you have any filling remaining, spoon it thinly over the top of the burritos. Spoon hearty salsa over the top of the dish–chunky salsa!–not too wet. Sprinkle the top with the remaining roasted peppers and some shredded cheese (a mix of monterey jack and cheddar is best).

Bake uncovered in a 400 degree F oven for 30-40 minutes, or until the edges of the burritos begin to brown.

Turn the oven to broil and finish by toasting the top of dish for 3-5 minutes–be careful not to burn it!–keep an eye on the dish and remove it when it reaches toasty-cheesy perfection.

Spoon burritos onto a plate and serve with sides of sour cream, guacamole, and salsa. It pairs great with rice!

Give this burrito recipe a try and let me know what you think.

If you enjoyed the dish, hit some of the buttons below and share this slice of burrito heaven with friends and family. Thanks for watching, and bon appétit!

And for another tasty Mexican inspired recipe, why not try the best Nachos Grande Recipe in the world.

nachos supreme
World’s Best Nachos Recipe

Thanks for checking out the recipes. Be sure and sign up for our mailing list so you’ll never miss a Chef Buck cooking video, and click a button below and share the dishes with your friends. We
appreciate all the kind comments and support, and we’ll see you next time in the kitchen!
–Chef Buck

Share and Enjoy !


Teriyaki Chicken Recipe Japanese Style!

chicken teriyaki

This Teriyaki Chicken recipe is easy to make, and the teriyaki sauce can be used in many kinds of dishes. This sauce is a semi-traditional Japanese variation using sake and mirin–it’s sweet, but not overly so–for a sweeter sauce, just add a little more brown sugar.

Teriyaki Chicken Ingredients

1½ lb. CHICKEN (cut into pieces)
2 Tbsp OIL (for cooking chicken)
1 tsp HOT PEPPER (optional, finely chopped)
GREEN ONION TOPS (sliced for garnish)
2 Tbsp CORN STARCH
SALT and PEPPER (to taste)

Teriyaki Sauce:
¼ cup MIRIN
¼ cup SAKE
¼ cup SOY SAUCE (light sodium)
1 tsp GINGER (finely chopped)
1-2 Tbsp BROWN SUGAR

How to make Teriyaki Chicken

In a bowl, combine mirin, sake, and soy sauce. Add 1 tsp minced ginger and 1 or 2 Tbsp of Brown sugar, depending on how sweet you like your teriyaki sauce. Mix ingredients well and set aside.

I’m using boneless and skinless chicken thighs, but if you prefer chicken breasts, use those. I like to cut my chicken up before cooking, that way it cooks quicker and gets more of an all around sear. I cut the chicken into about 1″ pieces. In a bowl, lightly season the chicken pieces with salt and pepper. Add the corn starch and mix until the chicken is well coated.

In a skillet, heat oil on medium heat. When the oil is hot, add the chicken. Let the chicken cook about 3 minutes and then turn the pieces and let them cook an additional 3 minutes…adjust this time depending on the size of the chicken; you want the chicken to be almost done, but not quite. If you like your dish to have a bit of spicy heat, add some finely chopped hot pepper to taste.

When the chicken is near completion, drain off any excess oils and chicken fat (there won’t be much if you’re using skinless chicken).

Raise the skillet temperature to high and add the teriyaki sauce.
The sauce will begin to bubble quickly. Allow it to cook on high for a couple of minutes to reduce the mirin and sake. After a couple of minutes, reduce the heat to med/low and continue cooking until the sauce is the consistency you like. You can check prices for pre-made Teriyaki Sauces on Amazon.

If the sauce cooks too long and gets too thick, add a little water to thin it, and for a thicker sauce, mix 1 teaspoon cornstarch with water and add to skillet and stir until thickness desired.

And that’s it– chicken teriyaki! or is it teriyaki chicken? Does it really matter?
Serve the chicken teriyaki over rice and top with chopped green onion. For extra sauce, double the sauce ingredients–extra sauce is great on rice.
Give this Teriyaki Chicken recipe a try and let me know what you think, and bon appétit!

For another Asian inspired recipe, try this fantastic Thai Beef Salad Recipe.

thai beef salad
thai beef salad recipe

Thanks for Watching our Teriyaki Chicken Recipe

Sign up for our mailing list so you’ll never miss a new recipe. Also click a button below and share the dishes with your friends. You can also follow Chef Buck on Youtube. We appreciate all the kind comments and support, and we’ll see you next time in the kitchen!

If you like what CG and I do, support us on Patreon, or throw us a tip in our Paypal Tip Jar. We’ll happily enjoy a coffee on the road – Thanks! We appreciate all the support, and we’ll see you next time in the kitchen!

We include affiliate links for products on our website. Making a purchase after clicking on our links and we may earn a commission which helps us produce more videos and drink more coffee :^) We participate in the Amazon Services LLC Associates Program, which is an affiliate advertising program. It provides a means for us to earn fees by linking to Amazon.com and affiliated sites, so we can make more videos.

Share and Enjoy !

How to Pick a Ripe Pineapple Every time

how to pick a ripe pineapple

Here’s how to pick a ripe pineapple every time! We use a lot of fresh pineapple and buy them often. The first thing I look for is a pineapple with loose leaves at the top.

  • 1) Just grab a top center leaf and pull–if the leaf comes out easily, then it’s looking good. (if you can’t find a pineapple with loose leaves…then pass ’em by and try again another day)
  • 2) If the pineapple has a little bit of give when you push on it, that’s a good sign…not too mushy, but not hard as a brick!
  • 3) if you put it to your nose, and it smells pineapple-y…that’s a good sign.
  • 4) And I like a nice golden color too, especially around the bottom…but that doesn’t guarantee ripeness…so bank on steps 1 through 3 first, but especially step 1 –loose leaves! If the leaves are stuck and the whole pineapple wants to be picked up when you pull on the top sprouts…then it’s not a keeper.

A pineapple will not ripen and mature after it is picked, so buying an unripe pineapple at the store and bringing it home to ripen will not work–choosing the best pineapple when you buy it is key to pineapple success. A pineapple will get softer as it gets old, but old isn’t the same as ripe!

Fresh pineapple is great in fruit salads and as a refreshing snack, it’s super healthy and well worth bringing home every now and then. We still used canned pineapple –especially on pizzas! –but for freshness and flavor, a nice ripe pineapple from the produce section can’t be beat!

Hope those tips help you pick a ripe pineapple, and for some practical pineapple application, here’s a Pineapple Sandwich that is popular in Germany: Toast Hawaii

Fancy Toast Hawaii
Fancy Toast Hawaii made with a bagel and Gruyere cheese

Thanks for Watching our Pineapple Video!

Click a button below and share the dishes with your friends. You can also follow Chef Buck on Youtube. We appreciate all the kind comments and support, and we’ll see you next time in the kitchen!

If you like what CG and I do, support us on Patreon, or throw us a tip in our Paypal Tip Jar. We’ll happily enjoy a coffee on the road – Thanks! We appreciate all the support, and we’ll see you next time in the kitchen!

We include affiliate links for products on our website. Making a purchase after clicking on our links and we may earn a commission which helps us produce more videos and drink more coffee :^) We participate in the Amazon Services LLC Associates Program, which is an affiliate advertising program. It provides a means for us to earn fees by linking to Amazon.com and affiliated sites, so we can make more videos.

Share and Enjoy !

Jalapeno Popper Recipe Cheeseburger Style

jalapeno poppers stuffed with ground beef

Try this twist on a jalapeno popper recipe. CG thinks traditional poppers are too cream cheesy –she prefers these less cream cheesy, more meaty cheeseburger jalapeno poppers. They taste fantastic with blue cheese, but use lean ground beef and whatever cheeses you like.

Ingredients for Cheeseburger Jalapeno Poppers

10 JALAPENO PEPPERS
½ cup ONION (chopped)
8 oz CREAM CHEESE
8 oz GROUND BEEF (lean)
¼ cup CHEDDAR CHEESE (shredded)
¼ cup BLUE CHEESE (crumbled)
1 cup PANKO BREAD CRUMBS
1 Tbsp WORCESTERSHIRE
SALT and PEPPER to taste
and extra CHEDDAR and BLUE CHEESE
for topping

How To Make a Jalapeno Popper

Remove cream cheese from the fridge to soften for half an hour

In a skillet on medium heat, brown 8oz of lean ground beef–the leaner the better–you don’t want your poppers to be overly greasy! As the beef browns add onions, Worcestershire sauce, and salt and pepper to taste. As soon as the beef browns, take the skillet off the heat and allow it to cool, because you don’t want to add hot beef to your cheese mixture…it’ll just be a mess.

While your seasoned beef cools, prepare the poppers. Carefully slice off the very end of the stems, leaving the interior off the jalapeno intact. Slice the pepper legthwise in half. Using a small spoon, scoop out the seeds and ridges, being careful to leave the end of the jalapeno intact–it’ll make a kind of canoe shape.

In a bowl, combine the softened cream cheese, the cooled beef, and ½ cup of your favorite shredded cheeseburger cheeses (we like using blue cheese, cheddar, and monterey jack…although I think blue cheese is best!). Thouroughly mix. It’ll be a semi-unattractive bowl of meat-cheese…but that’s okay, it’ll look better in the pepper.

jalapenos for poppers
sliced jalapenos for poppers

Using a spoon, stuff the jalapeno halves with the cheese and beef mix. Don’t overstuff, just to the top of the pepper.

Spread breadcrumbs on a flat surface, and press the cheesy side of the stuffed pepper into the breadcrumbs to form a coating. Check current prices for PANKO BREADCRUMBS on Amazon.

Arrange poppers on a baking sheet and bake in a 400 degree F oven for about 25 minutes.

After about 25 minutes, after once some of the breadcrumb toppings have begun to brown, remove the poppers from the oven and top with additional cheese. I love using blue cheese for this part! –it is delicious–but feel free to use whatever cheese you love (although blue cheese is seriously the best). Return poppers to the oven for 5-10 minutes or until cheese is melted, and then serve. Hope you like it!

Give this jalapeno popper recipe a try and let me know what you think, and bon appétit!

And for a more traditional jalapeno popper recipe, try this cream cheesy BAKED JALAPENO POPPERS.

jalapeno poppers

Thanks for Watching our Videos!

Thanks for checking out our jalapeno popper recipe. Sign up for our mailing list so you’ll never miss a new recipe. Also click a button below and share the dishes with your friends. You can also follow Chef Buck on Youtube.

We appreciate all the kind comments and support, and we’ll see you next time in the kitchen!If you like what CG and I do, support us on Patreon, or throw us a tip in our Paypal Tip Jar. We’ll happily enjoy a coffee on the road – Thanks! We appreciate all the support, and we’ll see you next time in the kitchen!

We include affiliate links for products on our website. Making a purchase after clicking on our links and we may earn a commission which helps us produce more videos and drink more coffee :^) We participate in the Amazon Services LLC Associates Program, which is an affiliate advertising program. It provides a means for us to earn fees by linking to Amazon.com and affiliated sites, so we can make more videos.

Share and Enjoy !

Toast Hawaii – How to Make this German Favorite

toast hawaii

Toast Hawaii is an open-faced sandwich popular in Germany. It is traditionally comprised of lightly toasted white bread which is then buttered and topped with thinly sliced ham, a pineapple slice, a cheese slice, and a maraschino cherry, so it’s really a deluxe toasted cheese sandwich. Check out the video below to see how me and CG first put together a traditional Toast Hawaii and then we build a fancy-pants version of the German favorite.

Both versions were alright…fancy-pants was definitely my favorite, but overall, pineapple plays too big a role in this sandwich for my tastes; I think pineapple should stay where it belongs –on the bottom of an upside down cake, or on a pizza; of course, there was a time when I didn’t think it belonged on a pizza…and then I ran into the right pineapple pizza. So give a version of Toast Hawaii a try and see what you think.

A traditional Toast Hawaii sandwich
A traditional German Toast Hawaii sandwich

I prefer a sandwich with a top and a bottom, something I can wrap my hands around, especially a pressed sandwich grilled on the top and the bottom, which is why a Cuban sandwich is so good. I often make sandwiches and then toast them in a skillet with a heavy pan on top pressing down, which is a great cheat for a toasted sandwich. A sandwich grill press is also a good option, and I’ve seen these often in thrift stores, or you can check current prices for a sandwich press on amazon.

How to Choose a Ripe Pineapple

  • 1) Just grab a top center leaf and pull–if the leaf comes out easily, then it’s looking good. (if you can’t find a pineapple with loose leaves…then pass ’em by and try again another day)
  • 2) If the pineapple has a little bit of give when you push on it, that’s a good sign…not too mushy, but not hard as a brick!
  • 3) if you put it to your nose, and it smells pineapple-y…that’s a good sign.
  • 4) And I like a nice golden color too, especially around the bottom…but that doesn’t guarantee ripeness…so bank on steps 1 through 3 first, but especially step 1 –loose leaves! If the leaves are stuck and the whole pineapple wants to be picked up when you pull on the top sprouts…then it’s not a keeper.

For a sandwich twist that I can get behind, try a banh mi style hamburger recipe. It’s a burger with a Vietnamese twist, but if want a sandwich with plenty of pizzazz and no pineapple, it fits the bill.

burger banh mi

Thanks for Watching our Pineapple Video!

Click a button below and share the dishes with your friends. You can also follow Chef Buck on Youtube. We appreciate all the kind comments and support, and we’ll see you next time in the kitchen!

If you like what CG and I do, support us on Patreon, or throw us a tip in our Paypal Tip Jar. We’ll happily enjoy a coffee on the road – Thanks! We appreciate all the support, and we’ll see you next time in the kitchen!

We include affiliate links for products on our website. Making a purchase after clicking on our links and we may earn a commission which helps us produce more videos and drink more coffee :^) We participate in the Amazon Services LLC Associates Program, which is an affiliate advertising program. It provides a means for us to earn fees by linking to Amazon.com and affiliated sites, so we can make more videos.

Share and Enjoy !

Okra Curry Recipe – Spicy Indian Bhindi

okra curry

This okra curry makes a great side dish or awesome entree when served over rice. Okra is a hearty, tasty, versatile vegetable which is relatively cheap and usually found in markets year-round. I like to cook okra whole in the pod, but for spicier dishes, I like to cut up okra and saute it with tomato and onion. This Indian bhindi recipe is easy and delicious, so give it a try.

Okra Curry Ingredients:

1 lb. OKRA (cut)
4-5 ROMA TOMATOES (chopped)
½ ONION (sliced)
3 Tbsp OLIVE OIL
1 tsp FENNEL SEEDS
1 tsp CUMIN SEEDS
1 tsp HOT PEPPER (finely chopped)
5-7 cloves GARLIC (finely chopped)
2 Tbsp GINGER (finely chopped)
2 tsp CORIANDER
1 tsp TURMERIC
¼ CHILI PEPPER (or to taste)
SALT and PEPPER (to taste)

okra pods
Okra is a versatile vegetable and tasty whole or cut.

How to make Okra Curry

Select okra pods 1″ to 2″ in length. Okra gets huge if left overlong on the plant, but big okra can be woody and tough, so bigger isn’t always better. Choose firm, green pods–okra will blacken around the edges as it gets older, so use within a few days.

Wash and dry okra thoroughly. Slice off the ends and cut into uniform sizes for even cooking.
Heat oil in a skillet on medium high.

Once oil is hot, add cumin and fennel seeds. The seeds will begin to crack after about 30 seconds. Add garlic and ginger and saute another 1-2 minutes. Add onion slices and continue cooking another 2-3 minutes. If you want a little more spice, also add some fresh chopped chili peppers.

Add in coriander, turmeric, and chili powder. Stir well for 1 minute and add tomato. I use 4 cut roma tomatoes, but use 1 can diced tomatoes if preferred. Add salt to taste.
Reduce heat to medium. You can check prices for Indian Spices on amazon.

Let tomatoes cook about 5 minutes.
Add okra.
The acid in the tomato helps to cut down on the natural “gooeyness” of okra. Some folks call it slime, but it’s just the juices in the okra. The gooeyness will reduce the longer the okra is cooked, so cook uncovered another 5-10 minutes depending on how well you like your okra done.

I cook mine about 8 minutes.
Sometimes I finish off the dish with a little garam masala for a more “Indiany” flavor, but this time I didn’t. Garam masala adds a little sweetness.
Serve this okra curry on its own as a side dish or serve over rice as an entree. It makes a nice vegetarian meal with a salad.

Give this okra curry recipe a try and let me know what you think, and bon appétit!

And for another great Indian-style vegetarian dish, check out this meatless version of a “Chicken” Tikka Masala Recipe.

jackfruit recipe
Seasoned and baked Jackfruit makes a convincing faux chicken when added to this rich Indian inspired tikka masala.

If you crave okra info, here’s more in depth nutritional info than you’ll ever want about okra.

Thanks for checking out our okra recipes, and all of our cooking videos. Sign up for our mailing list and never miss a new Chef Buck cooking video, and click a button below and share the dishes with your friends. We appreciate all the kind comments and support, and we’ll see you next time in the kitchen!

Thanks for Watching our Okra Recipe

Sign up for our mailing list so you’ll never miss a new recipe. Also click a button below and share the dishes with your friends. You can also follow Chef Buck on Youtube. We appreciate all the kind comments and support, and we’ll see you next time in the kitchen!

If you like what CG and I do, support us on Patreon, or throw us a tip in our Paypal Tip Jar. We’ll happily enjoy a coffee on the road – Thanks! We appreciate all the support, and we’ll see you next time in the kitchen!

We include affiliate links for products on our website. Making a purchase after clicking on our links and we may earn a commission which helps us produce more videos and drink more coffee :^) We participate in the Amazon Services LLC Associates Program, which is an affiliate advertising program. It provides a means for us to earn fees by linking to Amazon.com and affiliated sites, so we can make more videos.

Share and Enjoy !

Pancake Recipe for Fancy-Pants Pancakes

pancakes!

Pancakes are easily made from scratch and can be transformed into a fancy pancake recipe by adding a few favorite fillings. Some of my favorite combos are cranberry / walnut, chocolate chip / pecan, and banana / walnut. Nuts are always a great addition – they make a great bite!

Pancake Recipe Ingredients

(makes 5 good-size cakes or 8-10 sissy cakes):
1 EGG
3 Tbsp BUTTER
1¼ cup MILK
1½ cups ALL PURPOSE FLOUR
3½ tsp BAKING POWDER
1 Tbsp SUGAR
1 tsp SALT
CRANBERRIES
CHOCOLATE CHIPS
WALNUTS
PECANS

pancake recipe
Fancy Pancakes are yummier than regular pancakes, and better looking, too.

How to Make Pancakes

In a bowl, combine melted butter, milk, and egg. Stir until well blended. In another bowl, combine and mix flour, baking powder, sugar, and salt. Add the dry ingredients to the wet, or the wet ingredients to the dry (who cares? it’s no big deal either way), and stir until smoothish…if there are a few lumps, it doesn’t matter.

Heat a lightly oiled skillet or griddle on medium to medium high heat. Pour or ladle batter onto the skillet. Try not to make the first pancake too big, since often the first cake is the least pretty–although it wil still taste pretty good. Add pancake toppings into the batter–as much or as little as you like–a lot of folks use blueberries, but I prefer cranberries, chocolate chips, or bananas with nuts. Nuts are a great addition to a pancake–makes for a much better bite.

It will only take a minute or two for the pancake to be ready to flip. Once air begins bubbling and opening tiny holes into the top of your cake, flip. It will only take half as much time for the other side to cook. Just peek under the cake and remove it when you’re happy. Serve with syrup and butter…and bacon is always a good idea, too.

Give this fancy-pants pancake recipe a try and let me know what you think, and bon appétit!

And if you enjoy this fancy pancake recipe, then try this fancy-pants Salmon and Poached Eggs Recipe.
poached egg salmon spinach
Thanks for checking out the video and recipe. If you liked it, why not share it? All the cool kids are!
Thanks.
–Chef Buck

Share and Enjoy !


Edamame Brown Rice Recipe –A Great Vegetarian Dish

edamame

This edamame brown rice recipe is super flavorful, filling, a great side dish, and delicious hot or cold. If you buy frozen soy beans for this dish, make sure they are thawed before using –and shelled!– shelled edamame is called mukimame.

Edamame Brown Rice Recipe

2 inch GINGER, finely chopped
4-5 cloves GARLIC, finely chopped
16 oz bag MUKIMAME (shelled edamame)
¾ cup LONG-GRAIN BROWN RICE
2Tbsp fresh LIME JUICE
2 Tbsp RICE VINEGAR
2 tsp SOY SAUCE
2 tsp SESAME OIL
½-1 tsp SUGAR
3-4 GREEN ONIONS
5 Tbsp CILANTRO, chopped
2 Tbsp SESAME SEEDS, toasted
SALT and PEPPER to taste

edamame
Mukimame with Brown Rice Recipe

How to make Make Edamame with Brown Rice

  • In a saucepan, heat olive oil over medium-high heat. Check current prices for a sauce pan on amazon.
  • Sauté ginger and garlic for 1-2 minutes until fragrant.
  • Remove garlic and ginger from pan and set aside (I’ve tried skipping this step, and just continued cooking the garlic and ginger along with the rice, but it’s not as flavorful, so it’s definitely worth setting the garlic and ginger aside to add to the dish later).
  • In same pan (without rinsing), bring 1½ cups lightly salted water to a boil. Add rice, reduce to a low simmer; cover and cook, 30 minutes.
  • After 30 minutes, stir in thawed, shelled edamame (mukimame!); cover and cook until rice is tender and mukimame is heated through, about 15 to 20 minutes.
  • In a small bowl, combine lime juice, vinegar, soy sauce, sesame oil, and sugar and stir until sugar is dissolved.
  • Remove rice and beans from the stove and add ginger, garlic, lime juice mixture, scallions, cilantro and sesame seeds.
  • Mix well and add additional salt and pepper as desired.


Give this edamame brown rice recipe a try and let me know what you think, and bon appétit!

edamame
Frozen Mukimame (shelled edamame)

And for another great vegetarian dish, try this easy, awesome Quinoa Salad Recipe.

southwestern quinoa salad
a southwestern quinoa salad makes a tasty and healthy dinner choice.

Thanks For Watching Our Recipe Videos!

Thanks for checking out this edamame recipe, and all of our recipes. Be sure and sign up for our mailing list so you’ll never miss a new recipe. Also click a button below and share the dishes with your friends. You can also follow Chef Buck on Youtube. We appreciate all the kind comments and support, and we’ll see you next time in the kitchen!

If you like what CG and I do, you can also support us on Patreon, or throw us a tip in our Paypal Tip Jar. We’ll happily enjoy a coffee on the road – Thanks! We appreciate all the support, and we’ll see you next time in the kitchen!

We include affiliate links for products on our website. So, if you make a purchase after clicking on our links, we may earn a commission which helps us produce more videos and drink more coffee :^) We participate in the Amazon Services LLC Associates Program, which is an affiliate advertising program. It provides a means for us to earn fees by linking to Amazon.com and affiliated sites, so we can make more videos.

Share and Enjoy !

Baked Quinoa with Celery Root

Quinoa Vegetable Gratin

This baked quinoa recipe is tasty and versatile, and an terrific way to use celery root. I use zucchini and carrots in this video, but I’ve made the same dish using broccoli as the main veggie, so experiment with whatever you have on hand, just make sure to cut the veggies into smaller pieces to spread evenly.

Baked Quinoa Recipe Ingredients

1 cup QUINOA
1 CELERY ROOT (thinly sliced)
1 cup CARROT (shredded)
1 cup ZUCHINNI (diced well)
1-2 tsp HOT PEPPER (finely chopped)
½ ONION (chopped)
3-4 cloves GARLIC (finely chopped)
1 cup BLUE CHEESE
2 Tbsp BUTTER
½ cup ALMOND MILK (or Half N Half)
2 Tbsp ITALIAN SEASONING
1 tsp MUSTARD SEEDS
½ cup BREAD CRUMBS
1-2 Tbsp OLIVE OIL
SALT and PEPPER (to taste)

Quinoa Vegetable Gratin

How to make a Quinoa Bake

In a pot, heat olive oil on med. high heat. Add mustard seeds, garlic, and a little hot pepper, if desired. Give these ingredients about a 30 second head start, and then add the onion. Stir and let cook for 2-3 minutes until onions begin to soften. Stir in salt.

Add quinoa and water and stir. Cover pot and allow the ingredients to come to a boil. Reduce the heat to a simmer, and allow the pot to cook for about 10 minutes.

Remove pot from the heat, if there is a little water left, that’s okay. Add Italian seasonings (or experiment with different seasonings!). Add in the zucchini and carrot (or experiment with different veggies!). Stir in the milk and mix all ingredients together well.

Butter a deep 1.5 quart baking dish. Check here to see current prices for a casserole baking dish on Amazon.

Spoon in and spread a layer of the quinoa/veggie mix along the bottom of the dish, about a ½” to 1″ thick. Top this layer with a single layer of thinly sliced celery root (celeriac). Add a sprinkling of cheese–as cheesey as you like it. I use blue cheese in the video, but try feta cheese and ricotta cheese, too (I’ve used all and any crumbly/melty white cheese is gonna work well with this dish).

Add and spread another layer of the quinoa mixture, and continue building the quinoa, celery root, cheese layers until the dish is almost full. Make the top layer quinoa/veggie.

In a small bowl, combine bread crumbs w/ olive oil, Italian seasoning, salt, and pepper. Mix, and spread over the top of the quinoa dish.
Cover with aluminium foil and bake for about 55 minutes in an oven pre-heated to 375 degrees F.

After 55 minutes, remove the foil and continue to cook another 5 minutes or until the bread crumb topping is golden brown.

The dish is finished when a knife can pass easily through the sliced celerey root layers.
Let rest for 5-10 minutes, and then serve.
Give this baked quinoa vegetable recipe a try and let me know what you think, and bon appétit!

And for another casserole-style recipe idea, try this Broccoli Cheese and Cauliflower Gratin Recipe.

broccoli cheese
An easy, semi-healthy broccoli and cauliflower gratin recipe.

Thanks for Watching our Baked Quinoa Recipe Video

Sign up for our mailing list so you’ll never miss a new recipe. Also click a button below and share the dishes with your friends. You can also follow Chef Buck on Youtube. We appreciate all the kind comments and support, and we’ll see you next time in the kitchen!

If you like what CG and I do, support us on Patreon, or throw us a tip in our Paypal Tip Jar. We’ll happily enjoy a coffee on the road – Thanks! We appreciate all the support, and we’ll see you next time in the kitchen!

We include affiliate links for products on our website. Making a purchase after clicking on our links and we may earn a commission which helps us produce more videos and drink more coffee :^) We participate in the Amazon Services LLC Associates Program, which is an affiliate advertising program. It provides a means for us to earn fees by linking to Amazon.com and affiliated sites, so we can make more videos.

Share and Enjoy !

Home Fried Potatoes Crispy Breakfast Recipe

home fried potatoes recipe

This crispy home fried potatoes recipe makes a tasty breakfast side. I use onion and hot pepper in this video/recipe, but a little added green bell pepper is nice, too.

Home Fried Potatoes Recipe Ingredients

1 large POTATO
2-3 Tbsp BACON FAT
1/3 cup ONION (finely chopped)
¼ cup GREEN BELL PEPPER (finely chopped, optional)
HOT PEPPER (to taste, finely chopped)
1 tsp SMOKED PAPRIKA
SALT and PEPPER to taste

How to Make Home Fried Potatoes

  • In a skillet, fry up 4-5 pieces of fatty bacon, this will give you enough grease to cook up your potatoes.
  • Peel your potato, which is something I hate to say, ’cause potato skin is so delicious, but the breakfast home fries I grew up with were peeled, so that’s how I gotta roll.
  • Dice your potato into dinky cubes; they don’t have to be exactly the same same, but mostly they do, so cut them as uniformly as possible.
  • Add your diced potato to the skillet of hot grease–and by hot, I mean that your potatoes start to sizzle and cook when they hit the pan–but not overly hot, ’cause it will take 20-25 minutes to cook these potatoes up just right. Medium-low heat is a good temp, keep the potatoes sizzling, they need to crisp on the outside, but they also need to cook through on the inside, otherwise you’ll end up with a bunch of crispy, raw potato; so go slow, amigo.
  • Mix your potatoes with the grease and spread them out in the skillet and let them brown for about 5 minutes.
  • Add finely chopped onion and hot peppers; if desired, also add a little finely chopped green bell pepper for taste and color…I usually do, but if I don’t have it on hand, it’s not the end of the world–it’s just breakfast, man.
  • Mix the ingredients well and spread out in the skillet and let cook another 5 minutes.  If you don’t have a good pan, here are some current prices for cast iron skillets on Amazon.
  • Add paprika, stir and continue to cook for another 10 minutes, stirring occasionally, until the potatoes are cooked through and done to the desired crispness.
    The key is to not cook the potatoes too fast.

Give this home fried potatoes recipe a try and let me know what you think, and bon appétit!

And for a fancy pants breakfast dish, try this Baked Eggs Recipe.

baked eggs
Baked eggs are an easy way to impress folks for breakfast.

Thanks for checking out the home fried potatoes recipe, and all of our recipes. Be sure and sign up for our mailing list to never miss a new cooking video, and also click a button below and share the dishes with your friends, and follow Chef Buck on Youtube. We appreciate all the kind comments and support, and we’ll see you next time in the kitchen!

If you like what CG and I do, support us on Patreon, or throw a tip in our Paypal Tip Jar We’ll happily enjoy a coffee on the road, or maybe even pay a bill or two!–Thanks! We appreciate all the support, and we’ll see you next time in the kitchen!

Thanks for watching our recipe videos!

We include affiliate links for products on our website, so if you make a purchase after clicking on our links, we may earn a commission which helps us produce more videos and drink more coffee :^) We participate in the Amazon Services LLC Associates Program, which is an affiliate advertising program providing a means for us to earn fees by linking to Amazon.com and affiliated sites, so we can make more videos.

Share and Enjoy !

Spinach Salad Recipe with Pear and Cheese

Best Spinach Salad

This is the easiest, best spinach salad recipe in the world. We first had one of these spinach, pear, blue cheese, walnut, raspberry dressing salads years ago at a little tapas place in Key West, and we’ve been making them ever since–especially if we have a pear on the edge–the riper, softer, and juicier the pear, the better the salad is gonna taste.

What You need for the Best Spinach Salad

SPINACH
1 PEAR (ripe, diced)
WALNUTS (toasted) current WALNUT prices on Amazon
BLUE CHEESE (crumbled)
dressing:
2 Tbsp OLIVE OIL
1 Tbsp RASBERRY JAM
1 Tbsp VINEGAR
½ tsp ITALIAN SEASONING
SALT and PEPPER to taste

Best Spinach Salad
Best Spinach Salad

How to Make a Pear Spinach Salad

Crumble and spread your walnut pieces on a baking sheet and toast at 300 degrees F for 5-10 minutes until the nuts are toasted to your liking. Keep an eye on them–nuts are easy to over-toast and it’s usually worth setting a timer so they’re not forgotten.
While your nuts toast, throw together your salad dressing–basically and oil and vinegar dressing with a little jam added for flavor.

I make this dressing with all kinds of jams, but raspberry and strawberry are my favorites–although definitely give raspberry a try with this recipe. Combine your oil, vinegar, jam, salt, and Italian seasonings. Mix well. Taste and adjust as needed to your liking. A little sugar can be added if desired, but I usually find that the jam adds plenty of sweetness, plus the pear will add sweetness to the salad as well.

Toss the dressing with your spinach leaves until all are well-coated. Divide spinach into serving bowls. Chop pear into nice chunks and add to salad. An overly-ripe pear works best. Sprinkle the toasted walnuts over the salad, then sprinkle with blue cheese crumbles. Lots of blue cheese. Or less. I like blue cheese. There are no ratios with this salad. Check prices for WALNUTS on amazon

And that’s it. This is the best spinach salad in the world. So it is written, so it shall be done.
Give this Spinach Salad recipe a try and let me know what you think, and bon appétit!

For another tasty salad idea, try this Kale and Beet Dish!

kale beet salad

Thanks for Checking Out Our Spinach Salad

Click a button below and share the dishes with your friends. You can also follow Chef Buck on Youtube. We appreciate all the kind comments and support, and we’ll see you next time in the kitchen!

If you like what CG and I do, support us on Patreon, or throw us a tip in our Paypal Tip Jar. We’ll happily enjoy a coffee on the road – Thanks! We appreciate all the support, and we’ll see you next time in the kitchen!

We include affiliate links for products on our website. Making a purchase after clicking on our links and we may earn a commission which helps us produce more videos and drink more coffee :^) We participate in the Amazon Services LLC Associates Program, which is an affiliate advertising program. It provides a means for us to earn fees by linking to Amazon.com and affiliated sites, so we can make more videos.

Share and Enjoy !

Baked Eggs Recipe with Spinach and Tomato

baked eggs

This baked eggs recipe is a delicious treat for breakfast or brunch, and it’s easy to prepare even though it looks super fancy. I’m throwing spinach, tomato, and Roman cheese in this baked eggs recipe, but it’s a versatile dish, and anything that’ll work in an omelet will work in this preparation. For a spicier version, add a dash or two of hot sauce as the tomatoes cook.

What you need for a Baked Eggs Recipe

(this recipe serves 2)
4 EGGS
OIL for sauteing
2 cup fresh SPINACH
2-4 GREEN ONIONS (chopped)
2 small ROMA TOMATOES (chopped)
3-4 GARLIC cloves (finely chopped)
1-2 tsp dried ITALIAN SEASONING
chopped JALAPENO (optional)
freshly grated PARMESAN or ROMANO CHEESE
4 Tbsp HALF N HALF
SALT and PEPPER to taste
½ cup chopped PARSLEY (optional)
sprinkle of PAPRIKA and fresh herb for GARNISH (optional)

baked eggs
Baked eggs are an easy way to impress folks for breakfast.

How to Make Oven Baked Eggs

  • Heat oil on medium high heat in a small saute pan.
  • Add garlic and chopped bottoms of the green onion. Saute for 1 minute and then add the tomato.
  • Continue to saute for 2 minutes and then add salt, pepper, and Italian seasoning. Mix and cook for 1 minute.
  • Add green onion tops and spinach, and any fresh herbs you desire.
  • Saute until spinach is wilted.
  • Lightly grease an oven-safe dish. If you like the dishes I used in the video, you can check out current prices for au gratin baking dishes on Amazon.
  • Add a layer of cheese to bottom of the if you like, but this is optional.
  • Spoon and spread the spinach and tomato mixture into the bottom of the dish.
  • Drizzle Half n Half or cream over top and then sprinkle shredded Parmesan or Romano cheese.
  • Carefully crack eggs and top the dish with them.
  • Place in an oven preheated to 375 degrees Fahrenheit. If the baking dish/ramekins are small, place on a baking sheet for easy handling
  • Bake 15-20 minutes, or until the eggs are set and cooked as desired.
  • When eggs are finished baking, top with additional cheese if desired. Sprinkle with paprika or garnish with fresh parsley, or basil, or cilantro, or whatever, but a touch of freshly chopped green will make this dish quite lovely.

Serve right away, because eggs are best hot, dude.
Give this baked eggs recipe a try and let me know what you think, and bon appétit!

For another fancy pants breakfast dish, try this tasty Huevos Rancheros Recipe.

huevos rancheros
Huevos Rancheros is a flavorful, classic mexican dish…delicious!

Thanks for checking out his baked eggs recipe. If you liked it, then click a button or two below and share it with friends and family. I appreciate it!
–Chef Buck

Share and Enjoy !


Broccoli Recipe – Best Blue Cheese Broccoli

Broccoli with Blue Cheese

Try this super-quick and awesome broccoli recipe. If you like blue cheese then you’ll love this dish, in fact, you’ll actually love broccoli if you only just liked it before …I know, kinda confusing, but trust me, this is a pretty damn tasty broccoli dish–and healthy, too. So make it.

Bad-ass Blue Cheese Broccoli Recipe Ingredients:
5 cups BROCCOLI FLORETS
¼ cup CARROT strings
2-3 oz BLUE CHEESE crumbled
¼ cup SUNFLOWER SEEDS (shelled and toasted)
SALT and PEPPER to taste

Broccoli with Blue Cheese
Broccoli with Blue Cheese Recipe

directions:
Toast the sunflower seeds (already shelled). This can be done quite quickly in a hot pan or skillet. Heat pan or skillet on medium/med-low heat; not too hot or seeds will burn. Add sunflower seeds and spread them into a single layer. Do not use any oil or spray in the pan. Stir the seeds in the skillet for a couple of minutes until they begin to brown, lightly browned is perfect; they’re easy to over-toast, so don’t leave them too long. It will only take 2 minutes on medium heat.
Remove seeds from heat and set aside.

Cover the bottom of a pot with about ¼ inch of water, just enough for steaming the broccoli and carrots. Add The broccoli florets to the pot and top with the carrot strings. Raise the heat, cover the pot, and allow the veggies to steam for approx. 5 minutes; ideally the florets will be cooked through, soft but not soggy!

Turn off the heat and drain any remaining water in the sink. Add salt, pepper, the toasted sunflower seeds, and 2-3 ounces of crumbled blue cheese.
Lightly toss ingredients together and serve while hot.
This dish is super-simple and amazingly delicious –as long as you like blue cheese.
Give this broccoli recipe a try and let me know what you think, and bon appétit!

And for another great veggie dish, try this tasty Beet Greens Recipe.
beet greens saute

Share and Enjoy !


Mini Meatloaf Recipe – Packed with Flavor!

meatloaf recipe

Here’s a meatloaf recipe for folks who like their meatloaf to look like meatballs. These mini meatloaf meatballs are super flavorful and cook up quickly. I like to blend up some of the ingredients for this recipe, so a food processor is helpful for this dish, and you can check current prices for food processors at amazon.

Mini Meatloaf Recipe Ingredients

Meatloaf:

1½ lbs. lean ground BEEF
½ RED BELL PEPPER
1 sm ONION (or ½ lg)
4 cloves GARLIC
1 Tbsp CHILI POWDER
½ cup OATS
1 CARROT
1 EGG
2 tsp ITALIAN SEASONING
SALT and PEPPER to taste
1 Tbsp WOOSTERSHISTERSHIRE SAUCE

Meatloaf Sauce:

1/3 cup KETCHUP
1 Tbsp WOOSTERSHISTERSHIRE SAUCE
2 tsp MUSTARD
1 Tbsp CHILI POWDER
1 tsp CHILI PASTE or hot sauce to taste

meatloaf recipe
Mini meatloaves make moist meatballs…mmmmm

How to make Yummy Mini Meatloaf Balls

  • Blend oats in food processor until finely chopped.
  • In the processor also finely chop the red pepper, onion, carrot, and garlic.
  • In a large bowl, combine processed oats and veggies.
  • Add seasonings, Worcestershire sauce and egg. Mix well.
  • Does it smell awesome? Add additional seasoning, if desired.
  • Add the ground beef and use your hands to combine. Do not overmix the ingredients, over mixing can make the meatloaf dense and heavy.
  • Lightly roll the meat mixture into 12 balls with your hands.  Dividing the mixture into 4 parts makes the distribution a little more even.
  • Place rolled loaves in a lightly greased baking pan. If you need an oven-safe pan, you can check here for current prices for baking sheets on Amazon. 
  • In a small bowl, combine all of the sauce ingredients. I use chili paste to add a little heat, but use hot sauce or whatever you like–or nothing at all if you don’t want the dish too spicy hot. Stir until smooth and spoon over top each dinky meatloaf.
  • Bake, uncovered, at 450 degrees F for 15-18 minutes. If desired, finish under the broiler to get a bit of brown/burnt on top.

And that’s it! Give this meatloaf recipe a go and let me know what you think. Bon appétit!

Of course, the key to many ground beef recipes is the seasoning. For another delicious recipe using ground beef, try The Best Nachos Supreme Recipe ever.

best nachos recipe
This is a fantastic Nachos Supreme dish, and a giant pizza pan makes a great dish for cooking and serving.

Thanks for Watching our Meatloaf Recipe Video!

Click a button below and share the dishes with your friends. You can also follow Chef Buck on Youtube. We appreciate all the kind comments and support, and we’ll see you next time in the kitchen!

If you like what CG and I do, support us on Patreon, or throw us a tip in our Paypal Tip Jar. We’ll happily enjoy a coffee on the road – Thanks! We appreciate all the support, and we’ll see you next time in the kitchen!

We include affiliate links for products on our website. Making a purchase after clicking on our links and we may earn a commission which helps us produce more videos and drink more coffee :^) We participate in the Amazon Services LLC Associates Program, which is an affiliate advertising program. It provides a means for us to earn fees by linking to Amazon.com and affiliated sites, so we can make more videos.

Share and Enjoy !

Pickled Daikon and Carrot Relish –Vietnamese Style

Vietnamese Pickled Daikon and Carrot Relish

Vietnamese-style pickled daikon and carrot make a handy relish than can be used with salads, sandwiches, and all kinds of recipes. It’s a must have for making a banh mi sandiwich and I use it quite often as a salad topper and also dice it up to add to tuna, chicken, and quinoa salads. Keep a jar of pickled daikon and carrot in your fridge and experiment adding it to some of your favorite dishes.

Pickled Daikon and Carrot Ingredients:
2 cups cut DAIKON
2 Cups Cut CARROT
1-2 tsp SALT
¼ SUGAR
½ cup WATER (hot from tap)
½ cup VINEGAR

pickled daikon
Pickled daikon and carrot is a tasty and versatile relish to have in the fridge–awesome on sandwiches and salads.

directions:
Daikon is a BIG radish. When buying, choose one that is firm–if the daikon has green tops attached, choose one without wilted leaves, but often the tops are not attached. The skin is thin and can be peeled off with a simple vegetable peeler. The same is true for carrots, although I generally leave the skin on the carrots, but follow your heart. Slice and cut the daikon and carrot into matchstick sizes and place into a bowl. Add salt to the bowl and mix well with the daikon and carrot so that the veggies are coated. This will draw water out of the vegetables and soften them. Set bowl aside.
In a smaller bowl, prepare the pickling solution. Combine warm tap water and sugar. Stir until dissolved and then add the vinegar. And that’s it!
In the larger bowl, the salt will have started drawing moisture from the daikon and carrot matchsticks. When they have softened enough, cram them into a storage container and add the pickling solution.
This pickled combo will keep in your fridge for 2-3 weeks. It’s a must have topping for Vietnamese banh mi sandwiches and works well in all kinds of sandwiches. Use this relish as a topping for salads or chop it up to incorporate in whatever dish you desire (it’s great in a coleslaw or quinoa salad).
Give this pickled daikon and carrot relish a try and let me know what you think, and bon appetit!

And if you wanna see this relish in action, check out this deconstruction of a Banh Mi Sandwich.
bahn mi

Share and Enjoy !


Country Fried Steak with Rich Gravy

Country Fried Steak is easy to prepare and a terrific way to cook up an inexpensive cut of meat. This country fried steak recipe, also called chicken fried steak, uses cube steak, a cut of meat that has been run through a mechanical tenderizer, generally it’s a round or top sirloin cut of meat.

Country Fried Steak Ingredients

1 lb CUBE STEAK
¾ cup all-purpose FLOUR use enough to coat steaks and extra for making gravy
1 EGG (about one for every two cuts of meat)
COOKING OIL enough to cover the bottom of the skillet, add some butter if desired
1½ cups MILK (add as needed for desired gravy consistency)
SALT and PEPPER to taste

How to Make Country Fried Steak

  • Bread the cube steak. For about 1 lb. of meat, place approx. ¾ cup all-purpose flour in a shallow dish. This is more flour than you’ll need for the breading, but you’ll use whatever is leftover for making the gravy.
  • Season the flour simply with salt and pepper.
  • In another shallow dish, beat 1 egg.
  • Lay each side of the steak in the flour, breading each side, then lay the floured steak in the egg dish on each side to coat the steak in egg, then return the steak to the flour dish and re-coat each side in flour again; once fried, this double flouring will create a thick, decadent breading.
  • Heat oil in a skillet on med-high. Make sure the oil is HOT before adding the steaks!
  • Carefully lay the steaks in the pan. The breaded cuts should begin bubbling and cooking straight away. Because cube steak is pounded and thin, it takes very little time to cook–approx 2-3 minutes each side.
  • Once the breading has fried and turned golden, carefully turn the steaks. Be careful of the hot grease. Once both sides are crisp and golden, remove steak from the oil and place on a paper towel to drain.
  • Pour off excess grease from the pan so that only enough remains to make the gravy–this might be a couple of tablespoons or a ¼ cup, depending on how much gravy you wish to make. If there are bits and pieces left in the skillet from the frying steak, that’s great–it will make the gravy even more delicious.
  • Into the skillet, add about as much flour as there is grease. You can just eyeball it, it isn’t rocket science.
  • Stir the flour and grease together for about a minute. The flour will absorb the grease and thicken.
  • Slowly pour in milk, constantly stirring. Add the milk incrementally. Over the course of a few minutes, the gravy will smooth and thicken. Add milk until the gravy is the consistency you desire. Taste and season with additional salt and pepper if desired.
country fried steak

And that’s it. Pour the gravy over the steaks or serve on the side. And if you don’t want gravy, then skip the whole gravy part of this recipe entirely. Country fried steak, also called chicken fried steak, tastes great with or without gravy. And if you have leftovers, then cube steak is fantastic on a sandwich.

If you need a nice skillet, check current prices for a non-stick skillet on Amazon.

Give this country fried steak recipe a try and let me know what you think, and for another budget friendly southern favorite, try this Fried Chicken Livers Recipe.

fried chicken livers

Thanks for checking out our country fried steak recipe, and all of our recipes. Be sure and sign up for our mailing list and never miss a new Chef Buck cooking video, and also click a button below and share the dishes with your friends. We appreciate all the kind comments and support, and we’ll see you next time in the kitchen!

Thanks for watching our cooking videos!

We include affiliate links for products on our website, so if you make a purchase after clicking on our links, we may earn a commission which helps us produce more videos and drink more coffee :^)                                                                                                We participate in the Amazon Services LLC Associates Program, which is an affiliate advertising program providing a means for us to earn fees by linking to Amazon.com and affiliated sites, so we can make more videos.

Share and Enjoy !

Kung Pao Chicken Recipe Just Like Take-out!

Kung Pao Chicken

Kung Pao Chicken tastes great and cooks up super quick, so next time you feel like ordering Chinese take-out, try cooking this Chinese favorite at home instead.

Kung Pao Chicken Ingredients

1 lbs CHICKEN (boneless/skinless)
1 med-sized ZUCCHINI
1 stalk CELERY
½ RED BELL PEPPER
4-5 GREEN ONIONS
3-4 GARLIC minced
2 tsp GINGER minced
RED PEPPER FLAKES (to taste)
1 Tbsp SESAME OIL
1 Tbsp CORN STARCH
1 Tbsp SOY SAUCE
¾ cup PEANUTS
3 Tbsp OIL for skillet
Salt and Pepper (to taste)
Sauce Ingredients:
3 Tbsp SOY SAUCE
2 Tbsp RICE VINEGAR
2 tsp SESAME OIL
2 TBSP HOISIN SAUCE
(or sub brown sugar)
1 Tbsp CHILI PASTE
1 Tbsp CORN STARCH
½ cup WATER

Kung Pao Chicken
Serve Kung Pao Chicken with rice.

How to make Kung Pao Chicken

Cut 1 lb. of boneless, skinless chicken into ½”-1″ pieces and place in a bowl. Season meat with salt and pepper to taste, then add a splash of sesame oil, 1 Tbsp soy sauce, and 1 Tbsp cornstarch. Toss chicken with ingredients until the chicken pieces are coated, then set aside in the fridge.

In a small bowl, combine all of the ingredients listed above for the sauce. Stir until all ingredients are mixed well, and then set aside.

In a large skillet heat 3 Tbsp of oil on medium heat. You can check here for current pricing for a non-stick skillet on Amazon.

Add the coated chicken. Stir and allow the chicken to cook quickly. Brown all sides and cook until chicken is nearly done.

Add red pepper flakes (or fresh chopped hot peppers), minced garlic, and minced ginger, and stir for a few moments while the garlic colors.

Add chopped bottoms from green onions, diced red pepper (red or orange bell peppers look very nice with this dish), chopped celery, and diced zucchini. Stir with chicken for 2 minutes and then add sauce.

Keeping the skillet on med. high, the sauce will bubble and thicken quickly; stir 1-2 minutes and then add peanuts. Stir 1 more minute, then mix in green onion tops.

Remove from heat and serve over rice.
And that’s it–an Americanized version of a classic Chinese Kung Pao Chicken Recipe. Give this dish a try and let me know what you think…and bon appétit!

For another Chinese take-out style dish, try this General Tso’s Chicken Recipe.

general tso chicken

Thanks for Watching our Videos!

Thanks for checking out our kung pao chicken recipe. Sign up for our mailing list so you’ll never miss a new recipe. Also click a button below and share the dishes with your friends. You can also follow Chef Buck on Youtube. We appreciate all the kind comments and support, and we’ll see you next time in the kitchen!

If you like what CG and I do, support us on Patreon, or throw us a tip in our Paypal Tip Jar. We’ll happily enjoy a coffee on the road – Thanks! We appreciate all the support, and we’ll see you next time in the kitchen!

We include affiliate links for products on our website. Making a purchase after clicking on our links and we may earn a commission which helps us produce more videos and drink more coffee :^) We participate in the Amazon Services LLC Associates Program, which is an affiliate advertising program. It provides a means for us to earn fees by linking to Amazon.com and affiliated sites, so we can make more videos.

Share and Enjoy !

Stewed Prunes with Orange and Ginger

Stewed prunes are a tasty breakfast side or snack, and even a passable dessert. Orange and ginger make this stewed prune recipe naturally sweet and flavorful.

Ingredients for Stewing Prunes

2 cups pitted PRUNES
1 Tbsp ORANGE ZEST (minced)
juice from 1 large ORANGE
1-2 tsp minced fresh GINGER

stewed prunes

How to Make Stewed Prunes

Check current prices for prunes on Amazon.

  • Zest 1 large orange. Use approx. 1 tbsp of minced zest for this recipe.
  • Juice the orange.
  • In a small saucepan on medium heat, add the prunes and orange juice. Add just enough water to cover the tops of the prunes; don’t use too much water.
  • Stir in the orange zest and minced ginger. Some folks like to add a little brown sugar or maple syrup for added sweetness, but I don’t think it’s needed; prunes are sweet enough and the orange juice will add plenty of natural sugar.
  • Cover and allow the saucepan to come to a bubble. Reduce heat to low, and simmer gently for 25-30 minutes. The liquid will cook down and the prunes will plump up.

Eat them plain or serve stewed prunes with yogurt or cereals. They make a great breakfast side. Some people like to treat them like a dessert, even serving them with ice cream.

Stewed prunes make a tasty treat and are a great source of fiber and nutrition.
Prunes can be stewed up with all manner of flavors. Some popular additions to stewed prunes are cinnamon, cardamom, cloves, brown sugar, and maple syrup.
Pitted prunes make a great snack all on their own, and stewing them up makes them a little more versatile. Give this stewed prunes recipe a try and let me know what you think…and bon appétit!

stewed prunes

Prune Fun Facts

  • Prunes are high in fiber and a natural laxative.
  • The word “laxative” is not very appetizing.
  • Ounce for ounce, prunes contain more potassium than bananas.
  • Prunes are fat free.
  • Prunes can reverse bone loss and preserve bone structure, reducing the risk of brittle bone fracture.

Serve stewed prunes as a side for this healthy Tofu Breakfast Scramble.

tofu recipe
Delicious and Nutritious way to start the day

Thanks For Watching Our Recipe Videos!

Thanks for checking out this stewed prunes recipe, and all of our recipes. Sign up for our mailing list so you’ll never miss a new recipe. Also click a button below and share the dishes with your friends. You can also follow Chef Buck on Youtube. We appreciate all the kind comments and support, and we’ll see you next time in the kitchen!

If you like what CG and I do, support us on Patreon, or throw us a tip in our Paypal Tip Jar. We’ll happily enjoy a coffee on the road – Thanks! We appreciate all the support, and we’ll see you next time in the kitchen!

We include affiliate links for products on our website. Making a purchase after clicking on our links and we may earn a commission which helps us produce more videos and drink more coffee :^) We participate in the Amazon Services LLC Associates Program, which is an affiliate advertising program. It provides a means for us to earn fees by linking to Amazon.com and affiliated sites, so we can make more videos.

Share and Enjoy !

Stamppot Boerenkool Dutch Meat and Potatoes

kale and potato hash

This kale hash recipe is a hearty and healthy way to get a tasty kale dish on the table for dinner. It’s based on a Dutch dish called Stamppot Boerenkool.

Kale Hash Ingredients

1½ bunches KALE
3 lbs POTATOES
1 lb SMOKED SAUSAGE (sliced)
1 bunch GREEN ONIONS (chopped)
2-3 cloves GARLIC (finely chopped)
2 Tbsp BUTTER
½ cup MILK
1 tsp CELERY SEEDS
1 BAY LEAF
SALT and PEPPER to taste

How to make Stamppot Boerenkool

Clean your potatoes and get them cooking. I like to use red potatoes since it’s a nice contrast with the kale, and the skin is thin and tasty (but if you’re not a fan of potato skin, you can peel them). In a large pot, cover the potatoes with cool tap water (about an inch over the potatoes).

stamppot boerenkool
Use lots of kale! –And red potatoes work great for this dish.

Add salt and a bay leaf and bring potatoes to a boil until they are cooked through–cooking time will vary depending on the size of the potatoes–the potatoes I used in the video took approx. 25 minutes to cook; potatoes are cooked through once you can pierce them easily with a fork and the
potato slides off. While the potatoes cook, wash and cut the kale. Remove the kale stems and cut or tear the leaves into bite-size pieces. For three pounds of potatoes, use 1 to 2 bunches of kale, the kale will cook down quite a bit, so don’t be shy with it–ideally, you want an even kale/potato ratio.

Heat a large skillet on med. high heat and add the sausage (or for a vegetarian dish–just leave the sausage out…isn’t that genius?) . Saute for a a few minutes until the sausage begins to color. Add finely chopped garlic and chopped green onion bottoms. Mix with sausage and continue cooking 2 minutes. Add kale to the skillet. This will be a lot of kale, so don’t bother mixing the kale in at this point–just add ½ cup water and cover and allow the kale greens to wilt for 2 minutes.

kale and potato hash
Kale Hash Recipe (boerenkool)

Once the kale has began reducing and softening, add salt to taste and then mix with sausage, garlic, and onion. Add a little more water if needed, but be conservative, as the kale will continue to release water of it’s own. Cover and continue steaming 3-5 minutes, or until it is cooked to your taste.

When the potatoes are cooked through, drain off the hot water (reserve a small amount). Remove the bay leaf and mash the potatoes. Add butter, celery seeds, milk (optional–you can use the reserved hot potato water instead, or a mixture of the two), and add salt and black pepper to taste.

Mash the potatoes as smooth or chunky as desired and then add the kale/sausage mix. Add the green onion tops. Combine well…and that’s it, dinner is ready! We serve stamppot boerenkool with a side of mustard and it is fantastico!

Try new dishes! Get a bunch of spices, pots and pans, and begin experimenting with different recipes. Home cooking is a healthy hobby that will save you tons of money in the long run.
Check out current prices for Complete Kitchenware Sets on Amazon as well as Complete Starter Spice Kits. Or go to a thrift store! I’ve found some of my favorite kitchen gear at second-hand stores.

For a classic meat and potato dish, try this Hearty Beef Stew Recipe.

beef stew recipe

Thanks for checking out the recipes and I hope you give this stamppot boerenkool a try. Be sure and sign up for our mailing list so you’ll never miss a Chef Buck cooking video, and click a button below and share the dishes with your friends. We appreciate all the kind comments and support, and we’ll see you next time in the kitchen!
–Chef Buck

Share and Enjoy !


Kale Salad – Tips for Using Raw Kale Greens

fresh kale

Why eat raw kale salad? Kale is a so-called SUPERfood chock full of big-time nutrition and very fashionable in salad circles, so if you wanna be one of the cool kids, ya gotta eat it. If the Popeye franchise is ever re-booted, I’m sure our vegetable-friendly sailor will be shunning spinach and downing kale by the bunches–not that there’s anything wrong with spinach, but at the moment the kale lobby is a juggernaut.

Check out this video for tips on making a raw kale salad:

Kale Nutrition and Fun Facts

Kale belongs to the same family as cabbage, Brussels sprouts, and collards.
Kale is packed with antioxidants, which help neutralize harmful free radicals in the body.
One cup of chopped raw kale provides more than 100% of the daily value of vitamins A, C, and K.
In fact, Kale has more vitamin C than an orange.
Free Radicals are a thing scientists made up to sound smart.
Baked kale becomes crispy and can be substituted for potato chips.
Kale freezes well for future use.
Kale is a great addition to a soup.
Kale is believed to promote cell repair and may block the growth of cancer cells.

Wow…doesn’t that sound terrific? Who could pass up on that! Too bad kale doesn’t taste like a slice of coconut cream pie, but you can’t have everything. It is a tasty addition to a salad, though–and utilizing raw kale will insure the greatest health benefit from this leafy superfood.

kale salad
Raw kale salad with olives, artichoke, red leaf lettuce, and a carrot/daikon slaw.

Prepare fresh foods at home and have fun in the kitchen. Get a bunch of spices, pots and pans, and begin experimenting with different recipes. home cooking is a healthy hobby that will save you tons of money in the long run. Check out current prices for Complete Kitchenware Sets on Amazon as well as Complete Starter Spice Kits. Or go to a thrift store! I’ve found some of my favorite kitchen gear at second-hand stores.

Green is the way to go for a healthy lifestyle. Check out this simple recipe trick for Getting Raw Broccoli Into Your Diet.

raw broccoli
Raw broccoli is high in vitamins and nutrients and is great for digestive health.

Thanks for checking out the recipes. Be sure and sign up for our mailing list so you’ll never miss a Chef Buck cooking video, and click a button below and share the dishes with your friends. We
appreciate all the kind comments and support, and we’ll see you next time in the kitchen!
–Chef Buck

Share and Enjoy !


Chicken Curry Recipe a classic Indian dish

chicken curry

Chicken curry is delicious and easy to make. I throw a little yogurt in for a tad creaminess, but that’s optional, and it’ll be tasty either way. Chicken Curry is one of the most popular dishes in the world, and for good reason.

Chicken Curry Ingredients

2 lbs CHICKEN (boneless/skinned)
2 Tbsp OLIVE OIL
1 tsp BUTTER
1 lg ONION (chopped)
4-5 cloves GARLIC (finely chopped)
1 HOT PEPPER (finely chopped)
1 tsp TURMERIC
1 tsp CHILI POWDER
1 Tbsp CORIANDER
1 Tbsp CUMIN (plus seasoning for chicken)
1 Tbsp GARAM MASALA
1 28oz can CRUSHED TOMATO
¼ cup YOGURT
½ cup CILANTRO (chopped)
SALT and PEPPER to taste
(plus a little SALT, CORIANDER, CUMIN, and CHILI POWDER to season the chicken before cooking)
Check out current prices for Indian Spices on Amazon.

How to make Chicken Curry

Use 2 lbs of skinless, boneless chicken. You can use dark or light meat as you prefer. For this recipe, I like to cut the meat into approx. 1″ pieces and then season generously with salt, cumin, coriander, and chili powder.

Heat oil in a skillet on med. high heat and add seasoned chicken pieces. Sear chicken 5-7 minutes, turning once, and then remove chicken to a plate. Pour off excess fluid in the skillet and add butter. Add finely chopped garlic and hot pepper. Saute for 30 seconds and then add onion. Continue cooking for a couple of minutes.

Indian-style chicken curry recipe
Indian-style Chicken Curry

When onions begin to soften, add turmeric, chili powder, coriander, and cumin. Mix well and continue cooking 2 minutes. Stir in crushed tomato. Add salt and a little water, if needed (but not too much water at one time–you don’t want the dish to be too wet). Allow the sauce to come to a bubble, reduce the heat, cover and let simmer for 10 minutes.

After 10 minutes, return chicken to the skillet. Mix in Garam Masala, which is a blend of flavors (clove, cinnamon, cardamom, cumin, etc.). You can also spoon in a little plain yogurt, if you like–if I have some yogurt on hand I add it, and if I don’t, I don’t–it’s tasty either way (but yogurt adds a nice touch of creaminess). Add Fresh chopped cilantro and stir well.
And that’s it.

Serve the curry over rice with a little flat bread and you’ve got a delicious Indian-style entree. Give this chicken curry recipe a try and let me know what you think…and bon appétit!

For another super tasty chicken dinner, try this Asian inspired General Tso’s Chicken recipe.

general tso chicken

Thanks for Watching our Chicken Curry Recipe

Sign up for our mailing list so you’ll never miss a new recipe. Also click a button below and share the dishes with your friends. You can also follow Chef Buck on Youtube. We appreciate all the kind comments and support, and we’ll see you next time in the kitchen!

If you like what CG and I do, support us on Patreon, or throw us a tip in our Paypal Tip Jar. We’ll happily enjoy a coffee on the road – Thanks! We appreciate all the support, and we’ll see you next time in the kitchen!

We include affiliate links for products on our website. Making a purchase after clicking on our links and we may earn a commission which helps us produce more videos and drink more coffee :^) We participate in the Amazon Services LLC Associates Program, which is an affiliate advertising program. It provides a means for us to earn fees by linking to Amazon.com and affiliated sites, so we can make more videos.

Share and Enjoy !

Cook Chinese Eggplant Recipe with General Tso’s Sauce

Chinese Eggplant Recipe with Sweet Sauce

Cook Chinese Eggplant for a terrific vegetarian meal that will not having you missing the meat. For this Chinese eggplant dish, I use a sauce similar to one I use making General Tso’s Chicken, so it’s a rich and filling eggplant dish, hearty and vegetarian at the same time.

ingredients to cook Chinese Eggplant Recipe

1½ lbs CHINESE EGGPLANT
4-6 Tbsp OLIVE OIL
3 cloves GARLIC (finely chopped)
1-2 RED CHILIES (thinly sliced)
½ cup whole CASHEW NUTS
1 bunch GREEN ONIONS
1 Tbsp SESAME OIL
sauce ingredients:
1/3 cup SOY SAUCE
2 Tbsp HOISIN SAUCE
1 tsp SESAME OIL
2 Tbsp RICE VINEGAR
2-3 Tbsp BROWN SUGAR
1 Tbsp GINGER (minced)
2 Tbsp CORN STARCH
1½ cups WATER

cook Chinese Eggplant
Chinese Eggplant with Cashew Nuts and Sweet Sauce

how to cook Chinese Eggplant Recipe with General Tso’s Sauce

In a small bowl, combine all of the sauce ingredients. The fresh minced ginger is optional, but if you love ginger, why not? I also use 2 heaping Tbsp of brown sugar, but you can use more or less sugar depending on how much sweet you like–but the sweet is good with this recipe. Mix the sauce ingredients well and then set aside.
Cut your Chinese eggplant. You should buy firm eggplant with glossy, unblemished skins. Cut into pieces approx. 2″ long and ½” wide.
In a skillet or wok, heat olive oil on med. high heat. When the oil is hot, add eggplant. Saute eggplant 5-7 minutes. The eggplant will soak up the oil, so add more oil as needed or desired. Saute until the eggplant colors and begins to soften and then remove eggplant from the skillet. In the same hot skillet, add sesame oil and heat. Add garlic, hot pepper, and cashew nuts (or sub peanuts). Saute for 1 minute or until garlic colors. Add sauce and green onion bottoms. Stir sauce slowly. Because of the added corn starch, the sauce will quickly heat through, darken, and thicken. When the sauce has thicken to a a gravy/syrup consistency, return the eggplant to the skillet. Mix well, then cover the skillet and allow to simmer until the eggplant has finished cooking, 3-5 minutes depending on the size of the eggplant pieces. Stir in green onion tops. Fresh chopped cilantro also adds an excellent taste and garnish.
And that’s a very tasty way to cook Chinese eggplant.
Serve with rice, or without rice…and enjoy.
And for a tasty General Tso’s Chicken Recipe, click the pic below.

general tso chicken
click pic for recipe

Thanks for checking the recipe out. If you liked it, click a few buttons below and share it with your friends, I appreciate it.
–Chef Buck

Share and Enjoy !


Chorizo Recipe — Cazuela de Chorizo!

Chorizo Sausage recipe

This spicy chorizo sausage recipe is a Spanish inspired meat and potato stew that is super-flavorful and delicious–and hearty, too.

What you need for this Chorizo Sausage Recipe

1 lb CHORIZO LINKS
3-4 Tbsp OLIVE OIL
1 lg ONION (chopped well)
4-5 cloves GARLIC (thinly sliced)
3 ROMA TOMATOES (diced)
3 lg POTATOES (cut into approx 1″ pieces)
14 oz can BROTH (add water as needed)
1 BAY LEAF
1 tsp SMOKED PAPRIKA
1 Tbsp CHILI POWDER
¼ tsp CAYENNE PEPPER
½ tsp ground THYME
SALT and PEPPER to taste

Chorizo Sausage recipe
Fresh Chorizo Sausage Links

How to make Cazuela de Chorizo

  • Heat olive oil on medium high heat in a deep skillet or wide-bottom pot.
  • Add onion and garlic and saute.
  • As the onion begins to soften, add bay leaf, salt, chili powder, cayene pepper, and paprika.
  • Stir well and continue sauteing ingredients for 4-5 minutes.
  • Add chorizo sausage–use UNCOOKED chorizo links; slice the links in the casing, about ½ inch wide pieces.
  • Cook the sausage with the onions for 5 minutes and then add tomato (3 diced roma tomatoes or 14oz can diced tomatoes).
  • Mix tomato with onion and then add potato. I like to leave the skin on the potato mainly because it tastes GOOD. And then you don’t have to peel the potatoes either, which is good, too. The potato should be cut up into good sizes, about 1″ pieces, so that you’ll have some good chunks of potato after the dish stews.
  • Cover the skillet and bring the dish up to a bubble.
  • Reduce the heat to a simmer and add dried thyme.
  • Cover, and let simmer for about 30 minutes or until the potatoes are cooked through–stirring occasionally as needed.

Give it a taste and add a little more salt and seasoning as desired. Garnish this chorizo recipe with fresh chopped parsley, cilantro, or green onion…and enjoy!

Chorizo Sausage recipe
Spicy Chorizo Sausage Stew

If you don’t have a big skillet or pot, here’s a link to check out check out current prices for a BIG STEW POT on Amazon.

For another great stew idea, check out this vegetarian alternative, a Meatless Chili Recipe that even meat lovers will love.

vegetarian chili
pot o’ meatless chili for good times

Thanks for Watching our Chorizo Sausage Recipe Video!

Click a button below and share the dishes with your friends. You can also follow Chef Buck on Youtube. We appreciate all the kind comments and support, and we’ll see you next time in the kitchen!

If you like what CG and I do, support us on Patreon, or throw us a tip in our Paypal Tip Jar. We’ll happily enjoy a coffee on the road – Thanks! We appreciate all the support, and we’ll see you next time in the kitchen!

We include affiliate links for products on our website. Making a purchase after clicking on our links and we may earn a commission which helps us produce more videos and drink more coffee :^) We participate in the Amazon Services LLC Associates Program, which is an affiliate advertising program. It provides a means for us to earn fees by linking to Amazon.com and affiliated sites, so we can make more videos.

Share and Enjoy !

Blackberry Cobbler Recipe with an Oatmeal Twist

blackberry cobbler

You can make this blackberry cobbler recipe using any kind of berries or fruit. CG loves to use oatmeal when she can, which pairs well with the flour to make the batter for this dessert.

What you need for a Blackberry Cobbler Recipe

2 cups BERRIES (any kind)
1 Tbsp CORN STARCH
1 cup QUICK OATS
½ cup ALL-PURPOSE FLOUR
1½ tsp BAKING POWDER
1 tsp CINNAMON (optional)
½ cup SUGAR (use partial brown sugar if desired)
¼ cup BUTTER
1 lg EGG
½ tsp VANILLA EXTRACT
¼ cup MILK

How to make Blackberry Cobbler

Use any berries you like for this cobbler dessert–it’s a cobbler, but with a little twist on the batter–we’re pairing Quick-cook Oatmeal along with the flour. This recipe doesn’t make a huge amount, but it’s perfect for about 4 human-sized portions–just double the recipe for a bigger dessert. We’re using blackberries because we’ve got fresh ones.

To start, put your berries in a bowl and add 2-4 Tbsp of sugar–if desired–if your berries are already sweet enough, don’t bother with the added sugar. Add corn starch and toss with the berries and set aside.

In a second bowl, combine your Quick Oats, all-purpose flour, baking powder, and sugar. Mix Thoroughly, then cut butter into the mix. Stir until the butter is integrated into the mix, then add 1 beaten egg, vanilla extract, and milk. We’re using almond milk, but use whatever kind of milk you like. Stir ingredients together.

Grease an 8×8 oven friendly dish. We’re using an 8″ deep dish pie tin with a little butter spray; check prices for Pie Plates on Amazon. Spread the berry mixture evenly on the bottom of the dish, and then top the berries with spoonfuls of the batter. Don’t worry about spreading the batter neatly, spoon it evenly around the top and it will spread evenly in the oven.

Place the dish in an oven pre-heated to 350 degrees F and let bake for about 30 minutes until the topping is a golden brown. If your cooking dish is particularly small, place it on a baking sheet or tinfoil to catch any drippings.

Let the cobbler cool for 10-15 minutes and then serve with ice cream (or without ice cream, but that would be crazy).

creme fraiche
homemade fruit cobbler

For another great dessert, try this delicious but deadly but delicious Scone Recipe.

maple pecan scones

Thanks For Watching Our Cobbler Recipe!

Thanks for checking out our scones, and all of our recipes. Be sure and sign up for our mailing list so you’ll never miss a new recipe. Also click a button below and share the dishes with your friends. You can also follow Chef Buck on Youtube. We appreciate all the kind comments and support, and we’ll see you next time in the kitchen!

If you like what CG and I do, you can also support us on Patreon, or throw us a tip in our Paypal Tip Jar. We’ll happily enjoy a coffee on the road – Thanks! We appreciate all the support, and we’ll see you next time in the kitchen!

We include affiliate links for products on our website. So, if you make a purchase after clicking on our links, we may earn a commission which helps us produce more videos and drink more coffee :^) We participate in the Amazon Services LLC Associates Program, which is an affiliate advertising program. It provides a means for us to earn fees by linking to Amazon.com and affiliated sites, so we can make more videos.

Share and Enjoy !

Creamy Shrimp Curry Recipe –quick and easy with a yogurt sauce

creamy shrimp curry

Try this quick, creamy shrimp curry recipe for a change of taste. It’s super fast to prepare and kinda/sorta healthy–I usually serve this shrimp curry with rice and top with fresh chopped cilantro. Don’t be shy adding hot peppers, since the yogurt sauce and rice will absorb a lot of any heat added.

SHRIMP CURRY RECIPE
ingredients:
1 to 1½ lbs SHRIMP (peeled/deveined)
2-3 Tbsp OLIVE OIL
2 tsp MUSTARD SEEDS
2 chili peppers (chopped, or sub red pepper flakes)
1 cup plain Greek YOGURT
¼ tsp ground CINNAMON
¼ tsp ground CLOVE
½ tsp CARDAMOM
1½ tsp MANGO POWDER
2 tsp CORIANDER
½ tsp CORN STARCH
SALT to taste
CILANTRO (chopped)
serve w/ RICE

shrimp curry recipe
Creamy Shrimp Curry Recipe

In a small bowl, combine Greek yogurt with cinnamon, clove, cardamom, mango powder, coriander, and corn starch. Mix ingredients well until the yogurt is smooth. Heat olive oil in a skillet and add mustard seeds and finely chopped peppers. Use as much or little pepper as you like–if you’ve got fresh peppers that’s great, but red pepper flakes make a decent substitute. After 1 minute, add yogurt sauce to the skillet. Stir well and bring to a light bubble and let simmer 2 minutes. Adjust stovetop temperature as needed. Add shrimp, already peeled and deveined. Mix with sauce and return skillet to a simmer. Let cook 4-5 minutes, stirring as needed, until shrimp are pink and done–try not to overcook your shrimp ’cause that’s sad.
Salt dish as desired and remove from heat. Garnish with fresh chopped cilantro and serve with rice. It’s best to cook your rice ahead of time, since this creamy shrimp curry takes very little time to prepare. Give it a try and let me know what you think, and bon appetit!

For another tasty shrimp dish, give SPICY FRIED SHRIMP a try.

Share and Enjoy !


Artichoke Heart Recipe for Creamy Caper Pasta

canned artichoke hearts

This canned artichoke heart recipe is quick and tasty and easily prepared. And if you use quick-cook Chinese flat noodles, from start to finish–including prep time–this dish only takes about 10 minutes to make.

Ingredients for Artichoke Heart Recipe

14 oz can quartered ARTICHOKE HEARTS
¼ cup BUTTER
¼ cup OLIVE OIL
1 lg ONION (chopped)
5 cloves GARLIC (finely chopped)
2-3 Tbsp CAPERS
8 oz PASTA
2-3 Tbsp LEMON JUICE (optional)
SALT and PEPPER to taste

How to make Artichoke Heart Pasta

In a large skillet on medium-high heat, add olive oil and most of the butter. When oil is hot, add onion and garlic and saute until onions begin to soften (for a spicier dish, add a minced chili pepper in with the onion).

Add artichoke hearts, capers and salt to taste and continue sauteing for 2-3 minutes. Occasionally I’ll add the juice and zest of ½ a lemon, which is a pretty tasty option, so definitely give it a try sometime. Add any remaining butter to the skillet.

Add cooked pasta to the skillet. I like to use quick-cook Chinese flat noodles since it’s easy to time with the cooking of the sauce, but use any kind of pasta you like, just allow enough time for cooking. And for a wetter sauce, add a little bit of the pasta water to the skillet.

Mix pasta and sauce in skillet and then serve immediately. Garnish with fresh chopped parsley or thyme–or just add a few more capers. Serve with Parmesan cheese if desired. It’s a quick, easy artichoke heart recipe and a great use of canned artichoke hearts. Check on current prices for Canned Artichokes on Amazon.

Give the recipe a try and let me know what you think, and bon appetit!

artichoke hearts
canned artichoke hearts

For another super creamy and delicious pasta dish, Try this Decadent Pasta Carbonara Recipe.

spaghetti carbonara

Thanks for checking out the recipes. Be sure and sign up for our mailing list so you’ll never miss a Chef Buck cooking video, and click a button below and share the dishes with your friends. We
appreciate all the kind comments and support, and we’ll see you next time in the kitchen!
–Chef Buck

Share and Enjoy !


Thai Beef Salad Recipe Quick and Easy

thai beef salad

Thai Beef Salad is an easy recipe to prepare with lots of room for nuance, i.e., using whatever the hell you have in the fridge. I like to use sirloin steak since it’s a good piece of meat that doesn’t cost an arm and a leg and you can generally buy a nice cut that makes for good slicing. Season your steak up well, don’t overcook it, and let it rest well before slicing–these 3 steps are key for a great steak salad.

Ingredients for Thai Beef Salad

¾ lb SIRLOIN STEAK
1 Tbsp OLIVE OIL
2-3 cups SALAD GREENS (don’t use so much green that the steak is lost!)
3 GREEN ONIONS (chopped)
½ CUCUMBER (matchstick cuts are nice)
½ CARROT (thin cut–cut into strings is nice, dude)
1 Tbsp CHILI PASTE (more or less, depending on desire for heat)
1 tsp LEMON GRASS (minced) (sub extra ginger if lemon grass is not used)
1 tsp GINGER (minced)
1 LIME JUICE
½ cup CILANTRO (chopped) …thai basil and mint leaves are nice, too.
1 tsp CHILI POWDER
SALT and PEPPER to taste

How to Make a Thai Beef Salad

I’ve never bought lemon grass online, but it’s apparently a thing. Look here if you want to check current prices for fresh lemon grass on Amazon.

First, mix up your dressing. Lemon grass is a key component in many Thai dishes and makes a nice addition to this steak salad. Cut off the upper leaves of the stalk and the very bottom,leaving about 5-6 inches. This is generally the only part of the lemon grass used in recipes and is sometimes sold already cut into these sections in grocery stores. The outer part of the stalk is often very tough, so cut away the outer layers to reveal the softer core.

Mince about an inch of the lemon grass core and add it into a bowl. Add finely chopped ginger, chili paste, lime juice, salt, and mix ingredients well. Set dressing aside and season sirloin steak.

Season both sides of the steak well–I like salt, pepper, and chili powder–but use whatever seasonings you desire (and season it well!).

Heat oil in a skillet and cook the steak quickly on high heat, turning once and sealing the juices inside. Do not overcook the steak or puncture it with a knife or fork. Set the steak aside to rest at least 10-15 minutes, this will keep the juices from running when the steak is sliced.

While the steak rests, preare the salad. Use whatever greens you desire, but don’t use so much salad that the steak becomes just another component–allow the steak to be the star of the dish.
Tear salad greens into a bowl and add thinly cut carrots, cucumber matchsticks, chopped green onions, and chopped cilantro (also try fresh chopped basil and mint). Add salad dressing and toss.

Cutting against the grain of the meat, slice steak into thin strips and add to the salad. Add any juices from the steak and toss salad.
Garnish with toasted sesame seeds. Enjoy!

thai beef salad
thai beef salad recipe

If you’re new to home cooking, just get a bunch of spices, pots and pans, and start experimenting with different ingredients and recipes. It’s a healthy hobby that can save a lot of money in the long run. You can check out current prices for Complete Kitchenware Sets on Amazon as well as Complete Starter Spice Kits. Or just go to a thrift store! I’ve found some of my favorite kitchen gear at second-hand stores.

For another great healthy meal, try this Vietnamese Bánh Mì Style Quinoa Salad Recipe.

Quinoa Salad -- Banh Mi Style
Quinoa Salad — Banh Mi Style

Thanks for taking a peek at the video and recipes. If you like it, click a button or two below and share with your friends! I appreciate it!
–Chef Buck

Share and Enjoy !


Green Bean Recipe for people who hate green beans

This green bean recipe reminds me of the green beans we sometimes get out at Chinese restaurants; I’m not a fan of green beans, but if I gotta eat them, I like them like this or in a green bean casserole.  This dish is pretty simple to make and has a lot of nice nutritional stuff in it–you can forego the butter if you want and just use oil–but you’re already eating green beans, so isn’t that punishment enough?

Green Bean Recipe ingredients

1 lb. GREEN BEANS
½ large ONION (sliced)
2 Tbsp GARLIC (finely chopped)
1 Tbsp GINGER (finely chopped)
CHILI PEPPERS to taste (finely chopped)
1 Tbsp BUTTER
1 Tbsp OLIVE OIL
2-3 Tbsp SOY SAUCE
½ tsp SESAME OIL …current sesame oil prices on Amazon
SALT and PEPPER to taste
garnish w/ toasted SESAME SEEDS

chinese green bean recipe
green beans

Green Bean Recipe Directions

I’m not a fan of green beans, but this recipe is a quick way to make them edible.
First, trim the green beans by “snapping” off the ends–fresh beans will snap easily, and if there is a fiborous, stringy seam along the bean, this can be pulled off as well.

Bring a pot of lightly salted water to a boil and add the green beans. Allow to cook 2-3 minutes, the longer the beans are in the water, the softer they will get, but why overcook them? They’re already awful green beans, so you might as well get some nutrition out of them.

Remove the beans from the hot water and place in an ice bath for 1 minute. This is called blanching–it stops the cooking process, keeps the beans crisp and maintains the bright, green color of the beans. After a minute, drain the beans.

While the beans drain, heat olive oil and butter in a skillet. Add sliced onion, garlic, ginger, and chili peppers and saute for 2 minutes. Add drained green beans and continue cooking another 2 minutes. To finish, add soy sauce and sesame oil and mix well, then remove skillet from the heat. Check here for current pricing for a non-stick skillet on Amazon.

That’s it! Serve them hot and garnish the dish with toasted sesame seeds for optimal flavor potential.
Enjoy.

For another nightmare ingredient from childhood, revisit a new and tasty way to eat raw The Horror That Is Broccoli!

raw broccoli
Raw broccoli is high in vitamins and nutrients and is great for digestive health.

Thanks for checking out our green bean recipe, and all of our recipes. Be sure and sign up for our mailing list and never miss a new Chef Buck cooking video, and also click a button below and share the dishes with your friends. We appreciate the kind comments and support, and we’ll see you next time in the kitchen!
–Chef Buck

Thanks for watching our recipe videos!

We include affiliate links for products on our website, so if you make a purchase after clicking on our links, we may earn a commission which helps us produce more videos and drink more coffee :^) We participate in the Amazon Services LLC Associates Program, which is an affiliate advertising program providing a means for us to earn fees by linking to Amazon.com and affiliated sites, so we can make more videos.

Share and Enjoy !

Nachos Recipe like Restaurant Nachos Supreme

best nachos recipe

Try this great Nachos Supreme Recipe. It’s a super grande-sized platter of nacho heaven.
We use ground beef for this nachos recipe, but if you skip the meat and just use beans–it’ll still be pretty damn tasty. The key to great nachos recipe is a great nacho filling, so spice up your bean and beef mixture just right and build your nacho castle on a tasty foundation.

What You Need to Make The Best Nachos Grande

1 lb. GROUND BEEF
1 ONION chopped
15oz can KIDNEY BEANS
16oz can LOW FAT REFRIED BEANS
CORN TORTILLA CHIPS (thick)
2 ROMA TOMATOES diced
½ cup JALAPENOS sliced and pickled
¼ cup BLACK OLIVES sliced
8-10oz CHEESE (shredded)
2-3 GREEN ONIONS chopped
¼ cup CILANTRO chopped
1 Tbsp BROWN SUGAR
1-2 Tbsp CUMIN
2-3 Tbsp CHILI POWDER
SALT and PEPPER to taste
serve with sour cream, salsa, guacamole

How to make this Nachos Recipe

  • In a large skillet on medium heat, add ground beef and begin browning meat.
  • Add chopped onion and continue browning.
  • Add some salt, cumin, chili powder, and black pepper to begin seasoning as the ground beef browns.
  • Once the meat is browned, drain the excess grease.
  • Add the kidney and refried beans and stir into the ground beef.
  • Add ¼ can water. Stir ingredients until well mixed.
  • Add brown sugar and more cumin and chili powder. Stir and simmer 5 minutes.
  • On a baking sheet spread out corn tortilla chips; thicker, sturdier chips work best. If you don’t have a larger baking sheet, then buy a giant pizza pan like this one on amazon or look at a local thrift store–that’s where we found our huge pizza pan.
  • Spoon and sprinkle the ground beef mixture over the chips.
  • Top nachos with diced tomato, sliced jalapenos, black olives, and the chopped bottoms of the green onions.
  • Sprinkle the top with cheese.
  • Slide the baking sheet into the oven (pre-heated at 400 degrees F) and let cook approx. 15 minutes
    or until the cheese is melted and the nachos heated through.
  • Remove from the oven and top with chopped green onion tops and cilantro.
  • Serve with sour cream, salsa, or guacamole and eat ’em while they’re hot.

World’s Best Nachos Recipe?

best nachos recipe
This is a fantastic Nachos Supreme dish, and a giant pizza pan makes a great dish for cooking and serving.

For another meaty meal, check out these Crispy Oven-baked Chicken Wings.

wings recipe
Oven baked wings are healthier than deep fried, and less messy to make!

Thanks for Watching our Nachos Recipe Video!

Click a button below and share the dishes with your friends. You can also follow Chef Buck on Youtube. We appreciate all the kind comments and support, and we’ll see you next time in the kitchen!

If you like what CG and I do, support us on Patreon, or throw us a tip in our Paypal Tip Jar. We’ll happily enjoy a coffee on the road – Thanks! We appreciate all the support, and we’ll see you next time in the kitchen!

We include affiliate links for products on our website. Making a purchase after clicking on our links and we may earn a commission which helps us produce more videos and drink more coffee :^) We participate in the Amazon Services LLC Associates Program, which is an affiliate advertising program. It provides a means for us to earn fees by linking to Amazon.com and affiliated sites, so we can make more videos.

Share and Enjoy !

Spicy Crispy Chickpea Recipe -great salad topping!

Here’s a quick, spicy chickpea recipe that makes a great salad topping and a so-so snack; it’s a lot easier on your teeth than baked chickpea snacks, which I find to be almost inedible (they tend to turn into tiny rocks).

ingredients:
15 oz can CHICKPEAS
2-3 Tbsp OLIVE OIL
½ tsp CURRY POWDER
½ tsp CUMIN
½ tsp PAPRIKA
dash CAYENNE PEPPER
SALT to taste

chickpea recipe

Rinse and drain a 15oz can of chickpeas (garbanzo beans). In a skillet, heat olive oil on medium heat. When the oil is hot, add chickpeas–be sure that they are drained well, since water and hot oil definitely do not mix. Saute chickpeas for 10-15 minutes; obviously, the longer they’re in the skillet, the crispier they will get, but it’ll take about 15 minutes to get them “crispy”. Once the chickpeas get near the doneness you desire, add salt, pepper, and spices. The spice combo in the recipe works well, but experiment with whatever spices you have–and don’t be shy with the spices–spice really makes this recipe work, and a good deal of the spice you use will remain in the skillet when you remove the chickpeas. Saute chickpeas and spices another 2-3 minutes and then remove from the heat.
Use them as a salad topping instead of croutons for a healthy crunch, or a just tasty snack, something to nibble on besides potato chips.
Enjoy!

Ever try Chickpea Curry(chana masala)? It’s a terrific Indian chickpea dish.

Share and Enjoy !


Rice Pudding –Try Quinoa Pudding instead

rice pudding

Quinoa for dessert? If you like rice pudding, then give this quinoa recipe version a try; it’s super sweet and easy to make and yet another great way to include quinoa in your diet. Quinoa cooks up just like rice: one part quinoa to two parts water, bring to a boil, reduce to a simmer, and then cook covered until water is absorbed. Quinoa acts like a grain, but it’s actually a seed–and a complete protein–so it’s a great addition to your diet if you’re trying to cut down on eating meats and rice.  Check current prices for quinoa on amazon.

Ingredients for Quinoa Rice Pudding

1 cup QUINOA
1 CINNAMON STICK
14oz can COCONUT MILK
2 tsp minced GINGER
¼ cup BROWN SUGAR
½ tsp CARDAMOM (or sub nutmeg)
1/3 cup RAISINS
1 tsp minced ORANGE PEEL
½ cup toasted COCONUT FLAKES and/or toasted ALMOND SLICES

rice pudding
Quinoa pudding makes a nice change-up from rice pudding–and it’s just as easy to make.

How to Make Rice Pudding with Quinoa

  • In a saucepan, combine 1 cup quinoa with 2 cups of water and a cinnamon stick.
  • Bring pot to a boil, then reduce heat to a simmer. Cover pot and let cook 12-15 minutes until the water is absorbed.
  • Fluff and remove cinnamon stick and set aside.
  • In a small saucepan, combine 14oz can coconut milk, minced ginger, and brown sugar.
  • Slowly bring contents to a bubble, then reduce heat and continue stirring 5 minutes.
  • Remove from heat.
  • Add raisins, orange peel, and cardamom to quinoa (can sub nutmeg for cardamom). Mix well and then add coconut milk mixture.  Stir, then cover and set aside to cool about 20-30 minutes.  
  • Serve warm or chill and serve cold. When serving, garnish with toasted almond slices or coconut, or both.  The crunchiness of the toasted topping adds a great texture and I highly recommend giving it a try.  

The next time you’re in the mood for rice pudding, make quinoa pudding instead.  Give this quinoa recipe a go and let me know what you think!

rice pudding
quinoa pudding recipe


Try another delicious quinoa recipe idea: Spanish-Style Quinoa Recipe

spanish quinoa

Thanks for trying our Quinoa Rice Pudding

Click a button below and share the quinoa recipe with your friends. You can also follow Chef Buck on Youtube. We appreciate all the kind comments and support, and we’ll see you next time in the kitchen!

If you like what CG and I do, support us on Patreon, or throw us a tip in our Paypal Tip Jar. We’ll happily enjoy a coffee on the road – Thanks! We appreciate all the support, and we’ll see you next time in the kitchen!

We include affiliate links for products on our website. Making a purchase after clicking on our links and we may earn a commission which helps us produce more videos and drink more coffee :^) We participate in the Amazon Services LLC Associates Program, which is an affiliate advertising program. It provides a means for us to earn fees by linking to Amazon.com and affiliated sites, so we can make more videos.

Share and Enjoy !

Tilapia Recipe –Easy Baked Panko-Crusted Fish

This easy, baked tilapia recipe will make even those big boring bags of tilapia fillets taste great –or any other less than stellar fillet of fish. Tilapia is not an exciting fish, but it’s often a pretty good buy relative to everything else in the seafood department. This recipe will turn tilapia–or any bargain fillet–into a super tasty, super moist side of aquatic splendor (too much?). Breading and frying always helps tilapia, but breading and baking will do the same, and it’s a lot less messy and a lot more moist–and healthier, too.

Tilapia Recipe Ingredients

2 FISH FILLETS (about 8oz each)
½ ONION (sliced or chopped)
½ cup PANKO BREADCRUMBS
½ tsp GARLIC POWDER
SALT and PEPPER to taste
2 Tbsp fresh DILL (or 2 tsp dried dill)
¼ cup MAYONNAISE
1 tsp DIJON MUSTARD
1 clove GARLIC (minced)
1 Tbsp fresh LEMON JUICE (add zest for extra lemony-ness)

How to Bake Tilapia

Preheat oven to 450 degrees F.
In a small cup, combine panko crumbs (or any breadcrumbs–panko just happens to be best, I think) with garlic powder, salt, pepper and 1/2 of the dill and mix.
In a separate bowl, combine the remaining dill, mayonnaise, Dijon mustard (not yellow mustard!) and lemon juice and stir until smooth.
Rinse and pat the fish fillets dry with paper towels. Spray a baking pan with cooking spray. Lay onion slices in pan and place fillets over
onions. Evenly brush the tops and sides of the fish with the mayonnaise mixture. Sprinkle and press the crumbs into the mayonnaise.
Place pan in oven and bake about 15 minutes until the crumb topping has turned a nice, golden brown. Serve with rice and veggies.
Give this tilapia recipe a try and let me know what you think, and bon appetit!

For another tasty fish dish, try this Crispy Skin Salmon Recipe.

crispy salmon recipe
For the best fresh fish recipes…keep it simple

Have fun in the kitchen. Get a bunch of spices, pots and pans, and begin experimenting with different recipes. home cooking is a healthy hobby that will save you tons of money in the long run. Check out current prices for Complete Kitchenware Sets on Amazon as well as Complete Starter Spice Kits. Or go to a thrift store! I’ve found some of my favorite kitchen gear at second-hand stores.

Thanks for checking out the recipes. Be sure and sign up for our mailing list so you’ll never miss a Chef Buck cooking video, and click a button below and share the dishes with your friends. We
appreciate all the kind comments and support, and we’ll see you next time in the kitchen!
–Chef Buck

Share and Enjoy !


Edamame Recipe –Roasted Snack and Salad Topping

Try this roasted edamame recipe for a quick semi-healthy snack. The toasted Parmesan cheese will almost make you forget that you’re eating soybeans.

Roasted Edamame Recipe Ingredients:
10 oz frozen shelled EDAMAME (green soybeans)
1 Tbsp OLIVE OIL
1 tsp GARLIC POWDER (also add or substitute onion powder, chili powder)
SALT and PEPPER to taste
¼ cup shredded PARMESAN CHEESE

directions:
Preheat oven to 425 degrees F.
Mix frozen edamame beans (no need to thaw), olive oil, fresh-cracked black pepper, salt, garlic powder, and Parmesan cheese together in a large bowl. Try experimenting with different seasonings; substitute onion powder or chili powder for the garlic–or add them all–this is an easy snack food to change up for a little variety.
Spread mixture onto an ungreased baking sheet.
Place in oven and bake for 8-10 minutes and then remove from oven and stir. Spread edamame out again and cook another 8-10 minutes, until the cheese is toasted crispy and golden.
Add additional salt or garlic powder if desired.

Roasted edamame makes a great salad topping.

Eat as a quick snack–it is delicious hot out of the oven–or use as a topping for salads and whatnot.

Tastes great hot out of the oven--perfect for snacking.  Try it as a movie treat instead of popcorn.
Tastes great hot out of the oven–perfect for snacking. Try it as a movie treat instead of popcorn.

Give this roasted edamame recipe a try and let me know what you think, and bon appetit!

And for another quick and healthy salad topper, try this Spicy Chickpea Recipe.

chickpea snack recipe

Roasted edamame or chickpeas are both great components in a salad. A super-flavorful and healthy salad ingredient is kale. It’s extremely versatile and can be eaten raw or cooked. Click on the video link below to discover some simple tips on using raw kale in your next salad.

avocado kale w/ chickpeas
raw avocado kale salad

Share and Enjoy !


Asparagus Recipe — Tangy Lemon Ginger Asparagus

Asparagus is one of those veggies you cook when you’re trying to impress–and this asparagus recipe will do the job. The lemon adds a nice zing while the whole fennel/mustard seeds add flavor and texture without overpowering the great taste of asparagus.

Asparagus Recipe Ingredients:
1½ lb. ASPARAGUS
1 small LEMON (zest and juice)
2 Tbsp OLIVE OIL
½ tsp FENNEL SEEDS
½ tsp MUSTARD SEEDS
3-4 cloves GARLIC (or more…go for it, dude)
1 inch GINGER (which should end up being between 1-2 Tbsp thinly sliced)
SALT and PEPPER to taste

When buying asparagus, thin is better than thick. Choose firm spears. Avoid asparagus that have a wrinkled skin, or tips that are wet and greasy looking. Rinse and drain the asparagus spears, then chop into 1 inch pieces. When slicing, leave the tops of the spears intact so they don’t fall apart while cooking. Heat olive oil on medium heat in a skillet. When oil is hot, add mustard and fennel seeds and stir for 20-30 seconds–not long at all. Add garlic and ginger–a lot of ginger; I use about 1 inch, thinly sliced–about the size of a fish scale. Stir skillet 1 minute, lower heat if necessary.
Stir in asparagus. Add salt and pepper to taste. I like my asparagus to retain a bit of crunch–who likes mushy asparagus?–so this dish doesn’t take long to cook. Saute for about 4 minutes and the dish will be done. From the time you add the seeds to completion, the cooking time will only be about 5 minutes–of course you can extend the cooking time if YOU DO like softer asparagus (crazy!)–but everybody likes what they like, so namaste, man. About a minute before the dish is done, add the lemon zest. When the asparagus is crunchy or soft the way you like it, and you’re ready to get it off the heat, add the lemon juice, stir, and serve.
It’s a tasty asparagus dish and a perfect side for a nice steak (or whatever).
Give this asparagus recipe a try and let me know what you think, and bon appétit!

If you enjoy asparagus, you likely love this Brussels Sprouts Recipe.
brussels sprouts

Share and Enjoy !


Coleslaw Recipe with a Curry Twist

coleslaw

Chickpea curry and coleslaw are two of my favorite foods, so combining them is a win-win. This dish makes a perfect side for a spicy meal or a fancy-pants hamburger, so give chickpea curry coleslaw a go and let me know what you think.

Curry Coleslaw Dressing Ingredients

1 tsp CORIANDER
½ tsp TURMERIC
½ tsp CUMIN
2 Tbsp SUGAR
1 tsp GINGER (minced)
1 tsp GARLIC (minced)
2 Tbsp VINEGAR (or substitute fresh lemon juice and zest–very tasty!)
¼ cup SOUR CREAM (or substitute plain yogurt)
¼ cup MAYONNAISE

Slaw:
14 oz can CHICKPEAS
½ small CABBAGE (shredded)
2 medium CARROTS (shredded)
½ cup CILANTRO (chopped)
SALT and PEPPER to taste

chickpea curry coleslaw

How to Make Coleslaw

In a small bowl, combine ingredients for dressing and whisk together until smooth. Be sure the ginger and garlic are minced well. I’ve sometimes substituted lemon juice for the vinegar and it tastes great; if using fresh lemon, also throw in a little (or a lot) of the zest.

In a larger bowl, combine cabbage, carrots, and a 14oz can of chickpeas (rinsed and drained). Add dressing and mix well. Add salt and pepper to taste (a dash of cayenne will add a little bite). Add cilantro.

Try this curry twist on a classic coleslaw, you’re going to love it.

For an Asian twist on slaw. try this Crunchy Ramen Noodle Slaw Recipe.

crunchy slaw
Crunchy coleslaw or noodle salad? What sounds tastier?

We Hope You like the Curry Coleslaw

Sign up for our mailing list so you’ll never miss a new recipe. Also click a button below and share the dishes with your friends. You can also follow Chef Buck on Youtube. We appreciate all the kind comments and support, and we’ll see you next time in the kitchen!

If you like what CG and I do, support us on Patreon, or throw us a tip in our Paypal Tip Jar. We’ll happily enjoy a coffee on the road – Thanks! We appreciate all the support, and we’ll see you next time in the kitchen!

We include affiliate links for products on our website. Making a purchase after clicking on our links and we may earn a commission which helps us produce more videos and drink more coffee :^) We participate in the Amazon Services LLC Associates Program, which is an affiliate advertising program. It provides a means for us to earn fees by linking to Amazon.com and affiliated sites, so we can make more videos.

Share and Enjoy !

Share and Enjoy !

Chicken Tikka Masala Indian Restaurant Favorite

Chicken Tikka Masala is one of the most popular Indian recipes in the world, and for good reason.

I like chicken tikka masala with a rich, creamy sauce–plenty to mix in with the rice and scoop up with some warm flatbread. Give this dish a try and let me know what you think–it’s one of my favorites.

Ingredients for Chicken Tikka Masala

2 lbs boneless, skinless CHICKEN
1 cup plain YOGURT
1 tsp GARLIC (minced)
1 tsp GINGER (minced)
2 Tbsp LEMON JUICE
1 Tbsp CORIANDER POWDER
1 Tbsp GARAM MASALA
1 Tbsp CUMIN
SALT

Ingredients for Masala Sauce

1 ONION (chopped well)
2 tsp GARLIC (minced)
2 tsp GINGER (minced)
1 JALAPENO PEPPER (finely chopped, optional)
or ½ tsp RED PEPPER FLAKES (optional)
1 Tbsp TOMATO PASTE
1 28oz can CRUSHED TOMATOES
1 pint HEAVY CREAM
½ cup CILANTRO (chopped)
2 tsp CORIANDER POWDER
½ tsp CHILI POWDER
1 tsp TURMERIC
1 tsp CUMIN
1 tsp GARAM MASALA
Check out current prices for Indian Spices on Amazon.

Use 2 lbs of skinless, boneless chicken. You can use dark or light meat as you prefer. For this recipe, I like to cut the meat into strips that are easier to handle while marinating and cooking–later I’ll cut the chicken into bite-sized pieces to add into the creamy masala.

Mix a marinade of plain yogurt, ginger, garlic and lemon juice. Season the chicken strips with garam masala, cumin, coriander, and salt and coat with the marinade. Set in the fridge to marinate for at least a few hours, ideally overnight.

After the chicken has marinated, lightly coat a baking pan with oil. Remove as much of the marinade from the chicken as possible and arrange on the pan. Bake the chicken in a 400 degree F oven for 15-20 minutes or until nearly cooked through–adjusting the cooking time as needed depending on the size of the chicken strips; finish the chicken under the broiler to add a slight char to the outside. While the chicken is cooking, prepare the creamy masala.

In a skillet, on med high heat, heat 2 Tbsp of oil and 1 Tbsp of butter. Add minced ginger and garlic and saute 1 minute. Then add onion–also a fresh hot pepper, or red pepper flakes if you want to add a little heat to the dish. The onion and pepper should be chopped up well for a smoother sauce.

Continue sauteing for 5-6 minutes. Add coriander, cumin, turmeric, and chili powder; stir into the onion mixture. Add tomato paste (or don’t–it’ll be good either way–just a little more or less rich and tomatoey, so adjust according to your personal taste).

jackfruit recipe
Use young green jackfruit for a tasty meatless “chicken” tikka masala recipe.

Add 28oz can of crushed tomatoes.
Add salt to taste and mix ingredients thoroughly. Allow ingredients to come to a bubble, then reduce heat, cover, and let simmer for 15 minutes, stirring occasionally.

After 15 minutes, stir in garam masala and heavy cream and continue cooking on low heat for 5 minutes.
Add chopped cilantro.
Chop the cooked chicken strips into bite-sized pieces and stir into the masala.
Remove from heat and serve over rice.

I hope you give this chicken tikka masala recipe a try, I think you’ll love it.

To learn how to cook an entire Indian meal, check out my Complete Indian Dinner Cooking Lesson.

how to cook indian food

Thanks for Watching our Chicken Tikka Masala

Click a button below and share the spinach curry with your friends. You can also follow Chef Buck on Youtube. We appreciate all the kind comments and support, and we’ll see you next time in the kitchen!

If you like what CG and I do, support us on Patreon, or throw us a tip in our Paypal Tip Jar. We’ll happily enjoy a coffee on the road – Thanks! We appreciate all the support, and we’ll see you next time in the kitchen!

We include affiliate links for products on our website. Making a purchase after clicking on our links and we may earn a commission which helps us produce more videos and drink more coffee :^) We participate in the Amazon Services LLC Associates Program, which is an affiliate advertising program. It provides a means for us to earn fees by linking to Amazon.com and affiliated sites, so we can make more videos.

Share and Enjoy !

Quinoa Curry Recipe meets Thai Curry

quinoa curry recipe

Try this quinoa curry recipe with a tasty Thai influence. This is a helpful quinoa recipe to make when you’ve got a lot of vegetable odds and ends to out of the fridge.

Quinoa Curry Recipe Ingredients

½ cup QUINOA …check quinoa prices on Amazon
1 15 oz can COCONUT MILK
1 lg ONION (chopped)
1 inch GINGER (thinly sliced)
2 cloves GARLIC (finely chopped)
1 Hot Pepper (chopped, as desired)
1 RED BELL PEPPER (sliced)
¼ cup fresh BASIL (or CILANTRO) (chopped)
2 CARROTS (sliced)
½ small CAULIFLOWER (florets)
1 cup CABBAGE (chopped)
2 Tbsp OLIVE OIL
1 tsp CORIANDER POWDER
½ tsp CUMIN
½ tsp CHILI POWDER
½ tsp TURMERIC
OR, INSTEAD OF THE ABOVE SPICE COMBINATION, USE 1-2 Tbsp OF A PRE-MIXED CURRY
SALT and PEPPER, to taste
…and garnish with finely chopped PEANUTS

quinoa curry recipe

How to make a Quinoa Curry Recipe

  • In a small pot, bring 1/2 cup quinoa and 1 cup water to a boil.
  • Reduce heat and allow to simmer 13-15 minutes until water is absorbed.
  • Remove from heat, fluff with fork, and set aside. Check here for current prices for quinoa on Amazon.
  • In a large skillet, heat olive oil on medium high heat and then add onion, garlic, and hot pepper and saute for 3-4 minutes.
  • Add spices and mix well, and if you are a slave to the spice, don’t be afraid to add a little more.
  • Add a can of coconut milk and stir thoroughly, mixing completely with the spices and onion.
  • Let the coconut milk heat through, and then add ginger, carrot, cauliflower, and bell peppers. Continue stirring, adding salt and pepper to taste.
  • Bring the ingredients to a bubble, then reduce heat, cover, and allow skillet to simmer for 5 minutes.
  • After 5 minutes, uncover and add in the cabbage.
  • Add in the cooked quinoa.
  • Stir and allow another minute or two until veggies are cooked to your liking.
  • Add in fresh basil or cilantro and remove the skillet from heat.
  • Garnish with ground peanuts and serve immediately.

And that’s a quinoa curry recipe with a little taste of Thai thrown in for good measure. Give the recipe a try and let me know what you think, and bon appetit!

For another tasty twist on a Thai recipe, try this Pad Thai Recipe made with spaghetti squash.

pad thai recipe
pad thai recipe with spaghetti noodles

Thanks for Watching our Quinoa Curry Recipe

Click a button below and share the dishes with your friends. You can also follow Chef Buck on Youtube. We appreciate all the kind comments and support, and we’ll see you next time in the kitchen!

If you like what CG and I do, support us on Patreon, or throw us a tip in our Paypal Tip Jar. We’ll happily enjoy a coffee on the road – Thanks! We appreciate all the support, and we’ll see you next time in the kitchen!

We include affiliate links for products on our website. Making a purchase after clicking on our links and we may earn a commission which helps us produce more videos and drink more coffee :^) We participate in the Amazon Services LLC Associates Program, which is an affiliate advertising program. It provides a means for us to earn fees by linking to Amazon.com and affiliated sites, so we can make more videos.

Share and Enjoy !

Chocolate Chip Cookies quick and easy recipe

chocolate chip cookies

This quick chocolate chip cookies recipe makes a perfect weekend treat–it’s a super quick and tasty recipe that I have never mucked up–which is saying something.

Ingredients for Chocolate Chip Cookies

½ cup SUGAR
¼ cup BROWN SUGAR
½ cup BUTTER (soften)
2 tsp VANILLA EXTRACT
1 EGG
1½ cup ALL-PURPOSE FLOUR
½ tsp BAKING SODA
¼ tsp SALT
1 cup CHOCOLATE CHIPS
(or ½ cup chocolate chips and ½ cup chopped nuts)

How to make Chocolate Chip Cookies

Set out butter to soften and egg to come to room temperature.
Combine sugars, butter, vanilla extract, and egg in a bowl and mix well; you can use a mixer if you like, but I never have–just stir with a spoon to a smooth-ish consistency, do it as well as you can and that will likely be good enough (most things in life are like that, I find).
In another bowl, add flour, salt and baking soda (just ½ tsp BAKING SODA, if you add too much the cookies will be bitter, dude). Add chocolate chips and nuts–or if you don’t want nuts, just add chips–but that would be nuts. Mix ingredients well.
Add the sugar/butter combo to the dry ingredients and mix until incorporated. The dough should stick together when pressed.
Arrange spoonfuls of dough on an ungreased cookie sheet–about two inches apart. The recipe makes about 18-22 cookies, I usually get 17 or 18 cookies, cause I like mine kinda big.
Slide cookie sheet into an oven heated at 350 degrees F and let bake 10-12 minutes. When cookies are brown around the edges and lightly golden on top, they’re finito. Cool on cooling rack or eat them hot out of the oven with a glass of milk or a White Russian, depending on how your day is going.
Give this easy chocolate chip cookies recipe a try and let me know what you think, and bon appetit!

chocolate chip cookies

And for another sweet tooth fix, try this heavenly Caramel Oatmeal Squares Recipe.
caramel oatmeal squares

Thanks watching and checking out the ramen noodle recipes, and be sure to sign up for our mailing to receive our weekly posts delivered to your inbox. If you liked the recipe, click a few buttons below to share it with your friends. Thanks, I appreciate it!
–Chef Buck

Share and Enjoy !


Pesto Bread Recipe with Parmesan Cheese

parmesan pesto bread

Bake a delicious homemade Pesto Bread Recipe following this step-by-step instruction with Mama Redbuck. Mama bakes the best homemade bread from scratch and this is a fancy braided bread recipe that will wow your family.

What you need to make Pesto Parmesan Bread

5 ½ cups unbleached BREAD FLOUR
2 cups WARM WATER (approx. 130 degrees F)
2-4Tbsp OLIVE OIL
2 Tbsp SUGAR
½ cup SKIM MILK POWDER
1 Tbsp KOSHER SALT
1 Tbsp INSTANT YEAST
PESTO (approx. 1 cup divided between loaves)
1 cup PARMESAN CHEESE (shredded and divided)
a sprinkle of CORN MEAL ……………..recipe makes 2 loaves

How to this Pesto Bread Recipe

Sift 5 ½ cups of unbleached bread flour. Bread flour has a higher gluten count than all-purpose flour; gluten holds in the gases released by the yeast, enabling the bread to rise.

In a bowl, add 2 cups of warm water (approx 130 degrees F). Add 2 Tbsp olive oil, sugar, milk powder, salt, and yeast. Mix well.

1 cup at a time, add the sifted flour into the bowl until the dough thickens. Do not add all of the dough into the bowl. As soon as the dough in the bowl reaches a density forming a sticky ball, remove dough from the bowl and place onto a surface coated with flour. Continue adding the sifted flour to the ball, turning and folding the flour into the dough ball.

Continue this kneading process for 8-10 minutes, adding dough as needed (the entire 5 ½ cups may not be needed). Kneading transforms the dough into a more elastic consistency, enabling the gluten in the dough to better trap the gases from the yeast.

After kneading, place the dough into a bowl coated with 1 Tbsp of olive oil. The bowl should be at least twice the size of the dough ball. Cover bowl and set aside for 45-60 minutes to allow the dough to rise. The dough will expand to approx. double in size.

pesto Bread recipe

When dough has risen, push a floured fist into the top of the dough—this will release the gas. Remove dough from bowl and divide into equal halves. Mama Redbuck uses a kitchen scale to weigh her dough and divide equally; size is important because you want equal-sized loaves that will bake evenly. If you don’t have a scale, just estimate the size, but make sure the loaves are fairly close in size.

With a rolling pin, spread one of the dough halves into a square approx. 9 X 14 inches. Spread ½ cup of prepared pesto evenly over the flattened dough. Sprinkle top with ½ cup shredded, parmesan cheese.

Roll up the dough and toppings into a 14 inch “burrito” shape, folding and pinching the ends shut. With a sharp knife, cut lengthwise down the center of the rolled bread, creating halves. Cut gingerly, being mindful not crush the layers of dough, and leave one of the very ends attached so as to not separate the halves completely. Fold the bread halves into a braid. Keep the cut sides of dough facing upward.

Coat a loaf pan with olive oil and sprinkle the bottom of the pan with a light dusting of corn meal; this will help keep the bread from sticking to the bottom of the pan as it bakes. Transfer braided bread “face-up” into pan and cover. Repeat this processes with the other dough half and then set the 2 loaf pans aside for 1 hour to allow them to continue to rise.

After the loaves have risen, place them in an oven pre-heated to 375 degrees F and bake approx. 35-40 minutes.

Remove bread from oven. Parmesan cheese and pesto may be melted to the inside of the pan and you may need to cut around the edges of the pan with a knife. Remove loaves and place on a cooling rack, but don’t let the bread cool for too long before cutting off a slice—it’s delicious warm.

Getting into baking? My mom uses a Danish Whisk in this recipe, and you can check here for current prices for a Danish Whisk on Amazon.

Give this Parmesan Pesto Bread Recipe a try and let me know what you think, and for another tasty bread dish, watch Mama Redbuck cook up a beautiful Rosemary Bread Recipe.

rosemary bread

Thanks for checking out our non-alcoholic Bananas Foster Recipe, and all of our recipes. Be sure and sign up for our mailing list and never miss a new Chef Buck cooking video, and also click a button below and share the dishes with your friends. We appreciate all the kind comments and support, and we’ll see you next time in the kitchen!

Thanks for watching our recipe videos!

Should you even eat bread? Of course! But what does the New Yorker say about gluten?

We include affiliate links for products on our website, so if you make a purchase after clicking on our links, we may earn a commission which helps us produce more videos and drink more coffee :^)

We participate in the Amazon Services LLC Associates Program, which is an affiliate advertising program providing a means for us to earn fees by linking to Amazon.com and affiliated sites, so we can make more videos.

Share and Enjoy !

Banh Tet Rice Cake — Let’s Try Vietnamese Bánh Tét

banh tet

What is Banh Tet rice cake? Let’s try this traditional Vietnamese rice cake.

What is Banh Tet Rice Cake

Banh tet rice cake is a staple dish served to celebrate the Lunar New Year in Vietnam. It’s a very popular dish in Vietnamese culture, and if you live near a Vietnamese market or deli, you’ll probably be able to give it a try–and I recommend you do. It’s pretty tasty, kind of addictive, and a bargain dish in the International District in Seattle. I’ve eaten many bánh tét rice cake since shooting this video, and I see many more in my future.

banh tet rice cake
Banh tet sticky rice cake filled with pork and mung bean paste

Making a bánh tét rice cake often begins the day before Tét. The ingredients are prepared then cooked for at least six hours in a pot of boiling water. Glutinous rice, mung bean paste, and cooked pork fat are the main ingredients. The ingredients are layered on top of banana leaves and then wrapped tightly together with string. Bánh tét are generally wrapped several times with a string before boiling in a large pot of water to prevent the banana leaf from coming apart during cooking. The cake is savory, but sometimes sweetened, and tastes great with chili sauce.

If you liked this banh tet rice cake video, check out my Cool Foods Playlist

kiwano melon
kiwano has hints of citrus and cucumber

Ever Try a Banh Mi sandwich?


What is in a Banh Mi? Lets take one apart and see what we got.
This is the best Banh Mi, so far–thanks to eastsidegirl1977 for the great Seattle recommendation. I’ve been eating lots of these Vietnamese/French fusion sandwiches–maybe too many–but it’s too great a taste and value to pass up.

Thanks for checking out the videos. If you liked it, then click a button or two below and share it with your friends. I appreciate it!
–Buck

Share and Enjoy !


Wow! Healthy French Fries Recipe in the Oven

roasted vegetable fries

You can make French Fries without the guilt of eating French fries! Try this roasted vegetable fries recipe. It’s a super simple recipe that will maximize taste and nutrition.

Sweet potatoes, parsnips, and carrots make delicious fries, especially with a little mustard and maple syrup thrown into the mix. You’ll need a baking pan for this recipe, and you can check out current prices for baking pans on Amazon.

Roasted French Fries Ingredients:

4 Tbsp OLIVE OIL (extra virgin)
3 Tbsp MAPLE SYRUP
3 Tbsp DIJON MUSTARD
SALT and PEPPER to taste

2 med-sized SWEET POTATOES (steak fry-sized pieces)
4 PARSNIPS (peeled, steak fry-sized pieces)
4 CARROTS (steak fry-sized pieces)
1 ONION (sliced)
GARLIC cloves (sliced in halves or whole)
fresh ROSEMARY
french fries

How to Make Roasted French Fries:

  • Preheat the oven to 425 degrees Fahrenheit.
  • When slicing the root veggies, leave on the skins if desired; it will add excellent taste and nutritional value and is less wasteful.
  • Place the sliced veggies in bowl large enough to mix.
  • In a smaller bowl, mix together the syrup, mustard, oil, salt and pepper.
  • Toss the chopped veggies with the syrup mixture, coating the fries well.
  • Spread the fries out in a single layer onto a baking pan, or use two pans if necessary. Make sure the veggies are not piled up or jammed together.
  • Allow the veggies to roast, turning occasionally, until brown and cooked through, about 25 minutes, but it will depend on volume and size of veggies.  The longer you cook the fries, the crispier they will become.


These fries make a great side for chicken, beef, and pork entrees, or it’s a terrific way to transform a vegetarian meal into a hardy feast.
Give this roasted vegetable French fries recipe a try and let me know what you think, and bon appetit!

And for another tasty veggie side, try this Easy Okra Recipe.
french fries

Thanks for Watching our French Fries Recipe Video!

Click a button below and share the dishes with your friends. You can also follow Chef Buck on Youtube. We appreciate all the kind comments and support, and we’ll see you next time in the kitchen!

If you like what CG and I do, support us on Patreon, or throw us a tip in our Paypal Tip Jar. We’ll happily enjoy a coffee on the road – Thanks! We appreciate all the support, and we’ll see you next time in the kitchen!

We include affiliate links for products on our website. Making a purchase after clicking on our links and we may earn a commission which helps us produce more videos and drink more coffee :^) We participate in the Amazon Services LLC Associates Program, which is an affiliate advertising program. It provides a means for us to earn fees by linking to Amazon.com and affiliated sites, so we can make more videos.

Share and Enjoy !

Vegetarian Chili Recipe EVERYONE Will Love

vegetarian chili

Try this vegetarian chili recipe for folks who don’t like vegetarian chili!

It’s tatsy and easy to make, too; once you’ve chopped up the ingredients, you’re 90% done. Or at least 85% done. Give it a try and let me know what you think.

What You Need For This Vegetarian Chili Recipe

2 15 oz cans CHICK PEAS
2 15 oz cans KIDNEY BEANS
2 BELL PEPPERS (chopped)
1 ONION (chopped)
1 HOT PEPPER (diced)
6 cloves GARLIC (finely chopped)
2 SQUASH (cut into large pieces)
1 ZUCHINNI (cut into large pieces)
2 lg or 4 sm TOMATOES (chopped)
1 28 oz can CRUSHED TOMATOES
3-6 oz TOMATO PASTE
1/2 cup CILANTRO (chopped)
1 heaping Tbsp OREGANO
2 Tbsp OLIVE OIL
1 Tbsp CUMIN
1/2 tsp CAYENNE PEPPER
2 Tbsp CHILI POWDER
SALT and PEPPER, to taste
WATER as needed…add slowly

Vegetarian Chili Recipe
Don’t let the word “vegetarian” keep you from trying this recipe!

How To Make Vegetarian Chili

Heat olive oil in large pot on medium high heat. Add onions, hot pepper, and garlic and saute 4-5 minutes. Add bell peppers and continue sauteing. Add chili powder, cumin, salt, and cayenne pepper. Mix ingredients well. Add beans and continue cooking. Add zuchinni and squash and oregano. Continue cooking 2-3 minutes and then add fresh tomatoes. Add canned crushed tomatoes. Slowly add water–not too much–as the vegetables will begin to release water as they cook. Cover and bring pot to a boil. Reduce heat and stir in the cilantro. Cover and allow to simmer approx. 45 minutes.
That’s it man. If you can make it a day ahead, then you’re lucky–chili aways taste best on the day after! But it’s good right away, too. Top with shredded cheese, or a dollop of sourcream, or a handful of corn chips–or all three–it’s gonna be delicioso!
Give this vegetarian chili recipe a try and I bet you’re gonna love it–and it’s a healthy chili choice, too.
Bon appetit!

For more vegetarian comfort food, try this Gluten-Free Tofu Lasagna.
gluten free tofu lasagna

Thanks for checking this vegetarian chili recipe out! If you liked it, click some of the buttons below and share it with your friends and family, I appreciate it.
–Buck

Share and Enjoy !


Baked Jalapeno Poppers for Party People

jalapeno poppers

Baked jalapeno poppers are quick and cheesy and absolutely delicious. Check out this poppers recipe to see how easy it is to bake picture perfect stuffed jalapenos.

Thanks for watching, give it a go, and let me know what you think.

Ingredients for Baked Jalapeno Poppers

6 large JALAPENO peppers
8oz CREAM CHEESE
1 cup shredded CHEESE
4-5 cloves GARLIC (finely chopped)
about 1/4 cup CILANTRO (chopped)
1 tsp smoked PAPRIKA
1 tsp ONION POWDER
SALT and PEPPER, to taste
(dill, cumin, cayenne, and cajun mix
go well in poppers–experiment
with your favorite seasonings)

jalapenos for poppers
sliced jalapenos for poppers

How to Make Baked Jalapeno Poppers

  • Set cream cheese out from fridge for at least 1/2 hour to allow time to soften.
  • Cut stems from peppers, but not enough to open the back of the pepper entirely, this shallow cut will leave enough of the top of the pepper in place to form a “wall” that will hold the cheese as it bakes.
  • With a spoon, scoop out the seeds and ribs; your jalapeno should look like a little rowboat (without oars or life jacket).
  • In a bowl, thoroughly mix cream cheese, shredded cheese, cilantro, and seasonings together.
  • Spoon cheese mixture into pepper boats. Fill each pepper entirely, but do not overfill–just to the top of each pepper–mounded cheese will only make a mess and disrupt the optimal cheese to pepper ratio.
  • In a skillet, on medium heat, melt 2-3 Tbsp butter.
  • Add garlic and stir 1 minute.
  • Turn off heat and add bread crumbs.
  • Stir until butter is absorbed and garlic is mixed well with bread crumbs. Or, if you don’t want to fool with garlic cloves–just substitute garlic powder.
  • Press peppers cheese side down into the crumb mixture, then turn over and mound extra crumb topping on the peppers.
  • Place peppers on a baking sheet and cook 20-25 minutes at 400 degrees F.
  • When the crumb topping is baked golden, remove and allow peppers to rest 5 minutes.

After that, you can do whatever your heart desires.
Give this baked jalapeno poppers recipe a try and let me know what you think, and bon appetit!
baked jalapeno poppers

If you’re new to home cooking, just get a bunch of spices, pots and pans, and start experimenting with different ingredients and recipes. It’s a healthy hobby that can save a lot of money in the long run. You can check out current prices for Complete Kitchenware Sets on Amazon as well as Complete Starter Spice Kits. Or just go to a thrift store! I’ve found some of my favorite kitchen gear at second-hand stores.

If you liked these baked jalapeno poppers, then try a healthier Baked Chicken Tender Recipe. It’s less mess and a great appetizer or main meal.

chicken tenders


Thanks for Watching our Videos!

Thanks for checking out our jalapeno popper recipe. Sign up for our mailing list so you’ll never miss a new recipe. Also click a button below and share the dishes with your friends. You can also follow Chef Buck on Youtube.

We appreciate all the kind comments and support, and we’ll see you next time in the kitchen!If you like what CG and I do, support us on Patreon, or throw us a tip in our Paypal Tip Jar. We’ll happily enjoy a coffee on the road – Thanks! We appreciate all the support, and we’ll see you next time in the kitchen!

We include affiliate links for products on our website. Making a purchase after clicking on our links and we may earn a commission which helps us produce more videos and drink more coffee :^) We participate in the Amazon Services LLC Associates Program, which is an affiliate advertising program. It provides a means for us to earn fees by linking to Amazon.com and affiliated sites, so we can make more videos.

Share and Enjoy !

Scone Recipe — Pecan Maple Biscuit Treat

scone recipe

This is a delicious pecan maple scone recipe, but not a good idea for folks with sugar/carb addictions and questionable degrees of willpower…which is pretty much everyone.

The only reason I’m even putting this up is because The Devil assured me that if I did I would one day win an Oscar and live in a luxury beach house in Malibu (which IS going to happen ’cause I was smart enough to get the deal in writing).

Scone Recipe Ingredients

Scones:
2 cups FLOUR
1/2 cup SUGAR
1 Tbsp BAKING POWDER
1/2 tsp SALT
5 Tbsp BUTTER
1/2 cup PECANS (chopped)
1/4 cup RAISINS
1 cup SOUR CREAM
1/4 cup MAPLE SYRUP
1 tsp VANILLA

Icing for Scone Recipe

1 cup POWDERED SUGAR
splash of WATER
2 Tbsp MAPLE SYRUP

scone recipe
best scone ever…really

In a large bowl, combine flour, sugar, baking powder, and salt. Cut butter into flour mixture (freezing the butter and grating it into the mix is an easy trick to get this done). Add pecans and raisins into the mix.

In a separate bowl, combine sour cream, vanilla, and 1/4 cup maple syrup. Whisk together until smooth.
Pour the sour cream mixture into the flour mix and gently turn for a few minutes until the flour begins to form into clumps. Most of the loose flour will adhere into these clumps, but it’s okay if all of it doesn’t.

On a sheet of parchment paper or floured surface, pour the contents of the bowl. Press the clumps together into a mound–it’ll want to brake apart somewhat, but that’s okay. Flatten the mix into a circular cookie shape about 1 inch thick and cut like a pizza into 8 slices. Check here for current pricing for parchment paper on Amazon.

Arrange onto a flat baking sheet and bake in a 400 degree F oven for 20-25 minutes, until baked through and golden brown.

While scones cool, add powdered sugar into a small bowl. Add 1-2 Tbsp of warm tap water–add water slowly and whisk into a syrup; be conservative, it’s easy to add too much water. Then whisk 2 Tbsp of maple syrup into the powdered sugar syrup. Why? I don’t know, just crazy.

Drizzle the syrup glaze over the scones and allow the icing to harden (approx 10-15 min).

And there you go…a very sweet and healthy-free combo of questionable ingredients combined to put on the pounds and take potentially vibrant years off of the back-end of your life.
But this scone recipe is delicious.
Enjoy, if possible.
I usually really like the first two, and then I begin to question my motivations.

For a less decadent, less lethal treat, try this Homemade Biscotti Recipe.

biscotti recipe
Adding a little cocoa powder and ground coffee makes a nice biscotti twist.

Thanks For Watching Our Scone Recipe!

Thanks for checking out our scones, and all of our recipes. Be sure and sign up for our mailing list so you’ll never miss a new recipe. Also click a button below and share the dishes with your friends. You can also follow Chef Buck on Youtube. We appreciate all the kind comments and support, and we’ll see you next time in the kitchen!

If you like what CG and I do, you can also support us on Patreon, or throw us a tip in our Paypal Tip Jar. We’ll happily enjoy a coffee on the road – Thanks! We appreciate all the support, and we’ll see you next time in the kitchen!

We include affiliate links for products on our website. So, if you make a purchase after clicking on our links, we may earn a commission which helps us produce more videos and drink more coffee :^) We participate in the Amazon Services LLC Associates Program, which is an affiliate advertising program. It provides a means for us to earn fees by linking to Amazon.com and affiliated sites, so we can make more videos.

Share and Enjoy !

Chard Recipe with Sweet Potato

chard

Fresh rainbow or swiss chard greens are similar to beet greens, nutritious and very tasty prepared in this healthy chard recipe. Sweet potatoes are high in fiber and antioxidants and a healthier choice for your blood sugar levels than white potatoes.

Healthy Sweet Potato Chard Recipe:

2 large SWEET POTATOES
1 15 oz can CHICKPEAS, drained (or 1½ cups cooked)
4 cups CHARD (w/ spinach mixed, if desired)
1 15 oz can BROTH
1 15 oz can DICED TOMATOES
1 large ONION (chopped)
6 GARLIC cloves (chopped fine)
1 inch fresh GINGER (minced)
2 Tbsp OLIVE OIL
1 tsp PAPRIKA
1 tsp ground CUMIN
1 Tbsp ground CORIANDER
1 tsp ground TURMERIC
1/2 tsp ground CINNAMON
1/2 tsp SALT
1 tsp ground BLACK PEPPER
— Optional Accompaniments —
COUSCOUS, QUINOA
garnish of CUCUMBER, fresh CILANTRO and LEMON ZEST

chard with sweet potato
Chard and sweet potato make an excellent vegetarian meal.

How to make a Healthy Chard and Sweet Potato Dish

Heat olive oil in a large skillet or pot. Saute the onion for a few minutes minutes then add garlic, ginger, and stalk (if using chard), and saute a few minutes more until onions soften.
Stir in paprika, cumin, coriander, turmeric, cinnamon, salt, and black pepper.
Add diced tomatoes and broth.
Bring to a boil, then add sweet potato and chickpeas. Simmer 25 to 30 minutes, until the potatoes are tender. Stir in roughly chopped chard leaves for last 10 minutes (if using spinach, add leaves last 2 minutes).
Serve over couscous, quinoa, or all on its lonesome with a garnish of cucumber, chopped cilantro, and lemon zest.
It’s especially good over quinoa, and the protein in the quinoa makes this recipe a great main dish for a vegetarian meal.

Check the current price for a Saute Pan on amazon.

chard
Fresh Rainbow Chard is a beautiful, healthy, leafy green.

Health benefits Of Chard

  • Chard is a source of vitamin C, A, and K, potassium, magnesium, fiber and iron.
  • A single serving contains more than 300% of your daily vitamin K needs.
  • Swiss chard is high in antioxidants.
  • It is low in calories.
  • This leafy green belongs to the same family as beets, chard, spinach, and quinoa.
  • helps regulate the blood sugar levels in our body.

And if you want to try another green, what about Beet Greens?

beet greens recipe
Buy beet roots with the greens for two great ingredients.

Thanks for Watching our Chard Recipe Video!

Click a button below and share the dishes with your friends. You can also follow Chef Buck on Youtube. We appreciate all the kind comments and support, and we’ll see you next time in the kitchen!

If you like what CG and I do, support us on Patreon, or throw us a tip in our Paypal Tip Jar. We’ll happily enjoy a coffee on the road – Thanks! We appreciate all the support, and we’ll see you next time in the kitchen!

We include affiliate links for products on our website. Making a purchase after clicking on our links and we may earn a commission which helps us produce more videos and drink more coffee :^) We participate in the Amazon Services LLC Associates Program, which is an affiliate advertising program. It provides a means for us to earn fees by linking to Amazon.com and affiliated sites, so we can make more videos.

Share and Enjoy !

Pork Loin Chop Recipe Perfect Every Time

pork loin chop

Cook a delicious, juicy pork loin chop recipe perfect every time.

Use a lot of onion and garlic – especially garlic – those two ingredients are actually good for you, so why not use a lot? Also, this dish goes well with whatever beer is on sale.

Pork Loin Chop Recipe Ingredients

PORK LOIN CHOP
2 Tbsp OLIVE OIL
1 lg ONION (sliced)
6-8 cloves GARLIC (rough chopped)
fresh ROSEMARY
SALT and PEPPER, to taste

How to Cook a Pork Loin Chop

Season both sides of pork loin chop before cooking–and don’t be timid with the seasoning–it’ll make all the difference! I often use just salt and pepper (black pepper AND cayenne), but experiment with your favorite seasonings, too–every now and then I’ll season up pork chops with ground ginger and saute them with onion and sliced, fresh ginger–it’s so good!

Heat oil in a skillet. Not smoking hot, but pretty damn hot–we want to sear the pork and seal in the flavor. The skillet should be suitable for cooking on the stove top and in the oven. Check current price for a Cast Iron Skillet on Amazon. Place chops in the skillet, and they should sizzle when they hit the pan.

Add fresh rosemary sprigs. Cook chops 3-4 minutes on one side and then turn. This is for chops approx. 1″ thick–adjust cooking times according to the size of the chop you use. Move chops in pan to mix with oil and rosemary.

Add sliced onion and garlic. Cook chop 3-4 minutes on second side, then remove skillet from stove top and slide skillet into oven preheated to 350 degrees F. Cook another 4-5 minutes and return to stove top. Remove chops from skillet and set aside to rest.

Continue cooking onion and garlic with rosemary on medium/low heat to desired doneness.
Top chops with onion and garlic and serve.

And if you’re still in a carnivorous mood, here’s a method to Cook Up A Steak like a restaurant pro.

american kobe top sirloin steak
Cook a thick steak filet on high heat. Sear the outside for awesome taste and color, and then finish to desired doneness in the oven.

Thanks for checking out our pork loin chop recipe, and all of our recipes. Be sure and sign up for our mailing list and never miss a new Chef Buck cooking video, and also click a button below and share the dishes with your friends. We appreciate the kind comments and support, and we’ll see you next time in the kitchen!

Thanks for Watching our Pork Loin Chop Recipe

Click a button below and share the dish with your friends. You can also follow Chef Buck on Youtube. We appreciate all the kind comments and support, and we’ll see you next time in the kitchen!

If you like what CG and I do, support us on Patreon, or throw us a tip in our Paypal Tip Jar. We’ll happily enjoy a coffee on the road – Thanks! We appreciate all the support, and we’ll see you next time in the kitchen!

We include affiliate links for products on our website. Making a purchase after clicking on our links and we may earn a commission which helps us produce more videos and drink more coffee :^) We participate in the Amazon Services LLC Associates Program, which is an affiliate advertising program. It provides a means for us to earn fees by linking to Amazon.com and affiliated sites, so we can make more videos.

Share and Enjoy !

Tofu Lasagna Recipe — Gluten Free Edition

gluten free tofu lasagna

The only thing that sounds worse than a tofu lasagna recipe is a gluten-free tofu lasagna recipe. However, this recipe is actually pretty tasty, and still gluten-free.

Camera Girl whipped up this dish and it was damned tasty. I’m not ready to start driving the tofu train, but I am enjoying the ride.

Tofu Lasagna Recipe Ingredients

The sauce:
1 Tbsp OLIVE OIL
1/2 tsp RED PEPPER FLAKES (crushed)
1/2 large ONION (chopped)
3 cloves GARLIC (chopped)
15 oz can DICED TOMATOES
8 oz can TOMATO SAUCE
1 CARROT (chopped well)
1 stalk CELERY (chopped well)
2 tsp OREGANO
1/2 tsp BASIL
1 BAY LEAF
SALT & PEPPER, to taste
….or substitute 25 oz jar store-bought marinara sauce, but don’t do that :^(
The filling:
1 pkg gluten-free, rice LASAGNA NOODLES (you do not cook them prior to baking)
2 Tbsp extra-virgin OLIVE OIL
1/2 large ONION (chopped)
6 cloves GARLIC (minced)
16 ounce package EXTRA-FIRM, WATER-PACKED TOFU (not silken tofu)
3 cups fresh SPINACH (chopped)
1/2 cup PARMESAN CHEESE (shredded)
1/2 cup part-skim MOZZARELLA CHEESE (shredded)
2 Tbsp Kalamata OLIVES (finely chopped)
2 tsp dried OREGANO
1/2 tsp dried THYME
SALT & PEPPER, to taste

gluten free tofu lasagna

How to Make Tofu Lasagna

First thing, start making the sauce. Now, don’t buy pre-made sauce!–or do…maybe you’re busy, I don’t know.
Next, heat olive oil and red pepper in a saucepan over medium-high heat. Add onion and garlic and saute 2 to 4 minutes. Add carrot and celery and continue sauteing.
Mix in the remaining sauce ingredients and bring to a boil. Reduce heat to low and simmer 30 minutes or longer, until flavors are blended, stirring routinely.

While sauce is simmering, heat oil in a large skillet and saute garlic and onion for lasagna filling. Add tofu and spinach to skillet and stir until spinach wilts and the mixture is heated through (2 to 3 minutes). Transfer skillet contents to a bowl and stir in parmesan, olives, seasonings, and 2/3 of the marinara sauce.

Spread half of the remaining sauce on bottom of 9 x 13 baking pan. If you need a decent oven-safe baking dish, check out some current pricing for a Pyrex dish on Amazon. Next, place a layer of lasagna noodles over sauce–if using the gluten-free rice lasagna, the noodles will not have to be cooked before using. Spread half of the tofu mixture over noodles. Repeat layers of noodle and tofu mixture. Top with remaining marinara sauce and shredded mozzarella cheese.

Cover dish and bake in a 350 degree F oven for about an hour.
Remove from oven and allow to rest 10 minutes.

Give this tofu lasagna recipe a try and let me know what you think, and bon appetit!

If you like thinking outside of the box, try this vegetarian version of pulled pork Jackfruit BBQ Recipe

jackfruit pulled pork
Jackfruit BBQ is great over rice, on a sandwich, or all on its own.

Thanks for checking the recipes out! Click some of the buttons below and share it with your friends and family, I appreciate it.
–Buck

Share and Enjoy !


Beef Stew Recipe for a Hearty Meal

beef stew

This beef stew recipe is a classic meat and potato dish, a stick to your ribs meal that hits the spot on a cool day, or any day. A stew is a great way to clean out the fridge, so add any odds or ends you have hanging around. Adjust the seasonings as you like. I tend go do lighter on the seasonings just to keep it mild and meaty, but sometimes I do just the opposite. Many times I’ll add a ¼ cup of BBQ sauce just to jazz things up. There are no rules when it comes to beef stew, so go for it.

This will make you feel like a manly man if you’re a man, and if you’re a woman, you’ll likely take ownership of your own feelings and not need a bowl of food to direct your inner emotional understanding.

What you need for this Beef Stew Recipe

1½ lbs STEW BEEF
¼ cup ALL-PURPOSE FLOUR
1 GREEN BELL PEPPER (chopped)
1 15oz can DICED TOMATOES
2 lg CARROTS (chopped)
2 POTATOES (chopped)
1 lg ONION (sliced)
3-4 cloves GARLIC (sliced)
1 14oz can BROTH (chicken or beef)
CELERY? why not?
3 Tbsp OLIVE OIL
1 tsp CORIANDER
1-2 tsp CUMIN
1 BAY LEAF
1 tsp CHILI POWDER
(optional) ¼ cup of BBQ sauce …so good…give it a try
1 Tbsp BUTTER
SALT and PEPPER, to taste

beef stew

How to make Beef Stew

  • Chop up your veggies, dude.
  • In a bowl, season your stew beef with salt and pepper.
  • Add 1/4 cup flour and toss the meat until coated.
  • In a large pot, heat oil on medium high heat and add beef. Sear beef and turn to cook each side.
  • Remove beef from pot and set aside.
  • Return the pot to the stove and onions and butter.
  • Melt butter and then add garlic and bell pepper.
  • Sauté onions, garlic, and pepper 8-10 minutes.
  • Add cumin and coriander (add chili powder if desired, or mustard powder, cayene pepper, etc.–I tend to go light on the seasonings for a simple flavor).
  • Return meat to the pot and add 1 can of diced tomatoes.
  • Simmer for 5 minutes and then add 1 can of broth (chicken or beef or veg–whatever’s handy and floats your boat).
  • Add carrots, celery, and a bay leaf. Cover and bring to a boil, then reduce heat and simmer for 30 minutes.
  • After 30 minutes, add potatoes. Your potatoes should be cut into big, ping-pong-ball sizes so they don’t cook down to nothing. Add water as needed, just enough to cover your ingredients in the pot–don’t add too much water–we want a nice, thick stew when we’re done.
  • Cover, and continue to simmer for another 45-50 minutes.
  • Give it a taste and adjust seasoning as needed.

Serve stew with a thick slice of buttered bread and enjoy being the King or Queen of the castle.
And that’s it, man. Give this hearty beef stew recipe a try and let me know what you think, and bon appetit!

If you don’t have a big pot, here’s a link to check out current prices for a BIG STEW POT on Amazon.

Thanks for checking out this classic beef stew recipe. For another meaty stew with a spicy twist, try this Chorizo Sausage Stew Recipe. 

Chorizo Sausage recipe
Spicy Chorizo Sausage and Potato Stew

Thanks for Watching our Beef Stew Recipe Video!

Click a button below and share the dishes with your friends. You can also follow Chef Buck on Youtube. We appreciate all the kind comments and support, and we’ll see you next time in the kitchen!

If you like what CG and I do, support us on Patreon, or throw us a tip in our Paypal Tip Jar. We’ll happily enjoy a coffee on the road – Thanks! We appreciate all the support, and we’ll see you next time in the kitchen!

We include affiliate links for products on our website. Making a purchase after clicking on our links and we may earn a commission which helps us produce more videos and drink more coffee :^) We participate in the Amazon Services LLC Associates Program, which is an affiliate advertising program. It provides a means for us to earn fees by linking to Amazon.com and affiliated sites, so we can make more videos.

Share and Enjoy !

BBQ Beans Recipe – Tangy and Tasty Barbecue Flavor

bbq beans

A BBQ Bean Recipe with a spicy kick. This recipe is tangy and delicious and using a variety of beans gives this dish the illusion of grandeur, but it’s just beans, yummy tasty beans.

What You Need for BBQ Beans Recipe

4 15oz cans BEANS
1 large ONION (coarsely chopped)
1 GREEN PEPPER (coarsely chopped)
4 cloves of GARLIC (chopped)
1/3 cup light BROWN SUGAR
28oz can CRUSHED TOMATOES
14oz can BROTH
1/3 cup APPLE CIDER VINEGAR
1 Tbsp fresh ROSEMARY (minced)
1 tsp WORCESTERSHIRE SAUCE
1/2 tsp RED PEPPER FLAKES
1 1/2 tsp dried THYME
1/4 cup stone ground MUSTARD
1 Tbsp SOY SAUCE
1 BAY LEAF
3 Tbsp OLIVE OIL
SALT & PEPPER, to taste

How To Make Easy BBQ Beans

Heat olive oil in large skillet over medium high heat. Add onion, green pepper and sauté about 2 minutes. Add garlic and continue sautéing on med heat until begins to brown (3-5 more minutes).
Add rosemary, thyme and red pepper flakes and stir 1 minute.
Add tomatoes, prepared mustard, brown sugar, soy sauce, worcestershire sauce, stock, vinegar. Mix well. Bring to a bubble.
Stir in beans, bay leaf. Season with salt and pepper. Reduce heat and simmer on low for 60 minutes, stirring as needed.
Serve as a side–or a main dish–if you want your main dish to be beans.
And that’s it. Give this BBQ Beans recipe a try and let me know what you think, and bon appetit!

Wanna try another bean recipe? This Vegetarian Chili recipe is awesome!
vegetarian chili

Beans

-6 to 11 percent of a cooked bean’s weight is protein.
-Beans are one of the best things to eat for improving the stability of blood sugar levels in diabetics.
-Beans are low fat, contain no cholesterol or saturated fat, and are an excellent source of fiber, protein, calcium, iron,
folic acid and potassium.
-North Dakota produces more beans than any other state in the USA.

Thanks for Watching our BBQ Bean Recipe Video!

Click a button below and share the dishes with your friends. You can also follow Chef Buck on Youtube. We appreciate all the kind comments and support, and we’ll see you next time in the kitchen!

If you like what CG and I do, support us on Patreon, or throw us a tip in our Paypal Tip Jar. We’ll happily enjoy a coffee on the road – Thanks! We appreciate all the support, and we’ll see you next time in the kitchen!

We include affiliate links for products on our website. Making a purchase after clicking on our links and we may earn a commission which helps us produce more videos and drink more coffee :^) We participate in the Amazon Services LLC Associates Program, which is an affiliate advertising program. It provides a means for us to earn fees by linking to Amazon.com and affiliated sites, so we can make more videos.

Share and Enjoy !

Best Caramel Oatmeal Squares Recipe

oatmeal squares

Caramel Oatmeal Squares make great dessert treats – or bribes, if you need to motivate someone.

What you need to make Oatmeal Squares

Bars:
1 3/4 cup OATS
1 1/2 cup FLOUR
3/4 cup BROWN SUGAR
1/2 tsp BAKING SODA
1/4 tsp SALT (optional)
3/4 cup BUTTER (melted)
1 tsp VANILLA EXTRACT
1 cup PEANUTS
1 cup CHOCOLATE CHIPS

Caramel Sauce*:
3/4 cup BUTTER
1 1/2 cups BROWN SUGAR (firmly packed)
2 Tbsp WATER
1/4 tsp SALT
3/4 cup EVAPORATED MILK
1 Tbsp VANILLA EXTRACT
1/4 cup FLOUR (added after caramel has cooled)

*In a hurry? Instead of making caramel sauce, you use a 12 oz jar of caramel ice cream topping.

How to make Caramel Oatmeal Squares

Preheat oven to 350 degrees F.

Make the caramel sauce:

  • Combine butter, brown sugar, water, and salt in a medium sauce pan, over medium heat, stirring constantly.
  • Bring to boil and continue to stir for 5 minutes depending upon thickness desired. The longer it boils, the thicker your caramel sauce will eventually be. If you don’t stir the pot while the caramel is cooking, it will be a disaster, not as bad as knocking over the cake at a wedding, but the caramel will burn, which will kinda suck.
  • After 5 minutes, remove sauce from the heat and stir in evaporated milk and vanilla. Set aside to allow caramel to cool and thicken.

Grease a 9 x 13 baking pan. If you need a decent oven-safe baking dish, check out some current pricing for a Pyrex dish on Amazon.

  • In a bowl, mix oats, flour, brown sugar, baking powder, vanilla extract, and salt.
  • Stir in butter until well blended.
  • Reserve one cup of mixture to use as a topping later.
  • Press remaining mixture into bottom of greased pan.
  • Bake 10-12 minutes until light brown. Let cool 10 minutes.
  • Top with peanuts and chocolate pieces.
    Take your caramel sauce and stir in 1/4 cup flour until smooth. Drizzle sauce over nuts and chocolate, keeping the sauce 1/4 inch away from pan edges (to avoid having a cooked caramel mess on your pan).
  • Sprinkle top with the reserved cup of oat mixture.
  • Bake an additional 18-22 minutes or until golden brown.
  • Let cool. Then cut into squares.

*In a hurry? Instead of making caramel sauce, you use a 12 oz jar of caramel ice cream topping. To help it pour, heat it just a little before adding the extra flour.

Enjoy! Chocolate, peanuts, caramel…what’s not to enjoy? Give this oatmeal squares recipe a try and let me know what you think.

For another tasty dessert bar recipe, try an almost No-Bake Marshmallow Bar Recipe. It’s super easy.

marshmallow bars

Thanks for Watching our Oatmeal Squares Video!

Click a button below and share the dishes with your friends. You can also follow Chef Buck on Youtube. We appreciate all the kind comments and support, and we’ll see you next time in the kitchen!

If you like what CG and I do, support us on Patreon, or throw us a tip in our Paypal Tip Jar. We’ll happily enjoy a coffee on the road – Thanks! We appreciate all the support, and we’ll see you next time in the kitchen!

We include affiliate links for products on our website. Making a purchase after clicking on our links and we may earn a commission which helps us produce more videos and drink more coffee :^) We participate in the Amazon Services LLC Associates Program, which is an affiliate advertising program. It provides a means for us to earn fees by linking to Amazon.com and affiliated sites, so we can make more videos.

Share and Enjoy !

Black Eyed Peas are a Healthy Salad Choice

black eyed peas

Try out this Black eyed peas recipe the next time you’re in the mood for a healthy and tasty salad. Black-eyed peas are beans, and beans are a great way to turn a salad into a meal, especially garbanzo and kidney beans, but give black eyed peas a try, I bet you’ll love them.

This salad is a nice complement to a spicy meal–in fact it’s based on a dish we get all the time at an Indian restaurant where it’s served to balance out the spiciness of other dishes.

What you need for a Black Eyed Peas Salad

2 15oz cans BLACK-EYED PEAS
3-4 GREEN ONIONS (chopped)
1 stalk CELERY (chopped)
1 CUCUMBER (sliced)
1 CARROT (shredded)
3 PLUM TOMATOES (cut)
zest and juice of 1 LEMON
1 cup CILANTRO (chopped)
4 Tbsp BALSAMIC VINEGAR
2 Tbsp OLIVE OIL
1 ½ tsp CUMIN
½ tsp CHILI POWDER
2-3 Tbsp HONEY
HOT SAUCE, to taste
SALT and PEPPER, to taste

black eyed peas

How to make Blacke Eyed Pea Salad

This is a super simple dish to prepare. You can check here for current Black-Eye Pea Prices on Amazon. Canned beans are already cooked, but dried black eyed peas will have to be cooked before adding to the salad, just prepare the beans according to the package directions.

  • In a small bowl, mix balsamic vinegar and olive oil. Season with spices.
  • Toss in the beans, onion, vegetables–EXCEPT the tomato!–tomato loses a lot of it’s flavor when refrigerated, so add tomato just before serving.
  • Gently toss the Ingredients.
  • Cover, and chill in the refrigerator at least 1 hour, or overnight. The longer the better.
  • Remove dish from fridge, mix in tomato, add additional seasonings if desired, and serve.

Folks traditionally eat black eyed peas on the first day of the new year for good luck, but these beans are pretty good on the other 364 days as well, so stock some blackeyed peas in your cupboard and try them out in some of your favorite bean dishes.

And for another great healthy beany salady kind of recipe, try this Hearty Black Bean Salsa Recipe it’s fantastic.

Black Bean Corn Salsa
Salsa is great on a chip, as a topping for fish or salad, in an omelet, on ice cream…well, maybe not ice cream.

Thanks for checking out the black eyed peas recipe. Be sure and sign up for our mailing list so you’ll never miss a Chef Buck cooking video, and click a button below and share the dishes with your friends. We appreciate all the kind comments and support, and we’ll see you next time in the kitchen!
–Chef Buck

Thanks for watching our recipe videos!

Thanks for watching. We include affiliate links for products. If you make a purchase after clicking on our links, we may earn a commission which helps us produce more videos and drink more coffee :^)
We are a participant in the Amazon Services LLC Associates Program, an affiliate advertising program designed to provide a means for us to earn fees by linking to Amazon.com and affiliated sites.

Share and Enjoy !


Best General Tso’s Chicken Recipe

general tsos chicken

General Tso’s Chicken is a delicious dish you’ll find at most Chinese restaurants–and you can make the very same dish in your own kitchen at home.

The chicken in this recipe is baked instead of deep fried, which is a little healthier and a lot less messier, if you’re into that kinda thing. Give this recipe a try and let me know what you think.

Ingredients for General Tsos Chicken

3 cups crushed CORN FLAKES (or panko crumbs)
1 1/2 lbs boneless, skinless CHICKEN
1/2 cup ALL-PURPOSE FLOUR
2 EGGS, whisked
2 tsp SESAME OIL
5-6 GARLIC cloves (minced)
1 Tbsp GINGER (minced)
1/4 tsp RED PEPPER FLAKES
1/3 cup SOY SAUCE
1/4 cup APRICOT JAM
3 Tbsp HOISIN SAUCE (check current price for hoisin sauce on Amazon)
2 Tbsp CORNSTARCH
1 Tbsp BALSAMIC VINEGAR
1 2/3 cups WATER
SESAME SEEDS and GREEN ONION for garnish

How to make General Tso’s Chicken

Toast sesame seeds (make extra, ’cause they’re a great addition to all kinds of dishes).
You’ll need about 1 1/2 pounds of chicken cut into roughly 1″ pieces–dark or white, whichever you prefer. We’re gonna bread and bake the chicken ’cause it’s healthier and less messy than frying.

Set up a breading station:
In a bowl, season 1 cup of flour with salt and pepper.
In another bowl, whip 2 eggs.
And in a third bowl set out your breading–use panko flakes or crushed cereal.
Coat each piece of chicken in flour, then egg, and then roll and coat with bread crumbs
and arrange on a greased baking sheet.

When all the chicken is breaded and arranged on the pan, coat the top lightly with an oil spray. Slide the chicken into an oven heated at 400 degrees F and allow to bake 20 minutes. When the chicken is golden and crispy, remove from oven and set aside.

general tso chicken

In a bowl, combine soy sauce, hoisin sauce, vinegar, cornstarch and water. Mix well.

Heat sesame oil in a skillet on medium high heat. Add pepper flakes, garlic and ginger. Saute for 2 minutes and then add sauce. Constantly stirring, allow the sauce to come to a simmer. When the sauce begins to bubble, continue stirring a few minutes until the sauce thickens into a syrupy consistency–this will happen quite quickly.

Add the chicken and stir, tossing the chicken until it is well coated with sauce.
Transfer chicken and sauce to a serving dish and garnish with toasted sesame seeds and chopped green onion. Serve with rice or noodles.

If you’re just getting into home cooking, you can check out current pricing for a Complete Starter Spice Set on Amazon.

For another Asian inspired chicken dish, try a Japanese style Teriyaki Chicken recipe.

chicken teriyaki recipe
teriyaki chicken recipe

Thanks for watching. Give this General Tso’s Chicken recipe a try and let me know what you think, if you like it, click a button and share it with your friends.

Thanks for Watching our Chinese Chicken Recipe

Sign up for our mailing list so you’ll never miss a new recipe. Also click a button below and share the dishes with your friends. You can also follow Chef Buck on Youtube. We appreciate all the kind comments and support, and we’ll see you next time in the kitchen!

If you like what CG and I do, support us on Patreon, or throw us a tip in our Paypal Tip Jar. We’ll happily enjoy a coffee on the road – Thanks! We appreciate all the support, and we’ll see you next time in the kitchen!

We include affiliate links for products on our website. Making a purchase after clicking on our links and we may earn a commission which helps us produce more videos and drink more coffee :^) We participate in the Amazon Services LLC Associates Program, which is an affiliate advertising program. It provides a means for us to earn fees by linking to Amazon.com and affiliated sites, so we can make more videos.

Share and Enjoy !

Martini Recipe for Rednecks in Momma’s Special Glass

martini

Ever had a redneck martini? This is a family recipe. Lawyers and salesmen have been hogging this drink for too long, it’s time to take it back to the people. Give it a try and let me know what you think.

Martini Recipe Stuff:
1 splash VERMOUTH, dry
3 fingers VODKA
3, 4, or 5 OLIVES (the bigger the better)

Or you can try:
2 oz. VODKA ……or GIN (blagghhth!)
1/2 oz. VERMOUTH, dry
3/4 oz. OLIVE JUICE (for a “dirty martini”)

And then just do this:
Shake vermouth and vodka with ice to chill, strain, and then add olives to taste. I like it served in a mason jar, but pretty much anything that holds water will work. Loosen tie or kick off heels and relax. (although if you’re drinking out of a jar, you probably not wearing a tie.)
Repeat as needed.

Martini Fun Facts:
Martini drinks first became popular during prohibition when alcohol was outlawed.
The long stem of the martini glass is designed to keep your hot hand off of the bowl of the glass.
Martinis used to be made with cherries.
James Bond drinks a vodka martini (shaken, not stirred, of course).
I once had a chocolate martini, and I’ll probably never have one again (if I have any say in it).

And if you’re still in a drinking mood, give a Moscow Mule Cocktail a go–this video will show you how to make, and NOT MAKE this gingery drink.

moscow mule cocktail recipe
moscow mule cocktail

Share and Enjoy !


Follow Me!