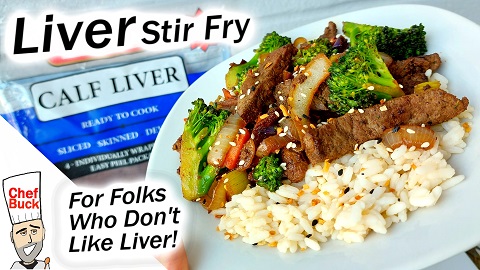
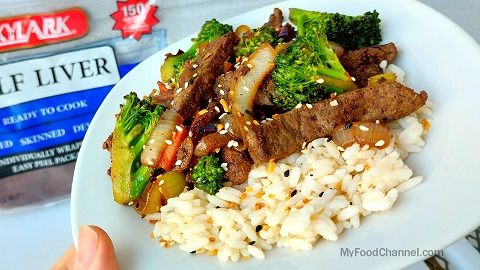
If you’re looking for an alternative to classic liver and onions, try liver in a delicious Asian-style Stir Fried Liver Recipe. I love a classic liver and onion recipe where Liver is the main ingredient, but making a stir-fry liver sneaks the liver into the dish, so now you can sneak some liver onto the family dinner table.
Stir Fried Liver Recipe Ingredients
8 oz LIVER 1 sm ONION 4-5 cloves sliced GARLIC 2 Tbsp sliced GINGER 3 cups CHOPPED VEGGIES In this recipe I used CELERY CARROT CABBAGE BROCCOLI 1-2 Tbsp TAMARI/SOY SAUCE 1 tsp SESAME OIL OIL for sauteing ¼ tsp BLACK PEPPER ½ tsp GARLIC POWDER ½ tsp ONION POWDER ½ tsp CHILI POWDER –top with sesame seeds (Everything Bagel Topping!) or chopped peanuts. –serve over rice
How to Make Stir Fried Liver
Heat oil in a skillet on Medium heat.
Add liver and cook 1-2 minutes on each side, then remove from skillet and set aside to rest.
Into the skillet, add onions, ginger, garlic, and other veggies, except for the broccoli and other veggies that might require less cooking time.
Saute veggies for 2-3 minutes.
Add in dried spices and remaining veggies and saute 2 minutes.
Slice liver into ½ strips and stir into the skillet.
Saute for 1-2 minutes until the liver is done to your liking.
Finish the dish with the Sesame oil, stir, and serve.
Serve over rice, and top with sesame seeds or chopped peanuts, if desired. Check current pricing for EVERTHING BAGEL TOPPING, which I think works great on this dish. I bet cilantro would be a great addition as well.
Liver is a super nutritious protein and a cool ingredient. If you’re a little apprehensive about eating liver, then this liver stir-fry recipe might be a great introduction, so give it a try and let us know what you think. For another twist on a liver recipe idea, try this Cuban Style Liver, or take a look at a Classic Liver and Onion Recipe.
liver recipe with onions
Thanks for Watching our Videos!
Thanks for checking out our stir fried liver recipe. Sign up for our mailing list so you’ll never miss a new recipe. Also click a button below and share the dishes with your friends. You can also follow Chef Buck on Youtube. We appreciate all the kind comments and support, and we’ll see you next time in the kitchen!
If you like what CG and I do, support us on Patreon, or throw us a tip in our Paypal Tip Jar. We’ll happily enjoy a coffee on the road – Thanks! We appreciate all the support, and we’ll see you next time in the kitchen!
We include affiliate links for products on our website. Making a purchase after clicking on our links and we may earn a commission which helps us produce more videos and drink more coffee :^) We participate in the Amazon Services LLC Associates Program, which is an affiliate advertising program. It provides a means for us to earn fees by linking to Amazon.com and affiliated sites, so we can make more videos.
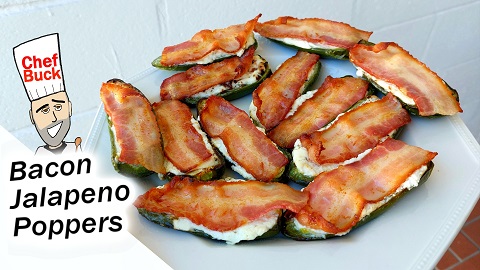
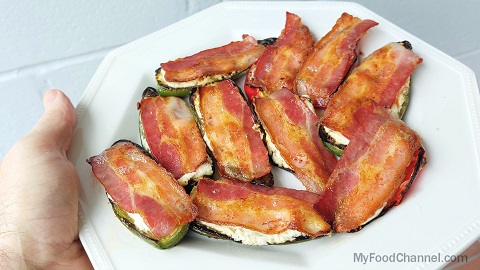
This recipe for broiled jalapeno poppers with bacon is flavorful and delicious. And we top each popper with bacon. What could be better?
Chef Buck and I enjoy jalapeno poppers! However, I [Camera Girl] am not crazy about the bread crumbs – yes, they add a crunch but why add another mild-mannered ingredient to your cheesy poppers? I want flavor, flavor, flavor!!
Fun fact: Some Texas friends recently told us that poppers are also called “armadillo legs”. Who knew?
What You Need to Make Broiled Jalapeno Poppers with Bacon
A sturdy BROILING PAN, or another oven-safe pan that is big enough for the poppers you want to make. Check current broiler pan prices on Amazon. Fresh, small to medium JALAPENO PEPPERS to fill your pan; Plan on 4 halves for each person. 1 package of your favorite, thinly sliced BACON. Thick slices of bacon do not crisp up quickly. Whatever filling(s) you want …..
Filling Suggestions Here are some of our favorite fillings for poppers. Each of the following suggestion provides the filling for 2 halves of a small to medium jalapeno:
1 oz plain cream cheese or herbed goat cheese
1 oz plain cream cheese, AND
1 tsp pepper jelly, 1 tsp cracked black pepper
1 Tbsp everything spice
3 tsp sundried tomatoes, 1/2 tsp garlic powder, 1 tsp cracked black pepper [ Buck says this one tastes like pizza ]
The options are endless! Try using: blue cheese, cheddar cheese, asiago cheese, pepper jack cheese, chives, green onions, 1 tsp soy or Worcestershire sauce, sundried tomatoes, minced garlic, some of your favorite meat rub.
If you want the bacon taste, but you also want the bacon to be super crispy? Instead of topping each popper with uncooked bacon, add cooked crispy bacon to your filling.
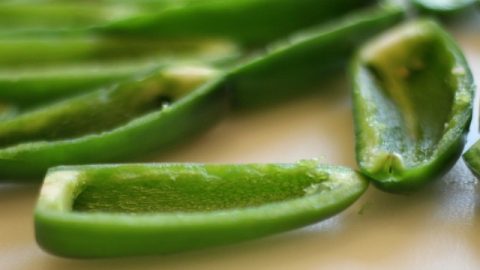
sliced jalapenos for poppers
How To Make Jalapeno Poppers With Bacon
Take out cream cheese, goat cheese and/or other dairy products you are using for filling.
Cut bacon slices in thirds, set aside.
Place oven rack 3 inches from broiler element (generally your top oven shelf). Pre-heat broiler.
Slice jalapenos in half (longways), taking off stem, seeds and membrane. REMEMBER TO BE CAREFUL HANDLING JALAPENOS. They contain capsaicin, which you do NOT want in your eyes or mouth.
Place jalapeno halves slice-side up in pan. Sear in preheated broiled for about 6 minutes.
While the jalapenos are initially in the oven, prepare your fillings.
Bring your jalapenos out of the oven and let them cool off the pan for about 3 minutes, until their temperature allows you to handle them.
Fill each half with your desired filling(s). Top with a bacon third.
Return halves to the pan. Slide pan back into the oven.
Broil for 6 minutes – watching closely, all ovens are different.
Remove from oven. Allow to cool on paper towels.
Additional Tips When Making Jalapeno Poppers
Want poppers that are less spicy? Use mini bell peppers instead of jalapenos. Or, if you have more time, after you’ve removed the membrane and seeds, soak them overnight in a bowl filled with Sprite.
These poppers can be made at least one day in advance and held in the fridge or freezer. If you do this, DON’T add your bacon until you’re ready to broil your poppers.
Also, you can serve your poppers on lettuce leaves…. which can also soak up some oil from the cheeses and bacon.
Thanks for checking out our broiled jalapeno poppers recipe. Sign up for our mailing list so you’ll never miss a new recipe. Also click a button below and share the dishes with your friends. You can also follow Chef Buck on Youtube. We appreciate all the kind comments and support, and we’ll see you next time in the kitchen!
If you like what CG and I do, support us on Patreon, or throw us a tip in our Paypal Tip Jar. We’ll happily enjoy a coffee on the road – Thanks! We appreciate all the support, and we’ll see you next time in the kitchen!
We include affiliate links for products on our website. Making a purchase after clicking on our links and we may earn a commission which helps us produce more videos and drink more coffee :^) We participate in the Amazon Services LLC Associates Program, which is an affiliate advertising program. It provides a means for us to earn fees by linking to Amazon.com and affiliated sites, so we can make more videos.
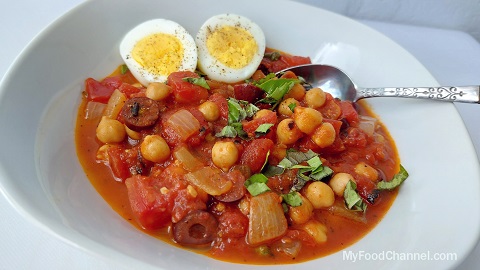
Puttanesca with chickpeas is a flavorful, quick and versatile twist on a classic Italian dish. A puttanesca recipe calls for anchovies, which is an ingredient some folks are not excited about–including myself!–but anchovy is perfect in this recipe. Like your favorite spaghetti sauce, puttanesca is great right when you cook it, and even more delicious the next day.
Ingredients for Chickpea Puttanesca
Optional: top your puttanesca with a protein e.g. boiled egg, Italian sausage, fish, poultry.
1 Tbsp oil 1/2 tsp dried chili pepper flakes 1 tsp cumin seeds (optional) 1 tsp fennel seeds (optional) Large onion (about a cup), cut in bite-sized chunks 1 Tbsp garlic cloves, finely chopped 3 anchovy fillets (about 1 oz), drained and finely chopped 1 Tbsp tomato paste 1/2 cup white wine 28 oz can diced tomatoes (in the video we used fire roasted) 1 tsp Italian seasoning 1/2 tsp black pepper 1 15 oz can of chickpea, drained and rinsed 1/3 cup sliced Kalamata olives 2 Tbsp capers, drained
Optional garnish: 1/4 cup choppped fresh basil (or parsley)
How to Make Puttanesca with Chickpeas
Note: You will want to pay extra attention to the heat of your skillet with this dish because you’re working with seeds and because you want some lightly brown bits….not a pan of burnt seeds, garlic and/or anchovies.
Prep some ingredients: Drain and rinse chickpeas. Peel and chop onions. Peel garlic. Dab excess moisture from anchovies. Mince garlic and anchovies. Open your cans of tomato paste, tomatoes Measure and drain your olives and capers. Decide if you want to have some protein on the top of your puttanesca. In the video, we served the puttanesca with boiled eggs. Here are two ways to make the perfect boiled eggs every time.
Prepare a flavorful base: Heat oil over medium high heat in a large skillet. Saute chili flakes, cumin seeds and fennel seeds onions for 30 seconds, stirring constantly. Add onions and cook for about 4 minutes. Add anchovies and garlic, stir constantly for 30 seconds more, until fragrant. Turn heat to medium. Add tomato paste and stir in for 30 seconds more. Add wine and stir for another minute, scraping up any small bits that have stuck to the pan. A stainless steel skillet is ideal for this recipe. Check current prices for stainless steel skillets on Amazon.
Complete your puttanesca: Add the tomatoes and juice, Italian seasoning and black pepper. Cook until the liquid is reduced by half, about 10 minutes. Add your chickpeas, olives and capers. Heat through.
Serve with basil and/or protein.
Experiment with your Puttanesca
Instead of white wine, you can use 1/4 cup white wine vinegar + 1/4 cup water.
Experiment with the seasonings. In one version, instead of the Italian seasoning and pepper flakes, we used Olde Thompson Italian Seasoning (now called ‘Pinch of Rome’ seasoning) – that is actually more like a great pizza topping.
Thanks for checking out this puttanesca recipe, and all of our recipes. Sign up for our mailing list so you’ll never miss a new recipe. Also click a button below and share the dishes with your friends. You can also follow Chef Buck on Youtube. We appreciate all the kind comments and support, and we’ll see you next time in the kitchen!
If you like what CG and I do, support us on Patreon, or throw us a tip in our Paypal Tip Jar. We’ll happily enjoy a coffee on the road – Thanks! We appreciate all the support, and we’ll see you next time in the kitchen!
We include affiliate links for products on our website. Making a purchase after clicking on our links and we may earn a commission which helps us produce more videos and drink more coffee :^) We participate in the Amazon Services LLC Associates Program, which is an affiliate advertising program. It provides a means for us to earn fees by linking to Amazon.com and affiliated sites, so we can make more videos.
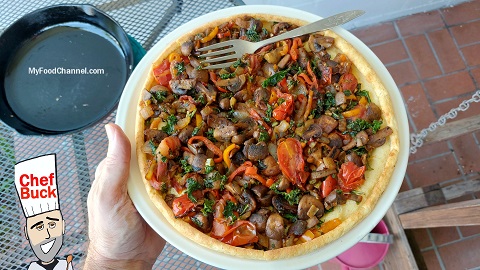
A German Pancake, also called a Dutch baby pancake, is easy to learn and can be used with a variety of savory or sweet toppings. This recipe version easily serves 2 people – each person enjoying half a 10”, ½” thick pancake plus toppings. If you’ve never had a German pancake, it’s a delicious cross between an easy-to-make soufflé, and a bowl-shaped crepe. You may know it by another name: a Bismarck, a Dutch Puff, or as a variation of the English Yorkshire pudding.
How To Make a Successful German Pancake
Use a cast-iron skillet . In a pinch, you can use some other oven-safe dish like a Pyrex dish, but it’s convenient to have something that can go from the stove to the oven. Cast iron skillets can be pricey, but I use economical Lodge Cast Iron skillets, including the one in the video. You can check current prices for these skillets on Amazon.
Make sure your eggs and milk at room temperature (In a pinch, you can use your microwave to knock the cold off….but don’t overcook either ingredient);
Make sure your butter or oil is sizzling hot, but not burnt, when the batter is poured into your pan;
You want your batter to be bubbly/frothy before you pour it into your pan with hot oil, AND your oven preheated to 425˚F so that as soon as the batter is poured, it is immediately placed into a hot oven.
Do NOT open the oven while the pancake is baking. This is where your oven light comes in handy.
Ingredients for a Savory German Pancake
3 large eggs ½ cup milk [can use non-dairy milk] ½ cup all-purpose flour ½ tsp salt ½ tsp freshly ground black pepper [1 tsp fresh herb e.g. thyme, optional ] 3 Tbsp unsalted butter or oil or combo
Sample Pancake Toppings: 8 cherry tomatoes, halved 2 Tbsp garlic, minced 3 kale leaves, stems and leaves chopped separately; stems minced 2 green onions, chopped 2-3 small red and/or yellow bell peppers, chopped [In the video, we made a heaping amount of topping, using up some refrigerator items e.g. mushrooms.]
Optional Garnishes: Sprinkle of parmesan cheese Fresh chopped parsley, or chives, for garnish
the same Savory German Pancake Recipe without Mushrooms
Directions for Making a Dutch Baby Pancake
Take eggs and milk out of frig. Room temperature ingredients yield more desired ‘puffiness’; also easier to blend.
Chop toppings. Sauté in 10 in cast-iron skillet. Remove toppings and keep warm. Wipe out skillet. Or use two separate skillets as I do in the video recipe.
Position an oven rack so that your pancake has at least 6 inches of space to rise. We simply remove one rack.
Preheat oven to 425°F. Place your skillet/dish in oven as it warms.
In a large bowl, whisk eggs and milk until blended. Whisk in flour, salt and pepper until smooth; stir in fresh herb – if adding. Continue to whisk until smooth and fluffy.
If you forgot to heat the pan, you can Heat a 10-in. cast-iron or other ovenproof skillet over medium-high heat.
AFTER pan is heated, remove from oven, add butter and heat until sizzling, but before it is browned . Watch to make sure butter doesn’t burn. Pour batter into hot pan. Immediately place into preheated oven.
Bake until top is puffed and sides are golden brown and crisp, 10-20 minutes, or until desired doneness. For savory dishes, I prefer a cooking time around 10 minutes, but for sweeter, more desert-like German Pancakes, I like to cook the cake for 15-20 minutes. Do not open oven while cooking – use oven light.
Set your table. Doublecheck your toppings.
Remove from oven. Immediately sprinkle with cheese, reserved toppings and garnishes. Serve hot.
Helpful Hints as you Experiment with German Pancakes
This recipe is scalable. The basic pancake ratio: 1 egg to ¼ cup flour, ¼ cup milk. You can add an extra egg to this ratio – like we did for this recipe.
You can also make the batter the night before, to save blending time. Start with all ingredients at room temperature. Refrigerate combined batter. Next morning, let come to room temperature. Beat the batter until light and foamy. Continue with recipe.
Instead of a single oven-proof dish or pan, you can use two 6” pans to make individual pancakes.
Savory German Pancake with Mushroom, Kale, and Tomato
Other Savory Topping Combinations to Try
In the video, we packed our pancake with lots of things we found in the frig, that we thought needed to be used. You can be choosier with your German pancake experiments. Here’s some ideas to get your imagination cooking.
Chopped asparagus, capers and a squeeze of lemon
Cooked bacon or Canadian ham and your favorite cheese
Brown some diced portabella mushrooms, ½ onion with a ¼ lb ground turkey, flavored with your favorite seasonings
Mushrooms, garlic and Parmesan cheese
Roasted tomatoes, garlic, a splash of fresh greens and cheese once it’s finished baking
Potential Ingredients for Making a Sweet German Pancake
Stay tuned for a separate video and blog for making a sweet dutch baby pancake. But, in the meantime, you can experiment with some of these ingredients…
Sweet Dutch Baby Pancake Topping Ideas: Lemon curd and powdered sugar Fresh berries and powdered sugar or a smidge of maple syrup and mint Applesauce, yogurt, cinnamon, nuts (sliced almonds, chopped walnuts) Cream and jam or jelly Sauté sliced apples, 2 Tbsp brown sugar, 2 Tbsp butter and about quarter cup of brandied cranberries, rum apples or bananas. For a fancy-pants occasion, flame ¼ cup brandy or rum over the fruit. Or maybe just add sliced toasted almonds or chopped walnuts.
For another delicious breakfast/brunch dish, check out our EGG BREAD RECIPE.
Fancy baked eggs to impress friends and family
Thanks For Watching Our Recipe Videos!
Thanks for checking out this savory German pancake recipe, and all of our recipes. Sign up for our mailing list so you’ll never miss a new recipe. Also click a button below and share the dishes with your friends. You can also follow Chef Buck on Youtube. We appreciate all the kind comments and support, and we’ll see you next time in the kitchen!
If you like what CG and I do, support us on Patreon, or throw us a tip in our Paypal Tip Jar. We’ll happily enjoy a coffee on the road – Thanks! We appreciate all the support, and we’ll see you next time in the kitchen!
We include affiliate links for products on our website. Making a purchase after clicking on our links and we may earn a commission which helps us produce more videos and drink more coffee :^) We participate in the Amazon Services LLC Associates Program, which is an affiliate advertising program. It provides a means for us to earn fees by linking to Amazon.com and affiliated sites, so we can make more videos.
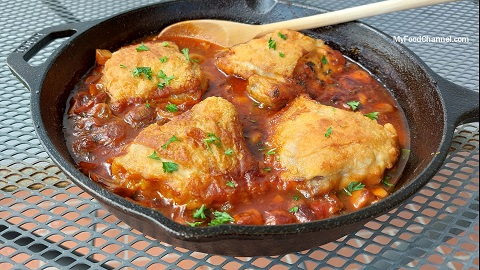
Here’s a decadent but simple version of a French Chicken Chasseur, or Hunter’s Chicken recipe. For this chicken and mushroom dish I like to use dark meat chicken, specifically the thigh, although you can definitely try another chicken cut if you prefer. Traditionally, French cooking calls for brandy in this chicken dish, but I find using only white wine is fine.
Ingredients For Easy Chicken Chasseur
2 lbs CHICKEN …thighs are best! ½ cup all-purpose FLOUR 12oz MUSHROOMS ½ cup ONION finely chopped GARLIC minced ½ cup dry WHITE WINE 2-4 Tbsp TOMATO PASTE 2 cups CHICKEN BROTH fresh chopped PARSLEY OIL for cooking
Heat oil on medium high heat in a heavy bottom, oven safe skillet.
Flour chicken and cook in the skillet until lightly browned on both sides. I like skinless boneless thighs for this recipe. If using chicken with skin, cook skin side down first until skin is crisp and golden.
Remove chicken from the skillet and set aside on a plate.
In the same still-hot skillet, add quartered mushrooms and saute until the mushrooms cook down.
Add onion and garlic and continue to saute for 2-3 minutes.
Stir in the tomato paste and saute until it begins to darken.
Add wine and allow to cook off.
Add chicken broth.
Raise the heat and bring the skillet to simmer, then lower the heat and simmer for 5 minutes.
Stir in parsley and whatever other fresh herbs you desire.
Return the browned chicken to the skillet.
Place the skillet in an oven preheated to 375˚F and cook for approx. 30 minutes, or until the chicken is cooked through.
Garnish with fresh parsley.
Serve chicken chasseur with bread or rice or all on its lonesome.
We hope you love this easy Chicken Chasseur recipe! Sign up for our mailing list so you’ll never miss a new recipe. Also click a button below and share the dishes with your friends. You can also follow Chef Buck on Youtube. We appreciate all the kind comments and support, and we’ll see you next time in the kitchen!
If you like what CG and I do, support us on Patreon, or throw us a tip in our Paypal Tip Jar. We’ll happily enjoy a coffee on the road – Thanks! We appreciate all the support, and we’ll see you next time in the kitchen!
We include affiliate links for products on our website. Making a purchase after clicking on our links and we may earn a commission which helps us produce more videos and drink more coffee :^) We participate in the Amazon Services LLC Associates Program, which is an affiliate advertising program. It provides a means for us to earn fees by linking to Amazon.com and affiliated sites, so we can make more videos.
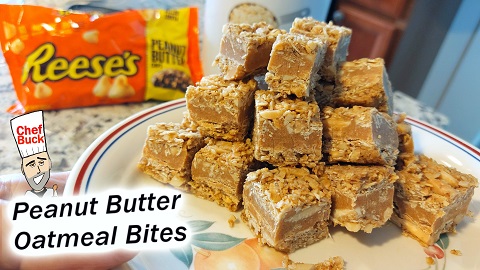
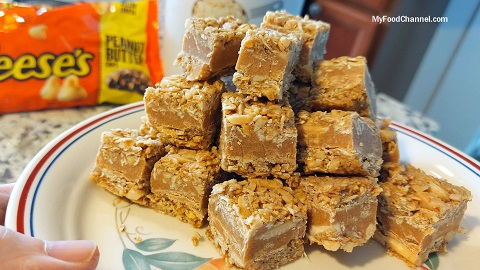
Today I’m toasting oatmeal to create delicious peanut butter oatmeal bars, but I’m cutting the bars into bite-sized bits so they’ll last longer. I like making these oatmeal treats with peanut butter chips, but this recipe is also tasty with chocolate or butterscotch chips.
Ingredients for Peanut Butter Oatmeal Bars
In the youtube recipe video, I halved the ingredients below to make a smaller serving.
3 cups ROLLED OATS 1 cup NUTS 2 cups PEANUT BUTTER CHIPS 1 cup MAPLE SYRUP ½ cup COCONUT OIL ½ cup COCONUT MILK 2 Tbsp BUTTER
How to Make Peanut Butter Oatmeal Bars
Toast the Old Fashioned Rolled Oats in an oven preheated to 300˚F. I toast mine for about 15 minutes, but ovens vary, so keep an eye on the oats as they bake. I like to toast the nuts as well. I prefer slivered almonds for this recipe. You can toast both oats and nuts at the same time, but don’t mix them in the same pan together, because the toasting time may differ, and some of the toasted oats will be blended for flour.
After rolled oats have toasted and cooled, place half of the oats into a blender and blend to the consistency of flour.
In a mixing bowl, whisk together the Maple Syrup and Coconut Oil. I’ve also added Vanilla Extract to this recipe in the past, and you can if you wish, but I think the flavor gets lost, so I generally skip the vanilla.
Into the bowl, add the whole toasted oats, the oat flour, and the nuts. Mix everything together well.
Line an approx. 8”x12” dish with parchment paper. Take half, or slightly more than half, of the oat mixture and spread it out evenly on the bottom of the dish. Press until compacted into a “crust-like” bottom. Set the rest of the oats aside as a topping for later.
Set up a double boiler on the stove top, which is just a smaller pot sitting in a larger pot slightly filled with water.
Heat the smaller pan in the water and then add the butter.
When the butter has melted, add in the Peanut Butter Chips and continuously stir until the chips melt. It will happen in a matter of moments. I like to use Reese’s chips, but any peanut butter chips will work. Check prices for Reese’s Peanut Butter Chips on Amazon.
Stir in the Coconut Milk until the mixture is smooth.
While the mixture is still hot, pour it over the dish of pressed oats. Spread the peanut butter mixture evenly over the top. Now allow the dish to set for about 15 minutes before adding the topping.
When the melted peanut topping has cooled, spread the remaining oats over the top to cover completely. Press the oat topping firmly.
Place the dish in the fridge for at least 3 hours.
Once the peanut butter oatmeal bars have set, you can slice the treat into whatever sizes you prefer, bars or bites!
I hope you enjoy these Peanut Butter Oatmeal Bars! Sign up for our mailing list so you’ll never miss a new recipe. Also click a button below and share the dishes with your friends. You can also follow Chef Buck on Youtube. We appreciate all the kind comments and support, and we’ll see you next time in the kitchen!
If you like what CG and I do, support us on Patreon, or throw us a tip in our Paypal Tip Jar. We’ll happily enjoy a coffee on the road – Thanks! We appreciate all the support, and we’ll see you next time in the kitchen!
We include affiliate links for products on our website. Making a purchase after clicking on our links and we may earn a commission which helps us produce more videos and drink more coffee :^) We participate in the Amazon Services LLC Associates Program, which is an affiliate advertising program. It provides a means for us to earn fees by linking to Amazon.com and affiliated sites, so we can make more videos.
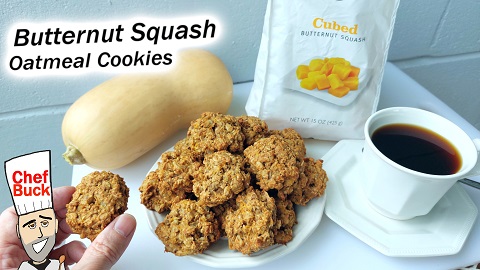
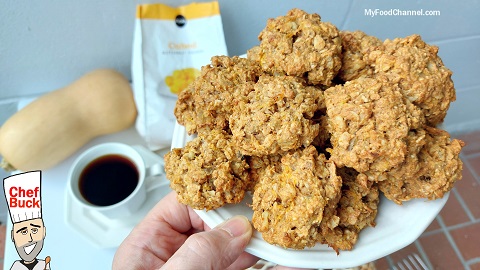
Butternut squash in oatmeal cookies? Yes! Whether you’re trying to sneak more veggies in your diet or just trying to use up some frozen butternut squash, these cookies are delicious. The candied ginger adds a great flavor. And nope, these cookies do NOT have a squash flavor.
Recipe makes about 2 dozen cookies
Butternut Squash Oatmeal Cookie Ingredients
1½ cup BUTTERNUT SQUASH 2 cups ROLLED OATS 1 cup FLOUR 2 tsp CINNAMON ½ tsp BAKING SODA ¾ tsp SEA SALT 10 Tbsp UNSALTED BUTTER (1 stick plus 2 Tbsp), softened ½ cup packed BROWN SUGAR 1 large EGG YOLK, room temperature 1 tsp VANILLA EXTRACT ¾ cup CANDIED GINGER, chopped 1 cup chopped WALNUTS
How to Make Delicious Butternut Squash Oatmeal Cookies
Take out butter and eggs.
Cook squash. Squeeze out excess moisture, then “smush” any large squash pieces. Set aside.
In a medium bowl, stir together oats, flour, cinnamon, baking powder and salt. Side aside.
In a separate bowl, use an electric mixer to beat butter and sugar until light and fluffy, about 2 minutes. Add eggs and vanilla and beat until combined.
By hand, add squeezed squash and combine well.
Preheat oven to 375°F. Line 2 baking sheets with parchment paper.
Stir flour mixture into wet mixture until just combined. Fold in ginger and nuts.
Drop cookies onto prepared baking sheets. We use an 1/8 cup measuring cup to scoop the batter and get similarly-sized cookies. Gently press the top fingers to flatten into discs. The cookies will not spread while baking.
Bake one pan at a time until the edges of the cookies are lightly browned. Check after 11 minutes, and every 2-3 minutes – as needed. Remove from the oven and cool on the baking sheet for 5 minutes.
Transfer the cookies to a wire rack to finish cooling.
Allow cookies to totally cool. Store cookies in an airtight container.
Additional Tips for Making Your Cookies Great
You can choose from several cook squash methods. In the video, we microwaved frozen cubed squash(+ 1 Tbsp water) for 4 minutes. You can also buy squash that is already cooked, or roast the squash like we did for our breakfast hash recipe.
Don’t have butternut squash? Instead, you can use pumpkin, acorn squash or sweet potato.
To remove the excess moisture, in the video we allowed the cooked cubed squash to cool in a collander, then simply used hands to squeeze out the extra moisture. You can use coffee filters, cheesecloths or other straining cloths. Paper towels can also be used but be careful not to leave little pieces in with the squash.
Leaving out the egg white makes the cookies chewier. You can freeze egg whites, if you can’t think of something to do with it in the next couple of days.
This recipe is very versatile. You can use raisins or cranberries instead of candied ginger. You can use other nuts and/or or seeds instead of walnuts. Try browning the butter, instead of just softening it. Or, if you don’t want to use butter, use extra virgin olive oil. What about adding 1/2 tsp ground ginger and/or ground cardamom?
You can freeze the uncooked batter or the baked cookies. Use 2 Tbsp of black strap molasses instead of brown sugar.
If you want to bake two sheets at a time, rotate sheets halfway through baking.
We hope you find this squash recipe is helpful and delicious! Sign up for our mailing list so you’ll never miss a new recipe. Also click a button below and share the dishes with your friends. You can also follow Chef Buck on Youtube. We appreciate all the kind comments and support, and we’ll see you next time in the kitchen!
If you like what CG and I do, support us on Patreon, or throw us a tip in our Paypal Tip Jar. We’ll happily enjoy a coffee on the road – Thanks! We appreciate all the support, and we’ll see you next time in the kitchen!
We include affiliate links for products on our website. Making a purchase after clicking on our links and we may earn a commission which helps us produce more videos and drink more coffee :^) We participate in the Amazon Services LLC Associates Program, which is an affiliate advertising program. It provides a means for us to earn fees by linking to Amazon.com and affiliated sites, so we can make more videos.
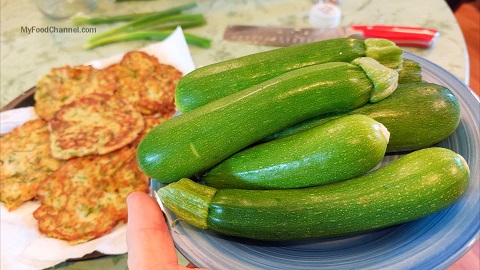
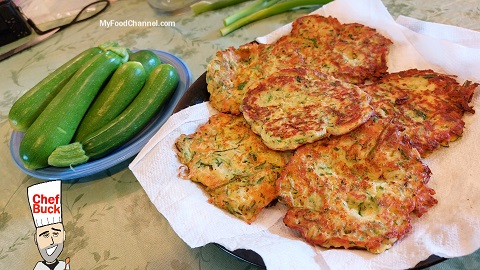
These zucchini fritters are flavorful, easy to make and great anytime of the day!
Ingredients for Delicious Zucchini Fritters
Makes about 6 fritters
4 cups of fresh ZUCCHINI, grated ½ tsp SALT 2 GREEN ONIONS, cut into thin 2-inch long slices ¼ cup CREAMY CHEESE 2 EGGS 12 RITZ CRACKERS (or use 3 Tbsp of saltines or flour) ½ tsp BLACK PEPPER ¼ tsp RED PEPPER FLAKES OIL for frying
Optional: A creamy fritter topping
Directions for Making These Easy Zucchini Fritters
Grate the zucchini into a colander. Mix in salt and set aside for 20 minutes to draw out some of the zucchini’s moisture.
While zucchini is drying out: Slice green onions into thin strains, about 2-inch long. Cover a plate with paper towels to absorb oil when fritters come out of the pan.
After letting zucchini set, squeeze out excess moisture.
In a large bowl, combine egg and cheese. Then add zucchini, green onions, crushed crackers and seasonings. Mix to combine ingredients.
Heat oil in large nonstick pan over medium heat. Place ¼ cup of fritter mix in heated oil, use non-metal spatula to flatten each fritter. Check prices for a non-stick skillet on Amazon.
Cook each side of the fritters for about 1 minute or until lightly browned. Place on paper toweled plate to absorb the oil.
Serve warm a la carte, or with your favorite creamy sauce. It can be as simple as a dollop of sour cream or mix up your special recipe.
Zucchini Fritter Options
Want to make these gluten-free? Use a non-gluten flour instead of the crackers.
Don’t want to spend the money on herbed goat cheese? Soften 2 oz cream cheese, and stir in 1/4 tsp garlic powder, 1 1/2 tsp Italian seasoning.
Thanks for checking out this zucchini recipe, and all of our recipes. Sign up for our mailing list so you’ll never miss a new recipe. Also click a button below and share the dishes with your friends. You can also follow Chef Buck on Youtube. We appreciate all the kind comments and support, and we’ll see you next time in the kitchen!
If you like what CG and I do, support us on Patreon, or throw us a tip in our Paypal Tip Jar. We’ll happily enjoy a coffee on the road – Thanks! We appreciate all the support, and we’ll see you next time in the kitchen!
We include affiliate links for products on our website. Making a purchase after clicking on our links and we may earn a commission which helps us produce more videos and drink more coffee :^) We participate in the Amazon Services LLC Associates Program, which is an affiliate advertising program. It provides a means for us to earn fees by linking to Amazon.com and affiliated sites, so we can make more videos.
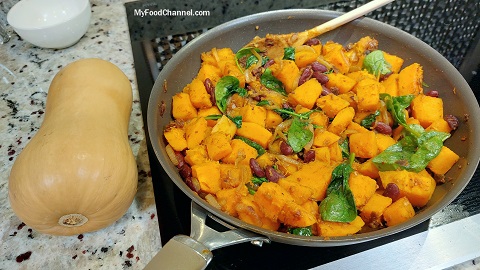
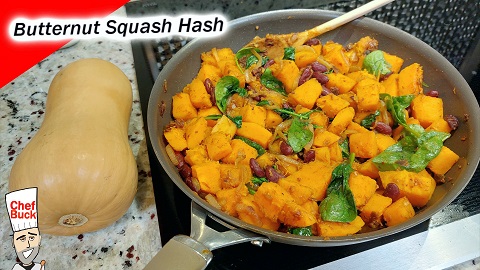
Butternut squash is the best squash for folks on the fence about squash, and this butternut squash recipe is fantastic. It’s a great combo of flavors and textures and super easy to prepare.
When buying a butternut squash, choose one with a smooth, creamy, blemish free skin, and also one that feels heavy for its size. At home you can store the squash in a cool dry place and it will keep for 1-2 months.
Butternut squash has a fairly thin skin, so it is easy to peel, in fact you can easily peel the skin with a potato peeler, or just slice away the skin with a sharp knife.
Ingredients for Butternut Squash Hash
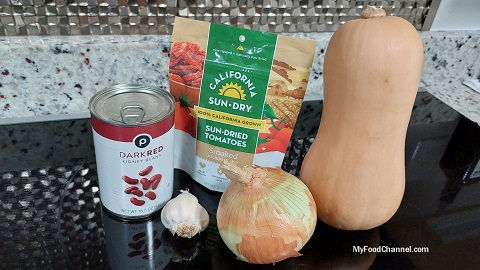
2 lb BUTTERNUT SQUASH 1 oz SUNDRIED TOMATOES –smoked sundried tomatoes are great! Check sundried tomato prices online. 2 Tbsp OIL for sauteing 1 ONION thinly sliced 3 cloves GARLIC mined 15 oz KIDNEY BEANS 1 Tbsp GARLIC POWDER SALT to taste BLACK PEPPER to taste …some SPINACH is nice
How to Make Butternut Squash Hash
Cut sun dried tomatoes into short strips. Cover with warm water and set aside so they can rehydrate.
Wash squash and cut in half, lengthwise. Scrape out seeds/stringy center.
Place cut-size down into ¼ inch water in a baking pan. Bake at 400˚F for 30-45 minutes. Cook until tender. Check regularly after 30 minutes in the oven.
While squash is cooking and cooling, slice onion, mince garlic, drain/rinse kidney beans.
Allow squash to cool till you can cut off skin. Dice into good-sized chunks.
Heat oil in a skillet on medium-high heat.
Saute onion and garlic for 2 minutes.
Add seasoning.
Add beans and sun dried tomatoes. Cook for an additional 5 minutes.
Add cubed butternut squash into the skillet, mixing everything together gently. Cook until all ingredients are warmed through. Add some spinach if you like; it’s great for color and added nutrition.
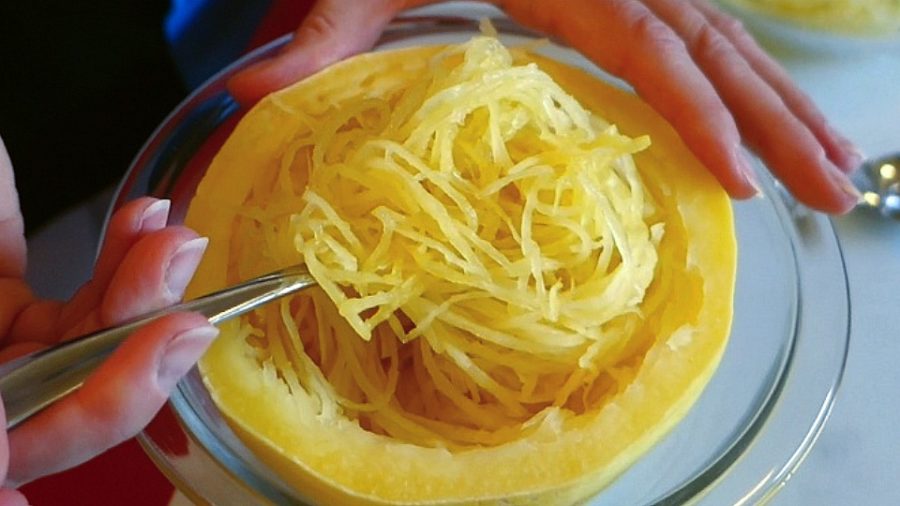
This butternut squash hash makes a terrific side dish and even a main dish if you just top it with an egg! It’s hearty like a potato dish. If you love Butternut Squash, then give Spaghetti Squash a try!
When cooked spaghetti squash pulls apart into “noodley strings”
Thanks For Checking out our Recipes
We hope you find this squash recipe is helpful and delicious! Sign up for our mailing list so you’ll never miss a new recipe. Also click a button below and share the dishes with your friends. You can also follow Chef Buck on Youtube. We appreciate all the kind comments and support, and we’ll see you next time in the kitchen!
If you like what CG and I do, support us on Patreon, or throw us a tip in our Paypal Tip Jar. We’ll happily enjoy a coffee on the road – Thanks! We appreciate all the support, and we’ll see you next time in the kitchen!
We include affiliate links for products on our website. Making a purchase after clicking on our links and we may earn a commission which helps us produce more videos and drink more coffee :^) We participate in the Amazon Services LLC Associates Program, which is an affiliate advertising program. It provides a means for us to earn fees by linking to Amazon.com and affiliated sites, so we can make more videos.
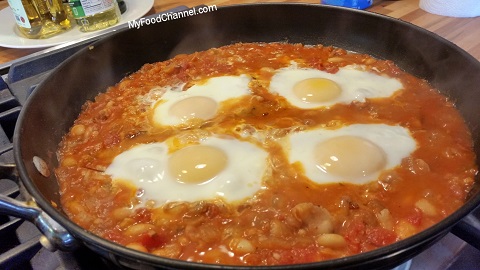
Make a rich white bean gravy with canned beans. I prefer cannellini beans for this gravy recipe, but most white beans will do the trick. When eating a low-fat diet, two of the things I miss most are biscuits and gravy, but there are healthy alternatives for these cravings, and a white bean gravy is super satisfying if you season it up just right.
Ingredients for White Bean Gravy
15oz can WHITE BEANS 1 med ONION 1-2 cloves GARLIC BROTH as needed fresh ROSEMARY (or SAGE is nice!) ½ tsp FENNEL SEED 1 Tbsp FLOUR 1 tsp SALT 1 tsp PAPRIKA 1 tsp GARLIC POWDER ½ tsp BLACK PEPPER HOT PEPPER (optional) I use Costena Chipotles check current prices on Amazon 1 Tbsp OIL Optional: fresh herbs or chopped green onion for garnish
How to Make White Bean Gravy
Heat about 1 Tbsp of oil in a pot on medium heat.
When the skillet is hot, add chopped onion and saute for 2 minutes.
Add garlic and hot pepper and all seasoning and continue cooking for 2 minutes more.
Stir in flour.
Add canned beans and about half a can of broth. Stir, and bring the skillet up to a simmer, then cover and let simmer for 10 minutes.
If needed, reduce the gravy farther on the stove, or add more broth or water if desired.
Use this bean gravy just like you would your favorite fat and flour gravy! And garnish with fresh green herbs or green onion for a picture perfect meal.
If you enjoy this white bean gravy recipe, then check out a breakfast bean favorite, Eggs and Beans!
Thanks for checking out our white bean gravy recipe, and all of our recipes. Be sure and sign up for our mailing list so you’ll never miss a new recipe. Also, click a button below and share the dishes with your friends. You can also follow Chef Buck on Youtube. We appreciate all the kind comments and support, and we’ll see you next time in the kitchen!
If you like what CG and I do, support us on Patreon. Or throw a tip in our Paypal Tip Jar. We’ll happily enjoy a coffee on the road – Thanks! We appreciate all the support, and we’ll see you next time in the kitchen!
Thanks for watching our recipe videos!
We include affiliate links for products on our website. So, if you make a purchase after clicking on our links, we may earn a commission which helps us produce more videos and drink more coffee :^) We participate in the Amazon Services LLC Associates Program, which is an affiliate advertising program. It provides a means for us to earn fees by linking to Amazon.com and affiliated sites, so we can make more videos.
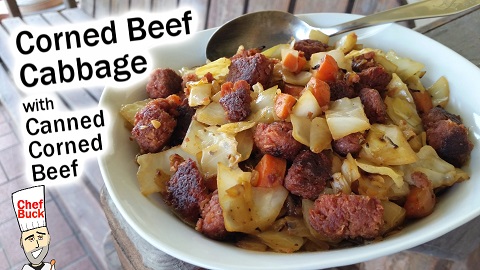
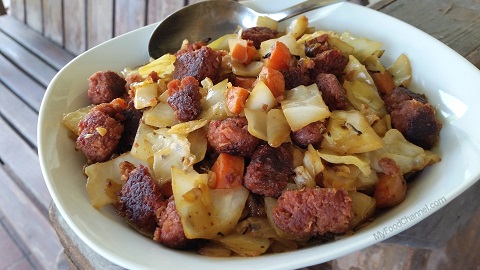
Try this delicious corned beef cabbage recipe. It’s super easy to make, especially if you’re using canned corned beef. The vinegar and Worcestershire give the dish a nice zing, and it’s a terrific comfort food that’s filling without requiring a ton of ingredients.
Ingredients for Corned Beef Cabbage Recipe
12oz canned CORNED BEEF 1 small CABBAGE 1 large ONION 1 large CARROT 3-4 cloves GARLIC 2-3 Tbsp VINEGAR 2 Tbsp WORCESTERSHIRE SAUCE 1 tsp CARAWAY SEEDS 1 Tbsp dried ITALIAN SEASONING SALT and PEPPER to taste OIL for cooking
How to make Corned Beef and Cabbage
Heat oil on medium heat in a large, heavy bottomed pot.
Add in chopped onions. Sauté onions for about five minutes.
Season onions with salt, pepper, and herbs.
Add in garlic and sauté for another minute.
Add in the cabbage and carrots and continue to cook on medium heat for 5 minutes, stirring occasionally.
Add in the Worcestershire sauce and vinegar and mix well.
Reduce the heat to medium low and let cook uncovered until much of the water has cooked out of the dish. Stir occasionally.
While cabbage continues to cook, open canned corned beef and cut into slices. Check current prices for CANNED CORNED BEEF on Amazon.
Heat a skillet on medium high heat and then sear the beef until well browned on each side. Then cut beef into smaller pieces. Check current prices for a CAST IRON SKILLET on Amazon.
When cabbage has reached desired doneness, add in the seared beef and toss lightly. Serve hot.
Give Canned Corned Beef a Try!
I prefer searing the beef in a separate skillet because it gives the canned meat a better flavor if it’s seared well. You can simply add the beef right out of the can into the cabbage if you prefer, but I think searing the beef well is worth the added effort.
This is an easy and exceptionally tasty dish. I like my corned beef cabbage recipe kind of mild, but adding a little hot sauce or cooking fresh chiles into the onions is an easy way to add heat.
Give this corned beef recipe a try and let me know what you think. For another canned corned beef recipe idea, try this Corned Beef Pickle Dip.
To meat or not to meat? As a cook and semi-professional foodie, it’s almost impossible for me to happily commit to vegetarianism, however, I don’t eat meat with the regularity that I once did. And I don’t miss it, in fact I appreciate meat more than ever now that I’ve reduced my meat consumption. Here’s a meatless chili recipe that is one of my favorite dishes, and don’t get me started on Jackfruit. For sure, meat can be delicious, but it’s not a requirement for a complete meal. Should we eat meat or beans? It’s a good question to ask. I like meat AND beans, but leaning into the beans might be a great idea in the long run.
Thanks for checking out our corned beef cabbage recipe, and all of our recipes. Be sure and sign up for our mailing list and never miss a new Chef Buck cooking video, and also click a button below and share the dishes with your friends. We appreciate all the kind comments and support, and we’ll see you next time in the kitchen! –Chef Buck
Thanks for watching our cooking videos!
We include affiliate links for products on our website, so if you make a purchase after clicking on our links, we may earn a commission which helps us produce more videos and drink more coffee :^) We participate in the Amazon Services LLC Associates Program, which is an affiliate advertising program providing a means for us to earn fees by linking to Amazon.com and affiliated sites, so we can make more videos.
Try this vegetarian chili recipe for folks who don’t like vegetarian chili!
It’s tasty and easy to make, too; once you’ve chopped up the ingredients, you’re 90% done. Or at least 85% done. Give it a try and let me know what you think.
What You Need For This Vegetarian Chili Recipe
2 15 oz cans CHICK PEAS 2 15 oz cans KIDNEY BEANS 2 BELL PEPPERS (chopped) 1 ONION (chopped) 1 HOT PEPPER (diced) 6 cloves GARLIC (finely chopped) 2 SQUASH (cut into large pieces) 1 ZUCHINNI (cut into large pieces) 2 lg or 4 sm TOMATOES (chopped) 1 28 oz can CRUSHED TOMATOES 3-6 oz TOMATO PASTE 1/2 cup CILANTRO (chopped) 1 heaping Tbsp OREGANO 2 Tbsp OLIVE OIL 1 Tbsp CUMIN 1/2 tsp CAYENNE PEPPER 2 Tbsp CHILI POWDER SALT and PEPPER, to taste WATER as needed…add slowly
Don’t let the word “vegetarian” keep you from trying this recipe!
How To Make Vegetarian Chili
Heat olive oil in large pot on medium high heat. Add onions, hot pepper, and garlic and sauté 4-5 minutes. Add bell peppers and continue sautéing. Add chili powder, cumin, salt, and cayenne pepper. Mix ingredients well. Add beans and continue cooking. Add zucchini and squash and oregano. Continue cooking 2-3 minutes and then add fresh tomatoes. Add canned crushed tomatoes. Slowly add water–not too much–as the vegetables will begin to release water as they cook. Cover and bring pot to a boil. Reduce heat and stir in the cilantro. Cover and allow to simmer approx. 45 minutes. That’s it man. If you can make it a day ahead, then you’re lucky–chili aways taste best on the day after! But it’s good right away, too. Top with shredded cheese, or a dollop of sourcream, or a handful of corn chips–or all three–it’s gonna be delicious! Give this vegetarian chili recipe a try and I bet you’re gonna love it–and it’s a healthy chili choice, too. Bon Appetit!
Click a button below and share the dishes with your friends. We appreciate all the kind comments and support, and we’ll see you next time in the kitchen!
If you like what CG and I do, support us on Patreon, or throw us a tip in our Paypal Tip Jar. We’ll happily enjoy a coffee on the road – Thanks! We appreciate all the support, and we’ll see you next time in the kitchen!
We include affiliate links for products on our website. Making a purchase after clicking on our links and we may earn a commission which helps us produce more videos and drink more coffee :^) We participate in the Amazon Services LLC Associates Program, which is an affiliate advertising program. It provides a means for us to earn fees by linking to Amazon.com and affiliated sites, so we can make more videos.