Best Butter Pecan Cookie Recipe

pecan sandies

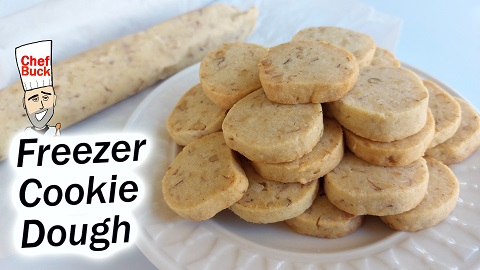
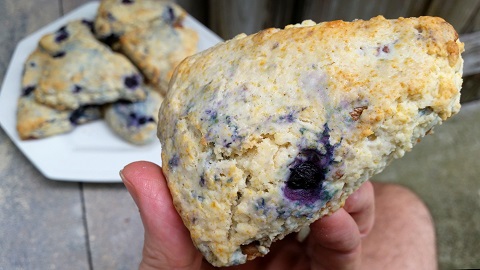
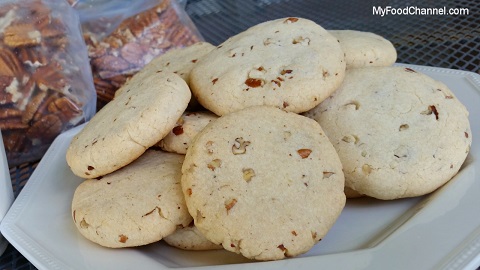
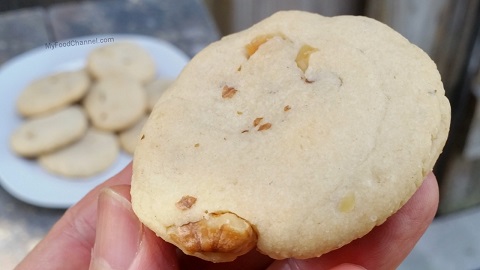
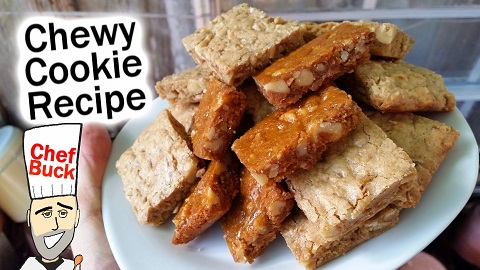
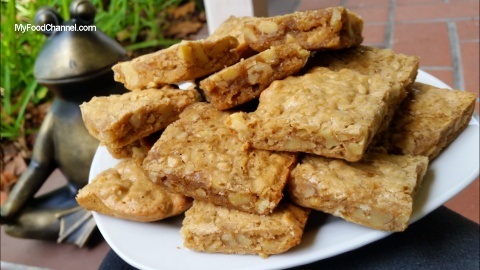
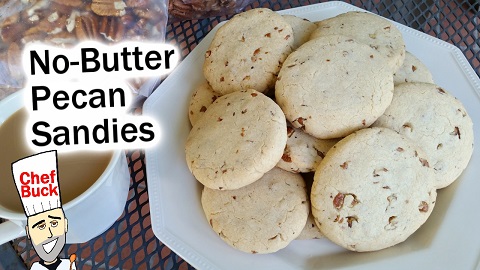
Thanks for watching/listening to our Cookie/Travel podcast. This butter pecan cookie recipe is great. If you enjoy Pecan Sandies, then you are going to love these cookies. I go a little heavy on the pecans with ¾ cup, and I think you can easily get away with only using a ½ cup of pecans, but don’t adjust the recipe too much, cause it’s pretty perfect, I think. In the video, I say to bake the cookies at for 20 minutes when I REALLY MEAN 15 MINUTES! They come out okay at 20 minutes, but 15 minutes is sooooo much better. The cookies actually look better after 20 minutes, but they are overdone, and taste much better at 15 minutes, before the tops of the cookies start to brown.

Butter Pecan Cookie Ingredients

1 cup all purpose FLOUR
½ cup salted BUTTER
¼ cup SUGAR
¾ cup toasted chopped PECANS
1 tsp VANILLA EXTRACT
⅛ tsp of SALT

This recipe makes a dozen cookies. Check current prices for Parchment Paper on amazon.

How to Make Butter Pecan Cookies

  • First put your butter out and allow it to soften.
  • Toast up your chopped pecan pieces. I bake the pecans at 350˚F for 5-10 minutes. Keep an eye on your pecans! There’s no reason to over toast them, and you don’t want to risk burning expensive pecans! Toast the pecans in advance so that they have time to cool before you fold them into the cookie dough.
  • Once your butter is soft, give it a nice whisk with a…whisk.
  • Then whisk in the sugar, and then whisk in the salt and vanilla extract, as well.
  • Add in the flour, then get a spoon or spatula and mix the flour and sugar/butter mixture together. Mix until the dough begins to stick into small clumpy pieces. It’ll seem pretty dry, but that’s how it should look.
  • Add in the toasted pecan pieces and mix everything together well.
  • Now press the dough together into a ball, and then separate the dough into a dozen even sizes.
  • Press each piece of dough into a ball, then flatten into a wheel and shape into a cookie size that is uniform and not too thin around the edges.
  • Space cookies apart on a cookie pan and bake for 15 minutes at 350˚F.
  • After 15 minutes, remove the cookies from the oven and place onto a cooling rack.

Cookie Tip: do not wait for the cookies to brown on top! The cookies will be colored on the bottom, but still look fairly light on top. If you wait for the tops to brown, the cookies will be too dry, I think. CG actually prefers the cookies baked for 20 minutes, but I think it’s too much. If you try this recipe both ways, then let me know what you think.

Are you trying to avoid butter? Well good luck. Maybe this butter-free pecan sandies recipe can help.

pecan sandies

Thanks for Trying Our Butter Pecan Cookie Recipe

Click a button below and share the dishes with your friends. You can also follow Chef Buck on Youtube. We appreciate all the kind comments and support, and we’ll see you next time in the kitchen!

If you like what CG and I do, support us on Patreon, or throw us a tip in our Paypal Tip Jar. We’ll happily enjoy a coffee on the road – Thanks! We appreciate all the support, and we’ll see you next time in the kitchen!

We include affiliate links for products on our website. Making a purchase after clicking on our links and we may earn a commission which helps us produce more videos and drink more coffee :^) We participate in the Amazon Services LLC Associates Program, which is an affiliate advertising program. It provides a means for us to earn fees by linking to Amazon.com and affiliated sites, so we can make more videos.

If you’re new to home cooking, get a bunch of spices, pots and pans, and start experimenting with different recipes. It’s a healthy hobby that can save a lot of money in the long run. Check out current prices for Complete Kitchenware Sets on Amazon as well as Complete Starter Spice Kits. Or try a thrift store! I’ve found some of my favorite kitchen gear at second-hand stores.

Share and Enjoy !

Best Sweet Potato Recipe

sweet potato recipe

I love sweet potato and CG and I found a delicious savory sweet potato recipe at a local BBQ joint. Cumin and fresh cilantro add a tasty and surprising twist to this delicious sweet potato dish, so if you’re looking for an alternative to a classic candied sweet potato, then try this potato recipe out; it’s easy to cook and makes a versatile side dish.

Sweet Potato Recipe Ingredients

3 SWEET POTATOES rough cut
1 cup fresh CILANTRO chopped
2-3 cloves GARLIC minced
1 tsp CUMIN
½ CHILI POWDER
SALT to taste

Check current prices for a new non-stick skillet on Amazon.

sweet potato recipe
savory sweet potato with brussels sprouts and a sandwich

How to Make a Savory Sweet Potato Recipe

  • Cut most of your sweet potato into rustic sizes, but I like to cut about ½ cup of the potato into smaller sizes so it’ll cook down faster.
  • Heat oil in a skillet on medium heat and add in the potato and saute for a few minutes.
  • Add in the seasoning and garlic and cook for another 2 minutes. I added measurements in the recipe for seasoning, but really it’s all season to taste, especially the cumin; put a little more than you think you want, and you might be surprised how tasty it gets.
  • Add in 1 cup of water, cover your skillet and bring the dish to a simmer. Simmer until the potato becomes soft enough to smash with a fork and add a little more water if needed.
  • Smash about ⅓ of the potato in the skillet, adjust seasoning to taste, and continue to cook to the consistency you desire.
  • When the potato is done, turn off the heat and stir in the fresh cilantro.

This savory sweet potato recipe makes a great side dish. We originally had it with BBQ ribs and it was a perfect pairing. Give this recipe a try and let us know what you think.

For a classic sweet potato dish, try a Candied Sweet Potato Recipe.

Thanks for Watching our Sweet Potato Recipe Video!

Click a button below and share the dishes with your friends. You can also follow Chef Buck on Youtube. We appreciate all the kind comments and support, and we’ll see you next time in the kitchen!

If you like what CG and I do, support us on Patreon, or throw us a tip in our Paypal Tip Jar. We’ll happily enjoy a coffee on the road – Thanks! We appreciate all the support, and we’ll see you next time in the kitchen!

We include affiliate links for products on our website. Making a purchase after clicking on our links and we may earn a commission which helps us produce more videos and drink more coffee :^) We participate in the Amazon Services LLC Associates Program, which is an affiliate advertising program. It provides a means for us to earn fees by linking to Amazon.com and affiliated sites, so we can make more videos.

If you’re new to home cooking, get a bunch of spices, pots and pans, and start experimenting with different recipes. It’s a healthy hobby that can save a lot of money in the long run. Check out current prices for Complete Kitchenware Sets on Amazon as well as Complete Starter Spice Kits. Or try a thrift store! I’ve found some of my favorite kitchen gear at second-hand stores.

Share and Enjoy !

Bolón Recipe Green Plantain Breakfast

bolon recipe

One of the best breakfast dishes in Ecuador is a Bolón recipe made with unripe green plantains and cheese. I prefer bolón mixto, which includes a bit of pork. In Ecuador, a traditional bolon mixto is made with chicharrón, but in my bolon recipe I use smoked rib meat. Bolon is a hearty breakfast comfort food, and along with Ecuadorian tigrillo, it’s a great way to cook green plantains.

Bolon Recipe Ingredients

2 banana-sized GREEN PLANTAIN
CHEESE ½ cup white cheese, cubed
ONION ¼ cup, chopped
2 cloves GARLIC finely chopped
OIL for cooking
SALT to taste
other seasonings
as desired…
I like a little
HOT PEPPER
and a little leftover MEAT, cubed (recommended!)

bolon recipe

How to Make Bolon

Use unripe, green plantains for this bolon recipe; it’s a very starchy ingredient, and green plantain can be used as a substitute in many potato recipes. This recipe is ideal for two hearty servings.

  • First, get a pot of salted water on the boil.
  • Peel your green plantains and slice into ½ inch pieces.
  • Add sliced plantain to the boiling water, reduce to a simmer, cover and cook for 15 to 20 minutes or until the plantain is tender enough to easily pass a fork into.
  • While the plantain simmers, chop the onion, cube white cheese, and cube a little pre-cooked meat to add later. You only need a little meat for flavor, maybe a ¼ cup; it’s optional, but highly recommended. If you’re in a meat-free mood, just leave it out and add more cheese.
  • Heat oil in a skillet on medium heat and add in the chopped onion and saute for 2 minutes.
  • Add in the meat and garlic and continue to saute.
  • Add salt to taste and any other desired seasoning. I like a little dried hot pepper.
  • Remove the cooked plantain from the pot, reserving some of the water.
  • Mash the plantain, and then add it to the skillet with onion and meat and seasonings. Mix ingredients together well. Add a bit of the reserved water if needed, but not too much.
  • Remove mixture from the skillet into a bowl.
  • When plantain mixture is cool enough to handle, add in the cubed cheese and mix by hand, then form the mixture into balls, aka bolones. Now you’ve got bolones ready to fry and eat whenever you like.
  • To fry, simply heat a little oil in a skillet on medium heat and turn the bolones in the skillet until fried to your liking. I love to serve this bolon recipe with a fried egg and avocado.

For another tasty green plantain dish, try this Ecuadorian Tigrillo Recipe. And find many more recipe ideas on our Plantain Video Recipe Playlist.

tigrillo recipe

What’s Healthier, Plantain or Potato? I found a potato vs. plantain nutrition article here that’s informative and easy to digest.

Check current prices for a new non-stick skillet on Amazon.

Thanks for Watching our Bolon Recipe Video!

Click a button below and share the dishes with your friends. You can also follow Chef Buck on Youtube. We appreciate all the kind comments and support, and we’ll see you next time in the kitchen!

If you like what CG and I do, support us on Patreon, or throw us a tip in our Paypal Tip Jar. We’ll happily enjoy a coffee on the road – Thanks! We appreciate all the support, and we’ll see you next time in the kitchen!

We include affiliate links for products on our website. Making a purchase after clicking on our links and we may earn a commission which helps us produce more videos and drink more coffee :^) We participate in the Amazon Services LLC Associates Program, which is an affiliate advertising program. It provides a means for us to earn fees by linking to Amazon.com and affiliated sites, so we can make more videos.

Share and Enjoy !

Pretzel Cookies with Bags of Pretzels

pretzel cookies

This week CG and I experimented making pretzel cookies. Bagged pretzels usually have plenty of salt, so there’s no need to add salt to this cookie recipe, in fact, if you’re on a low-salt diet, you’ll probably want to use unsalted butter and unsalted nuts, if you add nuts.

Variations on Pretzel Cookies

I use ground pretzels to make the flour for pretzel cookies, and to make the cookies even more “pretzely”, I also press a decorative pretzel into the top of the cookie before it bakes, but if you don’t feel like grinding pretzels in a blender, you can just use all purpose flour to make the dough, and then press a pretzel into the cookie anyway! It’ll still be a pretzel cookie! And that’s a good idea, too, if you’re sensitive to salt.

We made these cookies using walnuts, peanuts, peanut butter chips, and some with no additives at all. The basic recipe below calls for “½ to 1 cup NUTS” but that’s optional and flexible, so just leave the nuts out or add ½ to 1 cup of whatever you like.

In the video recipe I use an 8×8 dish for baking and you can check the current prices for Pryrex Dishes on Amazon as well as the current price for Parchment Paper.

Ingredients for Basic Pretzel Cookie Recipe

¾ cup BROWN SUGAR
½ cup PRETZEL FLOUR
1 EGG
1 Tbsp BUTTER
½ tsp VANILLA
½ to 1 cup NUTS
PRETZELS topping

pretzel cookies

How to make Pretzel Cookies

  • In a large bowl, add the softened butter, sugar, egg, and vanilla extract, then mix until smooth.
  • Add in the pretzel flour, which is just ground pretzels, or substitute all purpose flour.
  • Fold in the nuts, if desired.
  • Grease the bottom and sides of an 8” X 8” baking dish, OR LINE THE BOTTOM OF THE BAKING DISH WITH PARCHMENT PAPER. Between the two options, I highly recommend going with the parchment paper. The cookies are chewy, and they’re sticky on the bottom, so parchment paper will make getting them out of the pan much easier.
  • Press the cookie dough into the baking dish and spread it out evenly.
  • If you have any extra, nice looking pretzels, press them into the top of the dough before baking. Just be sure to space them evenly so that your baked dough will be easy to cut into cookie shapes.
  • Bake in an oven preheated to 350˚F for about 20 minutes.
  • Remove the dish from the oven and place on a rack to cool.
  • Some cookies are delicious when they’re hot out of the oven, but I think brown sugar cookies taste much better after they have cooled to a caramelly goodness.
  • Once cool, cut the cookies into squares.

For another easy cookie bake, these delicious Shortbread Cookies with Mama Redbuck.

shortbread cookie recipe

Thanks For Watching Our Recipe Videos!

Thanks for checking out our pretzel cookies, and all of our recipes. Sign up for our mailing list so you’ll never miss a new recipe. Also click a button below and share the dishes with your friends. You can also follow Chef Buck on Youtube. We appreciate all the kind comments and support, and we’ll see you next time in the kitchen!

If you like what CG and I do, support us on Patreon, or throw us a tip in our Paypal Tip Jar. We’ll happily enjoy a coffee on the road – Thanks! We appreciate all the support, and we’ll see you next time in the kitchen!

We include affiliate links for products on our website. Making a purchase after clicking on our links and we may earn a commission which helps us produce more videos and drink more coffee :^) We participate in the Amazon Services LLC Associates Program, which is an affiliate advertising program. It provides a means for us to earn fees by linking to Amazon.com and affiliated sites, so we can make more videos.

Share and Enjoy !

Zucchini Fritters – Easy Zucchini Recipe

These zucchini fritters are flavorful, easy to make and great anytime of the day!

zucchini fritters

Ingredients for Delicious Zucchini Fritters

Makes about 6 fritters

4 cups of fresh ZUCCHINI, grated
½ tsp SALT
2 GREEN ONIONS, cut into thin 2-inch long slices
¼ cup CREAMY CHEESE
2 EGGS
12 RITZ CRACKERS (or use 3 Tbsp of saltines or flour)
½ tsp BLACK PEPPER
¼ tsp RED PEPPER FLAKES
OIL for frying

Optional: A creamy fritter topping

zucchini fritters

Directions for Making These Easy Zucchini Fritters

Grate the zucchini into a colander. Mix in salt and set aside for 20 minutes to draw out some of the zucchini’s moisture.

While zucchini is drying out: Slice green onions into thin strains, about 2-inch long. Cover a plate with paper towels to absorb oil when fritters come out of the pan.

After letting zucchini set, squeeze out excess moisture.

In a large bowl, combine egg and cheese. Then add zucchini, green onions, crushed crackers and seasonings. Mix to combine ingredients.

Heat oil in large nonstick pan over medium heat. Place ¼ cup of fritter mix in heated oil, use non-metal spatula to flatten each fritter. Check prices for a non-stick skillet on Amazon.

Cook each side of the fritters for about 1 minute or until lightly browned. Place on paper toweled plate to absorb the oil.

Serve warm a la carte, or with your favorite creamy sauce. It can be as simple as a dollop of sour cream or mix up your special recipe.

Zucchini Fritter Options

Want to make these gluten-free? Use a non-gluten flour instead of the crackers.

Don’t want to spend the money on herbed goat cheese?  Soften 2 oz cream cheese, and stir in 1/4 tsp garlic powder, 1 1/2 tsp Italian seasoning.

For another delicious green onion recipe, check out this Asian-inspired green onion pancake recipe.

korean pajeon
A Korean pajeon recipe with green onions.

Thanks For Watching Our Recipe Videos!

Thanks for checking out this zucchini recipe, and all of our recipes. Sign up for our mailing list so you’ll never miss a new recipe. Also click a button below and share the dishes with your friends. You can also follow Chef Buck on Youtube. We appreciate all the kind comments and support, and we’ll see you next time in the kitchen!

If you like what CG and I do, support us on Patreon, or throw us a tip in our Paypal Tip Jar. We’ll happily enjoy a coffee on the road – Thanks! We appreciate all the support, and we’ll see you next time in the kitchen!

We include affiliate links for products on our website. Making a purchase after clicking on our links and we may earn a commission which helps us produce more videos and drink more coffee :^) We participate in the Amazon Services LLC Associates Program, which is an affiliate advertising program. It provides a means for us to earn fees by linking to Amazon.com and affiliated sites, so we can make more videos.

Share and Enjoy !

Crab Meat and What Type to Buy

There are lots of easy, delicious crab recipes you can make at home. However, before you go shopping, it’s helpful to know something about the varieties of crab meat you may find, so you don’t pay too much for the crab recipe you are making. Check current prices for canned crab meat on Amazon.

We are going to talk about two basic kinds of shelled crab we find in our local US grocery stores.  

  • Pasteurized, refrigerated crab, that is generally labelled according to it’s ‘grade’ of crab meat. In the U.S., we find them in the fresh seafood section of the grocery store.
  • Canned crab, which can include variety of ingredients, including some preservatives. We find them in the grocery store with the cans of tuna, sardines and oysters.

Types of Crab Meat

Of these two basic kinds of shelled crab meat you can find, there are four types we frequently encounter in either the refrigerated or canned forms:

crab meat
  1. Jumbo or Colossal lump crab. Buck would call this the ‘fancy pants’ of the crab meats.  It’s whole pieces of large blue crab’s muscles, and has a yummy delicate flavor.  Expect to pay top dollar for this kind of crab. This is reserved for SPECIAL occasions. Folks choose this meat for crab cocktail , crab sauté or crab louis recipes where the large crab pieces can be appreciated.
  • Lump (or backfin) crab meat. This grade of crab is great for a variety of dishes where you want the delicate crab taste to shine through. The difference between lump or backfin crab is just the size of the pieces; lump is bigger pieces. Both have the same great crab taste. Besides using for PART of SPECIAL crab cakes, this type of crab is ideal for a crab omelet or Crab Benedict.
  • Claw crab meat.  It’s some of the cheapest graded crab that you can find in the US. It will be more brown and oiler, than white crab meat. It is also more flavorful, and I actually prefer it in many recipes where I want the crab taste to stand up to other ingredients – like in any kind of seafood soups/bisques, or salads. Also, I use this meat in crab cakes when I’ll be adding green peppers, horseradish or other strong flavors. Since we’re talking about crab cakes, when I want to treat Chef Buck and myself, I mix fresh claw crab meat with lump crab.
  • Special or white crab meat. This is not to be confused with the crab meat’s color. Most natural ‘white’ crab meat is more of an off-white or ivory color. You get a good crab flavor and color in pieces about the size of shredded canned tuna.

This list is not meant to be exhaustive. In fact, there are two types of readily available crab that ARE NOT included in this list: truly fresh crab that you can buy from your local seafood shop or fisherman, and also NOT included in this list is imitation crab which, just like it sounds, isn’t really crab.

crab meat

More Tips For Choosing Perfect Crab Meat For Your Recipe

Canned crab meat. There are MANY brands of canned crab that represent a vast variety of flavors and textures. Many are perfectly great for making some crab dishes. Besides the checking the basics such as sale by date, texture, smell, it’s still a bit of trial and error to identify brands that work for your particular recipes. That just means to ‘test before you guest’; stick to a canned brand that you know, when guests are coming over, rather than using a ‘mystery’ can. Also, buying smaller cans of crab less than 16oz often yields better quality. Check current prices for canned crab meat on Amazon.

Some folks think that canned crab is too salty. One way to freshen canned crab a bit is to drain it. Then soak it in ice water for 10 minutes, drain it again and pat it dry.

Net weight vs Dry weight. Especially for canned crab, you will often find a net weight vs a dry weight. Unless otherwise specified, your recipe is talking about the dry weight of the can, the weight AFTER you drain the brine.

Crab is high in protein, and can be a quick-fix dish. The ‘graded’ forms of crab meat come from the crab muscles, legs and claws.  Other ‘ungraded’ crab meat can also include ‘brown’ crab meat that is found near the crab’s top shell. The ‘brown’/top shell meat is high is omega-3s, a smoother texture and stronger flavor. The white is a ‘cleaner’ flavor and has a firmer texture.

Crab Cake Recipe

Crab cakes are one of our favorite crab dishes to prepare, but remember, when forming crab cakes, DON’T overmix and DON’T overpack the cakes; you’re making delicate crab cakes, not denser salmon cakes or hamburgers.

Ingredients for Crab Cakes

16-18oz CRAB MEAT, picked over gently to assure no shells remain. We like to use a mix of refrigerated CLAW crab meat and canned crab.
3 Tbsp PORK RINDS, finely crushed
1 large EGG, beaten
½ cup MAYONNAISE
1 tablespoon DIJON MUSTARD
1 tablespoon WORCESTERSHIRE SAUCE
1⁄8 teaspoon fresh ground BLACK PEPPER
¼ cup OIL for cooking
Lemon wedges, for serving

crab meat

How to Make Crab Cakes

In a large bowl, whisk the egg. Add mayo, mustard, Worcestershire sauce until smooth. Mix in crushed pork rinds. Gently fold drained crabmeat into mixture.

Gently fold drained crabmeat into mixture. Check current prices for canned crab meat on Amazon.

Cover and refrigerate the mix for at least 1 hour, and can even be refrigerated overnight.

When ready to cook, heat oil in a large skillet over medium heat. Gently form cakes into patties about 1½” thick using approximately ⅓ cup of crab mixture for each patty.

Add the crab cakes to the skillet and cook over moderately high heat until golden and heated through, about 2-3 minutes per side. Use a large enough skillet to allow room to turn the cakes. Turn the cakes gently with a sturdy spatula, and let the cakes set before you turn them; if you try to turn them too soon, they are more likely to fall apart.

Serve crab cakes with your favorite sauce or dressing, or just lemon wedges. We often keep crab cake meals light, and will accompany them with a light salad or side of coleslaw.

For another seafood dish with crab, check out this Authentic New Orleans Seafood Gumbo Recipe.

seafood gumbo recipe

Thanks For Checking out our Recipes

We hope this info is helpful for the next time you’re out buying crab meat at the supermarket. Sign up for our mailing list so you’ll never miss a new recipe. Also click a button below and share the dishes with your friends. You can also follow Chef Buck on Youtube. We appreciate all the kind comments and support, and we’ll see you next time in the kitchen!

If you like what CG and I do, support us on Patreon, or throw us a tip in our Paypal Tip Jar. We’ll happily enjoy a coffee on the road – Thanks! We appreciate all the support, and we’ll see you next time in the kitchen!

We include affiliate links for products on our website. Making a purchase after clicking on our links and we may earn a commission which helps us produce more videos and drink more coffee :^) We participate in the Amazon Services LLC Associates Program, which is an affiliate advertising program. It provides a means for us to earn fees by linking to Amazon.com and affiliated sites, so we can make more videos.

Share and Enjoy !

Carrot Muffin Recipe – Tiny Carrot Bread

Try this carrot muffin recipe if you’re skeptical about veggies in dessert. But be warned, these carrot muffins are extremely addictive. Carrots make these muffins moist and delicious! And these carrot muffins freeze well, so you can make a big batch and tuck some perfect muffins away for another day.

carrot muffin recipe

Ingredients for a Carrot Muffin Recipe

2½ cup CARROTS freshly grated
1¼ cup All- PURPOSE FLOUR
¾ cup ROLLED OATS
1 cup SUGAR
1½ tsp BAKING SODA
1½ tsp CINNAMON
1 tsp SALT
3 EGGS
¾ cup OIL
¼ cup MILK
1 tsp VANILLA
1 cup WALNUTS chopped
Optional Topping:
Whipped cream cheese

How to Make Carrot Muffins

Most important – you do not want to overmix your batter. Once you’ve combined your dry and wet ingredients, you want to mix just long enough to gently distribute all the ingredients!

Check out current Muffin Pan prices on Amazon. And here are cupcake liners for your muffins.

  • Take eggs and milk out of the refrigerator – if they not already out. [You can just place the eggs in a bowl of warm water while you grate the carrots, chop the walnuts and mix dry ingredients.]
  • Grate carrots. We grate our carrots the large size of a manual grater. Set aside.
  • Chop walnuts. Set aside.
  • Preheat oven to 350 F.
  • Prepare your muffin tins using one of these methods: paper or foil cupcake liners, parchment paper (cut into squares, pressed into tins with the base of a glass), or grease tins with melted butter.
  • In a medium bowl, combine dry ingredients: flour, oats, sugar, baking soda, cinnamon, salt.
  • In a large bowl, whip eggs until bubbles appear. Add oil, milk, and vanilla.
  • Add the dry mixture into the wet mixture. Turn with a spoon just until most of the dry ingredients are moistened.
  • Add carrots and walnuts, then just mix until combined. Do not overmix.
  • Pour into prepared muffin tins and bake for 15-25 minutes, depending on the size of the muffins you pour. Check muffins after baking for about 15 minutes. Muffins are ready to come out when a toothpick poked into the center of the center muffin comes out clean.
  • When muffins have baked, as soon as safely possible, remove them from the muffin tin and place on a cooling rack.

Experiment with this Carrot Muffin Recipe

  • Instead of sugar, you use ¾ cup maple syrup AND do NOT add any milk (to balance the recipe’s total liquid)
  • Also, you can add ½ tsp of other spices like apple pie spice, pumpkin pie spice, cardamom.
  • Or, try another kind of nut – or no nuts at all.
  • Add ½ to ¾ cup of raisins, cranberries or coconut.
  • Make Carrot Bread! Instead of muffins, you can make a single 9×5 bread loaf. Use parchment paper or oil/flour for the bottom of the pan; this helps your loaf to come out in one piece. Bake loaf for 45-65 minutes; check after 45 minutes. The carrot bread will cut better once it’s cooled.

Want another recipe treat that goes great with coffee? Try this perfect Biscotti Recipe.

Thanks For Watching Our Recipe Videos!

Thanks for checking out this easy carrot muffin recipe, and all of our recipes. Sign up for our mailing list so you’ll never miss a new recipe. Also click a button below and share the dishes with your friends. You can also follow Chef Buck on Youtube. We appreciate all the kind comments and support, and we’ll see you next time in the kitchen!

If you like what CG and I do, support us on Patreon, or throw us a tip in our Paypal Tip Jar. We’ll happily enjoy a coffee on the road – Thanks! We appreciate all the support, and we’ll see you next time in the kitchen!

We include affiliate links for products on our website. Making a purchase after clicking on our links and we may earn a commission which helps us produce more videos and drink more coffee :^) We participate in the Amazon Services LLC Associates Program, which is an affiliate advertising program. It provides a means for us to earn fees by linking to Amazon.com and affiliated sites, so we can make more videos.

Share and Enjoy !

Mukimame Quinoa Recipe

mukimame quinoa recipe

Here’s a super healthy mukimame quinoa recipe. Shelled soybeans are called mukimame, but you might also find them still labeled as edamame even after they’ve been shelled. We buy bags of frozen shelled soybeans in the grocer freezer and pair them with quinoa to make a veggie protein bowl that’s great as a vegetarian entree or a delicious side dish.

mukimame quinoa recipe

Ingredients for Mukimame Quinoa Recipe

12 or 16 oz bag frozen MUKIMAME (may be labeled “edamame”)
1 cup QUINOA
2 Tbsp GINGER finely chopped
4-5 cloves GARLIC finely chopped
2 Tbsp fresh LIME JUICE
2 Tbsp RICE VINEGAR
2 tsp SOY SAUCE
2 tsp SESAME OIL
optional:
3-4 GREEN ONIONS chopped
½ cup CILANTRO chopped
2 Tbsp SESAME SEEDS, toasted
additional SALT and PEPPER to taste

How to make a Mukimame Quinoa Bowl

  • In a saucepan, heat olive oil over medium-high heat. Check current sauce pan prices on amazon.
  • Add ginger and garlic and sauté for a minute until fragrant.
  • Remove garlic and ginger from pan and set aside. I’ve tried skipping this step, and just continued cooking the garlic and ginger along with the rice, but it’s not as flavorful, so it’s definitely worth setting the garlic and ginger aside to add to the dish later.
  • In the same pan, bring 2¼ cups water, quinoa, and mukimame to a boil, then reduce pot to a simmer and cover with a tight-fitting lid. Cook for about 15 minutes or until all the water is absorbed. Stoves heat differently. Sometimes, to get rid of the extra water from the mukimame, you can turn the heat up to medium, take off the lid, and cook for another 4-6 minutes. Current prices for quinoa on amazon.
  • In a small bowl, combine lime juice, vinegar, soy sauce, and sesame oil.
  • After water is absorbed and quinoa is cooked, remove quinoa and mukimame from the stove. Add ginger, garlic, lime juice mixture and if desired, scallions, cilantro and toasted sesame seeds.
  • Mix well and add additional salt and pepper as needed.

Serve this mukimame quinoa recipe in a bowl as a vegetarian entrée. This combo is great topped with fresh chopped tomatoes, zucchini, or cucumber or simply serve as a tasty side dish.

For another delicious quinoa recipe, check out this Vietnamese Bánh Mì Style Quinoa Salad.

Quinoa Salad -- Banh Mi Style
Quinoa Salad — Banh Mi Style

Thanks For Watching Our Recipe Videos!

Thanks for checking out this mukimame quinoa recipe, and all of our recipes. Sign up for our mailing list so you’ll never miss a new recipe. Also click a button below and share the dishes with your friends. You can also follow Chef Buck on Youtube. We appreciate all the kind comments and support, and we’ll see you next time in the kitchen!

If you like what CG and I do, support us on Patreon, or throw us a tip in our Paypal Tip Jar. We’ll happily enjoy a coffee on the road – Thanks! We appreciate all the support, and we’ll see you next time in the kitchen!

We include affiliate links for products on our website. Making a purchase after clicking on our links and we may earn a commission which helps us produce more videos and drink more coffee :^) We participate in the Amazon Services LLC Associates Program, which is an affiliate advertising program. It provides a means for us to earn fees by linking to Amazon.com and affiliated sites, so we can make more videos.

Share and Enjoy !

Cream Cheese Pasta Recipe

Try a delicious cream cheese pasta recipe with roasted tomatoes. It’s an easy dish to prepare using an 8oz bar of cream cheese. You can also sneak in a little nutrition with added spinach.

cream cheese pasta

Ingredients for Cream Cheese Pasta Recipe

8-10 oz of PASTA
8 oz bar of CREAM CHEESE
2 pints CHERRY TOMATOES
4-6 cloves minced GARLIC
2 Tbsp OLIVE OIL
1 Tbsp ITALIAN SEASONING
½ tsp BLACK PEPPER
SALT to taste
½ tsp RED PEPPER FLAKES
¼ cup fresh BASIL
1 cup fresh SPINACH

So far, my favorite pastas for this dish are the smaller elbow pastas and rotini pasta.

cream cheese pasta

How to Make Cheesy Pasta

  • Preheat oven to 400˚F
  • In a baking dish, toss whole cherry tomatoes with 1 Tbsp of olive oil. Check prices for a baking dish on amazon.
  • Add in the garlic, salt, black pepper, pepper flakes, Italian seasoning and toss until the tomatoes are coated.
  • Make space for the bar of cream cheese in the center of the tomatoes and top the cheese with 1 Tbsp of olive oil.
  • Bake uncovered in the oven for 20 minutes.
  • While the tomatoes bake, make the pasta according to the pasta package directions.
  • Drain the pasta and toss the pasta in a bowl with roughly chopped spinach and basil. Check current prices for a colander on amazon.
  • After the tomatoes roast for 20 minutes, turn the oven to broil and continue to cook the tomatoes for 5 more minutes, then remove the tomatoes from the oven.
  • Carefully crush the tomatoes and cheese with a fork and stir the mixture together into a sauce.
  • Add the sauce to the past–or the pasta to the sauce!–whichever is easier with the dishes you’re using. Mix everything together well and serve the cheesy pasta hot.

Tips for this Creamy Pasta Recipe

  • Smaller pasta works great with this dish. Rotini pasta is ideal because the outer ridges are hold onto the creamy, cheesy sauce.
  • A bar of Philadelphia cream cheese is perfect for this recipe, but you can experiment with other creamy cheeses as well. My mom likes using Boursin cheeses, especially the garlic and herb flavor. Or you can try feta cheese, and maybe add some Greek olives for a Mediterranean twist.
  • Fresh basil is a nice touch, but it’s optional. Try adding a little dried basil if you don’t have fresh leaves, or just add a little extra Italian seasoning and leave the basil out altogether.
  • Sneaking spinach into the recipe is an easy way to add nutrition, and the green makes the dish look very appetizing. I don’t cook onions into this dish, but adding chopped green onions into the final toss of sauce and pasta is also an option and a way to add fresh color without the spinach.

And for another interesting pasta dish, check out this Couscous Salad Recipe.

pasta salad
Israeli couscous salad dish

Thanks For Watching Our Recipe Videos!

Thanks for checking out this cream cheese pasta recipe, and all of our recipes. Be sure and sign up for our mailing list so you’ll never miss a new recipe. Also click a button below and share the dishes with your friends. You can also follow Chef Buck on Youtube. We appreciate all the kind comments and support, and we’ll see you next time in the kitchen!

If you like what CG and I do, you can also support us on Patreon, or throw us a tip in our Paypal Tip Jar. We’ll happily enjoy a coffee on the road – Thanks! We appreciate all the support, and we’ll see you next time in the kitchen!

We include affiliate links for products on our website. So, if you make a purchase after clicking on our links, we may earn a commission which helps us produce more videos and drink more coffee :^) We participate in the Amazon Services LLC Associates Program, which is an affiliate advertising program. It provides a means for us to earn fees by linking to Amazon.com and affiliated sites, so we can make more videos.

Share and Enjoy !

Cookie Dough Recipe – Icebox Cookies

cookie dough recipe

Do you buy sleeves of premade cookie dough at the supermarket? You can make a homemade cookie dough recipe to keep in the freezer and then bake cookies whenever the mood strikes. Just slice off four or six or a dozen cookies or whatever you deserve and pop them into the oven for fresh baked cookies in a matter of minutes.

cookie dough recipe

¾ cup SUGAR
½ cup BUTTER
1 EGG
1 tsp VANILLA
¾ cup NUTS
2 cups FLOUR

  • Around 30 minutes prior to making the dough, set out the butter and 1 egg.
  • In a mixing bowl, cream the sugar and the softened butter together. In the video, CG uses an electric mixer, but you can simply do this step by hand if you wish.
  • Mix the vanilla and the egg into the butter/sugar.
  • Add nuts. We use pecans, but walnuts or slivered almonds are good.
  • Incrementally mix in the dry flour until the flour is incorporated into the wet ingredients.
  • Divide the dough into thirds.
  • On a sheet of parchment paper, roll out each portion into a “log” shape about 1”-1½” inches in diameter. Check parchment paper prices on Amazon.
  • Roll the dough up into the parchment paper, twist the ends, and then place in the freezer until ready to bake.

Baking the Cookies

When you’re in the mood for cookies, just remove a roll of dough from the freezer and bake away. The sweet thing about having the dough premixed and rolled up, is that you can bake the entire roll, or simply slice off and bake as many cookies as you’re in the mood to eat.

  • Preheat oven to 350˚F
  • Remove dough from the freezer and slice cookies about ¼” thick.
  • On a baking sheet, arrange the cookies on parchment paper; you can use the parchment paper that the cookie dough was rolled inside! Compare prices for baking sheets on Amazon.
  • Bake cookies for about 10-12 minutes.
  • Remove cookies from the oven and allow to cool to an edible temperature, then eat away. I like to let the cookies cool completely so that they’re extra crunchy…perfect with coffee.

Keeping some dough rolled up in the freezer is an easy way to have fresh baked cookies with little fuss whenever you like. Give this cookie dough recipe a try, and for another easy cookie idea, try these Chewy Brown Sugar Bar Cookies.

chewy cookie recipe

Thanks For Watching Our Recipe Videos!

Thanks for checking out our cookie dough recipe, and all of our recipes. Be sure and sign up for our mailing list so you’ll never miss a new recipe. Also click a button below and share the dishes with your friends. You can also follow Chef Buck on Youtube. We appreciate all the kind comments and support, and we’ll see you next time in the kitchen!

If you like what CG and I do, you can also support us on Patreon, or throw us a tip in our Paypal Tip Jar. We’ll happily enjoy a coffee on the road – Thanks! We appreciate all the support, and we’ll see you next time in the kitchen!

We include affiliate links for products on our website. So, if you make a purchase after clicking on our links, we may earn a commission which helps us produce more videos and drink more coffee :^) We participate in the Amazon Services LLC Associates Program, which is an affiliate advertising program. It provides a means for us to earn fees by linking to Amazon.com and affiliated sites, so we can make more videos.

Share and Enjoy !

Turnip Root Recipe – Roasted Turnips

Today we are preparing a delicious and healthy turnip root recipe. One of the easiest ways to cook turnip root is to roast it in the oven. I like to roast a variety of root vegetables together along with onion and garlic. Roasted turnips make a terrific side dish, or even as a salad topping as in this recipe.

turnip root recipe

Ingredients for this Turnip Root Recipe

TURNIP ROOTS
roast turnips with other root veggies like:
Carrot, Potato, Parsnip, Rutabaga, Onion, Garlic, etc
SEASONINGS as desired
2 Tbsp OLIVE OIL

turnip root recipe

Roasted Turnip Root Recipe

  • Wash and clean the turnip roots.
  • Cut turnip roots into relatively uniform sizes about half the size of your thumb.
  • Place the chopped turnip root into a bowl along with any other root veggies you wish to add. I’ll sometimes add potato, carrot, or rutabaga, and I almost always add some chopped onion or garlic to roast along with the turnip, although you can roast the turnips all by themselves if you prefer.
  • Add enough olive oil to the bowl to coat the veggies when tossed together.
  • Season to taste. In the video I add Black Pepper, Garlic Salt, Cayenne Pepper, Chili Powder, Italian Seasoning, but use whatever seasonings you’re in the mood for; smoked paprika is a favorite of mine, and sometimes I’ll use a curry mix seasoning. Sometimes I’ll roast the veggies with only salt and pepper to keep the dish simple.
  • Toss the veggies so that everything is coated in oil and seasoning, then spread the veggies out into a single layer on a baking sheet. Compare prices for a baking sheet on Amazon.
  • Place in an oven preheated to 400˚F and roast until the veggies have colored up and can be pierced easily with a fork. The cooking time might be between 30-45 minutes depending on the size of your veggies. Once during this cooking time, you can stir the veggies and re-spread them out into a single layer.

Roasted turnips make a great side dish for almost any meal, or you can simply top them on a salad.

Check out more Chef Buck Veggie Recipes.

Thanks For Watching Our Recipe Videos!

Thanks for checking out our beet green recipes, and all of our recipes. Be sure and sign up for our mailing list so you’ll never miss a new recipe. Also click a button below and share the dishes with your friends. You can also follow Chef Buck on Youtube. We appreciate all the kind comments and support, and we’ll see you next time in the kitchen!

If you like what CG and I do, you can also support us on Patreon, or throw us a tip in our Paypal Tip Jar. We’ll happily enjoy a coffee on the road – Thanks! We appreciate all the support, and we’ll see you next time in the kitchen!

We include affiliate links for products on our website. So, if you make a purchase after clicking on our links, we may earn a commission which helps us produce more videos and drink more coffee :^) We participate in the Amazon Services LLC Associates Program, which is an affiliate advertising program. It provides a means for us to earn fees by linking to Amazon.com and affiliated sites, so we can make more videos.

Share and Enjoy !

Seafood Gumbo Recipe – New Orleans Gumbo

seafood gumbo recipe

Make the best seafood gumbo at home! Since we’re in New Orleans, we thought we’d make a big pot of seafood gumbo with shrimp, fish, and crab –and of course a little fresh okra! It takes a little time to make a great gumbo, but maybe not as long as you think, and it’s not complicated, so give this gumbo recipe a try and let me know what you think.

seafood gumbo recipe

Ingredients for Seafood Gumbo Recipe

¾ cup oil VEGETABLE OIL …don’t substitute butter because it burns easily, but we’ll add a little butter eventually.
1½ cup FLOUR
2 Tbsp BUTTER
2 cup ONIONS, finely chopped
2 cups GREEN BELL PEPPER, chopped
1 cup RED BELL PEPPER, chopped
1 cup CELERY, chopped
12-16oz FRESH OKRA, cut into ¼” discs (frozen then thawed okra can be used, but fresh is better)
3-5 cloves GARLIC, minced
14.5 oz can undrained petite DICED TOMATOES
8oz can TOMATO SAUCE
2-3 BAY LEAVES
2 Tbsp SMOKED PAPRIKA (1 Tbsp to start, another Tbsp later in the recipe)
1 tsp dried THYME
4 Tbsp CREOLE SEASONING (2 Tbsp to start, another 2 Tbsp later in the recipe)
1 tsp SALT
4 cups of chicken or veggie STOCK (sub 8 oz clam juice for 1 of the cups, if desired)
1 tsp WORCESTERSHIRE SAUCE

4 lbs seafood:
2 lb firm white FISH like cod, catfish, tilapia, etc. cut into ½” cubes
1 lb peeled and deveined SHRIMP
1 lb LUMP CRAB MEAT, or use less and substitute more fish or shrimp
Toss in a few hard shell GUMBO CRABS if you like, but that’s optional!

If you don’t use a pre-prepared GUMBO SEASONING MIX, you can make your own creole seasoning with a simple mix of paprika, cayenne, garlic powder, oregano, salt and pepper. Here’s the GEAUX CREOLE SEASONING we used in the recipe video; price it on Amazon.

seafood gumbo recipe

How to Make Seafood Gumbo

  • Chop, dice, mince your veggies.
  • In a large pot, heat oil over medium heat for a few minutes until heated through. Check prices for Big Gumbo Cooking Pots on amazon.
  • Mix in flour and stir until smooth and then continue to stir constantly. You are making a “sort of roux”. A roux is equal parts fat and flour, but we’re using a little more flour in this recipe. Keep the heat on low to medium low and stir until the mixture slowly browns into a dark, rich, ice cream coffee coor. This might take 40-50 minutes, but don’t rush the process or your mixture will scorch.
  • When the roux is a rich, medium brown color, immediately add onions, green pepper, celery, garlic, and okra and stir well.
  • Add the first round of seasonings: 1 Tbsp smoked paprika, 2 Tbsp Creole seasoning, 1 Tsp dried crushed thyme, and bay leaves.
  • Add petite tomatoes, tomato sauce, and 4 cups of water/stock, and also include hard-shell gumbo crabs (optional). Mix everything together well.
  • Turn up the heat to bring the pot to a soft boil. Turn the heat down and simmer for 30 minutes. Stir occasionally.
  • After 30 minutes, add Worcestershire sauce and chopped fish and let the pot continue to simmer for about 10 minutes.
  • Add additional seasoning to finish: 2 Tbsp Creole seasoning, 1 Tbsp smoked paprika, 1 tsp dried crushed thyme.
  • Add shrimp and crab and cook for a final 5-10 minutes.
  • Adjust seasoning and stock/water as desired.

Serve seafood gumbo with WHITE RICE and top with chopped GREEN ONION or PARSLEY.

If you’d like to try a fish stew that tastes great, is very inexpensive, and super easy to make, then a take a look at this Canned Mackerel Fish Stew Recipe.

fish stew recipe

Thanks For Watching Our Recipe Videos!

Thanks for checking out our seafood gumbo recipe, and all of our recipes. Be sure and sign up for our mailing list so you’ll never miss a new recipe. Also click a button below and share the dishes with your friends. You can also follow Chef Buck on Youtube. We appreciate all the kind comments and support, and we’ll see you next time in the kitchen!

If you like what CG and I do, you can also support us on Patreon, or throw us a tip in our Paypal Tip Jar. We’ll happily enjoy a coffee on the road – Thanks! We appreciate all the support, and we’ll see you next time in the kitchen!

We include affiliate links for products on our website. So, if you make a purchase after clicking on our links, we may earn a commission which helps us produce more videos and drink more coffee :^) We participate in the Amazon Services LLC Associates Program, which is an affiliate advertising program. It provides a means for us to earn fees by linking to Amazon.com and affiliated sites, so we can make more videos.

Share and Enjoy !

Spaghetti Squash with Mushrooms and Sun Dried Tomato

Today we’re making spaghetti squash with mushrooms and sundried tomatoes. Spaghetti squash is one of our favorite ingredients and, true to its name, can be used in many healthy, faux pasta-like dishes. I soak the sun dried tomatoes in warm water to reconstitute them before adding them to the recipe. This recipe is a great flavor combo and an excellent way to prepare spaghetti squash.

spaghetti squash with mushrooms

Ingredients for this Spaghetti Squash Recipe

SPAGHETTI SQUASH
2-3 oz SUNDRIED TOMATOES …compare prices on Amazon for Sun Dried Tomatoes
12-16 oz MUSHROOMS
2 medium ONIONS
5-7 GARLIC cloves
OLIVE OIL
SALT and PEPPER

How to cook Spaghetti Squash

a basic spaghetti squash recipe :
Slice squash into halves.
Place cut sides down in shallow water in a roasting pan.
Bake for about 45 minutes at 350 degrees Fahrenheit.
Remove squash from the oven and carefully turn halves over to check for doneness –the water will be hot and steam will be trapped under the squash, so be cautious.
Allow squash to sit 5-10 minutes to cool slightly for easier handling.
With a fork or spoon, remove the meat of the squash.
The squash will pull away into strands that resemble spaghetti, although this squash will taste nothing like spaghetti.

spaghetti squash with mushrooms

How to make Spaghetti Squash with Mushrooms and Tomato

  • Heat 1-2 oz of olive oil in a large skillet.
  • Add sliced onion and saute for 3-4 minutes. You can add the garlic during this saute time if you prefer, but I like to add the garlic a little later in this recipe so that the dish will have a stronger garlic flavor.
  • Add sliced mushrooms and a little salt and pepper and mix well. Cover and let the mushrooms cook down for 5 minutes.
  • Uncover and then add in the reconstituted sun dried tomatoes and continue to saute ingredients in the skillet. Add more seasoning as desired.
  • Stir in the garlic.
  • Add in the spaghetti squash. Spaghetti squash varies in size, so add the entire squash or just as much as you like; mix in as much squash as you desire for a tasty mushroom/tomato/squash ratio. Any leftover squash can be used in another squash recipe.
  • Turn off the stove and then finish the dish by stirring in a little heavy olive oil to taste. Adjust salt and pepper and you’re ready for dinner.

If you like this spaghetti squash with mushrooms dish, check out this twist on a Pad Thai Recipe with Spaghetti Squash.

pad thai recipe
pad thai recipe with spaghetti noodles

Thanks For Watching Our Recipe Videos!

Thanks for checking out our spaghetti squash recipe, and all of our recipes. Be sure and sign up for our mailing list so you’ll never miss a new recipe. Also click a button below and share the dishes with your friends. You can also follow Chef Buck on Youtube. We appreciate all the kind comments and support, and we’ll see you next time in the kitchen!

If you like what CG and I do, you can also support us on Patreon, or throw us a tip in our Paypal Tip Jar. We’ll happily enjoy a coffee on the road – Thanks! We appreciate all the support, and we’ll see you next time in the kitchen!

We include affiliate links for products on our website. So, if you make a purchase after clicking on our links, we may earn a commission which helps us produce more videos and drink more coffee :^) We participate in the Amazon Services LLC Associates Program, which is an affiliate advertising program. It provides a means for us to earn fees by linking to Amazon.com and affiliated sites, so we can make more videos.

Share and Enjoy !

Kale Soup Recipe

Kale soup recipe

If you’re on the fence with kale, then try this healthy, leafy green in an easy kale soup recipe. Kale is a vegetable that folks either love or hate because of its texture, but kale’s robust texture makes it extremely versatile for many recipes, and using kale in a vegetable soup is a simple way to tame the texture.

kale soup recipe

Kale Soup Recipe Ingredients

12 oz KALE
1 lg ONION chopped
1 CARROT
1 SWEET POTATO
3-5 cloves GARLIC chopped
1 tsp CHILI POWDER
1 tsp CAYENNE PEPPER
1 tsp GARLIC POWDER
½ tsp BLACK PEPPER
2 cups BROTH
2 Tbsp OLIVE OIL

kale recipe

How to Make Kale Soup

  • Wash kale greens thoroughly and chop into rough, large sizes. Need a new Cutting Board? Price boards on Amazon.
  • I use 2 medium sized onions in the kale recipe video, or just use 1 large onion, but you can be flexible on the ratio of ingredients as you prefer. I like to cut the onion into large, thin slices for this soup dish.
  • In a large pot, heat light olive oil on medium heat. Check current prices for a Soup Pot on Amazon.
  • Saute chopped onion and garlic for 2 minutes.
  • Add seasoning and continue to saute for 2 minutes.
  • Add sweet potato, carrots, and broth, then top the dish with your kale greens. Cover the pot for a couple of minutes to allow the greens to soften and wilt.
  • Once the greens have wilted, stir all the ingredients together well, then add just enough water to cover the ingredients completely.
  • Cover the pot and turn up the heat to bring the pot to a bubble, then reduce the heat, cover the pot with a lid, and allow the soup to simmer gently for about 30 minutes.
  • After half an hour, your soup will be ready to eat, but the longer you let soup sit, the tastier it will be, which is always true for soups and stews, so the more advanced you can make the dish ahead of time, the better it will be!

For another healthy greens dish, try this fantastic Beet Greens Brunch Recipe.

Thanks For Watching Our Recipe Videos!

Thanks for checking out our beet green recipes, and all of our recipes. Be sure and sign up for our mailing list so you’ll never miss a new recipe. Also click a button below and share the dishes with your friends. You can also follow Chef Buck on Youtube. We appreciate all the kind comments and support, and we’ll see you next time in the kitchen!

If you like what CG and I do, you can also support us on Patreon, or throw us a tip in our Paypal Tip Jar. We’ll happily enjoy a coffee on the road – Thanks! We appreciate all the support, and we’ll see you next time in the kitchen!

We include affiliate links for products on our website. So, if you make a purchase after clicking on our links, we may earn a commission which helps us produce more videos and drink more coffee :^) We participate in the Amazon Services LLC Associates Program, which is an affiliate advertising program. It provides a means for us to earn fees by linking to Amazon.com and affiliated sites, so we can make more videos.

Share and Enjoy !

Beet Greens Brunch Recipe for Hipsters

For a quick beet greens brunch recipe, pair up tasty greens with beans and an egg! Beets are delicious and nutritious, and if you find beet bulbs with fresh beet greens attached, then you’ll have veggies for multiple beet recipes. Beet greens cook up super quick and make a fantastic side dish for all kinds of meals.

beet greens brunch recipe

Hipster Beet Greens Brunch Recipe

BEET GREENS
ONION medium sized, thinly sliced
GARLIC 3-4 cloves thinly sliced
2 Tbsp BALSAMIC VINEGAR
SALT and PEPPER to taste
2 Tbsp OLIVE OIL for sauteing
other seasoning as desired

beet greens recipe
Buy beet roots with the greens for two great ingredients.

Basic Beet Greens with Beans and Egg

  • This recipe calls for the beet greens only.
  • Wash the greens thoroughly and separate the stems from the leafy greens.
  • Tear greens into rough shreds.
  • Chop stems into ½ inch pieces.
  • Heat light olive oil in a skillet on medium heat.
  • Sauté thinly sliced onion for 2 minutes.
  • Add beet stems and garlic and continue to cook for another 2 minutes.
  • Season with salt and pepper to taste.
  • Add beet greens and cover the skillet with lid for 1 minute.
  • Remove lid and sauté dish for 1 more minute.
  • Finish with Balsamic vinegar and remove from the heat. Check current prices for balsamic vinegar on Amazon.

These quick beet greens make a perfect side dish for all kinds of meals, especially quick cook dishes like fish and kielbasa, or if you want to be a little less carnivorous, pair these greens with a side of beans and top with a soft-yolk egg for a perfect brunch recipe. The yolk makes a great sauce!

Looking for a Beet bulb recipe? Try Roasted beets with quinoa.

how to cook quinoa
Quinoa with roasted root vegetables.

Thanks For Watching Our Recipe Videos!

Thanks for checking out our beet green recipes, and all of our recipes. Be sure and sign up for our mailing list so you’ll never miss a new recipe. Also click a button below and share the dishes with your friends. You can also follow Chef Buck on Youtube. We appreciate all the kind comments and support, and we’ll see you next time in the kitchen!

If you like what CG and I do, you can also support us on Patreon, or throw us a tip in our Paypal Tip Jar. We’ll happily enjoy a coffee on the road – Thanks! We appreciate all the support, and we’ll see you next time in the kitchen!

We include affiliate links for products on our website. So, if you make a purchase after clicking on our links, we may earn a commission which helps us produce more videos and drink more coffee :^) We participate in the Amazon Services LLC Associates Program, which is an affiliate advertising program. It provides a means for us to earn fees by linking to Amazon.com and affiliated sites, so we can make more videos.

Share and Enjoy !

Cheesy Chile Party Snack Idea

cheesy chile party snack

This cheesy chile party snack is a quick, flavorful addition to any get together! You can get credit for bringing something homemade and great, although you didn’t have to spend much time in the kitchen. And the recipe is very versatile – you can easily adjust it to fit your particular taste buds.

Ingredients for Cheesy Chile Party Snack

BUTTER
7 oz canned GREEN CHILES, drained
½ teaspoon diced CHIPOTLE PEPPERS (jar or can)
6 oz MONTEREY JACK CHEESE, grated
2 EGGS
2 Tablespoons MILK
BLACK PEPPER to taste
PAPRIKA, to sprinkle on the top

cheesy chile party snack

How to Make Easy Cheese Bites with Chiles

Preheat oven to 350 degrees.
Open and drain chile peppers.
Grate cheese.
Butter bottom and side of an 8×8 dish. Check current prices for a BAKING DISH on Amazon.
Mix the drained green chile and chipotle peppers together. Remember, a LITTLE chipotle pepper goes a very long way. I like to use La Costena Chipotle Peppers; it’s on of my favorite ingredients for all kinds of dishes, but use it sparingly because it’s very hot and very easy too use too much! Check current prices for La Costena Peppers on Amazon.
Spread the pepper mixture evenly on the bottom of your dish.
Beat the eggs, milk and black pepper together.
Spread over peppers.
Sprinkle paprika on top.
Bake in middle of oven for 25-30 minutes, until the cheese starts to brown at the edges.

Enjoy it with crackers, warm or cold.

Variations for Cheesy Chile Party Snacks

If you don’t have chipotle peppers on hand, you can still get some smoky flavor by using a smoky cheese. Maybe even a fancy-pants gruyere?

Experiment with cheeses!  The recipe that inspired this recipe called for 8 oz of cheddar cheese. For us, we wanted to pepper flavor to be the star, not the cheese.

As I mentioned in the video, the cracker gets soggy if it sits around too much, especially with the chile side down. The easiest remedy for this is to gobble these nibbles up as soon as you pair them with a cracker.  But you could also use crostinis or toasted cocktail bread to keep the crunchiness around a bit longer. Or, you can serve this  cold, which will also increase your ‘crunch sustainability’.

And if you’re looking for a quick party food that’s sweet instead of savory, check out our pretzel chocolate treats. Want another easy, great party food that is a little fancier? Try our cranberry brie bites.

chocolate salty treats

Thanks For Watching Our Recipe Videos!

Thanks for checking out our cheesy chile party snack recipe, and all of our recipes. Be sure and sign up for our mailing list so you’ll never miss a new recipe. Also click a button below and share the dishes with your friends. You can also follow Chef Buck on Youtube. We appreciate all the kind comments and support, and we’ll see you next time in the kitchen!

If you like what CG and I do, you can also support us on Patreon, or throw us a tip in our Paypal Tip Jar. We’ll happily enjoy a coffee on the road – Thanks! We appreciate all the support, and we’ll see you next time in the kitchen!

We include affiliate links for products on our website. So, if you make a purchase after clicking on our links, we may earn a commission which helps us produce more videos and drink more coffee :^) We participate in the Amazon Services LLC Associates Program, which is an affiliate advertising program. It provides a means for us to earn fees by linking to Amazon.com and affiliated sites, so we can make more videos.

Share and Enjoy !

Best Berry Pie Recipe

berry pie recipe

Try an easy berry pie recipe that goes great with ice cream. We use frozen berries and a premade crust to keep the recipe super simple. A friend made this for us years ago when we were having regular dessert get togethers, and we’ve loved this simple recipe ever since. We got together recently and, yep, it’s still a delicious pie, especially with some good quality vanilla ice cream.

Ingredients for Easy Berry Pie

4.5 – 6 cup frozen mixed berries, almost completely thawed and drained. In the video, we used 4.5 cups of Wyman’s mixed berries (raspberries, blackberries and blueberries). Less berries means more crust per bite.

3 Tbsp flour

1/3 cup sugar + a bit more to sprinkle on the top crust

2 deep dish pie crusts, frozen If you don’t want o use two pie crusts, you can use a crumble topping like the topping we use in this Apple Crisp Recipe.

Aluminum foil cut into 1 1/2 inch strips to fit around pie edges, or you can use a pie crust shield. Check current prices for a PIE SHIELD on Amazon.

And be sure to wear berry-friendly clothes, because berry stains are difficult to get out of fabric!

berry pie recipe

Directions for Making Easy Berry Pie

Two hours ahead of your planned baking:
Measure out your berries, and leave them out to mostly thaw and drain. This, along with keeping your bottom crust in the freezer til you are ready to fill it, help you avoid a runny, soggy pie.  

Take out ONE of frozen pie crusts to thaw.  We use wax paper and a cutting board – to make final ‘flipping’ onto the pie easier.  When it ‘falls’ out of pie holder, cut vents (or more decorative designs) into top crust. You can even create a lattice top.  The vents are needed to release steam.

Preheat oven to 400, once your berries and one pie crust are ready.

Mix flour and sugar in with the berries.

Pour mixture over frozen pie crust.

Moisten bottom crust edges with water.  Lay vented top crust over berries.  

Use fork to pinch seams together.  

Lightly brush the top crust with water. Sprinkle with sugar.

Cover pie edges with 1 1/2 strips of aluminum foil (or use a pie crust shield, if you have one). Cook pie on cookie sheet – just in case you’ve filled the pie toooo much. Easier to clean cooked berries off a baking sheet rather than your oven.

Bake in preheated oven for 30 minutes.  NOTE: If you are also cooking separate pie crust pieces, set a timer for 5 minutes – those will need to come out much earlier than the pie itself.

Remove the foil, and bake another 10 minutes.

Cool at least 4 hours before serving.  Then you can serve it rewarmed, cool or cold.

Optional toppings:  vanilla ice cream, whipped cream, freshly grated lemon peel before serving.

Store uneaten pie in the refrigerator. If you are like us, this one just keeps calling to you – it doesn’t last long.

Additional Hints To Make Your Berry Pie Come Out Perfect

The frozen berry draining and the long cooling period help you avoid a runny berry pie.

In the video, we used ready-made pie crusts.  The worst parts were waiting for the berries to thaw and drain, as well as the time to partially thaw one of your crusts so you can use it to cover the pie. Also, you can use the microwave to thaw your berries. However, if you use the microwave, don’t heat your berries to mush – you want some texture in your baked pie.

If using refrigerated pie crusts:

  • Grease your pan before putting down the bottom crust.
  • Wet edges of bottom crust before placing top crust.

When thawing your berries, the objective is to allow them to almost thaw completely (to get rid of some extra moisture) but leave some of the berry texture intact.  If you use the microwave to defrost/thaw your berries, it’s more challenging to keep some of the berry texture.

I often thaw frozen top pie crusts on a cutting board and wax paper.  That way, if the crust is extra sticky when it comes out, I can cut out shapes on the cutting board, and then, if needed, the wax paper and/or cutting board can be used to more easily ‘flip’ the crust onto your pie.

If You Want To Freeze Your Pie

You can freeze the baked pie for up to 3 months. Thaw overnight in the refrigerator and allow to come to room temperature before serving.

If freezing prior to baking, but as soon as possible when you’ve put your pie together (to keep bottom from getting soggy). Wrap it well with plastic wrap or aluminum foil. Suggest not leaving it longer than a month. To bake, take out of freezer and thaw for 30 minutes. Bake at 400F for 55-60 minutes or until crust is golden brown and inside is warm.

For another easy sweet treat you can make with apples, you’ll enjoy our regular apple crisp or our low fat apple crisp.

low fat apple crisp recipe

Thanks For Watching Our Recipe Videos!

Thanks for checking out our easy berry pie recipe, and all of our recipes. Be sure and sign up for our mailing list so you’ll never miss a new recipe. Also click a button below and share the dishes with your friends. You can also follow Chef Buck on Youtube. We appreciate all the kind comments and support, and we’ll see you next time in the kitchen!

If you like what CG and I do, you can also support us on Patreon, or throw us a tip in our Paypal Tip Jar. We’ll happily enjoy a coffee on the road – Thanks! We appreciate all the support, and we’ll see you next time in the kitchen!

We include affiliate links for products on our website. So, if you make a purchase after clicking on our links, we may earn a commission which helps us produce more videos and drink more coffee :^) We participate in the Amazon Services LLC Associates Program, which is an affiliate advertising program. It provides a means for us to earn fees by linking to Amazon.com and affiliated sites, so we can make more videos.

Share and Enjoy !

Easy Biscuits – No Butter Biscuit Recipe

easy biscuits

Bake easy biscuits in a matter of minutes and have hot, fresh biscuits on the table lickety split. This biscuit recipe has no butter and very little oil, so it’s a perfect comfort food if you’re cutting down on fats.

easy biscuits

Ingredients for Easy Biscuits

¾ cup MILK (we use almond milk in the video)
2 Tbsp OIL
up to 2 cups ALL PURPOSE FLOUR
2 tsp BAKING POWDER
1 tsp SALT
2-3 tsp SUGAR optional

Quick Biscuit Recipe

  • In a bowl, whisk together milk, oil, salt, and baking powder. You can also add a few tsp of sugar if you desire, but that’s optional.
  • Slowly add flour into the mix ¼ cup at a time. You’ll probably use between 1½ and 2 cups of flour. Turn the flour into the wet ingredients until a doughy ball forms, but do not overmix or overwork the dough.
  • Using your hand, pinch and divide the large dough ball into 6 equal sizes of dough and arrange on a lightly greased baking pan or parchment paper.
  • You can lightly flour your fingers while dividing the dough. Do not press or shape the dough more than needed. The biscuits might not win a beauty contest, but they’ll be light and fluffy if the biscuit dough is not handled overly much.
  • For darker biscuits, you can lightly brush the dough with milk, but this is optional.
  • Place the baking sheet in an oven preheated to 350˚F and bake for about 20 minutes.
  • Enjoy!

Stuff you might need for the Biscuit Recipe

Current prices for PARCHMENT PAPER on Amazon
Current prices for a BAKING PAN on Amazon
Current prices for BAKING POWDER

If you’re looking for a more decadent biscuit, then try this classic country Buttermilk Biscuit Recipe with plenty of butter and buttermilk.

Thanks For Watching Our Recipe Videos!

Thanks for checking out our easy biscuits recipe, and all of our recipes. Be sure and sign up for our mailing list so you’ll never miss a new recipe. Also click a button below and share the dishes with your friends. You can also follow Chef Buck on Youtube. We appreciate all the kind comments and support, and we’ll see you next time in the kitchen!

If you like what CG and I do, you can also support us on Patreon, or throw us a tip in our Paypal Tip Jar. We’ll happily enjoy a coffee on the road – Thanks! We appreciate all the support, and we’ll see you next time in the kitchen!

We include affiliate links for products on our website. So, if you make a purchase after clicking on our links, we may earn a commission which helps us produce more videos and drink more coffee :^) We participate in the Amazon Services LLC Associates Program, which is an affiliate advertising program. It provides a means for us to earn fees by linking to Amazon.com and affiliated sites, so we can make more videos.

Share and Enjoy !

Eggplant Tuna Casserole Recipe

Twice baked eggplant tuna casserole is a delicious comfort food that is surprisingly healthy. It is an easy and forgiving recipe too. If you are trying to wean yourself away from yummy (aka bready, meaty, cheesy) tomato dishes, this can help. Yes, it has some parmesan cheese but is delicious without the addition of mozzarella, ricotta, flour and/or egg that you often find in similar dishes. When you scan the ingredients and see eggplant and tuna – don’t flee! The first time I had a variation of this dish, I was very glad I wasn’t told those two ingredients were in it. Try it! It’s easy to make, delicious, and you may surprise yourself too.

eggplant tune casserole

Ingredients Needed To Make Eggplant Tuna Casserole

1 large EGGPLANT
1 tsp SALT
2 cups ONION, diced
7+ medium/large GARLIC CLOVES, pressed (go wild, use a whole bulb!)
OIL for veggie baking AND casserole dish (around 2 1/2 Tbsp)
9 oz CANNED TUNA in water, drained
14.5 oz can DICED TOMATOES, half drained
8 oz can TOMATO SAUCE
1 Tbsp ITALIAN SEASONING
1 Tbsp ROASTED GARLIC POWDER (regular garlic powder works too)
1 tsp MINCED ONION SEASONING
1 tsp CARAWAY SEEDS
½ C grated PARMESAN CHEESE, divided
Optional Seasoning: In the video, we also used 1 tsp OLDE THOMPSON EVERYTHING ITALIAN (it’s pizza seasoning – adds a bit of heat too!)

In the video we used a 2 qt glass pyrex casserole dish, measuring 7 1/2 x 12. Check out current prices for a BAKING DISH on Amazon.

How To Make Twice Baked Eggplant Casserole

Preheat oven to 425 F.

Cut eggplant into 1/4 inch discs. Quarter the bigger discs. Sprinkle/distribute salt and let sit for 10 minutes (to draw out some moisture).  While your eggplant sweats, you can dice the onion. Peel and press the garlic. Put any extra small cloves aside so they don’t burn during the roasting process. [If you’ve never had roasted garlic before, and the amount we’re suggesting sounds very scary, know this – roasted garlic has a much more mellow flavor compared to eating it raw or sautéed. You can have roasted garlic without having ‘garlic breath’ for several hours.]

Oil baking sheet and casserole dish.

Pat eggplant dry.  

If your eggplant is extra large or your baking pan is small – you will need to roast your veggies in two parts (or use two oiled baking sheets). Place your eggplant and garlic in single layer on the oiled baking sheet. Sprinkle the onion onto pan – letting the onion cover any remaining surface area on the pan.

Cook your veggies for just 15-20 minutes. The onion tips will just begin to brown. In the finished casserole, the onions still have some texture – something to bite into*.

While your veggies cook, mix together your sauce of tuna, tomatoes, tomato sauce, and seasonings. Set aside.

Reduce your oven temperature to 350 F, when you take your veggies out.

Pick out garlic. Dice your garlic, in order to distribute the yummy flavor thorough out finished dish. Mix the diced garlic into your sauce.

In your oiled casserole dish, layer one-half of your eggplant, then one-half of your sauce** and sprinkle with about 1/3 of your Parmesan. Repeat the layers, topping with remaining 2/3 Parmesan cheese.

Bake, uncovered, in 350 degree F oven for 20 to 25 minutes. Most of the liquid will be gone. Broil/brown the cheese -watch carefully after 1 minute.  

Let it cool and then enjoy!

eggplant tuna casserole

If you enjoy this twice based eggplant casserole recipe, then check out other favorite eggplant recipes!

Hints To Make Your Casserole Just Right

Some people (Hi Mom!) would rather have their onions cooked more, so they don’t taste undone. If you’re in that group, simply cook your veggies till your onions are softer.

It’s okay if your sauce has a bit of liquid to it – simply mix up the sauce before you start layering.

How To Freeze Your Twice Baked Eggplant Casserole

Cover unbaked casserole with freezer paper and date it.  Freeze it for up to one month.

To bake frozen casserole, place in 375 degree F oven for 50 to 60 minutes. Let it set 10 minutes before serving to reabsorb some moisture.

If you’re not into eggplant, try a classic Tuna Casserole Recipe, but one that’s not wet!

tuna casserole recipe

Thanks For Watching Our Recipe Videos!

Thanks for checking out our eggplant tuna casserole recipe, and all of our recipes. Be sure and sign up for our mailing list so you’ll never miss a new recipe. Also click a button below and share the dishes with your friends. You can also follow Chef Buck on Youtube. We appreciate all the kind comments and support, and we’ll see you next time in the kitchen!

If you like what CG and I do, you can also support us on Patreon, or throw us a tip in our Paypal Tip Jar. We’ll happily enjoy a coffee on the road – Thanks! We appreciate all the support, and we’ll see you next time in the kitchen!

We include affiliate links for products on our website. So, if you make a purchase after clicking on our links, we may earn a commission which helps us produce more videos and drink more coffee :^) We participate in the Amazon Services LLC Associates Program, which is an affiliate advertising program. It provides a means for us to earn fees by linking to Amazon.com and affiliated sites, so we can make more videos.

Share and Enjoy !

Baked Eggplant Fries without Breading

Baked eggplant fries without breading or flour are possible! And these fries are simple to fix because you don’t need bread crumbs, flour, or egg. Buck and I found some beautiful eggplant at the local farmer’s market and wanted to do something other than just olive oil, rosemary, salt and pepper. These baked eggplant fries are easy, flavorful, and are a great side for your sandwich or wrap.

baked eggplant fries

One ‘medium’ eggplant fills a baking sheet. And since they are best fresh out of the oven, this makes a satisfying amount for Buck and me to scarf down in one sitting.

Ingredients for Baked Eggplant Fries

1 medium EGGPLANT
1 tsp SALT
1 tsp SMOKED PAPRIKA
1 tsp PAPRIKA
1 tsp GARLIC POWDER
1 tsp ONION POWDER
1/2 tsp BLACK PEPPER
pinch of CAYENNE PEPPER
1 Tbsp OLIVE OIL (+ may need 1/4 tsp more halfway through baking)
2 Tbsp PARMESAN CHEESE

baked eggplant fries

How to Make Baked Eggplant Fries

Wash and cut your eggplant. We generally cut them into longer/shoestring-like pieces but you can cut them into 1/4 inch coins as well. Sprinkle with the salt and set them aside for 10 minutes to draw some water out.

In those 10 minutes that your eggplant is ‘sweating’, you can:
Preheat to 400.
Make sure you have an oven rack set in the middle of the oven.
Oil your pan.
Mix together spices.

Pat eggplant to remove excess water.
Toss your spices with the eggplant.

Coat all sides of eggplant with the pan oil.   [Instead of oil, you can use parchment paper or a silicone baking sheet but be warned – the fries will not be as flavorful without the oil.]

Cook on medium rack for 15 minutes. Use a spatula to make sure your fries are not sticking.  If they are sticking a bit, you can add 1/4 – 1/2 tsp of oil or use cooking spray.

Sprinkle the parmesan cheese over your fries. Cook 5-10 more minutes,until crispy.

And if you are looking for a quick sauce to serve with your fries – try hummus. Of course you can get it in the store but it’s also easy to make a delicious hummus at home.

hummus recipe

Baked Eggplant Seasonings

Have you tried adding 1/2 tsp celery salt and/or 2 tsp of dried parsley to your fries?  What about adding 2 tsp of nutritional yeast – to add a cheese-like flavor and some vitamin B?

What about some fresh rosemary, onion powder and black pepper?

If you want more of an Italian taste try replacing the smoked paprika with:
1/2 tsp dried basil
1/2 tsp dried oregano
1/2 tsp dried thyme

If you’re interested in a Greek flavor, add some feta cheese, instead of parmesan. And maybe season with:
1/2 tsp dill
1 tsp dried oregano
1 tsp garlic powder
1 tsp onion powder
1/2 tsp black pepper

Thanks for checking out our baked eggplant fries recipe, and all of our recipes. Be sure and sign up for our mailing list to never miss a new cooking video, and also click a button below and share the dishes with your friends, and follow Chef Buck on Youtube. We appreciate all the kind comments and support, and we’ll see you next time in the kitchen!

If you like what CG and I do, support us on Patreon, or throw a tip in our Paypal Tip Jar We’ll happily enjoy a coffee on the road, or maybe even pay a bill or two!–Thanks! We appreciate all the support, and we’ll see you next time in the kitchen!

Thanks for watching our recipe videos!

We include affiliate links for products on our website, so if you make a purchase after clicking on our links, we may earn a commission which helps us produce more videos and drink more coffee :^) We participate in the Amazon Services LLC Associates Program, which is an affiliate advertising program providing a means for us to earn fees by linking to Amazon.com and affiliated sites, so we can make more videos.

Share and Enjoy !

Beans and Eggs One-Skillet Recipe

Try a delicious one-skillet breakfast recipe for beans and eggs. This egg recipe is easily adjustable for any family meal; just add as many eggs to the recipe as you have folks to feed! I like to spice up this bean dish with hot pepper and lots of seasoning, because beans and tomato can handle a lot of added flavor.

beans and eggs

Ingredients for Beans and Eggs

4 EGGS …add more eggs for more mouths!
15oz can BEANS …white beans are my favorite
15oz can diced TOMATOES
1 finely chopped ONION
2 cloves minced GARLIC
fresh chopped HOT PEPPER
or try La Costena Chipotle like I use in the video recipe
a little OIL for cooking
seasonings like:
½ tsp SALT
½ tsp BLACK PEPPER
1 tsp PAPRIKA
1 tsp GARLIC POWDER
…adjust seasonings to taste

Optional: fresh herbs or chopped green onion for garnish

How to Make One-Skillet Beans and Eggs

  • Heat about 1 Tbsp of oil in a skillet on medium heat.
  • When the skillet is hot, add chopped onion and saute for 2 minutes.
  • Add garlic and hot pepper and seasoning and continue cooking for 2 minutes more. I use La Costena Chipotle pepper in the recipe video. Check the current price for this Chipotle on Amazon.
  • Add canned beans and tomato and a little water. Stir, and bring the skillet up to a simmer, then cover and let simmer for about 10 minutes.
  • Uncover and stir until liquid reduces to saucey, but not too wet.
  • Crack eggs into the skillet, leaving space between them.
  • Cover and let cook 4-6 minutes more until the eggs are done to your liking…cook for a bit more than this if you like the yolks hard.
  • Turn off the heat, and serve the eggs and beans immediately. Garnish with fresh green herbs or green onion for a picture perfect meal.

If you like this egg recipe, check out another spicy favorite, Huevos Rancheros!

huevos rancheros
Huevos Rancheros is a flavorful, classic Mexican dish…delicious!

Thanks for checking out our beans and eggs recipe, and all of our recipes. Be sure and sign up for our mailing list to never miss a new cooking video, and also click a button below and share the dishes with your friends, and follow Chef Buck on Youtube. We appreciate all the kind comments and support, and we’ll see you next time in the kitchen!

If you like what CG and I do, support us on Patreon, or throw a tip in our Paypal Tip Jar We’ll happily enjoy a coffee on the road, or maybe even pay a bill or two!–Thanks! We appreciate all the support, and we’ll see you next time in the kitchen!

Thanks for watching our recipe videos!

We include affiliate links for products on our website, so if you make a purchase after clicking on our links, we may earn a commission which helps us produce more videos and drink more coffee :^) We participate in the Amazon Services LLC Associates Program, which is an affiliate advertising program providing a means for us to earn fees by linking to Amazon.com and affiliated sites, so we can make more videos.

Share and Enjoy !

Ramekin Egg Bake – Healthy Breakfast Idea

A ramekin egg bake recipe is not just fancy, it’s delicious, and comes with its own creamy sauce if you bake it just right. We add diced veggies and a quick broccoli side to make this breakfast egg dish ridiculously healthy. Chef Buck and I have the pleasure of house and pet sitting and caring for some chickens that provide great, fresh eggs.  It has inspired us to look for new ways to enjoy this perfect source of protein.

ramekin egg bake

Ingredients for a Ramekin Egg Bake

For Each Bake:
4 oz RAMEKIN* (oven safe)
1 – 2 EGGS
OIL (or spray)
1 tsp MILK (non-dairy or dairy options are fine)
SALT, BLACK PEPPER and your FAVORITE EGG SEASONINGS, to taste

*If you need ramekins for this recipe, you can check current prices for best sellers on Amazon.

Optional Ingredients:

Add up to 2 Tbsp minced herbs and/or minced veggies – mostly between the milk and the egg, although it’s fun to add a bit of color to the top

How To Bake Eggs in a Ramekin

  • Preheat oven to 350 degrees.  [This is for a convention oven – toaster- or regular-sized.  In the video, we are using the convection setting on a toaster oven, so we didn’t preheat it.]
  • OPTIONAL – Add extra flavor. If you want to add any minced herbs or veggies, get those chopped up now. We did in the video, and we’ve provided some other ingredient possibilities below, to tickle your taste buds. Yes, it takes a bit more time if you have to chop more ingredients but, for us, it’s worth the extra flavor. Plus, you can pat yourself on the back for getting in a partial veggie serving!
  • OPTIONAL – Have a ‘dipper’ handy for your runny egg yolk. If you plan to have a yummy runny egg, consider getting together a dipping side!  We did a side of broccoli in the video, and we’ve provided other dipping possibilities below.
  • Grease the bottom and side of each ramekin.  In the video we use a smidge of olive oil, but you can use another oil, or a cooking spray as well.
  • Pour your 1 tsp of milk over the oil in each ramekin.
  • If you have minced veggies, herbs, or other additions, sprinkle them over the milk in each ramekin. Save a couple pieces for the top – if you want to add some color to your finished egg.
  • Crack your egg into each ramekin. Watch that the eggshells don’t sneak in.
  • Top with a taste of pepper, salt …. and whatever other seasoning tickles your fancy. We use Olde Thompson Italian seasoning in the video. Optional, top with a couple veggie/herb pieces.
  • Bake for 8-10 minutes for runny yolks; the exact time will depend on your oven.  For doneness, CHECK the egg whites.  If you want a runny egg yolk (which provides a delicious, healthy sauce for a side dish), you want to take them out when the majority of the egg whites turn from clear to white, and you may see a bubble come up in one area of the egg white.  
ramekin egg bake

Additional Cooking Tips

Remember, the ramekin egg bake will keep cooking when you take it out of the oven, so if you want the yummy runny yolk – take them out of the oven when the there is still a tad of clear egg white.

And if you want a runny yolk, but you just seem to overcook them, try the French way.  Once you’ve prepared your individual dishes, place them in an oven-safe container that will allow you to add water to about halfway up the ramekins.  That keeps the eggs from getting any hotter than the water.

Feel free to cook the egg until the egg white is 100% white – your egg yolk will be solid too. You will basically have a couple of boiled eggs…..with some flavor from any seasonings, veggies, or herbs you added.  Or, you can scramble the eggs before you bake them.  Your choice.  Still a quick protein breakfast!

Experimenting With Individual Egg Bakes

Generally, I wouldn’t add more than 2 Tbsp of herbs or veggies.  In the video, we added the following minced ingredients to each bake: 2 tsp fresh summer squash, 1 tsp red bell pepper, 2 tsp yellow onion, 2 tsp green onion (green tops and white bottoms).Minced spinach, kale, garlic, artichoke, asparagus. Fresh herbs like thyme, sage, rosemary, dill. Cheese is a great addition as well. Crumbles of bacon, ham or sausage!  Add some tomatoes, black beans and seasonings you love on tacos for a Mexican version – top with sour cream. The options are endless!  

Each ramekin egg bake can include different ingredients and seasoning.  Warning: If you’re making 3 or more, you may not want to make an offer of individual egg bakes; folks may go wild and want not just very different ingredients but  want their eggs cooked to different levels of ‘doneness’ too.  You want to sit down and eat soon too!

Sides To Dip Into Your Egg Yolk

What can you dip into your warm, yummy, runny egg yolk?  In the video, we microwave frozen broccoli with minced onion and bell pepper  – enough for two people.  How? We put the broccoli, onion and bell pepper in a microwave-safe bowl, add a Tablespoon of water, cover and microwave it on full power for 2 minutes. Then we added some everything spice, salt and pepper, and cooked it on full power for another 5 minutes.  Because we can’t leave well enough alone, we add a taste of nutritional yeast and a taste of Italian blend cheese (parmesan, asiago, romano). Then it sat, covered, as we finished the egg bakes.  You can do something similar with a variety of fresh, frozen or even canned vegetables.

And there are other dipping side options for any lifestyle:  bread (toast, breadsticks, crackers), eggplant fries, sausage.

That’s it! If this recipe has you wanting to experiment with egg recipes, check out our egg-related video playlist on Youtube for inspiration, or our Korean pajeon recipe.

korean pajeon
A Korean pajeon recipe with green onions.

Thanks For Watching Our Recipe Videos!

Thanks for checking out the ramekin egg bake recipe, and all of our recipes. Be sure and sign up for our mailing list to never miss a new cooking video, and also click a button below and share the dishes with your friends, and follow Chef Buck on Youtube. We appreciate all the kind comments and support, and we’ll see you next time in the kitchen!

If you like what CG and I do, support us on Patreon, or throw a tip in our Paypal Tip Jar We’ll happily enjoy a coffee on the road, or maybe even pay a bill or two!–Thanks! We appreciate all the support, and we’ll see you next time in the kitchen!

We include affiliate links for products on our website, so if you make a purchase after clicking on our links, we may earn a commission which helps us produce more videos and drink more coffee :^) We participate in the Amazon Services LLC Associates Program, which is an affiliate advertising program providing a means for us to earn fees by linking to Amazon.com and affiliated sites, so we can make more videos.

Share and Enjoy !

Blueberry Scone Recipe NO eggs NO butter

A blueberry scone recipe is delicious and super easy to bake. You can prepare scones with butter, but safflower, sunflower, or coconut oil are great substitutes.

Ingredients for Blueberry Scone Recipe

2 cups ALL PURPOSE FLOUR
⅓ cup SUGAR
1 Tbsp BAKING POWDER
dash of SALT
½ cup SAFFLOWER OIL
1 cup HALF n HALF
⅓ cup chopped NUTS (pecans or walnuts are my favorites)
⅓ cup BLUEBERRIES, frozen

blueberry scone recipe

How to Make Blueberry Scones

  • Preheat oven to 425˚F
  • In a large bowl, combine flour, sugar, baking powder, and salt and mix well.
  • Make a well in the center of the dry ingredients and add in the oil and milk.
  • Gently mix the ingredients until they begin to combine, then fold in the blueberries and nuts. Mix lightly until the dry ingredients are wet, but do not overmix.
  • Roll the dough out of the bowl and shape into a wheel shape about ¾ to 1 inch thick.
  • Cut the dough wheel into 6 or 8 scone shapes, depending on how BIG you want your scones.
  • Arrange scones apart on parchment paper or a lightly greased baking sheet. Check current prices for Parchment Paper on amazon.
  • Brush the scone tops lightly with milk and then bake in the oven for 15 minutes.
  • When nicely colored, remove blueberry scones from the oven and transfer to a cooling rack.

Tips for a Perfect Scone Recipe

  • Add still frozen blueberries to the dough for less mess.
  • Make the scones as sweet as you like. I use ⅓ cup of sugar in the video recipe, but this measurement can be flexible. Use more sugar if you like, or NO SUGAR at all will also work. I’ve made this recipe without sugar, and it is still great, and the blueberries alone add quite a bit of sweetness. For a slightly more decadent scone recipe, check out this deadly but delicious Maple Scone Recipe.

For another baked treat, try this Easy Biscotti Recipe.

coffee biscotti

Thanks for checking out the blueberry scones recipe, and all of our recipes. Be sure and sign up for our mailing list to never miss a new cooking video, and also click a button below and share the dishes with your friends, and follow Chef Buck on Youtube. We appreciate all the kind comments and support, and we’ll see you next time in the kitchen!

If you like what CG and I do, support us on Patreon, or throw a tip in our Paypal Tip Jar We’ll happily enjoy a coffee on the road, or maybe even pay a bill or two!–Thanks! We appreciate all the support, and we’ll see you next time in the kitchen!

Thanks for watching our recipe videos!

We include affiliate links for products on our website, so if you make a purchase after clicking on our links, we may earn a commission which helps us produce more videos and drink more coffee :^) We participate in the Amazon Services LLC Associates Program, which is an affiliate advertising program providing a means for us to earn fees by linking to Amazon.com and affiliated sites, so we can make more videos.

Share and Enjoy !

Bourbon Brownies at Mama Redbuck’s

We went over to Mama Redbuck’s and she made CG and I lunch and bourbon brownies. I didn’t get over to Mama’s place early enough to video her making the dishes, but I’ve copied the recipes down below, so if you’re feeling adventurous, then give the dishes a try.

Ingredients for Bourbon Brownies

DUNCAN HINES BROWNIE MIX
3 EGGS
1 cup chopped WALNUTS
6 Tbsp BOURBON

½ cup softened BUTTER
2 cups POWDERED SUGAR
3 Tbsp RUM

6 oz semi-sweet CHOCOLATE
4 Tbsp BUTTER

bourbon brownies

How to Make Bourbon Brownies

Preheat oven to 350 degrees Fahrenheit.
Combine eggs and walnuts with brownie mix and bake according to package directions. Check current prices for Duncan Hines Brownie Mix on Amazon.
Remove the brownies from the oven and drizzle the brownie top with the bourbon, then set aside and allow to cool completely.
In a bowl, combine the softened butter with the powdered sugar and rum.
Spread mixture over the brownie, then chill in the fridge for 1 hour.
In a saucepan, melt the chocolate and 4 Tbsp butter.
Spread melted chocolate over the brownie and chill in the fridge until the topping hardens.
Slice into desired sizes and serve.

Italian Chicken French Bread Sandwich Roll (calzone-type thing)

FILLING:
1 cup cooked CHICKEN
½ cup diced RED BELL PEPPER
¼ cup fresh BASIL
⅓ cup freshly grated PARMESAN CHEESE
½ cup shredded MOZZARELLA CHEESE
¼ cup MAYONNAISE
2 cloves minced GARLIC

BREAD:
2 refrigerated 13” PILLSBURY FRENCH BREAD (uncooked dough in tubes)
1 lightly beaten EGG
1-2 tsp dry ITALIAN SEASONING

How to Make Stuffed French Bread

Pre-heat oven to 350˚F.
In a bowl, combine all of the filling ingredients and mix well.
Open each of the bread loaves and cut down the center of each roll to make an opening for the filling.
Divide the chicken filling equally into two, then fill each loaf evenly.
Pinch the loaves along the tops and fold the ends so each loaf is sealed with filling.
Braid the loaves together to make one thicker loaf.
Brush the exterior with beaten egg.
Sprinkle the loaf with Italian Seasoning.
Place loaf on a lightly grease baking pan, or use parchment paper, and bake 20 to 25 or until golden brown.

Check current prices for parchment paper on Amazon.

Check out Mama Redbuck’s Lemon Meringue Pie recipe.

lemon meringue pie
This meringue pie topping is tasty on all kinds of pies.

Thanks for checking out our cooking channel. Be sure and sign up for our mailing list and never miss a new Chef Buck cooking video, and also click a button below and share the dishes with your friends. Subscribe to Chef Buck on Youtube. We appreciate all the kind comments and support, and we’ll see you next time in the kitchen!

Thanks for watching our recipe videos!

We include affiliate links for products on our website, so if you make a purchase after clicking on our links, we may earn a commission which helps us produce more videos and drink more coffee :^) We participate in the Amazon Services LLC Associates Program, which is an affiliate advertising program providing a means for us to earn fees by linking to Amazon.com and affiliated sites, so we can make more videos.

Share and Enjoy !

Baked Cauliflower with Garlic Recipe

baked cauliflower

Oven baked cauliflower with garlic is easy to prepare and delicious. With a minimum of ingredients you can roast a super flavorful vegetarian dish. Besides the veggies, I use only a little olive oil, salt, and pepper with this roasted vegetables recipe.

What you need for Baked Cauliflower and Garlic

1 large CAULIFLOWER broken down
3 medium ONIONS
2 bulbs GARLIC
4-5 Tbsp OLIVE OIL
SALT and BLACK PEPPER to taste

baked cauliflower

How to make Roasted Cauliflower with Garlic

  • Preheat your oven to 425˚F.
  • Wash and pat dry a large head of cauliflower. Break the cauliflower down into florets and cut the stem into chunky sizes.
  • Chop the onions into large sizes and separate.
  • Break down two entire bulbs of garlic. Leave the garlic cloves intact, except for the larger cloves which you can slice into halves.
  • In a large bowl, combine the cauliflower, onion, garlic, olive oil, salt, and ground black pepper, and toss the veggies until lightly coated in oil.
  • Remove the veggies from the bowl and spread into a single layer on a baking sheet. You can line the baking sheet with parchment paper if desired. Check the current price for parchment paper on Amazon.
  • Place the baking sheet in the oven and roast for about 30 minutes, or until the cauliflower begins to color nicely.
  • After 30 minutes, remove the baking pan from the oven and give the veggies a toss and then re-spread them out into a single layer once more.
  • Return the baking pan to the oven and roast for approx. 20 more minutes or until the cauliflower has cooked down and colored to your desire.

And that’s it! This baked cauliflower with garlic recipe makes a fantastic vegetable side dish and is tasty hot or cold.

One of my favorite ways to use cauliflower is in a mock ‘potato” salad recipe. It’s a healthy twist on a classic potato salad.

cauliflower potato salad
low carb cauliflower “potato” salad recipe

Thanks for checking out our baked cauliflower recipe video, and all of our recipes. Find all cooking videos on the Chef Buck Youtube Channel.

Be sure and sign up for our mailing list and never miss a new Chef Buck cooking video, and also click a button below and share the dishes with your friends. We appreciate all the kind comments and support, and we’ll see you next time in the kitchen!
–Chef Buck

Thanks for watching our recipe videos!

We include affiliate links for products on our website, so if you make a purchase after clicking on our links, we may earn a commission which helps us produce more videos and drink more coffee :^) We participate in the Amazon Services LLC Associates Program, which is an affiliate advertising program providing a means for us to earn fees by linking to Amazon.com and affiliated sites, so we can make more videos.

Share and Enjoy !

No-Butter Pecan Sandies Cookie Recipe

pecan sandies

Try this no-butter pecan sandies cookie recipe. I substitute safflower oil for the butter in these pecan sandies, and also toast my pecans before chopping the nuts up to add into the cookie dough. Most pecan sandies recipes call for lots of butter, but I find this recipe works very well with just oil.

Ingredients for Pecan Sandies

1 EGG beaten
½ cup SAFFLOWER OIL
2 tsp VANILLA EXTRACT
1 cup SUGAR
2 cups ALL PURPOSE FLOUR
1 cup chopped PECANS

pecan sandies

How to Make No-Butter Pecan Sandies

  • Preheat oven to 350 degrees Fahrenheit.
  • Lightly toast pecans. This will only take about 5 minutes. Watch the nuts carefully because they will quickly overcook. Once nuts cool, then chop.
  • In a large bowl, whisk 1 egg and then add in the sugar, oil, and vanilla extract and mix well.
  • Fold in the flour and chopped pecans.
  • Using your hands, mold tablespoon sizes of batter into cookie shapes; be sure to make the cookies an even thickness.
  • Place cookies on parchment paper on a baking sheet and bake in the oven for 15-20 minutes. Check current prices for parchment paper on Amazon.
  • Remove cookies from the oven and transfer to a cooling rack.

I’ve made these no-butter cookies with canola oil and safflower oil, and I prefer the safflower oil. You can check the current price for safflower oil on Amazon. Sunflower oil is another good low-fat oil that tastes great in baking as well, but it’s pricier.

For another cookie recipe, try these easy brown sugar and oatmeal bar cookies.

chewy cookie recipe

Thanks for checking out our no-butter pecan sandies cookie recipe, and all of our recipes. Be sure and sign up for our mailing list and never miss a new Chef Buck cooking video, and also click a button below and share the dishes with your friends. You can find more of our dessert recipe videos on the Chef Buck Youtube Channel. We appreciate all the kind comments and support, and we’ll see you next time in the kitchen!

Thanks for Trying Our Butter Pecan Cookie Recipe

Click a button below and share the dishes with your friends. You can also follow Chef Buck on Youtube. We appreciate all the kind comments and support, and we’ll see you next time in the kitchen!

If you like what CG and I do, support us on Patreon, or throw us a tip in our Paypal Tip Jar. We’ll happily enjoy a coffee on the road – Thanks! We appreciate all the support, and we’ll see you next time in the kitchen!

We include affiliate links for products on our website. Making a purchase after clicking on our links and we may earn a commission which helps us produce more videos and drink more coffee :^) We participate in the Amazon Services LLC Associates Program, which is an affiliate advertising program. It provides a means for us to earn fees by linking to Amazon.com and affiliated sites, so we can make more videos.

If you’re new to home cooking, get a bunch of spices, pots and pans, and start experimenting with different recipes. It’s a healthy hobby that can save a lot of money in the long run. Check out current prices for Complete Kitchenware Sets on Amazon as well as Complete Starter Spice Kits. Or try a thrift store! I’ve found some of my favorite kitchen gear at second-hand stores.

Share and Enjoy !

Coffee Biscotti Recipe with Instant Coffee

Twice baked biscotti are delicious treats and the perfect pairing with a cup of hot coffee, and this is especially true for this coffee biscotti recipe. I use instant coffee to flavor this biscotti. I also add in a bit of liquor to the recipe, but that is completely optional, and using only vanilla and almond extracts will add plenty of flavor.

Coffee Biscotti Ingredients

2 ¼ cups all-purpose FLOUR
¾ cup SUGAR
1 cup ALMOND slivers
4-5 tsp INSTANT COFFEE
1 teaspoon BAKING POWDER
¼ teaspoon SALT
3 large EGGS
2 tsp VANILLA EXTRACT
2-3 Tbsp LIQUOR (I use Rum and Frangelico in the video)
(or sub. 2 tsp almond extract)

coffee biscotti

How to Make a Coffee Biscotti Recipe

  • Preheat the oven to 350 degrees Fahrenheit.
  • Combine flour, baking powder, salt then mix and set aside.
  • Whisk the eggs, instant coffee, sugar, liquor and extracts until blended well.
  • Add the dry ingredients, including nuts, and mix until combined.
  • Dough will be sticky at this point. Scrape the dough out onto a parchment lined sheet pan and quickly shape with a spoon into a long flat loaf. Check current prices for Parchment Paper on Amazon.
  • Bake loaf about 30 minutes at 350 degrees F.
  • Remove pan from the oven and allow the loaf to cool 10-15 minutes.
  • Lower oven heat to 300 degrees F.
  • After 15 minutes, slice the loaf into about 1/2″ wide biscotti slices.
  • Lay the slices cut side down on the baking sheet and bake another 15 minutes at 300 degrees Fahrenheit.
  • Turn the slices over and bake 10-15 minutes more.
  • Cool the biscotti on a rack completely before storing.

Serve the coffee biscotti up with coffee, cocoa, or hot tea.

And that’s it! Give this coffee biscotti recipe a try and let me know what you think. For another tasty treat that goes great with coffee, try this no-bake Oatmeal Fudge Bar Recipe.

Thanks for checking out our coffee biscotti recipe video, and all of our recipes. Be sure and sign up for our mailing list and never miss a new Chef Buck cooking video, and also click a button below and share the dishes with your friends. We appreciate all the kind comments and support, and we’ll see you next time in the kitchen! Subscribe to the Chef Buck Youtube Channel.

Thanks for watching our recipe videos!

We include affiliate links for products on our website, so if you make a purchase after clicking on our links, we may earn a commission which helps us produce more videos and drink more coffee :^) We participate in the Amazon Services LLC Associates Program, which is an affiliate advertising program providing a means for us to earn fees by linking to Amazon.com and affiliated sites, so we can make more videos.

Share and Enjoy !

Roasted Cauliflower Salt and Pepper Style

This roasted cauliflower recipe is spicy and delicious. My oven baked cauliflower dish is a twist on a Chinese inspired salt ‘n pepper style recipe. If you like salt and pepper shrimp, you might enjoy this vegetable version.

What you need for Spicy Roasted Cauliflower

1 lg head of CAULIFLOWER broken down
2 sliced JALAPENOS
6 chopped GREEN ONIONS
1 lg bunch fresh CILANTRO
10-12 cloves chopped GARLIC
2-3 Tbsp OLIVE OIL
SALT and BLACK PEPPER to taste

roasted cauliflower

How to make Roasted Cauliflower Salt ‘n Pepper Style

  • Preheat your oven to 425˚F.
  • Wash and pat dry a large head of cauliflower. Break the cauliflower down into florets and cut the stem into chunky sizes.
  • Chop the green onions; separate the green onion tops from the green onion bottoms.
  • Remove the white pith and seeds from the jalapenos and cut the peppers into slices. Jalapenos can burn your skin, so wear gloves if you are sensitive.
  • In a bowl, combine the cauliflower, green onion bottoms, and sliced jalapenos. Add in the olive oil, salt, and ground black pepper.
  • Toss the veggies until lightly coated in oil.
  • Remove the veggies from the bowl and spread into a single layer on a baking pan. Use parchment paper if you can, it will make the veggies easier to toss when you add the cilantro later. Check the current price for parchment paper on Amazon.
  • Place the baking pan in the oven and roast 30-40 minutes, or until the cauliflower begins to color nicely. Give the cauliflower an occasional stir and re-spread into a single layer.
  • While the Cauliflower roasts, chop up 1 bunch of fresh cilantro. Use the stems and the leaves, and use a large bunch!-the cilantro will cook down considerably in the oven.
  • Place the chopped cilantro into the same bowl used for the cauliflower mix. Reserve a bit of the cilantro for a garnish.
  • Add in the chopped green onion tops.
  • Give the garlic cloves a rough chop and add into the bowl as well.
  • Toss the ingredients together. Do not add additional olive oil.
  • When the cauliflower in the oven begins to color, stir in the cilantro mix, and spread the veggies out and return the baking pan to the oven.
  • Roast approx. 20 minutes until the cilantro has cooked down, giving the dish a toss about halfway through.

And that’s it! This roasted cauliflower dish is surprisingly tasty hot or cold. I used two jalapenos, but you can cut back to one jalapeno if you’re leery of hot peppers. Or just substitute red pepper flakes, but I love jalapenos with roasted cauliflower.

roasted cauliflower

If you need a baking pan for this recipe, you can check current prices on Amazon.

One of my favorite ways to use cauliflower is in a mock ‘potato” salad recipe. It’s a delicious and healthy twist on a classic potato salad.

cauliflower potato salad
low carb cauliflower “potato” salad recipe

Thanks for checking out our roasted cauliflower recipe video, and all of our recipes. Be sure and sign up for our mailing list and never miss a new Chef Buck cooking video, and also click a button below and share the dishes with your friends. We appreciate all the kind comments and support, and we’ll see you next time in the kitchen!

Cauliflower is a cruciferous vegetable, which is one one the healthiest vegetables according to nerds. Be sure and check out all of my healthy veggie recipes.

Thanks for watching our recipe videos!

We include affiliate links for products on our website, so if you make a purchase after clicking on our links, we may earn a commission which helps us produce more videos and drink more coffee :^) We participate in the Amazon Services LLC Associates Program, which is an affiliate advertising program providing a means for us to earn fees by linking to Amazon.com and affiliated sites, so we can make more videos.

Share and Enjoy !

Low Fat Oatmeal Recipe – Banana Bites with Oatmeal

For a healthy low-fat oatmeal recipe try Oatmeal Banana Bites. We’ve made a ton of oatmeal recipes this year and many of them are healthy snack options that have saved us from binging on too many empty calorie and carb treats. This old-fashioned oatmeal recipe is mostly oats, fresh banana, and dried fruit.

What you need for this Low-Fat Oatmeal Recipe

3 cups ROLLED OATS also called OLD FASHIONED OATS
2 cups BANANA
1 cup DRIED FRUIT
½ cup ALMOND BUTTER
1-2 Tbsp CINNAMON
optional:
8oz can crushed pineapple
2 Tbsp minced fresh ginger
(this recipe makes about 30 ping-pong ball-sized treats)

low fat oatmeal recipe

How to Make Oatmeal Banana Bites

  • In a large bowl, mash the bananas very well.
  • Add dried fruit. I use a mix of raisins and Craisins in the video recipe, but choose dried fruit to your liking, just be sure to chop whatever dried fruit you use into sizes similar to raisins. Here are current prices for Craisins on Amazon.
  • Add almond butter to the bowl, or substitute peanut butter, but realize that peanut butter will have a stronger flavor than the almond butter.
  • Then add 1-2 Tbsp of cinnamon powder. If desired, at this point you might add a few optional ingredients. I’ve experimented with crushed pineapple and fresh ginger. If you do add the crushed pineapple, just add an extra 10 minutes to the baking time.
  • Mix all the ingredients in the bowl together very well, and then fold in the old fashioned oats to form a thick batter. Check current prices for Rolled Oats on Amazon.
  • Mold the batter into shapes slightly smaller than a ping-pong ball and arrange them on a lightly greased baking sheet.
  • Place in an oven preheated to 350 degrees Fahrenheit and bake for about 20 minutes.
  • Remove from the oven and allow to cool.
  • This low-fat oatmeal recipe will keep fresh for a few days stored on the kitchen counter, but for longer storage keep them in the fridge.

These oatmeal treats are a great way to make oats a regular part of your diet, and for another oatmeal recipe idea, try this healthy Low-Fat Apple Crisp Recipe with oatmeal.

low fat apple crisp recipe

Thanks for checking out our oatmeal banana bite recipe. Be sure and sign up for our mailing list and never miss a new Chef Buck cooking video, and also click a button below and share the dishes with your friends. We appreciate all the kind comments and support, and we’ll see you next time in the kitchen!

Thanks for watching our oatmeal recipe video!

Oatmeal is one of the best foods for reducing cholesterol. Check here for more info on the health benefits of oatmeal.

We include affiliate links for products on our website, so if you make a purchase after clicking on our links, we may earn a commission which helps us produce more videos and drink more coffee :^) We participate in the Amazon Services LLC Associates Program, which is an affiliate advertising program providing a means for us to earn fees by linking to Amazon.com and affiliated sites, so we can make more videos.

Share and Enjoy !

Plain Cookies for Plain Folks

Crunchy, plain cookies are perfect with a cup of coffee. I love these cookies. They’re not overly sweet, but just sweet enough to pass as a cookie. If you like your cookies to shut up and sit in the corner until you’re ready for them, then this might be the cookie recipe for you.

Plain Cookie Recipe

2½ cups ALL PURPOSE FLOUR
½ cup SUGAR
½ cup OIL (I use safflower, canola, or sunflower oil…or substitute butter)
1 EGG beaten
2 tsp VANILLA EXTRACT
¼ tsp SALT
1 cup chopped WALNUTS (very optional…they won’t be plain cookies if you add nuts!)

plain cookies

How to Make Plain Cookies

  • Preheat oven to 350 degrees Fahrenheit.
  • In a large bowl, whisk 1 egg and then add in the sugar, oil, and vanilla extract and mix well.
  • In another bowl, sift the flour and salt.
  • Pour the wet ingredients into the dry ingredients and mix together. Add a touch more flour if the dough is too sticky.
  • If adding nuts, chips, or dried fruit, fold that into the dough.
  • Using your hands, mold tablespoon sizes of batter into cookie shapes; be sure to make the cookies an even thickness. Or roll out the batter and cut the dough into cookie shapes.
  • Place cookies on parchment paper on a baking sheet and bake in the oven until very lightly browned on the top. Need parchment paper? Check current prices for parchment paper on Amazon. The cookies will not color up much before they are finished, so if they are browned well on the bottom, they are likely done. If you wait for the top to color well, they will be overdone. 12-15 minutes baking time is a good estimate for tablespoon-sized cookies.
  • Remove cookies from the oven and transfer to a cooling rack. Allow the cookies to cool completely for the ultimate crunchiness. These cookies are pretty plain, but they have a terrific crunch and go great with a hot beverage.

For another cookie recipe that’s not so plain, try this Easy Oatmeal Cookie Recipe.

oatmeal cookie recipe

Thanks for checking out our plain cookies recipe, and all of our recipes. Be sure and sign up for our mailing list and never miss a new Chef Buck cooking video, and also click a button below and share the dishes with your friends. We appreciate all the kind comments and support, and we’ll see you next time in the kitchen!

If you think cookies are boring, try reading about the history of cookies.

Thanks for watching Chef Buck recipe videos!

We include affiliate links for products on our website, so if you make a purchase after clicking on our links, we may earn a commission which helps us produce more videos and drink more coffee :^) We participate in the Amazon Services LLC Associates Program, which is an affiliate advertising program providing a means for us to earn fees by linking to Amazon.com and affiliated sites, so we can make more videos.

Share and Enjoy !

Buttermilk Powder Pancakes Recipe

Try this easy buttermilk powder pancakes recipe. Powdered buttermilk has a very long shelf life, so it’s super convenient to have in the cupboard. Once opened, the buttermilk powder needs to be refrigerated, but it still lasts a long while for future buttermilk recipes.

buttermilk powder pancakes

Buttermilk Pancake Ingredients

4 Tbsp BUTTERMILK POWDER
1 cup all-purpose FLOUR
½ tsp BAKING SODA
1 tsp BAKING POWDER
1 Tbsp SUGAR (optional)
¼ tsp SALT (optional)
1 EGG
1 cup WATER (chilled)
2 Tbsp OIL
sprinkle of WALNUTS and/or FRUIT if desired

Check the current price for the Buttermilk Powder used in the video on Amazon

How to make Buttermilk Powder Pancakes

  • Mix and sift the dry ingredients into a large mixing bowl.
  • In another bowl prepare the wet ingredients: beat one egg, then mix in the chilled water and oil.
  • Gently mix the wet ingredients in with the dry ingredients until everything is wet. DO NOT OVERMIX! Your batter should be a bit lumpy!
  • Heat a lightly greased skillet on medium heat. In the video I use a Lodge cast iron skillet which is affordable and works great. Check the current price for a cast iron skillet on Amazon.
  • Once the skillet is hot, add batter into the skillet in whatever size cakes you prefer.
  • Bubbles will come up through the batter. Once the bubbles stop, take a peek under the cakes and give them one turn onto the other side.
  • Cook on the other side until done. Do not turn pancakes multiple times to cook because this makes pancakes dense and heavy.

That’s it! Serve buttermilk powder pancakes with syrup and your favorite fruit and nuts. And for a complete twist on traditional pancakes, try this gluten-free banana pancake recipe.

gluten free banana pancakes recipe

Banana pancakes are delicious, so definitely give them a try. Buttermilk pancakes are super delicious, too, but I’ve been eating much better these past few years, so I don’t have heavy flour pancakes nearly as often as I used to do. As I get older, I’m finding that a well-balanced breakfast makes a big difference in my energy levels and how I feel.

Thanks for watching our recipe videos!

Thanks for checking out this buttermilk powder pancakes recipe, and all of our recipes. Be sure and sign up for our mailing list so you’ll never miss a new recipe. Also click a button below and share the dishes with your friends. You can also follow Chef Buck on Youtube. We appreciate all the kind comments and support, and we’ll see you next time in the kitchen!

If you like what CG and I do, you can also support us on Patreon, or throw us a tip in our Paypal Tip Jar. We’ll happily enjoy a coffee on the road – Thanks! We appreciate all the support, and we’ll see you next time in the kitchen!

We include affiliate links for products on our website. So, if you make a purchase after clicking on our links, we may earn a commission which helps us produce more videos and drink more coffee :^) We participate in the Amazon Services LLC Associates Program, which is an affiliate advertising program. It provides a means for us to earn fees by linking to Amazon.com and affiliated sites, so we can make more videos.

Share and Enjoy !

Tofu Chocolate Pudding – Simple and Delicious

Does tofu and chocolate seem like strange bedfellows for pudding? I was skeptical too but, with a bit of experimenting, I’ve found a simple, delicious chocolate pudding recipe in which tofu provides a great creamy texture. And if you use a plant-based milk, it’s a non-dairy, vegan treat. Lastly, if you don’t have much soy in your diet, with this treat, you can pat yourself on the back that you’re serving your body some different nutrients. After all, food variety is the spice of life!

Intrigued?  Then let’s whip it up!

WHAT YOU NEED TO MAKE ORANGE COGNAC CHOCOLATE PUDDING

We suggest a MIXER (or FOOD PROCESSOR) to thoroughly blend the ingredients, to avoid a grainy feel (and tired arms).  Check current prices for a Kitchen Mixer on Amazon.

To make plain, but delicious, chocolate pudding: Use 2 Tbsp VANILLA EXTRACT instead of the COGNAC, ORANGE JUICE and ORANGE ZEST

16 oz SILKEN TOFU, drained and gently patted dry

2/3 cup unsweetened COCOA  ( I have NOT tried dark chocolate cocoa)

1 cup LIGHT BROWN SUGAR  

1/2 Cup MILK (I use unsweetened ALMOND MILK)

1 Tbsp COGNAC (we use Courvoisier in the video)

1 Tbsp ORANGE JUICE (we use freshly squeezed in the video)

1 Tbsp minced ORANGE ZEST

Potential Garnishes

Homemade crème fraîche or cool whip

Nuts (like toasted almond slivers or fancy-pants pistachios)

Berries

tofu chocolate pudding

HOW TO MAKE TOFU CHOCOLATE PUDDING

Drain your tofu, and gently pat dry.

Combine all your ingredients in a medium to large bowl. Mix at medium to high speed for 3-5 minutes, careful not to spatter precious pudding mix all over. Stir occasionally. When ready, it will still be soupy. And it’s okay that there are tiny tofu grains still visible in your pudding. Check out the video for a sample of what you can expect.

Spoon about 1/2 cup in small dishes – a full recipe makes 8 servings. I know, I know, a half a cup seems like a small serving. Trust me, this recipe is very chocolaty. Even if you are a chocoholic, you will want small portions.  Don’t add toppings to your pudding now, because they will become soggy.

Cover and chill overnight; a minimum of 4 hours. You are waiting for the tofu to ‘re-solidify’ to a pudding-y texture.

Enjoy your pudding ‘straight’, or with your favorite garnishes.

tofu chocolate pudding

EXPERIMENT WITH YOUR TOFU PUDDING RECIPE

Use the pudding to make a trifle!  Also, you can experiment with different flavor combinations.  We’ve divided a 16 oz container of SILKEN TOFU in half, then experimented with one half of the recipe.  That way, if your experiment results don’t excite you, you know you still have some delicious chocolate pudding. For easy reference, here is the recipe for 8 oz of tofu:

8 oz SILKEN TOFU, drained and gently patted dry

1/3 cup unsweetened COCOA

1/2 cup LIGHT BROWN SUGAR

1/2 cup ALMOND MILK

2 Tbsp of liquid flavoring

Here are some other things we have added to HALF the chocolate pudding recipe successfully:

1/4 cup PEANUT BUTTER, OR

1 tsp MARASCHINO CHERRY JUICE (subtract 1 tsp of the VANILLA EXTRACT), OR

1/2 tsp ESPRESSO POWDER, OR

Juice and minced zest from 1/2 large ORANGE, OR

1 Tbsp COGNAC, instead of 1 Tbsp of VANILLA EXTRACT

Remember, as you experiment, keep the liquid amount constant (no more than 1/2 cup + 2 Tbsp) so that it can set. Who wants soupy pudding?

Also, you will need a strong flavor combination to overcome the tofu flavor. We’ve tried lemon and berry varieties, but couldn’t quite disguise the tofu flavor. Of course, for those that enjoy the tofu flavor anyway, you will not have such worries. For the rest of us, it’s like using yogurt instead of mayo in a recipe – it sets up different expectations for your taste buds.

More Tofu Recipes!

And if tofu pudding has got you wanting to experiment with other soy options, take a look at our recipes for tofu scramble, garlic brown rice with mukimame, miso soup, and tofu lasagna (yep, you read that right!).

How healthy is Tofu? Check what institutions of higher learning have to say on the health benefits of soy.

tofu recipe
this tofu recipe makes a perfect breakfast, lunch, or dinner

Thanks for watching our recipe videos!

Be sure and sign up for our mailing list and never miss a new Chef Buck cooking video, and also click a button below and share the dishes with your friends. We appreciate all the kind comments and support, and we’ll see you next time in the kitchen!

We include affiliate links for products on our website, so if you make a purchase after clicking on our links, we may earn a commission which helps us produce more videos and drink more coffee :^) We participate in the Amazon Services LLC Associates Program, which is an affiliate advertising program providing a means for us to earn fees by linking to Amazon.com and affiliated sites, so we can make more videos.

Share and Enjoy !

Overnight Oats for a Healthy Oatmeal Habit

overnight oats

Overnight oats is one of the easiest ways to make oatmeal part of your dietary routine. Old fashioned oatmeal is nutritious, high in fiber, lowers cholesterol, and I credit oatmeal with helping me keep my weight down this year. I make this oatmeal recipe to last the week, and I pair it with fresh fruit, ginger, walnuts, and flax seed.

Overnight Oats Ingredients

OLD FASHIONED OATMEAL (aka Rolled Oats)
MILK (ALMOND or SOY MILK will store the best)

…those are really the only ingredients required, but
I like to add:

Fresh minced GINGER
CINNAMON POWDER
Dash of SALT

How to Make Overnight Oats

We generally make 3 to 5 cups of overnight oats at a time, which is enough for CG and I to have an oatmeal breakfast 2 to 3 times a week. I use old fashioned oats, but CG sometimes uses steel cut oats. I prefer the old fashioned kind, but either kind will work using the same method. Check current prices for oatmeal on Amazon.

You can simply use oats and milk (or any soaking liquid) for the ultimate “plain” oatmeal, but I also like to add fresh minced ginger, cinnamon, and a dash of salt to make my overnight oats base. I call it a base, because even though it is quite flavorful, I almost always add other ingredients when I’m ready to eat, depending on my mood and what’s available.

This is Truly the Easiest Oatmeal Recipe Ever

You really don’t have to measure any ingredients, just be sure to add a ratio of ginger and cinnamon to your tastes, and the liquid you add should be just enough to cover the oat mixture.

Fill a sealable container almost to the top with dry old fashioned oatmeal; leave about 1 inch at the top of the container. Mix in minced ginger and cinnamon to taste, plus a dash of salt if you like. You can see in the recipe video that I prefer quite a bit of fresh ginger. Raw fresh ginger can be quite strong, but soaking overnight with the oats mellows this healthy root considerably.

Once all the dry ingredients are mixed together well, pour in the liquid until the oats are just completely covered. I prefer to use almond milk or soy milk, which keeps quite well with the oats and lasts about 1 week in the fridge. You can use dairy milk, but it will not keep as long, so use almond or soy milk if making a batch of overnight oats for the week. You can also use just plain water. Sometimes I’ll use half water and half almond milk.

Seal the container and store in the fridge. You can do this late at night, and the oats will still be ready for an early breakfast. It only takes about 4 hours of soaking time for the oats to be perfect.

overnight oats

Fancy Overnight Oatmeal Additions

I like to use this overnight oat recipe as a vehicle for other healthy foods. Here is a list of some of my favorite additions that I add to this oatmeal base when I’m ready to eat:

  • WALNUTS (nuts add a much needed crunch, any nut will do, but walnuts pack nutrition)
  • FRESH FRUIT (blueberries and banana are my two favorite choices)
  • YOGURT (I try to use yogurt with live cultures for added benefit)
  • HONEY (just a spoonful to sneak in the health benefits of honey)
  • PEANUT BUTTER (if you made your oats with water, this is a way to add additional protein)
  • ALMOND BUTTER (same as peanut butter, but not as overpowering)
  • GROUND FLAX SEED (no one knows what this is, but you can add it to oatmeal)
  • PRUNES (add pitted prunes, but still be cautious!)
  • CHOCOLATE CHIPS (I do this sometimes, but I never feel good about it)

If you make overnight oats a regular part of your week, you’ll almost always have old fashioned oatmeal in the cupboards, here’s another great oatmeal treat No-Bake Oatmeal Fudge Bars.

Thanks for checking out this overnight oats recipe, and all of our video recipes. Be sure and sign up for our mailing list and never miss a new Chef Buck cooking video, and also click a button below and share the dishes with your friends. We appreciate all the kind comments and support, and we’ll see you next time in the kitchen!

Thanks for watching our recipe videos!

We include affiliate links for products on our website, so if you make a purchase after clicking on our links, we may earn a commission which helps us produce more videos and drink more coffee :^) We participate in the Amazon Services LLC Associates Program, which is an affiliate advertising program providing a means for us to earn fees by linking to Amazon.com and affiliated sites, so we can make more videos.

Share and Enjoy !

Corned Beef Hash Recipe with Canned Corned Beef

corned beef hash recipe

Today we prepare a classic corned beef hash recipe. You can mix your own leftover corned beef or use canned corned beef with diced potato and onion to create this hearty breakfast dish. I keep the seasoning simple with just salt, pepper, and Worcestershire sauce, so this recipe doesn’t require many ingredients.

Ingredients for a Corned Beef Hash Recipe

12 oz CANNED CORNED BEEF
2 medium-sized POTATOES
1 Lg ONION
2-3 Tbsp WORCESTERSHIRE SAUCE
1-2 tsp PAPRIKA
1 tsp CARAWAY SEEDS (optional)
OIL for the skillet
SALT and PEPPER to taste
…add a little fresh or dried HOT PEPPER if desired

corned beef hash recipe

How to make Corned Beef Hash

  • Heat oil in a skillet on medium heat.
  • I like to slice and sear my corned beef in the skillet while I prep the other ingredients for this dish. Corned beef in the can is already cooked, but that sear adds even more flavor to the recipe.
  • Remove seared beef from the skillet and set aside.
  • Add in diced potatoes. Cut potatoes uniformly, slightly smaller than a game die. You can skin the potatoes if you like, but why? It’s easier not to skin the potatoes, and the skin is good, so think about it, dude. Sauté potatoes for about five minutes. Give the dish an occasional stir, but not too much.
  • Mix in the chopped onion, and continue sautéing another 5 minutes.
  • Add in Worcestershire sauce, salt, and pepper and cook for another 5 minutes.
  • Shred corned beef into the skillet and mix well. Raise the skillet temperature to medium high and continue cooking 5-10 minutes more, or until the dish is done to your liking. Check current prices for a cast iron skillet on Amazon.

I love serving this classic corned beef hash recipe with toast and a couple of soft-yolked eggs. Maybe a splash of hot sauce? Check out current prices for canned Corned Beef on Amazon.

For another canned corned beef recipe idea try this Beef ‘n Pickle Dip.

canned corned beef recipe

Another traditional pairing is corned beef with cabbage. Simply sear up chopped onion, season as desired, add in chopped cabbage, shredded corned beef, a little water, and simmer until done. Canned corned beef is a versatile ingredient, so keeping a can in the cabinet for a rainy day is a smart idea. Check out the Complete Corned Beef and Cabbage Recipe.

corned beef cabbage recipe

Thanks for checking out our corned beef hash recipe, and all of our recipes. Be sure and sign up for our mailing list and never miss a new Chef Buck cooking video, and also click a button below and share the dishes with your friends. We appreciate all the kind comments and support, and we’ll see you next time in the kitchen!

Thanks for watching our cooking videos!

We include affiliate links for products on our website, so if you make a purchase after clicking on our links, we may earn a commission which helps us produce more videos and drink more coffee :^) We participate in the Amazon Services LLC Associates Program, which is an affiliate advertising program providing a means for us to earn fees by linking to Amazon.com and affiliated sites, so we can make more videos.

Share and Enjoy !

Miso Soup Recipe – Vegetable Soup with Yellow Miso

Miso is a fermented soybean paste perfect for a quick miso soup recipe. I find this popular Asian seasoning in a refrigerated case at my local big box grocery. There are 3 main varieties of miso: white, yellow, and red miso. White miso has the mildest flavor while red miso is the strongest; I generally choose yellow miso which is in the middle and use it primarily for making soups and dressings.

Ingredients for this Miso Soup Recipe

3 tsp YELLOW MISO
2 cups WATER
1 CARROT sliced
1 small ONION chopped (or use green onions)
1 stick CELERY chopped
handful of fresh SPINACH roughly chopped
dried SEAWEED to taste (we use versatile seaweed sheets)
1 Tbsp OIL
¼ tsp BLACK PEPPER
RED PEPPER FLAKES

miso soup recipe

How to Make Miso Soup with Vegetables

  • Heat a pot with oil on medium heat.
  • When oil is hot, add in the onions and red pepper flakes and sauté for 2-3 minutes.
  • Add in the carrots and celery and continue to sauté another 2 minutes.
  • Season with black pepper then pour in the water, cover the pot and let it come to a boil.
  • Once the pot is boiling, turn off the heat and stir in the miso until it dissolves.
  • Add in the remaining ingredients, stir, and serve hot.

We generally buy seaweed sheets, which is what I use in the video recipe. Dried seaweed sheets are versatile and easily used for making sushi rolls or simply adding to salads and soups. Check current prices for DRIED SEAWEED on Amazon.

miso soup recipe

Interested in a heartier soup? One of my favorite and easiest recipes is for this Healthy Mackerel Stew. Any time of year is great for a hearty, healthy soup or stew, but like miso soup, this dish is especially tasty when the cool weather arrives.

fish stew recipe

Thanks for checking out this vegetable miso soup recipe, and all of our recipe videos. Miso has a Wikipedia page if you’d like to discover more details about this Japanese soybean paste.

Be sure and sign up for our mailing list and never miss a new Chef Buck cooking video, and also click a button below and share the dishes with your friends. We appreciate all the kind comments and support, and we’ll see you next time in the kitchen!

Thanks for watching our recipe videos!

We include affiliate links for products on our website, so if you make a purchase after clicking on our links, we may earn a commission which helps us produce more videos and drink more coffee :^) We participate in the Amazon Services LLC Associates Program, which is an affiliate advertising program providing a means for us to earn fees by linking to Amazon.com and affiliated sites, so we can make more videos.

Share and Enjoy !

Swordfish Steaks with Rustic Veggies

Seared swordfish steaks are meaty and filling filets of fish. I find swordfish filets at a good price from the grocer’s freezer, but this simple fish preparation will work with many different fish types. To cook swordfish follow along step by step in this real-time recipe video as I prepare and serve blackened fish filets with couscous and rustic veggies. This complete fish dinner can be prepared and served in about 30 minutes.

How to Cook Swordfish Steaks

I buy swordfish steaks frozen from my regular big box grocery in the freezer case near the seafood counter. The swordfish filets are individually packaged and frozen and quite thick, but you can use almost any fish for this recipe, just be mindful of the size of the filet and adjust the cooking time as needed. Fish is easy to cook, and even easier to overcook, which you’ll want to avoid.

swordfish steaks

This basic preparation is a simple seasoning and searing of the filet. This is similar to a blackened fish, but I’m not using butter, which is common to blackening fish.

  • If frozen, allow the swordfish steaks to thaw completely.
  • Season both sides of the fish very well. Many seasonings will work great, but some of my favorites are paprika, chili powder, garlic powder, black pepper, and of course salt.
  • Heat 2 Tbsp of oil in a heavy-bottomed skillet on medium high heat. A cast iron skillet is ideal. I travel with a Lodge brand cast iron skillet which works well and is priced well, too.
  • Once oil is heated, add the swordfish steaks to the skillet. It should sizzle right when it hits the pan. Leave the fish alone and allow it to cook undisturbed 4-5 minutes, depending on the size of the fillet. Adjust the stove temperature as needed.
  • Turn the fish once and continue to cook on the other side 2-4 minutes as needed. If the swordfish steaks are especially thick, sear the sides of the fish as well.
  • Serve right away, and top with a tsp. of hot butter if desired.

Fish cooks up fast. Whether you’re serving salmon, tuna, swordfish steaks, mahi mahi, etc., you can whip up a fancy feast in quick time with these equally fast side-dish recipes.

Quick Rustic Veggies Recipe

This is a quick and healthy side-dish that pairs perfectly with swordfish and looks great if you chop the veggies into large irregular sizes. I use Za’atar as a seasoning in the recipe video; it’s a tasty ingredient we’ve enjoyed trying out, especially in vegetable dishes. You can check the current price for za’atar on Amazon.

2 cups thick cut ZUCCHINI
3-5 GARLIC CLOVES chopped
½ large ONION chopped
1 or 2 fresh TOMATOES chopped
1-2 Tbsp fresh chopped PARSLEY
Season as desired…
In the video recipe I use
½ tsp SALT
½ tsp BLACK PEPPER
1 Tbsp ZA’ATAR (or substitute ITALIAN SEASONING)
OIL for sauteing

  • Heat oil in a skillet on medium high heat.
  • Add in the onions and garlic and sauté 2 minutes. Adjust heat as needed.
  • Mix in the seasonings and sauté another 2 minutes.
  • Add in the zucchini and cook for 5 minutes.
  • Turn off the heat and stir in the chopped tomato and parsley and serve.
swordfish steaks

Fancy Couscous Recipe

Couscous is a quick-cooking pasta that is incredibly easy to prepare. Plain couscous makes a nice side-dish for swordfish steaks, but it doesn’t take much effort to transform plain couscous into fancy couscous.

about 1 cup COUSCOUS
½ tsp CUMIN SEEDS (optional)
3-5 GARLIC CLOVES chopped
½ large ONION chopped
1-2 Tbsp fresh chopped CILANTRO (or substitute fresh PARSLEY)
Season as desired…
In the video recipe I use
½ tsp SALT
1 tsp CORIANDER POWDER
1 Tbsp ITALIAN SEASONING
2 Tbsp OIL for sauteing

  • Heat oil in a pot on medium high heat.
  • When oil is hot, add in the cumin seeds and let cook for about 10 seconds. Then add in the onion and garlic and continue to sauté for 3-4 minutes.
  • Stir in the seasoning.
  • Add about 1 cup of water, cover, and bring the pot to a boil.
  • When water boils, stir in the couscous and the chopped parsley. The measure of couscous should be the same as the measure of water.
  • Remove the pot from the heat, recover the pot, and let sit undisturbed for at least 5 minutes.
  • After 5 minutes, fluff the couscous with a fork and serve.

That’s it! All three of these dishes combine to make a terrific fish dinner that kinda looks fancy, but it’s really pretty easy. Swordfish steaks have a great meatiness that is texturally reminiscent of a nice cut of beef, so if you’ve never tried swordfish then give it a go, it will taste like a nice treat. But whatever fish you choose to cook, it will probably pair very well with these quick side-dishes.

If you enjoyed this real-time Swordfish Steak dinner, then you might also like this step-by-step Mackerel Stew Recipe. This seafood stew is incredibly tasty and a great dish for family meals or anyone looking to freeze some leftovers.

fish stew recipe

Thanks for checking out our Swordfish Steak video. If you’re a stranger to this fish, here’s some swordfish info.

Be sure and sign up for our mailing list and never miss a new Chef Buck recipe, and also click a button below and share the dishes with your friends. We appreciate all the kind comments and support, and we’ll see you next time in the kitchen!

Thanks for watching our Cooking Videos!

We include affiliate links for products on our website, so if you make a purchase after clicking on our links, we may earn a commission which helps us produce more videos and drink more coffee :^) We participate in the Amazon Services LLC Associates Program, which is an affiliate advertising program providing a means for us to earn fees by linking to Amazon.com and affiliated sites, so we can make more videos.

Share and Enjoy !

Oatmeal Cranberry Bites Easy No-Bake Recipe

oatmeal cranberry bites

Try healthy Oatmeal Cranberry Bites for a treat that will satisfy your sweet craving without putting you on the refined sugar treadmill. You can make these no-bake oatmeal snacks by hand without a food processor.

What you need for No-Bake Oatmeal Cranberry Bites

1 cup OATMEAL aka OLD FASHIONED ROLLED OATS
3 Tbsp ground FLAX SEEDS
½ tsp CINNAMON
½ cup dried CRANBERRIES
½ cup ALMOND SLIVERS (toasted slivers taste best!)
1 cup ALMOND BUTTER (substitute ½ cup peanut butter if desired)
3 to 5 Tbsp HONEY
½ to 1 tsp VANILLA EXTRACT 1 to 2 Tbsp of neutral OIL as needed: Canola, Safflower, or refined Coconut are good choices.

How to Make Oatmeal Cranberry Bites

This one is easy…In a bowl, mix everything together well until it sticks together. Squeeze into balls or smash out on wax paper, then cut into squares. Refrigerate for an hour before eating, and store extra oatmeal bites in the refrigerator for later. Check current prices for Dried Cranberries on Amazon.

oatmeal cranberry bites

Try Apricot Coconut Energy Bites

If you liked Oatmeal Cranberry Bites, then you might like this flavor twist with dried apricot and coconut. This recipe is is oatmeal-free and less chewy and easy to make with a food processor.

Ingredients for Apricot Coconut Treats

½ cup WALNUTS
1 cup shredded unsweetened COCONUT, divided in half
1 Tbsp ground FLAX SEEDS (check current price for Ground Flax Seed on Amazon)
½ cup dried APRICOTS
pinch of SALT
1 heaping Tbsp fresh GINGER, minced
½ tsp CARDAMOM POWDER
1 tsp VANILLA EXTRACT
1 Tbsp SAFFLOWER (or coconut) OIL
1 to 2 Tbsp raw HONEY or other liquid sweetener

How to make these Apricot Bites

  • In a food processor, blend walnuts into small pieces. Remove nuts from the processor and divide into 2 equal parts.
  • In the processor, blend ½ cup of shredded coconut into powder. Remove coconut from processor.
  • Blend apricots into small pieces.
  • Put all ingredients, EXCEPT HALF OF THE WALNUTS, in the food processor and blend till everything begins sticking together.
  • Remove contents of the processor to a mixing bowl and stir in the remaining walnuts.
  • Either scoop and roll the mixture into balls or press onto a wax-paper covered pan and cut into squares. If the dough is too sticky, refrigerate the mixture until it hardens, about 30 minutes.
  • Unlike the cranberry oatmeal bites, these raw-oat free treats do not require any time to set in the fridge. Once the energy bites are are formed, they’re ready to eat. Store uneaten energy bites in the fridge.

Cashew Coconut Energy Bite Recipe

We’re on a roll, so here’s one more easy energy bite recipe idea.

Ingredients for Cashew Coconut Energy Bites

2 cups raw CASHEWS
1 cup pitted DATES
1 Tbsp COCONUT OIL
1 Tbsp MAPLE SYRUP
1 tsp VANILLA EXTRACT
¼ tsp SALT
½ cup SHREDDED COCONUT
juice and zest of 1 small LEMON

How to make Cashew Coconut Energy Bites

  • Place the raw cashews in a food processor and chop for a few moments. Your cashews should be chopped fine.
  • Add pitted dates and chop to the same size.
  • Add coconut oil, maple syrup, vanilla extract, and salt to the cashew/date mixture.
  • Zest one small lemon. Now, mince the zest and add it to the mixture.
  • Slice the lemon and squeeze all of the juice into the mix.
  • Mix thoroughly.
  • Shape the mixture into ball shapes. Make whatever size you like for snacking. I think grape size is best.
  • Next, roll the balls in shredded coconut to coat the outside.
  • And that’s it! Snack away! The balls can be stored in the fridge until desired. In fact, they taste best right out of the fridge!

If you liked the Oatmeal Cranberry Bites and energy treats, then try these No-Bake Oatmeal Fudge Bars.

oatmeal fudge bars

Thanks for checking out our Oatmeal Cranberry Bites and energy ball recipes. Be sure and sign up for our mailing list and never miss a new Chef Buck cooking video, and also click a button below and share the dishes with your friends. We appreciate all the kind comments and support, and we’ll see you next time in the kitchen!

Thanks for watching our Oatmeal Cranberry Bites recipe video!

Oatmeal is one of the best foods for reducing cholesterol.

We include affiliate links for products on our website, so if you make a purchase after clicking on our links, we may earn a commission which helps us produce more videos and drink more coffee :^) We participate in the Amazon Services LLC Associates Program, which is an affiliate advertising program providing a means for us to earn fees by linking to Amazon.com and affiliated sites, so we can make more videos.

Share and Enjoy !

Potato Hash Recipe Real Time Cooking Lesson

A potato hash recipe is a perfect comfort dish, and it’s ideal for any meal anytime of the day. A hash recipe usually involves meat and potatoes, but this semi vegetarian recipe foregoes the meatiest of the meat for a simple egg topping. An over easy egg with a nice runny yolk makes a tasty topping, but any fried egg will do, or leave the egg off altogether for a vegan hash.

Ingredients for Potato Hash Recipe

1 medium POTATO
½ cup chopped ONION
3 cloves minced GARLIC
¼ cup chopped BELL PEPPER
2 EGGS
OIL for cooking
1 tsp SALT
½ tsp CHILI POWDER or BLACK PEPPER
½ tsp TURMERIC
½ tsp SMOKED PAPRIKA
Optional:
½ tsp CARAWAY SEEDS
¼ cup chopped SPINACH
Some chopped CILANTRO

potato hash recipe

The chopping knife I use in the video is a Satoku-style design, and you can check current prices for this knife on Amazon.

How to make Potato Hash Recipe

  • Heat 3 Tbsp oil in a skillet on medium heat.
  • Cube potato into uniform sizes about as big as a game die.
  • When oil is hot, add potatoes to the skillet and spread into a single layer and let fry undisturbed for 10 to 15 minutes. Sprinkle potatoes with ½ tsp of salt.
  • After 15 minutes, add in the rest of the seasonings then stir potatoes and let cook for another 5 minutes.
  • Mix in onion, bell pepper, and garlic and continue to fry the potatoes until done, stirring occasionally, about 10 more minutes.
  • If desired, add in fresh greens for added nutrition and color.
  • When potatoes are finished, plate and top with a fried egg. An over-easy egg with a rich yolk makes a great saucy topping for this recipe.

If you prefer home fried potatoes with a bacon twist, check out this Home Fried Breakfast Potato Recipe.

home fried potatoes recipe
home fried potatoes

Thanks for checking out our potato hash recipe video, and all of our recipes. Be sure and sign up for our mailing list and never miss a new Chef Buck cooking video, and also click a button below and share the dishes with your friends. We appreciate all the kind comments and support, and we’ll see you next time in the kitchen!
–Chef Buck

In the cooking video, I mention how we wash and sanitize our veggies after buying them. Here’s an article CG wrote about Sanitizing fresh produce while we were traveling in Mexico. Her article includes several options for cleaning and sanitizing.

Thanks for watching our recipe videos!

We include affiliate links for products on our website, so if you make a purchase after clicking on our links, we may earn a commission which helps us produce more videos and drink more coffee :^) We participate in the Amazon Services LLC Associates Program, which is an affiliate advertising program providing a means for us to earn fees by linking to Amazon.com and affiliated sites, so we can make more videos.

Share and Enjoy !

Collard Greens Recipe with Frozen Chopped Collards

Here’s an easy collard greens recipe if you’ve ever wondered what to do with a bag of frozen greens. Since we’re visiting the grocery store less frequently, we’ve been buying more frozen vegetables, and chopped collards make a perfect side dish.

Ingredients for Collard Greens Recipe

1lb frozen chopped COLLARD GREENS
1 ONION chopped
2-3 cloves GARLIC finely chopped
3 Tbsp WORCESTERSHIRE SAUCE
3 Tbsp VINEGAR
1 tsp SALT (adjust to taste)
¼ tsp CAYENNE PEPPER
2-3 Tbsp OIL
Optional: sometimes I’ll transform this collards side dish into a main dish by adding a 15oz can diced TOMATOES or 2 fresh tomatoes, plus a 15oz can of CHICKPEAS, and more seasonings.

If you’d rather just buy your pre-made collards in a can, check current prices for Canned Collard Greens on Amazon.

collard greens recipe

How to Cook Collard Greens

  • Heat oil in a large skillet on medium high heat, then add in the onion and sauté 3-4 minutes.
  • Add in the garlic and continue to sauté for 1 minute.
  • Add in the seasonings and mix well, then add in the frozen chopped collard greens and one cup of water. Cover and bring the skillet to a bubble, then reduce the heat to a simmer and continue to cook covered for 15 minutes.
  • After 15 minutes, uncover and add in the vinegar and Worcestershire sauce, then continue to cook uncovered approximately 15 more minutes, or until the dish cooks off water to your desired consistency.
collard greens recipe

More Ideas for this Collard Green Recipe 

I’m making this a vegetarian recipe, but if you’ve got a little leftover meat in the fridge, it can pair well with greens; a leftover piece of bacon or sausage or ham thrown into the mix is a classic collards move.

This collards side dish is easy to transform into a main dish by adding a 15oz can of diced TOMATOES–or 2 fresh tomatoes–plus a 15oz can of CHICKPEAS, and some more seasonings. The cooking time is about the same, you just add in the additional ingredients when adding in the collards.

If collard greens aren’t available, or just not your favorite vegetable, then you can substitute kale for this recipe. Kale is sometimes easier to find at the market, especially if you’re going to use fresh, leafy greens.

For another easy greens dish, try the creamiest Creamed Spinach Recipe.

creamed spinach recipe

Thanks for checking out this easy collard greens recipe, and all of our recipes. Here’s a little collard green nutritional information if you’re a brainiac.

Be sure and sign up for our mailing list and never miss a new Chef Buck cooking video, and also click a button below and share the dishes with your friends. We appreciate all the kind comments and support, and we’ll see you next time in the kitchen!

Thanks for watching our recipe videos!

We include affiliate links for products on our website, so if you make a purchase after clicking on our links, we may earn a commission which helps us produce more videos and drink more coffee :^) We participate in the Amazon Services LLC Associates Program, which is an affiliate advertising program providing a means for us to earn fees by linking to Amazon.com and affiliated sites, so we can make more videos.

Share and Enjoy !

Sweet Potato Hummus – Easy Sweet Potato Recipe

sweet potato hummus

If you love hummus, be sure and give this sweet potato hummus recipe a try. It’s super easy and healthy, just like classic hummus, and very creamy. If you have a hard time getting your family excited about chickpeas, then this sweet potato recipe might be the answer.

What you need for Sweet Potato Hummus

1 medium size cooked SWEET POTATO
3 cloves GARLIC
2 Tbsp EXTRA VIRGIN OLIVE OIL
3-4 Tbsp TAHINI
2 Tbsp LEMON JUICE
SALT to taste …but about ½ tsp is cool
LEMON ZEST optional

sweet potato hummus

How to make Sweet Potato Hummus

Cook the sweet potato. But do you peel the potato first? That’s up to you, but I like to leave the potato peeling on, because it’s added taste and texture and nutrition, so why not? For hummus, I generally nuke the sweet potato in the microwave. Wash the potato, then pierce the skin of the potato 4 or 5 times with a fork, then microwave the potato for 5 to 6 minutes.

Put all ingredients into a food processor and then blend until smooth. Check Kitchen Food Processor prices on Amazon. If the hummus is overly thin, you can thicken it with added sweet potato. If the hummus is too thick, add a spoonful of water at a time until the hummus reaches the consistency you like, or add a bit of extra olive oil.

Check current prices for Tahini on Amazon.

Serve sweet potato hummus with warm pita bread, pita chips, crackers, or raw fruit and vegetables.

Is hummus too healthy for you? Are you a risk taker? Try a decadent Fancy Bean Dip Recipe.

bean dip
White bean puree makes an excellent bean dip or spread.

Thanks for checking out our hummus recipe video, and all of our recipes. If you’re interested in sweet potato nutrition info, here’s what science people have to say about the health benefits of sweet potatoes.

Be sure and sign up for our mailing list and never miss a new Chef Buck cooking video, and also click a button below and share the dishes with your friends. We appreciate all the kind comments and support, and we’ll see you next time in the kitchen!
–Chef Buck

Thanks for watching our recipe videos!

We include affiliate links for products on our website, so if you make a purchase after clicking on our links, we may earn a commission which helps us produce more videos and drink more coffee :^) We participate in the Amazon Services LLC Associates Program, which is an affiliate advertising program providing a means for us to earn fees by linking to Amazon.com and affiliated sites, so we can make more videos.

Share and Enjoy !

Low Fat Apple Crisp Recipe Healthy Dessert

Here’s a butter-free low fat apple crisp recipe for anyone looking to reduce fat but still enjoy dessert. I eliminate the butter in this dessert recipe and substitute healthy safflower oil instead. I even take it easy on the refined sugar by using sweeter apples. You can peel the apples if you prefer, but I like to leave the apple skins on for added texture and nutrition. Who’s idea was it to ever peel apples anyway?

However, be sure and wash the apples well. Apples are among the so-called “dirty dozen” produce members that sometimes harbor residual pesticides, these include strawberries, spinach, kale, nectarines, grapes, peaches, cherries, pears, tomatoes, celery, potatoes, and Telly Savalas.

What you need for this Low Fat Apple Crisp Recipe

FRUIT BASE:
6-8 small/medium APPLES
1 LEMON, juiced and zested
¼ cup SUGAR
1 Tbsp CINNAMON POWDER
3 Tbsp CORNSTARCH
2-4 Tbsp freshly grated GINGER (lots of ginger is a good idea)

TOPPING:
1 cup ROLLED OATS
½ cup ALL PURPOSE FLOUR
½ cup ground FLAXSEED or ALMOND MEAL
¼ cup BROWN SUGAR
½ cup SUNFLOWER, SAFFLOWER, or CANOLA OIL
½ cup chopped WALNUTS or PECANS
¼ tsp SALT
1 tsp CINNAMON POWDER
1 tsp CARDAMOM POWDER

low fat apple crisp recipe

How to Make a Low Fat Apple Crisp

  • Quarter apples and cut out the core, then slice apples into ¼” thickness.
  • Heat 1 Tbsp of oil in a pot on medium high heat and add apples, then reduce heat to medium and cook apples about 5 minutes until they just begin to soften.
  • Turn off the heat and add the ginger, lemon juice, and lemon zest. Toss with the apples.
  • Combine the sugar, cinnamon, and cornstarch and then toss with the apple/ginger mixture.
  • Lightly oil the bottom and sides of an 8” X 8” baking dish and spread the apple mixture evenly. Check current prices for an 8×8 Pyrex Dish on Amazon.
  • In a bowl, combine all of the topping ingredients and mix together well.
  • Distribute the mix evenly over the apple base.
  • Bake uncovered in an oven preheated to 350˚F for about 50 minutes to 1 hour.
  • Once the topping is browned and the edges begin to bubble, the crisp is done.
  • Remove from the oven and let sit about 30 minutes before serving.

This low fat apple crisp recipe is great all on its lonesome or topped with a scoop of ice cream, but if low fat isn’t your goal, either way it’s a tasty treat.

low fat apple crisp recipe

For another easy sweet treat with healthy ambitions, you’ll enjoy this Quinoa “Rice” Pudding Recipe.

rice pudding
quinoa pudding recipe

How healthy are apples? Check out what eggheads at Harvard College have to say about apples.

Thanks for checking out our low fat apple crisp recipe, and all of our recipes. Be sure and sign up for our mailing list and never miss a new Chef Buck cooking video, and also click a button below and share the dishes with your friends. We appreciate all the kind comments and support, and we’ll see you next time in the kitchen!

Thanks for watching our recipe videos!

We include affiliate links for products on our website, so if you make a purchase after clicking on our links, we may earn a commission which helps us produce more videos and drink more coffee :^) We participate in the Amazon Services LLC Associates Program, which is an affiliate advertising program providing a means for us to earn fees by linking to Amazon.com and affiliated sites, so we can make more videos.

Share and Enjoy !

Canned Clam Recipe for Flatbread Clam Pizza

Try this easy canned clam recipe for healthy flatbread clam pizza. Price wise, canned clams are one of the best buys for canned seafood. We use a thin tortilla wrap to make a super light clam pizza that packs tons of flavor without a lot of heavy bread.

How to Make Flatbread White Clam Pizza

This canned clam recipe will work with almost any kind of premade flatbread. For instance, we prefer a thin wrap because it crisps up nicely around the edges and doesn’t overwhelm the flavor of the pizza toppings.

You can really adjust the toppings and measurements for this pizza recipe. In the video, we use two cans of clams, one minced and one chopped, for an overwhelmingly clammy pizza experience, but we’ve also made this recipe using just one can of clams for two tortilla wrap pizzas and found it more than satisfying, so definitely adjust the recipe to taste.

And we love garlic, so two heaping Tbsp of minced garlic is perfect for us on a single pizza wrap. However, use less garlic if you’re scared.

canned clam recipe

Ingredients for a Flatbread Canned Clam Recipe

large TORTILLA WRAP or FLAT BREAD of choice
6.5 OZ minced CANNED CLAMS …use ½ can or an entire can for each wrap
1-2 Tbsp GARLIC minced
2 Tbsp extra-virgin OLIVE OIL
¼ cup grated MOZZARELLA CHEESE
1-2 Tbsp grated PARMESAN CHEESE
½ tsp dried OREGANO or Italian Seasoning

optional toppings:
some spinach leaves, thinly sliced onion, capers, chopped artichoke heart, cooked bacon crumbles, fresh parsley, dried red pepper flakes for heat

canned clam recipe

Check current prices for CANNED CLAMS on Amazon.

How to Cook Flatbread Clam Pizza on a Tortilla Wrap

  • Preheat the oven to 425 degrees.
  • In a small bowl, combine olive oil and minced garlic.
  • Brush half of the garlic-oil over the tortilla wrap, making sure to extend all the way to the tortilla edges.
  • Evenly distribute clams over the crust.
  • Add additional ingredients as desired. Remember to take your toppings all the way to the tortilla edges to avoid burnt edges with no flavor.
  • Drizzle the pizza top with the remaining garlic-oil.
  • Top with the dried oregano, and freshly grated Parmesan and Mozzarella cheese.
  • Place pizza on a lightly sprayed pan and slide into the preheated oven.
  • Bake until the crust edges are lightly browned and the cheese is melted, about 8-10 minutes.
  • Loosen the tortilla from the pan with a spatula and serve the pizza hot, warm, or cold; it’s garlicky and delicious anytime.
  • For added heat, sprinkle with dried red pepper flakes.
  • This flatbread pizza looks nice with fresh greens, and just a little spinach adds color and nutrition. But if you don’t love spinach, just a sprinkling of fresh parsley before serving will do the trick.

Check out more canned seafood recipe Ideas for a healthy diet.

canned herring recipe
Canned herring is an affordable and easy way to incorporate the health benefits of fish into your diet.

Thanks for checking out this canned clam recipe, and all of our cooking videos. Be sure and sign up for our mailing list and never miss a new Chef Buck cooking video, and also click a button below and share the dishes with your friends. We appreciate all the kind comments and support, and we’ll see you next time in the kitchen!

Here’s some nutritional data for canned clams.

Thanks for watching our canned clam recipe video!

We include affiliate links for products on our website, so if you make a purchase after clicking on our links, we may earn a commission which helps us produce more videos and drink more coffee :^) We participate in the Amazon Services LLC Associates Program, which is an affiliate advertising program providing a means for us to earn fees by linking to Amazon.com and affiliated sites, so we can make more videos.

Share and Enjoy !

Roasted Okra Recipe – Oven-Baked Whole Okra

Here’s an easy roasted okra recipe. Are you scared of slimy okra? Bake whole okra pods in the oven with a little oil and seasoning for a simple dish of non-gooey okra. When buying okra, choose smaller, firm, green pods with little to no discoloration. As the okra ages it will grow darker around the stem end.

What you need for this Roasted Okra Recipe

Fresh, whole OKRA pods
OLIVE OIL
some GARLIC POWDER
SALT to taste
additional SEASONING optional

I displayed jarred and pickled okra in the video. You can probably find pickled okra in the “pickle section” of your local grocery, or you can check current prices for Pickled Okra on Amazon.

roasted okra recipe

How to Roast Whole Pod Okra

  • Buy smaller pods of okra, and choosing pods less than 2” in length is ideal. Okra pods get woody in texture as they grow.
  • Trim the stem end of the okra, cutting the stem away just at the pod.
  • Wash and pat the okra dry.
  • In a bowl, lightly oil the okra pods, just a few sprays of olive oil will suffice.
  • Salt and season the okra as desired. I prefer very little salt and only a sprinkling of garlic powder. I prefer the simplicity of roasted okra.
  • Arrange the pods in one layer on a baking sheet and roast the okra in an oven preheated at 500˚F for about 20 minutes, turning as needed. I turn the okra once halfway through the cooking time.

That’s all there is to this roasted okra recipe. It’s a tasty, no-frills side dish that’s practically goo free, so if you’re scared off by slimy okra, then this is the dish for you.

My go-to okra dish is this easy skillet Whole Pod Okra Recipe with Tomato Gravy. I like using whole okra pods because it’s a cool looking ingredient, but sometimes I’ll use sliced okra. Sliced okra is often breaded and fried, but I like using sliced pods in this healthy Okra Curry Recipe.

okra curry recipe
okra curry

If you crave okra info, here’s more in depth nutritional info than you’ll ever want about okra.

Thanks for checking out our roasted okra recipe, and all of our cooking videos. Be sure and sign up for our mailing list and never miss a new Chef Buck cooking video, and also click a button below and share the dishes with your friends. We appreciate all the kind comments and support, and we’ll see you next time in the kitchen!
–Chef Buck

Thanks for watching our recipe videos!

We include affiliate links for products on our website, so if you make a purchase after clicking on our links, we may earn a commission which helps us produce more videos and drink more coffee :^) We participate in the Amazon Services LLC Associates Program, which is an affiliate advertising program providing a means for us to earn fees by linking to Amazon.com and affiliated sites, so we can make more videos.

Share and Enjoy !

Cauliflower Hummus Recipe for Health Nuts

Hummus is healthy enough, so isn’t a Cauliflower Hummus recipe just a little silly? Cauliflower hummus is very tasty, just like regular old delicious hummus, and it has cauliflower in it, so why not? Let’s do it.

What you need for a Cauliflower Hummus Recipe

1 15oz can WHITE BEANS
2 cups of fresh CAULIFLOWER
3 cloves GARLIC
3-4 Tbsp EXTRA VIRGIN OLIVE OIL
3-4 Tbsp TAHINI
3 Tbsp LEMON JUICE
SALT to taste …but about ½ tsp is cool
LEMON ZEST optional
additional SEASONING optional

cauliflower hummus recipe

How to make Cauliflower Hummus

Put everything in a food processor and blend it until smooth. That’s it. Wadja think?

Check current prices for tahini on Amazon. If you’re buying tahini from a brick and mortar store, look around in the various departments such as the “international” foods, health foods, and peanut butter section; different brands market tahini to different types of buyers, and the price can vary greatly, so definitely shop around to avoid over-priced tahini.

Serve hummus with warm pita bread, pita chips, crackers, or raw fruit and vegetables.

Is cauliflower hummus too healthy for you? Are you a risk taker? Like it on the wild side? Try this very dangerous Onion Dip Recipe…dangerously delicious.

onion dip recipe

Thanks for checking out our cauliflower hummus recipe video, and all of our recipes. Be sure and sign up for our mailing list and never miss a new Chef Buck cooking video, and also click a button below and share the dishes with your friends. We appreciate all the kind comments and support, and we’ll see you next time in the kitchen!

Check out this overly scientific article about chickpeas and hummus if you want to nerd out on some hummus nutritional info.

Thanks for watching our recipe videos!

We include affiliate links for products on our website, so if you make a purchase after clicking on our links, we may earn a commission which helps us produce more videos and drink more coffee :^) We participate in the Amazon Services LLC Associates Program, which is an affiliate advertising program providing a means for us to earn fees by linking to Amazon.com and affiliated sites, so we can make more videos.

Share and Enjoy !

Avocado Recipe Tostada for a Low Fat Diet

avocado recipe

A healthy way to start the day is with an avocado tostada for breakfast, but this easy avocado recipe is perfect anytime. A tostada is simply a corn tortilla baked or fried to crispy deliciousness. I’m trying to reduce saturated fats, so baking tortillas in an oven is a smart option for me, and avocados are one of the best sources of beneficial fats.

Ingredients for this Avocado Recipe

1 ripe AVOCADO
1 or 2 toasted CORN TORTILLAS
1 GREEN ONION chopped
1 Tbsp SUN DRIED TOMATO chopped
1 Tbsp EVERYTHING SEASONING for Bagels
1 Tbsp LEMON JUICE if not eating right away; this will help keep the avocado from discoloring.

This recipe makes 1 or 2 servings depending on how much avocado topping you desire on each tostada. CG and I usually make 2 servings, although in the video recipe I pile on the topping for one large serving.

You can buy premade tostadas, but often they are fried. If you already have corn tortillas at home, you can simply bake them in the oven and create your own tostadas. This will work with either yellow or white corn tortillas.

How to Toast Tortillas to Make Tostadas

  • Preheat the oven to 350˚F.
  • Spread tortillas on a baking sheet.
  • Bake for 10 minutes, then turn and bake for 5 more minutes. This time is approximate, so keep an eye on them. If you remove the tortillas too early, they will be more chewy than crisp, so simply return them to the oven and bake a few minutes more if needed.
  • When crisp, remove tostadas from the oven and allow to cool.

How to Make an Avocado Tostada

avocado recipe

Buy a ripe avocado for this recipe, and choose avocados that still have the “nubbin” on the stem end. Often these ends are missing on avocados, and sometimes this can allow for an avocado to dry out, or to spoil more quickly, so keep this in mind when shopping.

For this recipe, I like to use a combination of regular and smoked sundried tomato, but use whatever you prefer.

  • In a bowl, combine the chopped green onion bottoms, Everything Seasoning, sundried tomato, and fruit of the avocado. Check current prices for Everything Seasoning Mix on Amazon.
  • Mix well to desired smoothness. Add Lemon juice if eating later.
  • Spoon the mixture evenly onto 1 or 2 crispy tostadas.
  • Top with the chopped green onion tops, and additional sundried tomato if desired.

And that’s it! Hope you enjoy this healthy avocado tostada. For another easy avocado dish, check out this Guacamole Recipe.

easy guacamole recipe
guacamole recipe

Here’s a little info about some of the health benefits of avocados. Thanks for checking out our avocado tostada recipe, and be sure and sign up for our mailing list so you’ll never miss a Chef Buck cooking video, and also click a button below and share the dishes with your friends. We appreciate all the kind comments and support, and we’ll see you next time in the kitchen!

Thanks for Watching our Recipe Videos!

We hope you enjoy this avocado recipe. Sign up for our mailing list so you’ll never miss a new recipe. Also click a button below and share the dishes with your friends. You can also follow Chef Buck on Youtube. We appreciate all the kind comments and support, and we’ll see you next time in the kitchen!

If you like what CG and I do, support us on Patreon, or throw us a tip in our Paypal Tip Jar. We’ll happily enjoy a coffee on the road – Thanks! We appreciate all the support, and we’ll see you next time in the kitchen!

We include affiliate links for products on our website. Making a purchase after clicking on our links and we may earn a commission which helps us produce more videos and drink more coffee :^) We participate in the Amazon Services LLC Associates Program, which is an affiliate advertising program. It provides a means for us to earn fees by linking to Amazon.com and affiliated sites, so we can make more videos.

Share and Enjoy !

Tuna Casserole Recipe – Creamy NOT Wet!

Is there a more classic comfort food than a Tuna Casserole Recipe? A creamy tuna noodle bake is one of the easiest, tastiest dishes that you can serve. It’s super affordable, very filling, and a versatile recipe for using up odds and ends in the fridge.

Tuna Casserole Ingredients

12 oz can of TUNA in water
8 oz SHELL PASTA (8 ounces before cooking)
4 oz CREAM CHEESE softened
1 can CREAM of MUSHROOM SOUP
1 small ONION chopped
1 Tbsp PIMIENTOS or substitute fresh chopped peppers
½ cup CELERY chopped
some GREEN PEAS
1 Tbsp fancy MUSTARD
½ sleeve of SALTINE CRACKERS or BREADCRUMBS
2 Tbsp BUTTER
SALT and PEPPER to taste

tuna casserole recipe

How to Make Tuna Casserole Recipe

  • In a large bowl, simply combine all of the ingredients. Check current price for canned tuna on Amazon.
  • Cook the shell pasta according to package directions and then stir into the mix, but prepare the pasta al dente, which means firm and chewy, do not overcook!
  • Pour mixture into a greased 8×8 baking dish.
  • Spread the mixture evenly in the dish and then top with buttered, crushed saltines, or breadcrumbs.
  • Bake in an oven preheated at 400˚F for 30 minutes or until the topping is golden brown.

And that’s it! Hope you love this easy tuna casserole recipe. For another easy casserole dish, check out this Squash Casserole Recipe.

squash casserole recipe

Thanks for checking out our tuna casserole recipe, and be sure and sign up for our mailing list so you’ll never miss a Chef Buck cooking video, and also click a button below and share the dishes with your friends. We appreciate all the kind comments and support, and we’ll see you next time in the kitchen!

We appreciate you watching our recipe videos!

We include affiliate links for products on our website, so if you make a purchase after clicking on our links, we may earn a commission which helps us produce more videos and drink more coffee :^) We are participants in the Amazon Services LLC Associates Program, which is an affiliate advertising program that provides a means for us to earn fees by linking to Amazon.com and affiliated sites.

Share and Enjoy !

Oatmeal Fudge Bars No Bake Recipe

No-bake oatmeal fudge bars are easy to prepare and make a nice treat when you’re in a chocolaty mood. This is a no bake recipe, but you will need to melt chocolate on the stove top, which takes only a few moments. Use dark chocolate chips for the fudge. When buying chocolate chips, check the ingredients and choose chips where the 1st ingredient is chocolate instead of sugar, that way you can feel like a health nut when indulging in this rich treat. However, since this is a no-bake oatmeal dish, don’t gorge yourself too much, otherwise your digestive tract may go on strike.

Oatmeal Fudge Recipe Ingredients

2 cups OATMEAL (quick oats)
1 cup OAT FLOUR
1 cup NUTS chopped
⅓ cup HONEY
½ cup COCONUT OIL
1 tsp VANILLA
1 Tbsp BUTTER
2 cups DARK CHOCOLATE
¼ cup COCONUT MILK

oatmeal fudge bars

How to Make Oatmeal Fudge Bars

  • In a large mixing bowl, whisk together the honey, coconut oil and vanilla.
  • Add the quick oats and oat flour and stir into the mixture until well combined. Oat flour is simply ground up oats, so if you don’t want to buy oat flour, simply place oatmeal in a food processor and blend into a powder. Check the current price for Oat Flour on Amazon.
  • Add chopped nuts and fold into the mix. I like to use a combo of walnuts and toasted, slivered almonds, but any nut you prefer will be the right choice.
  • Layer the bottom and sides of a baking dish with parchment paper. Take about ⅔ of your oat-honey-nut mixture and press flat to cover the bottom of your baking dish; this will form the crust for your fudge bar. In the video recipe, I use an 8X8 baking dish for thick oatmeal fudge squares, but adjust the size of the dish to create the size bars you prefer. A larger dish will make for thinner bars, because that’s how science works. Be sure and prepare this part of the recipe before melting your chocolate.
  • On the stove top, prepare a double boiler to melt the chocolate. Heat the pot on medium low and add in the butter. When butter melts, add in the chocolate and stir until it has melted. Stir in the coconut milk until well mixed and the chocolate is smooth.
  • While still heated, remove melted chocolate from the stove and pour over your flattened oats.
  • Spread the chocolate evenly over the oats.
  • Take the remaining ⅓ oat mixture and crumble over the top of the soft fudge layer. Add extra nuts to the top if desired.
  • Use a spatula and slightly press the topping into the fudge.
  • Refrigerate overnight, or at least 2-3 hours before serving.

When the fudge sets, it will be very easy to remove from the baking dish thanks to the parchment paper. Check current prices for Parchment Paper on Amazon. Cut the oatmeal fudge bars into whatever sizes you desire. They are very rich bars, super decadent and delicious, so a little goes a long way.

Another of my favorite easy treats is this fantastic No-Bake Refrigerator Fruit Cake Recipe. Fruit cake? Trust me, it’s fantastic.

Or if you’re in a baking mood, but still want a quick and easy treat, here’s a Chewy Brown Sugar Cookie Bar that will do the trick!

chewy cookie recipe

Thanks for Watching our Videos!

Thanks for checking out our oatmeal fudge bars recipe. Sign up for our mailing list so you’ll never miss a new recipe. Also click a button below and share the dishes with your friends. You can also follow Chef Buck on Youtube. We appreciate all the kind comments and support, and we’ll see you next time in the kitchen!

If you like what CG and I do, support us on Patreon, or throw us a tip in our Paypal Tip Jar. We’ll happily enjoy a coffee on the road – Thanks! We appreciate all the support, and we’ll see you next time in the kitchen!

We include affiliate links for products on our website. Making a purchase after clicking on our links and we may earn a commission which helps us produce more videos and drink more coffee :^) We participate in the Amazon Services LLC Associates Program, which is an affiliate advertising program. It provides a means for us to earn fees by linking to Amazon.com and affiliated sites, so we can make more videos.

Share and Enjoy !

Spinach Curry with Chickpeas

This spinach curry recipe is one of my favorite Indian dishes. When you see spinach and chickpea curry at an Indian restaurant, it’s called Chole Palak. There are many versions of this dish. One of my favorite versions is here, but that spinach curry recipe calls for asafoetida and garam masala. If you wish to explore Indian cooking, I highly recommend you seek those ingredients out, but with the recipe below, you can make a delicious spinach curry with ingredients you might already have in the kitchen.

Ingredients for Spinach Curry Recipe

1 pack frozen or canned SPINACH thawed, 10 to 15 oz
½ to 1 cup ONION chopped
HOT PEPPER to taste, chopped, optional
15oz can diced TOMATOES or 2 fresh tomatoes
2-4 cloves GARLIC finely chopped
1 Tbsp minced GINGER
15 oz can CHICKPEAS rinsed and drained
1-2 tsp CUMIN SEEDS
2 tsp CORIANDER POWDER
½ tsp TURMERIC POWDER
1 tsp CHILI POWDER
2-3 Tbsp OIL
SALT and PEPPER to taste

Check out current prices for Indian Cooking Spices on Amazon.

spinach curry

How to Make Chickpeas and Spinach Curry

  • Heat oil on medium-high heat and add cumin seeds. The seeds should sizzle when they hit the pan and will brown and crack quickly, so only leave them cooking on their own for a matter of seconds.
  • Add in the onions and peppers and stir for about 1 minute.
  • Add in the garlic and seasonings and continue to stir another 1-2 minutes.
  • Empty one can of diced tomatoes and the ginger into the skillet and mix well with the other ingredients. Adjust the stove top heat as needed throughout the cooking process.
  • Add the canned chickpeas, rinsed and drain, plus 1-2 cups of water. Stir well and bring the skillet up to a simmer, then cover and cook for about 10 minutes.
  • Uncover and crush about ½ on the dish with a potato masher or fork. This will thicken up the dish and make it creamier. You can “smoosh” the entire dish if you like, but I prefer leaving about half of the chickpeas whole. Continue to simmer the curry uncovered until the water has cooked away to your desired consistency.

And that’s it! Spinach curry is often served very wet, sometimes almost soupy, but I prefer the dish much drier. Try the dish both ways and see which version you prefer. This Indian-style recipe is delicious, and maybe a good tactic to sway non-spinach lovers into giving spinach another try.

For more Indian recipes, check out this real-time Indian cooking lesson featuring some of my favorite Indian dishes.

mango curry
A complete Indian meal with mango curry, chana masala, and gobi matar.

Thanks for checking out our spinach curry recipe, and all of our recipes. Be sure and sign up for our mailing list and never miss a new Chef Buck cooking video, and also click a button below and share the dishes with your friends. We appreciate all the kind comments and support, and we’ll see you next time in the kitchen!
–Chef Buck

Thanks for watching our recipe videos!

We include affiliate links for products on our website, so if you make a purchase after clicking on our links, we may earn a commission which helps us produce more videos and drink more coffee :^) We participate in the Amazon Services LLC Associates Program, which is an affiliate advertising program providing a means for us to earn fees by linking to Amazon.com and affiliated sites, so we can make more videos.

Share and Enjoy !

Best Squash Casserole Recipe

Try this easy summer Squash Casserole recipe made with yellow squash. This recipe is great because it’s creamy, not wet like many squash recipes, and you can use any thin-skinned summer squash for this dish. My mother-in-law likes to use a mix of yellow squash and zucchini.

What you need for a Squash Casserole Recipe

2 lbs yellow SQUASH sliced thin
1 medium CARROT grated
1 Lg ONION chopped
1 EGG
8 oz SOUR CREAM
8 oz BREAD CRUMBS or SALTINE CRACKERS
1 cup grated CHEDDAR CHEESE (or use your favorite cheese)
¼ cup freshly grated PARMESAN CHEESE
1 tsp GARLIC POWDER
1 Tbsp ITALIAN SEASONING
2 Tbsp BUTTER
1 Tbsp OIL
SALT and PEPPER to taste

squash casserole recipe

How to Bake a Squash Casserole

  • Heat 1 Tbsp butter and 1 Tbsp oil in a large skillet on medium high heat, then add in the squash and onion. Sprinkle with salt and mix well. The salt will help draw out water from the veggies.
  • Stir the veggies for about five minutes, adding the garlic powder and any other seasonings you desire.
  • Once the veggies have softened, remove them from the skillet and place in a colander to allow some of the water to drain off. Press on the veggies to squeeze the water out.
  • In a large bowl, whisk an egg, then add in the squash, onion, cheddar cheese, carrot, sour cream, Italian seasoning, and half of the breadcrumbs or crackers. Stir until everything is well mixed.
  • In a small bowl make your casserole topping: combine the remaining bread crumbs with 1 Tbsp of melted butter. Mix in the Parmesan cheese.
  • Pour the casserole mix into an oven safe dish and then top with the bread crumb topping. Make sure the casserole topping is level so it will cook evenly.
  • Place the casserole in an oven preheated to 350˚F and bake for about 30 minutes, or until the bread crumb topping turns golden brown. Check current prices for Panko Bread Crumbs on Amazon.

This casserole makes a great side dish for almost any meal, so definitely give it a try!

For another squash dish, try this yummy Butternut Squash Recipe.

butternut squash recipe

Thanks for checking out our squash casserole recipe, and all of our recipes. Be sure and sign up for our mailing list and never miss a new Chef Buck cooking video, and also click a button below and share the dishes with your friends. We appreciate all the kind comments and support, and we’ll see you next time in the kitchen!
–Chef Buck

Thanks for watching our recipe videos!

We include affiliate links for products on our website, so if you make a purchase after clicking on our links, we may earn a commission which helps us produce more videos and drink more coffee :^) We participate in the Amazon Services LLC Associates Program, which is an affiliate advertising program providing a means for us to earn fees by linking to Amazon.com and affiliated sites, so we can make more videos.

Share and Enjoy !

Homemade Onion Dip Recipe

Try a caramelized onion dip recipe that will make you never want to use another dried onion dip recipe again. Homemade onion dip takes more time than a pre-packaged dried onion dip, but not too much time, just enough time to show that you care.

What you need for this Onion Dip Recipe

4 medium sized ONIONS
1 Tbsp BUTTER
1 Tbsp OIL
1 tsp SALT
2 tsp GARLIC POWDER
2-3 Tbsp WORCESTERSHIRE SAUCE or ¼ cup WINE
8oz softened CREAM CHEESE
SOUR CREAM as desired
fresh PARSLEY or GREEN ONION TOPS for garnish

onion dip recipe

How to make a Caramelized Onion Dip Recipe

  • Slice the onions. It’s best to use sweet or yellow onions.
  • Heat oil and butter on medium high heat in a skillet.
  • Add the onions and saute about 5-10 minutes, stirring routinely.
  • Reduce heat to medium and add salt and garlic powder and continue to stir as needed. As the onions cook down, add a little wine or Worcestershire sauce to keep the onions juicy, or just a sprinkling of water.
  • Continue cooking until the onions are rich and caramel colored. Don’t be in a hurry, it will take around 30 minutes to achieve perfectly caramelized onions, but the wait is worth it.
  • In a bowl, mix the softened cream cheese and a spoonful of sour cream.
  • Chop up the caramelized onions well and stir into the mix. Stir until the ingredients are well incorporated. You can adjust the amount of sour cream to make the dip as creamy as you like. The dip will firm up as the onions cool.
  • For color, stir in a little fresh parsley or green onion tops, but only use the fresh green onion if eating the same day.

This dip is tasty, but like most dips it’ll be even tastier if you can make it a day ahead of time to allow the flavors to meld.

Serve the dip with crackers, toast, chips, or sliced veggies. This dip makes a great creamy onion filling for other recipes. Stuff the onion filling in a jalapeno popper, or use the filling in an omelet!

If homemade onion dip isn’t your thing, you can check current prices
for a dried ONION DIP mix
on Amazon.

For another easy party favorite, try this Pimiento Cheese Dip Recipe.

pimiento cheese spread
homemade pimiento cheese spread

Thanks for checking out our onion dip recipe, and all of our recipes. Be sure and sign up for our mailing list and never miss a new Chef Buck cooking video, and also click a button below and share the dishes with your friends. We appreciate all the kind comments and support, and we’ll see you next time in the kitchen!
–Chef Buck

Thanks for watching our recipe videos!

We include affiliate links for products on our website, so if you make a purchase after clicking on our links, we may earn a commission which helps us produce more videos and drink more coffee :^) We participate in the Amazon Services LLC Associates Program, which is an affiliate advertising program providing a means for us to earn fees by linking to Amazon.com and affiliated sites, so we can make more videos.

Share and Enjoy !

Twice Baked Spaghetti Squash Recipe

Here’s a twice-baked spaghetti squash recipe that’s like a spaghetti squash casserole. I keep the recipe super simple with sliced onion, garlic and sundried tomatoes. Thinly slicing the ingredients helps the dish bake well together with the spaghetti squash. I also add jalapenos for heat, but that’s very optional. Even the cheese topping is optional if you want a dairy free recipe, but the cheese definitely adds more body to the dish.

What you need for this Squash Recipe

½ Lg SPAGHETTI SQUASH
1 med ONION sliced
¼ cup SUNDRIED TOMATO sliced
3-5 cloves GARLIC sliced
1 Tbsp JALAPENO PEPPER sliced
¼ cup PARMESAN CHEESE shredded
2 Tbsp OLIVE OIL
SALT to taste
2 tsp PAPRIKA

It’s easy to double up on this squash recipe, but only using half a large squash makes plenty for two people, and leaves half to use in a completely different dish. When buying a spaghetti squash, choose one that is blemish free, firm to the touch, and feels heavy for its size.

best spaghetti squash
When cooked spaghetti squash pulls apart into “noodley strings”

How to Bake a Spaghetti Squash

  • Slice the squash through the middle, separating both ends, then take a spoon and dig out the seeds.
  • Place the squash halves cut side down in a baking pan in ¼” water.
  • Bake for 30 minutes on the center rack in an oven preheated to 350˚F.
  • Carefully remove the squash from the pan and allow to cool until easy to handle.
  • Use a fork and separate the inner squash from the rind. The squash will come out in spaghetti-like strands. You can use this baked squash in all kinds of recipes.
baked spaghetti squash recipe

Twice Baked Spaghetti Squash Recipe

  • Thinly slice the onion, garlic, sundried tomato, and peppers.
  • In a large bowl, combine the baked squash and sliced veggies.
  • Add olive oil and toss well. Check current Olive Oil prices on Amazon.
  • Add seasoning and toss. Use whatever seasonings you like, but for this recipe I prefer only salt and paprika. The tomato and garlic adds a lot of natural flavor.
  • Spread everything evenly in an ungreased 8X8 inch baking dish and bake uncovered at 350˚F for 30 minutes.
  • After 30 minutes, top the dish with shredded cheese and bake for 10 minutes more.
  • And that’s it! Garnish with chopped herbs if desired.

For another easy spaghetti squash dish, try this Pad Thai Spaghetti Squash Recipe.

pad thai recipe
pad thai recipe with spaghetti noodles

Thanks for checking out our twice-baked spaghetti squash recipe, and all of our recipes. Be sure and sign up for our mailing list and never miss a new Chef Buck cooking video, and also click a button below and share the dishes with your friends. We appreciate all the kind comments and support, and we’ll see you next time in the kitchen!
–Chef Buck

Thanks for watching our recipe videos!

We include affiliate links for products on our website, so if you make a purchase after clicking on our links, we may earn a commission which helps us produce more videos and drink more coffee :^) We participate in the Amazon Services LLC Associates Program, which is an affiliate advertising program providing a means for us to earn fees by linking to Amazon.com and affiliated sites, so we can make more videos.

Share and Enjoy !

Chewy Cookie Recipe – Easy Bar Cookies

You won’t believe how easy it is to bake this chewy cookie recipe. I love bar cookies, and this brown sugar cookie recipe is practically foolproof. I’ve made many variations of these brown sugar chews and they’ve all turned out great, because the ingredients are super basic, so it’s hard to go wrong as long as you’re in the baking ballpark.

What you need for this Chewy Cookie Recipe

¾ cup BROWN SUGAR
½ cup ALL PURPOSE FLOUR
1 Tbsp BUTTER
1 EGG
1 tsp VANILLA EXTRACT
½ tsp SALT
1 cup chopped WALNUTS

chewy cookie recipe

How to make Brown Sugar Chews

  • In a large bowl, add the softened butter, sugar, egg, and vanilla extract, then stir until smooth.
  • Sift in the flour and salt and stir until mixed.
  • Fold in the walnuts.
  • Grease the bottom and sides of an 8” X 8” baking dish, OR LINE THE BOTTOM OF THE BAKING DISH WITH PARCHMENT PAPER. Between the two options, I highly recommend going with the parchment paper. The cookies are chewy, and sticky on the bottom, so parchment paper will make getting them out of the pan much easier. Check current prices for parchment paper on Amazon.
  • Roll the cookie dough into the baking dish and spread it evenly.
  • Bake in an oven preheated to 350˚F for about 20 minutes.
  • Remove the dish from the oven and place on a rack to cool.
  • Once cool, cut the cookies into squares.

That’s it! I love these cookies. And it’s a very easy recipe to modify.

Variations on this Chewy Cookie Recipe

  • Instead of ¾ cup brown sugar, use ½ cup brown sugar and ¼ cup Molasses.
  • For less chewy cookies, increase the amount of flour to match the amount of sugar.
  • Reduce the chopped walnuts to ½ cup and add ½ cup dried coconut. Or substitute chopped dates for the walnuts.
  • Substitute 1 tsp of lemon extract for the vanilla extract, and add 1 Tbsp of finely chopped lemon zest.
chewy cookie recipe

Salted Caramel Cookie Bar

Here’s one of my favorite variations of this bar cookie recipe. This recipe has more sugar and more butter and more salt, so it’s not a step in a healthier direction, but it’s delicious. I recommend this cookie recipe for folks with better-than-average willpower.

1 cup BROWN SUGAR
½ cup ALL PURPOSE FLOUR
2 Tbsp BUTTER
1 EGG
1 tsp VANILLA EXTRACT
½ tsp SALT in the batter…plus additional LARGE GRAIN SALT for the topping
1 cup chopped WALNUTS

You make this recipe the same as the recipe above, but as a final step, top the batter with additional large granule salt to taste before placing in the oven to bake.

For another easy cookie bake, try this Oatmeal Cookie Recipe.

oatmeal cookie recipe

Thanks for Watching our Chewy Cookie Recipe Video!

Click a button below and share the dishes with your friends. You can also follow Chef Buck on Youtube. We appreciate all the kind comments and support, and we’ll see you next time in the kitchen!

If you like what CG and I do, support us on Patreon, or throw us a tip in our Paypal Tip Jar. We’ll happily enjoy a coffee on the road – Thanks! We appreciate all the support, and we’ll see you next time in the kitchen!

We include affiliate links for products on our website. Making a purchase after clicking on our links and we may earn a commission which helps us produce more videos and drink more coffee :^) We participate in the Amazon Services LLC Associates Program, which is an affiliate advertising program. It provides a means for us to earn fees by linking to Amazon.com and affiliated sites, so we can make more videos.

Share and Enjoy !

Baked Bean Salad instead of Potato Salad?

If you’ve got a can of baked beans in the cabinet you can quickly jazz it up to create a baked bean salad. It’s kinda like a potato salad recipe, but with beans.

What you need for a Baked Bean Salad

15oz canned BAKED BEANS
1 BOILED EGG
1-2 Tbsp MAYONNAISE
2 Tbsp finely chopped PICKLES
1 Tbsp finely chopped JALAPENOS (optional)
Fresh cracked BLACK PEPPER

…you can also add fresh chopped onion if serving the salad right away, but I wouldn’t add onion if making the dish in advance.

baked bean salad

How to make this Bean Salad Recipe

Use whatever brand of baked beans you like. Canned baked beans already have a lot of seasoning and flavor, so this recipe requires few ingredients. Check here for current baked beans prices on Amazon.

  • Open and drain the canned beans. Do not rinse the beans.
  • In a large bowl, add 1 Tbsp of mayonnaise and egg yolk. Start with 1 Tbsp of mayo, you can always add more later if desired. Whisk until smooth.
  • Add in the beans, chopped egg whites, pickles, jalapenos, and cracked black pepper.
  • Toss the ingredients, and adjust to taste.

Garnish with a sprinkling of fresh chopped parsley or paprika. This baked bean salad is a perfect picnic side dish, and it travels very well.

baked bean salad

The recipe is a close cousin to potato salad, and I truly love potato salad, but over the years I’ve gotten addicted to this Mock Potato Salad made with cauliflower. It’s a great alternative if you’re looking for lower carbs. And for another classic picnic dish, try out this Easy Coleslaw Recipe.

cauliflower potato salad
low carb cauliflower “potato” salad recipe

Thanks for checking out our baked bean salad recipe, and all of our recipes. Be sure and sign up for our mailing list and never miss a new Chef Buck cooking video, and also click a button below and share the dishes with your friends. We appreciate all the kind comments and support, and we’ll see you next time in the kitchen!
–Chef Buck

Thanks for watching our recipe videos!

We include affiliate links for products on our website, so if you make a purchase after clicking on our links, we may earn a commission which helps us produce more videos and drink more coffee :^) We participate in the Amazon Services LLC Associates Program, which is an affiliate advertising program providing a means for us to earn fees by linking to Amazon.com and affiliated sites, so we can make more videos.

Share and Enjoy !

Best Fennel Recipe with Shrimp

What’s fancier than a fennel recipe? Shrimp with fennel! Fennel sounds fancy, but it’s a super easy vegetable to use with a slightly different taste than all other vegetables. You can eat fennel cooked or raw, so it pairs well with quick-cooking seafood. If you’ve never tried fresh fennel before, this shrimp and fennel recipe is a great place to start.

Ingredients for Fennel Recipe

1 bulb of FENNEL
1 lb. SHRIMP peeled and deveined
1 small ONION sliced
15-20 sliced CHERRY TOMATOES
1 Tbsp TOMATO PASTE
½ cup to 1 cup WHITE WINE
1 Tbsp SMOKED PAPRIKA
SALT and PEPPER to taste
2 Tbsp OIL for cooking
FENNEL fronds for garnish

Fennel Recipe with Shrimp

How to Buy and Cut Fresh Fennel

When you buy fennel at the store, it might simply be the bulb, or it might include the bulb, stalks and fronds. Buy fennel with an unblemished bulb, or at least with a bulb that can be cleaned up easily with a peeler. The edible parts of fennel are the bulb and the dill-like fennel fronds. The stalks resemble celery, but are too chewy to enjoy.

fennel recipe

Pull off some of the fennel fronds, wash, dry, and then chop them into a garnish for later. The stalks can be cut away and discarded. Wash the bulb and cut away any blemishes, or remove the outer layers entirely if they have too many spoiled areas.

Thinly shave the bottom of the bulb away. Cut the bulb in half from top to bottom to reveal the core. Larger fennels will have thicker layers and a larger core. Make divots on either side of the core and cut it away and discard. Slice the fennel into larger, thin pieces. Smaller fennel is more tender, and better suited for raw recipes, while larger fennel is best for cooking.

How to Peel and Devein Shrimp

For this recipe, I like to buy medium-sized shrimp at the best price I can find. Don’t spend gobs of cash on super-model shrimp, because the shrimp are not the star ingredient, this is an ensemble of great tastes working together.

If the best-priced shrimp aren’t peeled and deveined already, that’s fine, cleaning shrimp is a simple task. Just take the shrimp and twist off the head, then squeeze the shrimp at the tail-end of the shell and pull the shell and legs off like a jacket. The head and shells can be saved to make a seafood stock.

On the top and bottom of the shrimp you’ll see dark lines running along the length of the body. The bottom line you can ignore, that’s just a vein, but the dark line up top is the gritty intestinal tract of the shrimp, and should be removed for best eating.

With a sharp knife, cut along the length of the line at the top of the shimp. Don’t cut deeply, just enough to cut open the “vein”, which is really the digestive tract. Open the cut under water and wash the intestines away. And that’s it!

Cooking Fennel and Shrimp in a Skillet

Heat a skillet and oil on medium heat. For a skillet like the one used in the video, you can check current prices for a Cast Iron Skillet on Amazon .

Add in the onion slices and cook for one minute, then add in the fennel slices and continue cooking another minute. Add in the smoked paprika, salt, and pepper and mix well, then add in the tomato paste and continue mixing.

Add in a little wine. Add in ½ cup to start, and then ¼ cup at a time as desired. Wine is great for this dish, but water is fine if you’d rather.

Add in sliced cherry tomatoes and shrimp, and then stir another 2-3 minutes or until the shrimp are opaque and cooked through. And that’s it! This shrimp recipe is great over rice, and looks especially nice topped with a garnish of the chopped fennel fronds.

Give this shrimp and fennel recipe a try and let me know what you think, and check out this Eggs, Fennel and Salmon Brunch Recipe.

poached egg recipe

If you like the flavor of fennel, give cooking with fennel seeds a try. Seeds add incredible flavor to a dish, and cumin seeds and fennel seeds are two ingredients my kitchen is never without. Check current prices for Fennel Seeds on Amazon.

fennel recipe

Thanks for checking out our fancy fennel recipe, and be sure and sign up for our mailing list so you’ll never miss a Chef Buck cooking video, and also click a button below and share the dishes with your friends. We appreciate all the kind comments and support, and we’ll see you next time in the kitchen!

We appreciate you watching our recipe videos!

We include affiliate links for products on our website, so if you make a purchase after clicking on our links, we may earn a commission which helps us produce more videos and drink more coffee :^) We are a participant in the Amazon Services LLC Associates Program, which is an affiliate advertising program that provides a means for us to earn fees by linking to Amazon.com and affiliated sites.

Share and Enjoy !

Baked Salmon Cakes in the Oven

Try this easy baked salmon cakes recipe made with canned salmon. I generally use canned pink salmon to make a salmon cake because it’s less expensive than red salmon. But what’s the difference between the two types of canned salmon? They are actually two different species of salmon, and the pink fish is more prevalent, so the cost is less. Salmon cakes taste great cooked in a skillet on the stove top, but baking them in the oven uses less oil, so if you’re seeking a break from fried foods, baked canned salmon is a healthy option.

Ingredients for Baked Salmon Cakes

15oz canned SALMON
1 EGG
1 tsp minced GARLIC
¼ cup minced ONION
1 Tbsp minced PEPPERS

Season as desired. In this recipe I use…

½ tsp SALT
½ tsp PAPRIKA
1 tsp GARLIC POWDER

You will also need OIL for the baking pan

baked salmon cakes

How to Make Salmon Cakes in the Oven

  • Open and drain the canned salmon. Check current prices for canned salmon on Amazon.
  • In a bowl, crush the fish and bones. Everything in the can is pre-cooked and ready to eat including the bones, skin, and meat.
  • Into the bowl add the egg, minced vegetables, and seasoning.
  • Mix ingredients together well and then form into patties.
  • Place the salmon patties on a lightly oiled baking sheet and bake for 15 minutes in an oven preheated to 400 degrees Fahrenheit.
  • Turn patties once and bake for 5 minutes more.
  • Remove salmon cakes from the oven and serve, or allow to cool and save in the fridge for later.

Add a creamy dressing or sauce and these baked salmon cakes make a nice entree with little effort. The fish cakes also go great on a sandwich, and they make handy leftovers, or freeze easily for future meals.

If you enjoy this salmon cake recipe, then you might also like this Salmon Ball Recipe, which is a versatile way to use baked salmon in saucier dishes.

canned salmon
salmon meatball curry topped with cilantro

Thanks for Watching our Videos!

Thanks for checking out this baked salmon cakes recipe, and all of our recipes. Sign up for our mailing list so you’ll never miss a new recipe. Also click a button below and share the dishes with your friends. You can also follow Chef Buck on Youtube. We appreciate all the kind comments and support, and we’ll see you next time in the kitchen!

If you like what CG and I do, support us on Patreon, or throw us a tip in our Paypal Tip Jar. We’ll happily enjoy a coffee on the road – Thanks! We appreciate all the support, and we’ll see you next time in the kitchen!

We include affiliate links for products on our website. Making a purchase after clicking on our links and we may earn a commission which helps us produce more videos and drink more coffee :^) We participate in the Amazon Services LLC Associates Program, which is an affiliate advertising program. It provides a means for us to earn fees by linking to Amazon.com and affiliated sites, so we can make more videos.

Share and Enjoy !

Cherry Chocolate Cake with a Kick

Bake the best spicy chocolate cherry cake with this simple recipe. If you lean vegan, no problem, this cake is egg and dairy free. The inspiration for this recipe came from our travels in Mexico where we sampled several delicious chocolate desserts paired with the heat of peppers. Hot pepper and chocolate is a terrific combination.

Don’t worry, if you’re not a fan of spicy foods, the addition of heat in this recipe does not set your mouth on fire. But if the notion of pepper in your cake doesn’t thrill you, then just leave the pepper out, the cake is still moist and delicious.

Cherry Chocolate Cake Ingredients

1½ cups all-purpose FLOUR
1 cup white SUGAR
¼ cup COCOA powder …do not substitute hot chocolate mix, it’s not the same thing
1 tsp BAKING SODA
2 tsp CINNAMON
¾ tsp RED PEPPER POWDER or cayenne powder
1 tsp VANILLA
1 Tbsp WHITE VINEGAR
5 Tbsp refined COCONUT OIL …Using unrefined coconut oil will add a coconut taste
1 cup COLD WATER

Optional Toppings:
powdered sugar
cherry topping (recipe below)
crème fraîche (recipe below) Your favorite frosting or icing
Greek yogurt
whipped cream
cool whip

chocolate cherry cake

How to Bake a Cherry Chocolate Cake

  • Place 1 cup of water in the fridge to cool.
  • Lightly grease a 9-inch cake pan, or grease the pan sides, and place cut parchment paper in the bottom.
  • Place rack is in the center of your oven and preheat oven to 350 F.
  • In a large bowl, combine the dry ingredients: flour, sugar, cocoa, baking soda, cinnamon, and cayenne.
  • Add the vanilla, vinegar, oil, and 1 cup of cold water and stir until just combined. Do NOT over stir.
  • Pour batter into the cake pan and bake for 30 minutes, or until a knife or toothpick inserted in the center comes out clean.
  • Remove cake pan from oven and allow to cool on cooking rack until you can safely handle the pan. Do not try to remove the cake from the pan hot out of the oven, because it might fall apart.
  • Once cake pan can be handled, run a butter knife around the edges of the cake to loosen it from the pan, then turn the cake upside side on a cooling rack, tap the bottom of the pan and remove pan off of the cake. Need a cooling rack? Check current prices for cooking racks on Amazon.
  • Allow the cake to cool before adding any topping.

The chocolate cake is moist and delicious all on it’s own. Just a sprinkling of powdered sugar on the top of the cake will transform it into a very appealing dessert. For the video recipe, we add a rich cherry topping, but you can use any fruit you wish. You can check out the cherry cake topping recipe below, or simply top the cake with your favorite frosting, icing, or cool whip.

Cherry Topping Recipe

You can purchase a can of cherry topping to go on your fresh chocolate cake, but we’re not a big fan of the overly goopy and sweet canned cherry options. A homemade cherry topping is easy to prepare.

Ingredients for Cherry Topping

4 cups PITTED SWEET CHERRIES …we use frozen cherries
1/4 cup WATER
1 Tbsp CORN STARCH
1 Tbsp LEMON JUICE
2 Tbsp SUGAR

How to make Cherry Topping

  • In a medium saucepan, combine water, cornstarch, lemon juice, sugar.
  • Place over medium heat and constantly stir until it begins to thicken.
  • Add cherries and cook about 10 minutes, stirring occasionally, until sauce is lightly boiling across the surface.
  • Remove pan from the burner and allow the sauce to cool to room temperature. The sauce will thicken more as it sits.

How to Make Crème Fraîche

This topping is basically a homemade, mild sour cream. And if you think ‘sour cream’ doesn’t belong on a dessert, give this recipe a try before you decide. But be forewarned, this stuff is addictive! Here’s our video for making a crème fraîche recipe.

creme fraiche recipe
Delicious crème fraîche can be made at home simply and inexpensively.

Ingredients for Crème Fraîche

16 oz HEAVY CREAM, also called heavy whipping cream
2 Tbsp YOGURT with live cultures

You can halve or double the recipe, as needed.

The live cultures in the yogurt are key! We often use thicker Greek yogurt. Instead of YOGURT with live cultures, you can also use BUTTERMILK, but buttermilk will make a crème fraîche with a bit more tang, perhaps better suited as a savory foods topping.

How to make Homemade Crème Fraîche

  • Stir the two ingredients together in a jar. Top the jar with a loose fitting lid or something that allows the mixture to ‘breathe’. A coffee filter or even a napkin works.
  • Let jar sit at room temperature undisturbed for 12-24 hours.
  • Stir again and place the crème fraîche in the refrigerator. It will continue to thicken.
  • Your crème fraîche will keep 8 to 10 days in the refrigerator.

If hot pepper in your cake sounds interesting, what about beans? Here’s a gluten-free chocolate cake recipe that will shock you with deliciouness.

lemon meringue pie
Try this easy chocolate cake recipe…made with beans…wha!!!?

Thanks for Watching our Videos!

Thanks for checking our cherry chocolate cake recipe, and all of our recipes. Sign up for our mailing list so you’ll never miss a new recipe. Also click a button below and share the dishes with your friends. You can also follow Chef Buck on Youtube. We appreciate all the kind comments and support, and we’ll see you next time in the kitchen!

If you like what CG and I do, support us on Patreon, or throw us a tip in our Paypal Tip Jar. We’ll happily enjoy a coffee on the road – Thanks! We appreciate all the support, and we’ll see you next time in the kitchen!

We include affiliate links for products on our website. Making a purchase after clicking on our links and we may earn a commission which helps us produce more videos and drink more coffee :^) We participate in the Amazon Services LLC Associates Program, which is an affiliate advertising program. It provides a means for us to earn fees by linking to Amazon.com and affiliated sites, so we can make more videos.

Share and Enjoy !

Chilaquiles Recipe Mexican Breakfast Favorite

My favorite Mexican breakfast dish is a chilaquiles recipe. Chilaquiles are tortillas served with a delicious pepper sauce. For this recipe I use tomatoes and smoky ancho peppers, or dried poblanos, to create a rich, red, salsa topping. Another version of this dish is Chilaquiles verdes, which is tortillas topped with a green salsa. The recipe below will make 2-4 servings depending on your appetite.

Ingredients for this Chilaquiles Recipe

TORTILLA CHIPS
CHEESE (a crumbly white cheese)
CREMA (thickened cream)
Chopped raw ONIONS

Chilaquiles Sauce:
1-2oz ANCHO PEPPERS (dried poblano)
1 med ONION
3 med TOMATOES
1-2 cloves GARLIC
1 tsp SALT

Are You Ready for this Classic Mexican Breakfast?

You can buy a premade Mexican-style crema to top this chilaquiles recipe, or make your own creme fraiche at home. I’ll have a recipe video for creme fraiche posted below, and you’ll want to begin making this crema the day before you plan to use it.

I buy dried poblano peppers, aka ancho peppers, in the Latin foods section of my local grocery, or you can check current prices for Ancho Peppers on Amazon. Poblano peppers are relatively mild, so adding an additional type of hot pepper will be needed if you enjoy a spicy dish, or just add hot sauce.

Any cheese will do for this recipe, but I prefer a milder white cheese that melts easily. The cheese is there to add creaminess more than flavor.

You can make your own crispy tortillas by cutting fresh tortillas and frying them lightly in oil, or simply use premade chips. I like thicker tortillas for this recipe, but any kind will do, just be mindful that thinner chips will get mushier in the sauce faster.

There are different variations on chilaquiles. Some recipes call for the tortillas to be cooked for a while with the sauce making the chips very soft, even mushy. I prefer the chips to be topped with the sauce at the very end of the recipe, this way some of the chips will be softened, but some of the tortillas will retain a degree of crunchiness. There is no wrong way, whatever you prefer is the right way.

chilaquiles recipe

How to Make a Chilaquiles Recipe

  • Heat 5-6 cups of water in a heavy bottomed pot. Check current prices for a Kitchen Pot on Amazon.
  • Remove the stems and seeds from the dried peppers.
  • Into the pot add the roughly chopped onion, garlic, tomato, peppers, and salt.
  • Bring the pot to a boil, then reduce the heat and cover. Let the pot simmer for 30 minutes.
  • Pour away excess water from the pot and reserve if needed.
  • Add the contents of the pot into a blender and mix until smooth. I like to add about a ¼ cup of half and half into the blender for extra creaminess. If the sauce is too thick, thin with the reserved water.
  • Heat a skillet on medium heat and cover the bottom with some of the blended sauce.
  • Arrange the chips evenly across the skillet, as many as desired.
  • Top chips with half of the crumbled cheese and chopped onion.
  • Pour remaining sauce or as much as desired over the skillet contents.
  • Sprinkle with remaining chopped onion and cheese.
  • Drizzle with crema and serve immediately as a breakfast side or main dish.

I like to pair this chilaquiles recipe with softly cooked eggs. The runny yolks go great with this sauce, but any egg you like will work. And beans, too.

chilaquiles recipe

How to Make Homemade Crema for Chilaquiles

To make this cream topping into a Mexican style crema, just stir in a little lime juice. And visit our creme fraiche page for written details of this cream topping recipe.

For another Mexican breakfast favorite, try this spicy Huevos Rancheros Recipe.

huevos rancheros
Huevos Rancheros is a flavorful, classic mexican dish…delicious!

Thanks for Trying Our Chilaquiles Recipe

Click a button below and share the dishes with your friends. You can also follow Chef Buck on Youtube. We appreciate all the kind comments and support, and we’ll see you next time in the kitchen!

If you like what CG and I do, support us on Patreon, or throw us a tip in our Paypal Tip Jar. We’ll happily enjoy a coffee on the road – Thanks! We appreciate all the support, and we’ll see you next time in the kitchen!

We include affiliate links for products on our website. Making a purchase after clicking on our links and we may earn a commission which helps us produce more videos and drink more coffee :^) We participate in the Amazon Services LLC Associates Program, which is an affiliate advertising program. It provides a means for us to earn fees by linking to Amazon.com and affiliated sites, so we can make more videos.

If you’re new to home cooking, get a bunch of spices, pots and pans, and start experimenting with different recipes. It’s a healthy hobby that can save a lot of money in the long run. Check out current prices for Complete Kitchenware Sets on Amazon as well as Complete Starter Spice Kits. Or try a thrift store! I’ve found some of my favorite kitchen gear at second-hand stores.

Share and Enjoy !

Canned Corned Beef Recipe Ideas

Check out these three canned corned beef recipe ideas: dip, hash and corn beef and cabbage. But what is canned corned beef? Beef is cooked, minced, and packed into a can where it then becomes a can-shaped block of beef suitable for a variety of recipes.

Corned Beef Pickle Dip Recipe

An unexpected way to use canned corn beef is in this quick cracker dip recipe.

Canned Corned Beef Pickle Dip Ingredients

12oz canned CORNED BEEF
1 cup finely chopped PICKLES
16oz SOUR CREAM or substitute CREAM CHEESE
1 Tbsp dried minced ONION
½ tsp BLACK PEPPER

optional:
CREAMY HORSERADISH or chopped pickled JALAPENO to taste
I use about 1 Tbsp of each in the video recipe
Serve dip with crackers or sliced veggies

How to make Corned Beef Pickle Dip

  • I like to use 16 oz. of sour cream for this recipe, but you can substitute plain Greek yogurt or cream cheese, or use a mixture of these ingredients. If using cream cheese, set it out to soften beforehand.
  • Finely chop some dill pickles, or use a premade relish.
  • I like to add chopped jalapenos or creamy horseradish for heat, but that’s optional.
  • In a large bowl, combine all of the ingredients until well mixed. If you make the dip ahead of time, it will allow for the flavors to come together, but it’s fine to eat right away.
  • Serve with crackers or sliced fresh veggies like celery, carrot, and bell pepper. It’s a heavy dip, so it balances well with fresh veggies, and it’s very filling.
canned corned beef recipe

Canned Corned Beef Recipe Ideas

Canned corned beef is a popular ingredient for breakfast. Simply slice and fry the beef in a skillet and serve with eggs, grits, potatoes, rice, or whatever.

Canned beef is great on a simple sandwich. Sear beef slices in a skillet and eat them on white bread with plenty of mustard. This tastes great sitting outside your trailer in your favorite lawn chair. Do you like BLTs? What about a CBLT? A Corned beef, lettuce, and tomato sandwich is yummy.

Making a corned beef hash with diced potatoes is a breakfast classic. If you’ve ever tried a premade canned corn beef hash, then you know it’s pretty awful. But, if you make the hash at home with fresh potatoes and onions and canned corned beef, it’s terrific. Check current prices for Corned Beef on Amazon.

canned corned beef recipe

Corned Beef Hash Recipe

12oz canned CORNED BEEF
2 medium-sized POTATOES
1 ONION
2 Tbsp WORCESTERSHIRE SAUCE
SALT and PEPPER to taste
OIL for cooking

How to make Corned Beef Hash

  • Heat oil in a skillet on medium heat.
  • Add in diced potatoes. Cut potatoes uniformly, slightly smaller than a game die. You can skin the potatoes if you like, but why? It’s easier not to skin the potatoes, and the skin is good, so think about it, dude. Saute potatoes for about five minutes. Give the dish an occasional stir, but not too much.
  • Mix in the chopped onion, and continue sauteing another 5 minutes.
  • Add in Worcestershire sauce, salt, and pepper and cook for another 5 minutes.
  • Shred corned beef into the skillet and mix well. Raise the skillet temperature to medium high and continue cooking 5-10 minutes more, or until the dish is done to your liking. Check current prices for a non-stick skillet on Amazon.

I love serving this classic corned beef hash recipe with toast and a couple of soft-yolked eggs. Maybe a splash of hot sauce?

Or try a traditional pairing of corned beef and cabbage. It’s super easy to make, especially if you’re using canned corned beef. The vinegar and Worcestershire give the dish a nice zing, and it’s a terrific comfort food that’s filling without requiring a ton of ingredients.

Corned Beef and Cabbage Recipe

12oz canned CORNED BEEF
1 small CABBAGE
1 large ONION
1 large CARROT
3-4 cloves GARLIC
¼ cup VINEGAR
2 Tbsp WORCESTERSHIRE SAUCE
1 tsp CARAWAY SEEDS
1 Tbsp dried HERBS
SALT and PEPPER to taste
OIL for cooking

How to make Corned Beef and Cabbage

  • Heat oil on medium heat in a large, heavy bottomed pot.
  • Add chopped onions. Saute onions for about five minutes.
  • Season onions with salt, pepper, and herbs.
  • Add in garlic and saute for another minute.
  • Add the cabbage and carrots and continue to cook on medium heat for 5 minutes, stirring occasionally.
  • Add the Worcestershire sauce and vinegar and mix well.
  • Reduce the heat to medium low and let cook uncovered until much of the water has cooked out of the dish. Stir occasionally.
  • While cabbage continues to cook, open canned corned beef and chop and form beef into marble-sized pieces.
  • Lightly spray a skillet with oil and sear the beef on medium high heat until well browned.
  • When cabbage has reached desired doneness, add in the seared beef and toss lightly.
  • Serve hot.

I prefer searing the beef in a separate skillet because it gives the canned meat a better flavor if it’s seared well. Check current prices for a non-stick skillet on Amazon. And, you can simply add the beef right out of the can into the cabbage if you prefer, but I think searing the beef well is worth the added effort.

This is an easy, semi-healthy, and exceptionally tasty dish. I like my corned beef and cabbage recipe kind of mild, but adding a little hot sauce or cooking fresh chiles into the onions is an easy way to add heat.

Thanks for watching our recipe videos!

Thanks for checking out our canned corned beef recipe ideas, and all of our recipes. Be sure and sign up for our mailing list and never miss a new Chef Buck cooking video, and also click a button below and share the dishes with your friends. We appreciate all the kind comments and support, and we’ll see you next time in the kitchen!
–Chef Buck

For another easy cracker dip/spread, try a Classic Pimiento Cheese Recipe.

pimiento cheese spread
homemade pimiento cheese spread

We include affiliate links for products on our website, so if you make a purchase after clicking on our links, we may earn a commission which helps us produce more videos and drink more coffee :^) We participate in the Amazon Services LLC Associates Program, an affiliate advertising program providing a means for us to earn fees by linking to Amazon.com and affiliated sites, so we can make more videos.

Share and Enjoy !

Raw Broccoli Recipe – Classic Waldorf Salad w/ Broccoli

raw broccoli

Eating raw broccoli and other raw vegetables is a simple way to boost nutrition and improve digestion. The health benefits of a raw broccoli salad recipe are considerable, from added nutrition to protecting against disease and chronic illness, but raw broccoli can be kinda hard to enjoy. A variety of veggies is a good idea for improved health, so including raw broccoli is a no-brainer.

Cooked broccoli is extremely beneficial as well, as long as it’s not overcooked, particularly boiled; in fact, the nutrients in cooked broccoli are actually absorbed more readily by the body, especially lightly steamed broccoli. Consuming broccoli in a variety of recipe methods is best. I’ve found piggybacking on the classic Waldorf salad recipe to be an ideal way of sneaking raw broccoli into my diet.

If you’re new to home cooking, get a bunch of spices, pots and pans, and start experimenting with different recipes. It’s a healthy hobby that can save a lot of money in the long run. Check out current prices for Complete Kitchenware Sets on Amazon as well as Complete Starter Spice Kits. Or try a thrift store! I’ve found some of my favorite kitchen gear at second-hand stores.

Ingredients for Waldorf Salad w/ Raw Broccoli Recipe

1 cup diced CELERY
1-2 cups diced APPLES
½ cup chopped
WALNUTS or PECANS
¾ cup MAYONNAISE
1 med LEMON zest and juice
¼ cup dark RAISINS
some SALT and PEPPER
…plus
BROCCOLI FLORETS!

raw broccoli
Even raw broccoli looks good in a waldorf salad.

How to make a Waldorf Salad with Broccoli

Broccoli and apples can be two of the potentially dirtiest produce items at the grocery, so wash them well.

  • In a small bowl, add mayonnaise, lemon juice, lemon zest, salt, and pepper and whisk until smooth.
  • In a larger bowl, add chopped apple, sliced celery, toasted walnuts, and raisins.
  • Add in the dressing and toss the salad as soon as possible, this will keep the chopped apples looking fresh.

That’s all there is to a classic Waldorf Salad recipe, and it’s delicious, but adding a bit of raw broccoli will turn the salad from a semi-decadent dessert salad into a Superfood salad, and it won’t hurt at all; it’ll just be a bit more savory than sweet.
I like to add just the raw broccoli florets. You can chop the broccoli stem into smaller pieces and add into the salad, but why punish yourself?
The broccoli stem will make much tastier and better use in a soup, stir-fry, or casserole.
Add whatever amount of broccoli florets to the Waldorf salad as you like, just be mindful to keep broccoli portion at what food scientists call the “fun ratio”.
Adding broccoli florets to a Waldorf salad is a super tasty way to get kids or people who generally hate broccoli to eat raw broccoli, and enjoy it.

raw broccoli
Raw broccoli is high in vitamins and nutrients and is great for digestive health.

Why Eat More Broccoli?

Broccoli has potential health benefits such as…

  • Lots of nutrition with few fat and calories.
  • Increased fiber, to lower risks from diabetes, coronary disease, obesity.
  • Increased digestive tract health (use your imagination).
  • Broccoli packs loads of vitamins, including vitamin C.
  • Broccoli is a great source of vitamin K for healthy bones and teeth, although I doubt your dog will be interested.

Some folks like to add broccoli as a pizza topping, but that’s a terrible idea, and I do not endorse it at all.

Give a waldorf and raw broccoli salad recipe a try and let me know what you think, and bon appétit!

And for another great veggie dish, try this tasty Cauliflower “Potato” Salad.

cauliflower potato salad
low carb cauliflower “potato” salad recipe

Thanks for Watching our Raw Broccoli Video!

Click a button below and share the dishes with your friends. You can also follow Chef Buck on Youtube. We appreciate all the kind comments and support, and we’ll see you next time in the kitchen!

If you like what CG and I do, support us on Patreon, or throw us a tip in our Paypal Tip Jar. We’ll happily enjoy a coffee on the road – Thanks! We appreciate all the support, and we’ll see you next time in the kitchen!

We include affiliate links for products on our website. Making a purchase after clicking on our links and we may earn a commission which helps us produce more videos and drink more coffee :^) We participate in the Amazon Services LLC Associates Program, which is an affiliate advertising program. It provides a means for us to earn fees by linking to Amazon.com and affiliated sites, so we can make more videos.

Share and Enjoy !

Best Spaghetti Squash low-fat, low-carb recipe

best spaghetti squash

It doesn’t take a lot to make the best spaghetti squash recipe. A few simple ingredients are all you will need to cook this healthy, low fat spaghetti squash dish. This squash is a lowfat low carb ingredient with a wonderful texture and a mild flavor that allows it to work very well in a variety of recipes.

What you need for this Squash Recipe

1 SPAGHETTI SQUASH
GARLIC (5-10 cloves, finely chopped)
LEMON zest and juice (current price for a kitchen zester)
BUTTER (1-2 Tbsp)
OLIVE OIL (¼ cup)
PARSLEY (½ cup, chopped)
SALT and PEPPER to taste

The measurements above are just loose suggestions, and really need to be adjusted to your own tastes. The size of the spaghetti squash and how much squash you dig out will determine how much of the other ingredients you need. This recipe calls for simple and fresh ingredients, so there really is no wrong way to make this dish. The best spaghetti squash doesn’t get more super simple than this!

best spaghetti squash
spaghetti squash makes a healthy, low fat, low carb pasta alternative

Best Spaghetti Squash …simple, low fat, low carb recipe

  • When buying a spaghetti squash, choose one that seems heavy for its size.
  • Carefully slice the squash into halves. Cut the squash across instead of lengthwise, this will make for longer “noodles”.
  • Place cut sides down in shallow water in a roasting pan.
  • Bake for about 30-45 minutes at 350 degrees Fahrenheit. You can check on the squash after 30 minutes; the cooking time will vary according to the size of the squash.
  • It’s important not to overcook the squash, slightly crunchy strands of squash add great texture to a dish, and overcooking the squash will make the ingredient mushy.
  • Remove squash from the oven and carefully turn halves over to check for doneness –the water will be hot and steam will be trapped under the squash, so be cautious.
  • Allow squash to sit 5-10 minutes to cool slightly for easier handling.
  • Insert a fork and twist out strands of “spaghetti”. Once the fork has done its job, use a spoon to scrape out the remaining squash; it’s edible all the way to the rind, so don’t waste any!

On the Stove Top

  • Heat a skillet and melt cooking oil on medium heat.
  • Add finely chopped garlic and cook 1-2 minutes until it begins to color up. If you like a bit of heat with your dish, add some red pepper flakes as well.
  • Add a bit of butter for extra flavor (this is optional).
  • Add the spaghetti squash to the skillet and mix with the garlic.
  • Add salt and pepper to taste, add lemon zest and juice, and stir. Check current price for a lemon zester on Amazon.
  • Turn off the heat and add in a bit of dark, flavorful olive oil.
  • You can also stir in a bit of freshly grated Parmesan Cheese if desired, but this is optional.
  • Add fresh chopped parsley for bright flavor and color, and mix well.

And that’s it.  Enjoy!

If you’re new to home cooking, just get a bunch of spices, pots and pans, and start experimenting with different ingredients and recipes. It’s a healthy hobby that can save a lot of money in the long run. You can check out current prices for Complete Kitchenware Sets on Amazon as well as Complete Starter Spice Kits. Or just go to a thrift store! I’ve found some of my favorite kitchen gear at second-hand stores.

For another tasty veggie ingredient to experiment with, try some tasty Rutabaga Recipes. It’s a great potato substitute!

vegetable soup
rutabaga is like a turnip on steroids, but sweeter

Thanks for checking out our best spaghetti squash recipe, and all of our recipes. Be sure and sign up for our mailing list and never miss a new Chef Buck cooking video, and also click a button below and share the dishes with your friends. We appreciate the kind comments and support, and we’ll see you next time in the kitchen!
–Chef Buck

Thanks for watching our recipe videos!

We include affiliate links for products on our website, so if you make a purchase after clicking on our links, we may earn a commission which helps us produce more videos and drink more coffee :^) We participate in the Amazon Services LLC Associates Program, which is an affiliate advertising program providing a means for us to earn fees by linking to Amazon.com and affiliated sites, so we can make more videos.

Share and Enjoy !

Bean Dip Recipe for Healthy Snacking

bean dip

White bean dip is super versatile, and this easy dip recipe can be used in a variety of dishes. Bean dip makes a handy spread for a crostini or sandwich, a healthy dip for chips or vegetables, or as a bean puree to serve as a dinner side for meat, fish, or vegetarian meals.

Bean Dip Recipe Ingredients

2 15oz cans of WHITE BEANS (rinsed and drained)
16 oz MUSHROOMS (chopped)
5-10 cloves GARLIC (chopped)
½ cup ROMANO CHEESE (I like to use freshly grated Romano, Parmesan, or Asiago cheeses)
1 medium to large size LEMON, juice and zest
½ tsp RED PEPPER FLAKES (or use fresh peppers)
3-4 Tbsp WORCESTERSHIRE SAUCE
SALT and PEPPER to taste
2-3 Tbsp of dark, rich OLIVE OIL
Garnish dip with tomato, olives, capers, fresh herbs, etc.

bean dip
Add mushrooms and Worcestershire sauce for a bean dip recipe twist.

How To Make a Bean Dip Recipe

I like to use canned beans.
You can use your favorite beans, or a mixture of bean types.
I prefer white beans for this recipe, like Navy or Cannellini.

  • Heat oil in a pot on medium heat for sauteing.
  • Add in the chopped garlic and red pepper flakes; stir the garlic for a few minutes until it begins to color.
  • Add in a bit of black pepper, and the chopped mushrooms, and continue sauteing.
  • Add the Worcestershire sauce.
  • Continue cooking for 3 or 4 minutes; the mushrooms will cook down quite quickly.
  • Add in the beans and maybe ½ cup of water or broth. Be conservative when adding liquid; the finished bean dip will be best thicker, rather than thinner.
  • Raise the heat to medium high, cover, and simmer beans for about 5 minutes.
  • Uncover, reduce the heat, and continue simmering until the liquid has cooked down and the bean mix thickens.
  • Turn off the burner.
  • Stir in the cheese until it melts into the beans. Use freshly grated cheese for best results.
  • Add the zest and juice of one medium to large lemon, and 2-3 Tbsp of dark olive oil.
  • Mix into the beans and cheese.
  • Transfer to a blender or food processor and blend until the bean dip is smooth,
    or use a hand mixer and blend dip in the cooking pot. Check current prices for Hand Blenders at Amazon.
  • Give it a taste test and adjust seasoning as needed.
  • Set dip aside to cool a bit.
bean dip
White bean puree makes an excellent bean dip or spread.

This bean dip can be served warm or cold, although it’s especially tasty warm.
Use it as a dip for chips or sliced veggies; it pairs particularly well with thick tortilla chips.
Use this bean dip as a sandwich spread instead of mayonnaise, or as a crostini topping.
White bean dip will pair nicely as a puree for fish or meat entrees.
Great as a party or dinner appetizer or just as a movie watching snack.

Give this easy bean dip recipe a try and let me know what you think, and bon appétit!

And for another creamy, beany option, check out this Healthy Hummus Recipe.

hummus

Thanks For Watching Our Bean Dip Recipe!

Thanks for checking out our beet and quinoa recipe, and all of our recipes. Be sure and sign up for our mailing list so you’ll never miss a new recipe. Also click a button below and share the dishes with your friends. You can also follow Chef Buck on Youtube. We appreciate all the kind comments and support, and we’ll see you next time in the kitchen!

If you like what CG and I do, you can also support us on Patreon, or throw us a tip in our Paypal Tip Jar. We’ll happily enjoy a coffee on the road – Thanks! We appreciate all the support, and we’ll see you next time in the kitchen!

We include affiliate links for products on our website. So, if you make a purchase after clicking on our links, we may earn a commission which helps us produce more videos and drink more coffee :^) We participate in the Amazon Services LLC Associates Program, which is an affiliate advertising program. It provides a means for us to earn fees by linking to Amazon.com and affiliated sites, so we can make more videos.

Share and Enjoy !

Stuffed Mushrooms Recipe …easy appetizer

Stuffed Mushrooms Recipe

This stuffed mushrooms recipe makes a great appetizer and party dish. Stuffed mushrooms are often filled with freshly grated Parmesan, garlic, and herbs, but it’s a super versatile recipe…so experiment with your favorite flavors; I personally like a blue cheese and hot sauce combo thrown into the filling.

What You Need for This Stuffed Mushrooms Recipe

12-15 MUSHROOMS
½ cup PANKO BREADCRUMBS
1-2 TBSP BUTTER
some OLIVE OIL
filling mixture like…
½ cup PARMESAN CHEESE
½ cup BLUE CHEESE
4-6 cloves GARLIC (finely chopped)
½ cup PARSLEY (chopped)
½ cup CASHEWS (chopped)
some HOT SAUCE
SALT and PEPPER (to taste)
…but fillings are optional

stuffed mushrooms recipe
This stuffed mushrooms recipe makes a great appetizer and party dish

If you’re new to home cooking, get a bunch of spices, pots and pans, and start experimenting with different recipes. It’s a healthy hobby that can save a lot of money in the long run. Check out current prices for Complete Kitchenware Sets on Amazon as well as Complete Starter Spice Kits. Or try a thrift store! I’ve found some of my favorite kitchen gear at second-hand stores.

How To Make Stuffed Mushrooms

Buy whole mushrooms that are uniform in size; I buy mushrooms that are not already pre-packaged, so I can select the best.
Choose mushrooms that are firm and dry and store in the fridge in a paper sack until you are ready to use them.
Before using, clean mushrooms with a damp towel.
Remove the stems and use a knife or spoon to open the mushroom center and create more room for the stuffing.
Take your time preparing the mushroom caps to avoid splitting them.
I often set aside some of the stems to use in other recipes, while reserving some to chop and mix with the stuffing.
Coat the mushroom caps lightly with olive oil and set aside.
In a bowl, combine some of the chopped stems and whatever fillings you desire.
I often use an egg, minced garlic, freshly grated Parmesan, and fresh chopped parsley with my filling, butthe variations are endless.
Blue cheese is fantastic in stuffed mushrooms.
For added crunchiness, nuts are a great idea. I find that chopped cashews work very well.
I’ll often add ingredients to the stuffing mix as I stuff the mushrooms, which makes for a nice variety of flavors.
Spoon the filling into the mushroom cap.
In a skillet, melt butter and add panko breadcrumbs. The breadcrumbs will soak up the butter and flavor.
Top stuffed mushrooms with panko breadcrumbs and place on a rack over a baking sheet.
Place stuffed mushrooms in an oven pre-heated to 375 degrees F. and bake for approximately 30 minutes or until
the breadcrumb topping is nicely toasted.
Serve warm.

Tips for Best Stuffed Mushrooms

  • Bake the mushrooms on a rack! This will dry them out more and make them less mushy!
  • Breadcrumb topping and nuts are optional, but they both add nice texture and crunch.
  • Set aside some mushroom stems for another recipe and make room for more non-mushroomy filling.
  • Start with a simple filling and then add other ingredients as you stuff the mushrooms for more variety.

Give this stuffed mushrooms recipe a try, and let me know what you think, and bon appétit!

For another tasty party and appetizer dish, check out this Jalapeno Poppers Recipe.
jalapeno poppers

Thanks For Watching Our Mushroom Recipe

Thanks for checking out this quinoa salad recipe, and all of our recipes. Be sure and sign up for our mailing list so you’ll never miss a new recipe. Also click a button below and share the dishes with your friends. You can also follow Chef Buck on Youtube. We appreciate all the kind comments and support, and we’ll see you next time in the kitchen!

If you like what CG and I do, you can also support us on Patreon, or throw us a tip in our Paypal Tip Jar. We’ll happily enjoy a coffee on the road – Thanks! We appreciate all the support, and we’ll see you next time in the kitchen!

We include affiliate links for products on our website. So, if you make a purchase after clicking on our links, we may earn a commission which helps us produce more videos and drink more coffee :^) We participate in the Amazon Services LLC Associates Program, which is an affiliate advertising program. It provides a means for us to earn fees by linking to Amazon.com and affiliated sites, so we can make more videos.

Share and Enjoy !

Onion Rings Recipe – Crispy Baked Onion Rings

onion rings recipe

Try a delicious, crispy onion rings recipe. Can a baked onion ring be as good as a fried onion ring? Yep. You just need to batter the onions and bake them to onion ring perfection. Onion rings cooked in the oven can be quite crispy and flavorful, and these baked onion rings will still be considerably less mess and fuss than a fried onion rings recipe –and a much healthier recipe as well.

What You Need To Make This Baked Onion Rings Recipe

1 large ONION
2 EGGS
½ cup ALL PURPOSE FLOUR
(plus flour for coating onions in bag)
2 Tbsp melted BUTTER
½ cup HALF N HALF or BUTTERMILK
1½ cups PANKO BREADCRUMBS
2 Tbsp CORNMEAL
1 tsp CURRY POWDER
1 tsp PAPRIKA
1 tsp GARLIC POWDER
1 tsp ITALIAN SEASONING
1 tsp CHILI POWDER
1-2 tsp SALT (to taste)

Onion Rings recipe
The best onion ring recipe baked in the oven.

How To Make Crispy Onion Rings Baked in the Oven

I like to use a yellow onion when making onion rings. I find a baseball-sized onion serves two people, and makes a great side dish for any burger or sandwich.

Slice each end of the onion off and then remove the skin. Cut the onion into slices about ½” thick and then separate the onion into rings –use even the center and smallest rings!
Place the separated onion rings into a ziplock bag with about 2 Tbsp of flour. Seal the bag with plenty of air inside to give the onion room to move freely. Now shake the bag until the onion slices are well coated in dry flour and set the bag aside.

In a bowl, Combine the bread crumbs, cornmeal, and seasonings. Mix well and set aside.

In another bowl, break two eggs and whisk. Whisk in the milk and melted butter. Whisk in about ½ cup of flour. The batter should end up being similar to a thin pancake batter.

Now you’re ready to batter your onion rings

Arrange rings on a baking sheet or pan.
Use a fork –or chopsticks!– to handle the onions during the battering process…it will be less messy.

Take each onion ring coated in dry flour and dip it into the pancakey batter. Remove from the batter and let excess batter drip off, then drop into the breadcrumb mix and coat the onion completely.

Carefully, without knocking off the batter, place the battered onion ring onto the baking sheet.
Arrange the rings so they are not touching…you can place the smaller rings inside larger rings.
If you need an oven-safe pan, you can check here for current prices for baking sheets on Amazon.

Bake onion rings in an oven pre-heated to 400 degrees Fahrenheit, about 20 minutes, turning the onions once about halfway through the cooking process.
And that’s it.

Give this onion ring recipe a try and let me know what you think, and bon appétit!

For another great dish, check out this Crispy Baked Chicken Wings Recipe

hot wings recipe
Make spicy chicken wings at home and serve with creamy ranch or blue cheese dressing

Thanks For Checking out our Recipes

We hope you love this onion rings recipe! Sign up for our mailing list so you’ll never miss a new recipe. Also click a button below and share the dishes with your friends. You can also follow Chef Buck on Youtube. We appreciate all the kind comments and support, and we’ll see you next time in the kitchen!

If you like what CG and I do, support us on Patreon, or throw us a tip in our Paypal Tip Jar. We’ll happily enjoy a coffee on the road – Thanks! We appreciate all the support, and we’ll see you next time in the kitchen!

We include affiliate links for products on our website. Making a purchase after clicking on our links and we may earn a commission which helps us produce more videos and drink more coffee :^) We participate in the Amazon Services LLC Associates Program, which is an affiliate advertising program. It provides a means for us to earn fees by linking to Amazon.com and affiliated sites, so we can make more videos.

Share and Enjoy !

Creamed Kale Recipe – healthy coconut kale dish

kale

Cook a healthy creamed kale recipe that is not only incredibly tasty, but super simple to make. Although there are few ingredients to this kale dish, it’s super flavorful and makes a great side dish or a complete healthy meal when served over rice or quinoa.

Ingredients for Coconut Creamed Kale Recipe

1 big bunch KALE
15 oz canned COCONUT MILK
½ cup ONION (chopped)
5-9 cloves GARLIC (chopped)
1 JALAPENO (optional, chopped)
SALT and PEPPER (to taste)
OIL for cooking
serve over rice or quinoa,
and top with crushed peanuts

creamed kale recipe
Buy fresh kale that is firm and crisp and free off blemishes and discoloration. Avoid kale that is soft and wilted.

How to Cook Coconut Creamed Kale Recipe

Buy Kale that is crisp and firm, not sad and wilted.
Wash and drain the kale and separate the leaves from the stem. We’ll only be using the leaves for this recipe.
(If you can figure out something tasty to do with the stems, please let me know!)
Chop kale into a manageable sizes.
Heat a little oil in a large skillet or pot and saute the onion, garlic, and peppers for 2-3 minutes.
Add in the coconut milk and bring to a simmer. Check current prices for canned coconut milk on Amazon.
Add in the chopped kale, cover and let the kale steam and wilt for a couple of minutes.
Stir the pot and mix ingredients well.
Bring to a simmer, cover, and let cook to desired consistency…simmering about 5 minutes is good for me…the kale
is cooked down, but still has a nice texture.
Remove the pot from the stove and serve.
This dish makes a great side, or a healthy entree when served over rice or quinoa.
If desired, top with crushed peanuts for added texture and flavor.

creamed kale recipe
This Creamed Kale recipe is a simple and quick dish to prepare –and a very healthy choice!

Give this creamed kale recipe a try and let me know what you think, and take a look at more Chef Buck Kale Recipes.

Tips for Using Raw Kale

Thanks for checking out our creamed kale recipe, and be sure and sign up for our mailing list so you’ll never miss a Chef Buck cooking video, and also click a button below and share the dishes with your friends. We appreciate all the kind comments and support, and we’ll see you next time in the kitchen!

We appreciate you watching our recipe videos!

We include affiliate links for products on our website, so if you make a purchase after clicking on our links, we may earn a commission which helps us produce more videos and drink more coffee :^) We are a participant in the Amazon Services LLC Associates Program, which is an affiliate advertising program that provides a means for us to earn fees by linking to Amazon.com and affiliated sites.

Share and Enjoy !

Mediterranean Quinoa Salad Recipe

Mediterranean Quinoa salad

Mediterranean quinoa salad is easy to make, tastes great, and is a healthy choice for a better diet. This quinoa recipe is a perfect entree or side dish, either hot or cold. Quinoa cooks up similar to rice, in fact, you can substitute quinoa for rice in most recipes, so give quinoa a try.

Mediterranean Quinoa Salad Recipe Ingredients :

1 cup QUINOA
2 cups packed SPINACH
10-15 CHERRY TOMATOES (sliced in halves)
3 cloves chopped GARLIC
½-1 cup FETA cheese
¼ cup fresh BASIL
1 med chopped ONION
1 Tbsp OLIVE OIL for sautéing the onion
1-2 Tbsp mild VINEGAR
SALT and PEPPER to taste
1 tsp dried HERBS (thyme, basil, oregano, etc.)

mediterranean quinoa salad
Mediterranean Quinoa makes a great entrée or side dish.

How to Make Mediterranean Quinoa :

Bring 2 cups of salted water to a boil.
Add 1 cup of quinoa (at this time also add any dried herbs). Cover and let simmer 15 minutes, until the water is absorbed.
While the quinoa cooks, sauté the onions and garlic.
Once quinoa is cooked, remove from the heat and while the quinoa is still hot, stir in the spinach and basil until wilted, then add the onion and garlic.
Let Quinoa cool about 10 minutes, and then stir in the cherry tomatoes, vinegar, feta cheese, and extra salt and pepper as desired.
Serve warm or cold, it’s tasty either way.
Give this Mediterranean quinoa salad recipe a try and let me know what you think, and bon appétit!

Sometimes quinoa is pricey, but by shopping around, you can often find a better deal. See current prices for quinoa on Amazon. I like to buy quinoa in the bulk bins, or sometimes you can find a good deal on quinoa in the rice section. Quinoa in the “health” or “natural foods” section is often over-priced, so definitely look around for the better deal, because it’s out there!

For another flavor twist, try this Southwest inspired quinoa salad recipe.

southwestern quinoa salad
a southwestern quinoa salad makes a tasty and healthy dinner choice.

And for another more easy quinoa dishes, check out my quinoa recipe playlist on the Chef Buck Youtube Channel.

Thanks for checking out this Mediterranean quinoa recipe, and be sure and sign up for our mailing list so you’ll never miss a Chef Buck cooking video, and also click a button below and share the dishes with your friends. We appreciate all the kind comments and support, and we’ll see you next time in the kitchen!

We appreciate you watching our recipe videos!

We include affiliate links for products on our website, so if you make a purchase after clicking on our links, we may earn a commission which helps us produce more videos and drink more coffee :^) We are a participant in the Amazon Services LLC Associates Program, which is an affiliate advertising program that provides a means for us to earn fees by linking to Amazon.com and affiliated sites.

Share and Enjoy !

Baked Tomatoes Recipe with Basil, Cheese, and Walnut

baked tomatoes recipe

This is a terrific baked tomatoes recipe. I love tomatoes roasted and topped with garlic, bread crumbs, and butter, but I think this toasted walnut, basil, and cheese topping has it beat. These roasted plum tomatoes make an awesome vegetarian dish with more than enough substance to satisfy even the most carnivorous craving.

Baked Tomatoes Recipe Ingredients:

4 PLUM TOMATOES (roma is a type of plum tomato)
½ cup toasted WALNUTS
½ cup fresh BASIL
½ cup ROMANO CHEESE (or sub Parmesan cheese)
2-3 cloves GARLIC
some OLIVE OIL, dude
SALT and PEPPER (to taste)

baked tomatoes
Slice off the bottom of the tomatoes so they sit flat on the baking sheet.

Baked Tomato Recipe Directions:

Slice tomatoes lengthwise in half, and then slice a sliver off of the rounded backside so that the tomatoes rest flat.

Using a fork, tenderize the tops of the tomato halves, but do not poke the fork all the way through.
Arrange tomatoes on a baking sheet.

Season tomato tops with salt and pepper, and then coat the tomato tops lightly with olive oil.
Bake in an oven preheated at 500 degrees Fahrenheit for 10-15 minutes, or until the edges of the tomatoes begin to brown.

While the tomatoes bake, place chopped basil, toasted walnuts, shredded cheese, fresh ground pepper, and garlic in a food processor and pulse conservatively until the topping ingredients resemble tabouli. Check current prices for food processors on amazon.

baked tomatoes
Use about equal parts of toasted walnut, cheese, and basil…and garlic to taste.

Remove tomatoes from the oven. Add any oil and juices on the baking sheet into the blended basil/walnut/cheese topping. Also add ½ to 1 tsp olive oil if desired. Mix ingredients and then mound the topping evenly over each tomato.

Return tomatoes to the oven and continue baking at 500 degrees F for another 5 minutes.

After 5 minutes, turn oven to broil and let tomatoes broil 1-2 minutes longer, or until tops have browned; watch them closely!

And that’s it. Let them cool for a few minutes and serve. It’s a great appetizer, side, or can even be the main course of a vegetarian meal. The blended topping has a terrific, meaty texture. The baked tomatoes are quite filling, and delicious. I hope you like it!

Baked Tomatoes
This baked tomato recipe is beyond delicious…definitely give it a try!

Definitely give this Baked Tomatoes Recipe a try and let me know what you think, and bon appétit!

And for another great vegetarian dish, try this Baked Jalapeno Poppers Recipe.
jalapeno poppers

Thanks for Watching our Baked Tomatoes Recipe

Sign up for our mailing list so you’ll never miss a new recipe. Also click a button below and share the dishes with your friends. You can also follow Chef Buck on Youtube. We appreciate all the kind comments and support, and we’ll see you next time in the kitchen!

If you like what CG and I do, support us on Patreon, or throw us a tip in our Paypal Tip Jar. We’ll happily enjoy a coffee on the road – Thanks! We appreciate all the support, and we’ll see you next time in the kitchen!

We include affiliate links for products on our website. Making a purchase after clicking on our links and we may earn a commission which helps us produce more videos and drink more coffee :^) We participate in the Amazon Services LLC Associates Program, which is an affiliate advertising program. It provides a means for us to earn fees by linking to Amazon.com and affiliated sites, so we can make more videos.

Share and Enjoy !

Broccoli Cheese and Cauliflower Gratin Recipe

broccoli cheese

Try this easy, semi-healthy broccoli and cauliflower gratin recipe. A gratin is typically a bready-cheesy-toasty topping, and it’s a great way to jazz up broccoli and cauliflower. Just broccoli cheese is nice, but adding cauliflower kinda smooths out the taste. This is a cheesy dish without being overly cheesy, and not overcooking the vegetables will add awesome texture.

Broccoli Cheese Cauliflower Gratin Recipe Ingredients:

2 cups BROCCOLI FLORETS
2 cups CAULIFLOWER FLORETS
1 cups MONTEREY JACK (shredded)
½ cup ROMANO or PARMESAN cheese (shredded)
½ cup GREEK YOGURT
3-5 cloves GARLIC (finely chopped)
1 cup PANKO BREADCRUMBS
2 Tbsp BUTTER
SALT and PEPPER to taste

broccoli cheese
Mix panko bread crumbs with garlic and butter for a tasty gratin topping.

Broccoli Cheese Cauliflower Gratin Recipe Directions:

Grate the cheese. I like the Monterey Jack and Romano cheese combo, but any kind of cheese or cheeses will do, so use your favorite. In a small bowl, combine the cheese and yogurt, and add salt and pepper to taste. Mix well.

Trim fresh broccoli and cauliflower into similar sized florets so they will cook evenly.

In a small skillet, melt butter and saute garlic for about 1 minute.
Stir bread crumbs into the garlic and butter; I like panko bread crumbs for gratins.
The bread crumbs will soak up the butter. Mix well and set aside.

Steam veggies on the stove top in a steaming basket, or just add ½ inch of water to the bottom of a pan and steam. 4 to 6 minutes of steaming is generally what I like; veggies with a bit or crunch are more vibrant, soggy veggies are sad.

Drain broccoli and cauliflower well and place steamed veggies into a baking dish. Check here for current prices for a casserole baking dish on Amazon.

Add salt and pepper.
Top the veggies with the cheese and yogurt topping, then top the dish with the garlic and butter bread crumbs.

Bake in an oven preheated to 450 degrees Fahrenheit.
Bake until the breadcrumb topping is toasted. This will only take a few minutes, so watch the dish closely.

That’s it. Serve hot, dude.
Give this Broccoli Cheese Cauliflower Gratin a try and let me know what you think, and bon appétit!

For another tasty and good looking dish, try out this Fancy Baked Tomatoes Recipe.

Baked Tomato
This baked tomato recipe is beyond delicious…definitely give it a try!

Thanks for Watching our Broccoli Cheese Gratin

Sign up for our mailing list so you’ll never miss a new recipe. Also click a button below and share the dishes with your friends. You can also follow Chef Buck on Youtube. We appreciate all the kind comments and support, and we’ll see you next time in the kitchen!

If you like what CG and I do, support us on Patreon, or throw us a tip in our Paypal Tip Jar. We’ll happily enjoy a coffee on the road – Thanks! We appreciate all the support, and we’ll see you next time in the kitchen!

We include affiliate links for products on our website. Making a purchase after clicking on our links and we may earn a commission which helps us produce more videos and drink more coffee :^) We participate in the Amazon Services LLC Associates Program, which is an affiliate advertising program. It provides a means for us to earn fees by linking to Amazon.com and affiliated sites, so we can make more videos.

Share and Enjoy !

The Best Garlic Shrimp Recipe You’ll Ever Eat

garlic shrimp recipe

Try this super-quick and delicious garlic shrimp recipe. Lots of olive oil and garlic add great flavor, especially when served with fresh sliced bread. Cook the shrimp quickly in a hot skillet, but don’t overcook, because over cooked shrimp get rubbery. The total cooking time for this dish start to finish should be about 5-7 minutes.

What you need for Garlic Shrimp

2 lbs SHRIMP
½ cup OLIVE OIL
½ cup GARLIC …or as much as you like (finely chopped)
½ tsp RED PEPPER FLAKES
½ tsp PAPRIKA
SALT and PEPPER to taste
3-5 Tbsp LEMON JUICE
some PARSLEY (chopped)
sliced BREAD for sure!

How to make this Garlic Shrimp Recipe

  • Peel and devein the shrimp (save the shells and heads to make a stock!)
  • Heat olive oil in a skillet on medium high heat. Check current prices for a non-stick skillet on Amazon.
  • When oil is hot, add red pepper flakes. Red pepper flakes add a nice heat, but substitute fresh peppers, or even a little cayenne if you like.
  • Add garlic and saute for 1 minute. Use as much garlic as you like. I prefer lots of garlic. I literally used an entire bulb. It seems like a lot, but the oil and garlic taste great with thick slices of fresh bread.
  • Add the shrimp, and continue sautéing on medium heat.
  • The shrimp only take about 3-5 minutes to cook depending on the size of your shrimp. Don’t overcook the shrimp; they will become rubbery if cooked overly long.
  • Add paprika, and salt and pepper to taste. If you’re just getting into home cooking, here are current prices for starter spice sets on Amazon.
  • Saute shrimp until JUST cooked, when shrimp begin to color and curl, then remove the skillet from the heat.
  • Add lemon juice and fresh chopped parsley.
  • Mix well and serve in a bowl with thick slices of fresh bread. Or serve over rice…but this oily, garlicky shrimp is GREAT with thick slices of tasty bread.
garlic shrimp recipe
lots of garlic + lots of shrimp = delicious

Give this garlic shrimp recipe a try and let me know what you think…and bon appétit!

If you want another tasty shrimp idea, one of my favorites is this Spicy Tempura Shrimp Recipe.

spicy fried shrimp

Thanks For Watching Our Recipe Videos!

Thanks for checking out this cool carrot soup recipe, and all of our recipes. Sign up for our mailing list so you’ll never miss a new recipe. Also click a button below and share the dishes with your friends. You can also follow Chef Buck on Youtube. We appreciate all the kind comments and support, and we’ll see you next time in the kitchen!

If you like what CG and I do, support us on Patreon, or throw us a tip in our Paypal Tip Jar. We’ll happily enjoy a coffee on the road – Thanks! We appreciate all the support, and we’ll see you next time in the kitchen!

We include affiliate links for products on our website. Making a purchase after clicking on our links and we may earn a commission which helps us produce more videos and drink more coffee :^) We participate in the Amazon Services LLC Associates Program, which is an affiliate advertising program. It provides a means for us to earn fees by linking to Amazon.com and affiliated sites, so we can make more videos.

Share and Enjoy !

Fried Catfish Recipe without the Mess

fried catfish recipe

Here’s a faux fried catfish recipe that’s not fried, but tastes just as good as fried catfish and with a lot less mess. Cornmeal is essential for the breading, but along with flour you can also add crushed saltines or panko breadcrumbs. Catfish tastes best with tartar sauce, so we’ll throw together a simple tartar sauce, too.

Better Than Fried Catfish Ingredients

1 lbs. CATFISH
½ cup CORNMEAL
½ cup FLOUR
1 cup SALTINE CRACKERS (crushed) *optional
OLIVE OIL
SPICES…whatever you like
…in this video I use:
1 tsp PAPRIKA
1 tsp GARLIC POWDER
½ tsp CAYENNE PEPPER
1 tsp OREGANO
1 tsp THYME
1 tsp SALT
1 tsp BLACK PEPPER

also add 1tsp TURMERIC POWDER for great color

Tartar Sauce Ingredients:
1 cup MAYONNAISE
about 1/3 cup SWEET RELISH
1 tsp PICKLED JALAPENO (minced)
1-2 Tbsp JALAPENO PICKLING SOLUTION
(or sub lemon juice for the pickling juice)

Not Fried Catfish Recipe Directions

Catfish and tartar sauce are like Ying and Yang, so first things first, make the tartar sauce.
In a small bowl, combine the mayonnaise, sweet relish, jalapeno slices, and a little of the pickling solution. Ideally you do this a day ahead of time, or at the very least, a few hours; it’ll have a lot more flavor.

Not a fan of jalapeno peppers? Leave the peppers and pickling juices out, and substitute lemon juice instead. Mix well and refrigerate.

fried catfish recipe
Catfish tastes best with tartar sauce (and coleslaw!)

In a bowl, crush the saltine crackers, or you can substitute your favorite bread crumbs. Add the corn meal, all-purpose flour, and whatever spices and herbs you love.

The breading I use in this video is super tasty. Sometimes I use curry powder, which tastes fantastic, and also adds great color because of the turmeric. Whatever spices you use, be generous; catfish should be super flavorful! Remember, whatever spice you use will be balanced by the creamy tartar sauce.

On a baking sheet, generously coat the catfish with olive oil. Check current prices for baking sheets on Amazon. Coat both sides of the fish, and the pan. Dredge the fish in the breading, coating both sides.

Coat the fish well, and press the crumbs into the fish. Place on the baking pan and cook in an oven preheated to 375 degrees Fahrenheit. You can up the oven temperature to 400 degrees F and shorten the cooking time.

Cook until the fish is well-colored and bounces back when pressed. The fish in this video cooked for 45 minutes, but the pieces were quite large.

Make Your Side Dishes as the Fish Bakes

Fried catfish, and this not quite fried catfish recipe, go great with coleslaw, greens, and hush puppies. I’m usually too lazy to make all of that, and often I’ll just serve catfish with coleslaw and garlic toast.

For the perfect catfish dinner side dish, try this Classic Coleslaw Recipe.

crunchy slaw
classic coleslaw recipe

Thanks For Watching Our Recipe Videos!

Thanks for checking out this easy catfish recipe, and all of our recipes. Sign up for our mailing list so you’ll never miss a new recipe. Also click a button below and share the dishes with your friends. You can also follow Chef Buck on Youtube. We appreciate all the kind comments and support, and we’ll see you next time in the kitchen!

If you like what CG and I do, support us on Patreon, or throw us a tip in our Paypal Tip Jar. We’ll happily enjoy a coffee on the road – Thanks! We appreciate all the support, and we’ll see you next time in the kitchen!

We include affiliate links for products on our website. Making a purchase after clicking on our links and we may earn a commission which helps us produce more videos and drink more coffee :^) We participate in the Amazon Services LLC Associates Program, which is an affiliate advertising program. It provides a means for us to earn fees by linking to Amazon.com and affiliated sites, so we can make more videos.

Share and Enjoy !

Chocolate Cake Recipe – Gluten Free

chocolate cake recipe

This is a great gluten free chocolate cake recipe. It’s super easy, moist, and tasty; and kinda cool to bake, too, since the main ingredient is beans! What!? Garbanzo beans! Which are also called chick peas. So besides being a delicious cake, it’s a flour less, gluten-free cake. This cake is especially tasty with cream cheese frosting.

Chocolate Cake Recipe Ingredients:

2 15 oz cans GARBANZO BEANS
2 cups semi-sweet CHOCOLATE CHIPS
4 EGGS
1 cup SUGAR
¾ tsp BAKING POWDER
1 Tbsp VANILLA EXTRACT
2-3 Tbsp BUTTER
½ cup DRIED CHERRIES (or other dried fruit)
1 cup toasted NUTS (chopped)
POWDERED SUGAR (for dusting)
fresh BERRIES (for topping)

…or top with CREAM CHEESE frosting

Cream Cheese Frosting Ingredients:

8oz CREAM CHEESE, softened
¼ cup unsalted BUTTER, softened
2 cups POWDERED SUGAR
1 tsp VANILLA EXTRACT
1 Tbsp MILK

cream cheese frosting recipe
Cream cheese frosted cake

Chocolate Cake Recipe Directions:

  • Butter up a baking dish; 8X10 or 9X11…about the size of a human head. If you need a decent baking dish, check out some current pricing for a Pyrex dish on Amazon.
  • Rinse and drain garbanzo beans.
  • In a food processor, combine eggs and beans and blend until smooth.
  • Transfer beaten bean mixture to a large bowl and add baking powder and sugar and stir until well combined.
  • On the stove, set up a double boiler and melt the chocolate chips. Add butter to the chocolate as needed to keep the chocolate smooth.
  • Once melted, add the chocolate to the cake batter mix and stir until incorporated.
  • Stir in vanilla extract, your favorite dried fruit (I prefer cherries or cranberries), and chopped nuts.
  • Mix well and pour into buttered baking dish.
  • Bake for 45 minutes in an oven preheated to 350 degrees Fahrenheit.
  • After 45 minutes insert a knife or toothpick into the cake to check that it is done; if wet batter sticks to the toothpick, let it cook a few minutes longer.
  • Allow cake to set and firm up 10 minutes before removing from the baking dish.
  • After 10 minutes, turn cake onto a baking rack and continue to let cool.

Once the cake cools, it’s ready for the next step, whatever that is…
This chocolate cake recipe is a perfect match for a cream cheese frosting, but it tastes great with just a sprinkling of powdered sugar and fruit, or believe it or not,
it tastes great plain! It’s incredibly moist, and the nuts and fruit make it almost like a brownie.

Cream Cheese Frosting Directions:

  • About an hour ahead of time, set out the cream cheese and butter to soften.
  • In a bowl, combine cream cheese, butter, and vanilla extract and blend with hand mixer.
  • Once ingredients begin to come together, add in the powdered sugar. Add the sugar a bit at a time to avoid a sugary blending mess.
  • Mix until the frosting is smooth. To thin the frosting add a small amount of milk–no more than a Tablespoon at a time! For a thicker frosting, just add more powdered sugar.

And that’s it.
Spread on your dessert and eat away!

Give this flourless, chocolate cake recipe a go and let me know what you think!

And for another tasty dessert idea, check out my Death by Scone Recipe …it’s one of my favorite all-time treats.

scone recipe
best scone ever…really

Thanks for Watching our Chocolate Cake Recipe Video!

Click a button below and share the dishes with your friends. You can also follow Chef Buck on Youtube. We appreciate all the kind comments and support, and we’ll see you next time in the kitchen!

If you like what CG and I do, support us on Patreon, or throw us a tip in our Paypal Tip Jar. We’ll happily enjoy a coffee on the road – Thanks! We appreciate all the support, and we’ll see you next time in the kitchen!

We include affiliate links for products on our website. Making a purchase after clicking on our links and we may earn a commission which helps us produce more videos and drink more coffee :^) We participate in the Amazon Services LLC Associates Program, which is an affiliate advertising program. It provides a means for us to earn fees by linking to Amazon.com and affiliated sites, so we can make more videos.

Share and Enjoy !

New York Strip Steak Recipe with Cream Sauce

steak recipe

Cook up a New York strip steak recipe French bistro-style with this easy, creamy, peppercorn steak recipe. Use fresh cracked peppercorns for ultimate satisfaction!–it seems like a lot of pepper, but the cream sauce balances it out nicely.

New York Strip Steak Recipe Ingredients

NEW YORK STRIP (10-12 oz)
1 Tbsp PEPPERCORNS (crushed)
1 Tbsp BUTTER
2 Tbsp OIL
¼ cup WINE (red or white wine)
¾ cup HEAVY CREAM
1 clove GARLIC (minced)
SALT to taste

steak recipe

How To Cook a New York Strip Steak

I’m using a New York Strip Steak for this dish, but any good cut of steak will work.

  • First thing, trim the steak of excess fat and coat both sides of the steak with fresh cracked and crushed peppercorns. Use a course grinder, rolling pin, or something out of the toolbox. Check here for current prices for a pepper grinder on Amazon. It seems like a lot of pepper, but the rich and creamy sauce will balance the dish out nicely.
  • Add salt to taste and set the steak aside.
  • Heat a skillet on medium heat and add butter and oil. Ideally you want to not use a non-stick skillet.
  • Once the skillet is hot, add the steak. It should sizzle straight away, sealing in the flavors.
  • Cook steak to desired doneness, turning halfway through the cook time. I think medium rare (pink inside) is perfect.
  • When the steak is cooked to your liking, remove it from the skillet and cover on a plate to rest.
  • Leave the skillet with juices, butter, and oil on medium heat.
  • De-glaze thee skillet with wine.
  • Add the cream and garlic and continue stirring 3-4 minutes. Be sure to return any juices from the plate with the resting steak!
  • Stir sauce until it reduces to a creamy thickness. Add salt as desired.
  • Pour sauce onto a plate and top with steak and desired sides–steamed broccoli or asparagus are my favorites.

Serve with thick slices of bread to sop up the delicious, creamy sauce!
Give this New York Strip Steak Recipe a try and let me know what you think, and bon appétit!
And for another tasty entree, check out this delicious Pork Loin Chop Recipe.

pork loin chop

Thanks for Watching our NY Strip Steak Video!

Click a button below and share the dish with your friends. You can also follow Chef Buck on Youtube. We appreciate all the kind comments and support, and we’ll see you next time in the kitchen!

If you like what CG and I do, support us on Patreon, or throw us a tip in our Paypal Tip Jar. We’ll happily enjoy a coffee on the road – Thanks! We appreciate all the support, and we’ll see you next time in the kitchen!

We include affiliate links for products on our website. Making a purchase after clicking on our links and we may earn a commission which helps us produce more videos and drink more coffee :^) We participate in the Amazon Services LLC Associates Program, which is an affiliate advertising program. It provides a means for us to earn fees by linking to Amazon.com and affiliated sites, so we can make more videos.

Share and Enjoy !

Parsnip Recipe — Creamy Mashed Parsnips

Parsnips are delicious and can be cooked into a great mash, just like potatoes. You can make this parsnip recipe as smooth or chunky as you like; I like it a little chunky–and I throw in a potato, too, with the skin on! The skin adds a great texture. Mashed parsnips make a nice change from the same old potato dish.

What You Need For This Parsnip Recipe

2 lbs. PARSNIPS
1 lb. POTATOES
3-4 Tbsp BUTTER
3-4 Tbsp OLIVE OIL
HALF N HALF, CREAM, or MILK as desired
SALT and PEPPER to taste
½ cup PARSLEY (chopped)
and enough water or broth to
cover the simmering parsnips

parsnip recipe
A delicious and creamy parsnip recipe. It’s a perfect side for a meaty entree or a filling addition to a vegetarian meal.

If you’re new to home cooking, get a bunch of spices, pots and pans, and start experimenting with different recipes. It’s a healthy hobby that can save a lot of money in the long run. Check out current prices for Complete Kitchenware Sets on Amazon as well as Complete Starter Spice Kits. Or try a thrift store! I’ve found some of my favorite kitchen gear at second-hand stores.

How to Make a Mashed Parsnip Recipe

Wash the parsnips and potato.
I don’t peel either!–the skin adds great texture and nutrition (but you can follow your own heart).
In a mid-size pot, heat butter and oil.
Chop the parsnips and potatoes into chunks roughly ½ inch in size–they don’t have to be perfect, close
is close enough.
Add chopped parsnips and potato to the pot, mix with butter and oil and let cook 2-3 minutes, stirring as needed.
Add water to the pot, just enough to cover the parsnips. Sometimes I use broth instead of water–give it a go sometimes,
but it’s delicious either way. Add salt and pepper to taste. Bring the pot to a simmer, cover, and let simmer about 5 minutes.
Uncover and continue simmering until the liquid is reduced and parsnips are soft and break apart.
Add a little milk, cream, or half n half. This will make the dish super creamy; add to taste, but don’t add so much that the dish becomes soupy.
Stir over heat a minute or two until the dish reaches desired consistency; you can use a hand blender to puree the mix or leave it chunky
like a home-style mashed potato dish…it’s great both ways.

parsnip recipe
Here I’m serving parsnips with a country fried steak and fresh veggies.

Give this Mashed Parsnip recipe a go and let me know what you think, and bon appétit!

And for another delicious parsnip dish, try this Parsnip Curry Soup Recipe.
curry parsnip soup

Thanks For Watching Our Parsnip Recipe Videos!

Thanks for checking out this quinoa salad recipe, and all of our recipes. Be sure and sign up for our mailing list so you’ll never miss a new recipe. Also click a button below and share the dishes with your friends. You can also follow Chef Buck on Youtube. We appreciate all the kind comments and support, and we’ll see you next time in the kitchen!

If you like what CG and I do, you can also support us on Patreon, or throw us a tip in our Paypal Tip Jar. We’ll happily enjoy a coffee on the road – Thanks! We appreciate all the support, and we’ll see you next time in the kitchen!

We include affiliate links for products on our website. So, if you make a purchase after clicking on our links, we may earn a commission which helps us produce more videos and drink more coffee :^) We participate in the Amazon Services LLC Associates Program, which is an affiliate advertising program. It provides a means for us to earn fees by linking to Amazon.com and affiliated sites, so we can make more videos.

Share and Enjoy !

Pork Tenderloin Recipe with Beans

pork tenderloin

You’re gonna love this pork tenderloin recipe. As the name suggests, pork tenderloin is a very tender cut of meat. It’s super flavorful, moist, and delicious, and easy to prepare. Leftover tenderloin is perfect on a sandwich, so cook up enough to leave leftovers…you’ll be glad you did. I’m cooking this pork tenderloin with onions and beans and it’s a great dish –definitely give it a try.

Pork Tenderloin Recipe Ingredients:

2½ lbs PORK TENDERLOIN
1½ Lg ONION
15oz can PINTO BEANS
5-7 cloves GARLIC
fresh HOT PEPPERS to taste (or use red pepper flakes, or nothing…it’s all optional, baby!)
OLIVE OIL (as you like…I oil the meat, the skillet, and then throw a little olive oil on the onions)
SEASONING for meat
(1 tsp salt, ½ tsp black pepper, 1 tsp cumin, 1 tsp chili powder,
1 tsp Italian seasonings, etc…experiment, or use your own favorites)
½ cup dry WHITE WINE (optional)
½ cup CHICKEN BROTH

pork tenderloin
trim silver skin from tenderloin and sear 3 minutes each side before roasting in oven

Pork Tenderloin Recipe directions:

  • Trim the pork tenderloin of the sinewy silver skin.
  • Coat the pork in olive oil and seasonings. I’m using a rub of chili powder, cumin, salt, pepper, and Italian seasonings…but use whatever flavors you like, or just keep it simple with basic salt and pepper–there’s no wrong way to do it; as long as you don’t overcook the pork, it’ll be awesome!
  • Pre-heat your oven to 425 F. Cooking the tenderloin at a high temperature for a short time will keep it from drying out.
  • While the oven heats, sear the tenderloin on the stove top. In a heavy, oven safe skillet, heat a little olive oil on medium high heat. After the skillet and oil are hot, add the tenderloin–it should sizzle and cook right away. Check current prices online for an oven safe skillet.
  • Sear for 3 minutes and then turn and sear the other side.
  • Add thick sliced onion to the skillet. Do this after the tenderloin has been turned.
  • Add a little oil and seasonings to the onion.
  • After 3 minutes, remove the skillet from the stove top and place in the oven at 425 F. (be sure to use an oven-safe skillet!)
  • Cook for approx. 20 minutes. If using a meat thermometer, cook until the internal temperature of the pork is 145 F.
  • Remove the skillet from the oven and return to the stove top.
  • Remove the pork loin from the skillet and set aside 10 minutes to rest. It is very important to rest the meat before slicing. This will preserve the juiciness and flavor of the pork. If you slice the tenderloin right away, the thin juices will run and much of the flavor and moisture will be lost!
pork tenderloin
let pork tenderloin rest before slicing

While the pork tenderloin rests, we’ll complete the onion and bean side dish.

  • On medium heat, continue cooking the onions in the skillet. The liquid in the pan will reduce as it cooks. Add garlic–a lot is good!–and if desired, throw in a little fresh chopped hot peppers.
  • Add the pinto beans
  • After a few minutes, if you like, add a little wine. It’s optional, but adds a great flavor.
  • Simmer about 2 minutes and let the wine cook off.
  • Add chicken broth and continue simmering until the liquid cooks down. And that’s it!
pork tenderloin
pinto beans and caramalized onion

By now the pork tenderloin has rested enough and is ready to slice.
Serve the tenderloin with the beans and onion side, and maybe a little steamed broccoli or salad–and boom!–you got a complete fancy-pants pork tenderloin dinner!

pork tenderloin
Pork tenderloin dinner with caramelized onion and beans

Give this pork tenderloin recipe a try and let me know what you think, and bon appétit!

And for another great meal idea, try this Delicious Cornish Hen Dinner.

cornish game hen

Thanks for checking out our pork tenderloin recipe, and all of our recipes. Be sure and sign up for our mailing list and never miss a new Chef Buck cooking video, and also click a button below and share the dishes with your friends. We appreciate the kind comments and support, and we’ll see you next time in the kitchen!

Thanks for watching our recipe videos!

We include affiliate links for products on our website, so if you make a purchase after clicking on our links, we may earn a commission which helps us produce more videos and drink more coffee :^) We participate in the Amazon Services LLC Associates Program, which is an affiliate advertising program providing a means for us to earn fees by linking to Amazon.com and affiliated sites, so we can make more videos.

Share and Enjoy !

Best Green Beans Recipe

green beans

I’m not a lover of green beans, but sometimes green beans insert themselves into your life and then you just have to deal with them. Seeds and garlic and ginger are 3 friends that will help in this fight. This is a quick recipe, very tasty, and an effective way to deal with the green bean “problem”.

Green Bean Recipe Ingredients:
1 lb. GREEN BEANS
3 ROMA TOMATOES (chopped, or substitute 15oz can diced tomatoes)
2 Tbsp GARLIC (finely chopped)
2 Tbsp GINGER (finely chopped)
HOT PEPPERS (finely chopped, to taste–sub chili paste, hot sauce, sriracha, etc.)
½ tsp FENNEL SEEDS
1 tsp CUMIN SEEDS
SALT and PEPPER to taste
2-3 Tbsp OLIVE OIL
1-2 Tbsp BALSAMIC VINEGAR

green beans
Choose green beans that are firm and crisp!

Check current prices for a Non-Stick Skillet on amazon.

Green Bean Recipe Directions:
When buying, choose green beans that are firm and crisp, meaning that when you snap off the ends, they’ll make an actual “snap”. Which is the first thing you’ll do–snap off the ends and discard them. Wash your beans–and then blanch them.
To blanch, place beans into a pot of salted, boiling water and let them cook for 3-4 minutes, then remove beans from the hot water and transfer to an ice bath. Blanching prepares the beans so that they will cook easier and more quickly in the skillet.
Drain the beans and set aside
In a skillet, heat olive oil on medium heat. Add cumin and fennel seeds and allow to cook for just a few moments (10-20 seconds). Seeds add great flavor and texture–do yourself a favor and stock your kitchen with seeds! Add garlic (lots of garlic!) and continue cooking. Add a little fresh, diced hot pepper if you like–jalapenos or chili peppers are nice–or if you like, just add some chili paste, or hot sauce later.
Cook garlic and peppers for about 1 minute and then add in the chopped tomatoes and ginger, and let cook another 2-3 minutes.
Stir green beans into the skillet.
Add salt and pepper to taste.
Cook 3-5 minutes until the green beans are cooked to your taste, and that’s it.
Add a splash of balsamic vinegar if you like–I do–the tang is quite nice with this dish.

Give these green beans a try and let me know what you think, and bon appétit!

And for a green beans with an Asian flair, try this Asian-style Green Bean Recipe.

Green Bean Recipe
Green Bean Recipe

Thanks for Watching our Bean Recipe Video!

Click a button below and share the dishes with your friends. You can also follow Chef Buck on Youtube. We appreciate all the kind comments and support, and we’ll see you next time in the kitchen!

If you like what CG and I do, support us on Patreon, or throw us a tip in our Paypal Tip Jar. We’ll happily enjoy a coffee on the road – Thanks! We appreciate all the support, and we’ll see you next time in the kitchen!

We include affiliate links for products on our website. Making a purchase after clicking on our links and we may earn a commission which helps us produce more videos and drink more coffee :^) We participate in the Amazon Services LLC Associates Program, which is an affiliate advertising program. It provides a means for us to earn fees by linking to Amazon.com and affiliated sites, so we can make more videos.

Share and Enjoy !

Buffalo Chicken Pizza Recipe — Quick and Easy

buffalo chicken pizza

I love buffalo chicken dishes whether they’re wings, casseroles, salads, and especially if it’s a buffalo chicken pizza. The combo of chicken, hot sauce, celery, and blue cheese is absolutely perfect, and a buffalo chicken pizza can be prepared super quick, especially if you’re lazy like me and skip the making a pizza crust part. I prefer flat bread for a pizza crust. If you’ve got leftover chicken and you’re the kinda person who likes hot wings with blue cheese, then you’ll probably enjoy this buffalo chicken pizza recipe.

Buffalo Chicken Pizza Recipe Ingredients

I won’t suggest specific amounts…it’ll all depend on the size of your pizza!
FLAT BREAD (pita bread, etc.)
leftover CHICKEN (cooked, chopped)
HOT SAUCE (whatever)
BLUE CHEESE DRESSING (good kind…don’t be cheap)
BLUE CHEESE CRUMBLES (crumbled)
CELERY (chopped)
MOZZARELLA CHEESE (shredded)

Spicy Buffalo Chicken Pizza
Buffalo Chicken Pizza …quick and easy!

Buffalo Chicken Pizza Recipe Directions

As far as the amounts of ingredients goes…just follow your heart. I suggest going heavy on the toppings. A lot of celery doesn’t sound fun, but the overall contrast of tastes and textures is what makes this pizza delicious, so use lots of everything–including hot sauce–the hotter the better! The dairy in the blue cheese chunks and dressing will balance the heat.

Chop up some cooked chicken–use leftovers or just cook up a breast or two for topping. I like nice chicken chunks, about ½” square–but shred it if you like–it’s your pizza, man.

Drench the chopped chicken in hot sauce and set aside.

Chop up celery into ¼” thick pieces.

In a bowl combine a nice blue cheese dressing with blue cheese crumbles, about a 50/50 mixture. The result should be the consistency of a cottage cheese.

If you wanna make a pizza dough from scratch, God bless you. CG does, and it’s nice. I’m too lazy, and I actually prefer flat bread. I like pita bread–or any kind of flat bread. I’ve never tried naan, but it sounds good to me.

Spread the blue cheese dressing/crumbles over the flat bread. Spread it thick and even, almost to the edge–leave about a ¼” for a crust.

Generously top pizza with the hot sauce chicken chunks and celery, and cover with shredded mozzarella cheese.

Place on an ungreased baking sheet and cook in a pre-heated oven at 400 degrees Fahrenheit for 10-12 minutes, or until the edges of the flat bread are crisped to your liking. You can check here for current prices for baking sheets on Amazon. And that’s it! Hope you like the pizza!

For another party foods recipe idea, try these Crispy Baked Chicken Wings.

wings recipe
Oven baked wings are healthier than deep fried, and less messy to make!

Thanks for Watching our Buffalo Chicken Pizza Recipe Video!

Click a button below and share the dishes with your friends. You can also follow Chef Buck on Youtube. We appreciate all the kind comments and support, and we’ll see you next time in the kitchen!

If you like what CG and I do, support us on Patreon, or throw us a tip in our Paypal Tip Jar. We’ll happily enjoy a coffee on the road – Thanks! We appreciate all the support, and we’ll see you next time in the kitchen!

We include affiliate links for products on our website. Making a purchase after clicking on our links and we may earn a commission which helps us produce more videos and drink more coffee :^) We participate in the Amazon Services LLC Associates Program, which is an affiliate advertising program. It provides a means for us to earn fees by linking to Amazon.com and affiliated sites, so we can make more videos.

Share and Enjoy !

Teriyaki Chicken Recipe Japanese Style!

chicken teriyaki

This Teriyaki Chicken recipe is easy to make, and the teriyaki sauce can be used in many kinds of dishes. This sauce is a semi-traditional Japanese variation using sake and mirin–it’s sweet, but not overly so–for a sweeter sauce, just add a little more brown sugar.

Teriyaki Chicken Ingredients

1½ lb. CHICKEN (cut into pieces)
2 Tbsp OIL (for cooking chicken)
1 tsp HOT PEPPER (optional, finely chopped)
GREEN ONION TOPS (sliced for garnish)
2 Tbsp CORN STARCH
SALT and PEPPER (to taste)

Teriyaki Sauce:
¼ cup MIRIN
¼ cup SAKE
¼ cup SOY SAUCE (light sodium)
1 tsp GINGER (finely chopped)
1-2 Tbsp BROWN SUGAR

How to make Teriyaki Chicken

In a bowl, combine mirin, sake, and soy sauce. Add 1 tsp minced ginger and 1 or 2 Tbsp of Brown sugar, depending on how sweet you like your teriyaki sauce. Mix ingredients well and set aside.

I’m using boneless and skinless chicken thighs, but if you prefer chicken breasts, use those. I like to cut my chicken up before cooking, that way it cooks quicker and gets more of an all around sear. I cut the chicken into about 1″ pieces. In a bowl, lightly season the chicken pieces with salt and pepper. Add the corn starch and mix until the chicken is well coated.

In a skillet, heat oil on medium heat. When the oil is hot, add the chicken. Let the chicken cook about 3 minutes and then turn the pieces and let them cook an additional 3 minutes…adjust this time depending on the size of the chicken; you want the chicken to be almost done, but not quite. If you like your dish to have a bit of spicy heat, add some finely chopped hot pepper to taste.

When the chicken is near completion, drain off any excess oils and chicken fat (there won’t be much if you’re using skinless chicken).

Raise the skillet temperature to high and add the teriyaki sauce.
The sauce will begin to bubble quickly. Allow it to cook on high for a couple of minutes to reduce the mirin and sake. After a couple of minutes, reduce the heat to med/low and continue cooking until the sauce is the consistency you like. You can check prices for pre-made Teriyaki Sauces on Amazon.

If the sauce cooks too long and gets too thick, add a little water to thin it, and for a thicker sauce, mix 1 teaspoon cornstarch with water and add to skillet and stir until thickness desired.

And that’s it– chicken teriyaki! or is it teriyaki chicken? Does it really matter?
Serve the chicken teriyaki over rice and top with chopped green onion. For extra sauce, double the sauce ingredients–extra sauce is great on rice.
Give this Teriyaki Chicken recipe a try and let me know what you think, and bon appétit!

For another Asian inspired recipe, try this fantastic Thai Beef Salad Recipe.

thai beef salad
thai beef salad recipe

Thanks for Watching our Teriyaki Chicken Recipe

Sign up for our mailing list so you’ll never miss a new recipe. Also click a button below and share the dishes with your friends. You can also follow Chef Buck on Youtube. We appreciate all the kind comments and support, and we’ll see you next time in the kitchen!

If you like what CG and I do, support us on Patreon, or throw us a tip in our Paypal Tip Jar. We’ll happily enjoy a coffee on the road – Thanks! We appreciate all the support, and we’ll see you next time in the kitchen!

We include affiliate links for products on our website. Making a purchase after clicking on our links and we may earn a commission which helps us produce more videos and drink more coffee :^) We participate in the Amazon Services LLC Associates Program, which is an affiliate advertising program. It provides a means for us to earn fees by linking to Amazon.com and affiliated sites, so we can make more videos.

Share and Enjoy !

How to Pick a Ripe Pineapple Every time

how to pick a ripe pineapple

Here’s how to pick a ripe pineapple every time! We use a lot of fresh pineapple and buy them often. The first thing I look for is a pineapple with loose leaves at the top.

  • 1) Just grab a top center leaf and pull–if the leaf comes out easily, then it’s looking good. (if you can’t find a pineapple with loose leaves…then pass ’em by and try again another day)
  • 2) If the pineapple has a little bit of give when you push on it, that’s a good sign…not too mushy, but not hard as a brick!
  • 3) if you put it to your nose, and it smells pineapple-y…that’s a good sign.
  • 4) And I like a nice golden color too, especially around the bottom…but that doesn’t guarantee ripeness…so bank on steps 1 through 3 first, but especially step 1 –loose leaves! If the leaves are stuck and the whole pineapple wants to be picked up when you pull on the top sprouts…then it’s not a keeper.

A pineapple will not ripen and mature after it is picked, so buying an unripe pineapple at the store and bringing it home to ripen will not work–choosing the best pineapple when you buy it is key to pineapple success. A pineapple will get softer as it gets old, but old isn’t the same as ripe!

Fresh pineapple is great in fruit salads and as a refreshing snack, it’s super healthy and well worth bringing home every now and then. We still used canned pineapple –especially on pizzas! –but for freshness and flavor, a nice ripe pineapple from the produce section can’t be beat!

Hope those tips help you pick a ripe pineapple, and for some practical pineapple application, here’s a Pineapple Sandwich that is popular in Germany: Toast Hawaii

Fancy Toast Hawaii
Fancy Toast Hawaii made with a bagel and Gruyere cheese

Thanks for Watching our Pineapple Video!

Click a button below and share the dishes with your friends. You can also follow Chef Buck on Youtube. We appreciate all the kind comments and support, and we’ll see you next time in the kitchen!

If you like what CG and I do, support us on Patreon, or throw us a tip in our Paypal Tip Jar. We’ll happily enjoy a coffee on the road – Thanks! We appreciate all the support, and we’ll see you next time in the kitchen!

We include affiliate links for products on our website. Making a purchase after clicking on our links and we may earn a commission which helps us produce more videos and drink more coffee :^) We participate in the Amazon Services LLC Associates Program, which is an affiliate advertising program. It provides a means for us to earn fees by linking to Amazon.com and affiliated sites, so we can make more videos.

Share and Enjoy !

Jalapeno Popper Recipe Cheeseburger Style

jalapeno poppers stuffed with ground beef

Try this twist on a jalapeno popper recipe. CG thinks traditional poppers are too cream cheesy –she prefers these less cream cheesy, more meaty cheeseburger jalapeno poppers. They taste fantastic with blue cheese, but use lean ground beef and whatever cheeses you like.

Ingredients for Cheeseburger Jalapeno Poppers

10 JALAPENO PEPPERS
½ cup ONION (chopped)
8 oz CREAM CHEESE
8 oz GROUND BEEF (lean)
¼ cup CHEDDAR CHEESE (shredded)
¼ cup BLUE CHEESE (crumbled)
1 cup PANKO BREAD CRUMBS
1 Tbsp WORCESTERSHIRE
SALT and PEPPER to taste
and extra CHEDDAR and BLUE CHEESE
for topping

How To Make a Jalapeno Popper

Remove cream cheese from the fridge to soften for half an hour

In a skillet on medium heat, brown 8oz of lean ground beef–the leaner the better–you don’t want your poppers to be overly greasy! As the beef browns add onions, Worcestershire sauce, and salt and pepper to taste. As soon as the beef browns, take the skillet off the heat and allow it to cool, because you don’t want to add hot beef to your cheese mixture…it’ll just be a mess.

While your seasoned beef cools, prepare the poppers. Carefully slice off the very end of the stems, leaving the interior off the jalapeno intact. Slice the pepper legthwise in half. Using a small spoon, scoop out the seeds and ridges, being careful to leave the end of the jalapeno intact–it’ll make a kind of canoe shape.

In a bowl, combine the softened cream cheese, the cooled beef, and ½ cup of your favorite shredded cheeseburger cheeses (we like using blue cheese, cheddar, and monterey jack…although I think blue cheese is best!). Thouroughly mix. It’ll be a semi-unattractive bowl of meat-cheese…but that’s okay, it’ll look better in the pepper.

jalapenos for poppers
sliced jalapenos for poppers

Using a spoon, stuff the jalapeno halves with the cheese and beef mix. Don’t overstuff, just to the top of the pepper.

Spread breadcrumbs on a flat surface, and press the cheesy side of the stuffed pepper into the breadcrumbs to form a coating. Check current prices for PANKO BREADCRUMBS on Amazon.

Arrange poppers on a baking sheet and bake in a 400 degree F oven for about 25 minutes.

After about 25 minutes, after once some of the breadcrumb toppings have begun to brown, remove the poppers from the oven and top with additional cheese. I love using blue cheese for this part! –it is delicious–but feel free to use whatever cheese you love (although blue cheese is seriously the best). Return poppers to the oven for 5-10 minutes or until cheese is melted, and then serve. Hope you like it!

Give this jalapeno popper recipe a try and let me know what you think, and bon appétit!

And for a more traditional jalapeno popper recipe, try this cream cheesy BAKED JALAPENO POPPERS.

jalapeno poppers

Thanks for Watching our Videos!

Thanks for checking out our jalapeno popper recipe. Sign up for our mailing list so you’ll never miss a new recipe. Also click a button below and share the dishes with your friends. You can also follow Chef Buck on Youtube.

We appreciate all the kind comments and support, and we’ll see you next time in the kitchen!If you like what CG and I do, support us on Patreon, or throw us a tip in our Paypal Tip Jar. We’ll happily enjoy a coffee on the road – Thanks! We appreciate all the support, and we’ll see you next time in the kitchen!

We include affiliate links for products on our website. Making a purchase after clicking on our links and we may earn a commission which helps us produce more videos and drink more coffee :^) We participate in the Amazon Services LLC Associates Program, which is an affiliate advertising program. It provides a means for us to earn fees by linking to Amazon.com and affiliated sites, so we can make more videos.

Share and Enjoy !

Toast Hawaii – How to Make this German Favorite

toast hawaii

Toast Hawaii is an open-faced sandwich popular in Germany. It is traditionally comprised of lightly toasted white bread which is then buttered and topped with thinly sliced ham, a pineapple slice, a cheese slice, and a maraschino cherry, so it’s really a deluxe toasted cheese sandwich. Check out the video below to see how me and CG first put together a traditional Toast Hawaii and then we build a fancy-pants version of the German favorite.

Both versions were alright…fancy-pants was definitely my favorite, but overall, pineapple plays too big a role in this sandwich for my tastes; I think pineapple should stay where it belongs –on the bottom of an upside down cake, or on a pizza; of course, there was a time when I didn’t think it belonged on a pizza…and then I ran into the right pineapple pizza. So give a version of Toast Hawaii a try and see what you think.

A traditional Toast Hawaii sandwich
A traditional German Toast Hawaii sandwich

I prefer a sandwich with a top and a bottom, something I can wrap my hands around, especially a pressed sandwich grilled on the top and the bottom, which is why a Cuban sandwich is so good. I often make sandwiches and then toast them in a skillet with a heavy pan on top pressing down, which is a great cheat for a toasted sandwich. A sandwich grill press is also a good option, and I’ve seen these often in thrift stores, or you can check current prices for a sandwich press on amazon.

How to Choose a Ripe Pineapple

  • 1) Just grab a top center leaf and pull–if the leaf comes out easily, then it’s looking good. (if you can’t find a pineapple with loose leaves…then pass ’em by and try again another day)
  • 2) If the pineapple has a little bit of give when you push on it, that’s a good sign…not too mushy, but not hard as a brick!
  • 3) if you put it to your nose, and it smells pineapple-y…that’s a good sign.
  • 4) And I like a nice golden color too, especially around the bottom…but that doesn’t guarantee ripeness…so bank on steps 1 through 3 first, but especially step 1 –loose leaves! If the leaves are stuck and the whole pineapple wants to be picked up when you pull on the top sprouts…then it’s not a keeper.

For a sandwich twist that I can get behind, try a banh mi style hamburger recipe. It’s a burger with a Vietnamese twist, but if want a sandwich with plenty of pizzazz and no pineapple, it fits the bill.

burger banh mi

Thanks for Watching our Pineapple Video!

Click a button below and share the dishes with your friends. You can also follow Chef Buck on Youtube. We appreciate all the kind comments and support, and we’ll see you next time in the kitchen!

If you like what CG and I do, support us on Patreon, or throw us a tip in our Paypal Tip Jar. We’ll happily enjoy a coffee on the road – Thanks! We appreciate all the support, and we’ll see you next time in the kitchen!

We include affiliate links for products on our website. Making a purchase after clicking on our links and we may earn a commission which helps us produce more videos and drink more coffee :^) We participate in the Amazon Services LLC Associates Program, which is an affiliate advertising program. It provides a means for us to earn fees by linking to Amazon.com and affiliated sites, so we can make more videos.

Share and Enjoy !

Baked Quinoa with Celery Root

Quinoa Vegetable Gratin

This baked quinoa recipe is tasty and versatile, and an terrific way to use celery root. I use zucchini and carrots in this video, but I’ve made the same dish using broccoli as the main veggie, so experiment with whatever you have on hand, just make sure to cut the veggies into smaller pieces to spread evenly.

Baked Quinoa Recipe Ingredients

1 cup QUINOA
1 CELERY ROOT (thinly sliced)
1 cup CARROT (shredded)
1 cup ZUCHINNI (diced well)
1-2 tsp HOT PEPPER (finely chopped)
½ ONION (chopped)
3-4 cloves GARLIC (finely chopped)
1 cup BLUE CHEESE
2 Tbsp BUTTER
½ cup ALMOND MILK (or Half N Half)
2 Tbsp ITALIAN SEASONING
1 tsp MUSTARD SEEDS
½ cup BREAD CRUMBS
1-2 Tbsp OLIVE OIL
SALT and PEPPER (to taste)

Quinoa Vegetable Gratin

How to make a Quinoa Bake

In a pot, heat olive oil on med. high heat. Add mustard seeds, garlic, and a little hot pepper, if desired. Give these ingredients about a 30 second head start, and then add the onion. Stir and let cook for 2-3 minutes until onions begin to soften. Stir in salt.

Add quinoa and water and stir. Cover pot and allow the ingredients to come to a boil. Reduce the heat to a simmer, and allow the pot to cook for about 10 minutes.

Remove pot from the heat, if there is a little water left, that’s okay. Add Italian seasonings (or experiment with different seasonings!). Add in the zucchini and carrot (or experiment with different veggies!). Stir in the milk and mix all ingredients together well.

Butter a deep 1.5 quart baking dish. Check here to see current prices for a casserole baking dish on Amazon.

Spoon in and spread a layer of the quinoa/veggie mix along the bottom of the dish, about a ½” to 1″ thick. Top this layer with a single layer of thinly sliced celery root (celeriac). Add a sprinkling of cheese–as cheesey as you like it. I use blue cheese in the video, but try feta cheese and ricotta cheese, too (I’ve used all and any crumbly/melty white cheese is gonna work well with this dish).

Add and spread another layer of the quinoa mixture, and continue building the quinoa, celery root, cheese layers until the dish is almost full. Make the top layer quinoa/veggie.

In a small bowl, combine bread crumbs w/ olive oil, Italian seasoning, salt, and pepper. Mix, and spread over the top of the quinoa dish.
Cover with aluminium foil and bake for about 55 minutes in an oven pre-heated to 375 degrees F.

After 55 minutes, remove the foil and continue to cook another 5 minutes or until the bread crumb topping is golden brown.

The dish is finished when a knife can pass easily through the sliced celerey root layers.
Let rest for 5-10 minutes, and then serve.
Give this baked quinoa vegetable recipe a try and let me know what you think, and bon appétit!

And for another casserole-style recipe idea, try this Broccoli Cheese and Cauliflower Gratin Recipe.

broccoli cheese
An easy, semi-healthy broccoli and cauliflower gratin recipe.

Thanks for Watching our Baked Quinoa Recipe Video

Sign up for our mailing list so you’ll never miss a new recipe. Also click a button below and share the dishes with your friends. You can also follow Chef Buck on Youtube. We appreciate all the kind comments and support, and we’ll see you next time in the kitchen!

If you like what CG and I do, support us on Patreon, or throw us a tip in our Paypal Tip Jar. We’ll happily enjoy a coffee on the road – Thanks! We appreciate all the support, and we’ll see you next time in the kitchen!

We include affiliate links for products on our website. Making a purchase after clicking on our links and we may earn a commission which helps us produce more videos and drink more coffee :^) We participate in the Amazon Services LLC Associates Program, which is an affiliate advertising program. It provides a means for us to earn fees by linking to Amazon.com and affiliated sites, so we can make more videos.

Share and Enjoy !

Mini Meatloaf Recipe – Packed with Flavor!

meatloaf recipe

Here’s a meatloaf recipe for folks who like their meatloaf to look like meatballs. These mini meatloaf meatballs are super flavorful and cook up quickly. I like to blend up some of the ingredients for this recipe, so a food processor is helpful for this dish, and you can check current prices for food processors at amazon.

Mini Meatloaf Recipe Ingredients

Meatloaf:

1½ lbs. lean ground BEEF
½ RED BELL PEPPER
1 sm ONION (or ½ lg)
4 cloves GARLIC
1 Tbsp CHILI POWDER
½ cup OATS
1 CARROT
1 EGG
2 tsp ITALIAN SEASONING
SALT and PEPPER to taste
1 Tbsp WOOSTERSHISTERSHIRE SAUCE

Meatloaf Sauce:

1/3 cup KETCHUP
1 Tbsp WOOSTERSHISTERSHIRE SAUCE
2 tsp MUSTARD
1 Tbsp CHILI POWDER
1 tsp CHILI PASTE or hot sauce to taste

meatloaf recipe
Mini meatloaves make moist meatballs…mmmmm

How to make Yummy Mini Meatloaf Balls

  • Blend oats in food processor until finely chopped.
  • In the processor also finely chop the red pepper, onion, carrot, and garlic.
  • In a large bowl, combine processed oats and veggies.
  • Add seasonings, Worcestershire sauce and egg. Mix well.
  • Does it smell awesome? Add additional seasoning, if desired.
  • Add the ground beef and use your hands to combine. Do not overmix the ingredients, over mixing can make the meatloaf dense and heavy.
  • Lightly roll the meat mixture into 12 balls with your hands.  Dividing the mixture into 4 parts makes the distribution a little more even.
  • Place rolled loaves in a lightly greased baking pan. If you need an oven-safe pan, you can check here for current prices for baking sheets on Amazon. 
  • In a small bowl, combine all of the sauce ingredients. I use chili paste to add a little heat, but use hot sauce or whatever you like–or nothing at all if you don’t want the dish too spicy hot. Stir until smooth and spoon over top each dinky meatloaf.
  • Bake, uncovered, at 450 degrees F for 15-18 minutes. If desired, finish under the broiler to get a bit of brown/burnt on top.

And that’s it! Give this meatloaf recipe a go and let me know what you think. Bon appétit!

Of course, the key to many ground beef recipes is the seasoning. For another delicious recipe using ground beef, try The Best Nachos Supreme Recipe ever.

best nachos recipe
This is a fantastic Nachos Supreme dish, and a giant pizza pan makes a great dish for cooking and serving.

Thanks for Watching our Meatloaf Recipe Video!

Click a button below and share the dishes with your friends. You can also follow Chef Buck on Youtube. We appreciate all the kind comments and support, and we’ll see you next time in the kitchen!

If you like what CG and I do, support us on Patreon, or throw us a tip in our Paypal Tip Jar. We’ll happily enjoy a coffee on the road – Thanks! We appreciate all the support, and we’ll see you next time in the kitchen!

We include affiliate links for products on our website. Making a purchase after clicking on our links and we may earn a commission which helps us produce more videos and drink more coffee :^) We participate in the Amazon Services LLC Associates Program, which is an affiliate advertising program. It provides a means for us to earn fees by linking to Amazon.com and affiliated sites, so we can make more videos.

Share and Enjoy !

Quinoa Salad Recipe – Vietnamese Bánh Mì Style

A quinoa salad recipe inspired by the tasty flavor combinations found in a Vietnamese bánh mì sandwich. Quinoa provides a complete protein, making this dish an ideal vegetarian recipe.

Quinoa Salad Recipe Ingredients

1 cup QUINOA (uncooked)
2 cups DAIKON/CARROT RELISH (chopped)
2-3 JALAPENOS (finely chopped)
2 cups SALAD CUCUMBER (diced)
1 cup chopped CILANTRO
3 Tbsp MAYONNAISE
1 small LEMON (zest and juice)
2 Tbsp rice VINEGAR
SALT and PEPPER to taste
SALAD GREENS (I use a combo of Spinach and Red Leaf Lettuce, but use your favorite)

How to make a Bánh Mì Quinoa Salad

Cook up the quinoa just like rice: 1 part quinoa to 2 parts water, bring to a boil, reduce heat, cover and simmer for 15 minutes or until the water is absorbed. Fluff the quinoa and then set aside uncovered to cool.

Prepare the veggies: Dice 1 large salad cucumber, also called an English cucumber; these are great in a salad because the skin is thin and quite enjoyable to eat, and also adds a nice texture. Finely chop 2-3 whole jalapeno peppers, seeds and all. Chop 1 bunch of cilantro, including the stems. Chop 2 cups of pickled daikon and carrot.

Quinoa Salad -- Banh Mi Style
Quinoa Salad — Banh Mi Style

Prepare the dressing: Remove and mince the zest from 1 small lemon and place in a small bowl. Add the juice from the lemon, rice vinegar, mayonnaise, and salt and pepper. Mix well until the dressing is smooth.

In a large bowl, place the cooled quinoa. Add ½ of the dressing, the jalapenos, cilantro, and daikon/carrot, and mix well. Add the diced cucumbers and toss. Add salt and pepper, and more dressing as desired. I also add a bit of the pickling solution from the daikon/carrot pickle.
Serve the quinoa salad over a bed of leafy greens and garnish with cilantro.

Give this banh mi quinoa salad recipe a try and let me know what you think!

If you’re new to home cooking, get a bunch of spices, pots and pans, and start experimenting with different recipes. It’s a healthy hobby that can save a lot of money in the long run. Check out current prices for Complete Kitchenware Sets on Amazon as well as Complete Starter Spice Kits. Or try a thrift store! I’ve found some of my favorite kitchen gear at second-hand stores.

For another Asian inspired vegetarian dish, try this Ramen Noodle Crunchy Slaw Recipe.

crunchy slaw
Crunchy coleslaw or noodle salad? What sounds tastier?

Thanks For Watching Our Recipe Videos!

Thanks for checking out this quinoa salad recipe, and all of our recipes. Be sure and sign up for our mailing list so you’ll never miss a new recipe. Also click a button below and share the dishes with your friends. You can also follow Chef Buck on Youtube. We appreciate all the kind comments and support, and we’ll see you next time in the kitchen!

If you like what CG and I do, you can also support us on Patreon, or throw us a tip in our Paypal Tip Jar. We’ll happily enjoy a coffee on the road – Thanks! We appreciate all the support, and we’ll see you next time in the kitchen!

We include affiliate links for products on our website. So, if you make a purchase after clicking on our links, we may earn a commission which helps us produce more videos and drink more coffee :^) We participate in the Amazon Services LLC Associates Program, which is an affiliate advertising program. It provides a means for us to earn fees by linking to Amazon.com and affiliated sites, so we can make more videos.

Share and Enjoy !

Country Fried Steak with Rich Gravy

Country Fried Steak is easy to prepare and a terrific way to cook up an inexpensive cut of meat. This country fried steak recipe, also called chicken fried steak, uses cube steak, a cut of meat that has been run through a mechanical tenderizer, generally it’s a round or top sirloin cut of meat.

Country Fried Steak Ingredients

1 lb CUBE STEAK
¾ cup all-purpose FLOUR use enough to coat steaks and extra for making gravy
1 EGG (about one for every two cuts of meat)
COOKING OIL enough to cover the bottom of the skillet, add some butter if desired
1½ cups MILK (add as needed for desired gravy consistency)
SALT and PEPPER to taste

How to Make Country Fried Steak

  • Bread the cube steak. For about 1 lb. of meat, place approx. ¾ cup all-purpose flour in a shallow dish. This is more flour than you’ll need for the breading, but you’ll use whatever is leftover for making the gravy.
  • Season the flour simply with salt and pepper.
  • In another shallow dish, beat 1 egg.
  • Lay each side of the steak in the flour, breading each side, then lay the floured steak in the egg dish on each side to coat the steak in egg, then return the steak to the flour dish and re-coat each side in flour again; once fried, this double flouring will create a thick, decadent breading.
  • Heat oil in a skillet on med-high. Make sure the oil is HOT before adding the steaks!
  • Carefully lay the steaks in the pan. The breaded cuts should begin bubbling and cooking straight away. Because cube steak is pounded and thin, it takes very little time to cook–approx 2-3 minutes each side.
  • Once the breading has fried and turned golden, carefully turn the steaks. Be careful of the hot grease. Once both sides are crisp and golden, remove steak from the oil and place on a paper towel to drain.
  • Pour off excess grease from the pan so that only enough remains to make the gravy–this might be a couple of tablespoons or a ¼ cup, depending on how much gravy you wish to make. If there are bits and pieces left in the skillet from the frying steak, that’s great–it will make the gravy even more delicious.
  • Into the skillet, add about as much flour as there is grease. You can just eyeball it, it isn’t rocket science.
  • Stir the flour and grease together for about a minute. The flour will absorb the grease and thicken.
  • Slowly pour in milk, constantly stirring. Add the milk incrementally. Over the course of a few minutes, the gravy will smooth and thicken. Add milk until the gravy is the consistency you desire. Taste and season with additional salt and pepper if desired.
country fried steak

And that’s it. Pour the gravy over the steaks or serve on the side. And if you don’t want gravy, then skip the whole gravy part of this recipe entirely. Country fried steak, also called chicken fried steak, tastes great with or without gravy. And if you have leftovers, then cube steak is fantastic on a sandwich.

If you need a nice skillet, check current prices for a non-stick skillet on Amazon.

Give this country fried steak recipe a try and let me know what you think, and for another budget friendly southern favorite, try this Fried Chicken Livers Recipe.

fried chicken livers

Thanks for checking out our country fried steak recipe, and all of our recipes. Be sure and sign up for our mailing list and never miss a new Chef Buck cooking video, and also click a button below and share the dishes with your friends. We appreciate all the kind comments and support, and we’ll see you next time in the kitchen!

Thanks for watching our cooking videos!

We include affiliate links for products on our website, so if you make a purchase after clicking on our links, we may earn a commission which helps us produce more videos and drink more coffee :^)                                                                                                We participate in the Amazon Services LLC Associates Program, which is an affiliate advertising program providing a means for us to earn fees by linking to Amazon.com and affiliated sites, so we can make more videos.

Share and Enjoy !

Kung Pao Chicken Recipe Just Like Take-out!

Kung Pao Chicken

Kung Pao Chicken tastes great and cooks up super quick, so next time you feel like ordering Chinese take-out, try cooking this Chinese favorite at home instead.

Kung Pao Chicken Ingredients

1 lbs CHICKEN (boneless/skinless)
1 med-sized ZUCCHINI
1 stalk CELERY
½ RED BELL PEPPER
4-5 GREEN ONIONS
3-4 GARLIC minced
2 tsp GINGER minced
RED PEPPER FLAKES (to taste)
1 Tbsp SESAME OIL
1 Tbsp CORN STARCH
1 Tbsp SOY SAUCE
¾ cup PEANUTS
3 Tbsp OIL for skillet
Salt and Pepper (to taste)
Sauce Ingredients:
3 Tbsp SOY SAUCE
2 Tbsp RICE VINEGAR
2 tsp SESAME OIL
2 TBSP HOISIN SAUCE
(or sub brown sugar)
1 Tbsp CHILI PASTE
1 Tbsp CORN STARCH
½ cup WATER

Kung Pao Chicken
Serve Kung Pao Chicken with rice.

How to make Kung Pao Chicken

Cut 1 lb. of boneless, skinless chicken into ½”-1″ pieces and place in a bowl. Season meat with salt and pepper to taste, then add a splash of sesame oil, 1 Tbsp soy sauce, and 1 Tbsp cornstarch. Toss chicken with ingredients until the chicken pieces are coated, then set aside in the fridge.

In a small bowl, combine all of the ingredients listed above for the sauce. Stir until all ingredients are mixed well, and then set aside.

In a large skillet heat 3 Tbsp of oil on medium heat. You can check here for current pricing for a non-stick skillet on Amazon.

Add the coated chicken. Stir and allow the chicken to cook quickly. Brown all sides and cook until chicken is nearly done.

Add red pepper flakes (or fresh chopped hot peppers), minced garlic, and minced ginger, and stir for a few moments while the garlic colors.

Add chopped bottoms from green onions, diced red pepper (red or orange bell peppers look very nice with this dish), chopped celery, and diced zucchini. Stir with chicken for 2 minutes and then add sauce.

Keeping the skillet on med. high, the sauce will bubble and thicken quickly; stir 1-2 minutes and then add peanuts. Stir 1 more minute, then mix in green onion tops.

Remove from heat and serve over rice.
And that’s it–an Americanized version of a classic Chinese Kung Pao Chicken Recipe. Give this dish a try and let me know what you think…and bon appétit!

For another Chinese take-out style dish, try this General Tso’s Chicken Recipe.

general tso chicken

Thanks for Watching our Videos!

Thanks for checking out our kung pao chicken recipe. Sign up for our mailing list so you’ll never miss a new recipe. Also click a button below and share the dishes with your friends. You can also follow Chef Buck on Youtube. We appreciate all the kind comments and support, and we’ll see you next time in the kitchen!

If you like what CG and I do, support us on Patreon, or throw us a tip in our Paypal Tip Jar. We’ll happily enjoy a coffee on the road – Thanks! We appreciate all the support, and we’ll see you next time in the kitchen!

We include affiliate links for products on our website. Making a purchase after clicking on our links and we may earn a commission which helps us produce more videos and drink more coffee :^) We participate in the Amazon Services LLC Associates Program, which is an affiliate advertising program. It provides a means for us to earn fees by linking to Amazon.com and affiliated sites, so we can make more videos.

Share and Enjoy !

Stewed Prunes with Orange and Ginger

Stewed prunes are a tasty breakfast side or snack, and even a passable dessert. Orange and ginger make this stewed prune recipe naturally sweet and flavorful.

Ingredients for Stewing Prunes

2 cups pitted PRUNES
1 Tbsp ORANGE ZEST (minced)
juice from 1 large ORANGE
1-2 tsp minced fresh GINGER

stewed prunes

How to Make Stewed Prunes

Check current prices for prunes on Amazon.

  • Zest 1 large orange. Use approx. 1 tbsp of minced zest for this recipe.
  • Juice the orange.
  • In a small saucepan on medium heat, add the prunes and orange juice. Add just enough water to cover the tops of the prunes; don’t use too much water.
  • Stir in the orange zest and minced ginger. Some folks like to add a little brown sugar or maple syrup for added sweetness, but I don’t think it’s needed; prunes are sweet enough and the orange juice will add plenty of natural sugar.
  • Cover and allow the saucepan to come to a bubble. Reduce heat to low, and simmer gently for 25-30 minutes. The liquid will cook down and the prunes will plump up.

Eat them plain or serve stewed prunes with yogurt or cereals. They make a great breakfast side. Some people like to treat them like a dessert, even serving them with ice cream.

Stewed prunes make a tasty treat and are a great source of fiber and nutrition.
Prunes can be stewed up with all manner of flavors. Some popular additions to stewed prunes are cinnamon, cardamom, cloves, brown sugar, and maple syrup.
Pitted prunes make a great snack all on their own, and stewing them up makes them a little more versatile. Give this stewed prunes recipe a try and let me know what you think…and bon appétit!

stewed prunes

Prune Fun Facts

  • Prunes are high in fiber and a natural laxative.
  • The word “laxative” is not very appetizing.
  • Ounce for ounce, prunes contain more potassium than bananas.
  • Prunes are fat free.
  • Prunes can reverse bone loss and preserve bone structure, reducing the risk of brittle bone fracture.

Serve stewed prunes as a side for this healthy Tofu Breakfast Scramble.

tofu recipe
Delicious and Nutritious way to start the day

Thanks For Watching Our Recipe Videos!

Thanks for checking out this stewed prunes recipe, and all of our recipes. Sign up for our mailing list so you’ll never miss a new recipe. Also click a button below and share the dishes with your friends. You can also follow Chef Buck on Youtube. We appreciate all the kind comments and support, and we’ll see you next time in the kitchen!

If you like what CG and I do, support us on Patreon, or throw us a tip in our Paypal Tip Jar. We’ll happily enjoy a coffee on the road – Thanks! We appreciate all the support, and we’ll see you next time in the kitchen!

We include affiliate links for products on our website. Making a purchase after clicking on our links and we may earn a commission which helps us produce more videos and drink more coffee :^) We participate in the Amazon Services LLC Associates Program, which is an affiliate advertising program. It provides a means for us to earn fees by linking to Amazon.com and affiliated sites, so we can make more videos.

Share and Enjoy !

Chicken Curry Recipe a classic Indian dish

chicken curry

Chicken curry is delicious and easy to make. I throw a little yogurt in for a tad creaminess, but that’s optional, and it’ll be tasty either way. Chicken Curry is one of the most popular dishes in the world, and for good reason.

Chicken Curry Ingredients

2 lbs CHICKEN (boneless/skinned)
2 Tbsp OLIVE OIL
1 tsp BUTTER
1 lg ONION (chopped)
4-5 cloves GARLIC (finely chopped)
1 HOT PEPPER (finely chopped)
1 tsp TURMERIC
1 tsp CHILI POWDER
1 Tbsp CORIANDER
1 Tbsp CUMIN (plus seasoning for chicken)
1 Tbsp GARAM MASALA
1 28oz can CRUSHED TOMATO
¼ cup YOGURT
½ cup CILANTRO (chopped)
SALT and PEPPER to taste
(plus a little SALT, CORIANDER, CUMIN, and CHILI POWDER to season the chicken before cooking)
Check out current prices for Indian Spices on Amazon.

How to make Chicken Curry

Use 2 lbs of skinless, boneless chicken. You can use dark or light meat as you prefer. For this recipe, I like to cut the meat into approx. 1″ pieces and then season generously with salt, cumin, coriander, and chili powder.

Heat oil in a skillet on med. high heat and add seasoned chicken pieces. Sear chicken 5-7 minutes, turning once, and then remove chicken to a plate. Pour off excess fluid in the skillet and add butter. Add finely chopped garlic and hot pepper. Saute for 30 seconds and then add onion. Continue cooking for a couple of minutes.

Indian-style chicken curry recipe
Indian-style Chicken Curry

When onions begin to soften, add turmeric, chili powder, coriander, and cumin. Mix well and continue cooking 2 minutes. Stir in crushed tomato. Add salt and a little water, if needed (but not too much water at one time–you don’t want the dish to be too wet). Allow the sauce to come to a bubble, reduce the heat, cover and let simmer for 10 minutes.

After 10 minutes, return chicken to the skillet. Mix in Garam Masala, which is a blend of flavors (clove, cinnamon, cardamom, cumin, etc.). You can also spoon in a little plain yogurt, if you like–if I have some yogurt on hand I add it, and if I don’t, I don’t–it’s tasty either way (but yogurt adds a nice touch of creaminess). Add Fresh chopped cilantro and stir well.
And that’s it.

Serve the curry over rice with a little flat bread and you’ve got a delicious Indian-style entree. Give this chicken curry recipe a try and let me know what you think…and bon appétit!

For another super tasty chicken dinner, try this Asian inspired General Tso’s Chicken recipe.

general tso chicken

Thanks for Watching our Chicken Curry Recipe

Sign up for our mailing list so you’ll never miss a new recipe. Also click a button below and share the dishes with your friends. You can also follow Chef Buck on Youtube. We appreciate all the kind comments and support, and we’ll see you next time in the kitchen!

If you like what CG and I do, support us on Patreon, or throw us a tip in our Paypal Tip Jar. We’ll happily enjoy a coffee on the road – Thanks! We appreciate all the support, and we’ll see you next time in the kitchen!

We include affiliate links for products on our website. Making a purchase after clicking on our links and we may earn a commission which helps us produce more videos and drink more coffee :^) We participate in the Amazon Services LLC Associates Program, which is an affiliate advertising program. It provides a means for us to earn fees by linking to Amazon.com and affiliated sites, so we can make more videos.

Share and Enjoy !

Blackberry Cobbler Recipe with an Oatmeal Twist

blackberry cobbler

You can make this blackberry cobbler recipe using any kind of berries or fruit. CG loves to use oatmeal when she can, which pairs well with the flour to make the batter for this dessert.

What you need for a Blackberry Cobbler Recipe

2 cups BERRIES (any kind)
1 Tbsp CORN STARCH
1 cup QUICK OATS
½ cup ALL-PURPOSE FLOUR
1½ tsp BAKING POWDER
1 tsp CINNAMON (optional)
½ cup SUGAR (use partial brown sugar if desired)
¼ cup BUTTER
1 lg EGG
½ tsp VANILLA EXTRACT
¼ cup MILK

How to make Blackberry Cobbler

Use any berries you like for this cobbler dessert–it’s a cobbler, but with a little twist on the batter–we’re pairing Quick-cook Oatmeal along with the flour. This recipe doesn’t make a huge amount, but it’s perfect for about 4 human-sized portions–just double the recipe for a bigger dessert. We’re using blackberries because we’ve got fresh ones.

To start, put your berries in a bowl and add 2-4 Tbsp of sugar–if desired–if your berries are already sweet enough, don’t bother with the added sugar. Add corn starch and toss with the berries and set aside.

In a second bowl, combine your Quick Oats, all-purpose flour, baking powder, and sugar. Mix Thoroughly, then cut butter into the mix. Stir until the butter is integrated into the mix, then add 1 beaten egg, vanilla extract, and milk. We’re using almond milk, but use whatever kind of milk you like. Stir ingredients together.

Grease an 8×8 oven friendly dish. We’re using an 8″ deep dish pie tin with a little butter spray; check prices for Pie Plates on Amazon. Spread the berry mixture evenly on the bottom of the dish, and then top the berries with spoonfuls of the batter. Don’t worry about spreading the batter neatly, spoon it evenly around the top and it will spread evenly in the oven.

Place the dish in an oven pre-heated to 350 degrees F and let bake for about 30 minutes until the topping is a golden brown. If your cooking dish is particularly small, place it on a baking sheet or tinfoil to catch any drippings.

Let the cobbler cool for 10-15 minutes and then serve with ice cream (or without ice cream, but that would be crazy).

creme fraiche
homemade fruit cobbler

For another great dessert, try this delicious but deadly but delicious Scone Recipe.

maple pecan scones

Thanks For Watching Our Cobbler Recipe!

Thanks for checking out our scones, and all of our recipes. Be sure and sign up for our mailing list so you’ll never miss a new recipe. Also click a button below and share the dishes with your friends. You can also follow Chef Buck on Youtube. We appreciate all the kind comments and support, and we’ll see you next time in the kitchen!

If you like what CG and I do, you can also support us on Patreon, or throw us a tip in our Paypal Tip Jar. We’ll happily enjoy a coffee on the road – Thanks! We appreciate all the support, and we’ll see you next time in the kitchen!

We include affiliate links for products on our website. So, if you make a purchase after clicking on our links, we may earn a commission which helps us produce more videos and drink more coffee :^) We participate in the Amazon Services LLC Associates Program, which is an affiliate advertising program. It provides a means for us to earn fees by linking to Amazon.com and affiliated sites, so we can make more videos.

Share and Enjoy !

Green Bean Recipe for people who hate green beans

This green bean recipe reminds me of the green beans we sometimes get out at Chinese restaurants; I’m not a fan of green beans, but if I gotta eat them, I like them like this or in a green bean casserole.  This dish is pretty simple to make and has a lot of nice nutritional stuff in it–you can forego the butter if you want and just use oil–but you’re already eating green beans, so isn’t that punishment enough?

Green Bean Recipe ingredients

1 lb. GREEN BEANS
½ large ONION (sliced)
2 Tbsp GARLIC (finely chopped)
1 Tbsp GINGER (finely chopped)
CHILI PEPPERS to taste (finely chopped)
1 Tbsp BUTTER
1 Tbsp OLIVE OIL
2-3 Tbsp SOY SAUCE
½ tsp SESAME OIL …current sesame oil prices on Amazon
SALT and PEPPER to taste
garnish w/ toasted SESAME SEEDS

chinese green bean recipe
green beans

Green Bean Recipe Directions

I’m not a fan of green beans, but this recipe is a quick way to make them edible.
First, trim the green beans by “snapping” off the ends–fresh beans will snap easily, and if there is a fiborous, stringy seam along the bean, this can be pulled off as well.

Bring a pot of lightly salted water to a boil and add the green beans. Allow to cook 2-3 minutes, the longer the beans are in the water, the softer they will get, but why overcook them? They’re already awful green beans, so you might as well get some nutrition out of them.

Remove the beans from the hot water and place in an ice bath for 1 minute. This is called blanching–it stops the cooking process, keeps the beans crisp and maintains the bright, green color of the beans. After a minute, drain the beans.

While the beans drain, heat olive oil and butter in a skillet. Add sliced onion, garlic, ginger, and chili peppers and saute for 2 minutes. Add drained green beans and continue cooking another 2 minutes. To finish, add soy sauce and sesame oil and mix well, then remove skillet from the heat. Check here for current pricing for a non-stick skillet on Amazon.

That’s it! Serve them hot and garnish the dish with toasted sesame seeds for optimal flavor potential.
Enjoy.

For another nightmare ingredient from childhood, revisit a new and tasty way to eat raw The Horror That Is Broccoli!

raw broccoli
Raw broccoli is high in vitamins and nutrients and is great for digestive health.

Thanks for checking out our green bean recipe, and all of our recipes. Be sure and sign up for our mailing list and never miss a new Chef Buck cooking video, and also click a button below and share the dishes with your friends. We appreciate the kind comments and support, and we’ll see you next time in the kitchen!
–Chef Buck

Thanks for watching our recipe videos!

We include affiliate links for products on our website, so if you make a purchase after clicking on our links, we may earn a commission which helps us produce more videos and drink more coffee :^) We participate in the Amazon Services LLC Associates Program, which is an affiliate advertising program providing a means for us to earn fees by linking to Amazon.com and affiliated sites, so we can make more videos.

Share and Enjoy !

Nachos Recipe like Restaurant Nachos Supreme

best nachos recipe

Try this great Nachos Supreme Recipe. It’s a super grande-sized platter of nacho heaven.
We use ground beef for this nachos recipe, but if you skip the meat and just use beans–it’ll still be pretty damn tasty. The key to great nachos recipe is a great nacho filling, so spice up your bean and beef mixture just right and build your nacho castle on a tasty foundation.

What You Need to Make The Best Nachos Grande

1 lb. GROUND BEEF
1 ONION chopped
15oz can KIDNEY BEANS
16oz can LOW FAT REFRIED BEANS
CORN TORTILLA CHIPS (thick)
2 ROMA TOMATOES diced
½ cup JALAPENOS sliced and pickled
¼ cup BLACK OLIVES sliced
8-10oz CHEESE (shredded)
2-3 GREEN ONIONS chopped
¼ cup CILANTRO chopped
1 Tbsp BROWN SUGAR
1-2 Tbsp CUMIN
2-3 Tbsp CHILI POWDER
SALT and PEPPER to taste
serve with sour cream, salsa, guacamole

How to make this Nachos Recipe

  • In a large skillet on medium heat, add ground beef and begin browning meat.
  • Add chopped onion and continue browning.
  • Add some salt, cumin, chili powder, and black pepper to begin seasoning as the ground beef browns.
  • Once the meat is browned, drain the excess grease.
  • Add the kidney and refried beans and stir into the ground beef.
  • Add ¼ can water. Stir ingredients until well mixed.
  • Add brown sugar and more cumin and chili powder. Stir and simmer 5 minutes.
  • On a baking sheet spread out corn tortilla chips; thicker, sturdier chips work best. If you don’t have a larger baking sheet, then buy a giant pizza pan like this one on amazon or look at a local thrift store–that’s where we found our huge pizza pan.
  • Spoon and sprinkle the ground beef mixture over the chips.
  • Top nachos with diced tomato, sliced jalapenos, black olives, and the chopped bottoms of the green onions.
  • Sprinkle the top with cheese.
  • Slide the baking sheet into the oven (pre-heated at 400 degrees F) and let cook approx. 15 minutes
    or until the cheese is melted and the nachos heated through.
  • Remove from the oven and top with chopped green onion tops and cilantro.
  • Serve with sour cream, salsa, or guacamole and eat ’em while they’re hot.

World’s Best Nachos Recipe?

best nachos recipe
This is a fantastic Nachos Supreme dish, and a giant pizza pan makes a great dish for cooking and serving.

For another meaty meal, check out these Crispy Oven-baked Chicken Wings.

wings recipe
Oven baked wings are healthier than deep fried, and less messy to make!

Thanks for Watching our Nachos Recipe Video!

Click a button below and share the dishes with your friends. You can also follow Chef Buck on Youtube. We appreciate all the kind comments and support, and we’ll see you next time in the kitchen!

If you like what CG and I do, support us on Patreon, or throw us a tip in our Paypal Tip Jar. We’ll happily enjoy a coffee on the road – Thanks! We appreciate all the support, and we’ll see you next time in the kitchen!

We include affiliate links for products on our website. Making a purchase after clicking on our links and we may earn a commission which helps us produce more videos and drink more coffee :^) We participate in the Amazon Services LLC Associates Program, which is an affiliate advertising program. It provides a means for us to earn fees by linking to Amazon.com and affiliated sites, so we can make more videos.

Share and Enjoy !

Coleslaw Recipe with a Curry Twist

coleslaw

Chickpea curry and coleslaw are two of my favorite foods, so combining them is a win-win. This dish makes a perfect side for a spicy meal or a fancy-pants hamburger, so give chickpea curry coleslaw a go and let me know what you think.

Curry Coleslaw Dressing Ingredients

1 tsp CORIANDER
½ tsp TURMERIC
½ tsp CUMIN
2 Tbsp SUGAR
1 tsp GINGER (minced)
1 tsp GARLIC (minced)
2 Tbsp VINEGAR (or substitute fresh lemon juice and zest–very tasty!)
¼ cup SOUR CREAM (or substitute plain yogurt)
¼ cup MAYONNAISE

Slaw:
14 oz can CHICKPEAS
½ small CABBAGE (shredded)
2 medium CARROTS (shredded)
½ cup CILANTRO (chopped)
SALT and PEPPER to taste

chickpea curry coleslaw

How to Make Coleslaw

In a small bowl, combine ingredients for dressing and whisk together until smooth. Be sure the ginger and garlic are minced well. I’ve sometimes substituted lemon juice for the vinegar and it tastes great; if using fresh lemon, also throw in a little (or a lot) of the zest.

In a larger bowl, combine cabbage, carrots, and a 14oz can of chickpeas (rinsed and drained). Add dressing and mix well. Add salt and pepper to taste (a dash of cayenne will add a little bite). Add cilantro.

Try this curry twist on a classic coleslaw, you’re going to love it.

For an Asian twist on slaw. try this Crunchy Ramen Noodle Slaw Recipe.

crunchy slaw
Crunchy coleslaw or noodle salad? What sounds tastier?

We Hope You like the Curry Coleslaw

Sign up for our mailing list so you’ll never miss a new recipe. Also click a button below and share the dishes with your friends. You can also follow Chef Buck on Youtube. We appreciate all the kind comments and support, and we’ll see you next time in the kitchen!

If you like what CG and I do, support us on Patreon, or throw us a tip in our Paypal Tip Jar. We’ll happily enjoy a coffee on the road – Thanks! We appreciate all the support, and we’ll see you next time in the kitchen!

We include affiliate links for products on our website. Making a purchase after clicking on our links and we may earn a commission which helps us produce more videos and drink more coffee :^) We participate in the Amazon Services LLC Associates Program, which is an affiliate advertising program. It provides a means for us to earn fees by linking to Amazon.com and affiliated sites, so we can make more videos.

Share and Enjoy !

Share and Enjoy !

Bánh Mì Hamburger – Best Burger in the World?

banh mi hamburger

What makes a bánh mì taste like a bánh mì? The toppings! This bánh mì hamburger is a fusion of Thai and American styles to create a truly awesome burger experience–one of the best hamburgers I’ve ever eaten!

I whipped up a couple versions of this delicious French/Vietnamese sandwich using ground beef and cha lua (Vietnamese ham). It was fantastic–this combo of ingredients is soooo addictive. Use fresh toppings, and don’t be shy about piling them on. Give it a go and let me know what you think.

Stuff for a Bánh Mì Hamburger

1 lb. ground BEEF …or whatever meat you like
hamburger BUN
DAIKON (shredded)
CARROTS (shredded)
salad CUCUMBER (sliced)
fresh CILANTRO
1/4 cup ONION (minced)
JALAPENO (sliced)
1 cup VINEGAR
1/2 cup WATER
1/3 cup SUGAR
2 Tbsp SOY SAUCE
MAYONNAISE
SALT and PEPPER to taste

banh mi hamburger
Best Burger Bánh Mì

Make a Bánh Mi Burger

First things first, throw together a daikon/carrot pickle. This is a great combo that you can use on all kinds of sandwiches and salads.

Heat a small sauce pan on low heat and add vinegar, water, and sugar. Stir until sugar dissolves, then set aside to chill in the fridge. Cut or shred equal parts carrot and daikon into strings. Place veggies in container and cover with chilled pickling solution. The longer the daikon and carrot pickle, the more flavorful it will be. This pickle will last for a couple of weeks in the fridge.

Cut any variety of salad cucumber into thin, sandwich slices. A salad cucumber has a thin skin that is quite edible with little to no seeds. Thinly slice a jalapeno–or thickly slice–if that’s your thing…be sure to add a few pepper seeds for heat, the cool of the cucumber will balance it out. Wash a bunch af fresh cilantro–a fistful on each burger is a good idea.

Mix 1 lb. of ground beef with minced onion, garlic powder, salt and pepper to taste, and 2-3 Tbsp of soy sauce. Shape into patties and cook in a skillet on med-high heat. I like to use a fatty grind of beef, not too fatty, but not too lean. A juicy burger is best and expensive, lean ground beef will cook up too dry, so don’t be afraid of the “cheap meat” it’s your hamburger’s friend. Cook burgers to doneness desired. Try turning the patties one time only, and don’t punish the patties with the spatula, squeezing away all the juicy goodness into the pan!

Pile everything on a burger bun with creamy mayonnaise and enjoy the bánh mì goodness.

I made bánh mì burgers using ground beef and also thick cuts of cha lua, or Vietnamese ham and both were awesome. I love salmon patties and often eat them on a bun. Next time I think I’ll try a bánh mì variation of a salmon patty burger. Try making your favorite sandwich using traditional bánh mì fixings and see how you like it, I bet you’ll be happy.

Take a look inside a traditional Bánh Mì Sandwich.
bahn mi

For another Banh mi inspired dish, try this healthy Quinoa Salad Recipe – Vietnamese Bánh Mì Style.

Quinoa Salad -- Banh Mi Style
Quinoa Salad — Banh Mi Style

I Hope You Like The Bánh Mì Hamburger

Sign up for our mailing list so you’ll never miss a new recipe. Also click a button below and share the dishes with your friends. You can also follow Chef Buck on Youtube. We appreciate all the kind comments and support, and we’ll see you next time in the kitchen!

If you like what CG and I do, support us on Patreon, or throw us a tip in our Paypal Tip Jar. We’ll happily enjoy a coffee on the road – Thanks! We appreciate all the support, and we’ll see you next time in the kitchen!

We include affiliate links for products on our website. Making a purchase after clicking on our links and we may earn a commission which helps us produce more videos and drink more coffee :^) We participate in the Amazon Services LLC Associates Program, which is an affiliate advertising program. It provides a means for us to earn fees by linking to Amazon.com and affiliated sites, so we can make more videos.

Share and Enjoy !

Wow! Healthy French Fries Recipe in the Oven

roasted vegetable fries

You can make French Fries without the guilt of eating French fries! Try this roasted vegetable fries recipe. It’s a super simple recipe that will maximize taste and nutrition.

Sweet potatoes, parsnips, and carrots make delicious fries, especially with a little mustard and maple syrup thrown into the mix. You’ll need a baking pan for this recipe, and you can check out current prices for baking pans on Amazon.

Roasted French Fries Ingredients:

4 Tbsp OLIVE OIL (extra virgin)
3 Tbsp MAPLE SYRUP
3 Tbsp DIJON MUSTARD
SALT and PEPPER to taste

2 med-sized SWEET POTATOES (steak fry-sized pieces)
4 PARSNIPS (peeled, steak fry-sized pieces)
4 CARROTS (steak fry-sized pieces)
1 ONION (sliced)
GARLIC cloves (sliced in halves or whole)
fresh ROSEMARY
french fries

How to Make Roasted French Fries:

  • Preheat the oven to 425 degrees Fahrenheit.
  • When slicing the root veggies, leave on the skins if desired; it will add excellent taste and nutritional value and is less wasteful.
  • Place the sliced veggies in bowl large enough to mix.
  • In a smaller bowl, mix together the syrup, mustard, oil, salt and pepper.
  • Toss the chopped veggies with the syrup mixture, coating the fries well.
  • Spread the fries out in a single layer onto a baking pan, or use two pans if necessary. Make sure the veggies are not piled up or jammed together.
  • Allow the veggies to roast, turning occasionally, until brown and cooked through, about 25 minutes, but it will depend on volume and size of veggies.  The longer you cook the fries, the crispier they will become.


These fries make a great side for chicken, beef, and pork entrees, or it’s a terrific way to transform a vegetarian meal into a hardy feast.
Give this roasted vegetable French fries recipe a try and let me know what you think, and bon appetit!

And for another tasty veggie side, try this Easy Okra Recipe.
french fries

Thanks for Watching our French Fries Recipe Video!

Click a button below and share the dishes with your friends. You can also follow Chef Buck on Youtube. We appreciate all the kind comments and support, and we’ll see you next time in the kitchen!

If you like what CG and I do, support us on Patreon, or throw us a tip in our Paypal Tip Jar. We’ll happily enjoy a coffee on the road – Thanks! We appreciate all the support, and we’ll see you next time in the kitchen!

We include affiliate links for products on our website. Making a purchase after clicking on our links and we may earn a commission which helps us produce more videos and drink more coffee :^) We participate in the Amazon Services LLC Associates Program, which is an affiliate advertising program. It provides a means for us to earn fees by linking to Amazon.com and affiliated sites, so we can make more videos.

Share and Enjoy !

Chard Recipe with Sweet Potato

chard

Fresh rainbow or swiss chard greens are similar to beet greens, nutritious and very tasty prepared in this healthy chard recipe. Sweet potatoes are high in fiber and antioxidants and a healthier choice for your blood sugar levels than white potatoes.

Healthy Sweet Potato Chard Recipe:

2 large SWEET POTATOES
1 15 oz can CHICKPEAS, drained (or 1½ cups cooked)
4 cups CHARD (w/ spinach mixed, if desired)
1 15 oz can BROTH
1 15 oz can DICED TOMATOES
1 large ONION (chopped)
6 GARLIC cloves (chopped fine)
1 inch fresh GINGER (minced)
2 Tbsp OLIVE OIL
1 tsp PAPRIKA
1 tsp ground CUMIN
1 Tbsp ground CORIANDER
1 tsp ground TURMERIC
1/2 tsp ground CINNAMON
1/2 tsp SALT
1 tsp ground BLACK PEPPER
— Optional Accompaniments —
COUSCOUS, QUINOA
garnish of CUCUMBER, fresh CILANTRO and LEMON ZEST

chard with sweet potato
Chard and sweet potato make an excellent vegetarian meal.

How to make a Healthy Chard and Sweet Potato Dish

Heat olive oil in a large skillet or pot. Saute the onion for a few minutes minutes then add garlic, ginger, and stalk (if using chard), and saute a few minutes more until onions soften.
Stir in paprika, cumin, coriander, turmeric, cinnamon, salt, and black pepper.
Add diced tomatoes and broth.
Bring to a boil, then add sweet potato and chickpeas. Simmer 25 to 30 minutes, until the potatoes are tender. Stir in roughly chopped chard leaves for last 10 minutes (if using spinach, add leaves last 2 minutes).
Serve over couscous, quinoa, or all on its lonesome with a garnish of cucumber, chopped cilantro, and lemon zest.
It’s especially good over quinoa, and the protein in the quinoa makes this recipe a great main dish for a vegetarian meal.

Check the current price for a Saute Pan on amazon.

chard
Fresh Rainbow Chard is a beautiful, healthy, leafy green.

Health benefits Of Chard

  • Chard is a source of vitamin C, A, and K, potassium, magnesium, fiber and iron.
  • A single serving contains more than 300% of your daily vitamin K needs.
  • Swiss chard is high in antioxidants.
  • It is low in calories.
  • This leafy green belongs to the same family as beets, chard, spinach, and quinoa.
  • helps regulate the blood sugar levels in our body.

And if you want to try another green, what about Beet Greens?

beet greens recipe
Buy beet roots with the greens for two great ingredients.

Thanks for Watching our Chard Recipe Video!

Click a button below and share the dishes with your friends. You can also follow Chef Buck on Youtube. We appreciate all the kind comments and support, and we’ll see you next time in the kitchen!

If you like what CG and I do, support us on Patreon, or throw us a tip in our Paypal Tip Jar. We’ll happily enjoy a coffee on the road – Thanks! We appreciate all the support, and we’ll see you next time in the kitchen!

We include affiliate links for products on our website. Making a purchase after clicking on our links and we may earn a commission which helps us produce more videos and drink more coffee :^) We participate in the Amazon Services LLC Associates Program, which is an affiliate advertising program. It provides a means for us to earn fees by linking to Amazon.com and affiliated sites, so we can make more videos.

Share and Enjoy !

Pork Loin Chop Recipe Perfect Every Time

pork loin chop

Cook a delicious, juicy pork loin chop recipe perfect every time.

Use a lot of onion and garlic – especially garlic – those two ingredients are actually good for you, so why not use a lot? Also, this dish goes well with whatever beer is on sale.

Pork Loin Chop Recipe Ingredients

PORK LOIN CHOP
2 Tbsp OLIVE OIL
1 lg ONION (sliced)
6-8 cloves GARLIC (rough chopped)
fresh ROSEMARY
SALT and PEPPER, to taste

How to Cook a Pork Loin Chop

Season both sides of pork loin chop before cooking–and don’t be timid with the seasoning–it’ll make all the difference! I often use just salt and pepper (black pepper AND cayenne), but experiment with your favorite seasonings, too–every now and then I’ll season up pork chops with ground ginger and saute them with onion and sliced, fresh ginger–it’s so good!

Heat oil in a skillet. Not smoking hot, but pretty damn hot–we want to sear the pork and seal in the flavor. The skillet should be suitable for cooking on the stove top and in the oven. Check current price for a Cast Iron Skillet on Amazon. Place chops in the skillet, and they should sizzle when they hit the pan.

Add fresh rosemary sprigs. Cook chops 3-4 minutes on one side and then turn. This is for chops approx. 1″ thick–adjust cooking times according to the size of the chop you use. Move chops in pan to mix with oil and rosemary.

Add sliced onion and garlic. Cook chop 3-4 minutes on second side, then remove skillet from stove top and slide skillet into oven preheated to 350 degrees F. Cook another 4-5 minutes and return to stove top. Remove chops from skillet and set aside to rest.

Continue cooking onion and garlic with rosemary on medium/low heat to desired doneness.
Top chops with onion and garlic and serve.

And if you’re still in a carnivorous mood, here’s a method to Cook Up A Steak like a restaurant pro.

american kobe top sirloin steak
Cook a thick steak filet on high heat. Sear the outside for awesome taste and color, and then finish to desired doneness in the oven.

Thanks for checking out our pork loin chop recipe, and all of our recipes. Be sure and sign up for our mailing list and never miss a new Chef Buck cooking video, and also click a button below and share the dishes with your friends. We appreciate the kind comments and support, and we’ll see you next time in the kitchen!

Thanks for Watching our Pork Loin Chop Recipe

Click a button below and share the dish with your friends. You can also follow Chef Buck on Youtube. We appreciate all the kind comments and support, and we’ll see you next time in the kitchen!

If you like what CG and I do, support us on Patreon, or throw us a tip in our Paypal Tip Jar. We’ll happily enjoy a coffee on the road – Thanks! We appreciate all the support, and we’ll see you next time in the kitchen!

We include affiliate links for products on our website. Making a purchase after clicking on our links and we may earn a commission which helps us produce more videos and drink more coffee :^) We participate in the Amazon Services LLC Associates Program, which is an affiliate advertising program. It provides a means for us to earn fees by linking to Amazon.com and affiliated sites, so we can make more videos.

Share and Enjoy !

BBQ Beans Recipe – Tangy and Tasty Barbecue Flavor

bbq beans

A BBQ Bean Recipe with a spicy kick. This recipe is tangy and delicious and using a variety of beans gives this dish the illusion of grandeur, but it’s just beans, yummy tasty beans.

What You Need for BBQ Beans Recipe

4 15oz cans BEANS
1 large ONION (coarsely chopped)
1 GREEN PEPPER (coarsely chopped)
4 cloves of GARLIC (chopped)
1/3 cup light BROWN SUGAR
28oz can CRUSHED TOMATOES
14oz can BROTH
1/3 cup APPLE CIDER VINEGAR
1 Tbsp fresh ROSEMARY (minced)
1 tsp WORCESTERSHIRE SAUCE
1/2 tsp RED PEPPER FLAKES
1 1/2 tsp dried THYME
1/4 cup stone ground MUSTARD
1 Tbsp SOY SAUCE
1 BAY LEAF
3 Tbsp OLIVE OIL
SALT & PEPPER, to taste

How To Make Easy BBQ Beans

Heat olive oil in large skillet over medium high heat. Add onion, green pepper and sauté about 2 minutes. Add garlic and continue sautéing on med heat until begins to brown (3-5 more minutes).
Add rosemary, thyme and red pepper flakes and stir 1 minute.
Add tomatoes, prepared mustard, brown sugar, soy sauce, worcestershire sauce, stock, vinegar. Mix well. Bring to a bubble.
Stir in beans, bay leaf. Season with salt and pepper. Reduce heat and simmer on low for 60 minutes, stirring as needed.
Serve as a side–or a main dish–if you want your main dish to be beans.
And that’s it. Give this BBQ Beans recipe a try and let me know what you think, and bon appetit!

Wanna try another bean recipe? This Vegetarian Chili recipe is awesome!
vegetarian chili

Beans

-6 to 11 percent of a cooked bean’s weight is protein.
-Beans are one of the best things to eat for improving the stability of blood sugar levels in diabetics.
-Beans are low fat, contain no cholesterol or saturated fat, and are an excellent source of fiber, protein, calcium, iron,
folic acid and potassium.
-North Dakota produces more beans than any other state in the USA.

Thanks for Watching our BBQ Bean Recipe Video!

Click a button below and share the dishes with your friends. You can also follow Chef Buck on Youtube. We appreciate all the kind comments and support, and we’ll see you next time in the kitchen!

If you like what CG and I do, support us on Patreon, or throw us a tip in our Paypal Tip Jar. We’ll happily enjoy a coffee on the road – Thanks! We appreciate all the support, and we’ll see you next time in the kitchen!

We include affiliate links for products on our website. Making a purchase after clicking on our links and we may earn a commission which helps us produce more videos and drink more coffee :^) We participate in the Amazon Services LLC Associates Program, which is an affiliate advertising program. It provides a means for us to earn fees by linking to Amazon.com and affiliated sites, so we can make more videos.

Share and Enjoy !

Best Caramel Oatmeal Squares Recipe

oatmeal squares

Caramel Oatmeal Squares make great dessert treats – or bribes, if you need to motivate someone.

What you need to make Oatmeal Squares

Bars:
1 3/4 cup OATS
1 1/2 cup FLOUR
3/4 cup BROWN SUGAR
1/2 tsp BAKING SODA
1/4 tsp SALT (optional)
3/4 cup BUTTER (melted)
1 tsp VANILLA EXTRACT
1 cup PEANUTS
1 cup CHOCOLATE CHIPS

Caramel Sauce*:
3/4 cup BUTTER
1 1/2 cups BROWN SUGAR (firmly packed)
2 Tbsp WATER
1/4 tsp SALT
3/4 cup EVAPORATED MILK
1 Tbsp VANILLA EXTRACT
1/4 cup FLOUR (added after caramel has cooled)

*In a hurry? Instead of making caramel sauce, you use a 12 oz jar of caramel ice cream topping.

How to make Caramel Oatmeal Squares

Preheat oven to 350 degrees F.

Make the caramel sauce:

  • Combine butter, brown sugar, water, and salt in a medium sauce pan, over medium heat, stirring constantly.
  • Bring to boil and continue to stir for 5 minutes depending upon thickness desired. The longer it boils, the thicker your caramel sauce will eventually be. If you don’t stir the pot while the caramel is cooking, it will be a disaster, not as bad as knocking over the cake at a wedding, but the caramel will burn, which will kinda suck.
  • After 5 minutes, remove sauce from the heat and stir in evaporated milk and vanilla. Set aside to allow caramel to cool and thicken.

Grease a 9 x 13 baking pan. If you need a decent oven-safe baking dish, check out some current pricing for a Pyrex dish on Amazon.

  • In a bowl, mix oats, flour, brown sugar, baking powder, vanilla extract, and salt.
  • Stir in butter until well blended.
  • Reserve one cup of mixture to use as a topping later.
  • Press remaining mixture into bottom of greased pan.
  • Bake 10-12 minutes until light brown. Let cool 10 minutes.
  • Top with peanuts and chocolate pieces.
    Take your caramel sauce and stir in 1/4 cup flour until smooth. Drizzle sauce over nuts and chocolate, keeping the sauce 1/4 inch away from pan edges (to avoid having a cooked caramel mess on your pan).
  • Sprinkle top with the reserved cup of oat mixture.
  • Bake an additional 18-22 minutes or until golden brown.
  • Let cool. Then cut into squares.

*In a hurry? Instead of making caramel sauce, you use a 12 oz jar of caramel ice cream topping. To help it pour, heat it just a little before adding the extra flour.

Enjoy! Chocolate, peanuts, caramel…what’s not to enjoy? Give this oatmeal squares recipe a try and let me know what you think.

For another tasty dessert bar recipe, try an almost No-Bake Marshmallow Bar Recipe. It’s super easy.

marshmallow bars

Thanks for Watching our Oatmeal Squares Video!

Click a button below and share the dishes with your friends. You can also follow Chef Buck on Youtube. We appreciate all the kind comments and support, and we’ll see you next time in the kitchen!

If you like what CG and I do, support us on Patreon, or throw us a tip in our Paypal Tip Jar. We’ll happily enjoy a coffee on the road – Thanks! We appreciate all the support, and we’ll see you next time in the kitchen!

We include affiliate links for products on our website. Making a purchase after clicking on our links and we may earn a commission which helps us produce more videos and drink more coffee :^) We participate in the Amazon Services LLC Associates Program, which is an affiliate advertising program. It provides a means for us to earn fees by linking to Amazon.com and affiliated sites, so we can make more videos.

Share and Enjoy !

Best General Tso’s Chicken Recipe

general tsos chicken

General Tso’s Chicken is a delicious dish you’ll find at most Chinese restaurants–and you can make the very same dish in your own kitchen at home.

The chicken in this recipe is baked instead of deep fried, which is a little healthier and a lot less messier, if you’re into that kinda thing. Give this recipe a try and let me know what you think.

Ingredients for General Tsos Chicken

3 cups crushed CORN FLAKES (or panko crumbs)
1 1/2 lbs boneless, skinless CHICKEN
1/2 cup ALL-PURPOSE FLOUR
2 EGGS, whisked
2 tsp SESAME OIL
5-6 GARLIC cloves (minced)
1 Tbsp GINGER (minced)
1/4 tsp RED PEPPER FLAKES
1/3 cup SOY SAUCE
1/4 cup APRICOT JAM
3 Tbsp HOISIN SAUCE (check current price for hoisin sauce on Amazon)
2 Tbsp CORNSTARCH
1 Tbsp BALSAMIC VINEGAR
1 2/3 cups WATER
SESAME SEEDS and GREEN ONION for garnish

How to make General Tso’s Chicken

Toast sesame seeds (make extra, ’cause they’re a great addition to all kinds of dishes).
You’ll need about 1 1/2 pounds of chicken cut into roughly 1″ pieces–dark or white, whichever you prefer. We’re gonna bread and bake the chicken ’cause it’s healthier and less messy than frying.

Set up a breading station:
In a bowl, season 1 cup of flour with salt and pepper.
In another bowl, whip 2 eggs.
And in a third bowl set out your breading–use panko flakes or crushed cereal.
Coat each piece of chicken in flour, then egg, and then roll and coat with bread crumbs
and arrange on a greased baking sheet.

When all the chicken is breaded and arranged on the pan, coat the top lightly with an oil spray. Slide the chicken into an oven heated at 400 degrees F and allow to bake 20 minutes. When the chicken is golden and crispy, remove from oven and set aside.

general tso chicken

In a bowl, combine soy sauce, hoisin sauce, vinegar, cornstarch and water. Mix well.

Heat sesame oil in a skillet on medium high heat. Add pepper flakes, garlic and ginger. Saute for 2 minutes and then add sauce. Constantly stirring, allow the sauce to come to a simmer. When the sauce begins to bubble, continue stirring a few minutes until the sauce thickens into a syrupy consistency–this will happen quite quickly.

Add the chicken and stir, tossing the chicken until it is well coated with sauce.
Transfer chicken and sauce to a serving dish and garnish with toasted sesame seeds and chopped green onion. Serve with rice or noodles.

If you’re just getting into home cooking, you can check out current pricing for a Complete Starter Spice Set on Amazon.

For another Asian inspired chicken dish, try a Japanese style Teriyaki Chicken recipe.

chicken teriyaki recipe
teriyaki chicken recipe

Thanks for watching. Give this General Tso’s Chicken recipe a try and let me know what you think, if you like it, click a button and share it with your friends.

Thanks for Watching our Chinese Chicken Recipe

Sign up for our mailing list so you’ll never miss a new recipe. Also click a button below and share the dishes with your friends. You can also follow Chef Buck on Youtube. We appreciate all the kind comments and support, and we’ll see you next time in the kitchen!

If you like what CG and I do, support us on Patreon, or throw us a tip in our Paypal Tip Jar. We’ll happily enjoy a coffee on the road – Thanks! We appreciate all the support, and we’ll see you next time in the kitchen!

We include affiliate links for products on our website. Making a purchase after clicking on our links and we may earn a commission which helps us produce more videos and drink more coffee :^) We participate in the Amazon Services LLC Associates Program, which is an affiliate advertising program. It provides a means for us to earn fees by linking to Amazon.com and affiliated sites, so we can make more videos.

Share and Enjoy !

How to Make a Great Hummus Recipe

The hummus you buy at the market will never be as good as the hummus you make at home, so make it at home! Here is a no-frills, classic homemade hummus recipe.

Hummus Recipe Ingredients

A food processor is key for a creamy hummus. Check here for current prices on a food processor on Amazon.

2 Tbsp TAHINI
2 Tbsp LEMON JUICE
1 – 3 cloves GARLIC

1 15oz can CHICK PEAS also called Garbanzo Beans
2 Tbsp EXTRA VIRGIN OLIVE OIL
SALT to taste – I use about ¼ tsp

WATER as needed

How to Make Hummus

I use canned beans because it’s a lot less hassle and they’re fine in hummus.  Drain and rinse one 15oz can of chick peas, also called Garbanzo Beans.

IMPORTANT NOTE: For a creamier hummus, it makes a difference which ingredients you add first. Add only the tahini, lemon juice and garlic to the food processor and mix until creamy, usually around 30-45 seconds. Start with only 1 garlic clove because your friends and family will appreciate it.

Add the chick peas, extra virgin olive oil and salt to taste. Blend for another 30 seconds or so. [ The extra virgin olive oil has a richer flavor than the varieties used for sauteing. ]

Water can be added. The amount really depends on the consistency of the hummus you’re trying to make. Start with a ¼ cup and add more water if needed. Blend ingredients until desired chunkiness or smoothness is attained. Taste. Add more oil, salt and/or other ingredients (additional ideas provided below), according to your liking.

Garnish with extra virgin olive oil, paprika, parsley or cilantro, etc.

hummus

Make Different Hummus Recipes

All manner of ingredients can be added to the basic recipe above. ROASTED RED PEPPERS make a tasty addition, especially those from a jar as they blend readily, but forego adding water since the peppers will have plenty.

Also try adding cucumber, hot peppers, cumin, dill, curry, green onions, etc.
The subtle flavor of the chick peas will pair nicely with most ingredients.

Serve hummus with warm pita bread, pita chips, crackers, or raw fruit and vegetables. It’s great in wraps and sandwiches. Hummus on a hamburger? Why not. It’s inexpensive, easy to make, delicious, and a healthy dining choice. Hummus fits perfectly into a healthy Mediterranean diet.

For a twist on a classic hummus dish, try our sweet potato hummus recipe or this cauliflower hummus recipe.

cauliflower hummus recipe

Thanks for watching our recipe videos!

Thanks for checking out our homemade hummus recipe, and all of our recipes. Be sure and sign up for our mailing list and never miss a new Chef Buck cooking video, and also click a button below and share the dishes with your friends. We appreciate all the kind comments and support, and we’ll see you next time in the kitchen!

We include affiliate links for products on our website, so if you make a purchase after clicking on our links, we may earn a commission which helps us produce more videos and drink more coffee :^) 

We participate in the Amazon Services LLC Associates Program, which is an affiliate advertising program providing a means for us to earn fees by linking to Amazon.com and affiliated sites, so we can make more videos.

Share and Enjoy !

Red Potato Recipe w/ Garlic

red potato recipe

If you like potato salad, then give this garlic red potato recipe a try. Is it potato salad? Or something better? If you’re looking for a tasty twist on a simple comfort food, then try this Red Potato Recipe.

Red Potato Recipe Ingredients

3 lbs petite RED POTATOES
3-5 cloves GARLIC (finely chopped)
½ cup GREEN ONIONS (chopped)
1 cup PARSLEY (chopped)
1 tsp DRY MUSTARD
2 tsp WORCESTERSHIRE SAUCE
½ cup OLIVE OIL
¼ cup VINEGAR
1 tsp PAPRIKA
SALT and PEPPER (to taste)

How to Make Red Potato Salad

Wash potatoes and remove any blemishes. Leave the skin on. Place in a large pot with water, add salt, cover and bring to a boil and allow potatoes to cook 20-25 minutes. They’ll be done as soon as a fork inserts easily into the potato center. DO NOT OVERCOOK the potatoes! –it will be a disaster if you do. “Disaster” might be too strong a word, but you do not want the potatoes to become too soft. As soon as the potatoes are cooked, pour the hot water off in the sink and refill the pot with cold water to stop the potatoes from overcooking and becoming mushy.
While the potatoes cool, finely chop the garlic and chop the green onions and parsley. I prefer using the hardier curly parsley over the leafier Italian parsley for this dish.
In a large bowl, add olive oil, vinegar, Worcestershire sauce, dry mustard, paprika, salt and pepper, and mix ingredients well. Add the garlic, onion, and parsley and mix into the dressing. Drain potatoes and cut into large pieces into the bowl.
Toss potatoes gently with the dressing until well covered. Serve right away or serve it later, it tastes great either way. Give this Red Potato Recipe a try and let me know what you think, and…
Bon appétit!
seasoned red potato
For more potato and root vegetable fun, try these Roasted Veggie Fries.
roasted vegetable fries

Thanks for Watching our Red Potato Recipe Video!

Click a button below and share the dishes with your friends. You can also follow Chef Buck on Youtube. We appreciate all the kind comments and support, and we’ll see you next time in the kitchen!

If you like what CG and I do, support us on Patreon, or throw us a tip in our Paypal Tip Jar. We’ll happily enjoy a coffee on the road – Thanks! We appreciate all the support, and we’ll see you next time in the kitchen!

We include affiliate links for products on our website. Making a purchase after clicking on our links and we may earn a commission which helps us produce more videos and drink more coffee :^) We participate in the Amazon Services LLC Associates Program, which is an affiliate advertising program. It provides a means for us to earn fees by linking to Amazon.com and affiliated sites, so we can make more videos.

Share and Enjoy !

Gobi Matar Cauliflower Curry Recipe

gobi matar

Try this flavorful Indian gobi matar recipe with cauliflower and green peas. I use a mix of spices to create my own masala for this vegetarian recipe, but you can substitute a store-bought pre-made curry spice mix. This spicy vegan cauliflower curry makes a great side dish or entrée.

What You Need To Make Gobi Matar

1 CAULIFLOWER (cut into florets)
1 15oz can DICED TOMATOES (or 2 med tomatoes)
1 8oz can GREEN PEAS
1 large ONION (chopped)
1 HOT PEPPER (finely chopped)
1 Tbsp GINGER (finely chopped)
5-7 GARLIC cloves (finely chopped)
1 Tbsp CHILI POWDER (sub cumin powder for less heat)
1 Tbsp CUMIN SEEDS
1 Tbsp TURMERIC POWDER
1 Tbsp CORIANDER POWDER
2 tsp GARAM MASALA (optional)
3 Tbsp OIL for cooking
¼ cup WATER
SALT (to taste)

Check out current prices for Indian Cooking Spices on Amazon.

gobi matar
Is it gobi matar or gobi mattar? However you want to spell it, it’s a delicious Indian dish.

How To Make Cauliflower Curry

  • In a skillet or pot, heat oil on medium high heat.
  • Add cumin seeds. Seeds will brown and crack quickly, so almost immediately add onion.
  • Add onion and stir.
  • Cook 1 minute and then add ginger, garlic, and hot pepper.
  • Continue cooking until onions are soft.
  • Add turmeric, chili, and coriander powder and mix well.
  • Stir in tomatoes and continue cooking 4-5 minutes.
  • Add salt to taste.
  • Add tomatoes. If using fresh tomato, as tomatoes cook down I like to crush them with a spoon.
  • Stir in cauliflower florets.
  • Add water and bring dish to a bubble, then reduce heat to a simmer, cover, and let cook 4-5 minutes. I don’t want to cook all the nutrients out of the cauliflower, and I like my florets to still have a bit of crunch to them, so I simmer my cauliflower for only a few minutes.
  • When the cauliflower is almost cooked to your liking, add garam masala and green peas.
  • Mix and continue cooking until peas are heated through.

And that’s it, your cauliflower and peas are transformed into a delicious vegetable curry.

Check out a variation on this Indian gobi matar recipe and watch me cook a complete Indian dinner.

how to cook indian food

Thanks for checking out our gobi matar recipe, and all of our recipes. Be sure and sign up for our mailing list and never miss a new Chef Buck cooking video, and also click a button below and share the dishes with your friends. We appreciate all the kind comments and support, and we’ll see you next time in the kitchen! Check out the Chef Buck Youtube Channel.

Thanks for watching our Indian curry recipe!

We include affiliate links for products on our website, so if you make a purchase after clicking on our links, we may earn a commission which helps us produce more videos and drink more coffee :^) We participate in the Amazon Services LLC Associates Program, which is an affiliate advertising program providing a means for us to earn fees by linking to Amazon.com and affiliated sites, so we can make more videos.

Share and Enjoy !

Follow Me!