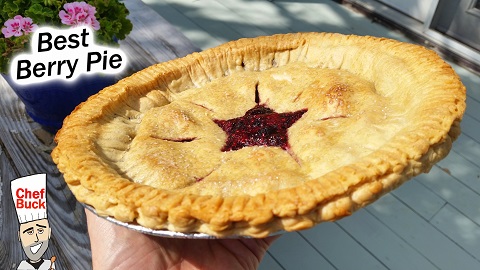
Try an easy berry pie recipe that goes great with ice cream. We use frozen berries and a premade crust to keep the recipe super simple. A friend made this for us years ago when we were having regular dessert get togethers, and we’ve loved this simple recipe ever since. We got together recently and, yep, it’s still a delicious pie, especially with some good quality vanilla ice cream.
Ingredients for Easy Berry Pie
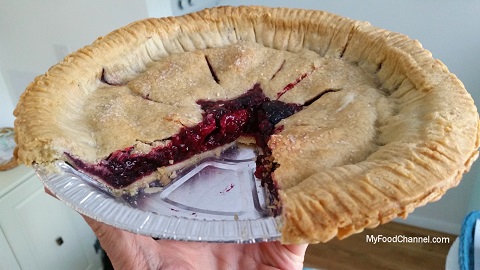
4.5 – 6 cup frozen mixed berries, almost completely thawed and drained. In the video, we used 4.5 cups of Wyman’s mixed berries (raspberries, blackberries and blueberries). Less berries means more crust per bite.
3 Tbsp flour
1/3 cup sugar + a bit more to sprinkle on the top crust
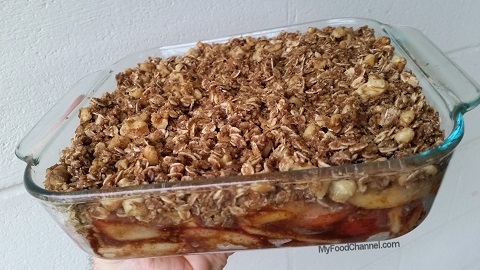
2 deep dish pie crusts, frozen If you don’t want o use two pie crusts, you can use a crumble topping like the topping we use in this Apple Crisp Recipe.
Aluminum foil cut into 1 1/2 inch strips to fit around pie edges, or you can use a pie crust shield. Check current prices for a PIE SHIELD on Amazon.
And be sure to wear berry-friendly clothes, because berry stains are difficult to get out of fabric!
Directions for Making Easy Berry Pie
Two hours ahead of your planned baking:
Measure out your berries, and leave them out to mostly thaw and drain. This, along with keeping your bottom crust in the freezer til you are ready to fill it, help you avoid a runny, soggy pie.
Take out ONE of frozen pie crusts to thaw. We use wax paper and a cutting board – to make final ‘flipping’ onto the pie easier. When it ‘falls’ out of pie holder, cut vents (or more decorative designs) into top crust. You can even create a lattice top. The vents are needed to release steam.
Preheat oven to 400, once your berries and one pie crust are ready.
Mix flour and sugar in with the berries.
Pour mixture over frozen pie crust.
Moisten bottom crust edges with water. Lay vented top crust over berries.
Use fork to pinch seams together.
Lightly brush the top crust with water. Sprinkle with sugar.
Cover pie edges with 1 1/2 strips of aluminum foil (or use a pie crust shield, if you have one). Cook pie on cookie sheet – just in case you’ve filled the pie toooo much. Easier to clean cooked berries off a baking sheet rather than your oven.
Bake in preheated oven for 30 minutes. NOTE: If you are also cooking separate pie crust pieces, set a timer for 5 minutes – those will need to come out much earlier than the pie itself.
Remove the foil, and bake another 10 minutes.
Cool at least 4 hours before serving. Then you can serve it rewarmed, cool or cold.
Optional toppings: vanilla ice cream, whipped cream, freshly grated lemon peel before serving.
Store uneaten pie in the refrigerator. If you are like us, this one just keeps calling to you – it doesn’t last long.
Additional Hints To Make Your Berry Pie Come Out Perfect
The frozen berry draining and the long cooling period help you avoid a runny berry pie.
In the video, we used ready-made pie crusts. The worst parts were waiting for the berries to thaw and drain, as well as the time to partially thaw one of your crusts so you can use it to cover the pie. Also, you can use the microwave to thaw your berries. However, if you use the microwave, don’t heat your berries to mush – you want some texture in your baked pie.
If using refrigerated pie crusts:
- Grease your pan before putting down the bottom crust.
- Wet edges of bottom crust before placing top crust.
When thawing your berries, the objective is to allow them to almost thaw completely (to get rid of some extra moisture) but leave some of the berry texture intact. If you use the microwave to defrost/thaw your berries, it’s more challenging to keep some of the berry texture.
I often thaw frozen top pie crusts on a cutting board and wax paper. That way, if the crust is extra sticky when it comes out, I can cut out shapes on the cutting board, and then, if needed, the wax paper and/or cutting board can be used to more easily ‘flip’ the crust onto your pie.
If You Want To Freeze Your Pie
You can freeze the baked pie for up to 3 months. Thaw overnight in the refrigerator and allow to come to room temperature before serving.
If freezing prior to baking, but as soon as possible when you’ve put your pie together (to keep bottom from getting soggy). Wrap it well with plastic wrap or aluminum foil. Suggest not leaving it longer than a month. To bake, take out of freezer and thaw for 30 minutes. Bake at 400F for 55-60 minutes or until crust is golden brown and inside is warm.
For another easy sweet treat you can make with apples, you’ll enjoy our regular apple crisp or our low fat apple crisp.
Thanks For Watching Our Recipe Videos!
Thanks for checking out our easy berry pie recipe, and all of our recipes. Be sure and sign up for our mailing list so you’ll never miss a new recipe. Also click a button below and share the dishes with your friends. You can also follow Chef Buck on Youtube. We appreciate all the kind comments and support, and we’ll see you next time in the kitchen!
If you like what CG and I do, you can also support us on Patreon, or throw us a tip in our Paypal Tip Jar. We’ll happily enjoy a coffee on the road – Thanks! We appreciate all the support, and we’ll see you next time in the kitchen!
We include affiliate links for products on our website. So, if you make a purchase after clicking on our links, we may earn a commission which helps us produce more videos and drink more coffee :^) We participate in the Amazon Services LLC Associates Program, which is an affiliate advertising program. It provides a means for us to earn fees by linking to Amazon.com and affiliated sites, so we can make more videos.