Ginger Chicken Recipe Chinese Restaurant Style

Ginger Chicken

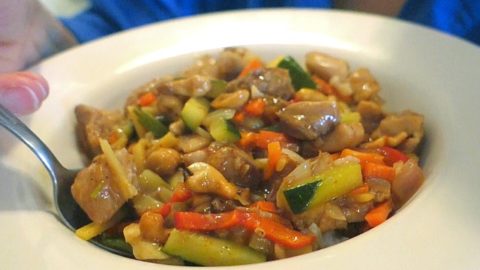
This Ginger Chicken Recipe will remind you of a delicious dish from your favorite Chinese restaurant. The key to a tasty ginger chicken dish is fresh ginger, and lots of it. You won’t need hard to find ingredients, just a little soy sauce, sesame oil, and some fresh produce will make all of the difference.

What You Need To Make This Ginger Chicken Recipe

1 lbs. CHICKEN
1 Tbsp CORN STARCH
1 Tbsp SESAME OIL
1 Tbsp SOY SAUCE
SALT and PEPPER (to taste)
4-6 cloves GARLIC
½ cup GINGER
½ cup ONION
½ to 1 cup CARROTS
½ to 1 cup CASHEWS
1 cup chopped Zucchini or other veggies (optional)
some OIL for sauteing
HOT PEPPER (optional)

Sauce Ingredients:
1 Tbsp SESAME OIL
2 Tbsp SOY SAUCE
2 Tbsp RICE VINEGAR
2-3 Tbsp JAM (or substitute sugar)
1 Tbsp CORN STARCH
½ to 1 cup WATER

Ginger Chicken
Best Ginger Chicken Recipe

How To Make Ginger Chicken

  • Use skinless and boneless white or dark meat chicken, whichever you prefer.
  • Chop chicken into bite-sized pieces and place into a bowl.
  • Add 1 Tbsp sesame oil, 1 Tbsp soy sauce, 1 Tbsp corn starch, and salt and pepper to taste.
    Mix well with the chicken and then set the bowl aside.
  • In another bowl, combine sauce ingredients and set aside.
  • Prepare the veggies; this dish will cook fast, so have all the veggies chopped before beginning to cook the chicken.
  • Chop fresh ginger into matchstick sizes; fresh ginger and lots of it make this recipe delicious,so don’t be shy with the ginger.
  • Cut carrots into matchstick sizes.
  • Finely chop the garlic.
  • Chop onions (I prefer green onions if I have them on hand, but any onion will work.
  • Chop hot pepper if desired; the fresh ginger will add a bit of bite to the dish,
    so skip the pepper if you prefer a milder recipe.
  • Heat a skillet and oil on medium high heat. Add chicken and cook, stirring occasionally for 5 minutes, and adjust heat as needed. If you need a nice skillet, you can check here for current pricing for a non-stick skillet on Amazon.
  • After 5 minutes, add onion, garlic, ginger, and hot peppers.
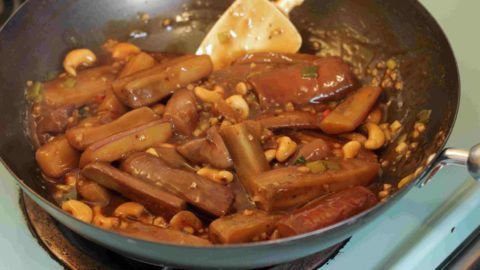
  • Cook another 5 minutes, then add carrots and any other veggies; add sauce and mix well and continue to cook for 5 more minutes.
  • Add more water if desired. The sauce will be thicker or thinner depending on the amount of water added.
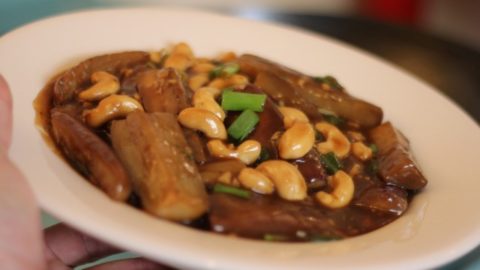
  • To finish the dish, stir in cashew nuts and remove from the heat.
  • And that’s it! Serve over rice.

    Give this this super simple and flavorful ginger chicken recipe a try and let me know what you think, and bon appétit!

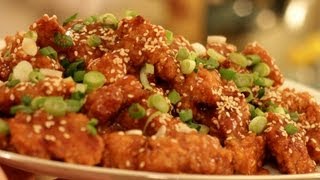
    And for another Chinese favorite, check out this General Tso’s Chicken Recipe.

    general tso chicken

    Thanks for checking out the recipes and videos. If you like what you see, share it with your friends and family on social media, I appreciate it!
    –Chef Buck

    Share and Enjoy !

    Tzatziki Sauce Recipe – Greek cucumber yogurt dressing

    Tzatziki Sauce recipe

    It’s super easy to make a healthy Greek tzatziki sauce recipe. It’s fairly quick to prepare tzatziki sauce, but it takes a little time to reach it’s full flavor potential, so make it a few hours ahead of time before serving. Tzatziki is a mild cucumber yogurt dressing that pairs very well with spicy falafel or lamb. The sauce can be used as a dressing or dip, especially for stuffed pitas, pita chips, or fresh veggies.

    Ingredients You’ll Need for Tzatziki Sauce Recipe:

    2 cups GREEK YOGURT
    2 cups fresh CUCUMBER
    3-4 cloves GARLIC (finely chopped)
    1 small LEMON zest and juice
    or substitute 1-2 Tbsp
    WHITE WINE VINEGAR
    ½ cup (or more) chopped HERBS
    …like dill, mint, or parsley
    1-2 Tbsp OLIVE OIL
    SALT and PEPPER (to taste)

    tzatziki sauce recipe
    Greek Tzatziki Sauce, a cucumber yogurt dressing

    How To Make a Greek Tzatziki Sauce Recipe:

    I prefer using English cucumbers (also called hothouse cucumbers), or using smaller, japanese cucumbers.
    These cucumber types have a lot of flavor, are less watery, and the skin is thin enough to be eaten and enjoyed (although I generally peel them when making tzatziki).
    When making a tzatziki sauce, start by preparing the cucumber; this will give the cucumber time to drain while you prepare the rest of the sauce ingredients.
    Peel your cucumber and grate with a hand grater, or use a food processor if you enjoy cleaning appliances.
    Chop the cucumber into smaller pieces, if desired, but don’t over-process, since chunks of cucumber make a tzatziki quite nice.
    Place the grated cucumber into a strainer over a bowl to allow the cucumber to drain.
    Mix a bit of salt to help draw out the water. Set bowl aside and prep the other ingredients.
    Into a mixing bowl, add Greek yogurt, minced garlic, lemon zest and juice, and fresh chopped herbs.
    If you don’t have a lemon on hand, substitute a mild rice or wine vinegar.
    Mix ingredients well.
    Return to the cucumber. Quite a bit of water will have drained into the straining bowl. Use a spatula or spoon to press out more water, and then add the strained cucumber to the yogurt mixture.
    Mix well, and add additional salt and pepper to taste.
    Cover and place in the fridge for at least 2+ hours before serving; this will give the flavors time to maximize.
    Serve as a dip or dressing/sauce.
    it’s great with pita chips or fresh sliced veggies; or serve with spicy lamb–especially as a sauce in stuffed pitas, or as a condiment on lamb burgers.
    Or as a dressing for a fresh salad.
    Greek tzatziki is healthy, versatile, and an easy recipe worth giving a go.
    Give this Greek tzatziki sauce recipe try and let me know what you think, and bon appétit!
    For another Greek inspired dish, check out this Hummus Recipe

    hummus
    click pic for video recipe

    Or this very tasty Pita Chips Recipe …that goes great with tzatiki
    spicy pita chips
    Thanks for checking out the recipes. If you like what you see, share these dishes with your friends and family on social media, I appreciate it!
    –Chef Buck

    Share and Enjoy !

    Edamame Brown Rice Recipe –A Great Vegetarian Dish

    edamame

    This edamame brown rice recipe is super flavorful, filling, a great side dish, and delicious hot or cold. If you buy frozen soy beans for this dish, make sure they are thawed before using –and shelled!– shelled edamame is called mukimame.

    Edamame Brown Rice Recipe

    2 inch GINGER, finely chopped
    4-5 cloves GARLIC, finely chopped
    16 oz bag MUKIMAME (shelled edamame)
    ¾ cup LONG-GRAIN BROWN RICE
    2Tbsp fresh LIME JUICE
    2 Tbsp RICE VINEGAR
    2 tsp SOY SAUCE
    2 tsp SESAME OIL
    ½-1 tsp SUGAR
    3-4 GREEN ONIONS
    5 Tbsp CILANTRO, chopped
    2 Tbsp SESAME SEEDS, toasted
    SALT and PEPPER to taste

    edamame
    Mukimame with Brown Rice Recipe

    How to make Make Edamame with Brown Rice

    • In a saucepan, heat olive oil over medium-high heat. Check current prices for a sauce pan on amazon.
    • Sauté ginger and garlic for 1-2 minutes until fragrant.
    • Remove garlic and ginger from pan and set aside (I’ve tried skipping this step, and just continued cooking the garlic and ginger along with the rice, but it’s not as flavorful, so it’s definitely worth setting the garlic and ginger aside to add to the dish later).
    • In same pan (without rinsing), bring 1½ cups lightly salted water to a boil. Add rice, reduce to a low simmer; cover and cook, 30 minutes.
    • After 30 minutes, stir in thawed, shelled edamame (mukimame!); cover and cook until rice is tender and mukimame is heated through, about 15 to 20 minutes.
    • In a small bowl, combine lime juice, vinegar, soy sauce, sesame oil, and sugar and stir until sugar is dissolved.
    • Remove rice and beans from the stove and add ginger, garlic, lime juice mixture, scallions, cilantro and sesame seeds.
    • Mix well and add additional salt and pepper as desired.


    Give this edamame brown rice recipe a try and let me know what you think, and bon appétit!

    edamame
    Frozen Mukimame (shelled edamame)

    And for another great vegetarian dish, try this easy, awesome Quinoa Salad Recipe.

    southwestern quinoa salad
    a southwestern quinoa salad makes a tasty and healthy dinner choice.

    Thanks For Watching Our Recipe Videos!

    Thanks for checking out this edamame recipe, and all of our recipes. Be sure and sign up for our mailing list so you’ll never miss a new recipe. Also click a button below and share the dishes with your friends. You can also follow Chef Buck on Youtube. We appreciate all the kind comments and support, and we’ll see you next time in the kitchen!

    If you like what CG and I do, you can also support us on Patreon, or throw us a tip in our Paypal Tip Jar. We’ll happily enjoy a coffee on the road – Thanks! We appreciate all the support, and we’ll see you next time in the kitchen!

    We include affiliate links for products on our website. So, if you make a purchase after clicking on our links, we may earn a commission which helps us produce more videos and drink more coffee :^) We participate in the Amazon Services LLC Associates Program, which is an affiliate advertising program. It provides a means for us to earn fees by linking to Amazon.com and affiliated sites, so we can make more videos.

    Share and Enjoy !

    Broccoli Recipe – Best Blue Cheese Broccoli

    Broccoli with Blue Cheese

    Try this super-quick and awesome broccoli recipe. If you like blue cheese then you’ll love this dish, in fact, you’ll actually love broccoli if you only just liked it before …I know, kinda confusing, but trust me, this is a pretty damn tasty broccoli dish–and healthy, too. So make it.

    Bad-ass Blue Cheese Broccoli Recipe Ingredients:
    5 cups BROCCOLI FLORETS
    ¼ cup CARROT strings
    2-3 oz BLUE CHEESE crumbled
    ¼ cup SUNFLOWER SEEDS (shelled and toasted)
    SALT and PEPPER to taste

    Broccoli with Blue Cheese
    Broccoli with Blue Cheese Recipe

    directions:
    Toast the sunflower seeds (already shelled). This can be done quite quickly in a hot pan or skillet. Heat pan or skillet on medium/med-low heat; not too hot or seeds will burn. Add sunflower seeds and spread them into a single layer. Do not use any oil or spray in the pan. Stir the seeds in the skillet for a couple of minutes until they begin to brown, lightly browned is perfect; they’re easy to over-toast, so don’t leave them too long. It will only take 2 minutes on medium heat.
    Remove seeds from heat and set aside.

    Cover the bottom of a pot with about ¼ inch of water, just enough for steaming the broccoli and carrots. Add The broccoli florets to the pot and top with the carrot strings. Raise the heat, cover the pot, and allow the veggies to steam for approx. 5 minutes; ideally the florets will be cooked through, soft but not soggy!

    Turn off the heat and drain any remaining water in the sink. Add salt, pepper, the toasted sunflower seeds, and 2-3 ounces of crumbled blue cheese.
    Lightly toss ingredients together and serve while hot.
    This dish is super-simple and amazingly delicious –as long as you like blue cheese.
    Give this broccoli recipe a try and let me know what you think, and bon appétit!

    And for another great veggie dish, try this tasty Beet Greens Recipe.
    beet greens saute

    Share and Enjoy !


    Pickled Daikon and Carrot Relish –Vietnamese Style

    Vietnamese Pickled Daikon and Carrot Relish

    Vietnamese-style pickled daikon and carrot make a handy relish than can be used with salads, sandwiches, and all kinds of recipes. It’s a must have for making a banh mi sandiwich and I use it quite often as a salad topper and also dice it up to add to tuna, chicken, and quinoa salads. Keep a jar of pickled daikon and carrot in your fridge and experiment adding it to some of your favorite dishes.

    Pickled Daikon and Carrot Ingredients:
    2 cups cut DAIKON
    2 Cups Cut CARROT
    1-2 tsp SALT
    ¼ SUGAR
    ½ cup WATER (hot from tap)
    ½ cup VINEGAR

    pickled daikon
    Pickled daikon and carrot is a tasty and versatile relish to have in the fridge–awesome on sandwiches and salads.

    directions:
    Daikon is a BIG radish. When buying, choose one that is firm–if the daikon has green tops attached, choose one without wilted leaves, but often the tops are not attached. The skin is thin and can be peeled off with a simple vegetable peeler. The same is true for carrots, although I generally leave the skin on the carrots, but follow your heart. Slice and cut the daikon and carrot into matchstick sizes and place into a bowl. Add salt to the bowl and mix well with the daikon and carrot so that the veggies are coated. This will draw water out of the vegetables and soften them. Set bowl aside.
    In a smaller bowl, prepare the pickling solution. Combine warm tap water and sugar. Stir until dissolved and then add the vinegar. And that’s it!
    In the larger bowl, the salt will have started drawing moisture from the daikon and carrot matchsticks. When they have softened enough, cram them into a storage container and add the pickling solution.
    This pickled combo will keep in your fridge for 2-3 weeks. It’s a must have topping for Vietnamese banh mi sandwiches and works well in all kinds of sandwiches. Use this relish as a topping for salads or chop it up to incorporate in whatever dish you desire (it’s great in a coleslaw or quinoa salad).
    Give this pickled daikon and carrot relish a try and let me know what you think, and bon appetit!

    And if you wanna see this relish in action, check out this deconstruction of a Banh Mi Sandwich.
    bahn mi

    Share and Enjoy !


    Cook Chinese Eggplant Recipe with General Tso’s Sauce

    Chinese Eggplant Recipe with Sweet Sauce

    Cook Chinese Eggplant for a terrific vegetarian meal that will not having you missing the meat. For this Chinese eggplant dish, I use a sauce similar to one I use making General Tso’s Chicken, so it’s a rich and filling eggplant dish, hearty and vegetarian at the same time.

    ingredients to cook Chinese Eggplant Recipe

    1½ lbs CHINESE EGGPLANT
    4-6 Tbsp OLIVE OIL
    3 cloves GARLIC (finely chopped)
    1-2 RED CHILIES (thinly sliced)
    ½ cup whole CASHEW NUTS
    1 bunch GREEN ONIONS
    1 Tbsp SESAME OIL
    sauce ingredients:
    1/3 cup SOY SAUCE
    2 Tbsp HOISIN SAUCE
    1 tsp SESAME OIL
    2 Tbsp RICE VINEGAR
    2-3 Tbsp BROWN SUGAR
    1 Tbsp GINGER (minced)
    2 Tbsp CORN STARCH
    1½ cups WATER

    cook Chinese Eggplant
    Chinese Eggplant with Cashew Nuts and Sweet Sauce

    how to cook Chinese Eggplant Recipe with General Tso’s Sauce

    In a small bowl, combine all of the sauce ingredients. The fresh minced ginger is optional, but if you love ginger, why not? I also use 2 heaping Tbsp of brown sugar, but you can use more or less sugar depending on how much sweet you like–but the sweet is good with this recipe. Mix the sauce ingredients well and then set aside.
    Cut your Chinese eggplant. You should buy firm eggplant with glossy, unblemished skins. Cut into pieces approx. 2″ long and ½” wide.
    In a skillet or wok, heat olive oil on med. high heat. When the oil is hot, add eggplant. Saute eggplant 5-7 minutes. The eggplant will soak up the oil, so add more oil as needed or desired. Saute until the eggplant colors and begins to soften and then remove eggplant from the skillet. In the same hot skillet, add sesame oil and heat. Add garlic, hot pepper, and cashew nuts (or sub peanuts). Saute for 1 minute or until garlic colors. Add sauce and green onion bottoms. Stir sauce slowly. Because of the added corn starch, the sauce will quickly heat through, darken, and thicken. When the sauce has thicken to a a gravy/syrup consistency, return the eggplant to the skillet. Mix well, then cover the skillet and allow to simmer until the eggplant has finished cooking, 3-5 minutes depending on the size of the eggplant pieces. Stir in green onion tops. Fresh chopped cilantro also adds an excellent taste and garnish.
    And that’s a very tasty way to cook Chinese eggplant.
    Serve with rice, or without rice…and enjoy.
    And for a tasty General Tso’s Chicken Recipe, click the pic below.

    general tso chicken
    click pic for recipe

    Thanks for checking the recipe out. If you liked it, click a few buttons below and share it with your friends, I appreciate it.
    –Chef Buck

    Share and Enjoy !


    Chorizo Recipe — Cazuela de Chorizo!

    Chorizo Sausage recipe

    This spicy chorizo sausage recipe is a Spanish inspired meat and potato stew that is super-flavorful and delicious–and hearty, too.

    What you need for this Chorizo Sausage Recipe

    1 lb CHORIZO LINKS
    3-4 Tbsp OLIVE OIL
    1 lg ONION (chopped well)
    4-5 cloves GARLIC (thinly sliced)
    3 ROMA TOMATOES (diced)
    3 lg POTATOES (cut into approx 1″ pieces)
    14 oz can BROTH (add water as needed)
    1 BAY LEAF
    1 tsp SMOKED PAPRIKA
    1 Tbsp CHILI POWDER
    ¼ tsp CAYENNE PEPPER
    ½ tsp ground THYME
    SALT and PEPPER to taste

    Chorizo Sausage recipe
    Fresh Chorizo Sausage Links

    How to make Cazuela de Chorizo

    • Heat olive oil on medium high heat in a deep skillet or wide-bottom pot.
    • Add onion and garlic and saute.
    • As the onion begins to soften, add bay leaf, salt, chili powder, cayene pepper, and paprika.
    • Stir well and continue sauteing ingredients for 4-5 minutes.
    • Add chorizo sausage–use UNCOOKED chorizo links; slice the links in the casing, about ½ inch wide pieces.
    • Cook the sausage with the onions for 5 minutes and then add tomato (3 diced roma tomatoes or 14oz can diced tomatoes).
    • Mix tomato with onion and then add potato. I like to leave the skin on the potato mainly because it tastes GOOD. And then you don’t have to peel the potatoes either, which is good, too. The potato should be cut up into good sizes, about 1″ pieces, so that you’ll have some good chunks of potato after the dish stews.
    • Cover the skillet and bring the dish up to a bubble.
    • Reduce the heat to a simmer and add dried thyme.
    • Cover, and let simmer for about 30 minutes or until the potatoes are cooked through–stirring occasionally as needed.

    Give it a taste and add a little more salt and seasoning as desired. Garnish this chorizo recipe with fresh chopped parsley, cilantro, or green onion…and enjoy!

    Chorizo Sausage recipe
    Spicy Chorizo Sausage Stew

    If you don’t have a big skillet or pot, here’s a link to check out check out current prices for a BIG STEW POT on Amazon.

    For another great stew idea, check out this vegetarian alternative, a Meatless Chili Recipe that even meat lovers will love.

    vegetarian chili
    pot o’ meatless chili for good times

    Thanks for Watching our Chorizo Sausage Recipe Video!

    Click a button below and share the dishes with your friends. You can also follow Chef Buck on Youtube. We appreciate all the kind comments and support, and we’ll see you next time in the kitchen!

    If you like what CG and I do, support us on Patreon, or throw us a tip in our Paypal Tip Jar. We’ll happily enjoy a coffee on the road – Thanks! We appreciate all the support, and we’ll see you next time in the kitchen!

    We include affiliate links for products on our website. Making a purchase after clicking on our links and we may earn a commission which helps us produce more videos and drink more coffee :^) We participate in the Amazon Services LLC Associates Program, which is an affiliate advertising program. It provides a means for us to earn fees by linking to Amazon.com and affiliated sites, so we can make more videos.

    Share and Enjoy !

    Creamy Shrimp Curry Recipe –quick and easy with a yogurt sauce

    creamy shrimp curry

    Try this quick, creamy shrimp curry recipe for a change of taste. It’s super fast to prepare and kinda/sorta healthy–I usually serve this shrimp curry with rice and top with fresh chopped cilantro. Don’t be shy adding hot peppers, since the yogurt sauce and rice will absorb a lot of any heat added.

    SHRIMP CURRY RECIPE
    ingredients:
    1 to 1½ lbs SHRIMP (peeled/deveined)
    2-3 Tbsp OLIVE OIL
    2 tsp MUSTARD SEEDS
    2 chili peppers (chopped, or sub red pepper flakes)
    1 cup plain Greek YOGURT
    ¼ tsp ground CINNAMON
    ¼ tsp ground CLOVE
    ½ tsp CARDAMOM
    1½ tsp MANGO POWDER
    2 tsp CORIANDER
    ½ tsp CORN STARCH
    SALT to taste
    CILANTRO (chopped)
    serve w/ RICE

    shrimp curry recipe
    Creamy Shrimp Curry Recipe

    In a small bowl, combine Greek yogurt with cinnamon, clove, cardamom, mango powder, coriander, and corn starch. Mix ingredients well until the yogurt is smooth. Heat olive oil in a skillet and add mustard seeds and finely chopped peppers. Use as much or little pepper as you like–if you’ve got fresh peppers that’s great, but red pepper flakes make a decent substitute. After 1 minute, add yogurt sauce to the skillet. Stir well and bring to a light bubble and let simmer 2 minutes. Adjust stovetop temperature as needed. Add shrimp, already peeled and deveined. Mix with sauce and return skillet to a simmer. Let cook 4-5 minutes, stirring as needed, until shrimp are pink and done–try not to overcook your shrimp ’cause that’s sad.
    Salt dish as desired and remove from heat. Garnish with fresh chopped cilantro and serve with rice. It’s best to cook your rice ahead of time, since this creamy shrimp curry takes very little time to prepare. Give it a try and let me know what you think, and bon appetit!

    For another tasty shrimp dish, give SPICY FRIED SHRIMP a try.

    Share and Enjoy !


    Spicy Crispy Chickpea Recipe -great salad topping!

    Here’s a quick, spicy chickpea recipe that makes a great salad topping and a so-so snack; it’s a lot easier on your teeth than baked chickpea snacks, which I find to be almost inedible (they tend to turn into tiny rocks).

    ingredients:
    15 oz can CHICKPEAS
    2-3 Tbsp OLIVE OIL
    ½ tsp CURRY POWDER
    ½ tsp CUMIN
    ½ tsp PAPRIKA
    dash CAYENNE PEPPER
    SALT to taste

    chickpea recipe

    Rinse and drain a 15oz can of chickpeas (garbanzo beans). In a skillet, heat olive oil on medium heat. When the oil is hot, add chickpeas–be sure that they are drained well, since water and hot oil definitely do not mix. Saute chickpeas for 10-15 minutes; obviously, the longer they’re in the skillet, the crispier they will get, but it’ll take about 15 minutes to get them “crispy”. Once the chickpeas get near the doneness you desire, add salt, pepper, and spices. The spice combo in the recipe works well, but experiment with whatever spices you have–and don’t be shy with the spices–spice really makes this recipe work, and a good deal of the spice you use will remain in the skillet when you remove the chickpeas. Saute chickpeas and spices another 2-3 minutes and then remove from the heat.
    Use them as a salad topping instead of croutons for a healthy crunch, or a just tasty snack, something to nibble on besides potato chips.
    Enjoy!

    Ever try Chickpea Curry(chana masala)? It’s a terrific Indian chickpea dish.

    Share and Enjoy !


    Asparagus Recipe — Tangy Lemon Ginger Asparagus

    Asparagus is one of those veggies you cook when you’re trying to impress–and this asparagus recipe will do the job. The lemon adds a nice zing while the whole fennel/mustard seeds add flavor and texture without overpowering the great taste of asparagus.

    Asparagus Recipe Ingredients:
    1½ lb. ASPARAGUS
    1 small LEMON (zest and juice)
    2 Tbsp OLIVE OIL
    ½ tsp FENNEL SEEDS
    ½ tsp MUSTARD SEEDS
    3-4 cloves GARLIC (or more…go for it, dude)
    1 inch GINGER (which should end up being between 1-2 Tbsp thinly sliced)
    SALT and PEPPER to taste

    When buying asparagus, thin is better than thick. Choose firm spears. Avoid asparagus that have a wrinkled skin, or tips that are wet and greasy looking. Rinse and drain the asparagus spears, then chop into 1 inch pieces. When slicing, leave the tops of the spears intact so they don’t fall apart while cooking. Heat olive oil on medium heat in a skillet. When oil is hot, add mustard and fennel seeds and stir for 20-30 seconds–not long at all. Add garlic and ginger–a lot of ginger; I use about 1 inch, thinly sliced–about the size of a fish scale. Stir skillet 1 minute, lower heat if necessary.
    Stir in asparagus. Add salt and pepper to taste. I like my asparagus to retain a bit of crunch–who likes mushy asparagus?–so this dish doesn’t take long to cook. Saute for about 4 minutes and the dish will be done. From the time you add the seeds to completion, the cooking time will only be about 5 minutes–of course you can extend the cooking time if YOU DO like softer asparagus (crazy!)–but everybody likes what they like, so namaste, man. About a minute before the dish is done, add the lemon zest. When the asparagus is crunchy or soft the way you like it, and you’re ready to get it off the heat, add the lemon juice, stir, and serve.
    It’s a tasty asparagus dish and a perfect side for a nice steak (or whatever).
    Give this asparagus recipe a try and let me know what you think, and bon appétit!

    If you enjoy asparagus, you likely love this Brussels Sprouts Recipe.
    brussels sprouts

    Share and Enjoy !


    Easy Shrimp Linguine Recipe

    shrimp linguine

    A quick and tasty shrimp pasta dinner recipe for two!

    Shrimp LinguineIngredients:

    1 pound SHRIMP (20-30, peeled and deveined)
    8oz LINGUINE (about ½ box)
    1-2 cups BROCCOLI florets (or substitute ½ cup PARSLEY if you’re not into broccoli)
    6-8 GARLIC cloves (minced)
    ½ large ONION (finely chopped)
    ½ stick BUTTER
    3-5 Tbsp OLIVE OIL
    SALT to taste
    (add OREGANO or ITALIAN HERBS if desired–I like just the extra garlicky taste)
    serve with PARMESAN CHEESE

    Shrimp Linguine Directions

    Prep your ingredients first, then get your pasta cooking.  I like to add a Tbsp of olive oil to my pasta water as well as a 2-4 tsp salt.  Cook the pasta according to the package directions and whatever firmness you desire.  I’m using whole grain wheat linguine for this recipe, which takes about 12 minutes to cook–a bit longer than most linguine.  The cooking time for the skillet ingredients should be around 7-9 minutes, so try to time your pasta to finish with the shrimp–overcooked shrimp is rubbery and overcooked pasta is mushy, so timing is everything!!!

    In your skillet, heat 2 Tbsp olive oil and 1/4 butter on medium heat.  When hot, add garlic and cook for 1 minute.  Add onions and continue to cook a couple more minutes.  Add broccoli florets, and add more butter and oil as needed.  If you don’t want to add broccoli, substitute 1/2 cup chopped parsley instead.  Sauté  florets, garlic, and onions another 2 minutes and then add shrimp.  Throw in some Italian herbs if you want to get all herby.

    The shrimp will be done when they turn pink–don’t overcook or they’ll turn rubbery!!  Remove the cooked pasta from water and add directly to the skillet.  Don’t drain or strain the pasta!!–you’re just throwing away good flavor.  Add the remainder of your original 1/2 stick butter.  Mix pasta and ingredients.  Add some pasta water to the mix (about 1/2 cup or so).  I find that the salt in the water and butter is plenty for me, but salt a little more if desired.  Remove the skillet from the heat and serve.  Fresh Parmesan cheese and toasted garlic bread are nice accompaniments!!  Maybe some wine?
    Bon appétit!

    Share and Enjoy !


    Cornish Hen Recipe – Easy One-Pot Meal

    cornish game hen

    Give this Cornish hen recipe a try. A Cornish hen is a classy bird, and a complete meal for two when cooked up with potatoes and carrots.

    What you need for this Cornish Hen Recipe

    1 CORNISH HEN …for this recipe I’m using a 1.5 lb. size hen, adjust cooking time for a smaller bird
    2 POTATOES cut into 1 inch pieces
    4 CARROTS chopped into ½-1 inch pieces
    1 ONION large onion, cut into large pieces
    1 GARLIC BULB chopped
    4-5 sprigs ROSEMARY finely chopped
    ¼ cup BUTTER melted–substitute olive oil, if desired
    SALT and PEPPER to taste
    This is a great dish to load up with extra seasonings…try CUMIN, SEASONING SALT, CAYENNE PEPPER, CAJUN SEASONINGS, etc.

    How to Cook Cornish Hen

    • If you’re using a frozen hen, allow the bird to thaw overnight in the fridge.
    • Cut hen through the breast and into two halves.
    • Rub both sides of hen with salt, pepper, garlic, and rosemary.
    • Lightly oil a baking dish and place the hen halves skin side up. Check current prices for a baking dish on Amazon.
    • Cover hens with potatoes and carrot and additional seasoning.
    • Top with chopped onion and melted butter and cover dish.
    • Cook in 400 degree F oven for 30 minutes.
    • Remove dish, mix ingredients, cover and return to the oven for 15 minutes more.
    • Remove dish and uncover. Mix ingredients, place hen halves on top of vegetables and return to the oven and cook for an additional 10 minutes.
    • At this point (dish has cooked 55 minutes total) I like to turn on the broiler and broil each side of the hen for 2-3 minutes, making the skin crispy and tasty. Keep an eye on the hens and do not overbroil!
    • Remove the dish from the oven and serve. I like to rub dried oregano between my palms and coat the plate and serve with sliced tomatoes.

    For another poultry dish, try this crispy Baked Chicken Recipe that you’ll love more than fried chicken.
    baked curry chicken

    Thanks for checking out our Cornish hen recipe, and all of our recipes. Be sure and sign up for our mailing list and never miss a new Chef Buck cooking video, and also click a button below and share the dishes with your friends. We appreciate all the kind comments and support, and we’ll see you next time in the kitchen!
    –Chef Buck

    Thanks for watching our recipe videos!

    We include affiliate links for products on our website, so if you make a purchase after clicking on our links, we may earn a commission which helps us produce more videos and drink more coffee :^) We participate in the Amazon Services LLC Associates Program, which is an affiliate advertising program providing a means for us to earn fees by linking to Amazon.com and affiliated sites, so we can make more videos.

    Share and Enjoy !

    Sausage Tomato Pie Recipe

    sausage tomato pie

    This sausage tomato pie might look like a pizza, but it’s definitely not a pizza! The crust has a flaky pastry quality and the onions act the part of a pie filling. This is a rich dish, bordering on decadent; it’s super filling and super flavorful. For a meatless alternative, try faux sausage—or no sausage at all—this dish works well just as a Tomato Pie.

    Ingredients:
    3 large ONIONS
    2 medium TOMATOES
    8-10 oz SAUSAGE
    8 oz MOZZARELLA CHEESE (shredded)
    5-7 GARLIC CLOVES (finely chopped)
    2 cups ALL PURPOSE FLOUR
    ¾ stick BUTTER (soft)
    DIJON MUSTARD
    ¼ VEGETABLE OIL (plus oil for sauteing)
    2 Tbsp OLIVE OIL
    2 Tbsp TOMATO SAUCE
    2 Tbsp PARSLEY (chopped)
    CHILI POWDER, CUMIN, SALT (for sausage seasoning, to taste)
    DRIED ITALIAN HERBS (thyme, oregano, basil, etc.)

    Heat 2 Tbsp oil in a skillet and add GARLIC. Sauté for 1 minute and add SAUSAGE. Continue cooking, adding CHILI POWDER, CUMIN, and SALT for seasoning. Cook meat to completion and set aside in a bowl. Slice 3 large ONIONS into strips. Add oil to pan and add onions. Cook onions down until soft and caramelized; this may take some time, but the more completely the onions are cooked down, the tastier the final dish will be! Remove onions from heat and set aside.

    In a bowl, combine 2 cups ALL PURPOSE FLOUR and ¾ stick softened BUTTER. Mix butter into flour thoroughly. Add ¼ cup VEGETABLE OIL and continue to mix. Add ½ cup Water. Mix until the dough is smooth. Spoon onto ungreased pizza pan and spread (use the spoon!). Spread evenly into the size of a large pizza and leave a raised edge for the crust. Place in pre-heated oven and cook at 375 F for 10 minutes. Remove dough from oven and top with DIJON MUSTARD. Spread a layer of mustard evenly and cover dough completely except for the outer edge—just like spreading mustard on a sandwich. Add cooked onions and spread evenly over the mustard. Top with SEASONED MEAT and MOZZARELLA CHEESE. Top dish with sliced TOMATOES and sprinkle liberally with dried ITALIAN HERBS: oregano, thyme, basil, etc..

    In a small bowl, combine 2 Tbsp OLIVE OIL, 2 Tbsp TOMATO SAUCE, and 1-2 Tbsp fresh chopped PARSLEY. Brush mixture over each tomato slice. Return pie to the oven and continue to bake at 375 F for 30-40 minutes until edge of crust is brown.

    Bon appétit!

    Share and Enjoy !


    Asian Jicama Salad Recipe

    asian jicama salad

    Jicama is a root vegetable that can be served raw. It is similar in appearance to a potato, but tastes more like an apple, although not quite as sweet; I find it has an “earthier” taste. Many folks compare the crisp texture of Jicama to that of a water chestnut. Jicama is especially good in this recipe because it takes on the flavor of the dressing very well.

    Ingredients:
    1 cup JICAMA (cut into 1 inch sticks)
    1 cup SNOW PEAS (cut into ¼ inch widths)
    1 cup NAPA CABBAGE (torn into salad-size pieces)
    2 CARROTS
    ¼ cup SESAME SEEDS (toasted)
    2 Tbsp VINEGAR (wine or rice)
    2 Tbsp SOY SAUCE
    4 tsp HONEY (or 2 tsp sugar)
    1 tsp SESAME OIL
    1-2 Tbsp WATER

    Peel jicama root and cut into matchstick shapes. Tear cabbage into salad-sized pieces (substitute romaine lettuce if preferred, but I find the cabbage holds up better in the dressing). Slice snow peas into ¼ inch widths. Shred carrots. Combine all in a bowl and mix.

    In a smaller bowl, add vinegar (red or white wine vinegar or rice vinegar can be used), soy sauce, honey, sesame oil, and water (start with 1 Tbsp of water and add another if desired). Mix ingredients.

    Combine dressing and vegetables and toss thoroughly. Serve as a side dish to add Asian flair to any meal—and it’s great with fish.

    Bon Appétit!

    Share and Enjoy !


    Fried Shrimp Recipe with spicy tempura

    spicy fried shrimp

    I love a tasty fried shrimp recipe, and “tempura” is just a fancy pants word for “fried”. This dish is a knock-off of a dish I love to order at a Chinese restaurant when I’m down in Tampa, but since I don’t live in Tampa, I had to figure out how to make this fried shrimp recipe for myself—and I’ve done it!

    The key is cilantro, and lots of it—also lots of garlic and a little hot pepper, too! Be sure to use a non-stick pan to cook up the spicy pepper mix, otherwise you’ll be setting yourself up for a headache and burned garlic!

    What you need for Spicy Fried Shrimp

    1 lb SHRIMP (peeled and deveined, tail on)
    1 bunch CILANTRO (1 to 2 cups chopped)
    10-12 cloves GARLIC (chopped)
    1 or 2 hot PEPPERS (chopped)
    1/2 cup GREEN ONION (chopped)
    1 tsp RED PEPPER FLAKES (or two tsp!—optional)
    1 cup ALL PURPOSE FLOUR
    1 EGG
    1 cup ice-cold WATER
    frying OIL
    SALT (to taste)

    How to make Spicy Fried Shrimp

    • Chop up 1 bunch of cilantro, stems AND leaves.
    • Chop 2 green onions and dice peppers, I like to use 2 green chili peppers, but use whatever peppers you like depending on how much heat you want in the dish.
    • Chop 10-12 cloves of garlic.
    • Heat a non-stick skillet with 2 Tbsp of oil—definitely use a non-stick skillet! If you don’t have a decent skillet, here’s a link to check out some current skillet prices on Amazon.
    • Add peppers to skillet and allow to cook 1 minute, then add garlic and red pepper flakes (adjust pepper flakes to taste).
    • Cook for 1 minute and then add green onions. Be sure to keep ingredients stirring, reduce heat as necessary to prevent garlic from burning.
    • As garlic browns, add the cilantro and continue to stir ingredients, cooking out the moisture. It’s okay if the garlic browns well, as long as it’s not burned; the dryer the ingredients get the better. Cook the ingredients down and then remove the skillet from the heat and set aside.
    • Heat up the oil for the shrimp.
    • While the oil heats, prepare the tempura batter. It’s best not to prepare the batter ahead of time. In a bowl, beat 1 egg, add 1 cup of ice-cold water, then add 1 cup of all purpose flour.
    • Mix together into a thin batter, but don’t over mix—it’s okay if there are some lumps.
    • Test the batter in the frying oil; the batter will sizzle and float if it is ready.
    • Use peeled and deveined shrimp with the tail still attached—the tail makes a perfect handle.
    • Dip shrimp in batter and then shake off the excess.
    • Lay shrimp in the hot oil and cook 3-4 minutes, turning once. DO NOT cook too many shrimp at the same time because they will stick together and not crisp and brown evenly.
    • When the shrimp are golden, remove from oil and drain on a paper towel (the 1st batch I put into the pepper mix to drain).
    • When all the shrimp are fried, add them to the pepper mix and return the skillet to the burner on low heat.
    • Salt to taste and toss the shrimp GENTLY and thoroughly with the spice mix.
    • Remove from heat and serve immediately.

    I like to serve this dish with sticky rice and a sautéed green, something like cabbage or bok choy. Give fried shrimp recipe a try a let me know what you think, and bon appétit!

    If you want another tasty shrimp idea, one of my favorite is this fancy Shrimp Pancake Recipe.

    shrimp pancake
    Korean style Haemul Pajeon with shrimp

    Thanks for checking out our shrimp recipe, and all of our recipes. Be sure and sign up for our mailing list and never miss a new Chef Buck cooking video, and also click a button below and share the dishes with your friends. We appreciate all the kind comments and support, and we’ll see you next time in the kitchen!
    –Chef Buck

    Thanks for watching our recipe videos!

    We include affiliate links for products on our website, so if you make a purchase after clicking on our links, we may earn a commission which helps us produce more videos and drink more coffee :^) We participate in the Amazon Services LLC Associates Program, which is an affiliate advertising program providing a means for us to earn fees by linking to Amazon.com and affiliated sites, so we can make more videos.

    Share and Enjoy !

    Best Seafood Pancake Recipe — Korean Haemul Pajeon

    seafood pancake dipping sauce

    Try out this seafood pancake recipe, haemul pajeon! It’s a tasty Korean twist on a pancake, and pretty damn tasty. A pancake for dinner is a good idea as long as it’s a cool pancake, and seafood is always a good idea.

    What You Need For This Seafood Pancake Recipe

    Pancake:
    6 oz SEAFOOD (shrimp, scallops, squid, etc.)
    5-6 GREEN ONIONS (cut into 1” lengths)
    1 tsp HOT PEPPER (finely chopped)
    ½ cup ALL PURPOSE FLOUR
    ½ cup cold WATER
    1 EGG (beaten)
    2-3 Tbsp cooking OIL
    Sauce:
    2 Tbsp SOY SAUCE
    1 Tbsp RICE VINEGAR
    1 tsp SESAME SEEDS
    –optional 1 tsp HOT SAUCE (chili garlic, pepper sauce, etc.)

    seafood pancake recipe
    Korean-style haemul pajeon is a delicious seafood pancake –and fun to make, too.

    How To Make A Seafood Pancake

    Mix sauce ingredients in a small dish and set aside.
    Cut green onions in half and then lengthwise, then cut into 1” pieces. Finely chop 1 tsp of hot red pepper—a hot green pepper will do—but a red pepper makes the dish look yummier (also, add a little red bell pepper for color, if desired).
    Chop seafood (seafood is ideal for this dish because it cooks quickly—use shrimp, squid, scallops, clams, etc.).
    In a bowl, mix flour with cold water. Mix well until a thin batter is formed (add a drop more water if needed—the batter should be thin enough to coat the veggies and seafood thoroughly and spread evenly when poured into the skillet).
    Add onions, peppers, and seafood to the batter and mix well.
    Heat a skillet on medium high heat and add oil. When oil is heated, add batter and spread evenly. Cook for 4-6 minutes until the edges of the cake begin to brown—but before the edges brown, add 1 well-beaten egg to the top of the cake (tip: shake the skillet to spread the egg evenly over the cake). When the cake has cooked to a light brown on one side, turn and cook approx. 2 minutes on the other side (it won’t take long—be mindful to not burn the egg, but a light crispness makes this dish delicious)
    Remove and serve immediately with the dipping sauce.
    Give this seafood pancake recipe a try and let me know what you think, and bon appétit!

    For another awesome and easy seafood dish, try this Seafood Stew Recipe.
    seafood stew

    Thanks for checking out the seafood pancake recipe. If you enjoyed it, click some of the clickables below to share the recipe with your friends. I appreciate it!
    –Chef Buck

    Share and Enjoy !


    Kale Recipe -Ginger Stir-fry w/ Tahini Sauce

    sauted ginger kale

    Try this easy stir-fry kale recipe. Kale is a cool cabbage that kicks broccoli’s ass (or at least in this recipe it does).

    Kale Recipe Ingredients:
    1 bunch KALE
    1 inch piece fresh GINGER
    1 medium ONION (cut into slices)
    ½ cup CARROT (thin cut or string cut)
    1 hot PEPPER (finely chopped, optional)
    1 Tbsp SESAME OIL
    SALT (to taste)
    1 Tbsp TAHINI
    3-4 Tbsp SOY SAUCE

    Divide a 1” piece of ginger into two halves. Finely chop one half to use in the sauce and thinly slice the other half and set aside to cook with the stir fry. In a small bowl, mix together the tahini and soy sauce until a thin peanut-buttery consistency is achieved. Mix the finely chopped ginger into the sauce and set aside.
    Wash kale, remove spine, and cut or tear into mouth-manageable pieces. Heat the sesame oil on medium high and sauté onion slices and finely chopped pepper for 1 minute. Add a pinch of salt (not much salt will be needed because of the salt in the soy sauce). Add Ginger slices and cook for another minute. Reduce heat to medium and add the kale and carrots. Mix thoroughly with the onion, pepper, and ginger. Cover and allow to cook for 2 minutes. Turn off heat and add sauce. Toss well and serve hot (and it goes great with rice).
    Give this healthy kale Recipe a try and let me know what you think, and…
    Bon appétit!

    Kale Fun Facts:
    Kale belongs to the same family as cabbage, Brussels sprouts, and collards.
    Kale is packed with antioxidants, which help neutralize harmful free radicals in the body.
    One cup of chopped raw kale provides more than 100% of the daily value of vitamins A, C, and K.
    Free Radicals are something scientists made up to sound smart.

    Want more kale recipe ideas? Try this Kale and Beet Superfood salad Recipe.
    kale beet salad

    Share and Enjoy !


    Spaghetti Carbonara Recipe w/ Chef Buck

    spaghetti carbonara

    A delicious super-simple spaghetti carbonara recipe.

    Ingredients for Spaghetti Carbonara

    13 oz SPAGHETTI
    8 oz PANCETTA or thick cut BACON
    1 EGG
    3 EGG YOLKS
    1/2 cup PECORINO ROMANO (grated)
    (or just romano, what’s the big deal?)
    (even a little parmesan won’t hurt)
    PEPPER (as much as you can handle)
    SALT (very little)
    PARSLEY (optional)

    How to Make a Spaghetti Carbonara Recipe

    Combine 3 egg yolks and 1 whole egg into a bowl and mix well. Stir in ½ to ¾ cup grated Pecorino Romano cheese—a Romano cheese is “pecorino” if it is made from sheep milk—but if you use Romano made from the milk of a cow or a goat, it won’t be the end of the world (and parmesan wouldn’t kill you either—although the pecorino is nice). Set this mixture aside.
    Prepare pasta according to package directions. Add a pinch of salt to the water, but sparingly—there will be plenty of salt in the other ingredients. While pasta cooks, prepare the meat.
    Cut 8oz of pancetta or thick-cut bacon into small squares. Pancetta is Italian bacon that is not smoked—most other bacon you find at the market will be smoked; again, it’s not the end of the world choosing one over the other, the main difference will be in the “smokiness” of the dish. In a large skillet, prepare the bacon. Add a generous helping of fresh cracked pepper (generous is whatever amount you like). Make sure the bacon is cooked through, but do not cook it to a crisp! Remove skillet from the heat and pour off the excess bacon grease. When spaghetti is ready, remove directly from the water (do not rinse!) and mix the pasta with the bacon in the skillet. Add the cheese/egg mixture to the hot pasta and continue mixing thoroughly. Initially it will not look like a lot of sauce, but as you stir the mixture into the pasta, it will become quite creamy (and delicious). Add a splash of pasta water if needed. Throw in a little chopped parsley for color and serve immediately.
    Give this spaghetti carbonara recipe a try and let me know what you think, and…
    Bon appétit!

    Want to try another fantastic pasta dish? Watch Chef Buck cook this Linguine w/ Clam Sauce Recipe.
    linguine with clam sauce

    Thanks for Watching our Videos!

    Thanks for checking out this spaghetti carbonara recipe, and all of our recipes. Sign up for our mailing list so you’ll never miss a new recipe. Also click a button below and share the dishes with your friends. You can also follow Chef Buck on Youtube. We appreciate all the kind comments and support, and we’ll see you next time in the kitchen!

    If you like what CG and I do, support us on Patreon, or throw us a tip in our Paypal Tip Jar. We’ll happily enjoy a coffee on the road – Thanks! We appreciate all the support, and we’ll see you next time in the kitchen!

    We include affiliate links for products on our website. Making a purchase after clicking on our links and we may earn a commission which helps us produce more videos and drink more coffee :^) We participate in the Amazon Services LLC Associates Program, which is an affiliate advertising program. It provides a means for us to earn fees by linking to Amazon.com and affiliated sites, so we can make more videos.

    Share and Enjoy !

    Spring Rolls with Peanut Dipping Sauce

    spring rolls dipping sauces

    Spring rolls are a nice appetizer when you go out to eat at a fancy-pants restaurant, and they’re just as nice when you eat them at home, and they’re easy to make. Briefly wetting the rice paper and placing it on a damp towel makes the delicate rice paper easier to handle. The rice paper softens while you place your filling–makes the process much easier–definitely give this technique a try!

    All you need to make spring rolls are rice paper and some tasty ingredients to roll up inside. You can buy rice paper at any Asian food store, most health food markets, and in the ethnic foods section of many local grocery stores. It’s an economical buy. The last batch I bought was a package of 20 for $2.25 U.S. dollars. It comes in sheets, like paper, but usually round in shape; it doesn’t feel like paper, though—it feels more like plastic, almost like something you’d find at the hardware store, but don’t let that put you off, it softens quickly when wet. Despite its initial “plasticky” appearance, it’s not bad for you, or particularly good for you either—rice, tapioca, salt, and water are the prime components. How your spring rolls taste will be determined by the ingredients you roll up inside, and any dipping sauce you might like to serve them with. It’s a great vehicle for getting raw vegetables into your diet; I like to think of a spring roll as a cigar-shaped salad, but many pre-cooked meats and seafood work well in spring rolls, too.

    What You Need to make Spring Rolls

    Rice Paper and
    Whatever the hell you wanna roll up in the rice paper.
    Here are a few options I like to use:
    cilantro (I ALWAYS USE CILANTRO), cucumber, basil leaves, lettuce, carrots, sprouts, rice noodles, steamed shrimp, stir-fried spicy pork, bell pepper, green onions, cabbage, and on and on and on…
    there’s no end to what you can use.

    spring rolls
    Spring rolls make a great appetizer or entree

    How to Make a Fresh Spring Roll

    Prepare your filling ingredients—mainly making sure the ingredients are chopped or sliced in a manner which will make them rice paper-wrapping friendly—this is especially true if you plan on slicing the spring rolls in half—your filling ingredients will tumble out easily if they’re too loose and tiny.
    Wet the rice paper with warm tap water. Just a few seconds under a warm tap is plenty. Place the rice paper on a damp towel and gently press down. The rice paper will quickly soften and become pliable. Arrange your filling ingredients at one end of the sheet and roll them up in the rice paper like a burrito. Using basil or lettuce or cabbage leaves as your base ingredient will make the rolls structurally sound and easier to roll. It’s very important that the first rollover be tight—compact the ingredients as much as possible—a loosely rolled spring roll is a sad sight, and will quickly fall apart if sliced. The rice paper will be your friend. It will help. It is very sticky and will seal almost like an envelope around your stuffings. If you want a tasty spring roll, it’s as easy as rolling up a tasty combo of ingredients—a yummy dipping sauce will help, and here are two:

    Peanut Dipping Sauce:
    1 Tbsp Peanut Butter
    1 Tbsp Rice Wine Vinegar
    1 Tbsp Toasted Sesame Oil

    Chili Dipping Sauce:
    2 Tbsp Chili-Garlic sauce
    2 Tbsp Soy Sauce
    1 tsp Sesame Seeds

    And just plain old soy sauce works fine, too. Or maybe some hot mustard—I’ve never tried that, but it just popped into my head, so maybe next time I’ll give it a go.
    Alright, that’s enough blabbing.
    Give these spring rolls a try and bon appétit!

    For another delicious Asian inspired dish, try a Seafood Pancake Recipe.
    seafood pancake dipping sauce

    Share and Enjoy !


    Seafood Stew Recipe for Winners

    seafood stew

    A simple and delicious seafood stew recipe for winners*.
    *also appropriate for non-winners

    Seafood Stew Recipe Ingredients

    1 lb MIXED SEAFOOD
    1 HOT PEPPER (finely chopped)
    3-4 cloves GARLIC (finely chopped)
    1 medium ONION (chopped)
    ½ cup CELERY (sliced)
    2 Tbsp TOMATO PASTE
    1 13 oz can DICED TOMATOES
    1 cup CHICKEN STOCK
    2 cups WATER (substitute 1 cup CLAM JUICE if desired)
    1 cup WHITE WINE
    2 Tbsp LEMON JUICE
    1 BAY LEAF
    1 Tbsp OREGANO
    1 tsp THYME
    1 tsp BASIL
    SALT/PEPPER to taste
    1 Tbsp OLIVE OIL

    How to make this Seafood Stew

    Heat olive oil on medium heat and add onion and celery and hot pepper.
    Give these ingredients a minute head start and then add the garlic and salt.

    Cook until the onion begins to soften and then add the tomato paste. Push the paste around with the vegetables—spread it around the bottom of the pan and let it cook up a minute or two—if the paste sticks a little, that’s cool—because now we’ll add white wine which will deglaze any stuck on paste.

    Add a bay leaf, oregano, thyme, basil—throw some red pepper flakes in as well if you like it hot. Let the mix simmer for about 5 minutes.

    Add diced tomatoes, 1 cup of broth (I use chicken broth, but any broth will do), and 2 cups of water—you can substitute 1 cup of clam juice for 1 of the cups of water, if desired. Bring to a boil and then reduce to a simmer, cover, and allow to cook 30 minutes.

    After 30 minutes, add 1 lb. of miscellaneous seafood—a variety of big-bite pieces make a nice presentation. Cover and simmer for another 7-8 minutes. Stir in some lemon juice and remove from heat and serve.

    It looks tasty in a bowl with a nice pyramid of rice in the middle.
    it’s easy peezey and puts a nice glow in your belly, so give this seafood stew recipe a try.

    Bon appétit!

    Hey!!!  ….what about a Beef Stew Recipe?

    beef stew

    Thanks for checking the seafood stew recipe out! Click some of the buttons below and share it with your friends and family, I appreciate it.
    –Buck

    Share and Enjoy !


    Baked Chicken Recipe better than fried chicken

    baked curry chicken

    It’s not fried chicken, but just barely. This is a simple and delicious recipe for folks who like juicy chicken more than greasy chicken, so give this baked chicken recipe a try.

    What you need for this Baked Chicken Recipe

    2½ lbs. CHICKEN (skin removed)
    1 cup MILK (I use almond milk, but buttermilk is cool)
    HOT SAUCE (to taste)
    1 cup BREAD CRUMBS
    3 tsp CURRY POWDER
    1 tsp GARLIC POWDER
    1 tsp ONION POWDER
    1 tsp ONION SALT (or regular salt, adjust to taste)
    ½ tsp GROUND MUSTARD
    1 tsp PAPRIKA
    *add ½ tsp red pepper if you want a kick

    baked curry chicken

    How to “Bake” Fried Chicken

    Buy skinless or remove the skin and clean and rinse 2-2½ lbs. of chicken pieces. I love the dark meat, so I usually use thighs, but use whatever cuts you like and adjust the cooking time accordingly.

    Spread the chicken out in a shallow bowl and dash with hot sauce to taste. Add one cup of milk. I like to use almond milk, but my mama always used buttermilk. Allow the chicken to soak 30-60 minutes.

    In a ziplock bag, add the remainder of ingredients and mix.

    2 pieces at a time, add chicken to the ziplock bag and turn until coated. Sealing plenty of air in the bag will help coat the chicken pieces easily and evenly.

    Place pieces on a non-stick or lightly-oiled baking pan and bake at 350 degrees Fahrenheit for about 30 minutes.
    Periodically check on the pieces as oven cooking times will vary.
    After 30 minutes, or when the pieces are well on their way to cooking, turn them, and continue cooking for another 15-20 minutes.

    Curry gives the chicken a wonderful color, and it looks very much like fried chicken, although not as crunchy as fried chicken. For extra crunchiness, broil the pieces for 1-2 minutes on each side.

    Give this baked chicken recipe a go and let me know what you think!

    If you’re new to home cooking, just get a bunch of spices, pots and pans, and start experimenting with different ingredients and recipes. It’s a healthy hobby that can save a lot of money in the long run. You can check out current prices for Complete Kitchenware Sets on Amazon. Or just go to a thrift store! I’ve found some of my favorite kitchen gear at second-hand stores.

    And when you’re tired of chicken, try this Juicy Pork Loin Recipe.

    pork loin chop

    Thanks for checking out our baked chicken recipe, and all of our recipes. Be sure and sign up for our mailing list and never miss a new Chef Buck cooking video, and also click a button below and share the dishes with your friends. We appreciate all the kind comments and support, and we’ll see you next time in the kitchen!
    –Chef Buck

    Thanks for watching our recipe videos!

    We include affiliate links for products on our website, so if you make a purchase after clicking on our links, we may earn a commission which helps us produce more videos and drink more coffee :^) We participate in the Amazon Services LLC Associates Program, which is an affiliate advertising program providing a means for us to earn fees by linking to Amazon.com and affiliated sites, so we can make more videos.

    Share and Enjoy !

    Beet Greens Recipe — Easy, healthy Dish!

    beet greens

    This is a super simple beet greens recipe. If you purchase beets with the greens intact, don’t throw those greens away! You can cook up a tasty dish using the beet greens (and if you don’t buy beets with the greens, then you need to make an adjustment in your shopping habit).

    Beet Greens Recipe Ingredients:

    1 bunch BEET GREENS
    ½ RED ONION (chopped)
    1/3 RED BELL PEPPER (chopped)
    2 cloves GARLIC (thinly sliced)
    2 Tbsp OLIVE OIL
    SALT (to taste)
    PEPPER (to taste)
    LEMON JUICE or VINEGAR (optional)

    beet greens recipe
    Buy beet roots with the greens for two great ingredients.

    How to make Beet Greens

    Remove the greens from the root and wash thoroughly because greens always seem to need a good washing, especially beet greens. I like to separate the green leaf from the thicker stem since the leafy greens will need far less time to cook. Heat 2 Tbsp of olive oil on med-med high heat. When the oil is hot, add onions and garlic.

    I chop the onion big and the garlic thin. Stir for a minute and then add the red bell pepper and stir for a few minutes more. I use about a third of a red pepper, not too much, because it’s more for color than to influence the taste of the dish. The stems are a nice contrast to the dark greens.

    Add a little water if needed, but not too much, the greens will release plenty of water.
    Add the beet green stems. These will soften pretty fast, so a minute or two will be plenty of time Remember, overcooked veggies are a drag, man! Add the leafy greens.

    Initially, I don’t mix the greens with the ingredients. I just cover the skillet for a minute or two and give the greens time to wilt. Remove the lid and stir, then add salt and pepper to taste and stir a minute more. That’s about when they’re ready. Camera Girl likes to add a splash of lemon, and vinegar goes great with greens, too.
    Remove from heat and serve hot.

    Beet greens make a great side, especially with chicken or a cheap cut of meat. I like to serve greens as a main dish over quinoa, which is a seed that acts like a grain and is an excellent source of protein. (Check current prices for quinoa on Amazon.)

    These quick beet greens make a perfect side dish for all kinds of meals, especially quick cook dishes like fish and kielbasa, or if you want to be a little less carnivorous, pair these greens with a side of beans and top with a soft-yolk egg. The yolk makes a great sauce!

    Give these healthy beet greens recipes a try and let me know what you think, and bon appétit!

    For another beet dish, try this Roasted Beet and Quinoa Recipe.

    how to cook quinoa
    Quinoa with roasted root vegetables.

    Thanks For Watching Our Recipe Videos!

    Thanks for checking out our beet green recipes, and all of our recipes. Be sure and sign up for our mailing list so you’ll never miss a new recipe. Also click a button below and share the dishes with your friends. You can also follow Chef Buck on Youtube. We appreciate all the kind comments and support, and we’ll see you next time in the kitchen!

    If you like what CG and I do, you can also support us on Patreon, or throw us a tip in our Paypal Tip Jar. We’ll happily enjoy a coffee on the road – Thanks! We appreciate all the support, and we’ll see you next time in the kitchen!

    We include affiliate links for products on our website. So, if you make a purchase after clicking on our links, we may earn a commission which helps us produce more videos and drink more coffee :^) We participate in the Amazon Services LLC Associates Program, which is an affiliate advertising program. It provides a means for us to earn fees by linking to Amazon.com and affiliated sites, so we can make more videos.

    Share and Enjoy !

    Follow Me!