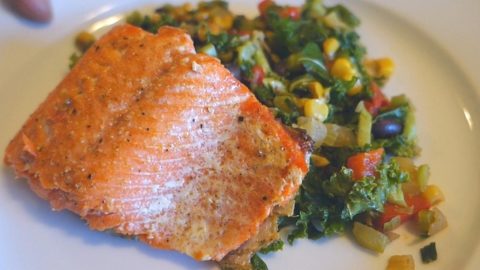
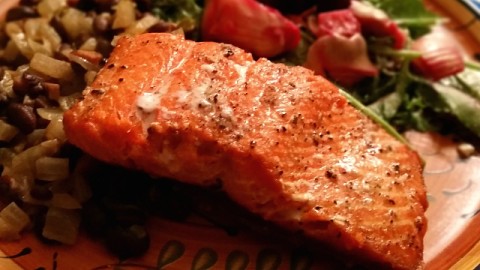
My favorite salmon recipe calls for crisping the fish skin on the stove top then finishing the salmon fillet in the oven under the broiler. This is a simple salmon dish with just a bit of oil and seasoning and a maple glaze to add a hint of sweetness. Honey can be substituted for the maple syrup, or this step can be skipped entirely. I often season salmon with just salt and pepper and then cook the salmon fillet in the same manner.
Ingredients for salmon recipe
SALMON FILLET w/ skin OLIVE OIL PAPRIKA GARLIC POWDER SALT and PEPPER MAPLE SYRUP (optional, or substitute honey) OIL for frying
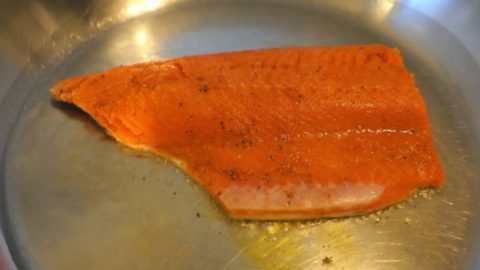
Crisp salmon skin on the stove top for added flavor and texture
How To Cook Salmon Recipe
Wash the salmon filet and pat dry with a paper towel.
Coat the salmon with olive oil, skin side as well.
When oil is hot, add salmon fillet skin side down and cook about 3 minutes.
Transfer the skillet to the oven and continue cooking the salmon under the broiler for 2-3 minutes –adjust time depending on the size of the fillet.
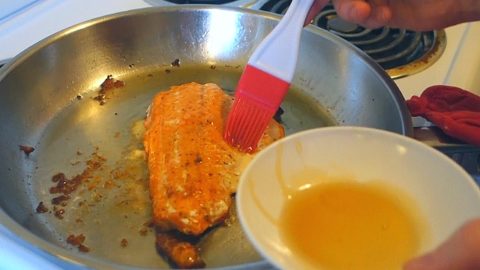
When the salmon is almost finished cooking, apply a glaze of maple syrup, and continue broiling for final minute. If you don’t have a nice syrup on hand, substitute honey.
Remove skillet from the stove and transfer fish to a plate.
Add a glaze of maple syrup or honey for a touch of sweetness
Not Fried Catfish …tastes great, easy, and less mess.
Thanks for Watching our Salmon Recipe Video!
Click a button below and share the dishes with your friends. You can also follow Chef Buck on Youtube. We appreciate all the kind comments and support, and we’ll see you next time in the kitchen!
If you like what CG and I do, support us on Patreon, or throw us a tip in our Paypal Tip Jar. We’ll happily enjoy a coffee on the road – Thanks! We appreciate all the support, and we’ll see you next time in the kitchen!
We include affiliate links for products on our website. Making a purchase after clicking on our links and we may earn a commission which helps us produce more videos and drink more coffee :^) We participate in the Amazon Services LLC Associates Program, which is an affiliate advertising program. It provides a means for us to earn fees by linking to Amazon.com and affiliated sites, so we can make more videos.
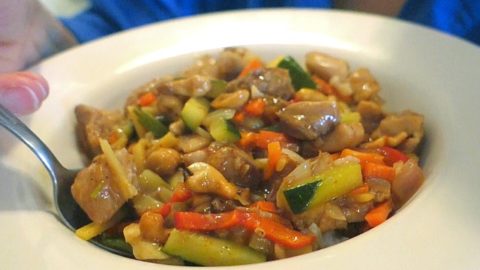
This Ginger Chicken Recipe will remind you of a delicious dish from your favorite Chinese restaurant. The key to a tasty ginger chicken dish is fresh ginger, and lots of it. You won’t need hard to find ingredients, just a little soy sauce, sesame oil, and some fresh produce will make all of the difference.
What You Need To Make This Ginger Chicken Recipe
1 lbs. CHICKEN 1 Tbsp CORN STARCH 1 Tbsp SESAME OIL 1 Tbsp SOY SAUCE SALT and PEPPER (to taste) 4-6 cloves GARLIC ½ cup GINGER ½ cup ONION ½ to 1 cup CARROTS ½ to 1 cup CASHEWS 1 cup chopped Zucchini or other veggies (optional) some OIL for sauteing HOT PEPPER (optional)
Sauce Ingredients: 1 Tbsp SESAME OIL 2 Tbsp SOY SAUCE 2 Tbsp RICE VINEGAR 2-3 Tbsp JAM (or substitute sugar) 1 Tbsp CORN STARCH ½ to 1 cup WATER
Best Ginger Chicken Recipe
How To Make Ginger Chicken
Use skinless and boneless white or dark meat chicken, whichever you prefer.
Chop chicken into bite-sized pieces and place into a bowl.
Add 1 Tbsp sesame oil, 1 Tbsp soy sauce, 1 Tbsp corn starch, and salt and pepper to taste. Mix well with the chicken and then set the bowl aside.
In another bowl, combine sauce ingredients and set aside.
Prepare the veggies; this dish will cook fast, so have all the veggies chopped before beginning to cook the chicken.
Chop fresh ginger into matchstick sizes; fresh ginger and lots of it make this recipe delicious,so don’t be shy with the ginger.
Cut carrots into matchstick sizes.
Finely chop the garlic.
Chop onions (I prefer green onions if I have them on hand, but any onion will work.
Chop hot pepper if desired; the fresh ginger will add a bit of bite to the dish, so skip the pepper if you prefer a milder recipe.
Heat a skillet and oil on medium high heat. Add chicken and cook, stirring occasionally for 5 minutes, and adjust heat as needed. If you need a nice skillet, you can check current prices for a NON-STICK SKILLET on Amazon.
After 5 minutes, add onion, garlic, ginger, and hot peppers.
Cook another 5 minutes, then add carrots and any other veggies; add sauce and mix well and continue to cook for 5 more minutes.
Add more water if desired. The sauce will be thicker or thinner depending on the amount of water added.
To finish the dish, stir in cashew nuts and remove from the heat.
And that’s it! Serve over rice.
Give this this super simple and flavorful ginger chicken recipe a try and let me know what you think, and bon appétit!
Click a button below and share the dishes with your friends. You can also follow Chef Buck on Youtube. We appreciate all the kind comments and support, and we’ll see you next time in the kitchen!
If you like what CG and I do, support us on Patreon, or throw us a tip in our Paypal Tip Jar. We’ll happily enjoy a coffee on the road – Thanks! We appreciate all the support, and we’ll see you next time in the kitchen!
We include affiliate links for products on our website. Making a purchase after clicking on our links and we may earn a commission which helps us produce more videos and drink more coffee :^) We participate in the Amazon Services LLC Associates Program, which is an affiliate advertising program. It provides a means for us to earn fees by linking to Amazon.com and affiliated sites, so we can make more videos.
If you’re new to home cooking, get a bunch of spices, pots and pans, and start experimenting with different recipes. It’s a healthy hobby that can save a lot of money in the long run. Check out current prices for Complete Kitchenware Sets on Amazon as well as Complete Starter Spice Kits. Or try a thrift store! I’ve found some of my favorite kitchen gear at second-hand stores.
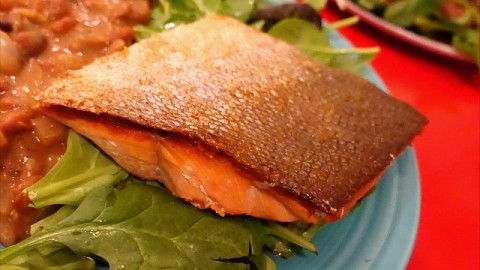
This crispy salmon recipe is delicious. Cooking salmon with a crispy skin adds great texture and flavor. Keep it simple; all you need is a little oil, salt, and pepper to cook up this tasty fish dinner. Give this super easy crispy salmon dish a try…it’s a winner.
How to Cook A Crispy Salmon Recipe
SALMON FILET w/ skin on OLIVE OIL SALT and PEPPER to taste OIL for frying
Keep salmon skin-side up to preserve crispiness
Wash the salmon filet and pat dry with a paper towel.
If your cut of fish has pin bones, remove them.
Coat the salmon with olive oil, skin side as well.
When the oil is hot, add the salmon fillet skin side down and cook for 2-4 minutes –adjust time depending on the size of the fillet.
Transfer the skillet to the oven and continue cooking the salmon under the broiler for 1-3 minutes.
Remove the skillet from the stove and transfer salmon fillet to a plate, skin-side up …resting the fish skin-side down will cause the skin to lose it’s crispiness!
Give this simple crispy salmon recipe a try and let me know what you think, and bon appétit!
And don’t just cook salmon this way! Any tasty fillet of fish with skin on can be prepared in this manner. To appreciate fresh fish, keep it simple.
Thanks for checking out our crispy salmon recipe. Sign up for our mailing list so you’ll never miss a new recipe. Also click a button below and share the dishes with your friends. You can also follow Chef Buck on Youtube. We appreciate all the kind comments and support, and we’ll see you next time in the kitchen!
If you like what CG and I do, support us on Patreon, or throw us a tip in our Paypal Tip Jar. We’ll happily enjoy a coffee on the road – Thanks! We appreciate all the support, and we’ll see you next time in the kitchen!
We include affiliate links for products on our website. Making a purchase after clicking on our links and we may earn a commission which helps us produce more videos and drink more coffee :^) We participate in the Amazon Services LLC Associates Program, which is an affiliate advertising program. It provides a means for us to earn fees by linking to Amazon.com and affiliated sites, so we can make more videos.
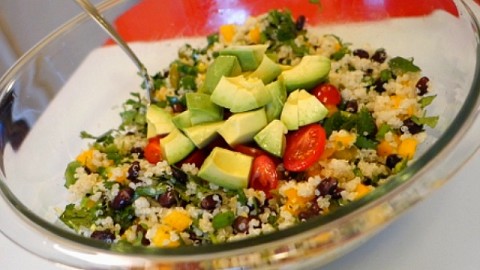
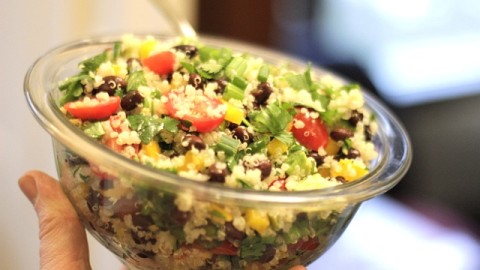
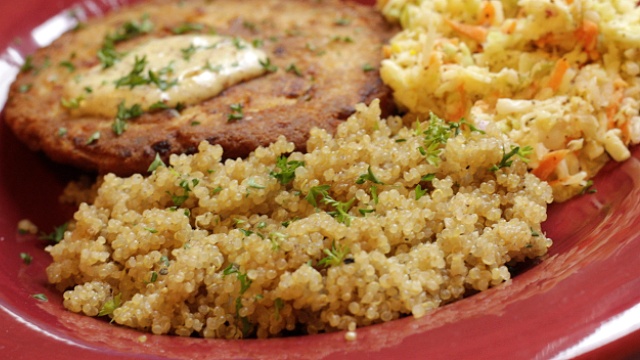
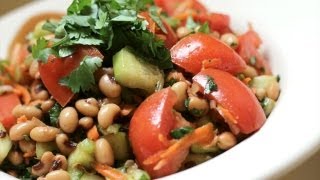
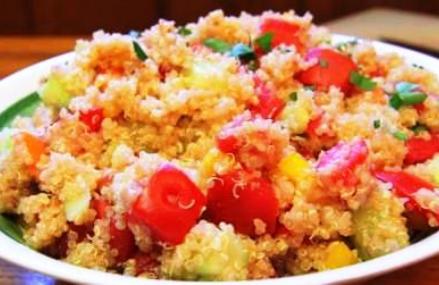
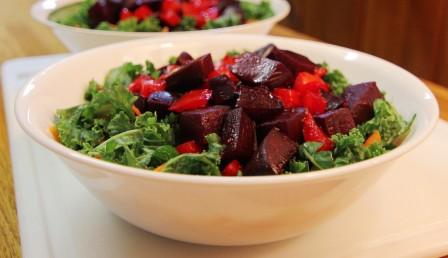
Everywhere you turn, there’s a Southwestern quinoa salad, and for good reason. It’s delicious, easy to make, and a great choice for a healthy meal. Since quinoa is a complete protein, this Southwestern inspired salad makes an ideal vegetarian recipe, doubly so since this quinoa is paired with black beans.
What you need to make a Southwestern Quinoa Salad
2 cups COOKED QUINOA (check current prices for QUINOA on Amazon) 1 15 oz can BLACK BEANS 10-15 sliced CHERRY TOMATOES 1 AVOCADO ½ diced YELLOW BELL PEPPER 3-5 chopped GREEN ONIONS ¼ cup chopped, pickled JALAPENO ½ cup chopped CILANTRO 1 LEMON …juice and zest 2 Tbsp OLIVE OIL SALT and PEPPER to taste
southwest quinoa salad recipe
How to make a Southwest Quinoa Salad
Cook up the quinoa just like rice: 1 part quinoa to 2 parts water, bring to a boil, reduce heat, cover and simmer for 15 minutes or until the water is absorbed. Fluff the quinoa and then set aside uncovered to cool.
While the quinoa cools, prepare the veggies:
Dice ½ a yellow bell pepper, or any color pepper, but if you’re like me and you’re making a corn-free southwest quinoa salad, then using a yellow pepper will make your quinoa salad more lovely to look at. Slice some cherry tomatoes. Cherry tomatoes have a great flavor, and the hardiness of the tiny tomato makes it the perfect choice for a salad.
Chop up some green onions, and cilantro. If you like a little heat, chop up some pickled jalapeno, too, and reserve a Tbsp of the jalapeno pickling juice for added kick and flavor.
When the quinoa cools:
Add 2 cups of the cooked quinoa to a large mixing bowl. Rinse and drain the black beans and add them to the bowl. Add the yellow pepper, jalapeno pepper, onion, cilantro, lemon zest, olive oil, juice from half the lemon, and salt and pepper. Mix ingredients thoroughly. Add tomato. Slice avocado and add to salad. Take the remaining lemon half and squeeze its juice over the cut avocado, this will preserve the vibrancy of the avocado.
Gently mix the salad and serve.
This Southwestern quinoa tastes great on it’s own, as a healthy side dish, or served over a bed of fresh greens for a super salad topping.
Give healthy southwest quinoa salad recipe a try and let me know what you think, and bon appétit!
Click a button below and share the dishes with your friends. You can also follow Chef Buck on Youtube. We appreciate all the kind comments and support, and we’ll see you next time in the kitchen!
If you like what CG and I do, support us on Patreon, or throw us a tip in our Paypal Tip Jar. We’ll happily enjoy a coffee on the road – Thanks! We appreciate all the support, and we’ll see you next time in the kitchen!
We include affiliate links for products on our website. Making a purchase after clicking on our links and we may earn a commission which helps us produce more videos and drink more coffee :^) We participate in the Amazon Services LLC Associates Program, which is an affiliate advertising program. It provides a means for us to earn fees by linking to Amazon.com and affiliated sites, so we can make more videos.
If you’re new to home cooking, get a bunch of spices, pots and pans, and start experimenting with different recipes. It’s a healthy hobby that can save a lot of money in the long run. Check out current prices for Complete Kitchenware Sets on Amazon as well as Complete Starter Spice Kits. Or try a thrift store! I’ve found some of my favorite kitchen gear at second-hand stores.
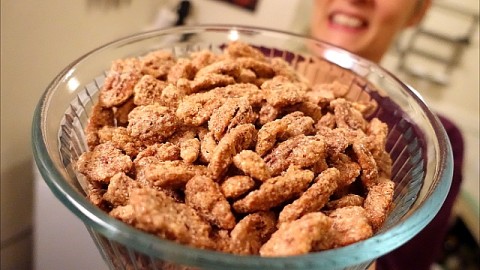
You can make a super simple and tasty candied pecan treat. This sugar pecan recipe is an easy way to impress friends and family. My mom gives tins of pecan candy out as gifts for the holidays, and it’s a sure hit for any party or get-together. CG especially likes these nuts as ice cream toppings.
What You Need to Make Candied Pecans
1 lb. PECANS 1 cup SUGAR 1 tsp CINNAMON ½ tsp SALT 1 EGG WHITE 1 Tbsp WATER
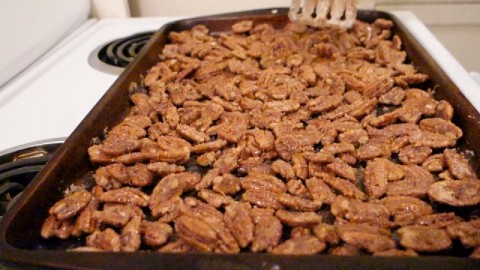
Place pecans on a large ungreased baking sheet and bake 30 minutes at 300 degrees F. Turn pecans every 10 minutes while baking.
How to make Pecan Candies
Buy a pound of pecan halves. When buying, be sure to choose pecans that are in good shape …a bag of broken and busted up pecans doesn’t look as pretty in a dish. Pecans can be pretty pricey, but check here for current pecan prices on Amazon.
In a bowl, combine the cinnamon, sugar, and salt, and then mix well. Set that bowl aside, and in another bowl, combine 1 egg white and 1 Tbsp. of water. Whisk the egg white and water into a frothy foam. Add the pecan halves into the egg white mix. By hand, mix the pecans until coated thoroughly. Once the pecans are coated completely, transfer then into the dry mix bowl. Still using your hand, mix the pecans in the cinnamon sugar until they are coated well.
On an ungreased baking sheet, spread the coated pecans into a single layer. Place the baking sheet in an oven preheated to 300 degrees Fahrenheit. You can check here for current prices for baking sheets on Amazon.
Remove the baking sheet every 10 minutes to give the pecans a stir and spread them out again; this will let the pecans bake evenly and keep from sticking together.
After a total of 30 minutes baking time, remove the pecans for a final stir, then set aside to cool. That’s it. As soon as they’re cool enough to eat, then eat away. Be sure to allow the pecans to cool completely before sealing in a container.
My mom sends out tins of candied pecans to her favorite children, which sometimes includes me.
These sugar pecan candies make a great holiday treat or anytime treat. My mom makes them all the time for family gatherings and they’re a sure fire hit.
Give this candied pecans recipe a try and let me know what you think, and bon appétit!
Thanks for checking out this candied pecans recipe, and all of our recipe videos. Be sure and sign up for our mailing list and never miss a new Chef Buck cooking video, and also click a button below and share the dishes with your friends. We appreciate all the kind comments and support, and we’ll see you next time in the kitchen! –Chef Buck
Thanks for watching our recipe videos!
We include affiliate links for products on our website, so if you make a purchase after clicking on our links, we may earn a commission which helps us produce more videos and drink more coffee :^) We participate in the Amazon Services LLC Associates Program, which is an affiliate advertising program providing a means for us to earn fees by linking to Amazon.com and affiliated sites, so we can make more videos.
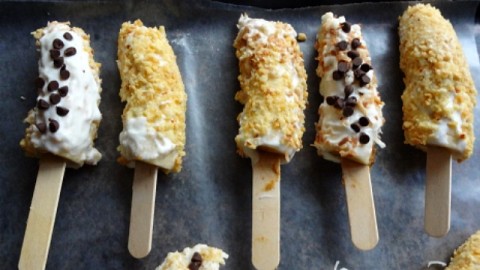
Try a healthy Frozen Yogurt Banana Treat. It’s easy to make, and a nice dessert option instead of ice cream when you’re trying not to be too bad. Crushed peanuts and coconut flakes make this yogurt banana popsicle extra tasty, and a chocolate chip or two won’t hurt, especially if you’re making it as a ghostly Halloween treat for some lucky kid.
What You Need to make a Frozen Yogurt Banana Pop
Banana Crushed Peanuts Coconut Flakes Chocolate Chips Greek Yogurt (or melt white chocolate instead of yogurt) and some Wax Paper
How to make a frozen Yogurt Banana Pop
Peel a banana!
You can use 1 banana to make 2 popsicles, or 4 popsicles.
For two frozen treats, just cut the banana in two. This size makes a yummy pop, but can be a bit much if frozen for a loooong time; for easier to eat frozen banana popsicles, cut the halves into lengthwise halves.
Poke a stick into the center of the banana. A thin stick will be needed for smaller popsicles, otherwise the banana will split.
Roll or dip the banana stick in yogurt and coat thoroughly. Thick, Greek yogurt is ideal for a nice coating.
Place pops on wax paper and Freeze AT LEAST 1 hour. The longer it freezes, the more like a popsicle they will become, but it will take at least 1 hour for minimum frozen popsicle satisfaction.
For fancy popsicles, roll the banana sticks in crushed peanuts and coconut flakes. This can be done before or after the pops are coated in yogurt.
For extra coconut flavor, toast the coconut flakes.
For a more decadent dessert, sprinkle the yogurt covered pops with chocolate chips before freezing. Or M&M’s…or any kind of sprinkles you like.
And for a spooky treat for the children, use chocolate chips to shape eyes and a mouth to make a yogurt/banana ghost. This is an easy and healthy low-calorie treat to make around Halloween.
And if you’re not counting calories, use white (or dark) chocolate instead of yogurt; simply melt chocolate in a skillet and roll the banana sticks to coat.
You can fancy up a frozen yogurt banana recipe with chocolate chips, coconut flakes , peanuts, peanut butter, M&M’s…whatever you like!
Give this frozen yogurt covered banana recipe a try and let me know what you think, and bon appétit!
THANKS FOR WATCHING! If you enjoyed the post, share it with your friends …be a cool kid and hit some of the share links below. I appreciate it! –Chef Buck
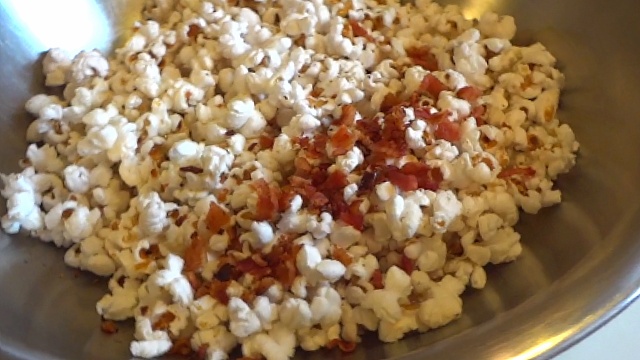
90% of all U.S. households have a microwave oven, but we don’t, so when we make popcorn, it’s on the stove top. Generally we buy the store brand, it’s considerably cheaper than name brand popcorn, and we find it offers the same result. We cook popcorn in coconut oil. Coconut oil has a high heat point and retains it’s nutritional value when heated. We like to add flavorings, too. My favorite is grated Parmesan cheese. Of course we always add butter and salt, but I’ve found that fresh ground black pepper is a great addition as well.
How to Cook Popcorn on the Stove top:
1) On Medium Heat, add 2 Tbsp of coconut oil in a heavy bottomed pot.
2) Add a couple of test corn kernels into the pot.
3) When the oil heats through, and the test kernels have popped, add ½ cup of popcorn kernels.
4) Shake the pan to distribute the kernels along the bottom of the pan. They should form a single layer.
5) Cover the pot with a lid, but don’t cover tightly, leave the lid slightly ajar to allow steam to escape; this will keep the popcorn from tasting stale.
6) Allow the kernels to pop until the popping sound almost completely subsides.
7) Once popped, removed pot from burner and pour popcorn into a bowl.
8) While hot, add melted butter and salt and whatever seasonings you desire.
and that’s it!
Below is a video we made experimenting with bacon, but I think I prefer basic popcorn, although the fresh ground black pepper tasted awesome.
Fun Facts:
–Two tablespoons of unpopped corn kernels produce a quart of popcorn for about 25 cents. –In movie theaters, for every dollar spent on popcorn, about 90 cents is profit. –A cup of plain popcorn contains about 31 calories. –Americans eat more popcorn than any other country. –About 70% of popcorn sold in America is eaten in the home. –By volume, popcorn is America’s most popular snack food.
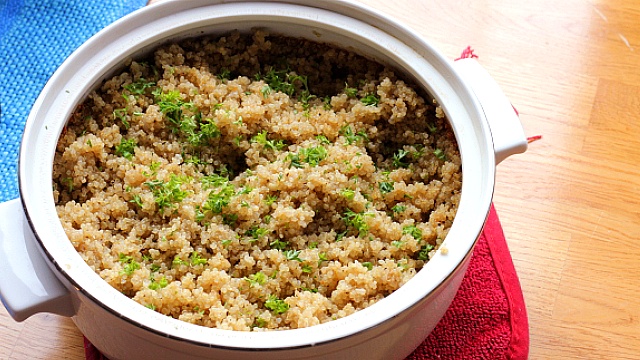
This garlic quinoa recipe makes a terrific side dish. I use quinoa often to provide the protein in vegetarian meals, but quinoa is also a smart choice to serve with other proteins. This garlic quinoa side is filling and tasty, and a great accompaniment for many meat and fish dishes.
Garlic Quinoa Recipe Ingredients:
2 cups QUINOA 3 cups WATER 3-4 cloves GARLIC (finely chopped) 2 Tbsp OLIVE OIL SALT and PEPPER to taste and add chopped PARSLEY …if you like, man
garlic quinoa makes a great side dish
Garlic Quinoa Recipe Directions:
In an oven proof dish, add 3 cups of water. Add in the olive oil, or melted butter. Add the quinoa. Add finely chopped garlic. I find 3-4 cloves to be plenty (this is one of those rare dishes where I have found too much garlic to be too much). Add salt and pepper to taste. If you want to add a little heat, add some finely chopped red chilis (it adds a nice color, too), or just a little cayenne pepper. Stir the ingredients together well and place top or foil covering over the baking dish. Bake in an oven preheated to 350 degrees Fahrenheit for 90 minutes. No attention to the dish is required while baking. After 90 minutes, remove the dish from the oven, uncover and let set for a few minutes. Fluff with a fork and serve. It’s a great side dish for meat, fish, and vegetarian meals. Any leftovers can be used to make quick quinoa salads. Give this Garlic Quinoa Recipe a try and let me know what you think, and bon appétit!
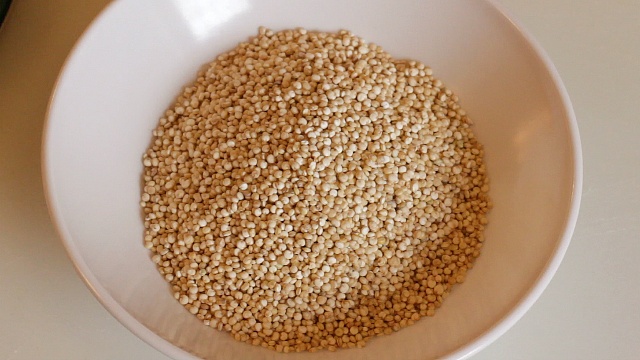
uncooked quinoa…looks like a grain, but it’s a seed.
Quinoa is a terrific ingredient to incorporate into your diet for many reasons, here are a few: 1) It is a complete protein (provides all essential amino acids). 2) High in fiber and nutrition. 3) High in magnesium and iron. 4) Is low on the Glycemic Index, making it a good choice for blood sugar regulation. 5) it can easily be substituted for rice in many recipes
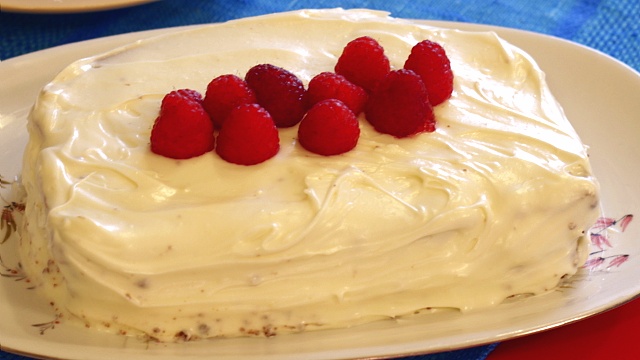
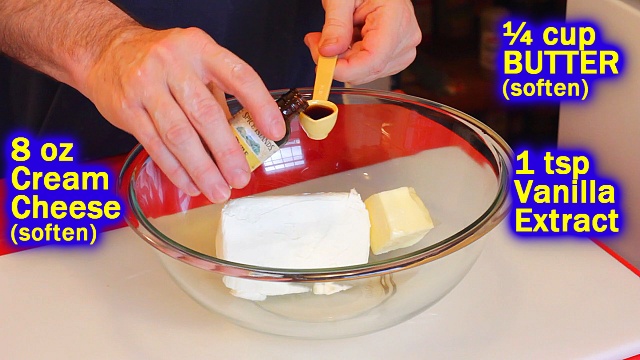
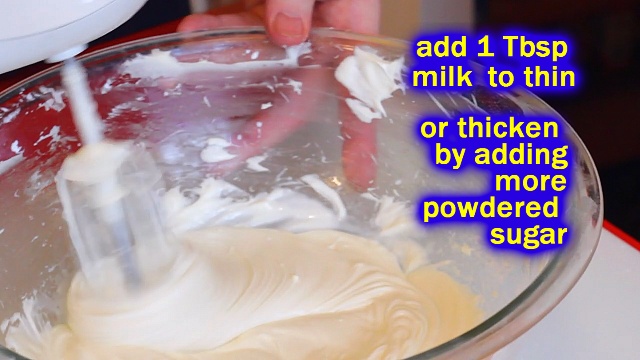
Need an easy, super tasty cake frosting? This cake frosting recipe is ready in minutes and makes the perfect icing for cake (and cupcake!) perfection! It’s an especially great balance for a chocolate cake. You can make this frosting as thick or thin as you like, just add more powdered sugar to thicken, and more milk to thin, but add the milk just a wee little at a time–it doesn’t take much.
About an hour ahead of time, set out the cream cheese and butter to soften. In a bowl, combine cream cheese, butter, and vanilla extract and blend with hand mixer. Once ingredients begin to come together, add in the powdered sugar. Add the sugar a bit at a time to avoid a sugary blending mess. Mix until the frosting is smooth. To thin the frosting add a small amount of milk–no more than a Tablespoon at a time! For a thicker frosting, just add more powdered sugar. And that’s it. Spread on your dessert and eat away!
Add milk to thin, or more powdered sugar to thicken the frosting.
Give this cream cheese frosting recipe a go and let me know what you think, and bon appétit!
And for more tasty dessert ideas, check out these tasty treats:
click the pic for more desserts!
“Life is uncertain. Eat dessert first.” ~Ernestine Ulmer “If you want to make an apple pie from scratch, you must first create the universe.” ~Carl Sagan “Seize the moment. Remember all those women on the Titanic who waved off the dessert cart.” ~Erma Bombeck
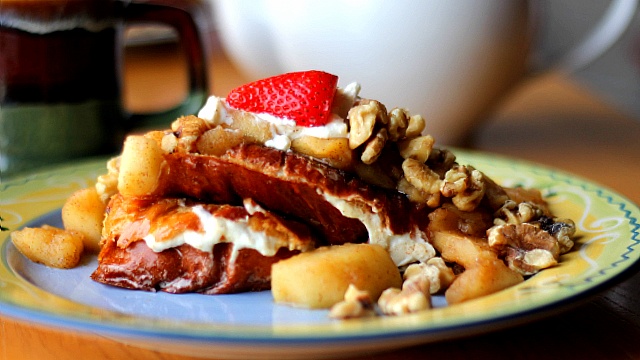
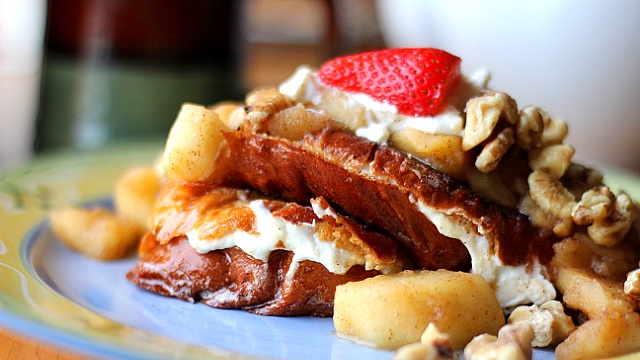
Why have Plain French Toast when you can have French Toast with a cream cheese filling? A little creamy cheese and cinnamon ginger apples can transform your breakfast into a 10-year old’s dream breakfast.
French Toast Ingredients:
BREAD (sliced, stale) 1½ cups MILK 4 EGGS BUTTER for frying, and apples APPLES (peeled, sliced) CANDIED GINGER (sliced) WALNUTS (toasted) 8 oz CREAM CHEESE (soft) 15 oz RICOTTA CHEESE CINNAMON (to taste) optional: sugar and vanilla
Stale bread makes the best french toast! –slice ahead of time!
French Toast Directions:
Stale bread makes great French toast, so slicing bread ahead of time is a great idea; at least a few hours ahead of time, but ideally overnight. Stale bread will soak up the French toast batter without becoming overly soggy and falling apart, especially if you’re using thinner slices of bread, and the thinner or thicker the slices will depend on your particular tastes. This French toast recipe doesn’t need thicker slices, since you’re basically building a French toast sandwich; I’m using thicker slices of challa bread for this video, but I often use regular slices of Hawaiian sweet bread, which works great.
Mix the cream cheese and ricotta cheese together. Be sure to set your cream cheese out ahead of time to soften, this will make mixing it with the ricotta cheese much easier. I’ll often mix these ingredients ahead of time. If making a smaller amount, the cheese mix is about a 2 to 1 ratio of ricotta to cream cheese. I sometimes add a tsp. or two of sugar to the cheese mix, but this is optional; I prefer it without the added sugar, since the apple mix will be quite sweet.
Any leftover cream/ricotta mix can be used as dessert topping, and makes a tasty filling for omelets. I generally make too much apple mix, but that’s a good thing, too. I’m generous with the apple topping, and any leftover apple mix is a perfect topping for oatmeal or ice cream.
Creamy cheese filled French Toast
To make the apple mix, peel, slice, and remove the cores of the apples. Apples vary quite a bit in size, but I usually end up with about 4-6 cups of apple slices, and I generally use gala or Fuji apples, which take little time to cook down.
Melt about 2 Tbsp of butter in a pot and add apples. Mix with butter and cook over medium heat. Add candied ginger slices; I think ½ to 1 cup is a good amount of candied ginger, but there is no wrong amount, follow your gut. Add 1-2 Tbsp of sugar and cinnamon to taste, Mix and cover and cook about 20 minutes, until apples soften and get juicy. For extra liquidy goodness, stir in about ¼ cup water. You want the apples to be a little syrupy, that way you won’t have to use any maple syrup with the French toast. Once the apples are cooked to your liking, cover and set aside.
Mix the French toast batter. A basic batter is eggs and milk, and I’m also adding cinnamon, but often folks will add a little sugar or vanilla extract. I don’t add vanilla or sugar to the batter with this particular dish, because the creamy cheese center and apple-ginger topping will add more than enough flavor. In a bowl, combine the milk, eggs, and cinnamon to taste (½ tsp is a good amount). Whisk together well and then pour some into a shallow bowl–or all–it depend on the size of your shallow bowl; you don’t want the batter to be so deep that it runs into the cheesy part of your French toast sandwich.
To build the French toast sandwich, simply spread the cheese mixture onto a slice of bread and top with another slice, making a basic cheese sandwich.
You can also add toasted walnuts into the sandwich for a nice crunch, or simply top the toast later with toasted nuts, but definitely add nuts at some point, cause the crunchy contrast makes the dish perfect, and toasted walnuts are awesome. To toast the walnuts: spread walnuts on a baking sheet and roast at 350 degrees Fahrenheit for 5-7 minutes. It won’t take long. As soon as the nuts begin to color up, remove them from the oven; they will burn if ignored, so set a timer and watch them closely. Taking the time to toast the walnuts is well worth the effort…it’s a great taste.
Once you’ve constructed the cheesy French toast sandwich, heat a little butter in a non-stick skillet on medium heat. Check current prices for a Non-Stick Skillet on Amazon. Place the sandwich in the batter and let soak a moment and then turn and batter the other side. Place sandwich in the skillet and cook on medium heat until golden brown, turn and cook other side and remove from the heat. Slice French toast and then top with apples and walnuts (a dusting of powdered sugar is optional). For a splash of color, add fresh berries or mint.
Serve this cheese stuffed French toast with maple syrup, or without–I find the cooked apples to be syrupy enough, and the warm cheesy center keeps the French toast from being too dry.
It’s a super delicious dish and a great treat for company.
Give this fancy pants Cream Cheese French Toast recipe a try and let me know what you think, and bon appétit!
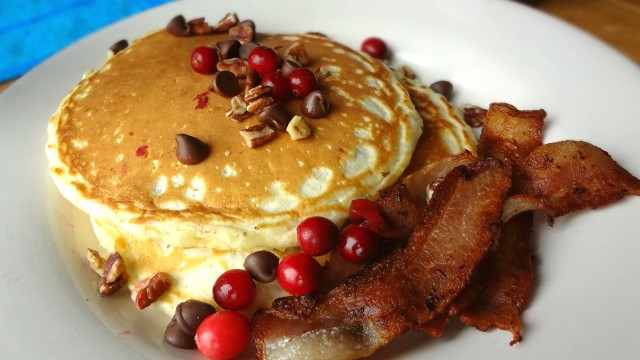
And for another fancy pants breakfast dish, try this Pancake Recipe.
Fancy pancakes are easy to make, and better looking, too.
Thanks for Watching our French Toast Recipe Video!
Click a button below and share the dishes with your friends. You can also follow Chef Buck on Youtube. We appreciate all the kind comments and support, and we’ll see you next time in the kitchen!
If you like what CG and I do, support us on Patreon, or throw us a tip in our Paypal Tip Jar. We’ll happily enjoy a coffee on the road – Thanks! We appreciate all the support, and we’ll see you next time in the kitchen!
We include affiliate links for products on our website. Making a purchase after clicking on our links and we may earn a commission which helps us produce more videos and drink more coffee :^) We participate in the Amazon Services LLC Associates Program, which is an affiliate advertising program. It provides a means for us to earn fees by linking to Amazon.com and affiliated sites, so we can make more videos.
It’s easy to make friends with this easy, awesome tasting biscuit recipe. You biscuits in all manner of meals. Serve them alone as a breakfast side, pile them up into the perfect breakfast sandwich, ladle them with gravy for a wholesome entree, or top them with whipped cream and strawberries for a decadent dessert!
Buttermilk Biscuit Recipe Ingredients
4 cups ALL PURPOSE FLOUR 1 Tbsp BAKING POWDER 1 tsp BAKING SODA 1 tsp SALT 1 Tbsp SUGAR 1 cup BUTTER (diced, chilled) 1½ cups BUTTERMILK (chilled) (plus buttermilk for brushing biscuit tops)
Buttermilk Biscuit Recipe Directions
In a bowl, combine flour, baking powder, baking soda, salt, and sugar (optional). Mix ingredients together well. Add diced butter. For best results use chilled butter –keep the diced butter in the refrigerator until needed. Cut butter into the flour using a pastry cutter or knives. Check here for current prices for a pastry cutter on Amazon.
Butter should be cut into pea-sized bits, but there’s no reason to be militant about it…nice chunks of butter are nice. Once the butter is cut into the flour, add buttermilk. Keep the buttermilk chilled until you are ready to use it–cold butter and buttermilk are best for this recipe.
Pour the buttermilk into the bowl, and using a spatula (or your hand), roll the flour around the edge of the bowl until the buttermilk is absorbed and the dry flour begins sticking together. Roll until there is very little loose flour…add a drop more buttermilk if needed, but do so sparingly–you don’t want the flour to be “wet”.
On a lightly floured surface, empty the bowl and press the flour together, knead once or twice and then spread the dough out into a flat, ½ inch thickness. Do not knead or “handle” the dough too much.
Flour the edges of a biscuit cutter or drinking glass and cut out biscuits. I like my buttermilk biscuit about 2″-3″ across, but make whatever size you like. Giant biscuits can be fun :^) Cut the biscuits closely and get as many out of the first press as you can. Once all of the biscuits are cut from the first press, bring the dough together again and cut out remaining biscuits–again trying to handle the dough as little as possible.
Arrange the biscuits touching side by side on a lightly greased pan or on parchment paper. Lightly brush the tops of the biscuits with buttermilk or melted butter–this will help them to brown nicely. Place biscuits in the oven and bake at 425 degrees Fahrenheit for approximately 15 minutes, or until biscuits are golden brown to your liking.
Give these biscuit recipes a try and let me know what you think, and for another breakfast bread dish, try this Egg Bread Recipe.
Fancy baked eggs to impress friends and family
Thanks for checking out our biscuit recipe, and all of our recipes. Be sure and sign up for our mailing list and never miss a new Chef Buck cooking video, and also click a button below and share the dishes with your friends. We appreciate all the kind comments and support, and we’ll see you next time in the kitchen! –Chef Buck
Thanks for watching our recipe videos!
We include affiliate links for products on our website, so if you make a purchase after clicking on our links, we may earn a commission which helps us produce more videos and drink more coffee :^) We participate in the Amazon Services LLC Associates Program, which is an affiliate advertising program providing a means for us to earn fees by linking to Amazon.com and affiliated sites, so we can make more videos.
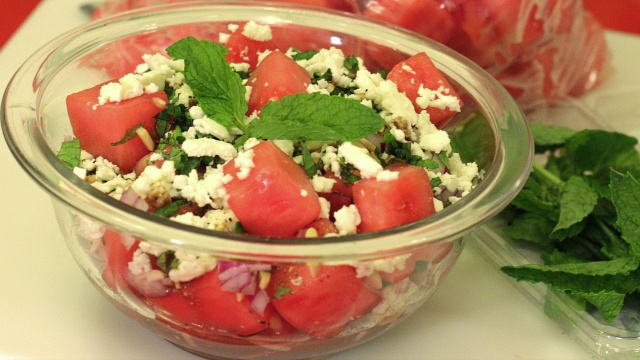
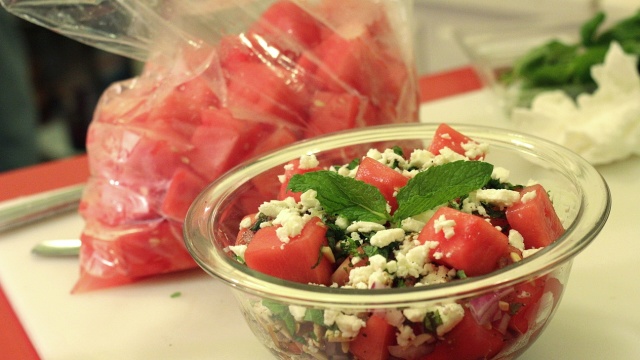
Watermelon Salad is simple to throw together and a tasty way to save a crappy melon. CG loves watermelon, but once in a while she brings home a dud that just doesn’t make the cut; so what does one do with an unsweet, flavorless melon? Turn it into a savory salad dish!
Watermelon Salad Recipe Ingredients: 6 cups crappy, unsweet, seedless WATERMELON 1-2 Tbsp fresh MINT (chopped) ¼ cup RED ONION (chopped) ¼ cup FETA CHEESE crumbles ½ cup toasted ALMOND SLIVERS
dressing: ¼ cup BALSAMIC VINEGAR 2 Tbsp OLIVE OIL 1 Tbsp DIJON MUSTARD 1 Tbsp MAPLE SYRUP (or substitute honey) 1 clove GARLIC (minced) SALT and PEPPER to taste
Turn crappy watermelon into happy watermelon! (sorry)
Watermelon Salad Directions: This salad works best with a seedless melon–’cause it’s a salad–and no one wants to dig seeds out of a salad. Wash your melon and cut away the rind. Slice the red flesh into hearty, but mouth-sized pieces. If it’s sweet–then you’re set! Chow down, because that’s what a melon is for! –but if it’s not sweet, if it’s a flavorless lump that sits in your mouth like play-doh, then don’t despair…it’s salad time. First thing, make the dressing. In a small bowl, combine the balsamic vinegar, olive oil, dijon mustard, maple syrup (or substitue honey), garlic, salt, and pepper. Mix together and set aside. In a larger bowl combine cut watermelon pieces, mint, red onion, feta cheese, and almond slivers. I’ve suggested some ingredient measurements–but that’s just a loose guildeline, man. It’s a salad…follow your heart (and taste buds). Add salad dressing to taste and toss. Boom. That’s it, dude. Your crappy melon has been transformed into a delicious salad.
Give this Watermelon Salad recipe a try and let me know what you think, and bon appétit!
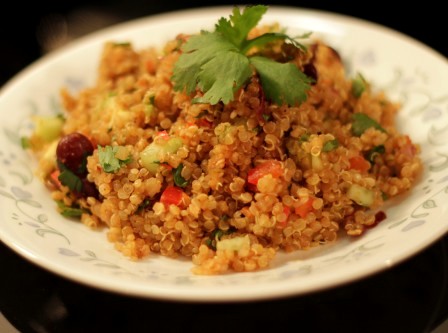
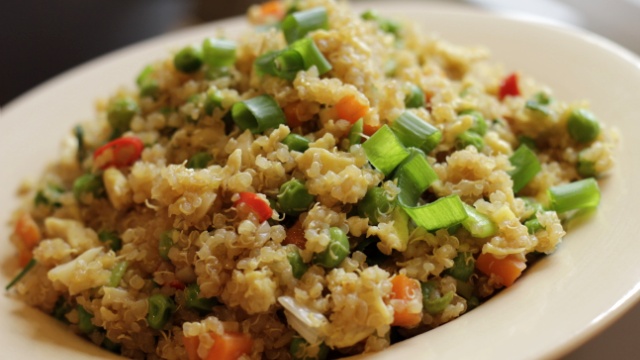
This fried quinoa recipe is a quick and tasty take on Chinese fried rice. Quinoa makes a great substitute for rice in many recipes, especially quinoa fried “rice”. Quinoa is a complete protein, which makes this dish a complete meal, even if you leave out the egg–which is an easy way to make this a vegetarian recipe. Of course you can go the other route and throw in a little diced pork chop or ham if you like, but I’m quite happy with just a couple scrambled eggs thrown in.
Fried Quinoa Recipe Ingredients: 1 cup QUINOA (before cooking) 1 cup PEAS 1 CARROT (diced) 4-6 GREEN ONIONS (chopped, tops separate) 3-5 cloves GARLIC (finely chopped) 2 Tbsp GINGER (finely chopped) HOT PEPPERS (as desired, finely chopped) 2 EGGS (scrambled) 2-3 Tbsp OIL for sautéing SOY SAUCE as desired SESAME OIL 1-2 tsp SALT and PEPPER to taste
Quinoa Fried “Rice”
Fried Quinoa Recipe Directions: This is a great dish for leftover quinoa. The next time you’re making a pot of quinoa for another recipe, just make a little extra for this fried rice recipe knockoff! But if you don’t have any leftover cooked quinoa handy, just prepare this quinoa a little ahead of time to give it time to cool down–this will keep the quinoa from easily overcooking and becoming mushy.
Quinoa is easy to prepare–just like rice, in fact! Rinse the quinoa if needed (many brands come pre-rinsed). In a pot, add 1 cup quinoa to 2 cups water. Bring the pot to a boil, reduce pot to a simmer, and then cover and let cook 13 minutes (this will result in slightly al-dente quinoa, which is what you want for frying). Remove the quinoa from the heat and let sit for 10 minutes. Then fluff with a fork and allow to cool completely (salt if desired).
For fried rice, I like to scramble my eggs first and then set aside. I Use two eggs for this recipe, but feel free to use 1, or 3, or none if you want a vegetarian fried quinoa. Whisk the eggs (add a splash of milk if desired–makes scrambled eggs smoother). Heat oil in a skillet and quickly scramble eggs on med-high heat and then set aside for later.
In a large skillet, heat 2-3 Tbsp oil on medium.
Add raw, diced carrots (should be about pea size). Add chopped hot peppers, too–if desired. I like adding a little fresh red chili peppers for taste, but jalapenos would work just as well, or red pepper flakes, or even just a little sriracha later, if desired–or no heat at all–it’s up to your tastes; follow your heart, but spicy food is good for you, right?
Sauté the carrot and peppers for a minute and then add the ginger, garlic, and chopped green onion bottoms (reserve the chopped tops for a flavorful garnish).
Continue sautéing another minute and then add in the quinoa. Stir fry until heated through, this won’t take very long.
Add sesame oil and peas. I like to use frozen peas (thawed), because they hold their texture better than canned peas. Stir until mixed. Add soy sauce to taste. Add fish sauce if desired. The sauces will provide plenty of salt, but if you want a little black pepper, go ahead and throw that in now.
Mix up and then add the scrambled egg. Mix and fry for another minute and then remove from the heat.
That’s it.
This dish is ready pretty quick. Top the fried quinoa with chopped green onion, crushed peanuts, or both. Serve fried quinoa it’s own or with a veggie side (broccoli or bok choy or Thai eggplant are nice).
Give this Fried Quinoa recipe a try and let me know what you think, and bon appétit! And for more tasty quinoa dishes, check out my Quinoa Video Playlist.
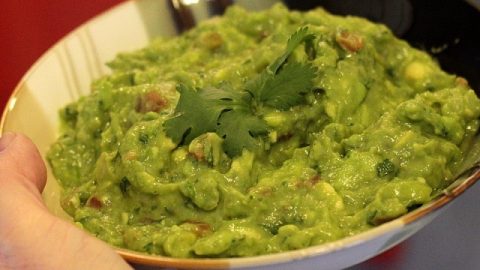
The guacamole you make at home from fresh ingredients will always be superior to store-bought guacamole–and it’s such a quick and easy dish to prepare!–so why wouldn’t you?
Classic Guacamole Recipe Ingredients
3 AVOCADO (ripe, pitted and skinned and diced) 1-2 Tbsp LIME JUICE (or sub lemon juice) ¼ cup ONION (chopped) 2 ROMA TOMATO (chopped) 1 clove GARLIC (minced) 1-2 Tbsp CILANTRO (chopped) ½ tsp CUMIN (optional) dash of CAYENNE or HOT SAUCE as desired ½ tsp SALT …adjust to taste
How to make Homemade Guacamole
Choose ripe avocados!–an avocado is ripe if it’s soft (not too soft and not too firm–right in the middle) …a ripe avocado will give slightly when pressed. If it feels hard like a rock, then it’s not ripe…if it feels mushy, then it’s overripe. If the skin feels papery and dry (crackly)–then it’s too old. It’s not rocket science–just go through the avocados at the market and pick whichever one Goldilocks would pick.
Run a knife around the center of the avocado and pull it apart to reveal the pit. Remove the pit, cut the halves into quarters and peel away the skin. Dice the avocado and place in a bowl. Quickly add the lime or lemon juice and toss well, coating the avocado–this will add a great flavor and more importantly keep the avocado from browning!
Add salt. If desired, add a little cumin, cayenne pepper, hot sauce for bite–but this is optional.
Mix the ingredients well and, with a fork, smash up the avocado–but not too much–the ideal guacamole is lumpy, not smooth.
Add chopped roma tomatoes, onion, cilantro, and garlic. Use fresh ingredients! –the key to a delicious guacamole is fresh ingredients.
Toss everything together and then cover and place the guacamole in the refrigerator until needed.
guacamole recipe
Give this guacamole recipe a try and let me know what you think, and bon appétit!
If you’re new to home cooking, get a bunch of spices, pots and pans, and begin experimenting with different recipes. Cooking is a healthy hobby and skill that will save you money in the long run. Check out current prices for Complete Kitchenware Sets on Amazon as well as Complete Starter Spice Kits. Or go to a thrift store! I’ve found some of my favorite kitchen gear at second-hand stores.
Thanks for checking out the recipes. Be sure and sign up for our mailing list so you’ll never miss a Chef Buck cooking video, and click a button below and share the dishes with your friends. We appreciate all the kind comments and support, and we’ll see you next time in the kitchen! –Chef Buck
This crispy home fried potatoes recipe makes a tasty breakfast side. I use onion and hot pepper in this video/recipe, but a little added green bell pepper is nice, too.
Home Fried Potatoes Recipe Ingredients
1 large POTATO 2-3 Tbsp BACON FAT 1/3 cup ONION (finely chopped) ¼ cup GREEN BELL PEPPER (finely chopped, optional) HOT PEPPER (to taste, finely chopped) 1 tsp SMOKED PAPRIKA SALT and PEPPER to taste
How to Make Home Fried Potatoes
In a skillet, fry up 4-5 pieces of fatty bacon, this will give you enough grease to cook up your potatoes.
Peel your potato, which is something I hate to say, ’cause potato skin is so delicious, but the breakfast home fries I grew up with were peeled, so that’s how I gotta roll.
Dice your potato into dinky cubes; they don’t have to be exactly the same same, but mostly they do, so cut them as uniformly as possible.
Add your diced potato to the skillet of hot grease–and by hot, I mean that your potatoes start to sizzle and cook when they hit the pan–but not overly hot, ’cause it will take 20-25 minutes to cook these potatoes up just right. Medium-low heat is a good temp, keep the potatoes sizzling, they need to crisp on the outside, but they also need to cook through on the inside, otherwise you’ll end up with a bunch of crispy, raw potato; so go slow, amigo.
Mix your potatoes with the grease and spread them out in the skillet and let them brown for about 5 minutes.
Add finely chopped onion and hot peppers; if desired, also add a little finely chopped green bell pepper for taste and color…I usually do, but if I don’t have it on hand, it’s not the end of the world–it’s just breakfast, man.
Add paprika, stir and continue to cook for another 10 minutes, stirring occasionally, until the potatoes are cooked through and done to the desired crispness. The key is to not cook the potatoes too fast.
Give this home fried potatoes recipe a try and let me know what you think, and bon appétit!
Baked eggs are an easy way to impress folks for breakfast.
Thanks for checking out the home fried potatoes recipe, and all of our recipes. Be sure and sign up for our mailing list to never miss a new cooking video, and also click a button below and share the dishes with your friends, and follow Chef Buck on Youtube. We appreciate all the kind comments and support, and we’ll see you next time in the kitchen!
If you like what CG and I do, support us on Patreon, or throw a tip in our Paypal Tip Jar We’ll happily enjoy a coffee on the road, or maybe even pay a bill or two!–Thanks! We appreciate all the support, and we’ll see you next time in the kitchen!
Thanks for watching our recipe videos!
We include affiliate links for products on our website, so if you make a purchase after clicking on our links, we may earn a commission which helps us produce more videos and drink more coffee :^) We participate in the Amazon Services LLC Associates Program, which is an affiliate advertising program providing a means for us to earn fees by linking to Amazon.com and affiliated sites, so we can make more videos.
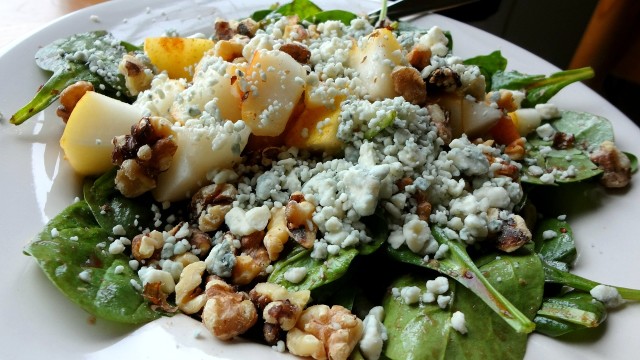
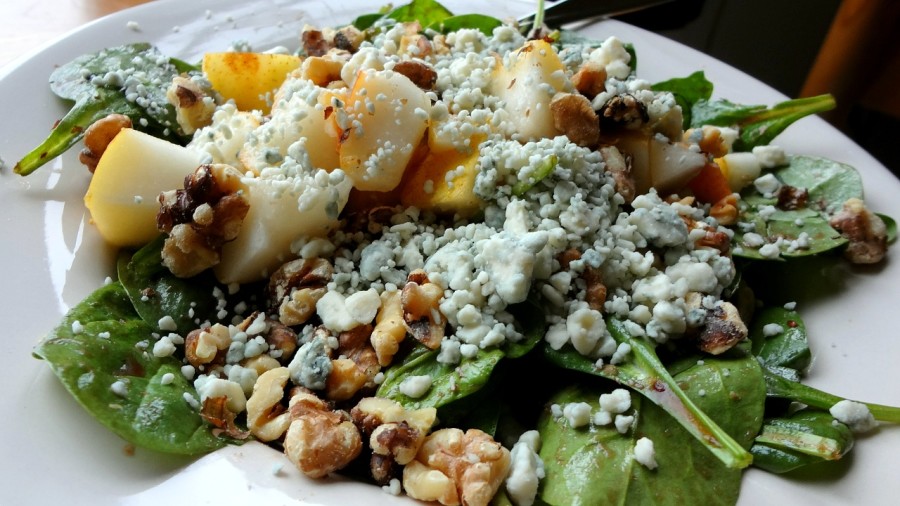
This is the easiest, best spinach salad recipe in the world. We first had one of these spinach, pear, blue cheese, walnut, raspberry dressing salads years ago at a little tapas place in Key West, and we’ve been making them ever since–especially if we have a pear on the edge–the riper, softer, and juicier the pear, the better the salad is gonna taste.
What You need for the Best Spinach Salad
SPINACH 1 PEAR (ripe, diced) WALNUTS (toasted) current WALNUT prices on Amazon BLUE CHEESE (crumbled) dressing: 2 Tbsp OLIVE OIL 1 Tbsp RASBERRY JAM 1 Tbsp VINEGAR ½ tsp ITALIAN SEASONING SALT and PEPPER to taste
Best Spinach Salad
How to Make a Pear Spinach Salad
Crumble and spread your walnut pieces on a baking sheet and toast at 300 degrees F for 5-10 minutes until the nuts are toasted to your liking. Keep an eye on them–nuts are easy to over-toast and it’s usually worth setting a timer so they’re not forgotten. While your nuts toast, throw together your salad dressing–basically and oil and vinegar dressing with a little jam added for flavor.
I make this dressing with all kinds of jams, but raspberry and strawberry are my favorites–although definitely give raspberry a try with this recipe. Combine your oil, vinegar, jam, salt, and Italian seasonings. Mix well. Taste and adjust as needed to your liking. A little sugar can be added if desired, but I usually find that the jam adds plenty of sweetness, plus the pear will add sweetness to the salad as well.
Toss the dressing with your spinach leaves until all are well-coated. Divide spinach into serving bowls. Chop pear into nice chunks and add to salad. An overly-ripe pear works best. Sprinkle the toasted walnuts over the salad, then sprinkle with blue cheese crumbles. Lots of blue cheese. Or less. I like blue cheese. There are no ratios with this salad. Check prices for WALNUTS on amazon
And that’s it. This is the best spinach salad in the world. So it is written, so it shall be done. Give this Spinach Salad recipe a try and let me know what you think, and bon appétit!
Click a button below and share the dishes with your friends. You can also follow Chef Buck on Youtube. We appreciate all the kind comments and support, and we’ll see you next time in the kitchen!
If you like what CG and I do, support us on Patreon, or throw us a tip in our Paypal Tip Jar. We’ll happily enjoy a coffee on the road – Thanks! We appreciate all the support, and we’ll see you next time in the kitchen!
We include affiliate links for products on our website. Making a purchase after clicking on our links and we may earn a commission which helps us produce more videos and drink more coffee :^) We participate in the Amazon Services LLC Associates Program, which is an affiliate advertising program. It provides a means for us to earn fees by linking to Amazon.com and affiliated sites, so we can make more videos.
This baked eggs recipe is a delicious treat for breakfast or brunch, and it’s easy to prepare even though it looks super fancy. I’m throwing spinach, tomato, and Roman cheese in this baked eggs recipe, but it’s a versatile dish, and anything that’ll work in an omelet will work in this preparation. For a spicier version, add a dash or two of hot sauce as the tomatoes cook.
What you need for a Baked Eggs Recipe
(this recipe serves 2) 4 EGGS OIL for sauteing 2 cup fresh SPINACH 2-4 GREEN ONIONS (chopped) 2 small ROMA TOMATOES (chopped) 3-4 GARLIC cloves (finely chopped) 1-2 tsp dried ITALIAN SEASONING chopped JALAPENO (optional) freshly grated PARMESAN or ROMANO CHEESE 4 Tbsp HALF N HALF SALT and PEPPER to taste ½ cup chopped PARSLEY (optional) sprinkle of PAPRIKA and fresh herb for GARNISH (optional)
Baked eggs are an easy way to impress folks for breakfast.
How to Make Oven Baked Eggs
Heat oil on medium high heat in a small saute pan.
Add garlic and chopped bottoms of the green onion. Saute for 1 minute and then add the tomato.
Continue to saute for 2 minutes and then add salt, pepper, and Italian seasoning. Mix and cook for 1 minute.
Add green onion tops and spinach, and any fresh herbs you desire.
Add a layer of cheese to bottom of the if you like, but this is optional.
Spoon and spread the spinach and tomato mixture into the bottom of the dish.
Drizzle Half n Half or cream over top and then sprinkle shredded Parmesan or Romano cheese.
Carefully crack eggs and top the dish with them.
Place in an oven preheated to 375 degrees Fahrenheit. If the baking dish/ramekins are small, place on a baking sheet for easy handling
Bake 15-20 minutes, or until the eggs are set and cooked as desired.
When eggs are finished baking, top with additional cheese if desired. Sprinkle with paprika or garnish with fresh parsley, or basil, or cilantro, or whatever, but a touch of freshly chopped green will make this dish quite lovely.
Serve right away, because eggs are best hot, dude. Give this baked eggs recipe a try and let me know what you think, and bon appétit!
Huevos Rancheros is a flavorful, classic mexican dish…delicious!
Thanks For Watching Egg Recipe
Thanks for checking out this Egg Bake recipe, and all of our recipes. Sign up for our mailing list so you’ll never miss a new recipe. Also click a button below and share the dishes with your friends. You can also follow Chef Buck on Youtube. We appreciate all the kind comments and support, and we’ll see you next time in the kitchen!
If you like what CG and I do, support us on Patreon, or throw us a tip in our Paypal Tip Jar. We’ll happily enjoy a coffee on the road – Thanks! We appreciate all the support, and we’ll see you next time in the kitchen!
We include affiliate links for products on our website. Making a purchase after clicking on our links and we may earn a commission which helps us produce more videos and drink more coffee :^) We participate in the Amazon Services LLC Associates Program, which is an affiliate advertising program. It provides a means for us to earn fees by linking to Amazon.com and affiliated sites, so we can make more videos.
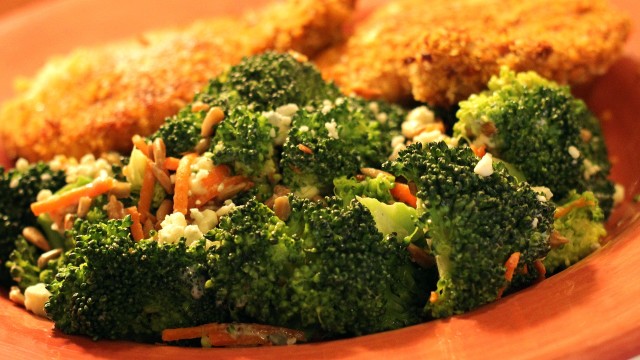
Try this super-quick and awesome broccoli recipe. If you like blue cheese then you’ll love this dish, in fact, you’ll actually love broccoli if you only just liked it before …I know, kinda confusing, but trust me, this is a pretty damn tasty broccoli dish–and healthy, too. So make it.
Bad-ass Blue Cheese Broccoli Recipe Ingredients: 5 cups BROCCOLI FLORETS ¼ cup CARROT strings 2-3 oz BLUE CHEESE crumbled ¼ cup SUNFLOWER SEEDS (shelled and toasted) SALT and PEPPER to taste
Broccoli with Blue Cheese Recipe
directions: Toast the sunflower seeds (already shelled). This can be done quite quickly in a hot pan or skillet. Heat pan or skillet on medium/med-low heat; not too hot or seeds will burn. Add sunflower seeds and spread them into a single layer. Do not use any oil or spray in the pan. Stir the seeds in the skillet for a couple of minutes until they begin to brown, lightly browned is perfect; they’re easy to over-toast, so don’t leave them too long. It will only take 2 minutes on medium heat. Remove seeds from heat and set aside.
Cover the bottom of a pot with about ¼ inch of water, just enough for steaming the broccoli and carrots. Add The broccoli florets to the pot and top with the carrot strings. Raise the heat, cover the pot, and allow the veggies to steam for approx. 5 minutes; ideally the florets will be cooked through, soft but not soggy!
Turn off the heat and drain any remaining water in the sink. Add salt, pepper, the toasted sunflower seeds, and 2-3 ounces of crumbled blue cheese. Lightly toss ingredients together and serve while hot. This dish is super-simple and amazingly delicious –as long as you like blue cheese. Give this broccoli recipe a try and let me know what you think, and bon appétit!
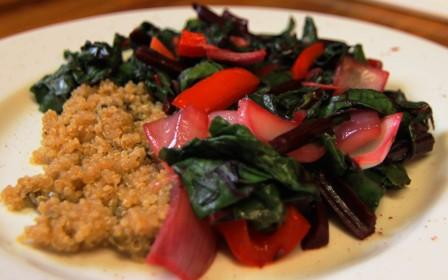
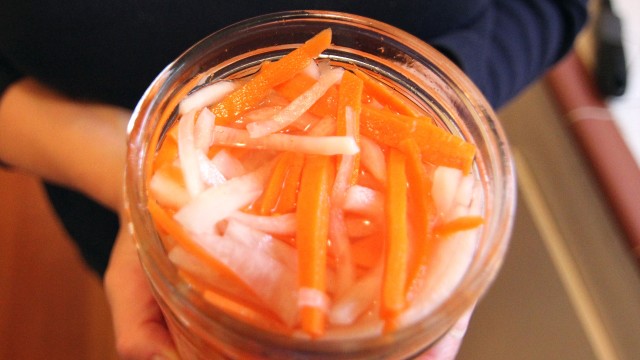
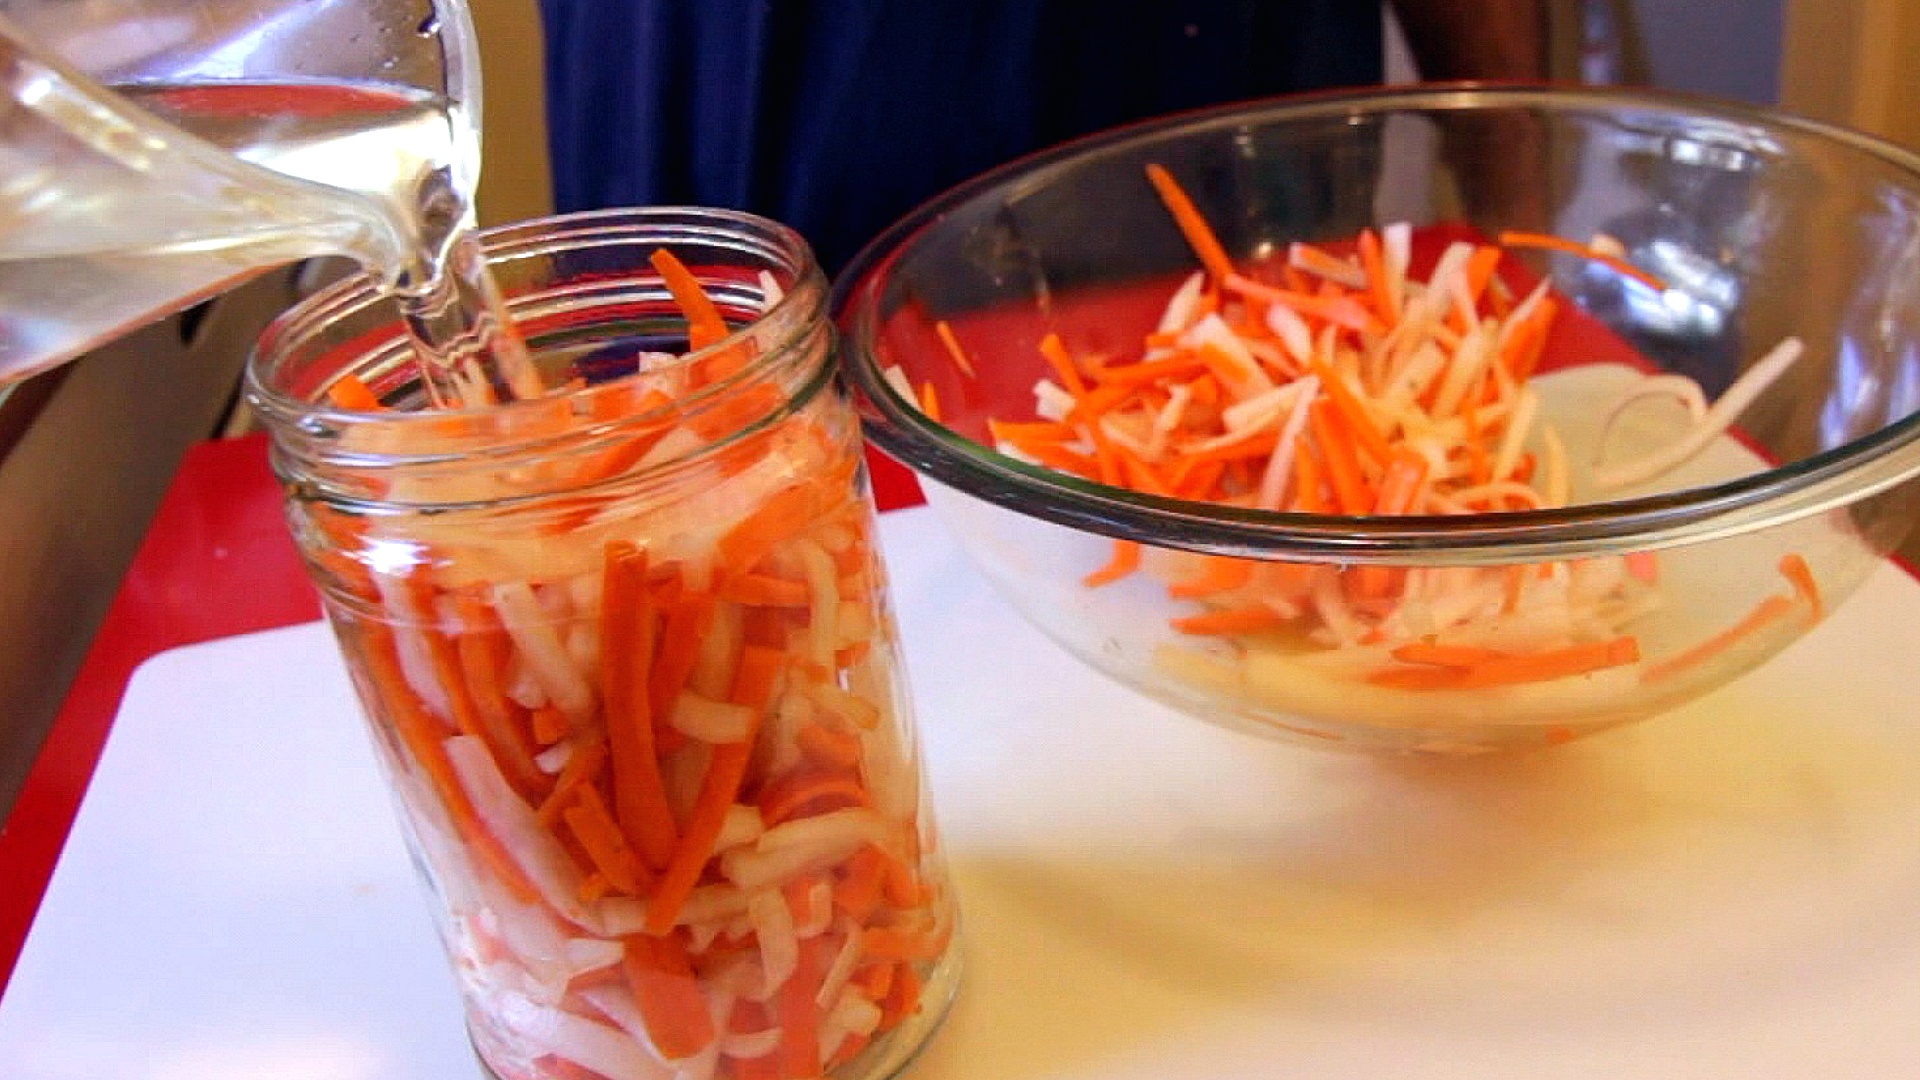
Vietnamese-style pickled daikon and carrot make a handy relish than can be used with salads, sandwiches, and all kinds of recipes. It’s a must have for making a banh mi sandiwich and I use it quite often as a salad topper and also dice it up to add to tuna, chicken, and quinoa salads. Keep a jar of pickled daikon and carrot in your fridge and experiment adding it to some of your favorite dishes.
Pickled Daikon and Carrot Ingredients: 2 cups cut DAIKON 2 Cups Cut CARROT 1-2 tsp SALT ¼ SUGAR ½ cup WATER (hot from tap) ½ cup VINEGAR
Pickled daikon and carrot is a tasty and versatile relish to have in the fridge–awesome on sandwiches and salads.
directions: Daikon is a BIG radish. When buying, choose one that is firm–if the daikon has green tops attached, choose one without wilted leaves, but often the tops are not attached. The skin is thin and can be peeled off with a simple vegetable peeler. The same is true for carrots, although I generally leave the skin on the carrots, but follow your heart. Slice and cut the daikon and carrot into matchstick sizes and place into a bowl. Add salt to the bowl and mix well with the daikon and carrot so that the veggies are coated. This will draw water out of the vegetables and soften them. Set bowl aside. In a smaller bowl, prepare the pickling solution. Combine warm tap water and sugar. Stir until dissolved and then add the vinegar. And that’s it! In the larger bowl, the salt will have started drawing moisture from the daikon and carrot matchsticks. When they have softened enough, cram them into a storage container and add the pickling solution. This pickled combo will keep in your fridge for 2-3 weeks. It’s a must have topping for Vietnamese banh mi sandwiches and works well in all kinds of sandwiches. Use this relish as a topping for salads or chop it up to incorporate in whatever dish you desire (it’s great in a coleslaw or quinoa salad). Give this pickled daikon and carrot relish a try and let me know what you think, and bon appetit!
And if you wanna see this relish in action, check out this deconstruction of a Banh Mi Sandwich.