Black Bean Corn Salsa is Good on Everything*

Black Bean Corn Salsa

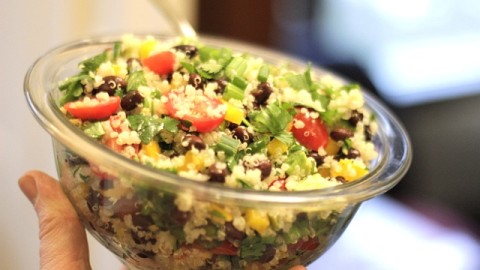
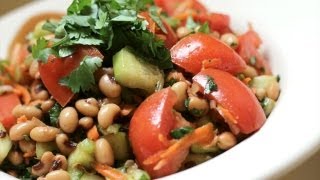
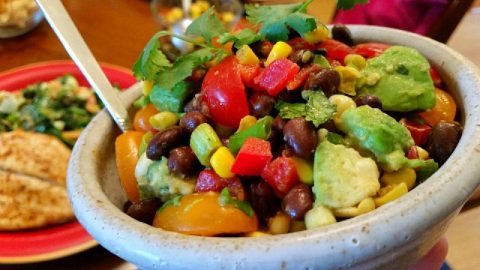
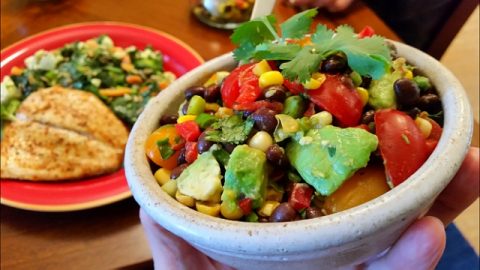
Here’s a simple Black Bean Corn Salsa that will knock your socks off, or at least be very tasty on a chip, a fish, a salad, on or in an omelet…you get the idea. It’s an easy and versatile way to use beans, which are good for your heart, in fact the more you eat beans, the more you…crave more beans? Something like that, so definitely give this recipe a try. This salsa is super tasty and you can pack it with raw, healthy, and fresh ingredients to use as an accompaniment for types of recipe dishes.

What you need for Black Bean Corn Salsa

dressing:
1 Tbsp LEMON JUICE
1 Tbsp RED WINE VINEGAR or balsamic vinegar
1 Tbsp HONEY
1 tsp TURMERIC
1 tsp GARLIC POWDER or 1 Tbsp minced garlic
¼ tsp PAPRIKA
½ BLACK PEPPER
½-1 tsp SALT
salsa:
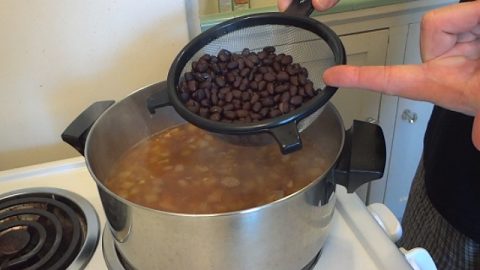
2 15 oz cans BLACK BEANS, drained and rinsed
1 15 oz can YELLOW AND WHITE CORN, drained or 2 cups frozen corn, thawed
12-16 sliced CHERRY TOMATOES
5-7 small GREEN ONIONS, finely sliced, or ½ cup red onion, finely diced.
1 Red or Orange BELL PEPPER, diced
1 bunch of chopped, fresh CILANTRO, or substitute parsley
1-2 AVOCADO peeled, pitted, and diced; add JUST before serving

Black Bean Corn Salsa
Salsa is great on a chip, as a topping for fish or salad, in an omelet, on ice cream…well, maybe not ice cream.

How to make the Black Bean Corn Salsa

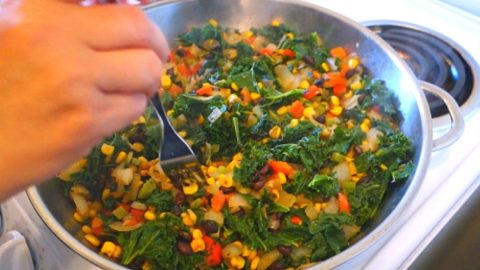
  • In a small bowl, combine the dressing ingredients, mix well, and then set aside.
  • Drain and rinse the black beans and corn. In this recipe we use a mix of yellow and white whole kernel corn.
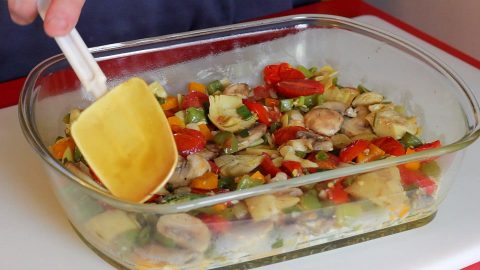
  • Slice and dice and chop tomatoes, onions, and other veggies you want to add; see other veggie suggestions below.
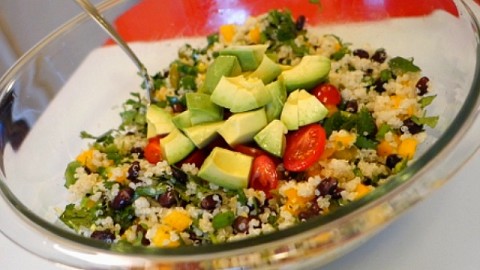
  • In a large bowl, combine and toss veggies and beans and corn.
  • Add dressing and mix well.
  • For best results, place overnight in the refrigerator. Remember that turmeric can stain some plastic containers. Ziplocs allow you to periodically flip salsa to distribute dressing more evenly.
  • Let marinate at least a couple of hours, preferably overnight.
  • Before serving, add diced avocados and gently mix.
  • Taste, adjust seasoning as needed.
  • Serve with chips, or as a topping or filling.

Options and Substitutions

  • ½ cup red onion, finely chopped
  • Pickled jalapeno slices
  • ½ tsp chili powder
  • 2 tsp cumin
  • Mango, diced

More Uses for Salsa

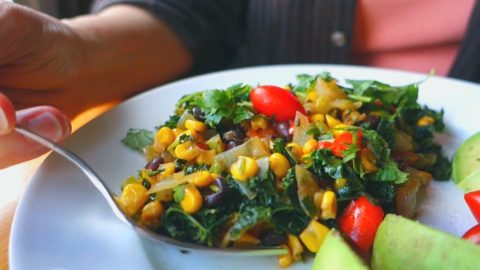
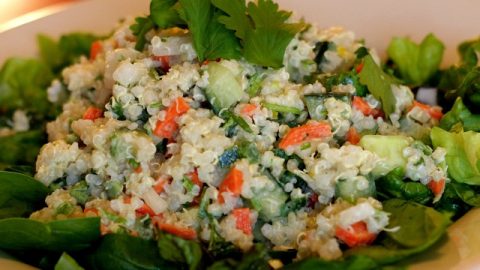
  • Use black bean corn salsa as a salad topping!
  • Fancy Slaw: add chopped cabbage, mayo/yogurt.
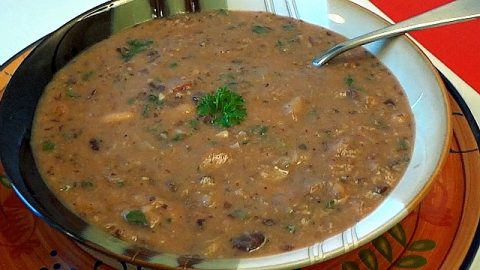
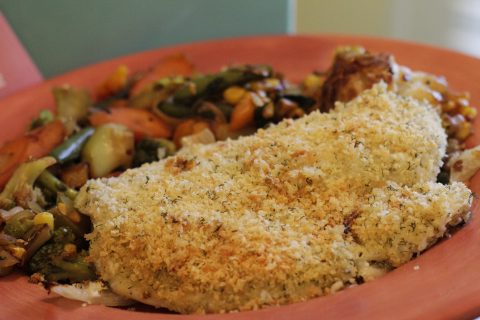
  • Fish topping: add mango and cumin and then warm.
  • Omelet filling or topping: add cheese, cumin, then garnish with sour cream and/or guacamole.
  • Use salsa as a filling for quesadillas, tortillas, etc..

If you’re new to home cooking, get a bunch of spices, pots and pans, and begin experimenting with different recipes. It’s a healthy hobby that will save you money in the long run. Check out current prices for Complete Kitchenware Sets on Amazon as well as Complete Starter Spice Kits. Or go to a thrift store! I’ve found some of my favorite kitchen gear at second-hand stores.

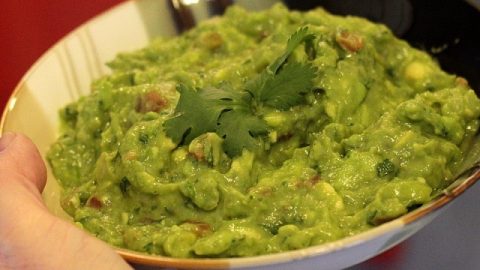
This black bean corn salsa goes great with a lot of dishes, and for another avocado-ee recipe try a Classic Homemade Guacamole Recipe.

easy guacamole recipe
guacamole recipe

Be sure and sign up for our mailing list and never miss a new Chef Buck cooking video, and also click a button below and share the dishes with your friends. We appreciate all the kind comments and support, and we’ll see you next time in the kitchen!
–Chef Buck

Thanks for watching our recipe videos!

We include affiliate links for products on our website, so if you make a purchase after clicking on our links, we may earn a commission which helps us produce more videos and drink more coffee :^) We participate in the Amazon Services LLC Associates Program, which is an affiliate advertising program providing a means for us to earn fees by linking to Amazon.com and affiliated sites, so we can make more videos.

*almost

Share and Enjoy !

Jackfruit Pulled Pork Recipe for Vegetarian BBQ

jackfruit pulled pork

Here is the easiest jackfruit pulled pork recipe ever. A faux pork vegetarian recipe made with canned young, green jackfruit will deliver the taste and texture of your favorite BBQ pork, and it’s a much healthier choice. This recipe is basically a BBQ sauce delivery system. Unripe canned jackfruit makes a perfect meat substitute that works well for either pork or chicken, so definitely give it a try.

Ingredients for Jackfruit Pulled Pork BBQ

1 20oz can young, green JACKFRUIT
1 medium ONION
2-4 cloves GARLIC
your favorite BBQ SAUCE
1 tsp CUMIN POWDER
½ tsp CHILI POWDER
some SALT and PEPPER
OIL for sautéing

jackfruit pulled pork
BBQ jackfruit makes a perfect vegetarian pulled “pork” sandwich.

How to Make Vegetarian Pulled Pork BBQ with Jackfruit

  • Rinse and drain the young, green jackfruit. Make sure to buy unripe jackfruit and NOT the
    yellow ripe jackfuit. You can buy jackfruit online. Check CURRENT CANNED JACKFRUIT PRICES on Amazon.
  • Shred the jackfruit. I do this by hand, it’s very easy, but you can use a knife, too.
  • Heat oil in a skillet on medium heat.
  • Add thinly sliced onion and finely chopped garlic and saute 3-4 minutes.
  • Add in seasoning.
  • Add jackfruit and a little BBQ sauce.
  • Raise the temperature and heat the jackfruit through, then reduce to a simmer and cook until the dish reduces as the water cooks out of the onion and jackfruit.
  • Add more BBQ sauce to desired sauciness, and then remove from heat.

This jackfruit pulled pork substitute is great all on its own, served over rice, or perfect on a soft roll or bun, so definitely give it a try. If you like pulled pork BBQ, you will be amazed at this vegetarian option and how easy it is to prepare.

jackfruit pulled pork
Jackfruit BBQ is great over rice, on a sandwich, or all on its own.

What is Jackfruit?

Jackfruit is exactly what it sounds like, a fruit, but it’s HUGE. A 50 pound jackfruit is not uncommon. This giant tropical fruit grows on trees and is very popular in Asia. Unripe jackfruit can be cooked and used in savory dishes. Ripened jackfruit can be eaten raw and, unlike young green jackfruit, is very juicy and sweet.

Buying and cleaning fresh jackfruit is quite an endevour, so canned jackfruit is a perfect alternative. I prefer the green jackfruit and find it to be a terrific ingredient to experiment with in a variety of vegetarian recipes. The mildness of its flavor allows young jackfruit to be incredibly versatile, and it will enhance a recipe without overpowering it.

I’ve used green jackfruit as a pulled pork BBQ, as a faux meat filling in tacos, in an Indian-style variation of Jackfruit Tikka Masala, and as a No-Potato Hash for breakfast.
Its super nutritious, readily available at Asian markets, and well worth giving a try, so seek it out.

jackfruit recipe
Seasoned and baked Jackfruit makes a convincing faux chicken when added to this rich Indian inspired tikka masala.

Thanks for watching our recipe videos!

Thanks for checking out the canned jackfruit pulled pork recipe, and all of our recipes. Be sure and sign up for our mailing list to never miss a new cooking video, and also click a button below and share the dishes with your friends, and follow Chef Buck on Youtube. We appreciate all the kind comments and support, and we’ll see you next time in the kitchen!

If you like what CG and I do, support us on Patreon, or throw a tip in our Paypal Tip Jar We’ll happily enjoy a coffee on the road, or maybe even pay a bill or two!–Thanks! We appreciate all the support, and we’ll see you next time in the kitchen!

We include affiliate links for products on our website, so if you make a purchase after clicking on our links, we may earn a commission which helps us produce more videos and drink more coffee :^) We participate in the Amazon Services LLC Associates Program, which is an affiliate advertising program providing a means for us to earn fees by linking to Amazon.com and affiliated sites, so we can make more videos.

Share and Enjoy !

Vegetarian Chili is not just for Vegetarians!

vegetarian chili

Here’s a satisfying and hearty vegetarian chili recipe that’ll put a little pep in your step. If you’re a die-hard carnivore, then your initial reaction is probably NOPE, but you should give meatless chili a try. I love a good meat chili, and when I get chili at a restaurant I generally order a meat and bean chili, but at home I’m vegetarian chili all the way. Vegetarian chili just tastes great, and I don’t miss the meat, plus it’s a perfect way to clean out all the veggie odds and ends in your fridge. The key to a hearty meatless chili is lots of seasoning, onions, and peppers. I like to add at least two kinds of beans, and the veggies can be whatever you like, so be creative!

What You Need to Make a Great Vegetarian Chili

15 oz can CHICK PEAS
15 oz can KIDNEY BEANS
1 BELL PEPPER (chopped)
Lg ONION (chopped)
JALAPENO PEPPER (diced, very optional)
2-3 cloves GARLIC (finely chopped)
1 ZUCHINNI (cut into large pieces)
1 cup CAULIFLOWER (chopped)
2 ROMA TOMATOES (chopped)
28 oz can CRUSHED TOMATOES
1 heaping Tbsp DRIED OREGANO
1 Tbsp CUMIN
1 tsp GARLIC POWDER
1 Tbsp CHILI POWDER
1 Tbsp SMOKED PAPRIKA
SALT and PEPPER, to taste
2 Tbsp OLIVE OIL for sauteing
WATER as needed…add slowly
I also add a little leftover RUTABAGA to this recipe, but that is very optional. A vegetarian chili is a great way to clean out the fridge of all those veggie odds and ends, so use what you have.

vegetarian chili
pot o’ meatless chili for good times

How to Make Easy Vegetarian Chili

  • Slice, dice, mince, and chop all your ingredients. Prepping this dish is the most labor intensive part of this recipe. Once your ingredients are ready, it’s pretty eazy peezy.
  • Heat some oil in a large pot on medium heat.
  • Add in the onion and hot pepper and saute for 4-5 minutes.
  • Add in the rest of the peppers, garlic, and seasoning, then mix and saute for another couple minutes.
  • Add in everything else, plus about ½ a can of water. Be conservative with the water. The dish might seem overly thick, but a lot of water will be released from the veggies as the chili cooks. You can always add more water later.
  • Cover and bring the pot to a bubble, reduce the heat down to a simmer, and cook covered for about 45 minutes, adding water as needed and desired.
  • After 45 minutes give the dish a taste test and adjust seasoning, but remember, the flavor of the chili will intensify on its own as it sits.

Like any soup or stew or chili, it’s ideal if you make the recipe ahead of time, because the dish will get exponentially better as the days pass, so be sure to make a big pot of chili so you’ll have plenty of leftovers.

vegetarian chili
hearty vegetarian chili recipe…try it!

That’s it! Hope you like it, and if you’ve got a bigger pot, CLICK HERE for a double-sized variation of this vegetarian chili recipe.

If you want jalapeno corn muffins to pair with chili, here’s a recipe that tastes great and is a breeze to make.

vegetarian chili
make a batch of corn muffins for a great chili sidedish

Jalapeno Corn Muffin Recipe

¾ cup cornmeal (whole, medium grind)
1¼ cup all-purpose flour
2½ tsp baking powder
½ tsp smoked paprika
½ tsp chipolte (or regular chili powder)
½ tsp salt…unless the corn or butter already contain salt
1 cup milk
2 Tbsp oil (alternative butter, melted)
3 Tbsp honey
1 large egg
1 cup canned corn kernels, drained
¼ cup pickled jalapenos, chopped
¼ onion, minced
1 cup shredded sharp cheddar cheese (plus ¼ cup for topping)
optional: 1 jalapeno (deseeded and sliced for topping)

Place rack in middle of the oven and preheat to 400°F.
Grease 12 muffin pan cups or line with parchment paper baking cups; set aside.
Combine dry ingredients in bowl.
Combine remaining ingredients in another bowl (minus topping, jalapeno). Add to dry ingredients and stir until ingredients are moistened.
Fill prepared muffin cups evenly.
Top with remaining jalapeno rings and cheese.
Bake 20-30 minutes or until toothpick inserted into center comes out clean and muffins are golden brown.
Allow to cool for 5 minutes before removing from muffin tins.
Serve warm or cold. Serve with butter or honey butter.
HONEY BUTTER:
½ cup butter, softened
2 Tbsp honey

I hope you like these recipe ideas. Give this healthy chili recipe a try and let me know what you think, and for more hearty meat-free options, try this very easy blackened eggplant Veggie Burger Recipe or this fantastic faux pasta made with Zucchini Zoodles.
Or visit my Vegetarian Recipe Playlist over on The Chef Buck Youtube Channel.

Thanks for Watching our Vegetarian Chli Recipe!

Click a button below and share the dishes with your friends. We appreciate all the kind comments and support, and we’ll see you next time in the kitchen!

If you like what CG and I do, support us on Patreon, or throw us a tip in our Paypal Tip Jar. We’ll happily enjoy a coffee on the road – Thanks! We appreciate all the support, and we’ll see you next time in the kitchen!

We include affiliate links for products on our website. Making a purchase after clicking on our links and we may earn a commission which helps us produce more videos and drink more coffee :^) We participate in the Amazon Services LLC Associates Program, which is an affiliate advertising program. It provides a means for us to earn fees by linking to Amazon.com and affiliated sites, so we can make more videos.

Share and Enjoy !

Must Try Egg Bread Bake Recipe

egg bread

Egg bread is a fancy dish for breakfast or brunch, and it’s an easy recipe to prepare. The recipe is a cross between baked eggs, bread pudding, and stove top stuffing. It’s a great way to use up old and stale bread. I go light on the cheese in this egg bread recipe, but adding more cheese and making a cheese bread is super tasty. One thing you don’t want to do is go light on the seasoning, especially if you’re using a plain loaf of bread; the more seasoning the better–especially rosemary!

What You Need for an Egg Bread Bake

crusty BREAD cubed
6 EGGS
about 1 cup MILK
2 GREEN ONION chopped
HOT PEPPER finely chopped
shredded CHEESE
1-2 Tbsp dried ROSEMARY
1 tsp dried OREGANO
PAPRIKA
BLACK PEPPER
GARLIC POWDER
CHILI POWDER (optional)
BUTTER/OIL to grease the baking dish

egg bread
Fancy baked eggs to impress friends and family

How to Make Baked Egg Bread

Any bread will do, but ideally use a hard and crusty loaf. If you’ve got a loaf of bread you’re thinking is to stale to eat, then this is a perfect recipe to save it.

  • Slice the bread into cubes and place in a large mixing bowl. I like using larger cube sizes for a rustic looking dish.
  • In a bowl, whisk 2 eggs and milk.
  • Add the egg/milk mixture in with the bread and toss, coating the bread.
  • Add in the herbs and spices, onion, hot pepper, and cheese and toss until the bread is well coated.
  • Lightly grease an oven safe baking dish and add the bread mix, spreading out evenly. Check current prices on a Pyrex Baking Dish on Amazon.
  • With a spoon, make an impression on the top of the bread mix for each egg serving.
  • Crack an egg into each depression.
  • Slide into a preheated oven and bake at 350 degrees Fahrenheit for 30-40 minutes, until the eggs are baked to desired doneness.
  • Slice into servings and serve hot or cold.
egg bread
add extra bling for fancier egg bread, but don’t skimp on the seasoning

That’s it! Takes a little while to bake, but otherwise this egg bread is a fairly quick dish to prepare, and a fancy way to use up stale bread.

Give this baked egg bread recipe a try and let me know what you think, and bon appétit!

And for a less bready baked egg dish, try this Fancy Egg Bake Recipe.

egg bake recipe
sliced egg bake on a salad is yummy!

Thanks For Watching Our Recipe Videos!

Thanks for checking out this Egg Bread recipe, and all of our recipes. Sign up for our mailing list so you’ll never miss a new recipe. Also click a button below and share the dishes with your friends. You can also follow Chef Buck on Youtube. We appreciate all the kind comments and support, and we’ll see you next time in the kitchen!

If you like what CG and I do, support us on Patreon, or throw us a tip in our Paypal Tip Jar. We’ll happily enjoy a coffee on the road – Thanks! We appreciate all the support, and we’ll see you next time in the kitchen!

We include affiliate links for products on our website. Making a purchase after clicking on our links and we may earn a commission which helps us produce more videos and drink more coffee :^) We participate in the Amazon Services LLC Associates Program, which is an affiliate advertising program. It provides a means for us to earn fees by linking to Amazon.com and affiliated sites, so we can make more videos.

Share and Enjoy !

Pad Thai Recipe with Spaghetti Squash Noodles

pad thai recipe

Try a tasty Pad Thai recipe with a spaghetti squash twist. Spaghetti squash is a lowfat low carb ingredient with a terrific texture and a mild flavor that allows it to work well in a variety of recipes, including this easy Pad Thai Recipe. A few simple ingredients are all you need to cook this healthy faux noodle vegetarian recipe.

What You Need to Make Pad Thai Recipe w/ Spaghetti Squash

SPAGHETTI SQUASH
4-6 cloves GARLIC finely chopped
2-3 GREEN ONIONS chopped, bottoms separated from tops
1 RED BELL PEPPER chopped
2 Tbsp OLIVE OIL
1 Tbsp SESAME OIL
1-2 Tbsp RICE VINEGAR
1- 2 Tbsp SOY SAUCE
1-2 Tbsp PEANUT BUTTER
FISH SAUCE (optional) 1 or 2 EGGS
1 tsp CHILI PEPPER
SALT and PEPPER to taste

Garnishes:
chopped PEANUTS
chopped CILANTRO
BEAN SPROUTS

The measurements above are just loose suggestions, and really need to be adjusted to your own tastes. The size of the spaghetti squash and how much squash noodles you dig out will determine how much of the other ingredients you need; they are simple and fresh ingredients, so there really is no wrong way to make this dish.

best spaghetti squash
When cooked spaghetti squash pulls apart into “noodley strings”

How to Make Spaghetti Squash Make Pad Thai

  • When buying a spaghetti squash, choose one that seems heavy for its size.
  • Carefully slice the squash into halves. Cut the squash across instead of lengthwise; this will make for longer “noodles”.
  • Place cut sides down in shallow water in a roasting pan.
  • Bake for about 30-45 minutes at 350 degrees Fahrenheit. You can check on the squash after 30 minutes; the cooking time will vary according to the size of the squash. It’s important not to overcook the squash, slightly crunchy strands of squash add great texture to a dish, and overcooking the squash will make the ingredient mushy.
  • Remove squash from the oven and carefully turn halves over to check for doneness –the water will be hot and steam will be trapped under the squash, so be cautious.
  • Allow squash to sit 5-10 minutes to cool slightly for easier handling.
  • Insert a fork and twist out strands of “spaghetti”. Once the fork has done its job, use a spoon to scrape out the remaining squash; it’s edible all the way to the rind, so don’t waste any!

On the stove top…

  • Heat a skillet on medium heat and add sesame and olive oil. You can check here for current pricing for a non-stick skillet on Amazon.
  • Add chopped green onion bottoms, chopped garlic, and chopped bell pepper and saute cook 1-2 minutes. If you like a bit of heat with your dish, add some red pepper flakes or fresh chopped hot peppers.
  • Add in salt and chili pepper and continue sauteing.
  • Stir in rice vinegar, soy sauce, and peanut butter. Add fish sauce if you’re a hardcore pad Thai aficionado. Add a bit of water to thin the sauce, if desired.
  • Cook for 1 -2 minutes. Then, add in the spaghetti squash and mix well with the sauce.
  • Make a well in the center of the squash and add in the whisked eggs. Once the eggs set, give them a stir and scramble, then mix scrambled eggs in with the rest of the dish and get it off the heat.
  • Top with fresh chopped cilantro and chopped peanuts and serve.
  • Add fresh bean sprouts, too, if you be cray.
pad thai recipe
Pad Thai with spaghetti squash noodles

And that’s it.
This recipe makes a nice twist on a traditional pad Thai recipe.
Give this spaghetti squash recipe a try and let me know what you think, and bon appetit!

And for another healthy veggie noodle dish, try this handmade Zucchini Zoodles Recipe.

zoodles recipe
Handmade zoodles are easy to make and a nice change from a heavy pasta dish.

Thanks for checking out our spaghetti squash pad Thai recipe, and all of our recipes. Be sure and sign up for our mailing list and never miss a new Chef Buck cooking video, and also click a button below and share the dishes with your friends. We appreciate the kind comments and support, and we’ll see you next time in the kitchen!
–Chef Buck

Thanks for watching our recipe videos!

We include affiliate links for products on our website, so if you make a purchase after clicking on our links, we may earn a commission which helps us produce more videos and drink more coffee :^) We participate in the Amazon Services LLC Associates Program, which is an affiliate advertising program providing a means for us to earn fees by linking to Amazon.com and affiliated sites, so we can make more videos.

Share and Enjoy !

Egg Bake Italiano with Spinach and Tomato

egg bake

An egg bake recipe is one of the easiest and least expensive meals to prepare, and an Italian egg bake is one of the tastiest. I’ll often clean out the fridge and use odds and ends to make a random egg casserole recipe, but an egg bake doesn’t always have to be a random mishmash of ingredients. If I have fresh spinach and sun dried tomato on hand, then an Italian Egg Bake is a cinch to make. It’s almost like a lasagna, but a whole lot easier and less expensive to prepare. An egg bake is an easy way to feed a family or gathering, and a casserole travels very well, so it’s a perfect recipe for a potluck or dinner party or any event where you need to bring a dish.

What You Need to Make an Italian Egg Bake

(ideal ingredients for a 1½ quart baking dish)

7 EGGS
8-10 oz SPINACH
1 med ONION (chopped)
SUN DRIED TOMATOES (chopped) …smoked sun dried tomatoes are my favorite!
6-10 cloves GARLIC (minced)
½ tsp dried ITALIAN SEASONING
1 cup shredded PARMESAN
or ROMANO CHEESE
½ cup MILK or YOGURT
SALT and PEPPER and
seasonings to taste, like:
garlic powder
onion powder
chili powder
paprika
…add others, or leave some of
these out.
OIL for sauteing

egg bake
It’s like an easier, less expensive lasagna

How to Make an Italian Egg Bake

  • In a large bowl, crack the eggs, add milk and dried Italian seasonings, and whisk well. Set bowl aside.
  • Heat oil in a skillet on medium high heat.
  • Into the skillet add the onion, garlic, and sun dried tomatoes and saute 4-5 minutes.
  • Add in the seasoning and continue sauteing 3-4 minutes.
  • Add in spinach. Stir until spinach wilts and cooks down, which will happen quickly.
  • Lightly spray a 1½ quart baking dish and line the bottom with freshly shredded Romano or Parmesan cheese.
    You don’t need a lot of cheese, line the bottom of the dish and whatever is left reserve to melt on top of the dish later. Check here for current prices on a Pyrex Baking Dish set on Amazon.
  • Remove the sauteed skillet ingredients and spread them evenly over the cheese layer.
  • Gently pour over the whisked egg and milk.
  • Slide the baking dish into an oven preheated to 350 degrees Fahrenheit and bake about 20 minutes or until the egg is firm.
  • Remove from the oven. If desired, top with more shredded cheese and return dish to the oven for about 5 more minutes.
egg bake
I like to use smoked sundried tomatoes for this egg bake recipe…give them a try.

And that’s all there is to this egg casserole.
An Italian egg bake tastes great right out of the oven, but will taste even better the next day.
Serve hot or cold. I actually prefer it cold or at room temperature, so this egg bake recipe makes a great snack, or perfect breakfast, lunch, or dinner; or even brunch, if you’re one of those kinda people.

And that’s it! Give this easy Italian Egg Bake Recipe a try and let us know what you think. And for another breakfast or brunch recipe idea, check out this Fancy Oven-Baked Eggs Recipe.

baked eggs
Baked eggs are an easy way to impress folks for breakfast.

Thanks For Watching Our Recipe Videos!

Thanks for checking out this Egg Bake recipe, and all of our recipes. Sign up for our mailing list so you’ll never miss a new recipe. Also click a button below and share the dishes with your friends. You can also follow Chef Buck on Youtube. We appreciate all the kind comments and support, and we’ll see you next time in the kitchen!

If you like what CG and I do, support us on Patreon, or throw us a tip in our Paypal Tip Jar. We’ll happily enjoy a coffee on the road – Thanks! We appreciate all the support, and we’ll see you next time in the kitchen!

We include affiliate links for products on our website. Making a purchase after clicking on our links and we may earn a commission which helps us produce more videos and drink more coffee :^) We participate in the Amazon Services LLC Associates Program, which is an affiliate advertising program. It provides a means for us to earn fees by linking to Amazon.com and affiliated sites, so we can make more videos.

Share and Enjoy !

Jicama Recipe for Easy Breakfast Hash

jicama recipe

Try a tasty breakfast hash made from fresh jicama. Jicama makes an easy hash recipe because jicama is crunchy and can be eaten raw, just cook it long enough with the other ingredients to impart flavor and heat the jicama through. I like lots of onion and peppers in this jicama recipe, but experiment with other ingredients as well. A hash is a great dish for cleaning out the fridge. Jicama root is like the offspring of a potato and an apple; the root is white and crunchy and can be eaten raw, it has a very mild flavor, and is not too sweet, so it makes an ideal ingredient for many recipes. Give this jicama recipe a try and let me know what you think!

Ingredients for this Jicama Recipe

1 JICAMA diced into cubes
chopped ONION
chopped BELL PEPPERS
chopped HOT PEPPER
finely chopped GARLIC? why not.
seasonings:
SALT for jicama
PAPRIKA
CHIPOTLE
GARLIC POWDER
BLACK PEPPER
but use whatever
seasonings you like
…sometimes I use dried
ITALIAN SEASONING
…give it a try

jicama recipe
Jicama root is super mild and crunchy and can be eaten raw and used in many recipes. Give it a try!

How to make a Breakfast Hash with Jicama

  • Buy jicama with an unblemished, unbroken skin, one that seems
    heavy for its size since jicama is mostly water, just like you.
  • Wash and cut the skin of the jicama off with a knife.
  • Dice jicama into cubes and toss in a bowl with salt and set aside.
  • Heat oil in a skillet and add in the onion, peppers, and garlic.
  • Saute for 2-3 minutes and then add in seasonings to taste, but don’t be shy.
  • Continue sauteing another 2-3 minutes.
  • Dry salted jicama with a paper towel and add into the skillet.
  • Saute jicama with the other ingredients as desired.
  • Once the jicama is heated through, the dish is ready!

jicama recipe
Jicama hash with just onions and seasoning…make a super simple hash for a quick breakfast side dish.

Give this easy jicama recipe a try and let me know what you think, and bon appétit!

And for another vegetarian breakfast dish idea, try out this canned Jackfruit Hash Recipe.

Thanks for checking out the jicama recipe and video, if you liked this quick breakfast hash idea, click a button or two below and share it with your friends.
I appreciate it, thanks!
–Chef Buck

Share and Enjoy !


Jackfruit Recipe Meatless Chicken Tikka Masala

jackfruit recipe

Chicken tikka masala is one of the most popular Indian inspired dishes in the world, because it’s fantastic, but you can easily make a tasty and meatless version of a tikka masala using this canned jackfruit recipe. Young green jackfruit is versatile and very easy to use. Green jackfruit’s mild flavor and rich texture make young green jackfruit an excellent faux meat. It’s popular in mock BBQ pork dishes, and also a favorite of my own in a meatless breakfast hash. When seasoned and baked in the oven, jackfruit handily mimics the texture of baked chicken, and it makes an ideal substitute in this tikka masala recipe. I’m using as few ingredients as I can in order to make this jackfruit recipe super easy.

Ingredients for a Meatless Tikka Masala Jackfruit Recipe

1 20oz can JACKFRUIT (use only young green jackfruit! …don’t buy sweet ripe jackfruit in syrup!)
15oz can TOMATO SAUCE
15oz can CRUSHED TOMATO
½ cup PLAIN GREEK YOGURT
1 medium chopped ONION
6-8 cloves finely chopped GARLIC
1 tsp CUMIN SEEDS
2-3 Tbsp pre-mixed CURRY (or make your own!)
SALT to taste
½ tsp CHILI POWDER
1 tsp GARLIC POWDER
OIL for sauteing
CILANTRO or green onion

jackfruit recipe
When buying canned jackfruit, notice that there are often two types for sale: a ripe sweet jackfruit in syrup, and young green jackfruit. Use young green jackfruit for this mock chicken tikka masala recipe.

How to Make a Meatless Chicken Tikka Masala with Jackfruit

  • For this jackfruit recipe, rinse and drain the jackfruit and cut into smaller, bite-sizes. You can buy jackfruit online. Check current canned jackfruit prices on Amazon.
  • In a bowl, toss the jackfruit with chili and garlic powder.
  • Spread the seasoned jackfruit out on a lightly greased baking sheet and bake at 400 degrees Fahrenheit
    for about 20 minutes.
  • In a skillet, heat oil on medium high heat.
  • When the oil is heated, add the cumin seeds, stir and allow to simmer for just a few moments.
  • Once the seeds begin to crack, add the finely chopped garlic.
  • Saute for a few moments and add in the onion.
  • Reduce the heat to medium and stir for approx. 2-3 minutes and add the curry powder. Use a premixed curry, or your own mixture. Mix well and continue to saute for 1-2 more minutes.
  • Add in the canned tomatoes. Mix well, raise the temperature and allow the ingredients to come to a bubble.
    Reduce the pot to a simmer, cover, and allow cooking for 10 minutes.
  • After 10 minutes, turn the heat off.
  • Blend the ingedients in the pot smooth with a hand blender; this step isn’t crucial, but it will help give the dish the creaminess of a restaurant style chicken tikka masala.
  • Stir in yogurt and mix well.
  • Add in the baked jackfruit and mix well.
  • Serve with rice or on its own.
  • Garnish with fresh coriander leaves or chopped green onion tops.
jackfruit recipe
Use young green jackfruit for a tasty meatless “chicken” tikka masala recipe.

Give this easy meatless “chicken” tikka masala recipe a try and let me know what you think. If you’re a fan of chicken tikka masala, definitely try this jackfruit recipe version out.
The dish cooks up super quick with much less effort than you need to make a traditional chicken tikka masala, and I think you will be very happy with this meatless version. Cook it up and try it out on your friends and family–don’t tell them it’s jackfruit!–tell them it’s chicken tikka masala and see if they notice the difference.

For more easy Indian recipe ideas, check out my Complete Indian Meal Tutorial where I cook up an entire dinner.

how to cook indian food

Thanks for checking out the canned jackfruit recipe, and all of our recipes.

Be sure and sign up for our mailing list to never miss a new cooking video, and also click a button below and share the dishes with your friends, and follow Chef Buck on Youtube. We appreciate all the kind comments and support, and we’ll see you next time in the kitchen!

If you like what CG and I do, support us on Patreon, or throw a tip in our Paypal Tip Jar We’ll happily enjoy a coffee on the road, or maybe even pay a bill or two!–Thanks! We appreciate all the support, and we’ll see you next time in the kitchen!

We include affiliate links for products on our website, so if you make a purchase after clicking on our links, we may earn a commission which helps us produce more videos and drink more coffee :^) We participate in the Amazon Services LLC Associates Program, which is an affiliate advertising program providing a means for us to earn fees by linking to Amazon.com and affiliated sites, so we can make more videos.

Share and Enjoy !

Tofu Recipe for Beginners – Breakfast Scramble

tofu recipe

Try a tofu recipe that makes a nice break from a typical breakfast egg scramble. This dish is a great introduction to tofu. I use firm tofu in this dish and lots of fresh greens. In this tofu scramble I’m using the leaves and stems of fresh kale, but we often use fresh spinach too, which will cook up quicker if you’re in a rush.

Ingredients for Tofu Recipe

6-8 oz Firm TOFU
2 cups chopped KALE
or substitute SPINACH
chopped GREEN ONIONS
chopped BELL PEPPER
finely chopped GARLIC
sliced CHERRY TOMATOES
and whatever seasonings
you like, like:
PAPRIKA, CURRY, dried HERBS,
CHILI POWDER, SALT, and PEPPER
OIL for cooking
….optional: SEEDS!…I use seeds in this video cause I had too much oil in my skillet and I wanted to take advantage of it. I added caraway seeds, but cumin or fennel seeds
would have added great flavor, too.

If you’re not used to using tofu in cooking, this tofu recipe is a good place to start. Tofu is a soy product and a meatless protein. It has almost no flavor, so tofu is very versatile. Tofu will take on whatever flavors you add, and it needs lots of flavor, so be generous. Bland tofu is terrible, but a well-seasoned tofu dish can be delicious. Give this version of a tofu scramble a try, or make your own with whatever fresh veggies you have on hand.

tofu recipe
Use firm tofu for this recipe

How to Make a Tofu Breakfast Scramble

  • Even firm tofu isn’t all that firm, so buy firm tofu.
  • Chop tofu into cubes or slices, but not too small.
  • Heat oil in a skillet on medium heat. Check here for current prices for a non-stick skillet on Amazon.
  • Season tofu well and saute about 5-10 minutes, turning as it cooks,until the tofu is browned on most sides.
  • In another skillet, heat oil on medium heat.
  • Add in chopped kale stems and cook 2-3 minutes.
  • Add onions, peppers, and garlic and continue sauteeing another 2-3 minutes.
  • Add seasoning and spices and mix ingredients well.
  • Add in the remaining ingredients–kale leaves, tomato, green onion tops–and continue cooking another 3-5 minutes.
  • Add in browned tofu. Mix well, and serve.

tofu recipe
this tofu recipe makes a perfect breakfast, lunch, or dinner

And that’s it. Experiment and use whatever ingredients you desire and have on hand. A breakfast scramble can be whatever you want, and tofu is a great way to add
protein to a meatless dish. And this tofu breakfast scramble makes a nice lunch and dinner, too!

And for another healthy breakfast dish, check out this Eggs Benedict on Salmon Recipe.

salmon cakes
use leftover salmon cakes to make a terrific variation of Eggs Benedict!

Thanks for checking the video and tofu recipe out. Be sure and sign up for our mailing list so you’ll never miss a Chef Buck cooking video, and click a button below and share the dishes with your friends. We appreciate all the kind comments and support, and we’ll see you next time in the kitchen!
–Chef Buck

Share and Enjoy !


Canned Jackfruit and Potato Hash Recipe

canned jackfruit

Make a tasty breakfast potato hash with canned jackfruit. Young, green jackfruit is a great meat substitute that works well in this classic breakfast recipe of potato and peppers. Canned jackfruit is easy to use, inexpensive, and a extremely versatile ingredient. Unripe jackfruit adds a nice texture when pulled apart, and its neutral flavor makes it ideal for many recipes.

Ingredients for Canned Jackfruit Potato Hash

1 20oz can young, green JACKFRUIT
1 cup chopped POTATO (any kind you like, sweet potato makes a nice change-up)
½ cup chopped ONION
chopped PEPPERS (I like using a combo of jalapeno and bell peppers, but use whatever you prefer)
finely chopped GARLIC (optional, but always a good idea)
1 tsp CUMIN POWDER
1 tsp PAPRIKA
1 tsp TURMERIC
2 Tbsp WORCERSTERSHIRE
some SALT and PEPPER

canned jackfruit
Breakfast hash with young green jackfruit with potato

How to Make Jackfruit Potato Hash

  • Rinse and drain canned jackfruit. You can buy jackfruit online. Check current canned jackfruit prices on Amazon.
  • Shred it. I do this by hand, it’s very easy, but you can use a knife, too.
  • Heat oil in a skillet on medium high heat.
  • Add chopped onion and peppers and saute 3-4 minutes.
  • Add garlic and cook 1 minute.
  • Add seasoning and mix well, continue sauteing for another minute.
  • Add in shredded jackfruit and Worcestershire sauce and mix well.
  • Raise skillet heat and add in potato. Add 1 can of water and mix.
  • Cover skillet and allow ingredients to come to a bubble.
  • Reduce heat to a simmer and continue cooking until potatoes are near done.
  • Remove cover and continue cooking hash until potatoes are done.
  • Serve as a breakfast side or the main dish.
    Top with eggs, if desired.
canned jackfruit
Jackfruit and potato hash topped with fried egg; the yolk makes a nice sauce.

What is Jackfruit?

Jackfruit is exactly what it sounds like, a fruit, but it’s HUGE. A 50 pound jackfruit is not uncommon. This giant tropical fruit grows on
trees and is very popular in Asia. Unripe, jackfruit can be treated like a starch, cooked and used in savory dishes. Ripened jackfruit can be eaten raw and is very
juicy and sweet; quite a combo. Buying and cleaning a fresh jackfruit is quite an endevour. For me, canned jackfruit is a perfect ingredient.

I prefer unripe, young, green jackfruit and find it to be a terrific ingredient to experiment with in a variety of recipes. The texture of unripe jackfruit makes it a fantastic faux meat,
and the mildness of its flavor allows it to be incredibly versatile.

I’ve used it as a meatless pulled pork BBQ, as a faux meat filling in tacos, in an Indian-style variation of Jackfruit Tikka Masala, and as a potato hash for breakfast.
Its super nutritious, readily available at Asian markets, and well worth giving a try.

No canned jackfruit on hand, but still want a tasty potato dish for breakfast? Try this classic Crispy Potato Breakfast Recipe.

home fried potatoes recipe
home fried potatoes

Thanks for watching our recipe videos!

Thanks for checking out the canned jackfruit recipe, and all of our recipes. Be sure and sign up for our mailing list to never miss a new cooking video, and also click a button below and share the dishes with your friends, and follow Chef Buck on Youtube. We appreciate all the kind comments and support, and we’ll see you next time in the kitchen!

If you like what CG and I do, support us on Patreon, or throw a tip in our Paypal Tip Jar We’ll happily enjoy a coffee on the road, or maybe even pay a bill or two!–Thanks! We appreciate all the support, and we’ll see you next time in the kitchen!

We include affiliate links for products on our website, so if you make a purchase after clicking on our links, we may earn a commission which helps us produce more videos and drink more coffee :^) We participate in the Amazon Services LLC Associates Program, which is an affiliate advertising program providing a means for us to earn fees by linking to Amazon.com and affiliated sites, so we can make more videos.

Share and Enjoy !

Baked Fish Recipe for Cod with Tartar Sauce

baked fish recipe

Cod fillets make a great baked fish recipe. This recipe is great for all types of fish, especially cod or tilapia fish fillets, which are generally good buys at the supermarket. Cod and
tilapia are both low key fish with a mild flavor, so baking them in the oven with a homemade tartar sauce and panko breadcrumb topping adds a nice twist. This baked fish recipe cooks up quick and is
perfect for family meals.

What You Need for this Baked Fish Recipe

2 COD FILLETS (about 8oz each)
½ ONION (sliced)
½ cup PANKO BREADCRUMBS check current prices on Amazon
1 Tbsp melted BUTTER
½ tsp PAPRIKA (optional)
SALT and PEPPER to taste
chopped fresh DILL
spray cooking OIL for pan and onions
sauce:
½ cup MAYONNAISE
some chopped fresh DILL
1-2 Tbsp chopped PICKLES or PICKLE RELISH
spoonful or two of the pickling solution or
1 Tbsp fresh LEMON JUICE (add zest for extra lemony-ness)
(also…add a sqeeze of dijon mustard if desired)

baked fish recipe
cod is often a great buy at the supermarket

How to Make a Baked Fish Recipe

  • Pat the cod fillets dry and lightly season with salt and pepper
  • Heat a skillet on the stove top and melt butter.
  • Turn burner off, add breadcrumbs to the skillet and stir until butter is absorbed.
  • Add salt, pepper, any other spices desired, ½ of the chopped dill, and mix well.
  • To make the sauce, combine the remaining dill, mayonnaise, chopped pickles, and pickling solution or lemon juice, in a bowl, and stir until smooth.
  • Spray a baking pan or aluminium foil with cooking spray. If you need an oven-safe pan, you can check here for current prices for baking sheets on Amazon.
  • Lay onion slices in pan and place fillets over top the onions.
  • Evenly coat the tops of the fish with the tartar sauce mixture.
  • Sprinkle and press the seasoned panko crumbs into the sauce.
  • Place pan in oven and bake at 400 degrees F for 20-25 minutes until the crumb topping has turned a nice, golden brown.
  • Serve with rice and veggies.
    And enjoy!

And for another easy fish recipe, here’s a quick way to cook up a crispy skin Stove top Salmon Fillet Recipe.

how to cook salmon
Keep salmon skin-side up to preserve crispiness

Thanks for checking out our baked fish recipe, and all of our recipes. Be sure and sign up for our mailing list and never miss a new Chef Buck cooking video, and also click a button below and share the dishes with your friends. We appreciate all the kind comments and support, and we’ll see you next time in the kitchen!

Thanks for watching our recipe videos!

We include affiliate links for products on our website, so if you make a purchase after clicking on our links, we may earn a commission which helps us produce more videos and drink more coffee :^)                                                                                                We participate in the Amazon Services LLC Associates Program, which is an affiliate advertising program providing a means for us to earn fees by linking to Amazon.com and affiliated sites, so we can make more videos.

Share and Enjoy !

Zoodles Recipe …handmade zucchini noodles

zoodles recipe

Make a healthy zucchini zoodles recipe without a fancy spiralizer. You can cook a low fat zoodles pasta substitute by simply slicing zucchini into faux noodles with a knife. It takes almost no time, in fact, the time you save cleaning up will likely make it just as fast as using a fancy kitchen gadget. This zucchini zoodles recipe is light and low-fat and provides a nice break from a heavy pasta dish, so definitely make some handmade zoodles and give this dish a go.

Healthy Zoodles Recipe with Zucchini Noddles

2 medium ZUCCHINI
10-15 CHERRY TOMATOES (halved)
¼ cup GARLIC
¼ cup ONION
some PARMESAN CHEESE
(or romano or asiago cheese)
½ LEMON …use the juice and zest (current price for a kitchen zester)
1 tsp ITALIAN SEASONING
SALT and PEPPER to taste
2-3 Tbsp OLIVE OIL
OIL for sauteing

zoodles recipe
Handmade zoodles are easy to make and a nice change from a heavy pasta dish.

How To Make Zucchini Noodles a.k.a Zoodles Recipe

This zoodles recipe cooks quickly, so have all of the ingredients prepared and on hand before you start cooking.

  • Buy zucchini that are firm and blemish free, also buy zucchini that are relatively straight, because they’re easier to slice into zoodles.
  • Wash the zucchini and, leaving the skin on, slice the zucchini lengthwise into thin planks.
  • Stack planks on one another in bundles of three and slice into thinner shoelace size “strings”; they
    don’t have to be too thin or uniform, just get as close to shoestring size as you can, they’ll cook up easily enough and get soft quickly on the stove top.
  • Heat oil in a skillet on medium heat and add in the onion and cook for about 1 minute.
  • Add in the garlic and cook for 1-2 minutes more. If you want a little heat, add in some rep pepper flakes as well.
  • Add salt, pepper, Italian seasoning, and lemon zest. Mix and cook another minute.
  • Add in the sliced zucchini and mix well with all the ingredients.
  • Once the zucchini is added, just cook 2-4 minutes or until the zucchini is heated through. Do not cook overly long or the zucchini will lose its texture and the dish will become too wet. If this
    happens. just drain off a bit of the water.
  • Stir in the olive oil and lemon juice.
  • If desired, add in a little grated Parmesan cheese to taste.
  • Remove the skillet from the stove top and serve immediately.

That’s all there is to this super easy and delicious zoodles dish. If you love kitchen gadgets you can check the current price for a Vegetable Spiralizer on Amazon. I might get one if I see it in the thrift store, and I’m feeling a bit richy-rich.
Give this healthy zucchini zoodles recipe a try and let me know what you think, and bon appétit.

And for another low-fat veggie entree alternative, check out this Spaghetti Squash Recipe.

best spaghetti squash
When cooked spaghetti squash pulls apart into “noodley strings”

Thanks for checking out our zoodles recipe, and all of our recipes. Be sure and sign up for our mailing list and never miss a new Chef Buck cooking video, and also click a button below and share the dishes with your friends. We appreciate the kind comments and support, and we’ll see you next time in the kitchen!
–Chef Buck

Thanks for watching our recipe videos!

We include affiliate links for products on our website, so if you make a purchase after clicking on our links, we may earn a commission which helps us produce more videos and drink more coffee :^) We participate in the Amazon Services LLC Associates Program, which is an affiliate advertising program providing a means for us to earn fees by linking to Amazon.com and affiliated sites, so we can make more videos.

Share and Enjoy !

Chole Masala Recipe with the fewest ingredients!

chole masala

Chole masala is an Indian chickpea curry recipe. For this simple chole recipe, I’m using the fewest ingredients I can. I do add Garam masala and cilantro to this version of chickpea curry; for a super simple version of chole masala, these two ingredients can be optional, but certainly use them if you have them on hand. I’m leaving out the asoefetida and besan (chickpea flour), and also the onion, which I will often cook into a chana masala. Chickpea curry is a delicious Indian staple, and a great introduction to Indian cooking.

what you need to make Chole Masala

1 15oz can CHICKPEAS
1 15oz can DICED TOMATO
3-5 cloves GARLIC finely chopped
½ tsp CUMIN SEEDS
1 tsp CUMIN POWDER
½ tsp TURMERIC POWDER
1 tsp CORIANDER POWDER
1 tsp CHILI POWDER
SALT and PEPPER (to taste)
½ tsp GARAM MASALA (optional)
fresh chopped CILANTRO (optional)
OIL for sauteing
Check out current prices for Indian Spices on Amazon.

chole masala
Chana masala is a great introduction to Indian cooking

how to make Chole Masala

  • In a skillet, heat oil on medium high heat.
  • When the oil is heated, add the cumin seeds, stir and allow to simmer for about 20 seconds.
  • Once the seeds begin to crack, add the finely chopped garlic.
  • Stir for approx. 1 minute and then add the diced tomatoes. Mix well and allow the tomatoes to bubble.
    As the tomatoes cook down, you can crush them with your stirrer for a smoother chana massala.
  • Stir in the chili powder, turmeric, coriander, and cumin powders (or substitute a premade curry mix instead).
  • Mix in the chickpeas and add ½ can of water.
  • Bring the dish to a bubble, then reduce to a simmer, cover, and allow cooking for 10 minutes.
  • After 10 minutes, the chick peas will be soft. Use a fork or potato masher to smash some of the chick peas, this will help thicken the chana masala.
  • If desired, add garam masala and then simmer uncovered to the desired consistency, remove and serve.
  • Garnish with fresh coriander leaves.
    Serve with rice or on its own.

Give this easy chole masala recipe a try and let me know what you think, and bon appétit!

And for more easy Indian recipe ideas, check out my Indian Recipes Playlist.

chole masala
click pic for easy Indian cooking recipes

Thanks for checking the chole masala recipe out, if you like it, then click a button or two below and share the dish with your friends, I appreciate it.
Thanks,
–Chef Buck

Share and Enjoy !


Easy Kale Recipe Idea — Mexican Kale

easy kale recipe

Here’s an easy kale recipe with a South of the border flair. We make a lot of dishes with fresh kale. Kale is a versatile, nutrient packed leafy green that we alternate often with spinach. Spinach and kale are interchangeable in most recipes. We call this recipe Mexican Kale since it has corn, beans, and cilantro, with spices that lend it a flavor you might find in a healthy restaurant featuring a Southwestern style menu.

Ingredients for Easy Kale Recipe

8-10 KALE leaves and stems
1 bunch CILANTRO chop and roughly divide leaves and stems
1 large ONION chopped
1 RED BELL PEPPER chopped
5 cloves GARLIC finely chopped
14oz can CORN rinsed and drained
15oz can BLACK BEANS rinsed and drained
1 tsp CHILI POWDER
2 tsp CUMIN POWDER
SALT and PEPPER to taste
OIL for sauteing

easy kale recipe
Steaming the kale at the end of the recipe preserves the nutrition

How to Make Mexican Kale

  • Wash kale thoroughly; kale leaves can hold a lot of dirt and grit in the leaves!
  • Separate the kale leaves from the stem.
  • Tear or chop the leaves into rough salad sizes, and chop the stems into ¼ inch pieces, or smaller.
  • Set stem pieces aside, and in a bowl, massage the kale leaves with about about a ¼ tsp of salt, or less.
  • Set kale aside.
  • Heat a skillet with oil on medium high heat.
  • When hot, add the onion, bell pepper, and kale stems and saute for 4-5 minutes.
  • Add in the corn, beans, cilantro stems, and garlic.
  • Add in the seasonings, but go lightly on the salt, since salt has already been added to the kale leaves.
  • Mix ingredients well, cover and continue cooking 3-4 minutes.
  • Remove the skillet lid and top the skillet mixture with the cilantro and kale leaves. Spread leaves evenly.
    Replace the lid, turn off the heat, and let the leaves steam for 3-5 minutes.
  • Uncover, mix well, and serve hot as a healthy side dish or entree.

easy kale recipe
Turn a simple kale side dish into a kale entree for a healthier dinner

That’s it, hope you like it.

Give this Mexican kale recipe a try and let me know what you think. For more easy kale recipe ideas, check out KALE RECIPE PLAYLIST.

easy kale recipe
click pic for more kale recipe ideas

Thanks for watching. If this easy kale recipe was helpful, please click a button or two below and share it with your friends, I appreciate it!
— Chef Buck

Share and Enjoy !


Salmon Recipe – quick and easy cooked salmon fillet

salmon recipe

My favorite salmon recipe calls for crisping the fish skin on the stove top then finishing the salmon fillet in the oven under the broiler. This is a simple salmon dish with just a bit of oil and seasoning and a maple glaze to add a hint of sweetness. Honey can be substituted for the maple syrup, or this step can be skipped entirely. I often season salmon with just salt and pepper and then cook the salmon fillet in the same manner.

Ingredients for salmon recipe

SALMON FILLET w/ skin
OLIVE OIL
PAPRIKA
GARLIC POWDER
SALT and PEPPER
MAPLE SYRUP (optional, or substitute honey)
OIL for frying

salmon recipe
Crisp salmon skin on the stove top for added flavor and texture

How To Cook Salmon Recipe

  • Wash the salmon filet and pat dry with a paper towel.
  • Coat the salmon with olive oil, skin side as well.
  • Generously season fish.
  • Using an oven safe skillet, on med. high heat, heat a little oil on the stove top. Check current prices for a stove top and oven safe cast iron skillet on Amazon.
  • When oil is hot, add salmon fillet skin side down and cook about 3 minutes.
  • Transfer the skillet to the oven and continue cooking the salmon under the broiler for 2-3 minutes –adjust time depending on the size of the fillet.
  • When the salmon is almost finished cooking, apply a glaze of maple syrup, and continue broiling for final minute. If you don’t have a nice syrup
    on hand, substitute honey.
  • Remove skillet from the stove and transfer fish to a plate.
salmon recipe
Add a glaze of maple syrup or honey for a touch of sweetness

Hope you like the salmon dish. Ever try baked catfish? This recipe tastes like fried catfish, but better.

fried catfish recipe
Not Fried Catfish …tastes great, easy, and less mess.

Thanks for Watching our Salmon Recipe Video!

Click a button below and share the dishes with your friends. You can also follow Chef Buck on Youtube. We appreciate all the kind comments and support, and we’ll see you next time in the kitchen!

If you like what CG and I do, support us on Patreon, or throw us a tip in our Paypal Tip Jar. We’ll happily enjoy a coffee on the road – Thanks! We appreciate all the support, and we’ll see you next time in the kitchen!

We include affiliate links for products on our website. Making a purchase after clicking on our links and we may earn a commission which helps us produce more videos and drink more coffee :^) We participate in the Amazon Services LLC Associates Program, which is an affiliate advertising program. It provides a means for us to earn fees by linking to Amazon.com and affiliated sites, so we can make more videos.

Share and Enjoy !

Egg Salad Recipe …spicy like you likey

egg salad recipe

Try a spicy egg salad recipe for a flavorful twist on a traditional boring, bland egg salad. Most egg salads are a snooze fest, but sauteing up a little onion, pepper, and spices will put a little zing in your thing, and added nuts will give your egg salad a sorely needed crunch.

Spicy Egg Salad Recipe Ingredients

8 BOILED EGGS [link to Best Way to Boil Eggs ]
3-5 cloves GARLIC finely chopped
chopped HOT PEPPER as desired (I generally use a whole jalapeno pepper with the ribs and seeds removed)
2 tsp GINGER minced
½ to 1 cup CASHEWS (or if nuts ain’t your thang, sub some chopped celery)
1 small RED ONION chopped
¼ cup MAYONNAISE
½ cup chopped CILANTRO
½ cup chopped PARSLEY
10-12 CHERRY TOMATOES cut into quarters
LEMON zest and juice
1 tsp CHILI POWDER
1 Tbsp PAPRIKA
1 tsp TURMERIC
SALT and PEPPER to taste
OIL for sauteing

egg salad recipe
Perfectly boiled eggs make the best egg salad

How to Make This Egg Salad Recipe

The key to any egg salad are the eggs; you don’t want overdone boiled eggs that are dried out with that tell-tell greenish tint. But no fear! Fool proof boiled eggs are super easy to prepare.
HOW TO MAKE PERFECT HARD BOILED EGGS:

  • In a pot, cover the eggs with cold water.
  • Cover and bring the pot to a boil.
  • Once boiling, remove the pot from the heat and allow the eggs to sit in the hot water for 10 minutes.
  • After 10 minutes, transfer the eggs to an ice water bath.
  • Peel eggs when cooled.
  • In a skillet, heat a little oil on medium high heat.
  • Add in the garlic and hot peppers and cook for 1 minute then
  • add in the onion and ginger and continue cooking until onions begin to soften.
  • Stir in the spices and then the cashews. Substitute peanuts if you prefer, or if you’re not into nuts, add chopped celery; a little crunchiness makes for a more interesting egg salad dish.
  • Saute ingredients for 2-3 more minutes, then set skillet aside to cool.
  • In a bowl, combine the peeled eggs and mayonnaise and mash into a lumpy mixture.
  • Add in the cooled ingredients from the skillet, and mix well.
  • Add lemon juice and zest, and stir in some fresh herbs, like parsley, cilantro, or dill.
  • And finally, stir in some quartered cherry tomatoes; cherry tomatoes are best because the tomato skin will help keep them from falling apart.
    And that’s it!–serve warm or cold, all by itself or as a salad or bread topping or a hearty egg salad sandwich.

egg salad recipe
Top egg salad on a green salad, use as a sandwich filling, or spread on a crostini or cracker

Give this spicy egg salad recipe a try and let me know what you think, and bon appétit!

And for another tasty salad idea, try this Southwestern Quinoa Salad Recipe.

southwestern quinoa salad
a southwestern quinoa salad makes a tasty and healthy dinner choice.

Thanks for checking the egg salad recipe out. If you liked the dish, then click a button or two below and share it with friends…I appreciate it!
–Chef Buck

Share and Enjoy !


Tzatziki Sauce Recipe – Greek cucumber yogurt dressing

Tzatziki Sauce recipe

It’s super easy to make a healthy Greek tzatziki sauce recipe. It’s fairly quick to prepare tzatziki sauce, but it takes a little time to reach it’s full flavor potential, so make it a few hours ahead of time before serving. Tzatziki is a mild cucumber yogurt dressing that pairs very well with spicy falafel or lamb. The sauce can be used as a dressing or dip, especially for stuffed pitas, pita chips, or fresh veggies.

Ingredients You’ll Need for Tzatziki Sauce Recipe:

2 cups GREEK YOGURT
2 cups fresh CUCUMBER
3-4 cloves GARLIC (finely chopped)
1 small LEMON zest and juice
or substitute 1-2 Tbsp
WHITE WINE VINEGAR
½ cup (or more) chopped HERBS
…like dill, mint, or parsley
1-2 Tbsp OLIVE OIL
SALT and PEPPER (to taste)

tzatziki sauce recipe
Greek Tzatziki Sauce, a cucumber yogurt dressing

How To Make a Greek Tzatziki Sauce Recipe:

I prefer using English cucumbers (also called hothouse cucumbers), or using smaller, japanese cucumbers.
These cucumber types have a lot of flavor, are less watery, and the skin is thin enough to be eaten and enjoyed (although I generally peel them when making tzatziki).
When making a tzatziki sauce, start by preparing the cucumber; this will give the cucumber time to drain while you prepare the rest of the sauce ingredients.
Peel your cucumber and grate with a hand grater, or use a food processor if you enjoy cleaning appliances.
Chop the cucumber into smaller pieces, if desired, but don’t over-process, since chunks of cucumber make a tzatziki quite nice.
Place the grated cucumber into a strainer over a bowl to allow the cucumber to drain.
Mix a bit of salt to help draw out the water. Set bowl aside and prep the other ingredients.
Into a mixing bowl, add Greek yogurt, minced garlic, lemon zest and juice, and fresh chopped herbs.
If you don’t have a lemon on hand, substitute a mild rice or wine vinegar.
Mix ingredients well.
Return to the cucumber. Quite a bit of water will have drained into the straining bowl. Use a spatula or spoon to press out more water, and then add the strained cucumber to the yogurt mixture.
Mix well, and add additional salt and pepper to taste.
Cover and place in the fridge for at least 2+ hours before serving; this will give the flavors time to maximize.
Serve as a dip or dressing/sauce.
it’s great with pita chips or fresh sliced veggies; or serve with spicy lamb–especially as a sauce in stuffed pitas, or as a condiment on lamb burgers.
Or as a dressing for a fresh salad.
Greek tzatziki is healthy, versatile, and an easy recipe worth giving a go.
Give this Greek tzatziki sauce recipe try and let me know what you think, and bon appétit!
For another Greek inspired dish, check out this Hummus Recipe

hummus
click pic for video recipe

Or this very tasty Pita Chips Recipe …that goes great with tzatiki
spicy pita chips
Thanks for checking out the recipes. If you like what you see, share these dishes with your friends and family on social media, I appreciate it!
–Chef Buck

Share and Enjoy !


Cook Spaghetti Squash for a Healthy, Low-fat Diet

best spaghetti squash

Cook spaghetti squash for a healthy addition to a low-fat diet. It’s mild flavor and hardy texture makes spaghetti squash ideal for a variety of recipes.

How to cook Spaghetti Squash

This is a basic spaghetti squash recipe :
Slice squash into halves.
Place cut sides down in shallow water in a roasting pan.
Bake for about 45 minutes at 350 degrees Fahrenheit.
Remove squash from the oven and carefully turn halves over to check for doneness –the water will be hot and steam will be trapped under the squash, so be cautious.
Allow squash to sit 5-10 minutes to cool slightly for easier handling.
With a fork or spoon, remove the meat of the squash.
The squash will pull away into strands that resemble spaghetti, although this squash will taste nothing like spaghetti.

cook spaghetti squash
When cooked spaghetti squash pulls apart into “noodley strings”

Here’s one of my favorite spaghetti squash recipes —

Mediterranean Spaghetti Squash Recipe

This dish is super tasty, and I can eat way too much without feeling too guilty. Watch the video and learn how to easily cook this squash. It’s a terrific ingredient; delicious and healthy. This Mediterranean style recipe is just one of many ways to use this versatile vegetable. Give it a try!

Spaghetti Squash Recipe Ingredients:

1 medium SPAGHETTI SQUASH
1 Tbsp OLIVE OIL
1 large ONION (chopped)
4-6 cloves GARLIC (finely chopped)
½ RED BELL PEPPER (sliced)
1 14 oz can ARTICHOKE HEARTS in water (chopped)
1 cup OLIVES, and olive juice to taste (chopped)
¾ to 1 cup PARMESAN CHEESE (shredded or grated)
1 tsp OREGANO
½ tsp THYME
1 tsp BASIL
SALT and PEPPER to taste

How to Make this Spaghetti Squash Recipe

Preheat oven to 350.
Cut spaghetti squash in half, lengthwise (a good, sharp knife will be nice).  Place each side, cut side down, in a shallow pan with about ¾ c water. Cook spaghetti squash uncovered for 45 minutes. Set aside to cool squash halves–enough to handle without causing death to the handler–but not completely cool.
You have time to chop up all your ingredients while the squash cooks.   For the artichoke, you may want to remove some of the outer, tougher leaves.
For each half, use a spoon to scrape out and discard the seeds and dark center strings.  Use a fork to scrape out the squash into ‘spaghetti-like’ strands.
Heat oil over medium high heat.  Saute onion and garlic 4-6 minutes.  Add bell pepper. Turn heat to low, stir and cover for 2-4 minutes.  Uncover, stir in spaghetti squash and remaining ingredients.  Cover and cook til all ingredients are warm, about 7-10 minutes
Add 1 Tbsp of olive juice and any other seasonings to taste. Serve warm. And a little toasted bread on the side won’t hurt.
Give this spaghetti squash recipe a try and let me know what you think, and…
Bon appétit!
And for another great spaghetti squash recipe, try this Spanish-style Spaghetti Squash.

spaghetti squash recipe
click image to check out this recipe

Thanks for watching, sharing, and subscribing to my videos, I appreciate it!

Share and Enjoy !


Crispy Salmon Recipe – How to Cook Salmon

crispy salmon recipe

This crispy salmon recipe is delicious. Cooking salmon with a crispy skin adds great texture and flavor. Keep it simple; all you need is a little oil, salt, and pepper to cook up this tasty fish dinner. Give this super easy crispy salmon dish a try…it’s a winner.

How to Cook A Crispy Salmon Recipe

SALMON FILET w/ skin on
OLIVE OIL
SALT and PEPPER to taste
OIL for frying

crispy salmon recipe
Keep salmon skin-side up to preserve crispiness
  • Wash the salmon filet and pat dry with a paper towel.
  • If your cut of fish has pin bones, remove them.
  • Coat the salmon with olive oil, skin side as well.
  • Generously season fish with salt and pepper.
  • Using an oven safe skillet, on medium high heat, heat a little oil on the stove top. Check current prices for a stove top and oven safe cast iron skillet on Amazon.
  • When the oil is hot, add the salmon fillet skin side down and cook for 2-4 minutes –adjust time depending on the size of the fillet.
  • Transfer the skillet to the oven and continue cooking the salmon under the broiler for 1-3 minutes.
  • Remove the skillet from the stove and transfer salmon fillet to a plate, skin-side up …resting the fish skin-side down will cause the skin to lose it’s crispiness!

Give this simple crispy salmon recipe a try and let me know what you think, and bon appétit!

And don’t just cook salmon this way! Any tasty fillet of fish with skin on can be prepared in this manner. To appreciate fresh fish, keep it simple.

And for another tasty fish dish, try this healthy baked cod recipe.

baked fish recipe
oven baked fish fillets

Thanks for Watching our Videos!

Thanks for checking out our crispy salmon recipe. Sign up for our mailing list so you’ll never miss a new recipe. Also click a button below and share the dishes with your friends. You can also follow Chef Buck on Youtube. We appreciate all the kind comments and support, and we’ll see you next time in the kitchen!

If you like what CG and I do, support us on Patreon, or throw us a tip in our Paypal Tip Jar. We’ll happily enjoy a coffee on the road – Thanks! We appreciate all the support, and we’ll see you next time in the kitchen!

We include affiliate links for products on our website. Making a purchase after clicking on our links and we may earn a commission which helps us produce more videos and drink more coffee :^) We participate in the Amazon Services LLC Associates Program, which is an affiliate advertising program. It provides a means for us to earn fees by linking to Amazon.com and affiliated sites, so we can make more videos.

Share and Enjoy !

Best Southwestern Quinoa Salad Recipe

southwestern quinoa salad

Everywhere you turn, there’s a Southwestern quinoa salad, and for good reason.  It’s delicious, easy to make, and a great choice for a healthy meal. Since quinoa is a complete protein, this Southwestern inspired salad makes an ideal vegetarian recipe, doubly so since this quinoa is paired with black beans.

What you need to make a Southwestern Quinoa Salad

2 cups COOKED QUINOA (check current prices for quinoa on Amazon)
1 15 oz can BLACK BEANS
10-15 sliced CHERRY TOMATOES
1 AVOCADO
½ diced YELLOW BELL PEPPER
3-5 chopped GREEN ONIONS
¼ cup chopped, pickled JALAPENO
½ cup chopped CILANTRO
1 LEMON …juice and zest
2 Tbsp OLIVE OIL
SALT and PEPPER to taste

southwestern quinoa salad
southwest quinoa salad recipe

How to make a Southwest Quinoa Salad

Cook up the quinoa just like rice: 1 part quinoa to 2 parts water, bring to a boil, reduce heat, cover and simmer for 15 minutes or until the water is absorbed. Fluff the quinoa and then set aside uncovered to cool.

While the quinoa cools, prepare the veggies:

Dice ½ a yellow bell pepper, or any color pepper, but if you’re like me and you’re making a corn-free southwest quinoa salad, then using a yellow pepper will make your quinoa salad more lovely to look at. Slice some cherry tomatoes. Cherry tomatoes have a great flavor, and the hardiness of the tiny tomato makes it the perfect choice for a salad.

Remove and mince the zest from 1 small lemon, and then slice the lemon in half. Check current prices for a lemon zester on Amazon.

Chop up some green onions, and cilantro. If you like a little heat, chop up some pickled jalapeno, too, and reserve a Tbsp of the jalapeno pickling juice for added kick and flavor.

When the quinoa cools:

Add 2 cups of the cooked quinoa to a large mixing bowl.
Rinse and drain the black beans and add them to the bowl.
Add the yellow pepper, jalapeno pepper, onion, cilantro, lemon zest, olive oil, juice from half the lemon, and salt and pepper.
Mix ingredients thoroughly.
Add tomato.
Slice avocado and add to salad.
Take the remaining lemon half and squeeze its juice over the cut avocado, this will preserve the vibrancy of the avocado.

Gently mix the salad and serve.

This Southwestern quinoa tastes great on it’s own, as a healthy side dish, or served over a bed of fresh greens for a super salad topping.

Give healthy southwest quinoa salad recipe a try and let me know what you think, and bon appétit!

For another healthy option with a southwestern flair, check out out this meat-free Vegetarian Chili Recipe that even carnivores will love.

vegetarian chili
pot o’ meatless chili for good times

Thanks for checking out our Southwestern quinoa salad recipe, and all of our recipes. Be sure and sign up for our mailing list and never miss a new Chef Buck cooking video, and also click a button below and share the dishes with your friends. We appreciate all the kind comments and support, and we’ll see you next time in the kitchen!

Thanks for watching our cooking videos!

We include affiliate links for products on our website, so if you make a purchase after clicking on our links, we may earn a commission which helps us produce more videos and drink more coffee :^)                                                                                                We participate in the Amazon Services LLC Associates Program, which is an affiliate advertising program providing a means for us to earn fees by linking to Amazon.com and affiliated sites, so we can make more videos.

Share and Enjoy !

Banana Pancakes – Flourless Gluten Free Recipe

banana pancakes

This Banana Pancakes recipe tastes great! These banana pancakes are flourless and gluten free and cook up fluffy and filling for a healthy, easy to make breakfast alternative to traditional pancakes. And pancakes are especially tasty when you add in some nuts, chocolate chips, or fresh berries.

What You Need to Make Banana Pancakes

(makes 6 good-size pancakes or 8-10 sissy cakes)

2 BANANAS
2 EGGS
½ tsp BAKING POWDER
½ tsp CINNAMON POWDER
splash of VANILLA EXTRACT
sprinkle of WALNUTS and/or FRUIT if desired
SALT to taste (optional)

banana pancakes
Banana pancakes are flourless and gluten free and cook up fluffy and filling for a healthy, easy to make breakfast alternative to traditional pancakes.

How to Make Banana Pancakes

  • In a bowl, mash up 2 bananas; the riper the bananas, the more banana-ee your pancakes will be!
  • Add eggs.
  • Add cinnamon, baking powder, salt, and vanilla extract.
  • Mix ingredients well. The batter should be the consistency of a traditional pancake batter–add more mashed banana if needed.
  • Let batter sit for a few minutes.
  • Heat a greased skillet or griddle on medium low heat. In the video I use a Lodge cast iron skillet which works great and is pretty affordable for a cast iron skillet. Check the current price for a cast iron skillet on Amazon.
  • Once skillet is heated, spoon batter to form pancakes; whatever size you like.
  • Cook undisturbed about 3-4 minutes or until the pancake begins to brown.
  • If desired, sprinkle nuts or berries or chocolate chips on the cakes.
  • Flip pancakes with a spatula and cook on the other side until brown. Unlike traditional flour pancakes, you can flip these cakes over and over until they are cooked and colored to your liking.
  • Serve hot off the grill with maple syrup.
banana pancakes
Banana Pancake Recipe

Give these flourless banana pancakes a try and let me know what you think, and bon appétit!

And for another healthy breakfast idea, try a Tofu Scramble Recipe.

tofu recipe
this tofu recipe makes a perfect breakfast, lunch, or dinner

Thanks for checking out this banana pancakes recipe, and all of our recipe videos. Be sure and sign up for our mailing list and never miss a new Chef Buck cooking video, and also click a button below and share the dishes with your friends. We appreciate all the kind comments and support, and we’ll see you next time in the kitchen!

Thanks for watching our recipe videos!

We include affiliate links for products on our website, so if you make a purchase after clicking on our links, we may earn a commission which helps us produce more videos and drink more coffee :^) We participate in the Amazon Services LLC Associates Program, which is an affiliate advertising program providing a means for us to earn fees by linking to Amazon.com and affiliated sites, so we can make more videos.

Share and Enjoy !

Potato Cake Recipe — How To Make Sweet Potato Latkes

potato cake recipe

Check out this simple potato cake recipe. Or do you call them potato pancakes? Or potato latkes? I like to use sweet potatoes because they are less starchy and cook up quicker than white potatoes, plus sweet potatoes just taste great, and they are a good nutrition and energy source.

Ingredients to Make A Sweet Potato Cake Recipe :

1 med SWEET POTATO
ONION (½ as much as potato)
Fresh HOT PEPPER (optional)
2 EGGS
2 Tbsp FLOUR
1 tsp CURRY POWDER
½ tsp CHILI POWDER (optional)
……or whatever seasonings you prefer!
SALT and PEPPER (to taste)
OIL for cooking

potato cake recipe
Are they potato latkes, potato pancakes, or potato cakes? What do you call them?

How to Make Sweet Potato Latkes :

    • Shred sweet potato into strings, and thinly slice onion into stringy lengths.
    • I like to also thinly slice a jalapeno pepper; the pepper adds a nice zing, flavor, and color, but you can skip the pepper if you’re a “fraidy cat”.
    • In a bowl, combine the potato, onion, and pepper with the flour until well coated.
    • Beat two eggs and add into the mix, stirring well.
    • Add seasonings as desired. I like a lot of seasoning, and the potato and onion like it, too, so be liberal with the salt, pepper, and flavors you prefer; it’ll make for tastier cakes.

potato cake recipe
thinly sliced sweet potato, onion, and pepper make for a sturdy, tasty, potato cake.

  • Heat oil in a skillet on medium-high heat and spoon the potato mixture into the skillet and press and shape into patties. The potato cakes should be about the size and thickness of a nice ¼lb burger, but not too thin.
  • Don’t crowd the skillet. I use a ten-inch skillet and get two batches of three patties each, which is a terrible sentence, and almost sounds like math, so sorry for that.
  • Cook patties for 3-4 minutes on each side, turning carefully.
  • Adjust the burner temperature as needed; reduce heat to cook each potato patty for 3-4 minutes without burning.
  • Cook until nicely colored, then remove potato cakes from the skillet and drain on a paper towel.

It’s a great dish for breakfast, lunch, or dinner.
Give this simple potato cakes recipe a try and let me know what you think, and bon appétit.

And for another yummy potato dish, check out this classic Home Fried Potatoes Recipe.

home fried potatoes recipe
home fried potatoes

Thanks for watching. If you like the potato cake recipe, use some of the share links below to share the dish with your friends and family.
I appreciate it!
–Chef Buck

Share and Enjoy !


Frozen Yogurt Banana Pops – make a healthy treat

frozen yogurt banana

Try a healthy Frozen Yogurt Banana Treat. It’s easy to make, and a nice dessert option instead of ice cream when you’re trying not to be too bad. Crushed peanuts and coconut flakes make this yogurt banana popsicle extra tasty, and a chocolate chip or two won’t hurt, especially if you’re making it as a ghostly Halloween treat for some lucky kid.

What You Need to make a Frozen Yogurt Banana Pop

Banana
Crushed Peanuts
Coconut Flakes
Chocolate Chips
Greek Yogurt
(or melt
white chocolate
instead of yogurt)
and some Wax Paper

How to make a frozen Yogurt Banana Pop

  • Peel a banana!
  • You can use 1 banana to make 2 popsicles, or 4 popsicles.
  • For two frozen treats, just cut the banana in two. This size makes a yummy pop, but can be a bit much if frozen for a loooong time; for easier to eat frozen banana popsicles, cut the halves into lengthwise halves.
  • Poke a stick into the center of the banana. A thin stick will be needed for smaller popsicles, otherwise the banana will split.
  • Roll or dip the banana stick in yogurt and coat thoroughly. Thick, Greek yogurt is ideal for a nice coating.
  • Place pops on wax paper and Freeze AT LEAST 1 hour. The longer it freezes, the more like a popsicle they will become, but it will take at least 1 hour for minimum frozen popsicle satisfaction.
  • For fancy popsicles, roll the banana sticks in crushed peanuts and coconut flakes. This can be done before or after the pops are coated in yogurt.
  • For extra coconut flavor, toast the coconut flakes.
  • For a more decadent dessert, sprinkle the yogurt covered pops with chocolate chips before freezing. Or M&M’s…or any kind of sprinkles you like.
  • And for a spooky treat for the children, use chocolate chips to shape eyes and a mouth to make a yogurt/banana ghost. This is an easy and healthy low-calorie treat to make around Halloween.
  • And if you’re not counting calories, use white (or dark) chocolate instead of yogurt; simply melt chocolate in a skillet and roll the banana sticks to coat.

frozen yogurt banana
You can fancy up a frozen yogurt banana recipe with chocolate chips, coconut flakes , peanuts, peanut butter, M&M’s…whatever you like!

Give this frozen yogurt covered banana recipe a try and let me know what you think, and bon appétit!

And for another tasty (and healthier) dessert idea, check out this Chocolate Cake made with garbanzo beans.

gluten free cake
Gluten-free Garbanzo Bean Cake

THANKS FOR WATCHING! If you enjoyed the post, share it with your friends …be a cool kid and hit some of the share links below. I appreciate it!
–Chef Buck

Share and Enjoy !


Canned Mackerel Recipe for Meatballs

canned mackerel recipe

Try this canned mackerel recipe and cook a healthy Italian-style meatball dish. Mackerel provides a ton of nutrition, and is a wild caught fish full of healthy oils. It’ a rich source of omega-3 fatty acids. Canned mackerel is inexpensive, super convenient, and an ideal ingredient to have around the house.

What You Need to Make a Meatball Canned Mackerel Recipe

1 can MACKEREL
1 EGG
1 Lg ONION
4-5 cloves GARLIC
4-5 Tbsp OLIVE OIL
14oz can TOMATO SAUCE
14oz can CRUSHED TOMATO
½ GREEN BELL PEPPER
1 RED or YELLOW BELL PEPPER
½ cup grated ROMANO CHEESE
1 Tbsp ITALIAN SEASONING
2 tsp CHILI POWDER
SALT and PEPPER (to taste)
some fresh parsley…and serve over rice or noodles

How to Make Canned Mackerel Meatballs

  • Open the canned mackerel and pour fish into a bowl. Like canned tuna, the mackerel has already been cooked during the canning process. The skin and bones are edible, in fact they are quite nutritious.
  • Remove some of the juice that was in the can, but leave about a ¼ cup of juices.
  • The larger vertabrae, while quite chewable, can be a little distracting in a meatball.
    Using your hands, break the fish up, smashing as much of the bone matter as convenient.
  • Into the bowl add salt, pepper, and chili powder to taste. You’ll also add some of these spices into the marinara sauce as well.
  • Add the freshly grated Romano cheese, or substitute Parmesan cheese.
  • Add one egg, and about 1 Tbsp each of finely chopped onion, garlic and green bell pepper.
  • Thoroughly combine all of the ingredients in the bowl and then form the mixture into meatballs about the size of a ping pong ball. The bowl should yield 12-14 meatballs.

Time to Cook the Meatballs!

  • Heat a skillet with oil on medium high heat.
  • Brown the meatballs on all sides. Be gentle, the mackerel meatballs will be moist and quite soft. The meatballs will likely not keep their round shape, but that’s fine. Use tongs and turn them gently in the hot oil. The browning will help the meatballs to keep their shape later in the marinara sauce.
  • Brown meatballs for 5-7 minutes and the remove the meatballs from the skillet and set aside on a plate.
  • Into the skillet add the remaining onion, garlic, and bell peppers. Saute for several minutes until they begin to soften.
  • Add more salt, pepper, and hot pepper as desired. Use fresh hot peppers if you like!
  • Add in the crushed tomatoes and tomato sauce.
  • Stir in the dried Italian seasonings.
  • Bring skillet to a bubble and the reduce to a simmer and cover and let simmer for about 20 minutes.
  • After 20 minutes, add fresh parsley and then return the meatballs to the skillet.
  • Gently mix the meatballs with the sauce and let cook for another 5 minutes.

And that’s it! Serve the sauce and mackerel meatballs over pasta or rice.
Give this canned mackerel recipe a try and let me know what you think, and bon appétit!

If you can’t find it at the store, you can check out canned mackerel prices on Amazon.

canned mackerel recipe
Canned Mackerel is packed with nutrition, super convenient, and relatively inexpensive.

And for another canned seafood recipe, try this delicious Salmon Burger Recipe.

Thanks for watching the video and checking out the recipe. If you enjoyed it, then click some of the share buttons below and introduce your friends to the joy of canned mackerel! I appreciate it!
–Chef Buck

Share and Enjoy !


Make the Best Bean Soup Today !

bean soup

This bean soup recipe is super tasty and easy to make. Doesn’t bean soup sound delicious? Especially if you’re a kid. I use cannellini beans and black beans in this recipe, but you can use whatever beans you like. Ham or sausage is great in bean soup, too, and it doesn’t have to be a lot; just a little meat adds great flavor to bean soup. If going meat free, be sure to add lots of spice and maybe and extra veggie or two…beans need all the excitement they can get.

Bean Soup Recipe Ingredients:

2 15oz cans CANNELLINI BEANS
1 15oz can BLACK BEANS
2 medium sized ONIONS chopped
4-5 cloves GARLIC finely chopped
some leftover SAUSAGE or HAM (cooked)
32 oz BROTH (or ½ water ½ broth)
a little HALF AND HALF if you want
1 tsp CHIPOTLE POWDER
(or use some other kinda heat)
SALT and PEPPER to taste
1-2 Tbsp Oil
chopped PARSLEY if you want

bean soup
adding a mix of beans will add color and texture to your soup

Bean Soup Recipe Directions:

Heat 1 to 2 Tbsp of oil in a soup pot.
Add the onion and garlic and saute for several minutes.
If you’ve got fresh chili or jalapeno peppers, dice and add a little of that, too…if you want.
Add seasoning. I use salt, pepper, and chipotle powder in this recipe. Chipotle is awesome in bean soup. It adds great flavor
and a little heat. Don’t have chipotle powder? Add chili powder or chili/garlic paste instead, or anything you like, soup is all about
improvising.
Cook the spices and onions together for a few minutes and then add broth (meat or veggie broth, whatever, dude).
Toss in a bay leaf and bring the pot to a bubble.
Add in beans. I like to use a mix of cannellini and black beans.

If you have some sausage or ham on hand, chop and toss a little into the soup.
Reduce the heat down to a low simmer, cover and let cook 30-45 minutes.
After simmering, remove the bay leaf.
Use a hand blender to blend the soup to desired consistency. Check here for current prices on Hand Blenders at Amazon.

bean soup
use a hand blender to make a soup creamier

I like to add a little half and half for added creaminess; not a lot, just a little does the trick, around ½ a cup.
Turn off the heat and stir in a little chopped parsley or cilantro, and that’s it!
If you can make it a day ahead, all the better; soup only gets tastier with time!
Hope you love it!
Give Bean Soup recipe a try and let me know what you think, and bon appétit.

And for more bean fun, check out this crazy awesome Vegetarian Chili Recipe that even the meat lovers in your family will enjoy.

vegetarian chili
pot o’ meatless chili for good times

Thanks for Watching our Videos!

Thanks for checking out our bean soup recipe. Sign up for our mailing list so you’ll never miss a new recipe. Also click a button below and share the dishes with your friends. You can also follow Chef Buck on Youtube. We appreciate all the kind comments and support, and we’ll see you next time in the kitchen!

If you like what CG and I do, support us on Patreon, or throw us a tip in our Paypal Tip Jar. We’ll happily enjoy a coffee on the road – Thanks! We appreciate all the support, and we’ll see you next time in the kitchen!

We include affiliate links for products on our website. Making a purchase after clicking on our links and we may earn a commission which helps us produce more videos and drink more coffee :^) We participate in the Amazon Services LLC Associates Program, which is an affiliate advertising program. It provides a means for us to earn fees by linking to Amazon.com and affiliated sites, so we can make more videos.

Share and Enjoy !

Egg Bake Recipe … or giant oven omelette!

egg bake recipe

Give this easy Egg Bake Recipe a try. Or is it an oven omelette recipe? Or just a fancy-pants egg casserole? Whatever you want to call it, it’s delicious and nutritious and super easy to prepare.
The leftovers make a terrific breakfast on the go, and it’s a great recipe for using up odds and ends in your refrigerator, so definitely give this brunch / breakfast dish a try.

Egg Bake Recipe Ingredients:

10 EGGS
1 cup MILK
1 cup GREEN ONION chopped
3-5 cloves GARLIC finely chopped
1-2 cups shredded CHEESE …I like gruyere and monterey jack best
1 cup MUSHROOMS sliced
½ cup BELL PEPPERS chopped
½ cup ARTICHOKE HEARTS chopped
½ cup TOMATOES
HOT PEPPERS chopped, to taste
SALT and PEPPER to taste
OIL for cooking
add CILANTRO, PARSLEY,
or any chopped HERBS
you like!

Egg Bake Recipe Directions:

My favorite part of this dish is the leftovers. It’s great cold for a tasty and nutritious breakfast on the go, so make a batch at the beginning of your week, and you’ll have a quick snack whenever you like.

Step 1:
Saute your veggies. Use the suggestions in my recipe, or better yet, use whatever you have on hand. I NEVER make this dish with the same ingredients, because it’s the perfect opportunity to clean out the refrigerator. Add salt and pepper as desired.

egg bake recipe
use lots of fresh veggies –and ham or cooked sausage if you’re feeling carnivorous.

Step 2:
In a bowl, whisk together the eggs and milk. Add some fresh herbs if you like. Chives and basil are awesome in this mix.

Step 3:
Lightly grease an oven safe baking dish, about 8 X 10. Check here for current prices on a Pyrex Baking Dish on Amazon.

Step 4:
Line the bottom of the dish with freshly shredded cheese. I like gruyere and monterey jack the best, but use your favorite cheese.

egg bake recipe
layer a lightly greased baking dish with cheese

Step 5:
Evenly spread the sauteed veggies over the cheesy bottom. If you have extra cheese, sprinkle on top.

egg bake recipe
spread sauteed veggies evenly over cheesy bottom.

Step 6:
Pour the egg/milk mix gently over the veggies. The egg will soak to the bottom and cover the top.

egg bake recipe
Completely cover dish with egg mix.

Step 7:
Bake in an oven preheated to 350 degrees Fahrenheit for 40-50 minutes. Add a sprinkling of cheese to the top during the last 10 minutes, if desired.
Remove from the oven and allow the egg bake to rest 10 minutes before slicing.

egg bake recipe
Serve hot or cold, and make a bunch, because the leftovers are twice as good!

This dish makes a terrific breakfast for a family gathering, it’s awesome over salad greens, and the leftovers are perfect for a quick snack or breakfast on the go.

Give this easy egg bake recipe a try and let me know what you think…and bon appétit!

And for another tasty breakfast recipe, check out this Complete Huevos Rancheros from Scratch Recipe.

huevos rancheros
Huevos Rancheros is a flavorful, classic mexican dish…delicious!

Thanks for checking out the recipes. Be sure and sign up for our mailing list so you’ll never miss a Chef Buck cooking video, and click a button below and share the dishes with your friends. We appreciate all the kind comments and support, and we’ll see you next time in the kitchen!
–Chef Buck

Share and Enjoy !


Garlic Quinoa Recipe …instead of garlic rice

garlic quinoa

This garlic quinoa recipe makes a terrific side dish. I use quinoa often to provide the protein in vegetarian meals, but quinoa is also a smart choice to serve with other proteins. This garlic quinoa side is filling and tasty, and a great accompaniment for many meat and fish dishes.

Garlic Quinoa Recipe Ingredients:

2 cups QUINOA
3 cups WATER
3-4 cloves GARLIC (finely chopped)
2 Tbsp OLIVE OIL
SALT and PEPPER to taste
and add chopped PARSLEY …if you like, man

garlic quinoa
garlic quinoa makes a great side dish

Garlic Quinoa Recipe Directions:

In an oven proof dish, add 3 cups of water.
Add in the olive oil, or melted butter.
Add the quinoa.
Add finely chopped garlic. I find 3-4 cloves to be plenty (this is one of those rare dishes where I have found too much garlic to be too much).
Add salt and pepper to taste.
If you want to add a little heat, add some finely chopped red chilis (it adds a nice color, too), or just a little cayenne pepper.
Stir the ingredients together well and place top or foil covering over the baking dish.
Bake in an oven preheated to 350 degrees Fahrenheit for 90 minutes. No attention to the dish is required while baking.
After 90 minutes, remove the dish from the oven, uncover and let set for a few minutes.
Fluff with a fork and serve.
It’s a great side dish for meat, fish, and vegetarian meals.
Any leftovers can be used to make quick quinoa salads.
Give this Garlic Quinoa Recipe a try and let me know what you think, and bon appétit!

raw quinoa
uncooked quinoa…looks like a grain, but it’s a seed.

Quinoa is a terrific ingredient to incorporate into your diet for many reasons, here are a few:
1) It is a complete protein (provides all essential amino acids).
2) High in fiber and nutrition.
3) High in magnesium and iron.
4) Is low on the Glycemic Index, making it a good choice for blood sugar regulation.
5) it can easily be substituted for rice in many recipes

For more quinoa inspired recipes, check out my QUINOA PLAYLIST.
spanish quinoa

Share and Enjoy !


Roasted Garlic Recipe …and make a Fancy Crostini

roasted garlic

This roasted garlic recipe is easy to prepare and there are a zillion uses for roasted garlic, like a spread for bread, which I do in this video for a quick crostini idea.
Roasted garlic makes a great addition to rice, potato, and quinoa dishes, jams, salad dressings…most things are better with a little garlic.

Roasted Garlic Recipe Ingredients:

GARLIC
SALT
PEPPER
OLIVE OIL
…plus herbs and spices if you like

For Crostini:
BREAD
FETA CHEESE
CAPERS
KALAMATA OLIVES

roasted garlic recipe
use roasted garlic to make a quick crostini

Roasted Garlic Recipe Directions:

When buying, choose garlic bulbs that are firm and have an intact “papery” outer covering. Avoid soft bulbs, or bulbs that have give and seem overly dry and desiccated. Buy bigger bulbs with bigger cloves! Peeling garlic is a semi-pain, so make it easier on yourself and choose the largest cloves available.

Remove the papery outer covering and separate the cloves.
Do you have a secret tip (that really works!) for quickly peeling garlic cloves? If so, please let me know! I’ve found that the best way for me is the tried and true one-at-a-time method: just give each clove a gentle whack, enough to break the peel, and then remove the skin.
Place peeled cloves on a sheet of aluminum foil.

Drizzle with olive oil. It doesn’t have to be a lot, just enough to coat the cloves.
Add salt and pepper to taste, and any dried herbs or seasonings you like. I usually add a little thyme.
Stir and coat the cloves in the oil and seasonings and then close up the aluminum foil like a Hershey’s Kiss.
Place on a baking sheet and slide into an oven preheated to 400 degrees Fahrenheit.
Bake 30-40 minutes and they’ll be soft and ready for use.

Raw garlic is super strong with a burning bite, but roasting mellows out the bite and transforms the garlic into a tasty treat that can be popped into your mouth whole. I usually eat a handful of cloves when they’re right out of the oven–I can’t help myself!
Warm roasted garlic is great on a crostini, which is really just a fancy piece of toast.
Toast slices of French bread and smear on the warm garlic cloves like butter. Top with feta cheese, capers, and kalamata olives for a quick treat.

Use roasted garlic as a spread for sandwiches.
Mix into mashed potatoes or rice dishes (or quinoa).
Add roasted garlic to salads or mash into salad dressings.
Add to jams, and gravies, and guacamole.
Mix with butter for garlic bread.
Add roasted garlic to anything; it’s a great item to have in the fridge.
Store refrigerated and it will keep several days, store in a jar refrigerated and covered with oil, and it will keep a little longer,but there are so many uses for roasted garlic, it will be very easy to find ways to quickly use it up.
Give this roasted garlic recipe a try and let me know what you think, and bon appétit!

And for another simple and versatile recipe dish, try this Pickled Daikon and Carrot Relish.

Vietnamese Pickled Daikon and Carrot Relish
click pic for Vietnamese Pickled Daikon and Carrot recipe

Share and Enjoy !


Hearts of Palm Recipe with Beans …healthy and tasty!

hearts of palm

Hearts of palm are often used in salad recipes. Heart of palm is literally the edible core of a palm tree stem. It’s easily found sold in cans, but CG scored a fresh heart of palm, so we’ll take a look at this weirdo veggie and make a simple, but very tasty salad. Canned hearts of palm are not as crunchy as fresh heart, so be sure and add CELERY to this recipe when using canned hearts of palm.

Hearts of Palm Recipe Ingredients:

1 heaping cup sliced HEART OF PALM
15oz can MIXED BEANS
1 tsp GINGER (minced)
½ cup CILANTRO
½ cup GREEN ONIONS (chopped)
dressing:
2 Tbsp LEMON JUICE
½ tsp LEMON ZEST
1 Tbsp RICE VINEGAR
1 Tbsp heavy OLIVE OIL
2 tsp SOY SAUCE
SALT and PEPPER to taste
if using canned hearts of palm, add ½ cup chopped CELERY
(and toasted nuts are never a bad idea, either)

hearts of palm
Fresh heart of palm and salad.

Hearts of Palm Recipe Directions:

If using fresh heart of palm, slice away the bamboo-like outer hull and remove the heart. fresh heart of palm has a great texture, a little crunchy with a creamy after taste; this slight crunch makes fresh heart of palm ideal for salad–canned hearts of palm are not as firm, so be sure to add ½ cup celery to this recipe if using canned hearts of palm.
In a bowl, combine the beans, heart of palm, cilantro, ginger, and green onion. A mix of beans is ideal…different beans will add a variety of textures.
In a smaller bowl, combine the dressing ingredients and whisk well–super well!
Add the dressing to the salad and toss.
And that’s it.
We found this simple combo to be quite tasty. You can always add more ingredients, but sometimes simple is best.
Be sure to add celery for crunch if using canned hearts, and toasted nuts are always a great crunchy element for salads–plus they add protein to the dish as well.

Hearts of palm
Hearts of palm in a can

Give this heart of palm recipe a try and let me know what you think, and bon appétit!

And for another tasty salad idea, check out this Black-eyed Pea Salad.
black eyed pea salad
Click on Pic for Recipe

Share and Enjoy !


How to Eat Pomegranate Fruit — great nutrition!

how to eat pomegranate

How to eat pomegranate. First off, Pomegranate is a weird, messy fruit.

When selecting a pomegranate, choose a fruit that is heavy for its size; like with most fruits, this signifies that it is fresh and juicy. The skin should be firm.

How to Eat Pomegranate

Pomegranate juice can be quite messy, and will easily stain clothing. It is a good idea to slice and prepare pomegranate in a large bowl or kitchen sink where the juice splatter can be contained.

The edible part of the pomegranate are the red “seeds” within the fruit. These seeds are called arils. Inside the arils you’ll find an inner seed that is a little gritty, but it is edible and contributes to the overall texture of the pomegranate, which is…interesting. Pomegranate is a food folks tend to love or hate, but whichever camp you fall into, pomegranate will provide an attractive and nutritious experience. Pomegranate is high in fiber, antioxidants, vitamins C, and potassium.

pomegranate
arils from pomegranate

To remove the arils, slice the pomegranate in half, and then into wedges. The arils are held firm by a membranous inside that is bitter and not to be eaten. The arils can be easily pulled away from the membrane. There are quite a lot of arils in a pomegranate, so this can take a little time…playing some cool jazz will help.

Some folks like to remove the seeds while holding the pomegranate beneath a bowl of water…this will cut down on the splatter, but it will also dilute any of the juice within the fruit.

How to eat pomegranate? Pomegranate can be eaten raw, juiced, or cooked.

Pomegranates keep for a week at room temperature, or up to 3 weeks if refrigerated.

Pomegranate is often referred to as “the food of the Gods”. Give ’em a go. You’ll either love it or hate it.

And for another interesting fruit experience, give DRAGON FRUIT a try.

Share and Enjoy !


Beet Greens Great over Quinoa or Rice

beet greens recipe

Try this easy beet greens recipe. I almost always buy beets with the beet greens still attached–you’re getting two great ingredients in one! Beet greens are quick to cook up, full of nutrients, taste great, and look great, too. Serve this recipe over rice or quinoa as an entree, or serve it all on it’s lonesome as a side dish.

Beet Greens Recipe Ingredients:

1 bunch BEET GREENS
1 bunch GREEN ONIONS (chopped)
1 can diced TOMATOES
4-5 cloves GARLIC (finely chopped)
2 Tbsp VINEGAR
1-2 Tbsp OLIVE OIL
SALT and PEPPER to taste
HOT PEPPERS (chopped, to taste)
serve over QUINOA or RICE

beet greens

How to cook Beet Greens

Wash beet greens well and then separate the stalk from the leaves. Chop the stalk into bite-sized peices, and then rough chop the greens.
Heat olive oil in a skillet on medium heat. Check prices for a new skillet on Amazon.
Add garlic and, if desired, a little fresh hot pepper.

Let these ingredients cook for about a minute, and then add chopped green onion bottoms (reserve chopped green onion tops to add later)
Cook for 2 minutes and then add the chopped beet stalks.
Saute for 1-2 minutes and then add diced tomato. Bring the skillet back up to a simmer. Add salt and pepper and simmer for approx. 5 minutes.

Add in a little vinegar. I’m throwing in 2-3 Tbsp by the time the dish is complete, but adjust to taste. Add vinegar incrementally–it’s a lot easier to put in than to take out!
Simmer dish another 2 minutes.

Add in the leafy greens and most of the green onion tops–I reserve a little of the green onion tops for a garnish.
Cover and simmer 2 minutes.

And that’s it! Adjust the seasoning as desired, and get it off the heat. Serve the greens over rice or quinoa as an entree, or a side dish. Check current prices for quinoa on Amazon.

Give this beet greens recipe a try and let me know what you think, and bon appétit!

For another great greens dish, try this Creamed Kale Recipe.

kale
A lot of kale isn’t always a lot, kale contains a high water content and will cook down quite bit.

Thanks for checking out our beet greens recipe, and be sure and sign up for our mailing list so you’ll never miss a Chef Buck cooking video, and also click a button below and share the dishes with your friends. We appreciate all the kind comments and support, and we’ll see you next time in the kitchen!

We appreciate you watching our recipe videos!

We include affiliate links for products on our website, so if you make a purchase after clicking on our links, we may earn a commission which helps us produce more videos and drink more coffee :^) We are a participant in the Amazon Services LLC Associates Program, which is an affiliate advertising program that provides a means for us to earn fees by linking to Amazon.com and affiliated sites.

Share and Enjoy !

Cook Quinoa with Roasted Vegetables Recipe

how to cook quinoa

How to cook quinoa with beets; a simple recipe that pairs quinoa with delicious roasted root vegetables. For this quinoa recipe, I roasted beets, carrot, and onion, but any root vegetable will do. I also added a little RAW ginger and garlic, to provide a flavor punch along with excellent nutrition. A complete protein, quinoa makes this dish an ideal vegetarian recipe. It’s a perfect side dish or main course.

Quinoa and Root Vegetable Recipe Ingredients:

1 cup QUINOA
2 med. BEET ROOTS
1 med. ONION
1-2 Lg CARROTS
2 Tbsp GARLIC (minced)
2 Tbsp GINGER (minced)
½ cup PARSLEY (chopped)
HOT PEPPER (to taste)
2 Tbsp OLIVE OIL
4-6 Tbsp VINEGAR
SALT and PEPPER to taste

how to cook quinoa
Chop root veggies into bite-size pieces (but big bites!)

How to Cook Quinoa and Root Vegetable Recipe

Wash and then chop beet bulbs and carrots into roughly ½ inch pieces–bite size, but not too small.
Chop onion into similar sizes. Place chopped veggies in a bowl and toss with olive oil, salt and pepper.

On an ungreased baking sheet, spread veggies out into a single layer and then roast approx. 30 minutes in an oven pre-heated at 400 degrees Fahrenheit. Halfway through the roasting, give the veggies a stir and return to the oven.
While the root vegetables roast, prepare the quinoa.

If you’ve ever wondered how to cook quinoa …it’s just like rice: 1 part quinoa to 2 parts water. Most quinoa sold in stores throughout the USA has been pre-washed, but check packaging for details. (Check current prices for quinoa on Amazon.)

If desired, add a little chopped hot pepper in with the quinoa. Bring the pot to a boil, reduce heat, cover and simmer quinoa for about 15 minutes, or until all of the water is absorbed. Remove pot from the heat and set aside for 5 minutes. Fluff with a fork.

Transfer quinoa to a bowl and season with salt, pepper, and vinegar to taste. Mix well, and then add the roasted vegetables. Add the raw, minced ginger and garlic, and the parsley. Toss until all of the ingredients are well combined. Taste and adjust seasoning as needed.

This recipe makes an awesome side, but it also works well as an entree. Give this quinoa and beet recipe a try and let me know what you think, and bon appétit!

For another recipe featuring beets, Check out this Fresh Beet Greens Recipe.

beet greens recipe
Buy beet roots with the greens for two great ingredients.

Thanks For Watching Our Recipe Videos!

Thanks for checking out our beet and quinoa recipe, and all of our recipes. Be sure and sign up for our mailing list so you’ll never miss a new recipe. Also click a button below and share the dishes with your friends. You can also follow Chef Buck on Youtube. We appreciate all the kind comments and support, and we’ll see you next time in the kitchen!

If you like what CG and I do, you can also support us on Patreon, or throw us a tip in our Paypal Tip Jar. We’ll happily enjoy a coffee on the road – Thanks! We appreciate all the support, and we’ll see you next time in the kitchen!

We include affiliate links for products on our website. So, if you make a purchase after clicking on our links, we may earn a commission which helps us produce more videos and drink more coffee :^) We participate in the Amazon Services LLC Associates Program, which is an affiliate advertising program. It provides a means for us to earn fees by linking to Amazon.com and affiliated sites, so we can make more videos.

Share and Enjoy !

Salmon Burger Recipe Using Canned Salmon

salmon Burger recipe

Use canned salmon to create this simple and satisfying salmon burger recipe. Canned salmon is perfect for making salmon patties, and salmon patties are an ideal stand-in for a hamburger when you’re hamburgered out –plus it’s a healthier choice.

Salmon Burger Recipe Ingredients:

14oz canned SALMON (red or pink)
¼ – ½ cup ONION (finely chopped)
HOT PEPPER (finely chopped, to taste)
2 EGGS (beaten)
SALT and PEPPER to taste
OIL for sauteing (3-4 Tbsp…salmon will soak up the oil)
1 Tbsp CURRY POWDER (optional, check current curry prices online)

salmon Burger recipe
Canned Salmon makes tasty burgers!

Salmon Burger Recipe Directions:

I love canned salmon–red or pink–although I prefer pink canned salmon when making burgers since the pink salmon is much cheaper to buy. I use the more expensive red salmon for making salmon salad.

Salmon in the can is already cooked–in fact it is part of the canning process that cooks the salmon.
Open the the can and drain off the liquid–you don’t want the salmon patties to be too wet when you form them.

salmon burger recipe
Canned Pink Salmon …traditional style means skin and bones are still intact

Traditional canned salmon will come with skin and bones still intact . The skin and bones are soft and edible. You can remove the skin and bones if you like; I used to remove them, but now I’m too cheap, and I don’t want to miss out on the extra nutrition, either.

  • Place drained salmon in a bowl.
  • Add ¼ – ½ cup onion depending on how much you like onion. Make sure the onion is finely chopped; smaller pieces will help keep the patties from falling apart. If desired, add some finely chopped hot pepper. If you don’t have fresh pepper, add a little chili powder or hot sauce.
  • Add salt and pepper to taste.
  • Add one or two beaten eggs. I like to use two beaten eggs because it helps to keep the patties together better; I don’t like my burgers to fall apart while I’m eating them.
  • Mix all the ingredients together well.
  • Shape into patties. I usually get 4 patties out of a 14oz can, but make as many as you like–bigger or smaller–depending on how big you want your burger to be. Here’s some current prices for canned salmon if you like to do your fishing on the internet.
  • Heat oil in a skillet. I like medium heat. You want the oil to be hot enough to sizzle when you add the patties, but not so hot that the patties will cook too quickly; you want the patties to get a nice cooked side before turning them, this will keep then from breaking apart.
  • Cook 5-7 minutes and then turn gently when the patties are golden brown.
  • Cook another 3-4 minutes and then remove from skillet and drain salmon patties on a paper towel.

I like to serve salmon patties on a toasted bun with sliced tomato, onion, lettuce and mayo.
It’s a nice break from hamburgers, and just as tasty.
Sometimes I’ll add a Tbsp of curry powder into the mix to make Curried Salmon Burgers, which you should definitely try sometime.

Give this salmon burger recipe a try and let me know what you think, and bon appétit!

And for another alternative take on a burger dish, try one of my favorite vegetarian burger ideas, A Super Eggplant Burger Recipe.

veggie burger recipe
Best veggie burger? Looks like it.

Thanks For Checking out our Recipes

We hope this info is helpful for the next time you’re out buying crab meat at the supermarket. Sign up for our mailing list so you’ll never miss a new recipe. Also click a button below and share the dishes with your friends. You can also follow Chef Buck on Youtube. We appreciate all the kind comments and support, and we’ll see you next time in the kitchen!

If you like what CG and I do, support us on Patreon, or throw us a tip in our Paypal Tip Jar. We’ll happily enjoy a coffee on the road – Thanks! We appreciate all the support, and we’ll see you next time in the kitchen!

We include affiliate links for products on our website. Making a purchase after clicking on our links and we may earn a commission which helps us produce more videos and drink more coffee :^) We participate in the Amazon Services LLC Associates Program, which is an affiliate advertising program. It provides a means for us to earn fees by linking to Amazon.com and affiliated sites, so we can make more videos.

Share and Enjoy !

Baby Bok Choy Recipe with Quick and Easy Sauce

baby bok choy recipe

Try this simple baby bok choy recipe with a super tasty sauce that’s ready in minutes. This dinky cabbage can be steamed or sautéed to create many healthy and tasty dishes. Bok choy is easily found in markets and is sold in several shapes and sizes under the name bok choy, ranging from tiny baby bok choy to the larger size cabbages that are perfect for soups.

What You Need To Make A Baby Bok Choy Recipe

15-20 BABY BOK CHOY
HOT PEPPERS (finely chopped, to taste)
2 Tbsp GINGER (finely chopped)
5-7 cloves GARLIC (finely chopped)
½ cup HOISIN SAUCE
1-2 Tbsp OLIVE OIL for sauteing

baby bok choy recipe
fresh baby bok choy

How To Cook Baby Bok Choy

Wash the bok choy; bok choy tends to hold dirt around the stem bottoms, so soak and wash thoroughly.
Slice the bok choy lengthwise into even halves.

Steam bok choy for 3-4 minutes. Do not overcook. The stalks are fairly thin and do not require much steaming to soften them, and you don’t want the leafy tops to become overdone; by not
over cooking, you’ll preserve a crunchy texture in the stalk as well as more of the nutritional value.

In a skillet, heat olive oil on medium heat. Add hot peppers, ginger, and garlic and saute for 1-2 minutes. Add the hoisin sauce and mix well.

Add steamed bok choy to the skillet and toss with the sauce until well coated.

If desired, top with toasted sesame seeds or crushed peanuts–it’s very tasty that way–but I like it just as well without.
This dish makes a complete meal when served with a rice or quinoa side.

Hope you like it! It’s well worth giving baby bok choy recipe a try.
Give this dish a go and let me know what you think, and bon appétit!

And for another delicious bok choy dish, try this Bok Choy Soup Recipe.

bok choy recipe
Bok Choy Soup

Thanks for checking out the recipe! If you enjoyed it, click some of the buttons below and share it.
I appreciate it!
–Chef Buck

Share and Enjoy !


Watermelon Salad Recipe –or how to save a sad melon

watermelon salad

Watermelon Salad is simple to throw together and a tasty way to save a crappy melon. CG loves watermelon, but once in a while she brings home a dud that just doesn’t make the cut; so what does one do with an unsweet, flavorless melon? Turn it into a savory salad dish!

Watermelon Salad Recipe Ingredients:
6 cups crappy, unsweet, seedless WATERMELON
1-2 Tbsp fresh MINT (chopped)
¼ cup RED ONION (chopped)
¼ cup FETA CHEESE crumbles
½ cup toasted ALMOND SLIVERS

dressing:
¼ cup BALSAMIC VINEGAR
2 Tbsp OLIVE OIL
1 Tbsp DIJON MUSTARD
1 Tbsp MAPLE SYRUP (or substitute honey)
1 clove GARLIC (minced)
SALT and PEPPER to taste

watermelon salad
Turn crappy watermelon into happy watermelon! (sorry)

Watermelon Salad Directions:
This salad works best with a seedless melon–’cause it’s a salad–and no one wants to dig seeds out of a salad.
Wash your melon and cut away the rind. Slice the red flesh into hearty, but mouth-sized pieces. If it’s sweet–then you’re set! Chow down, because that’s what a melon is for! –but if it’s not sweet, if it’s a flavorless lump that sits in your mouth like play-doh, then don’t despair…it’s salad time.
First thing, make the dressing.
In a small bowl, combine the balsamic vinegar, olive oil, dijon mustard, maple syrup (or substitue honey), garlic, salt, and pepper. Mix together and set aside.
In a larger bowl combine cut watermelon pieces, mint, red onion, feta cheese, and almond slivers. I’ve suggested some ingredient measurements–but that’s just a loose guildeline, man. It’s a salad…follow your heart (and taste buds).
Add salad dressing to taste and toss.
Boom.
That’s it, dude.
Your crappy melon has been transformed into a delicious salad.

Give this Watermelon Salad recipe a try and let me know what you think, and bon appétit!

And for another tasty salad recipe, try this Black-eyed Pea Salad Recipe.

black eyed pea salad

Share and Enjoy !


Bok Choy Recipe for Healthy Bok Choy Soup

bok choy recipe

This bok choy recipe is one of my favorites. Bok choy is a type of cabbage, and quite versatile. It’s easily found in markets and is sold in several shapes and sizes under the name bok choy ranging from dinky baby bok choy to the larger size cabbages that I like to use for soups.

Bok Choy Recipe Ingredients

1 large BOK CHOY (rough chopped)
2 medium SWEET POTATOES (cubed)
1 medium ONION (chopped)
CHILI PEPPERS (to taste)
2 Tbsp GINGER (sliced, minced)
5-7 cloves GARLIC (chopped)
1 Tbsp CORIANDER POWDER
1 tsp MANGO POWDER
1 tsp LEMONGRASS POWDER (or fresh lemongrass)
1 can COCONUT MILK
½ cup fresh BASIL (chopped)
SALT and PEPPER to taste
WATER enough to cover ingredients

bok choy recipe
bok choy cabbage

How to make Bok Choy Soup

If you need a nice soup pot for your kitchen, you can check here for current pricing for a soup pot on Amazon.

In a soup pot, heat oil on medium high heat and add the ginger, garlic, chili peppers (or jalepenos, or whatever your favorite heat is–or no heat if you wanna skip the bite), and onion.
Saute for a minute or two and then add in the coriander, mango powder, and lemongrass powder (if using fresh lemongrass, add in with onions). Mix well and saute for another minute.

Add in sweet potatoes, skinned and cubed into ½ inch peices.
Add one 13.5 oz can of coconut milk and 1 can of water.
Bring pot to a boil, then reduce to a simmer and let cook for 5-6 minutes.

While pot simmers, separate the bok choy stalks from the leaves and wash well.
When the 5-6 minutes are up, add in the bok choy stalk bottoms and mix well. Add more water if needed. The water should be just enough to cover the soup ingredients, add sparingly.
Bring pot back to a simmer, cover and let cook for another 2 minutes.

Add salt and pepper to taste.
Stir in the bok choy leaves and cook for 1 minute.
Stir in the fresh chopped basil and remove from the heat.
And that’s it.

Soup is a great opportunity to clean out the fridge, so experiment with adding other veggies. I often add carrots and bell pepper. Give this bok choy recipe a try and let me know what you think, and bon appétit!

And for another Asian inspired dish, try this Spicy Chinese Eggplant Recipe.

Chinese Eggplant Recipe with Sweet Sauce

Thanks for checking the recipes out! Subscribe to our mailing list and never miss a new recipe video, we appreciate it.
–Chef Buck

Share and Enjoy !


Fried Quinoa Recipe — Quinoa Fried “Rice”

fried quinoa recipe

This fried quinoa recipe is a quick and tasty take on Chinese fried rice. Quinoa makes a great substitute for rice in many recipes, especially quinoa fried “rice”. Quinoa is a complete protein, which makes this dish a complete meal, even if you leave out the egg–which is an easy way to make this a vegetarian recipe. Of course you can go the other route and throw in a little diced pork chop or ham if you like, but I’m quite happy with just a couple scrambled eggs thrown in.

Fried Quinoa Recipe Ingredients:
1 cup QUINOA (before cooking)
1 cup PEAS
1 CARROT (diced)
4-6 GREEN ONIONS (chopped, tops separate)
3-5 cloves GARLIC (finely chopped)
2 Tbsp GINGER (finely chopped)
HOT PEPPERS (as desired, finely chopped)
2 EGGS (scrambled)
2-3 Tbsp OIL for sautéing
SOY SAUCE as desired
SESAME OIL 1-2 tsp
SALT and PEPPER to taste

fried quinoa recipe
Quinoa Fried “Rice”

Fried Quinoa Recipe Directions:
This is a great dish for leftover quinoa. The next time you’re making a pot of quinoa for another recipe, just make a little extra for this fried rice recipe knockoff! But if you don’t have any leftover
cooked quinoa handy, just prepare this quinoa a little ahead of time to give it time to cool down–this will keep the quinoa from easily overcooking and becoming mushy.

Quinoa is easy to prepare–just like rice, in fact! Rinse the quinoa if needed (many brands come pre-rinsed). In a pot, add 1 cup quinoa to 2 cups water. Bring the pot to a boil, reduce pot to a
simmer, and then cover and let cook 13 minutes (this will result in slightly al-dente quinoa, which is what you want for frying). Remove the quinoa from the heat and let sit for 10 minutes.
Then fluff with a fork and allow to cool completely (salt if desired).

For fried rice, I like to scramble my eggs first and then set aside. I Use two eggs for this recipe, but feel free to use 1, or 3, or none if you want a vegetarian fried quinoa. Whisk the eggs (add a
splash of milk if desired–makes scrambled eggs smoother). Heat oil in a skillet and quickly scramble eggs on med-high heat and then set aside for later.

In a large skillet, heat 2-3 Tbsp oil on medium.

Add raw, diced carrots (should be about pea size). Add chopped hot peppers, too–if desired. I like adding a little fresh red chili peppers for taste, but jalapenos would work just as well, or red
pepper flakes, or even just a little sriracha later, if desired–or no heat at all–it’s up to your tastes; follow your heart, but spicy food is good for you, right?

Sauté the carrot and peppers for a minute and then add the ginger, garlic, and chopped green onion bottoms (reserve the chopped tops for a flavorful garnish).

Continue sautéing another minute and then add in the quinoa. Stir fry until heated through, this won’t take very long.

Add sesame oil and peas. I like to use frozen peas (thawed), because they hold their texture better than canned peas. Stir until mixed. Add soy sauce to taste. Add fish sauce if desired. The
sauces will provide plenty of salt, but if you want a little black pepper, go ahead and throw that in now.

Mix up and then add the scrambled egg. Mix and fry for another minute and then remove from the heat.

That’s it.

This dish is ready pretty quick. Top the fried quinoa with chopped green onion, crushed peanuts, or both. Serve fried quinoa it’s own or with a veggie side (broccoli or bok choy or Thai eggplant
are nice).

Give this Fried Quinoa recipe a try and let me know what you think, and bon appétit!
And for more tasty quinoa dishes, check out my Quinoa Video Playlist.

quinoa salad

Share and Enjoy !


Boiled Peanut Recipe – A Southern Tradition

boiled peanut recipe

This boiled peanut recipe is a southern tradition and a delicious mess. You can readily find boiled peanuts sold along roadsides throughout the Southern USA. Boiled peanuts are a messy treat–and a little bit of work to eat–they’re kinda like eating pistachios in a soggy shell (not taste-wise, just work-wise). I love ’em–I don’t make them, ’cause I’m too lazy–but I’m always happy to eat them when CG boils up a batch, especially if she’s digging them out of the shells for me.

Boiled Peanut Recipe Ingredients

3 lbs RAW “green” PEANUTS
½ cup SALT
optional:
BAY LEAVES
CHILI POWDER
GARLIC fresh or dried
HOT PEPPERS fresh or dried
HOT SAUCE
flavored BOULLION (broth)
…pretty much any seasoning that you like!

southern boiled peanuts
southern style boiled peanuts

How to make a Boiled Peanut Recipe

Ideally you want to use raw “green” peanuts. Green peanuts are not green, that just means they’re minimally processed–pretty much just out of the ground. Use green peanuts quickly, because they will not keep long and are prone to mold. Green peanuts are ideal because they will more quickly and most readily absorb the seasonings during the boil. You can use peanuts that have been dried in the shell, but don’t use roasted peanuts.

Wash and rinse the peanuts thoroughly, and then place them in a large pot and cover with plenty of water.

Place on the stovetop, cover and bring the pot to a boil, then reduce the heat to medium and allow the peanuts to cook for 2 hours. Add more water to the pot as needed. The peanuts should always be covered in plenty of water. At first the peanuts will float, but after time, the peanuts will sink.

After 2 hours, add seasonings (it’s in the latter part of the boil that the peanuts absorb the most flavor). Add salt, which is the primary ingredient–in fact salt is all you need; many folks JUST USE SALT–they’re plenty tasty that way, but we prefer to add other seasonings as well, which is generally called “cajun boiled peanuts”. For this batch we added several cloves of raw garlic, dried chili peppers, and ½ cup chili powder. But you can add whatever seasonings you like.

If you’re just getting into home cooking and don’t have a lot of seasoning choices, you can check out current pricing for a Complete Starter Spice Set on Amazon.

Cover, and allow the peanuts to continue bubbling on medium heat for 30 more minutes.

After thirty minutes, remove the peanuts from the heat and allow to sit in the seasoned water until they reach the desired flavor, anywhere from 2-5 hours. The longer they sit cooling in the pot, the more seasoned they will become. Give them a try every half hour until you’re happy with the flavor.

They are a mess to eat, but delicious and addictive. Once you start eating them, it’s hard to stop–they will go quickly! If you have leftovers, just drain them and store them in the fridge in ziplock bags. You can also freeze them in ziplocks for longer storage.

Give this Boiled Peanut Recipe a try and let me know what you think, and bon appétit!

Thanks for watching! Click a button or two and share the dish if you like it.
And for another tasty southern style treat, try this Country Fried Steak Recipe.

country fried steak
Cube steak is a hammered and tenderized cut of round or top sirloin steak

Share and Enjoy !


Cashew Coconut Energy Balls — Power Bars in a Ball!

Cashew Coconut energy Balls

Cashew Coconut Lemon Bites! or Balls! A quick energy bar in a ball snack recipe! Very easy to make, and super flavorful.  These power balls are like a mini desert, but full of semi-healthy stuff that will put a little pep in your step.  And you get the extra energy without the drastic sugar crash.

Cashew Coconut Energy Balls Ingredients:

2 cups raw CASHEWS
1 cup pitted DATES
1 Tbsp COCONUT OIL
1 Tbsp MAPLE SYRUP
1 tsp VANILLA EXTRACT
¼ tsp SALT
½ cup SHREDDED COCONUT
juice and zest of 1 small LEMON

energy snack
power snack in a yummy treat!

Cashew Coconut Energy Balls Directions:

You’ll need a food processor for this recipe. In fact, you can do the entire recipe in a food processor.  However, my processor is pretty small, so I just use it for chopping up the cashews and dates.  I do the rest of the mixing in another bowl.

Place the raw cashews in a food processor and chop for a few moments. Your cashews should be chopped fine. Then, add pitted dates and chop to same size.
Add coconut oil, maple syrup, vanilla extract, and salt to the cashew/date mixture.
Zest one small lemon. Now, mince the zest and add it to the mixture.
Slice the lemon and squeeze all of the juice into the mix.
Mix thoroughly.
Shape the mixture into ball shapes. Make whatever size you like for snacking! I think grape size is best.
Next, roll the balls in shredded coconut to coat the outside.
And that’s it! Snack away!
The balls can be stored in the fridge until desired.  In fact, they taste best right out of the fridge!

This super easy recipe makes a tasty treat. And it’s a great alternative to sugary candy bars and ice cream.

Keep Checking Back For New Recipe Ideas:

So, give this Cashew Coconut Energy Balls recipe a try and let me know what you think, and bon appétit!

And for another tasty, sweet treat, try this semi-healthy and awesome BERRY COBBLER RECIPE

blackberry cobbler
blackberry cobbler

Share and Enjoy !

Best Burrito Recipe – Family Style

Cheesy baked burritos

Try this family-style burrito recipe–it’s enough for a family or perfect for anyone who loves leftovers. We like to use roasted peppers in the filling, which is optional, but well worth the effort.

What You Need To Make The Best Burrito Recipe

TORTILLAS (about 7″ diameter)
2 cups SHREDDED CHEESE
¾ lb GROUND BEEF
1 can KIDNEY BEANS (15oz)
1 can REFRIED BEANS (15oz)
3 Lg ROASTED PEPPERS (chopped)
2 cups ONION (chopped)
4-5 cloves GARLIC (finely chopped)
1 Tbsp CHILI POWDER
2 Tbsp CUMIN
SALT and PEPPER (to taste)
OIL (for greasing pans)
1 cup SALSA for topping
and some HOT SAUCE (optional)

Is this the best burrito recipe ever? It sure looks like it!

Baked burrito recipe
Family-Style Baked Burritos

How to Make A Family-Style Burrito Recipe

You don’t HAVE TO roast peppers for this recipe–but it’s tasty if you do.

We like to use 3 large peppers, get whatever kind you like–we usually use two poblano and one green bell pepper for a mix of flavors. Slice the peppers in half lengthwise and remove the ribs and seeds. Place the peppers cut side down on a greased pan and bake uncovered in the oven at 400 degrees F for 30 minutes. As the peppers roast, they will darken and begin to bubble.

After half an hour, remove the peppers from the oven and cover the pan while the peppers are still hot. Let the peppers steam in their own heat for 10-15 minutes–this will loosen the skin and make it easy to peel away. Once the skin is removed you’ll have roasted peppers! They’re a tasty ingredient for many dishes; since we’re using all three peppers for the burrito filling, dice them all and set aside.

Heat a large skillet on medium heat and brown the ground beef. As the beef begins to cook and release it’s fat, add the onion and garlic (if it’s too fatty, drain a little of the grease). Stir until the beef is lightly browned–no need to overcook, ’cause the beef will continue to cook in the oven.

Remove the skillet from the heat and add the kidney beans and re-fried beans. Add ¾ of the diced roasted peppers and reserve ¼ to use later as a topping.

Add the salt, pepper, cumin and chili powder–and if you want some heat, throw in a little hot sauce to taste.

Mix ingredients well, and that’s the burrito filling!

Cheesy baked burritos
Awesome Burrito Recipe

Grease an oven safe baking dish.  If you don’t have a good-sized dish, here are some current prices for Pyrex baking dishes on Amazon.

We use medium size tortillas, about 7″. Put as much filling as you think is appropriate–we like two heaping spoonfuls–top the filling with cheese and roll the burrito up and place in the baking dish; repeat until the baking dish is full.

If you have any filling remaining, spoon it thinly over the top of the burritos. Spoon hearty salsa over the top of the dish–chunky salsa!–not too wet. Sprinkle the top with the remaining roasted peppers and some shredded cheese (a mix of monterey jack and cheddar is best).

Bake uncovered in a 400 degree F oven for 30-40 minutes, or until the edges of the burritos begin to brown.

Turn the oven to broil and finish by toasting the top of dish for 3-5 minutes–be careful not to burn it!–keep an eye on the dish and remove it when it reaches toasty-cheesy perfection.

Spoon burritos onto a plate and serve with sides of sour cream, guacamole, and salsa. It pairs great with rice!

Give this burrito recipe a try and let me know what you think.

If you enjoyed the dish, hit some of the buttons below and share this slice of burrito heaven with friends and family. Thanks for watching, and bon appétit!

And for another tasty Mexican inspired recipe, why not try the best Nachos Grande Recipe in the world.

nachos supreme
World’s Best Nachos Recipe

Thanks for checking out the recipes. Be sure and sign up for our mailing list so you’ll never miss a Chef Buck cooking video, and click a button below and share the dishes with your friends. We
appreciate all the kind comments and support, and we’ll see you next time in the kitchen!
–Chef Buck

Share and Enjoy !


Edamame Brown Rice Recipe –A Great Vegetarian Dish

edamame

This edamame brown rice recipe is super flavorful, filling, a great side dish, and delicious hot or cold. If you buy frozen soy beans for this dish, make sure they are thawed before using –and shelled!– shelled edamame is called mukimame.

Edamame Brown Rice Recipe

2 inch GINGER, finely chopped
4-5 cloves GARLIC, finely chopped
16 oz bag MUKIMAME (shelled edamame)
¾ cup LONG-GRAIN BROWN RICE
2Tbsp fresh LIME JUICE
2 Tbsp RICE VINEGAR
2 tsp SOY SAUCE
2 tsp SESAME OIL
½-1 tsp SUGAR
3-4 GREEN ONIONS
5 Tbsp CILANTRO, chopped
2 Tbsp SESAME SEEDS, toasted
SALT and PEPPER to taste

edamame
Mukimame with Brown Rice Recipe

How to make Make Edamame with Brown Rice

  • In a saucepan, heat olive oil over medium-high heat. Check current prices for a sauce pan on amazon.
  • Sauté ginger and garlic for 1-2 minutes until fragrant.
  • Remove garlic and ginger from pan and set aside (I’ve tried skipping this step, and just continued cooking the garlic and ginger along with the rice, but it’s not as flavorful, so it’s definitely worth setting the garlic and ginger aside to add to the dish later).
  • In same pan (without rinsing), bring 1½ cups lightly salted water to a boil. Add rice, reduce to a low simmer; cover and cook, 30 minutes.
  • After 30 minutes, stir in thawed, shelled edamame (mukimame!); cover and cook until rice is tender and mukimame is heated through, about 15 to 20 minutes.
  • In a small bowl, combine lime juice, vinegar, soy sauce, sesame oil, and sugar and stir until sugar is dissolved.
  • Remove rice and beans from the stove and add ginger, garlic, lime juice mixture, scallions, cilantro and sesame seeds.
  • Mix well and add additional salt and pepper as desired.


Give this edamame brown rice recipe a try and let me know what you think, and bon appétit!

edamame
Frozen Mukimame (shelled edamame)

And for another great vegetarian dish, try this easy, awesome Quinoa Salad Recipe.

southwestern quinoa salad
a southwestern quinoa salad makes a tasty and healthy dinner choice.

Thanks For Watching Our Recipe Videos!

Thanks for checking out this edamame recipe, and all of our recipes. Be sure and sign up for our mailing list so you’ll never miss a new recipe. Also click a button below and share the dishes with your friends. You can also follow Chef Buck on Youtube. We appreciate all the kind comments and support, and we’ll see you next time in the kitchen!

If you like what CG and I do, you can also support us on Patreon, or throw us a tip in our Paypal Tip Jar. We’ll happily enjoy a coffee on the road – Thanks! We appreciate all the support, and we’ll see you next time in the kitchen!

We include affiliate links for products on our website. So, if you make a purchase after clicking on our links, we may earn a commission which helps us produce more videos and drink more coffee :^) We participate in the Amazon Services LLC Associates Program, which is an affiliate advertising program. It provides a means for us to earn fees by linking to Amazon.com and affiliated sites, so we can make more videos.

Share and Enjoy !

Spinach Salad Recipe with Pear and Cheese

Best Spinach Salad

This is the easiest, best spinach salad recipe in the world. We first had one of these spinach, pear, blue cheese, walnut, raspberry dressing salads years ago at a little tapas place in Key West, and we’ve been making them ever since–especially if we have a pear on the edge–the riper, softer, and juicier the pear, the better the salad is gonna taste.

What You need for the Best Spinach Salad

SPINACH
1 PEAR (ripe, diced)
WALNUTS (toasted) current WALNUT prices on Amazon
BLUE CHEESE (crumbled)
dressing:
2 Tbsp OLIVE OIL
1 Tbsp RASBERRY JAM
1 Tbsp VINEGAR
½ tsp ITALIAN SEASONING
SALT and PEPPER to taste

Best Spinach Salad
Best Spinach Salad

How to Make a Pear Spinach Salad

Crumble and spread your walnut pieces on a baking sheet and toast at 300 degrees F for 5-10 minutes until the nuts are toasted to your liking. Keep an eye on them–nuts are easy to over-toast and it’s usually worth setting a timer so they’re not forgotten.
While your nuts toast, throw together your salad dressing–basically and oil and vinegar dressing with a little jam added for flavor.

I make this dressing with all kinds of jams, but raspberry and strawberry are my favorites–although definitely give raspberry a try with this recipe. Combine your oil, vinegar, jam, salt, and Italian seasonings. Mix well. Taste and adjust as needed to your liking. A little sugar can be added if desired, but I usually find that the jam adds plenty of sweetness, plus the pear will add sweetness to the salad as well.

Toss the dressing with your spinach leaves until all are well-coated. Divide spinach into serving bowls. Chop pear into nice chunks and add to salad. An overly-ripe pear works best. Sprinkle the toasted walnuts over the salad, then sprinkle with blue cheese crumbles. Lots of blue cheese. Or less. I like blue cheese. There are no ratios with this salad. Check prices for WALNUTS on amazon

And that’s it. This is the best spinach salad in the world. So it is written, so it shall be done.
Give this Spinach Salad recipe a try and let me know what you think, and bon appétit!

For another tasty salad idea, try this Kale and Beet Dish!

kale beet salad

Thanks for Checking Out Our Spinach Salad

Click a button below and share the dishes with your friends. You can also follow Chef Buck on Youtube. We appreciate all the kind comments and support, and we’ll see you next time in the kitchen!

If you like what CG and I do, support us on Patreon, or throw us a tip in our Paypal Tip Jar. We’ll happily enjoy a coffee on the road – Thanks! We appreciate all the support, and we’ll see you next time in the kitchen!

We include affiliate links for products on our website. Making a purchase after clicking on our links and we may earn a commission which helps us produce more videos and drink more coffee :^) We participate in the Amazon Services LLC Associates Program, which is an affiliate advertising program. It provides a means for us to earn fees by linking to Amazon.com and affiliated sites, so we can make more videos.

Share and Enjoy !

Baked Eggs Recipe with Spinach and Tomato

baked eggs

This baked eggs recipe is a delicious treat for breakfast or brunch, and it’s easy to prepare even though it looks super fancy. I’m throwing spinach, tomato, and Roman cheese in this baked eggs recipe, but it’s a versatile dish, and anything that’ll work in an omelet will work in this preparation. For a spicier version, add a dash or two of hot sauce as the tomatoes cook.

What you need for a Baked Eggs Recipe

(this recipe serves 2)
4 EGGS
OIL for sauteing
2 cup fresh SPINACH
2-4 GREEN ONIONS (chopped)
2 small ROMA TOMATOES (chopped)
3-4 GARLIC cloves (finely chopped)
1-2 tsp dried ITALIAN SEASONING
chopped JALAPENO (optional)
freshly grated PARMESAN or ROMANO CHEESE
4 Tbsp HALF N HALF
SALT and PEPPER to taste
½ cup chopped PARSLEY (optional)
sprinkle of PAPRIKA and fresh herb for GARNISH (optional)

baked eggs
Baked eggs are an easy way to impress folks for breakfast.

How to Make Oven Baked Eggs

  • Heat oil on medium high heat in a small saute pan.
  • Add garlic and chopped bottoms of the green onion. Saute for 1 minute and then add the tomato.
  • Continue to saute for 2 minutes and then add salt, pepper, and Italian seasoning. Mix and cook for 1 minute.
  • Add green onion tops and spinach, and any fresh herbs you desire.
  • Saute until spinach is wilted.
  • Lightly grease an oven-safe dish. If you like the dishes I used in the video, you can check out current prices for au gratin baking dishes on Amazon.
  • Add a layer of cheese to bottom of the if you like, but this is optional.
  • Spoon and spread the spinach and tomato mixture into the bottom of the dish.
  • Drizzle Half n Half or cream over top and then sprinkle shredded Parmesan or Romano cheese.
  • Carefully crack eggs and top the dish with them.
  • Place in an oven preheated to 375 degrees Fahrenheit. If the baking dish/ramekins are small, place on a baking sheet for easy handling
  • Bake 15-20 minutes, or until the eggs are set and cooked as desired.
  • When eggs are finished baking, top with additional cheese if desired. Sprinkle with paprika or garnish with fresh parsley, or basil, or cilantro, or whatever, but a touch of freshly chopped green will make this dish quite lovely.

Serve right away, because eggs are best hot, dude.
Give this baked eggs recipe a try and let me know what you think, and bon appétit!

For another fancy pants breakfast dish, try this tasty Huevos Rancheros Recipe.

huevos rancheros
Huevos Rancheros is a flavorful, classic mexican dish…delicious!

Thanks for checking out his baked eggs recipe. If you liked it, then click a button or two below and share it with friends and family. I appreciate it!
–Chef Buck

Share and Enjoy !


Broccoli Recipe – Best Blue Cheese Broccoli

Broccoli with Blue Cheese

Try this super-quick and awesome broccoli recipe. If you like blue cheese then you’ll love this dish, in fact, you’ll actually love broccoli if you only just liked it before …I know, kinda confusing, but trust me, this is a pretty damn tasty broccoli dish–and healthy, too. So make it.

Bad-ass Blue Cheese Broccoli Recipe Ingredients:
5 cups BROCCOLI FLORETS
¼ cup CARROT strings
2-3 oz BLUE CHEESE crumbled
¼ cup SUNFLOWER SEEDS (shelled and toasted)
SALT and PEPPER to taste

Broccoli with Blue Cheese
Broccoli with Blue Cheese Recipe

directions:
Toast the sunflower seeds (already shelled). This can be done quite quickly in a hot pan or skillet. Heat pan or skillet on medium/med-low heat; not too hot or seeds will burn. Add sunflower seeds and spread them into a single layer. Do not use any oil or spray in the pan. Stir the seeds in the skillet for a couple of minutes until they begin to brown, lightly browned is perfect; they’re easy to over-toast, so don’t leave them too long. It will only take 2 minutes on medium heat.
Remove seeds from heat and set aside.

Cover the bottom of a pot with about ¼ inch of water, just enough for steaming the broccoli and carrots. Add The broccoli florets to the pot and top with the carrot strings. Raise the heat, cover the pot, and allow the veggies to steam for approx. 5 minutes; ideally the florets will be cooked through, soft but not soggy!

Turn off the heat and drain any remaining water in the sink. Add salt, pepper, the toasted sunflower seeds, and 2-3 ounces of crumbled blue cheese.
Lightly toss ingredients together and serve while hot.
This dish is super-simple and amazingly delicious –as long as you like blue cheese.
Give this broccoli recipe a try and let me know what you think, and bon appétit!

And for another great veggie dish, try this tasty Beet Greens Recipe.
beet greens saute

Share and Enjoy !


Kale Salad – Tips for Using Raw Kale Greens

fresh kale

Why eat raw kale salad? Kale is a so-called SUPERfood chock full of big-time nutrition and very fashionable in salad circles, so if you wanna be one of the cool kids, ya gotta eat it. If the Popeye franchise is ever re-booted, I’m sure our vegetable-friendly sailor will be shunning spinach and downing kale by the bunches–not that there’s anything wrong with spinach, but at the moment the kale lobby is a juggernaut.

Check out this video for tips on making a raw kale salad:

Kale Nutrition and Fun Facts

Kale belongs to the same family as cabbage, Brussels sprouts, and collards.
Kale is packed with antioxidants, which help neutralize harmful free radicals in the body.
One cup of chopped raw kale provides more than 100% of the daily value of vitamins A, C, and K.
In fact, Kale has more vitamin C than an orange.
Free Radicals are a thing scientists made up to sound smart.
Baked kale becomes crispy and can be substituted for potato chips.
Kale freezes well for future use.
Kale is a great addition to a soup.
Kale is believed to promote cell repair and may block the growth of cancer cells.

Wow…doesn’t that sound terrific? Who could pass up on that! Too bad kale doesn’t taste like a slice of coconut cream pie, but you can’t have everything. It is a tasty addition to a salad, though–and utilizing raw kale will insure the greatest health benefit from this leafy superfood.

kale salad
Raw kale salad with olives, artichoke, red leaf lettuce, and a carrot/daikon slaw.

Prepare fresh foods at home and have fun in the kitchen. Get a bunch of spices, pots and pans, and begin experimenting with different recipes. home cooking is a healthy hobby that will save you tons of money in the long run. Check out current prices for Complete Kitchenware Sets on Amazon as well as Complete Starter Spice Kits. Or go to a thrift store! I’ve found some of my favorite kitchen gear at second-hand stores.

Green is the way to go for a healthy lifestyle. Check out this simple recipe trick for Getting Raw Broccoli Into Your Diet.

raw broccoli
Raw broccoli is high in vitamins and nutrients and is great for digestive health.

Thanks for checking out the recipes. Be sure and sign up for our mailing list so you’ll never miss a Chef Buck cooking video, and click a button below and share the dishes with your friends. We
appreciate all the kind comments and support, and we’ll see you next time in the kitchen!
–Chef Buck

Share and Enjoy !


Creamy Shrimp Curry Recipe –quick and easy with a yogurt sauce

creamy shrimp curry

Try this quick, creamy shrimp curry recipe for a change of taste. It’s super fast to prepare and kinda/sorta healthy–I usually serve this shrimp curry with rice and top with fresh chopped cilantro. Don’t be shy adding hot peppers, since the yogurt sauce and rice will absorb a lot of any heat added.

SHRIMP CURRY RECIPE
ingredients:
1 to 1½ lbs SHRIMP (peeled/deveined)
2-3 Tbsp OLIVE OIL
2 tsp MUSTARD SEEDS
2 chili peppers (chopped, or sub red pepper flakes)
1 cup plain Greek YOGURT
¼ tsp ground CINNAMON
¼ tsp ground CLOVE
½ tsp CARDAMOM
1½ tsp MANGO POWDER
2 tsp CORIANDER
½ tsp CORN STARCH
SALT to taste
CILANTRO (chopped)
serve w/ RICE

shrimp curry recipe
Creamy Shrimp Curry Recipe

In a small bowl, combine Greek yogurt with cinnamon, clove, cardamom, mango powder, coriander, and corn starch. Mix ingredients well until the yogurt is smooth. Heat olive oil in a skillet and add mustard seeds and finely chopped peppers. Use as much or little pepper as you like–if you’ve got fresh peppers that’s great, but red pepper flakes make a decent substitute. After 1 minute, add yogurt sauce to the skillet. Stir well and bring to a light bubble and let simmer 2 minutes. Adjust stovetop temperature as needed. Add shrimp, already peeled and deveined. Mix with sauce and return skillet to a simmer. Let cook 4-5 minutes, stirring as needed, until shrimp are pink and done–try not to overcook your shrimp ’cause that’s sad.
Salt dish as desired and remove from heat. Garnish with fresh chopped cilantro and serve with rice. It’s best to cook your rice ahead of time, since this creamy shrimp curry takes very little time to prepare. Give it a try and let me know what you think, and bon appetit!

For another tasty shrimp dish, give SPICY FRIED SHRIMP a try.

Share and Enjoy !


Artichoke Heart Recipe for Creamy Caper Pasta

canned artichoke hearts

This canned artichoke heart recipe is quick and tasty and easily prepared. And if you use quick-cook Chinese flat noodles, from start to finish–including prep time–this dish only takes about 10 minutes to make.

Ingredients for Artichoke Heart Recipe

14 oz can quartered ARTICHOKE HEARTS
¼ cup BUTTER
¼ cup OLIVE OIL
1 lg ONION (chopped)
5 cloves GARLIC (finely chopped)
2-3 Tbsp CAPERS
8 oz PASTA
2-3 Tbsp LEMON JUICE (optional)
SALT and PEPPER to taste

How to make Artichoke Heart Pasta

In a large skillet on medium-high heat, add olive oil and most of the butter. When oil is hot, add onion and garlic and saute until onions begin to soften (for a spicier dish, add a minced chili pepper in with the onion).

Add artichoke hearts, capers and salt to taste and continue sauteing for 2-3 minutes. Occasionally I’ll add the juice and zest of ½ a lemon, which is a pretty tasty option, so definitely give it a try sometime. Add any remaining butter to the skillet.

Add cooked pasta to the skillet. I like to use quick-cook Chinese flat noodles since it’s easy to time with the cooking of the sauce, but use any kind of pasta you like, just allow enough time for cooking. And for a wetter sauce, add a little bit of the pasta water to the skillet.

Mix pasta and sauce in skillet and then serve immediately. Garnish with fresh chopped parsley or thyme–or just add a few more capers. Serve with Parmesan cheese if desired. It’s a quick, easy artichoke heart recipe and a great use of canned artichoke hearts. Check on current prices for Canned Artichokes on Amazon.

Give the recipe a try and let me know what you think, and bon appetit!

artichoke hearts
canned artichoke hearts

For another super creamy and delicious pasta dish, Try this Decadent Pasta Carbonara Recipe.

spaghetti carbonara

Thanks for checking out the recipes. Be sure and sign up for our mailing list so you’ll never miss a Chef Buck cooking video, and click a button below and share the dishes with your friends. We
appreciate all the kind comments and support, and we’ll see you next time in the kitchen!
–Chef Buck

Share and Enjoy !


Thai Beef Salad Recipe Quick and Easy

thai beef salad

Thai Beef Salad is an easy recipe to prepare with lots of room for nuance, i.e., using whatever the hell you have in the fridge. I like to use sirloin steak since it’s a good piece of meat that doesn’t cost an arm and a leg and you can generally buy a nice cut that makes for good slicing. Season your steak up well, don’t overcook it, and let it rest well before slicing–these 3 steps are key for a great steak salad.

Ingredients for Thai Beef Salad

¾ lb SIRLOIN STEAK
1 Tbsp OLIVE OIL
2-3 cups SALAD GREENS (don’t use so much green that the steak is lost!)
3 GREEN ONIONS (chopped)
½ CUCUMBER (matchstick cuts are nice)
½ CARROT (thin cut–cut into strings is nice, dude)
1 Tbsp CHILI PASTE (more or less, depending on desire for heat)
1 tsp LEMON GRASS (minced) (sub extra ginger if lemon grass is not used)
1 tsp GINGER (minced)
1 LIME JUICE
½ cup CILANTRO (chopped) …thai basil and mint leaves are nice, too.
1 tsp CHILI POWDER
SALT and PEPPER to taste

How to Make a Thai Beef Salad

I’ve never bought lemon grass online, but it’s apparently a thing. Look here if you want to check current prices for fresh lemon grass on Amazon.

First, mix up your dressing. Lemon grass is a key component in many Thai dishes and makes a nice addition to this steak salad. Cut off the upper leaves of the stalk and the very bottom,leaving about 5-6 inches. This is generally the only part of the lemon grass used in recipes and is sometimes sold already cut into these sections in grocery stores. The outer part of the stalk is often very tough, so cut away the outer layers to reveal the softer core.

Mince about an inch of the lemon grass core and add it into a bowl. Add finely chopped ginger, chili paste, lime juice, salt, and mix ingredients well. Set dressing aside and season sirloin steak.

Season both sides of the steak well–I like salt, pepper, and chili powder–but use whatever seasonings you desire (and season it well!).

Heat oil in a skillet and cook the steak quickly on high heat, turning once and sealing the juices inside. Do not overcook the steak or puncture it with a knife or fork. Set the steak aside to rest at least 10-15 minutes, this will keep the juices from running when the steak is sliced.

While the steak rests, preare the salad. Use whatever greens you desire, but don’t use so much salad that the steak becomes just another component–allow the steak to be the star of the dish.
Tear salad greens into a bowl and add thinly cut carrots, cucumber matchsticks, chopped green onions, and chopped cilantro (also try fresh chopped basil and mint). Add salad dressing and toss.

Cutting against the grain of the meat, slice steak into thin strips and add to the salad. Add any juices from the steak and toss salad.
Garnish with toasted sesame seeds. Enjoy!

thai beef salad
thai beef salad recipe

If you’re new to home cooking, just get a bunch of spices, pots and pans, and start experimenting with different ingredients and recipes. It’s a healthy hobby that can save a lot of money in the long run. You can check out current prices for Complete Kitchenware Sets on Amazon as well as Complete Starter Spice Kits. Or just go to a thrift store! I’ve found some of my favorite kitchen gear at second-hand stores.

For another great healthy meal, try this Vietnamese Bánh Mì Style Quinoa Salad Recipe.

Quinoa Salad -- Banh Mi Style
Quinoa Salad — Banh Mi Style

Thanks for taking a peek at the video and recipes. If you like it, click a button or two below and share with your friends! I appreciate it!
–Chef Buck

Share and Enjoy !


Spicy Crispy Chickpea Recipe -great salad topping!

Here’s a quick, spicy chickpea recipe that makes a great salad topping and a so-so snack; it’s a lot easier on your teeth than baked chickpea snacks, which I find to be almost inedible (they tend to turn into tiny rocks).

ingredients:
15 oz can CHICKPEAS
2-3 Tbsp OLIVE OIL
½ tsp CURRY POWDER
½ tsp CUMIN
½ tsp PAPRIKA
dash CAYENNE PEPPER
SALT to taste

chickpea recipe

Rinse and drain a 15oz can of chickpeas (garbanzo beans). In a skillet, heat olive oil on medium heat. When the oil is hot, add chickpeas–be sure that they are drained well, since water and hot oil definitely do not mix. Saute chickpeas for 10-15 minutes; obviously, the longer they’re in the skillet, the crispier they will get, but it’ll take about 15 minutes to get them “crispy”. Once the chickpeas get near the doneness you desire, add salt, pepper, and spices. The spice combo in the recipe works well, but experiment with whatever spices you have–and don’t be shy with the spices–spice really makes this recipe work, and a good deal of the spice you use will remain in the skillet when you remove the chickpeas. Saute chickpeas and spices another 2-3 minutes and then remove from the heat.
Use them as a salad topping instead of croutons for a healthy crunch, or a just tasty snack, something to nibble on besides potato chips.
Enjoy!

Ever try Chickpea Curry(chana masala)? It’s a terrific Indian chickpea dish.

Share and Enjoy !


Tilapia Recipe –Easy Baked Panko-Crusted Fish

This easy, baked tilapia recipe will make even those big boring bags of tilapia fillets taste great –or any other less than stellar fillet of fish. Tilapia is not an exciting fish, but it’s often a pretty good buy relative to everything else in the seafood department. This recipe will turn tilapia–or any bargain fillet–into a super tasty, super moist side of aquatic splendor (too much?). Breading and frying always helps tilapia, but breading and baking will do the same, and it’s a lot less messy and a lot more moist–and healthier, too.

Tilapia Recipe Ingredients

2 FISH FILLETS (about 8oz each)
½ ONION (sliced or chopped)
½ cup PANKO BREADCRUMBS
½ tsp GARLIC POWDER
SALT and PEPPER to taste
2 Tbsp fresh DILL (or 2 tsp dried dill)
¼ cup MAYONNAISE
1 tsp DIJON MUSTARD
1 clove GARLIC (minced)
1 Tbsp fresh LEMON JUICE (add zest for extra lemony-ness)

How to Bake Tilapia

Preheat oven to 450 degrees F.
In a small cup, combine panko crumbs (or any breadcrumbs–panko just happens to be best, I think) with garlic powder, salt, pepper and 1/2 of the dill and mix.
In a separate bowl, combine the remaining dill, mayonnaise, Dijon mustard (not yellow mustard!) and lemon juice and stir until smooth.
Rinse and pat the fish fillets dry with paper towels. Spray a baking pan with cooking spray. Lay onion slices in pan and place fillets over
onions. Evenly brush the tops and sides of the fish with the mayonnaise mixture. Sprinkle and press the crumbs into the mayonnaise.
Place pan in oven and bake about 15 minutes until the crumb topping has turned a nice, golden brown. Serve with rice and veggies.
Give this tilapia recipe a try and let me know what you think, and bon appetit!

For another tasty fish dish, try this Crispy Skin Salmon Recipe.

crispy salmon recipe
For the best fresh fish recipes…keep it simple

Have fun in the kitchen. Get a bunch of spices, pots and pans, and begin experimenting with different recipes. home cooking is a healthy hobby that will save you tons of money in the long run. Check out current prices for Complete Kitchenware Sets on Amazon as well as Complete Starter Spice Kits. Or go to a thrift store! I’ve found some of my favorite kitchen gear at second-hand stores.

Thanks for checking out the recipes. Be sure and sign up for our mailing list so you’ll never miss a Chef Buck cooking video, and click a button below and share the dishes with your friends. We
appreciate all the kind comments and support, and we’ll see you next time in the kitchen!
–Chef Buck

Share and Enjoy !


Edamame Recipe –Roasted Snack and Salad Topping

Try this roasted edamame recipe for a quick semi-healthy snack. The toasted Parmesan cheese will almost make you forget that you’re eating soybeans.

Roasted Edamame Recipe Ingredients:
10 oz frozen shelled EDAMAME (green soybeans)
1 Tbsp OLIVE OIL
1 tsp GARLIC POWDER (also add or substitute onion powder, chili powder)
SALT and PEPPER to taste
¼ cup shredded PARMESAN CHEESE

directions:
Preheat oven to 425 degrees F.
Mix frozen edamame beans (no need to thaw), olive oil, fresh-cracked black pepper, salt, garlic powder, and Parmesan cheese together in a large bowl. Try experimenting with different seasonings; substitute onion powder or chili powder for the garlic–or add them all–this is an easy snack food to change up for a little variety.
Spread mixture onto an ungreased baking sheet.
Place in oven and bake for 8-10 minutes and then remove from oven and stir. Spread edamame out again and cook another 8-10 minutes, until the cheese is toasted crispy and golden.
Add additional salt or garlic powder if desired.

Roasted edamame makes a great salad topping.

Eat as a quick snack–it is delicious hot out of the oven–or use as a topping for salads and whatnot.

Tastes great hot out of the oven--perfect for snacking.  Try it as a movie treat instead of popcorn.
Tastes great hot out of the oven–perfect for snacking. Try it as a movie treat instead of popcorn.

Give this roasted edamame recipe a try and let me know what you think, and bon appetit!

And for another quick and healthy salad topper, try this Spicy Chickpea Recipe.

chickpea snack recipe

Roasted edamame or chickpeas are both great components in a salad. A super-flavorful and healthy salad ingredient is kale. It’s extremely versatile and can be eaten raw or cooked. Click on the video link below to discover some simple tips on using raw kale in your next salad.

avocado kale w/ chickpeas
raw avocado kale salad

Share and Enjoy !


Asparagus Recipe — Tangy Lemon Ginger Asparagus

Asparagus is one of those veggies you cook when you’re trying to impress–and this asparagus recipe will do the job. The lemon adds a nice zing while the whole fennel/mustard seeds add flavor and texture without overpowering the great taste of asparagus.

Asparagus Recipe Ingredients:
1½ lb. ASPARAGUS
1 small LEMON (zest and juice)
2 Tbsp OLIVE OIL
½ tsp FENNEL SEEDS
½ tsp MUSTARD SEEDS
3-4 cloves GARLIC (or more…go for it, dude)
1 inch GINGER (which should end up being between 1-2 Tbsp thinly sliced)
SALT and PEPPER to taste

When buying asparagus, thin is better than thick. Choose firm spears. Avoid asparagus that have a wrinkled skin, or tips that are wet and greasy looking. Rinse and drain the asparagus spears, then chop into 1 inch pieces. When slicing, leave the tops of the spears intact so they don’t fall apart while cooking. Heat olive oil on medium heat in a skillet. When oil is hot, add mustard and fennel seeds and stir for 20-30 seconds–not long at all. Add garlic and ginger–a lot of ginger; I use about 1 inch, thinly sliced–about the size of a fish scale. Stir skillet 1 minute, lower heat if necessary.
Stir in asparagus. Add salt and pepper to taste. I like my asparagus to retain a bit of crunch–who likes mushy asparagus?–so this dish doesn’t take long to cook. Saute for about 4 minutes and the dish will be done. From the time you add the seeds to completion, the cooking time will only be about 5 minutes–of course you can extend the cooking time if YOU DO like softer asparagus (crazy!)–but everybody likes what they like, so namaste, man. About a minute before the dish is done, add the lemon zest. When the asparagus is crunchy or soft the way you like it, and you’re ready to get it off the heat, add the lemon juice, stir, and serve.
It’s a tasty asparagus dish and a perfect side for a nice steak (or whatever).
Give this asparagus recipe a try and let me know what you think, and bon appétit!

If you enjoy asparagus, you likely love this Brussels Sprouts Recipe.
brussels sprouts

Share and Enjoy !


Best Stuffed Squash Recipe –looks fancy, tastes great!

squash recipe

This stuffed squash recipe is easy to cook, yummy as hell, and looks pretty fancy-pants when you stuff it full of delectable goodies.

Try out the recipe below and let me know what you think. Hope you like it!

Stuffed Squash Recipe Ingredients:

2 ACORN SQUASH (halved, seeds removed)
2 tsp OLIVE OIL
3 cloves GARLIC (minced)
1/2 inch fresh GINGER (minced)
1 CARROT (peeled and chopped)
1 cup GARBANZO BEANS (drained)
1/3 cup RAISINS (or dried currants)
1 tsp ground CUMIN
1/2 tsp ground CINNAMON
[1/4 tsp ground GINGER, if didn’t use fresh]
SALT and freshly GROUND PEPPER, to taste
1 cup BROTH
3/4 cup instant COUSCOUS
1/2 cup SLIVERED ALMONDS (toasted)
2-3 GREEN ONIONS (white and green parts, chopped)
1/2 golden delicious APPLE (cored and chopped)

squash recipe
A squash recipe to impress!.

How to Make Stuffed Squash:

Preheat the oven to 400.
Toast the almonds.
Place the squash halves, cut side down, on a shallow pan with ¼ inch of water. Roast until the squash is easily pierced with a fork, about 30 – 40 minutes.
In a medium saucepan, heat the olive oil over medium heat. Stir in the garlic, ginger, and carrots, and cook 5 minutes. Mix in the garbanzo beans and raisins. Season with cumin, cinnamon, salt, and pepper, and continue stirring for another minute.
Add broth, simmer 5 minutes.
Stir in couscous, cover pot, and turn off heat. Allow couscous to absorb liquid for 5 minutes.
Stir in the almonds, green onions, and apple. Spoon the filling into the roasted squash, mounding generously and serve.
You can freeze leftovers (or make extras). Freeze by mashing the squash on the bottom of the container then adding the couscous mixture on top.
And that’s that.
Give this stuffed squash recipe a try and let me know what you think, and bon appétit!

Also, try this TERRIFIC SPAGHETTI SQUASH RECIPE!
stuffed squash recipe

Thanks for watching and sharing and subscribing, I appreciate it!

Share and Enjoy !


Vegetarian Chili Recipe EVERYONE Will Love

vegetarian chili

Try this vegetarian chili recipe for folks who don’t like vegetarian chili!

It’s tatsy and easy to make, too; once you’ve chopped up the ingredients, you’re 90% done. Or at least 85% done. Give it a try and let me know what you think.

What You Need For This Vegetarian Chili Recipe

2 15 oz cans CHICK PEAS
2 15 oz cans KIDNEY BEANS
2 BELL PEPPERS (chopped)
1 ONION (chopped)
1 HOT PEPPER (diced)
6 cloves GARLIC (finely chopped)
2 SQUASH (cut into large pieces)
1 ZUCHINNI (cut into large pieces)
2 lg or 4 sm TOMATOES (chopped)
1 28 oz can CRUSHED TOMATOES
3-6 oz TOMATO PASTE
1/2 cup CILANTRO (chopped)
1 heaping Tbsp OREGANO
2 Tbsp OLIVE OIL
1 Tbsp CUMIN
1/2 tsp CAYENNE PEPPER
2 Tbsp CHILI POWDER
SALT and PEPPER, to taste
WATER as needed…add slowly

Vegetarian Chili Recipe
Don’t let the word “vegetarian” keep you from trying this recipe!

How To Make Vegetarian Chili

Heat olive oil in large pot on medium high heat. Add onions, hot pepper, and garlic and saute 4-5 minutes. Add bell peppers and continue sauteing. Add chili powder, cumin, salt, and cayenne pepper. Mix ingredients well. Add beans and continue cooking. Add zuchinni and squash and oregano. Continue cooking 2-3 minutes and then add fresh tomatoes. Add canned crushed tomatoes. Slowly add water–not too much–as the vegetables will begin to release water as they cook. Cover and bring pot to a boil. Reduce heat and stir in the cilantro. Cover and allow to simmer approx. 45 minutes.
That’s it man. If you can make it a day ahead, then you’re lucky–chili aways taste best on the day after! But it’s good right away, too. Top with shredded cheese, or a dollop of sourcream, or a handful of corn chips–or all three–it’s gonna be delicioso!
Give this vegetarian chili recipe a try and I bet you’re gonna love it–and it’s a healthy chili choice, too.
Bon appetit!

For more vegetarian comfort food, try this Gluten-Free Tofu Lasagna.
gluten free tofu lasagna

Thanks for checking this vegetarian chili recipe out! If you liked it, click some of the buttons below and share it with your friends and family, I appreciate it.
–Buck

Share and Enjoy !


Brussels Sprouts Recipe That Everyone Will Love

brussels sprouts

This is my absolute favorite Brussels Sprouts recipe. it’s super tasty, simple to make, and a healthy choice, too, so definitely give it a try.

Brussels Sprouts Recipe Ingredients

1½ lbs BRUSSELS SPROUTS
3-4 Tbsp OLIVE OIL
½ ONION (chopped)
4-5 cloves GARLIC (finely chopped)
1 LEMON zest and juice …current prices online for Kitchen Zesters
½ cup WATER
SALT and PEPPER, to taste

brussels sprouts recipe
Sear Brussels sprouts in a hot skillet for exceptional taste!

How to Cook Brussels Sprouts

  • Wash 1½ lbs sprouts. Cut off the ends and discard outer leaves. Slice sprouts into halves, or larger sprouts into 3rds.
  • Heat 3-4 Tbsp oil in a skillet on high heat–you want the skillet to be hot to sear the sprouts–and don’t be shy with the olive oil.
  • Add Brussels sprouts. They should start to sizzle and pop right away. Let set before stirring to get a seared edge. Turn sprouts and continue to sear.
  • After 4-5 minutes, stir in onion and garlic and continue to cook on high to med. high heat, searing and turning another 3-4 minutes.
  • Then reduce heat to medium and add water. Add seasoning.
  • Stir, cover, and let cook 4-5 minutes.
  • Then turn off heat, stir in lemon zest and lemon juice, and serve.

Need a nice skillet? Check current prices for skillets on Amazon.

Give this Brussels Sprouts Recipe a try and let me know what you think, and if you’re still in the mood for foods that start with “B”, try this Beet Recipe.
brussel sprouts recipe

Brussels Sprouts Fun Facts

  • 89% of all children despise Brussels Sprouts.
  • 3/4 of all convicted felons do not eat Brussels sprouts.
  • Albert Einstein considered the Brussels Sprout to be the most compact cabbage, relatively speaking.
  • Even children who dislike the taste of Brussels sprouts appreciate the vegetable for it’s “slingshotability”
  • Every U.S. president has loved Brussels sprouts and eaten them routinely.

Thanks for checking out our Brussels sprouts recipe, and all of our recipes. Be sure and sign up for our mailing list and never miss a new Chef Buck cooking video, and also click a button below and share the dishes with your friends. We appreciate the kind comments and support, and we’ll see you next time in the kitchen!
–Chef Buck

Thanks for watching our recipe videos!

We include affiliate links for products on our website, so if you make a purchase after clicking on our links, we may earn a commission which helps us produce more videos and drink more coffee :^) We participate in the Amazon Services LLC Associates Program, which is an affiliate advertising program providing a means for us to earn fees by linking to Amazon.com and affiliated sites, so we can make more videos.

Share and Enjoy !

Spicy Spanish Spaghetti Squash Recipe w/ Sausage

spaghetti squash spanish

Spaghetti squash tastes great with a little Spanish chorizo thrown into the mix.

When buying, choose a firm spaghetti squash that seems heavy for its size. Avoid squash with overly glossy or with greenish rinds–this may indicate the squash is not quite ripe enough. The stem of a spaghetti squash should be dry. Moisture around the stem may mean the squash is not fresh.

Ingredients:
1 SPAGHETTI SQUASH
4-5oz Spanish style CHORIZO (diced)
1 lg ONION (chopped)
4-5 cloves GARLIC (finely chopped)
1/2 cup PARMESAN or ASIAGO CHEESE (shredded)
1/2 cup CILANTRO (chopped)
2 Tbsp OLIVE OIL
SALT and PEPPER, to taste

Preheat oven to 350 degrees F.
Slice 1 spaghetti squash lengthwise into halves. Remove seeds and place cut side down in a baking pan. Pour a small amout of water in the pan to keep the squash from sticking. Place in the oven and bake for 45 minutes. The squash is ready when a fork will slide easily into the flesh.
In a skillet, heat oil on medium high heat. Add onions and saute a few minutes (add red pepper flakes for heat, if desired). Add garlic and chorizo and continue sauteing. Add salt and pepper to taste. You don’t need a lot of seasoning for this dish–the chorizo will add plenty of flavor. Take a fork and scrape the squash away fromm its skin and into the skillet; the squash will separate easily in spaghetti-like strands…which is why it’s called what it’s called. The squash is already cooked, so this is more about mixing the ingredients than cooking them. Add cilantro and cheese, mix well, and remove the skillet from the heat. It’s a delicious dish, and hearty enough to make a terric main course. Serve with a salad and bread and you’ll have a more than enough.
Enjoy!

And try this delicious vegetarian Mediterranean-Style Spaghetti Squash Recipe

mediterrean spaghetti squash

Share and Enjoy !


Kale Beet Salad – Healthy Super Food Recipe

kale beet salad

Doesn’t Kale Beet Salad sound like a dream come true? Beets are fun, kale is cool…very exciting stuff. Kale is a slightly rough and tough cabbagee-thingy that’s a little less than friendly in it’s natural state, but massaging salt into the raw leaves can turn Kale into a delicious salad green. Here’s a very tasty and nutritionally jam-packed raw kale recipe with beets.

What you need for Kale Beet Salad

8-10 KALE (leaves)
2 BEET ROOTS (medium-sized)
2 TOMATOES (small…I use plum tomatoes)
2 CARROTS
1/2 cup GOLDEN RAISINS
SALT (to taste…I use approx. 1 tsp.)
PEPPER (to taste)
1 Tbsp OLIVE OIL
2 tsp BALSAMIC VINEGAR

How to make a Kale and Beet Salad

Pre-heat oven to 350 degrees.
Remove greens from beets and cut root bulbs into smaller pieces, about 1/2 inch squares. Spread the beet pieces onto a baking pan and add enough water to cover the bottom of the pan. Cook for 25-35 minutes, remove and allow to cool.

While beets are cooking, remove the spine from the center of the kale leaves and tear kale into salad pieces. Kale is rough, but adding salt to the greens will draw out moisture and soften the leaves, making them darker. Gently massage salt into the kale until it achieves a desirable consistency, this may take several minutes.

Grate carrots into the greens, add raisins, then toss and divide portions into salad bowls. In a separate bowl, add diced tomatoes and cooled beets, then add olive oil, balsamic vinegar, and black pepper and mix together. Spoon beet/tomato mixture over kale greens and serve.

kale beet salad

This is a delicious way to enjoy and optimize the benefits of raw kale. I’m not usually a big raisin fan, but I find the raisins work really well in this salad. I’ve contemplated tossing minced ginger into the mix, but haven’t gotten around to doing so, although I might next time I whip this dish up. If you give it a try, let me know what you think.

This is one of the healthiest dishes I routinely prepare, but be aware, eating beets can cause some rosy changes when you answer “the call of nature”. (Don’t be alarmed, you probably won’t be dying…in fact, you’ll probably be doing a lot better.)
Give this kale beet salad a try and let me know what you think, and bon appétit!

Have fun in the kitchen. Get a bunch of spices, pots and pans, and begin experimenting with different recipes. home cooking is a healthy hobby that will save you tons of money in the long run.
Check out current prices for Complete Kitchenware Sets on Amazon as well as Complete Starter Spice Kits. Or go to a thrift store! I’ve found some of my favorite kitchen gear at second-hand stores.

And for another tasty salad idea, try this Black Eyed Pea Salad Recipe.

black eyed pea salad

Thanks for Checking Out Our Kale Beet Salad

Click a button below and share the dishes with your friends. You can also follow Chef Buck on Youtube. We appreciate all the kind comments and support, and we’ll see you next time in the kitchen!

If you like what CG and I do, support us on Patreon, or throw us a tip in our Paypal Tip Jar. We’ll happily enjoy a coffee on the road – Thanks! We appreciate all the support, and we’ll see you next time in the kitchen!

We include affiliate links for products on our website. Making a purchase after clicking on our links and we may earn a commission which helps us produce more videos and drink more coffee :^) We participate in the Amazon Services LLC Associates Program, which is an affiliate advertising program. It provides a means for us to earn fees by linking to Amazon.com and affiliated sites, so we can make more videos.

Share and Enjoy !

Quinoa Salad Recipe for Vegetarian Protien

quinoa salad

Quinoa salad is vegetarian perfection. Quinoa is a versatile food, similar to rice, but with 9 essential amino acids, making it a complete protein. It’s easy to prepare and super tasty. The salad recipe below makes an excellent meal, a tasty side dish, or a light snack. Serves 2-4.

Quinoa Salad Ingredients:

1 cup QUINOA (check current prices for quinoa on Amazon)
3 medium TOMATOES (chopped)
¼ cup RED ONION (finely chopped)
3-5 GARLIC CLOVES (minced)
½ inch GINGER (minced)
1 CUCUMBER (chopped)
1/3 YELLOW BELL PEPPER (chopped)
1 CARROT (thinly sliced)
¼ cup PARSLEY or CILANTRO (chopped)
3 Tbsp APPLE CIDER VINEGAR
2-3 Tbsp OLIVE OIL
2 Tbsp LEMON JUICE
SALT (to taste)

Quinoa Salad Direections:

Add 1 cup quinoa to 2 cups water and bring to a boil. Reduce heat, cover, and simmer 10-15 minutes (I find it usually takes about 15 minutes). Place cooked quinoa in bowl and let cool—doesn’t have to cool completely—by the time you get your other ingredients prepped, the quinoa will be cool enough.

Add vinegar, olive oil, salt, and stir well. Add onion, ginger, and garlic. I usually chop the onion fine and MINCE the garlic and ginger VERY WELL. The raw garlic and ginger adds lots of flavor and nutrition. Give the bowl a good stir and get these ingredients mixed thoroughly.

Add yellow pepper (red pepper is fine, but yellow makes a nice color contrast), cucumber, carrot. Sometimes I also add green onions—or even diced jalapeños if I’m looking for a little kick—feel free to experiment with any vegetables you enjoy in a raw state.

Mix ingredients and then add the tomatoes. I like to add the tomatoes last so they don’t get too beat up by the spoon. If you’ve got some parsley or cilantro on hand, throw that in as well—I make sure I’ve got some cilantro on hand when I’m making this dish. A bit of lemon juice is a nice finish and will also help keep the colors of the dish vibrant.
Give this quinoa salad recipe a try and let me know what you think, and bon appetit!

We still use rice, but not nearly as often (if I have to choose between eating ribs and rice or ribs and quinoa, it’s really not a choice, I choose rice every time–and I’m talking white rice!) but for MANY dishes, I’m losing the rice and going with quinoa. White rice doesn’t stand a chance against quinoa, but even brown rice doesn’t provide as much nutritional value–plus with quinoa being a complete protein, it’s a lot less hassle to fashion a meatless meal.

I’ve always got quinoa on hand now, and before using rice in a dish, I ask myself “will quinoa work here?” Sometimes the answer is NO, because rice provides great texture for many dishes–but more often than not, I go with quinoa.

Thanks for checking the quinoa salad out. If you like it, click a button or two below and share it!
And for another delicious salad idea, try this Cauliflower Super Salad Recipe.

cauliflower salad
add sliced tomato for a quick splash of color

Share and Enjoy !


Easy Shrimp Linguine Recipe

shrimp linguine

A quick and tasty shrimp pasta dinner recipe for two!

Shrimp LinguineIngredients:

1 pound SHRIMP (20-30, peeled and deveined)
8oz LINGUINE (about ½ box)
1-2 cups BROCCOLI florets (or substitute ½ cup PARSLEY if you’re not into broccoli)
6-8 GARLIC cloves (minced)
½ large ONION (finely chopped)
½ stick BUTTER
3-5 Tbsp OLIVE OIL
SALT to taste
(add OREGANO or ITALIAN HERBS if desired–I like just the extra garlicky taste)
serve with PARMESAN CHEESE

Shrimp Linguine Directions

Prep your ingredients first, then get your pasta cooking.  I like to add a Tbsp of olive oil to my pasta water as well as a 2-4 tsp salt.  Cook the pasta according to the package directions and whatever firmness you desire.  I’m using whole grain wheat linguine for this recipe, which takes about 12 minutes to cook–a bit longer than most linguine.  The cooking time for the skillet ingredients should be around 7-9 minutes, so try to time your pasta to finish with the shrimp–overcooked shrimp is rubbery and overcooked pasta is mushy, so timing is everything!!!

In your skillet, heat 2 Tbsp olive oil and 1/4 butter on medium heat.  When hot, add garlic and cook for 1 minute.  Add onions and continue to cook a couple more minutes.  Add broccoli florets, and add more butter and oil as needed.  If you don’t want to add broccoli, substitute 1/2 cup chopped parsley instead.  Sauté  florets, garlic, and onions another 2 minutes and then add shrimp.  Throw in some Italian herbs if you want to get all herby.

The shrimp will be done when they turn pink–don’t overcook or they’ll turn rubbery!!  Remove the cooked pasta from water and add directly to the skillet.  Don’t drain or strain the pasta!!–you’re just throwing away good flavor.  Add the remainder of your original 1/2 stick butter.  Mix pasta and ingredients.  Add some pasta water to the mix (about 1/2 cup or so).  I find that the salt in the water and butter is plenty for me, but salt a little more if desired.  Remove the skillet from the heat and serve.  Fresh Parmesan cheese and toasted garlic bread are nice accompaniments!!  Maybe some wine?
Bon appétit!

Share and Enjoy !


Cornish Hen Recipe – Easy One-Pot Meal

cornish game hen

Give this Cornish hen recipe a try. A Cornish hen is a classy bird, and a complete meal for two when cooked up with potatoes and carrots.

What you need for this Cornish Hen Recipe

1 CORNISH HEN …for this recipe I’m using a 1.5 lb. size hen, adjust cooking time for a smaller bird
2 POTATOES cut into 1 inch pieces
4 CARROTS chopped into ½-1 inch pieces
1 ONION large onion, cut into large pieces
1 GARLIC BULB chopped
4-5 sprigs ROSEMARY finely chopped
¼ cup BUTTER melted–substitute olive oil, if desired
SALT and PEPPER to taste
This is a great dish to load up with extra seasonings…try CUMIN, SEASONING SALT, CAYENNE PEPPER, CAJUN SEASONINGS, etc.

How to Cook Cornish Hen

  • If you’re using a frozen hen, allow the bird to thaw overnight in the fridge.
  • Cut hen through the breast and into two halves.
  • Rub both sides of hen with salt, pepper, garlic, and rosemary.
  • Lightly oil a baking dish and place the hen halves skin side up. Check current prices for a baking dish on Amazon.
  • Cover hens with potatoes and carrot and additional seasoning.
  • Top with chopped onion and melted butter and cover dish.
  • Cook in 400 degree F oven for 30 minutes.
  • Remove dish, mix ingredients, cover and return to the oven for 15 minutes more.
  • Remove dish and uncover. Mix ingredients, place hen halves on top of vegetables and return to the oven and cook for an additional 10 minutes.
  • At this point (dish has cooked 55 minutes total) I like to turn on the broiler and broil each side of the hen for 2-3 minutes, making the skin crispy and tasty. Keep an eye on the hens and do not overbroil!
  • Remove the dish from the oven and serve. I like to rub dried oregano between my palms and coat the plate and serve with sliced tomatoes.

For another poultry dish, try this crispy Baked Chicken Recipe that you’ll love more than fried chicken.
baked curry chicken

Thanks for checking out our Cornish hen recipe, and all of our recipes. Be sure and sign up for our mailing list and never miss a new Chef Buck cooking video, and also click a button below and share the dishes with your friends. We appreciate all the kind comments and support, and we’ll see you next time in the kitchen!
–Chef Buck

Thanks for watching our recipe videos!

We include affiliate links for products on our website, so if you make a purchase after clicking on our links, we may earn a commission which helps us produce more videos and drink more coffee :^) We participate in the Amazon Services LLC Associates Program, which is an affiliate advertising program providing a means for us to earn fees by linking to Amazon.com and affiliated sites, so we can make more videos.

Share and Enjoy !

Asian Jicama Salad Recipe

asian jicama salad

Jicama is a root vegetable that can be served raw. It is similar in appearance to a potato, but tastes more like an apple, although not quite as sweet; I find it has an “earthier” taste. Many folks compare the crisp texture of Jicama to that of a water chestnut. Jicama is especially good in this recipe because it takes on the flavor of the dressing very well.

Ingredients:
1 cup JICAMA (cut into 1 inch sticks)
1 cup SNOW PEAS (cut into ¼ inch widths)
1 cup NAPA CABBAGE (torn into salad-size pieces)
2 CARROTS
¼ cup SESAME SEEDS (toasted)
2 Tbsp VINEGAR (wine or rice)
2 Tbsp SOY SAUCE
4 tsp HONEY (or 2 tsp sugar)
1 tsp SESAME OIL
1-2 Tbsp WATER

Peel jicama root and cut into matchstick shapes. Tear cabbage into salad-sized pieces (substitute romaine lettuce if preferred, but I find the cabbage holds up better in the dressing). Slice snow peas into ¼ inch widths. Shred carrots. Combine all in a bowl and mix.

In a smaller bowl, add vinegar (red or white wine vinegar or rice vinegar can be used), soy sauce, honey, sesame oil, and water (start with 1 Tbsp of water and add another if desired). Mix ingredients.

Combine dressing and vegetables and toss thoroughly. Serve as a side dish to add Asian flair to any meal—and it’s great with fish.

Bon Appétit!

Share and Enjoy !


Fried Shrimp Recipe with spicy tempura

spicy fried shrimp

I love a tasty fried shrimp recipe, and “tempura” is just a fancy pants word for “fried”. This dish is a knock-off of a dish I love to order at a Chinese restaurant when I’m down in Tampa, but since I don’t live in Tampa, I had to figure out how to make this fried shrimp recipe for myself—and I’ve done it!

The key is cilantro, and lots of it—also lots of garlic and a little hot pepper, too! Be sure to use a non-stick pan to cook up the spicy pepper mix, otherwise you’ll be setting yourself up for a headache and burned garlic!

What you need for Spicy Fried Shrimp

1 lb SHRIMP (peeled and deveined, tail on)
1 bunch CILANTRO (1 to 2 cups chopped)
10-12 cloves GARLIC (chopped)
1 or 2 hot PEPPERS (chopped)
1/2 cup GREEN ONION (chopped)
1 tsp RED PEPPER FLAKES (or two tsp!—optional)
1 cup ALL PURPOSE FLOUR
1 EGG
1 cup ice-cold WATER
frying OIL
SALT (to taste)

How to make Spicy Fried Shrimp

  • Chop up 1 bunch of cilantro, stems AND leaves.
  • Chop 2 green onions and dice peppers, I like to use 2 green chili peppers, but use whatever peppers you like depending on how much heat you want in the dish.
  • Chop 10-12 cloves of garlic.
  • Heat a non-stick skillet with 2 Tbsp of oil—definitely use a non-stick skillet! If you don’t have a decent skillet, here’s a link to check out some current skillet prices on Amazon.
  • Add peppers to skillet and allow to cook 1 minute, then add garlic and red pepper flakes (adjust pepper flakes to taste).
  • Cook for 1 minute and then add green onions. Be sure to keep ingredients stirring, reduce heat as necessary to prevent garlic from burning.
  • As garlic browns, add the cilantro and continue to stir ingredients, cooking out the moisture. It’s okay if the garlic browns well, as long as it’s not burned; the dryer the ingredients get the better. Cook the ingredients down and then remove the skillet from the heat and set aside.
  • Heat up the oil for the shrimp.
  • While the oil heats, prepare the tempura batter. It’s best not to prepare the batter ahead of time. In a bowl, beat 1 egg, add 1 cup of ice-cold water, then add 1 cup of all purpose flour.
  • Mix together into a thin batter, but don’t over mix—it’s okay if there are some lumps.
  • Test the batter in the frying oil; the batter will sizzle and float if it is ready.
  • Use peeled and deveined shrimp with the tail still attached—the tail makes a perfect handle.
  • Dip shrimp in batter and then shake off the excess.
  • Lay shrimp in the hot oil and cook 3-4 minutes, turning once. DO NOT cook too many shrimp at the same time because they will stick together and not crisp and brown evenly.
  • When the shrimp are golden, remove from oil and drain on a paper towel (the 1st batch I put into the pepper mix to drain).
  • When all the shrimp are fried, add them to the pepper mix and return the skillet to the burner on low heat.
  • Salt to taste and toss the shrimp GENTLY and thoroughly with the spice mix.
  • Remove from heat and serve immediately.

I like to serve this dish with sticky rice and a sautéed green, something like cabbage or bok choy. Give fried shrimp recipe a try a let me know what you think, and bon appétit!

If you want another tasty shrimp idea, one of my favorite is this fancy Shrimp Pancake Recipe.

shrimp pancake
Korean style Haemul Pajeon with shrimp

Thanks for checking out our shrimp recipe, and all of our recipes. Be sure and sign up for our mailing list and never miss a new Chef Buck cooking video, and also click a button below and share the dishes with your friends. We appreciate all the kind comments and support, and we’ll see you next time in the kitchen!
–Chef Buck

Thanks for watching our recipe videos!

We include affiliate links for products on our website, so if you make a purchase after clicking on our links, we may earn a commission which helps us produce more videos and drink more coffee :^) We participate in the Amazon Services LLC Associates Program, which is an affiliate advertising program providing a means for us to earn fees by linking to Amazon.com and affiliated sites, so we can make more videos.

Share and Enjoy !

Deviled Egg Recipe – Indian Style with Curry

curried deviled eggs

This deviled egg recipe is a tasty treat, and preparing eggs with Indian inspired spices will make a nice change from the average awesomeness of a traditional deviled egg recipe.

Deviled Egg Recipe Ingredients

6 EGGS
2-3 Tbsp MAYONNAISE
1 clove GARLIC (finely chopped)
¼ tsp CUMIN SEEDS
OLIVE OIL (1-2 tsp)
SALT and PEPPER (to taste)
CURRY POWDER (to taste)

How to Make Deviled Eggs

Boil and peel 6 eggs.
You can boil them perfectly, if you boil them this way: (Overly-long egg boiling description follows)
Use older eggs. As an egg ages, it shrinks within the shell and separates from the inner membrane, making the egg easier to peel after boiling. Fresher eggs will have a stronger membranous attachment to the shell and are more difficult to peel (yawn). Eggs 10 days to 2 weeks old will work well.
Prepare the eggs in a pot large enough to keep them from jostling together and cracking. Heating the eggs gradually will also prevent cracking. Place eggs in a pot and fill with cold tap water so the eggs are completely covered and there is an extra 1 inch of water above the eggs. Add a pinch of salt. (Some folks add a tablespoon of vinegar to prevent the eggs from leaking should they crack, but I never do this because I don’t think James Dean would). Uncovered, bring the pot to a boil.
As soon as the pot begins to boil, turn off the heat, cover and allow eggs to sit 12 minutes.
After 12 minutes, exchange the hot water for cold under the tap and allow eggs to cool; exchange the water several times if needed.
When eggs have cooled, peel them under the water in the pot. (Peeling them under running water is kind of a waste of water, so why do dat?)
Okay. Now you’ve got 6 boiled and peeled eggs.

Slice them into halves lengthwise and plop out the yellow yolks into a mixing bowl. And one of the egg white halves to the mixing bowl as well, or two halves if you like a lot of filling. Add salt and pepper to taste.
In a skillet, heat a splash of olive oil on med-high heat and sauté ¼ tsp cumin seeds and 1 clove of finely chopped garlic until garlic is lightly browned—do not burn: the garlic will cook quickly.
Add the garlic and cumin seeds to the yolk mixture. Add mayonnaise gradually and mix the ingredients to desired smoothness (AGAIN—add the mayonnaise gradually! If the mixture is too soft it will not set up properly in the egg white!)
Which brings us back to the egg white.
Spoon the yolk mixture into the egg whites and arrange nicely onto a serving dish.
Sprinkle as desired with curry powder (or substitute cumin powder).

Thanks for watching! Share this post, comment, and make eggs for dinner, dude.

For another tasty appetizer recipe, try Asian-Style Spring Rolls w/ Sauce.
Deviled Egg Recipe

Share and Enjoy !


Kale Recipe -Ginger Stir-fry w/ Tahini Sauce

sauted ginger kale

Try this easy stir-fry kale recipe. Kale is a cool cabbage that kicks broccoli’s ass (or at least in this recipe it does).

Kale Recipe Ingredients:
1 bunch KALE
1 inch piece fresh GINGER
1 medium ONION (cut into slices)
½ cup CARROT (thin cut or string cut)
1 hot PEPPER (finely chopped, optional)
1 Tbsp SESAME OIL
SALT (to taste)
1 Tbsp TAHINI
3-4 Tbsp SOY SAUCE

Divide a 1” piece of ginger into two halves. Finely chop one half to use in the sauce and thinly slice the other half and set aside to cook with the stir fry. In a small bowl, mix together the tahini and soy sauce until a thin peanut-buttery consistency is achieved. Mix the finely chopped ginger into the sauce and set aside.
Wash kale, remove spine, and cut or tear into mouth-manageable pieces. Heat the sesame oil on medium high and sauté onion slices and finely chopped pepper for 1 minute. Add a pinch of salt (not much salt will be needed because of the salt in the soy sauce). Add Ginger slices and cook for another minute. Reduce heat to medium and add the kale and carrots. Mix thoroughly with the onion, pepper, and ginger. Cover and allow to cook for 2 minutes. Turn off heat and add sauce. Toss well and serve hot (and it goes great with rice).
Give this healthy kale Recipe a try and let me know what you think, and…
Bon appétit!

Kale Fun Facts:
Kale belongs to the same family as cabbage, Brussels sprouts, and collards.
Kale is packed with antioxidants, which help neutralize harmful free radicals in the body.
One cup of chopped raw kale provides more than 100% of the daily value of vitamins A, C, and K.
Free Radicals are something scientists made up to sound smart.

Want more kale recipe ideas? Try this Kale and Beet Superfood salad Recipe.
kale beet salad

Share and Enjoy !


Spring Rolls with Peanut Dipping Sauce

spring rolls dipping sauces

Spring rolls are a nice appetizer when you go out to eat at a fancy-pants restaurant, and they’re just as nice when you eat them at home, and they’re easy to make. Briefly wetting the rice paper and placing it on a damp towel makes the delicate rice paper easier to handle. The rice paper softens while you place your filling–makes the process much easier–definitely give this technique a try!

All you need to make spring rolls are rice paper and some tasty ingredients to roll up inside. You can buy rice paper at any Asian food store, most health food markets, and in the ethnic foods section of many local grocery stores. It’s an economical buy. The last batch I bought was a package of 20 for $2.25 U.S. dollars. It comes in sheets, like paper, but usually round in shape; it doesn’t feel like paper, though—it feels more like plastic, almost like something you’d find at the hardware store, but don’t let that put you off, it softens quickly when wet. Despite its initial “plasticky” appearance, it’s not bad for you, or particularly good for you either—rice, tapioca, salt, and water are the prime components. How your spring rolls taste will be determined by the ingredients you roll up inside, and any dipping sauce you might like to serve them with. It’s a great vehicle for getting raw vegetables into your diet; I like to think of a spring roll as a cigar-shaped salad, but many pre-cooked meats and seafood work well in spring rolls, too.

What You Need to make Spring Rolls

Rice Paper and
Whatever the hell you wanna roll up in the rice paper.
Here are a few options I like to use:
cilantro (I ALWAYS USE CILANTRO), cucumber, basil leaves, lettuce, carrots, sprouts, rice noodles, steamed shrimp, stir-fried spicy pork, bell pepper, green onions, cabbage, and on and on and on…
there’s no end to what you can use.

spring rolls
Spring rolls make a great appetizer or entree

How to Make a Fresh Spring Roll

Prepare your filling ingredients—mainly making sure the ingredients are chopped or sliced in a manner which will make them rice paper-wrapping friendly—this is especially true if you plan on slicing the spring rolls in half—your filling ingredients will tumble out easily if they’re too loose and tiny.
Wet the rice paper with warm tap water. Just a few seconds under a warm tap is plenty. Place the rice paper on a damp towel and gently press down. The rice paper will quickly soften and become pliable. Arrange your filling ingredients at one end of the sheet and roll them up in the rice paper like a burrito. Using basil or lettuce or cabbage leaves as your base ingredient will make the rolls structurally sound and easier to roll. It’s very important that the first rollover be tight—compact the ingredients as much as possible—a loosely rolled spring roll is a sad sight, and will quickly fall apart if sliced. The rice paper will be your friend. It will help. It is very sticky and will seal almost like an envelope around your stuffings. If you want a tasty spring roll, it’s as easy as rolling up a tasty combo of ingredients—a yummy dipping sauce will help, and here are two:

Peanut Dipping Sauce:
1 Tbsp Peanut Butter
1 Tbsp Rice Wine Vinegar
1 Tbsp Toasted Sesame Oil

Chili Dipping Sauce:
2 Tbsp Chili-Garlic sauce
2 Tbsp Soy Sauce
1 tsp Sesame Seeds

And just plain old soy sauce works fine, too. Or maybe some hot mustard—I’ve never tried that, but it just popped into my head, so maybe next time I’ll give it a go.
Alright, that’s enough blabbing.
Give these spring rolls a try and bon appétit!

For another delicious Asian inspired dish, try a Seafood Pancake Recipe.
seafood pancake dipping sauce

Share and Enjoy !


Seafood Stew Recipe for Winners

seafood stew

A simple and delicious seafood stew recipe for winners*.
*also appropriate for non-winners

Seafood Stew Recipe Ingredients

1 lb MIXED SEAFOOD
1 HOT PEPPER (finely chopped)
3-4 cloves GARLIC (finely chopped)
1 medium ONION (chopped)
½ cup CELERY (sliced)
2 Tbsp TOMATO PASTE
1 13 oz can DICED TOMATOES
1 cup CHICKEN STOCK
2 cups WATER (substitute 1 cup CLAM JUICE if desired)
1 cup WHITE WINE
2 Tbsp LEMON JUICE
1 BAY LEAF
1 Tbsp OREGANO
1 tsp THYME
1 tsp BASIL
SALT/PEPPER to taste
1 Tbsp OLIVE OIL

How to make this Seafood Stew

Heat olive oil on medium heat and add onion and celery and hot pepper.
Give these ingredients a minute head start and then add the garlic and salt.

Cook until the onion begins to soften and then add the tomato paste. Push the paste around with the vegetables—spread it around the bottom of the pan and let it cook up a minute or two—if the paste sticks a little, that’s cool—because now we’ll add white wine which will deglaze any stuck on paste.

Add a bay leaf, oregano, thyme, basil—throw some red pepper flakes in as well if you like it hot. Let the mix simmer for about 5 minutes.

Add diced tomatoes, 1 cup of broth (I use chicken broth, but any broth will do), and 2 cups of water—you can substitute 1 cup of clam juice for 1 of the cups of water, if desired. Bring to a boil and then reduce to a simmer, cover, and allow to cook 30 minutes.

After 30 minutes, add 1 lb. of miscellaneous seafood—a variety of big-bite pieces make a nice presentation. Cover and simmer for another 7-8 minutes. Stir in some lemon juice and remove from heat and serve.

It looks tasty in a bowl with a nice pyramid of rice in the middle.
it’s easy peezey and puts a nice glow in your belly, so give this seafood stew recipe a try.

Bon appétit!

Hey!!!  ….what about a Beef Stew Recipe?

beef stew

Thanks for checking the seafood stew recipe out! Click some of the buttons below and share it with your friends and family, I appreciate it.
–Buck

Share and Enjoy !


Baked Chicken Recipe better than fried chicken

baked curry chicken

It’s not fried chicken, but just barely. This is a simple and delicious recipe for folks who like juicy chicken more than greasy chicken, so give this baked chicken recipe a try.

What you need for this Baked Chicken Recipe

2½ lbs. CHICKEN (skin removed)
1 cup MILK (I use almond milk, but buttermilk is cool)
HOT SAUCE (to taste)
1 cup BREAD CRUMBS
3 tsp CURRY POWDER
1 tsp GARLIC POWDER
1 tsp ONION POWDER
1 tsp ONION SALT (or regular salt, adjust to taste)
½ tsp GROUND MUSTARD
1 tsp PAPRIKA
*add ½ tsp red pepper if you want a kick

baked curry chicken

How to “Bake” Fried Chicken

Buy skinless or remove the skin and clean and rinse 2-2½ lbs. of chicken pieces. I love the dark meat, so I usually use thighs, but use whatever cuts you like and adjust the cooking time accordingly.

Spread the chicken out in a shallow bowl and dash with hot sauce to taste. Add one cup of milk. I like to use almond milk, but my mama always used buttermilk. Allow the chicken to soak 30-60 minutes.

In a ziplock bag, add the remainder of ingredients and mix.

2 pieces at a time, add chicken to the ziplock bag and turn until coated. Sealing plenty of air in the bag will help coat the chicken pieces easily and evenly.

Place pieces on a non-stick or lightly-oiled baking pan and bake at 350 degrees Fahrenheit for about 30 minutes.
Periodically check on the pieces as oven cooking times will vary.
After 30 minutes, or when the pieces are well on their way to cooking, turn them, and continue cooking for another 15-20 minutes.

Curry gives the chicken a wonderful color, and it looks very much like fried chicken, although not as crunchy as fried chicken. For extra crunchiness, broil the pieces for 1-2 minutes on each side.

Give this baked chicken recipe a go and let me know what you think!

If you’re new to home cooking, just get a bunch of spices, pots and pans, and start experimenting with different ingredients and recipes. It’s a healthy hobby that can save a lot of money in the long run. You can check out current prices for Complete Kitchenware Sets on Amazon. Or just go to a thrift store! I’ve found some of my favorite kitchen gear at second-hand stores.

And when you’re tired of chicken, try this Juicy Pork Loin Recipe.

pork loin chop

Thanks for checking out our baked chicken recipe, and all of our recipes. Be sure and sign up for our mailing list and never miss a new Chef Buck cooking video, and also click a button below and share the dishes with your friends. We appreciate all the kind comments and support, and we’ll see you next time in the kitchen!
–Chef Buck

Thanks for watching our recipe videos!

We include affiliate links for products on our website, so if you make a purchase after clicking on our links, we may earn a commission which helps us produce more videos and drink more coffee :^) We participate in the Amazon Services LLC Associates Program, which is an affiliate advertising program providing a means for us to earn fees by linking to Amazon.com and affiliated sites, so we can make more videos.

Share and Enjoy !

Lentil Soup Recipe with Ginger

lentil ginger soup

A lentil soup recipe! Doesn’t that sound like all of your dreams are coming true? Pick up some brightly colored lentils and give this lentil soup recipe a try.

What you Need for this Lentil Soup Recipe:

1 ½ cups LENTILS
5-6 cups WATER (or ½ water ½ broth)
1 large ONION (finely chopped)
2 Tbsp fresh GINGER (finely chopped)
1 hot PEPPER (finely chopped)
2 Tbsp OLIVE OIL
1 tsp CUMIN SEEDS
½ tsp TUMERIC POWDER
1 tsp CORIANDER POWDER
1 14 oz can DICED TOMATOES (or 2 Lg tomatoes, diced)
SALT and BLACK PEPPER to taste
CILANTRO LEAVES for garnish (coriander leaves)

How to Make the Soup:

If you need a nice soup pot for your kitchen, you can check here for current pricing for a soup pot on Amazon.

  • In a large pot, heat olive oil on medium heat. When oil is hot, add the cumin seeds and allow cooking for about 1 minute. After a minute the seeds will begin to open, at this point add the onion and hot pepper and allow cooking until the onions soften and become translucent.
  • Now, add ginger, coriander, and turmeric and continue mixing ingredients over medium heat.
    Add tomatoes, mix, and cook with ingredients for 2 minutes.
  • Add lentils (be sure to wash and rinse first). Red or yellow lentils will make this dish look extra yummy. Darker lentils will taste equally as good—the dish just won’t win a beauty contest—but use whatever kind you have, ultimately, your stomach won’t know the difference.
  • Add water, or a combination of water/broth.
  • Next, bring the pot to a boil, reduce heat, then cover the pot loosely and allow ingredients to simmer for 30 minutes.
  • After 30 minutes, add salt and pepper to taste. Add more water as needed, but sparingly—you don’t want your soup to be too thin. Cover pot loosely and continue cooking another 15-20 minutes.

Final Steps:

  • When the lentils are soft and completely cooked, lightly blend the soup to add a creamy consistency. A hand-held stick blender works great—a few quick pulses and voilà! If a stick blender is not handy (rim shot), simply remove a few cups of the soup to a table top blender, smooth, and return to the pot. This step isn’t necessary, but do it; just do it.
  • If the soup is thinner than you like, continue to simmer briefly—but remember, the lentils, like rice, will continue to absorb water and thicken the soup on their own.
  • Garnish with cilantro (coriander leaves) and serve with French bread for optimal taste satisfaction.

Keep Coming Back To See What’s New!

Bon appétit!

And, if you like bread with your soup, you might love trying this Fancy Egg Bread Recipe, it’s one of my favorites.

egg bread
baked egg bread with rosemary seasoning

Thanks for checking the recipes out! If you liked it, click some of the buttons below and share it with your friends and family, I appreciate it.
–Buck

Share and Enjoy !

Calamari Salad Recipe …easy squid dish!

calamari salad squid

Calamari salad makes a great addition to any potluck! Also, Dr. Freud theorized the squid to be the unconscious driver underlying all human action. This recipe builds on that theory, and adds carrots.

What you need for a Calamari Salad

1 lb SQUID
½ cup CARROT (strings)
½ cup CUCUMBER (sticks)
1/3 cup CILANTRO or BASIL LEAVES (chopped)
1 tsp GINGER (minced)
1 tsp SESAME OIL
1 Tbsp extra virgin OLIVE OIL
1 Tbsp RICE WINE VINEGAR
1 tsp CHILI GARLIC SAUCE (or sub hot sauce to taste)
1 Tbsp LEMON JUICE
SOY SAUCE (to taste)
½ tsp SESAME SEEDS
SALT (to taste)

How to make Calamari Salad

Start with 1 lb. of cleaned squid. I’ve used fresh and frozen squid for this recipe and both work well—and smaller squid work best for salad—which is something to think about when choosing your squid; buying them frozen and already cleaned is much nicer than cleaning a dozen dinky cephalopods.

Cut squid into thin rings (1/4 inch max) and boil in salted water for 25 seconds (yep—they’ll cook up that fast). Drain, then rinse under cold water to prevent overcooking (over-boiled squid can be quite rubbery).

In a large bowl, combine sesame oil, olive oil, vinegar, chili garlic sauce, and ginger (also salt to taste—or dress with soy sauce). Mix well.

Add squid, carrot, cucumber, and cilantro and toss with dressing.
Add lemon juice (or substitute lime juice). Add soy sauce to taste.

Mix all, top with sesame seeds, and serve over a bed of mixed greens.
It’s light, tasty, and suctioncupalicious.

Wanna try squid in another dish? One of my favorite uses for calamari is in a Seafood Pancake Recipe, which sounds weird, but try it, you’ll like it.

shrimp pancake
Korean style Haemul Pajeon seafood pancake

Thanks for checking out the calamari salad recipe. If you enjoyed it, click some of the clickables below to share the recipe with your friends. I appreciate it!
–Chef Buck

Share and Enjoy !


Pita Chips Recipe for a baked, spicy, pita snack

spicy pita chips

Pita chips are easy to make and you can bake them up quickly using your favorite spices. You can’t have hummus without pita chips! I mean, you can, but…why? Pita chips go great with all kinds of dips and are excellent with salads or just as an alternative to your run-of-the-mill potato chip.

Pita Chips Ingredients:
1 pkg. PITA BREAD
OLIVE OIL
SALT
SPICES: curry powder, garlic powder, cajun seasonings, etc. (whatever you like)

Cut pitas into triangular chip shapes. Each pita will easily yield 12 chips. Soak one side of each pita triangle in olive oil and stack pitas so the soaked side of one is stacked against the unsoaked side of the next. Press stacked chips together—this will flatten the chips and suffuse the oil throughout.
Arrange chips on a flat baking sheet. Salt to taste. Add spices—the more the better, in my opinion. I usually bake three distinct batches. Curry is probably my favorite—just salt and lots of curry on a toasted pita chip, it’s delicious. Garlic is great, too. Try some Tony Chachere’s seasoning (or comparable cajun seasoning) on a chip—or simply add a sprinkle of cayenne pepper with Cumin. Whatever your favorite seasonings are, give them a try.
Bake the chips 8-10 minutes in a pre-heated oven at 350 degrees Fahrenheit. Oven cooking times vary, so keep an eye on your first batch to see how long it takes to toast them the way you like—they will burn quickly if forgotten. I like mine CRISP. One side of the pita will be thinner than the other side and some triangles may need to be removed from the oven before the other chips are done. You’ll figure it out.
Give this pita chips recipe a try and let me know what you think, and…
Bon appétit!

Want to make hummus right now? Check out this Classic Hummus Recipe.
spicy pita chips

Share and Enjoy !


Parsnip Soup with a curry twist…you’ll love it

curry parsnip soup

If you’ve never tried parsnips before, this parsnip soup recipe is an easy introduction.  Blended up, this dish is super creamy without a drop of cream, which is a healthy low-cal option and makes my belly happy on several levels. Parsnips are available year-round. They resemble carrots, but are paler and have a stronger flavour. Give this parsnip soup recipe a try—it’s guaranteed super delicious or your money back.

What You Need For This Parsnip Soup Recipe

1 lb PARSNIPS (chopped for soup)
1 large POTATO (chopped for soup)
1 medium ONION (chopped)
2 Tbsp OLIVE OIL
1 Tbsp CURRY POWDER
1 tsp CUMIN POWDER
1 tsp CORIANDER POWDER
2 cups BROTH (chicken or vegetable)
2 cups WATER
SALT (to taste)
CORIANDER LEAVES (chopped, garnish)

How to Make Parsnip Soup

  • In a soup pot, heat olive oil on medium high heat and add onions and cook for 1 minute.
  • Add parsnips and potatoes and continue cooking until the onions are soft.
  • Add curry, cumin, and coriander powder and mix well. Add 4 cups of liquid— ½ broth and ½ water .
  • Bring contents to a boil, add salt, then reduce heat to low, cover, and simmer for 30 minutes.
  • After a half hour the parsnips and potato should be quite tender. For a creamy texture, blend soup as desired—no milk or cream are needed. I like to leave a few chunks of potato unblended, and garnish with chopped coriander leaves.

And that’s it…give this parsnip soup recipe a try and let me know what you think!

If you’re new to home cooking, get a bunch of spices, pots and pans, and start experimenting with different recipes. It’s a healthy hobby that can save a lot of money in the long run. Check out current prices for Complete Kitchenware Sets on Amazon as well as Complete Starter Spice Kits. Or try a thrift store! I’ve found some of my favorite kitchen gear at second-hand stores.

Parsnip Fun facts:

In Roman times parsnips were believed to have been an aphrodisiac.
In Scotland parsnips are still known as White Carrots.
Are a favourite with gardeners because of the short growing season.
People used to believe that eating parsnips could relieve a toothache or tired feet.
Half of the carbohydrates in parsnips are sugar, and the rest is starch.
Parsnips were once used to sweeten jams and cakes before sugar was widely available.

For another super vegetarian recipe idea, try this No-Meat Vegetarian Chili Recipe.

Thanks For Watching Our Recipe Videos!

Thanks for checking out this quinoa salad recipe, and all of our recipes. Be sure and sign up for our mailing list so you’ll never miss a new recipe. Also click a button below and share the dishes with your friends. You can also follow Chef Buck on Youtube. We appreciate all the kind comments and support, and we’ll see you next time in the kitchen!

If you like what CG and I do, you can also support us on Patreon, or throw us a tip in our Paypal Tip Jar. We’ll happily enjoy a coffee on the road – Thanks! We appreciate all the support, and we’ll see you next time in the kitchen!

We include affiliate links for products on our website. So, if you make a purchase after clicking on our links, we may earn a commission which helps us produce more videos and drink more coffee :^) We participate in the Amazon Services LLC Associates Program, which is an affiliate advertising program. It provides a means for us to earn fees by linking to Amazon.com and affiliated sites, so we can make more videos.

Share and Enjoy !

Spicy Couscous Recipe …how to make a quick side dish

spicy couscous

Anyone up for a spicy couscous recipe? Couscous is a quick and simple dish, so naturally I love it. It makes a great pairing with fish, and both can be cooked up quickly. I usually start with plain couscous and spice it up myself, it is simple to do and much yummier than any overpriced pre-made couscous mix you’ll buy at the market.

What You Need To Make This Spicy Couscous Recipe

1 cup COUSCOUS
2 Tbsp OLIVE OIL
1 medium ONION (chopped)
3 cloves GARLIC (finely chopped)
1 HOT PEPPER (finely chopped)
1 tsp MUSTARD SEEDS
1 tsp CHILI POWDER
1 tsp PAPRIKA
½ tsp TURMERIC POWDER
1 tsp TOMATO PASTE
1 ½ cup WATER (or broth)
SALT (to taste)

couscous recipe
Spicy couscous makes a tasty side dish, and it is fast and easy to prepare …and did I mention cheap?

How To Make Spicy Couscous

Heat olive oil on medium high heat and then add onions.
Stir for 1 minute and add mustard seeds, hot pepper, and garlic.
Continue sautéing for a couple more minutes.
Stir in chili powder, paprika, and turmeric.
Add salt and tomato paste and mix well.

Pour in 1 ½ cups of water, stir, cover pot and turn up the heat and bring the pot to a boil.
After ingredients come to a boil, stir in the couscous and mix well. Cover and remove from heat and allow pot to sit for 5 minutes.

After 5 minutes the couscous will have completely absorbed all the water.
Uncover and immediately fluff with a fork; this will keep the couscous for overcooking and becoming a sticky, starchy mess; couscous should be light and fluffy, and in this case, nice and spicy, too.
Give this spicy couscous recipe a try, and I hope you like it.
Bon appétit!

This couscous recipe goes great with this DELICIOUS BLACKENED FISH RECIPE!

blackened fish mahi mahi
Click image to watch this easy Blackened Fish recipe

Thanks for watching my couscous recipe video. If you liked it, then used the buttons below to share the recipe with your friends. Thanks!
-Chef Buck

Share and Enjoy !


Shrimp Remoulade Recipe …Best Shrimp Salad Ever!

shrimp remoulade salad
Shrimp remoulade salad is one of my all-time favorite dishes.  I used to eat this all the time when I lived in New Orleans—and I never go back without making a stop at the Gumbo Shop for a taste.  I don’t know exactly how the Gumbo Shop prepares shrimp remoulade sauce, but this recipe is how I throw it together.   A lot of ingredients go into the sauce, but it’s worth the effort.  Give it a try!

What You Need to Make Shrimp Remoulade

TOMATO PUREE (½ cup)
MUSTARD (¼ cup –creole, stone ground, or dijon)
HORSERADISH (2 tsp –prepared)
GREEN ONION (1 tsp, minced)
PARSLEY (1 Tbsp, finely chopped)
WORCESTERSHIRE SAUCE (½ tsp)
MAYONNAISE (3-5 Tbsp)
CELERY (1 Tbsp, minced)
GARLIC (1 clove, minced)
CHILI POWDER (1 tsp)
PAPRIKA (1 tsp, smoked)
SUGAR (1 tsp, optional
SALT (to taste)
HOT SAUCE (½ tsp)
LEMON JUICE (1 Tbsp)
OLIVE OIL (1 Tbsp)
VINEGAR (1 tsp)
Salad Ingredients:
SHRIMP (1 lb, boiled)
SALAD GREENS
TOMATO SLICES
GREEN ONION (chopped, optional)

shrimp remoulade
Shrimp Remoulade is a New Orleans classic

How to Make Shrimp Remoulade

The Remoulade Sauce:

To make the sauce, just mix all the sauce ingredients together (really?!).  I’m using tomato puree in this version, but I’ve also made this dish using ketchup or tomato sauce; it will be thinner if you use those two, but that can be a good thing, especially if you want to toss the greens in the remoulade sauce.  Sugar is optional and definitely not needed if you’re using ketchup, which is usually sweet enough.  Sometimes I’ll add a teaspoon of onion powder.  This is a great recipe to play with, but be judicious with the mayonnaise!  Using fresh ingredients like parsley, garlic, green onion, and celery will really make this sauce shine.  You can definitely make and serve the sauce immediately, but making it hours ahead or even the day before will embolden the flavors.  Embolden the flavors?  I’m not sure if that’s the right way to say that, but you know what I mean.

The Shrimp:

I’m using 1 pound of deveined shrimp in the shell. For this salad, the bigger the shrimp the better, but I usually get whatever’s on sale—any kind of shrimp is gonna be delish in this dish. Before boiling, prepare a bowl of ice water to cool the shrimp after cooking—this will keep the shrimp from becoming overdone (tough and rubbery).
Put a pot of water on the stove and add 2 bay leaves and a generous amount of salt. Bring the pot to a boil and add the shrimp. I find a pound of shrimp takes about 2 minutes, but this will vary depending on the size of the shrimp and the amount of water in the pot. For sure, they will cook fast. Do not ignore them—it’s not a good time to multi-task. When the shrimp turn pink, they’re done. Get ’em out of the hot water and into the ice bath—this will halt the cooking process, and your shrimp will be perfecto (and now that they’re cooked, they’ll be super easy to peel).
Toss the shrimp in the remoulade sauce and serve over a bed of fresh greens. I like to garnish the salad with green onion and fresh tomato. Serve with saltines or a loaf of French bread and soft butter. Let the salivating begin.
And bon appétit!

calamari salad squid
Be adventurous and TRY A CALAMARI SALAD!

Thanks for checking out the recipe. To never miss a video, subscribe to Chef Buck! Click some of the buttons below and share this awesome Shrimp Remoulade with your friends. Thanks!
–Chef Buck

Share and Enjoy !


Quinoa Recipe — Spicy Spanish Style Quinoa

spanish quinoa

Try this spicy Spanish-style quinoa recipe; it’s vegetarian heaven. Quinoa is a versatile ingredient and an excellent source of protein. Quinoa is a grain-like superfood and a great substitute for rice, and just as easy to prepare. I use it often as an alternative to rice–even in rice pudding. Give this quinoa recipe a try; I’m sure you’ll be eating a whole lot less rice in the future, and not missing it at all.

What You Need For This Quinoa Recipe

  • 1 Tbsp OLIVE OIL
  • 1 ½ cups QUINOA (check current prices for quinoa on Amazon)
  •  ½ cup RED ONION (minced, separated)
  • 3-5 cloves GARLIC (finely chopped)
  •  ½ large RED BELL PEPPER (minced, separated)
  • 1 14 oz can DICED TOMATO (reserve juice)
  • 1 15 oz can KIDNEY BEANS (drained, rinsed)
  • 1 tsp CUMIN powder
  • 1 tsp CHILI powder
  • 2 cups WATER, including drained tomato liquid
  • ½ cup CILANTRO (fresh, chopped)
  • 1 small CUCUMBER (diced, peeled if waxed)
  • 1 AVOCADO (seeded, peeled, diced)
  • 1/3 cup LIME JUICE (freshly squeezed)
  • SALT and PEPPER to taste

quinoa recipe
uncooked quinoa…looks like a grain, but it’s a seed.

How to Make Spanish Quinoa

  • Open the canned tomato and drain the tomato liquid into a measuring cup. Add enough water to equal 2 cups.
  • Heat oil on medium high. Saute garlic, 2/3 of the onion and 1/3 of the red pepper for 2-3 minutes. [the rest of the onion and red pepper will be added raw at the end.]
  • Add quinoa.
  • Stir in tomatoes with green chilies, kidney beans, cumin and chili powder and water/tomato juice mixture.  Bring the pot to a boil. Reduce to medium low and cook approx. 15 minutes. The liquid will be absorbed.
  • Remove from the heat and let sit for about 10 minutes and then fluff with a fork. Allow quinoa to cool some, you want it to be warm, not piping hot when you add the rest of the ingredients.
  • After quinoa has cooled some, add in the remaining onion and pepper pieces, and the chopped cilantro.  Mix. Then add cucumber and avocado and lime juice (or sub lemon juice). Toss gently.
  • And then serve.
  • Give this spicy Spanish quinoa recipe a try and let me know what you think, and…

Bon appétit!

For another tasty vegetarian recipe, try this Easy Eggplant Burger Recipe.

veggie burger recipe
Veggie burger recipe with blackened eggplant

Thanks for watching and subscribing –And hit those buttons below to share this recipe. I appreciate it!

Share and Enjoy !


Spaghetti Squash Recipe — Mediterranean Style

mediterrean spaghetti squash

I love this Mediterranean spaghetti squash recipe; its super tasty, and I can eat way too much without feeling too guilty. Watch the video and learn how to easily cook this squash. It’s a terrific ingredient; delicious and healthy. This Mediterranean style recipe is just one of many ways to use this versatile vegetable. Give it a try!

Spaghetti Squash Recipe Ingredients:

1 medium SPAGHETTI SQUASH
1 Tbsp OLIVE OIL
1 large ONION (chopped)
4-6 cloves GARLIC (finely chopped)
½ RED BELL PEPPER (sliced)
1 14 oz can ARTICHOKE HEARTS in water (chopped)
1 cup OLIVES, and olive juice to taste (chopped)
¾ to 1 cup PARMESAN CHEESE (shredded or grated)
1 tsp OREGANO
½ tsp THYME
1 tsp BASIL
SALT and PEPPER to taste

Mediterranean spaghetti squash recipe
Mediterranean spaghetti squash makes a great vegetarian meal

How to Make this Spaghetti Squash Recipe

Preheat oven to 350.
Cut spaghetti squash in half, lengthwise (a good, sharp knife will be nice).  Place each side, cut side down, in a shallow pan with about ¾ c water. Bake, uncovered for 45 minutes. Set aside to cool squash halves–enough to handle without causing death to the handler–but not completely cool.
You have time to chop up all your ingredients while the squash cooks.   For the artichoke, you may want to remove some of the outer, tougher leaves.
For each half, use a spoon to scrape out and discard the seeds and dark center strings.  Use a fork to scrape out the squash into ‘spaghetti-like’ strands.
Heat oil over medium high heat.  Saute onion and garlic 4-6 minutes.  Add bell pepper. Turn heat to low, stir and cover for 2-4 minutes.  Uncover, stir in spaghetti squash and remaining ingredients.  Cover and cook til all ingredients are warm, about 7-10 minutes
Add 1 Tbsp of olive juice and any other seasonings to taste. Serve warm. And a little toasted bread on the side won’t hurt.
Give this spaghetti squash recipe a try and let me know what you think, and…
Bon appétit!
And for another great spaghetti squash recipe, try this Spanish-style Spaghetti Squash.

spaghetti squash recipe
click image to check out this recipe

Thanks for watching, sharing, and subscribing to my videos, I appreciate it!

Share and Enjoy !


Try the Best Moroccan Chicken Stew Recipe

moroccan chicken tagine

Wow! This is super flavorful Moroccan chicken stew recipe. The combo of lemon and olive add a tangy richness to the broth and add a nice twist to your expectations of a chicken stew. Chef Bill cooked up this wonderful Chicken tagine and we had the camera running to catch it all. Give this delicious recipe a try and you will not be disappointed.

Ingredients for Chicken Stew:

2 1/2 lbs CHICKEN Pieces (skinned)
1 Tbsp OLIVE OIL
1 cup ONION (chopped)
2-3 cloves GARLIC (finely chopped)
1 cup CHICKEN BROTH
2 cups pitted WHOLE GREEN OLIVES
1 tsp ground CINNAMON
1/2 tsp CUMIN
1/2 inch GINGER (minced–or substitute 1/2 teaspoon ground ginger)
1-2 tsp LEMON ZEST
1/4 cup LEMON JUICE
1 Tbsp CILANTRO (chopped)
SALT and PEPPER to taste

chicken stew
Moroccan inspired Chicken Stew

How to Make This Chicken Tagine

Heat olive oil in a pot over high heat. Season chicken with salt and pepper and then place in pot. Brown chicken appox. 3 minutes each side and then remove from pot.
Add onion and garlic and saute in juices for a couple of minutes. Return chicken to pot and add Chicken Broth.
Add olives. Add cinnamon, cumin, and ginger. Stir, and bring pot to a boil. Reduce heat, cover, and simmer for 45 minutes.
After 45 minutes, uncover, turn chicken, and let cook 15 more minutes.
Using a slotted spoon, remove chicken and olives from pot and place in a serving dish. To the broth in the pot, add lemon juice, zest, and cilantro.
Serve the chicken and olives over rice or couscous and top with broth as desired. The olives are fantastic.
And the chicken is, too!
Give this terrific chicken stew a try and let me know what you think, and…
Bon Appétit!

And try this tasty Cornish Hen Recipe, too.

cornish game hen

Share and Enjoy !


Quick Salad Recipe Ideas for Spicy Foods

tomato cucumber salads

Two quick and cool salad recipe ideas: tomato and cucumber salad. These salads make perfect sides for a spicy meal. The tomato basil goes great with any blackened fish, and I love the creamy cucumber with spicy Indian fare. No cooking is required; simply combine the raw ingredients for an easy accompaniment to your favorite spicy dishes.

Tomato Basil Salad Recipe

Ingredients:
2 fresh TOMATOES (diced)
½ cup BASIL (chopped)
¼ cup FETA CHEESE (crumbled)
1 Tbsp OLIVE OIL
1 tsp BALSAMIC VINEGAR
SALT and PEPPER, to taste

Creamy Cucumber Salad Recipe

Ingredients:
2 SALAD CUCUMBERS (diced)
½ LEMON (juice and zest)
¼ cup GREEK YOGURT
1 tsp DILL
SALT and PEPPER, to taste

Give these salad ideas a go and let me know what you think, and bon appétit!

Want another salad idea? Try this Jicama Salad Recipe.
salad recipe

Share and Enjoy !


Beet Greens Recipe — Easy, healthy Dish!

beet greens

This is a super simple beet greens recipe. If you purchase beets with the greens intact, don’t throw those greens away! You can cook up a tasty dish using the beet greens (and if you don’t buy beets with the greens, then you need to make an adjustment in your shopping habit).

Beet Greens Recipe Ingredients:

1 bunch BEET GREENS
½ RED ONION (chopped)
1/3 RED BELL PEPPER (chopped)
2 cloves GARLIC (thinly sliced)
2 Tbsp OLIVE OIL
SALT (to taste)
PEPPER (to taste)
LEMON JUICE or VINEGAR (optional)

beet greens recipe
Buy beet roots with the greens for two great ingredients.

How to make Beet Greens

Remove the greens from the root and wash thoroughly because greens always seem to need a good washing, especially beet greens. I like to separate the green leaf from the thicker stem since the leafy greens will need far less time to cook. Heat 2 Tbsp of olive oil on med-med high heat. When the oil is hot, add onions and garlic.

I chop the onion big and the garlic thin. Stir for a minute and then add the red bell pepper and stir for a few minutes more. I use about a third of a red pepper, not too much, because it’s more for color than to influence the taste of the dish. The stems are a nice contrast to the dark greens.

Add a little water if needed, but not too much, the greens will release plenty of water.
Add the beet green stems. These will soften pretty fast, so a minute or two will be plenty of time Remember, overcooked veggies are a drag, man! Add the leafy greens.

Initially, I don’t mix the greens with the ingredients. I just cover the skillet for a minute or two and give the greens time to wilt. Remove the lid and stir, then add salt and pepper to taste and stir a minute more. That’s about when they’re ready. Camera Girl likes to add a splash of lemon, and vinegar goes great with greens, too.
Remove from heat and serve hot.

Beet greens make a great side, especially with chicken or a cheap cut of meat. I like to serve greens as a main dish over quinoa, which is a seed that acts like a grain and is an excellent source of protein. (Check current prices for quinoa on Amazon.)

These quick beet greens make a perfect side dish for all kinds of meals, especially quick cook dishes like fish and kielbasa, or if you want to be a little less carnivorous, pair these greens with a side of beans and top with a soft-yolk egg. The yolk makes a great sauce!

Give these healthy beet greens recipes a try and let me know what you think, and bon appétit!

For another beet dish, try this Roasted Beet and Quinoa Recipe.

how to cook quinoa
Quinoa with roasted root vegetables.

Thanks For Watching Our Recipe Videos!

Thanks for checking out our beet green recipes, and all of our recipes. Be sure and sign up for our mailing list so you’ll never miss a new recipe. Also click a button below and share the dishes with your friends. You can also follow Chef Buck on Youtube. We appreciate all the kind comments and support, and we’ll see you next time in the kitchen!

If you like what CG and I do, you can also support us on Patreon, or throw us a tip in our Paypal Tip Jar. We’ll happily enjoy a coffee on the road – Thanks! We appreciate all the support, and we’ll see you next time in the kitchen!

We include affiliate links for products on our website. So, if you make a purchase after clicking on our links, we may earn a commission which helps us produce more videos and drink more coffee :^) We participate in the Amazon Services LLC Associates Program, which is an affiliate advertising program. It provides a means for us to earn fees by linking to Amazon.com and affiliated sites, so we can make more videos.

Share and Enjoy !

Follow Me!