Charcuterie Ideas

charcuterie ideas

Need charcuterie ideas? The most important aspect of a charcuterie board – include foods that YOU want to eat, perhaps trying one or two new things! The options are endless. Sometimes, Chef Buck and I think we want a charcuterie plate but end up just getting out some veggies and hummus, or just some nuts, or just some cheese.  Since we often make meals for just the two of us, a charcuterie collection is our starting point but we let our mood ultimately guide us.

Chef Buck and I have been on the search for the perfect non-gluten snacks to go with a glass of wine. And well, we are generally eaters rather than mere nibblers, so we often are looking for more than a small block of good chocolate or a bowl of peanuts. A charcuterie plate/board/platter, aka a varied plate of cold cuts and other yummy morsels, is just the ticket!  

Strictly speaking, charcuterie (shar-KOO-ta-REE) is a shop where you can buy cold meats and meat dishes, and the term can also refer to the meat products sold in such a shop. But you can go to a shop, restaurant or someone’s home and a referenced charcuterie board or platter can contain much more than cold cuts. In this blog, we explore some of our favorite charcuterie ideas, and a couple of experimental ingredients.

Charcuterie Ideas – Have A Variety of Textures and Tastes

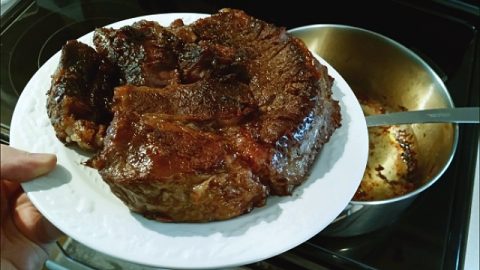
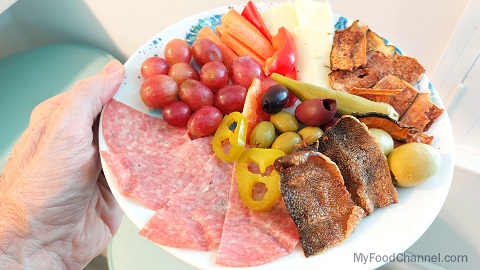
COLD MEATS. Since charcuterie specifically references cold meats, let’s start there. Yes, you can use cold cuts from your grocery deli, sliced extra thin. We enjoy something with a bit of flavor, so we lean toward varieties of salami. Have you tried any summer sausages? Summer sausages is a general term for fully cooked sausages that do not require refrigeration until after the packaging is opened; they are especially plentiful around the holiday times.    We have tried a couple of the cured meats with no preservatives. However, we found them a bit too dry and chewy, perhaps because we’ve spent decades eating other varieties. You can check prices for fancy charcuterie meats on Amazon.

charcuterie
Simple Charcuterie Plate

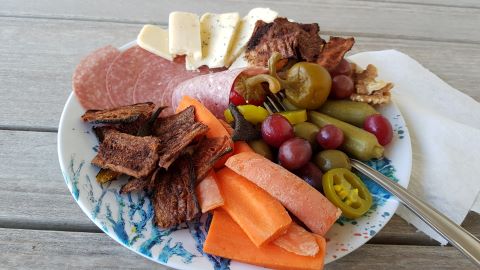
PICKLED OR BRINED ITEMS.  Chef Buck’s charcuterie plate is never complete without some olives. He prefers pitted kalamata (black, actually deep purple) olives as well as plump green manzanilla olives stuffed with pimentos or jalapenos. If you feel like really splurging, try some castelvetrano olives. They are also green but have a buttery goodness that are a special treat. Beyond olives, perhaps you’ll want to include a bite of marinated artichokes, pickled cherry peppers, pickled okra or just some plain pickles.

CHEESES. A creamy cheese is one of my favorite additions to our charcuterie plates. We’re always happy with a smoked gouda or creamy havarti. We’ve had successful experiments with creamy cheeses we can easily find in our local grocery store: dill havarti, caramelized onion gouda. But you don’t have to stop with just the creamy cheeses. We’ve added a herbed goat cheese, that had such a gusto of flavor that we didn’t need as much variety on that night’s plate – some veggies and nuts worked. We’ve had some harder cheeses when we’ve picked a white wine that has a particularly strong flavor.

FRESH VEGETABLES and FRUITS. We add fresh veggies and fruits to our charcuterie for some crunch and as the ocassional palate cleanser. And hey, Chef Buck thinks this addition makes the whole plate healthy. Some of our favorite fresh vegetables for a charcuterie plate are red/purple/yellow bell pepper, carrots, radishes, cauliflower florets. We once found a purple daikon at a local farmer’s market – it was a great addition with a burst of color. Grapes are an easy addition to a charcuterie. Perhaps you want some sweeter figs or berries? Or maybe cut up some apples or other seasonal fruit (peaches, pears) and sprinkle them with some lemon juice to slow down the browning process.

DRIED FRUITS. When the wine and fresh fruits are enough to satisfy your sweet tooth, and perhaps your seasonal fruit options are slim, consider adding a couple pieces of dried fruit. Dried apricots, cranberries, even prunes can provide some contrast to your briny/pickled options. Want some fancier options? Add dried figs, mango and/or pineapple.

BREAD, CRACKERS. Bread, breadsticks, crackers – all go well with meats, cheeses and many of your other charcuterie choices. They are a favorite for many people on their charcuterie boards. In college, my roommate and I survived the two weeks before leaving for the holidays, by living on the Hickory Farms gift packages of cocktail bread (fancy, miniature loaves of plain, wheat, rye or pumpernickel), sausage and cheeses, coupled with ridiculously big slathers of mayo.

SPREADS. You can include sweet and savory options. Jars of preserves, jellies or chutney provide a different taste combo with a bite of meat, cheese, bread or cracker. Jalopeno jelly is one of our favorite jellies.  Although we think they are especially messy, honey or syrups also provide different flavor and texture profiles. And for savory options, add some mustard, maybe even some horseradish or wasabi. You can add olives in the form of a tapenade. And yes, you can include some of your favorite dip – it’s YOUR charcuterie after all!

OTHER NON-GLUTEN OPTIONS. Since Chef Buck and I have been eating less bread and crackers, we’ve been exploring some additional non-gluten options for our charcuteries. Nuts are one of our favorite and again, the options are endless – raw, roasted, candied, spicy. Especially when we’re including a red wine, we sneak in a little dark chocolate. We have added pork rinds but found that their dryness just made us eat more of everything else. The same with the yummy ‘all-cheese’ crackers that have appeared in the last few years, usually made of parmesan and/or other hard cheeses.

How expensive can a charcuterie sampling be? Just for an idea of how pricey something like this can be, here’s a link to a fancy charcuterie board on Amazon. I’m not recommending that you buy a charcuterie assortment online or in a restaurant. You can make something like this at home just as fancy for ⅕ the cost.

charcuterie ideas
Use a variety of flavors and textures to create the ideal charcuterie plate.

Don’t Be Afraid to Experiment with Your Charcuterie Ideas

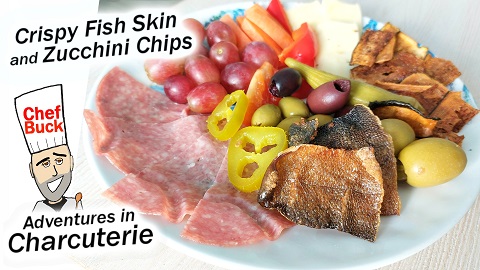
In the video, you can see two of our charcuterie experiments: one quicker (fried fish skins) and one that takes 2+ hours to slowly bake (zucchini chips). As we mention, we’ve been especially interested in non-gluten options.

FRIED FISH SKINS. We buy smoked trout when we want to have a fancy-pants breakfast. It often comes with a skin on one side. Since we enjoy crisping the skin on salmon or trout fillets, Chef Buck was inspired to try crisping just the skin from our smoked trout. As the video shows, it was messy but a big success. Also, it was a great addition to that night’s charcuterie plates.

ZUCCHINI CHIPS.  It wasn’t a typo. It took 2.5 hours to cook a single rack of zucchini chips, from two medium-sized zucchini. Perhaps we need to try dehydrating some? Anyway, although the cooking time is long, the video shows that the process is an easy one.  You just cut, oil and season the chips. Place them in a single layer in a pan and cook them in an oven preheated to 250.

Additional Tips for the Perfect Charcuterie Plate

Take your cheese out 20-30 minutes before you’re going to eat it. You’ve spent the money on some fancy cheese – let the flavors and creaminess come through.

Your charcuterie collection can be unrefrigerated for two hours. You were often spared the bother of cooking anything for your charcuterie plate, but it still needs some respect.

Individual charcuterie plates can make a romantic dinner for two. [Plus, individual plates may give you the opportunity to appear generous by ‘sharing’ some of your portion once you’re full, instead of realizing you’ve only eaten two bites from a single charcuterie plate, while your partner gobbled up everything else on the plate.]

You’ve done the hard work by picking your favorite charcuterie ideas. Now, spend a minute on presentation. Make your plate look inviting. Add some color – everything doesn’t have to be red and yellow.  It doesn’t have to be much extra effort. Instead of your meat and cheese being in a single stack – fan them out just a smidge. Distribute your colors around a bit. And if you want to ‘go all out’, the internet is full of charcuterie presentation pictures (and instructions) to provide inspiration.

Check out some of our other appetizer recipes!

Thanks for Watching our Videos!

Thanks for checking out our blog regarding charcuterie ideas. Sign up for our mailing list so you’ll never miss a new recipe. Also click a button below and share the dishes with your friends. You can also follow Chef Buck on Youtube. We appreciate all the kind comments and support, and we’ll see you next time in the kitchen!

If you like what CG and I do, support us on Patreon, or throw us a tip in our Paypal Tip Jar. We’ll happily enjoy a coffee on the road – Thanks! We appreciate all the support, and we’ll see you next time in the kitchen!

We include affiliate links for products on our website. Making a purchase after clicking on our links and we may earn a commission which helps us produce more videos and drink more coffee :^) We participate in the Amazon Services LLC Associates Program, which is an affiliate advertising program. It provides a means for us to earn fees by linking to Amazon.com and affiliated sites, so we can make more videos.

Share and Enjoy !

Dash Egg Cooker Review and 3 ways to make Eggs

dash egg cooker

We tried the Dash Egg Cooker, which is basically an egg steamer. The rapid egg cooker model we reviewed can “boil” 1-6 eggs at a time. In addition to cooking soft, medium, or hard-boiled eggs, you can also make an easy omelet, which was really more like an egg scramble. The best feature of the egg cooker was its use as an egg poacher, since it can poach two perfect eggs faster than you can boil a pot of water.

Trying Out the Egg Cooker for the 1st Time

The Dash Go Egg Cooker model I tried didn’t have an alarm, but the newer model Dash egg cookers do, and they are also rated pretty well over on Amazon. Check out the current prices for a Rapid Egg Cooker on Amazon.

dash egg cooker
Complete Egg Cooker includes 3 distinct trays for different egg styles

Why buy this egg cooker?

  • Good for a quick egg dish for 1 to 2 people.
  • Great for poaching 2 eggs pretty fast.
  • Sturdy build for a kitchen gadget, and not too expensive.
  • No muss, no fuss boiled eggs soft, medium, or hard.
  • Easy clean up.

Why you don’t need this egg cooker:

  • Not practical for preparing eggs for more than 2 people at a time.
  • The omelets are more like egg scrambles.
  • Other than poaching 2 eggs, it’s not particularly “rapid”.
  • How hard is it to cook eggs? If you currently have a stove, a pot, and a pan, then you can already cook eggs any way you want…so do you need a new gadget taking up space in the kitchen?
dash egg cooker
Well constructed and pretty cheap last time I looked on amazon.

Cleaning Up the Dash Egg Cooker

It’s a pretty hassle free clean up. The base of the Dash Egg Cooker is electric and not safe to put in a dishwasher or submerge under water. You might get some stains on the heating pad from egg residue, but just add a splash of vinegar and it wipes right off. The plastic omelet tray, poaching tray, boiled-egg holder, and steaming dome are all dishwasher and sink safe, so wash accordingly.

Dash Egg Cooker Conclusion

I’m not a kitchen gadget guy, because I’d rather have free counter and cabinet space, but overall I have to give the Dash egg cooker a thumbs up. It’s not TOO big, it’s not overly junky in its construction, and it does a good job cooking eggs. If you like gadgets, then this device is not a total rip-off. I can see where it would be useful to someone wanting a quick egg without a lot of hassle. Here’s our affiliate link if you want to check out the egg cooker on Amazon.

And for a kitchen gadget that is a definite MUST-HAVE, see how easy it is to make Perfect Coffee with a French Press.

pour over coffee

Thanks for all the support!

We include affiliate links for products. If you make a purchase after clicking on our links, we may earn a commission which helps us produce more videos and drink more coffee.
We are a participant in the Amazon Services LLC Associates Program, an affiliate advertising program designed to provide a means for us to earn fees by linking to Amazon.com and affiliated sites.

Share and Enjoy !

Cook a Sirloin Steak Like a Restaurant Pro

american kobe top sirloin steak

Cooking the perfect steak is easy. Sear the outside of the steak in a hot skillet to add color and flavor, and then simply finish the steak to desired doneness in a hot oven. This cooking preparation is especially ideal for thick cuts of steak.

How To Cook The Perfect Steak Filet

  • Choose a good cut of beef. The perfect steak is never the cheapest steak!
  • I’m using a Top Sirloin Steak for this video, but any good cut of steak will do (and remember, marbled steak makes a juicy steak!)
  • Let the steak come to room temperature before cooking.
  • Season the steak well, on both sides, with coarse salt and pepper.
  • Preheat your oven to 500 degrees Fahrenheit.
  • On the stove top, heat a little oil in a heavy-bottomed, oven safe skillet. You’ll want a nice skillet that’s great on the stove top and in the oven, here’s a deal if you want to check current prices for a cast iron skillet on Amazon.
  • Add steak to the hot skillet.  The beef should sizzle when it hits the pan.
  • Sear on medium high heat for approx 2 minutes.
  • Turn steak with tongs and sear other side for 1 minute.
  • Slide the skillet into the oven and continue cooking steak to the desired temperature.
  • Test the doneness of the steak by pressing on it with your fingers. Steak becomes firm as it cooks. A well done steak is very firm, and a rare steak very malleable. Poking or slicing the steak to check for temperature will result in loss of juices, so this should be avoided.
  • When steak is almost cooked to desired doneness, remove the steak from the oven and skillet and place on a plate to rest for 5 minutes. The internal temperature of the steak will continue to rise for a few moments after leaving the oven.
  • Allowing the steak to rest for 5 minutes before serving will preserve the juiciness of the cut.

sirloin steak
For a simple steak preparation, always choose a great cut of beef

Best Steak Cuts for a Great Dinner

A simply prepared steak can taste terrific, but it requires a good cut of meat.  The cheapest meat never makes the best steak.  Less expensive cuts of beef can be great as roasts, in stews, fajitas, or marinated, but spending a little more will make all the difference when cooking a nice steak dinner.

  • Ribeye Steak – This is a well-marbled and tender cut of steak, and also my favorite.
  • New York Strip or Strip Steak – marbled and tender, but comes in 2nd behind the ribeye in my book.
  • T-Bone – This cut is a T-shaped bone with a strip steak on one side of the bone and a partial cut of the beef tenderloin, or filet mignon, on the other side of the bone. It’s a big steak, not as big as the porterhouse, but still more than I want to pay for.
  • Porterhouse – this steak is really two steaks, it includes the strip steak and the entire filet mignon hugging a T-shaped bone between them. It looks great and tastes great, but it’s pretty pricey, and since it includes even more of the tenderloin than the T-bone steak, it isn’t a cut of steak I buy unless it’s a crazy deal.
  • Top Sirloin Steak – sirloin steak can be divided into “top” and “bottom” cuts. TOP SIRLOIN steak like I cooked in the video above makes a nice steak, but anything less than top sirloin can be a little tough for a simple steak preparation.
  • Filet Mignon or Tenderloin – I almost hate to include this cut, since it’s the priciest steak by cost per pound, and also the steak I’m least likely to buy, but lots of people love it. It’s lean and tender, but too lean for my taste. In my book Fat = Flavor.

sirloin steak
Test the temperature of a steak with your finger. Steak becomes more firm as it cooks.

How To Test When A Steak Is Done

A steak is done when it’s done to your liking.
I like my steak cooked medium rare.
To test the doneness of a steak, simply press down on the beef with your fingers. The more give there is in the steak, the less cooked it is.
As a steak cooks it becomes firmer, so as the meat becomes more done, it becomes less pliable. This is something that is easy to figure out as you cook more steaks and test them for doneness in this manner.
It is the best way to check for doneness; avoid cutting the steak open or puncturing it to test for temperature. Slicing or poking the steak before it rests will result in a loss of juices, which is really another way of saying a loss of flavor, which defeats the entire point of buying a nice cut of steak

Try This Top Sirloin Steak preparation

american kobe top sirloin steak
Cook a thick steak filet on high heat. Sear the outside for awesome taste and color, and then finish to desired doneness in the oven.

Give this top sirloin steak a try, or any kind of steak you like, just keep it simple and buy a nice cut of beef.

If you liked the video and recipe info, click some of the buttons below to share this post with friends and family. And for another tasty dish, try this Fantastic Stove Top Pot Roast Recipe.

pot roast recipe
Throw your chuck roast in a pot on the stove and it practically cooks itself.

Thanks for checking out the recipes. Be sure and sign up for our mailing list so you’ll never miss a Chef Buck cooking video, and click a button below and share the dishes with your friends. We appreciate all the kind comments and support, and we’ll see you next time in the kitchen!
–Chef Buck

Share and Enjoy !


Popcorn : How To Cook Popcorn On The Stove Top

how to cook popcorn on the stove

90% of all U.S. households have a microwave oven, but we don’t, so when we make popcorn, it’s on the stove top. Generally we buy the store brand, it’s considerably cheaper than name brand popcorn, and we find it offers the same result.
We cook popcorn in coconut oil. Coconut oil has a high heat point and retains it’s nutritional value when heated.
We like to add flavorings, too. My favorite is grated Parmesan cheese. Of course we always add butter and salt, but I’ve found that fresh ground black pepper is a great addition as well.

How to Cook Popcorn on the Stove top:

1) On Medium Heat, add 2 Tbsp of coconut oil in a heavy bottomed pot.

2) Add a couple of test corn kernels into the pot.

3) When the oil heats through, and the test kernels have popped, add ½ cup of popcorn kernels.

4) Shake the pan to distribute the kernels along the bottom of the pan. They should form a single layer.

5) Cover the pot with a lid, but don’t cover tightly, leave the lid slightly ajar to allow steam to escape; this will keep the popcorn from tasting stale.

6) Allow the kernels to pop until the popping sound almost completely subsides.

7) Once popped, removed pot from burner and pour popcorn into a bowl.

8) While hot, add melted butter and salt and whatever seasonings you desire.

and that’s it!

Below is a video we made experimenting with bacon, but I think I prefer basic popcorn, although the fresh ground black pepper tasted awesome.

Fun Facts:

–Two tablespoons of unpopped corn kernels produce a quart of popcorn for about 25 cents.
–In movie theaters, for every dollar spent on popcorn, about 90 cents is profit.
–A cup of plain popcorn contains about 31 calories.
–Americans eat more popcorn than any other country.
–About 70% of popcorn sold in America is eaten in the home.
–By volume, popcorn is America’s most popular snack food.

For another tasty snack idea, check out these Cashew Coconut Lemon Bites

energy snack
power snack in a yummy treat!

Share and Enjoy !


Onions – Which Type of Onion Should You Use?

types of onions

Different onions have different uses. What is the difference between types of onion? Bulb onions, like red, white, sweet, and yellow onions are similar, but have their own individual traits. All onions can be eaten raw, or cooked, but some are better suited for specific culinary uses.

Yellow Onions:

Strongest flavor
Great for soups, stews, roasting, and sauces
Best for long cooking times.
Most popular onion (more than 80% of onions grown are yellow onions…so often economically the best buy)
High in sulphur and sugar content, so best for caramelizing
Also called brown onion

Sweet Onions:

Strong flavor
Great for roasting dishes, frying (onion rings!)
Are generally named for the region they are grown.
Examples include the Vidalia, the Walla Walla, and Bermuda onion.
They are high in sugar, but contain less sulphur than yellow onion.
Good for caramelizing and cooking.
They have a high water content and a relatively shorter shelf-life.
To extend the onion, wrap in a paper towel and store in the refrigerator

Red Onion:

Milder flavor
Best onion for raw applications
Excellent for slicing thin and adding to salads or sandwiches
Great for pickling
Best for Grilling
Lower sugar and sulphur makes them poor for caramelizing

White Onion:

Strong flavor
Great for cooking, and raw uses
Thinner onion layers, crisp
Favored onion for salsas, chutneys, guacamole, and most Latin recipes
Best pizza topping

types of onions
What is the difference in white, yellow, red, and sweet onions?

When buying, choose an onion that is firm, and heavy for its size. Avoid ones that are bruised or showing signs of mold. Store in a well ventilated, dry, cool area. Do not store onions with potatoes–this will reduce their shelf-life. Sweet onion is highest in water content and will spoil more quickly than dryer onions; to extend life, wrap a sweet onion in a paper towel and store in the fridge. Price onion storage ideas on amazon.

Cut onions when you are ready to use them. Onion flavor intensifies quickly after being cut, and once cut, can become overly strong over a short period (old onions!–blech!)

Nutritionally, onions are awesome. They provide vitamin C and valuable nutrients, are high in fiber, lower the risk of some cancers, promote heart health, and act as an anti-inflammatory. The greatest concentration of nutrition is in the outer layer of the onion, so peel away as little of the onion as possible when using–why waste it?

If you’re new to home cooking, just get a bunch of spices, pots and pans, and start experimenting with different ingredients and recipes. It’s a healthy hobby that can save a lot of money in the long run. You can check out current prices for Complete Kitchenware Sets on Amazon or just go to a thrift store! I’ve found some of my favorite kitchen gear at second-hand stores.

Here’s one of my favorite ways to use onion: Check out this Pork Loin Chop with Onions Recipe.

pork loin chop

Thanks For Watching Our Recipe Videos!

Thanks for checking out our beet green recipes, and all of our recipes. Be sure and sign up for our mailing list so you’ll never miss a new recipe. Also click a button below and share the dishes with your friends. You can also follow Chef Buck on Youtube. We appreciate all the kind comments and support, and we’ll see you next time in the kitchen!

If you like what CG and I do, you can also support us on Patreon, or throw us a tip in our Paypal Tip Jar. We’ll happily enjoy a coffee on the road – Thanks! We appreciate all the support, and we’ll see you next time in the kitchen!

We include affiliate links for products on our website. So, if you make a purchase after clicking on our links, we may earn a commission which helps us produce more videos and drink more coffee :^) We participate in the Amazon Services LLC Associates Program, which is an affiliate advertising program. It provides a means for us to earn fees by linking to Amazon.com and affiliated sites, so we can make more videos.

Share and Enjoy !

Whipped Cream -how to make dessert topping

whipped cream

Give up the cool whip, ’cause whipped cream is super easy to make at home. If you’ve got heavy whipping cream and a little powdered sugar, you can whip up your own topping –and if you’ve got some leftover biscuits, then you’re just one step away from a fantastic dessert –that one step being fresh fruit– ideally strawberries; Biscuits topped with strawberries and homemade whipped cream make a helluva tasty treat!

Homemade Whipped Cream Recipe Ingredients:

1 cup HEAVY WHIPPING CREAM
½ to 1 tsp VANILLA EXTRACT (to taste, really…it’s semi-optional, but do it)
1 Tbsp POWDERED SUGAR

whipped cream
Heavy Whipping Cream

Homemade whipped Cream is best made in a chilled, metal bowl–and if you’re using a hand mixer–chill the mixing paddles as well! –for scientific reasons involving temperature transference and passive ambient cooling, chilling these tools will assist in the “whippification”.
Into the chilled bowl, add cream.
Using a smoothie or hand mixer–or even a hand whisk!–whip the cream until it begins to thicken (but before it begins to peak). Once the cream begins to thicken, add in the powdered sugar and the vanilla.
Continue whipping until the cream thickens and forms “peaks”, i.e., turns into whipped cream.
At this point, it’s ready to use (if you refrigerate the topping, the cream will eventually break down and have to be re-whipped).

whipped cream
Strawberry Shortcake knock-off using leftover biscuits

Strawberry Biscuit Dessert Directions:

We like to pair this whipped topping with leftover biscuits to create a faux strawberry shortcake:
Take 1lb. of fresh strawberries and slice them into a bowl, add 1 to 2 Tbsp Sugar and mix. Refrigerate for 2-3 hours or overnight.
Slice biscuits in half and toast under a broiler.
Spoon the chilled strawberries over the toasted biscuits and top with homemade whipped topping.
Boom. It’s perfecto.

Give this homemade whipped Cream and strawberry biscuit dessert recipe a go and let me know what you think, and bon appétit!

And for a quick biscuit tutorial, check out the Buttermilk Biscuit Recipe.

Buttermilk Biscuit Recipe
Easy Buttermilk Biscuit Recipe

Share and Enjoy !


Maki Sushi – Step-by-Step How to Make Sushi

sushi

Maki sushi is my favorite sushi (makizushi), or sushi wrapped in dried seaweed (nori). Check out the video for step-by-step instructions on how to make sushi quick and easy.

Maki sushi is one of the healthiest and most entertaining foods you can put on the table…and pretty easy to prepare. You will need a SUSHI ROLLER to easily make this recipe. They are available at many supermarkets, most health food stores and every Asian market. You can get one for around $2 to $4.

Maki Sushi Ingredients:
6 to 7 NORI (dried seaweed sheets)
2 cups RICE (do not use long grain rice! Japanese sushi rice can be used, but I prefer short-grain brown rice.)
1/2 cup VINEGAR (apple cider or rice)
SALT (to taste, I use very little)
Assortment of SLICED VEGETABLES, FISH, etc
Feel free to experiment with your choices. I generally use a mix of the following: AVOCADO, CUCUMBER, CARROT, GREEN ONIONS, RED PEPPERS, SALMON (I buy 3oz pre-packaged smoked salmon for convenience, since I use so little). I’ve also used SHRIMP, CRAB, CREAM CHEESE and ASPARAGUS (lightly steamed). Mix and match and find combos you enjoy. I find that I almost always use avocado.
Desired condiments e.g. SOY SAUCE, WASABI, PICKED GINGER SLICES
Optional: I like to sprinkle TOASTED SESAME SEEDS over my finished sushi—it adds a great taste and looks nice, too.

Prepare rice according to directions. Remove from stove and add vinegar. Gently mix and set aside to cool. Slice desired ingredients for filling. For a full dinner for two, I generally use 6-7 nori. Place nori shiny side down on your sushi roller. When rice is cool, spread desired amount over nori. I like heaps of rice in my maki sushi, approx. ¾ to1 cup. Spread so that the rice covers the nori leaving ¼ inch on the two sides and on the end closest to you. Leave 1 inch open on the far end of the seaweed sheet. Pull the nori flush with the back end of the roller. Lay the sliced fillings across the rice and, holding the ingredients in check with your fingers, use the roller to roll the seaweed over the ingredients and then press gently along the top and sides. The seaweed should form a nice wrap around the ingredients. Pull the seaweed roll to the back of the roller and roll forward once more until the nori is shaped entirely around the fillings. Use a sharp knife to slice into sushi, and wipe the knife frequently for a cleaner cut. I usually get 6-7 pieces per roll.
After I plate my sushi, I sprinkle lightly with toasted sesame seeds (optional) and serve with wasabi, soy sauce, plum sauce, and pickled ginger slices.
It’s an amazingly easy dish to prepare and a great way to impress a date or get yourself out of the doghouse (if you’re at that stage in your relationship). It kicks ass at parties and your friends will think you are more hip than you probably are –but only if you USE CHOPSTICKS!!!

For a great maki sushi recipe side, try a Calamari Salad Recipe.
calamari salad squid

Share and Enjoy !


Follow Me!