No-Bake Holiday Fruit Cake Recipe

fruit cake recipe

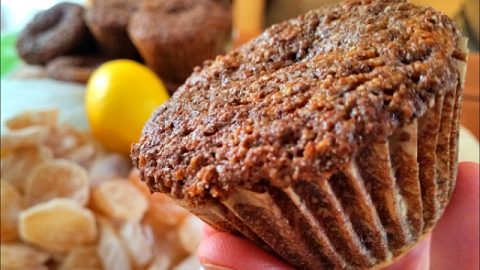
Try this easy, almost no-cooking fruit cake recipe for people who hate fruit cake.  Just tell the fruit cake haters it’s graham cracker chews.  They will taste it and fall in love. The holiday season is upon us and this is a great dish to take to parties, pot lucks, and family gatherings. This dessert recipe can be made quickly, is extremely adjustable and freezes well. Follow the recipe exactly, or use whatever nuts and dried fruit you prefer.

What You Need For A Refrigerator Fruit Cake Recipe

14 oz box of GRAHAM CRACKERS, smashed  [alternative:  VANILLA WAFERS]
10 oz bag MARSHMALLOWS
½ cup MILK
3 cups of NUTS, chopped*
4 cups of dried FRUIT, chopped*
2 Tbsp CINNAMON (optional)

*[What we used for this recipe:  2 cups walnuts, raw and 1 cup pecans, toasted; 6 oz unsweetened coconut, 5 oz dried pineapple (NOT candied like used in traditional fruit cake), 5 oz reduced sugar craisins, white raisins.  The coconut adds some moisture without adding a strong coconut flavor.]

How To Make This Fruit Cake Recipe

If you want to try an old-school store bought fruit cake, you can check out current prices for Claxton Fruit Cake on Amazon.

fruit cake recipe
  • In a large bowl, crush an entire box of graham crackers (or vanilla wafers). You can do this by hand or use a food processor, but crush crackers as small as possible.
  • Add in the dried fruit and nuts. There are no wrong fruits and nuts, whatever YOU LIKE will work.   Candied ginger? Dried cherries? Follow my ingredients exactly or use your own, it’s an extremely adjustable recipe, which is one of the reasons the recipe is so great!
  • Add in the cinnamon, and toss all the ingredients together well. Maybe a little cardamon, too? Added sugar? I think adding more sugar is crazy, but it’s an option. Brown sugar? Maybe.
  • On the stove top, heat a pot on low heat and add in the milk and marshmallows.
  • Stir milk and marshmallows together for about two minutes until they melt into a gooey liquid-like state. Stick to low heat, because using higher heat and getting in a hurry is just an invitation to disaster. it’ll only take a couple of minutes on low heat.
  • Once the marshmallows are melted, as quickly as possible–while the warm marshmallow mixture is at it’s “gooeyest”–pour the melted marshmallow in with the dry ingredients and mix everything together very well.
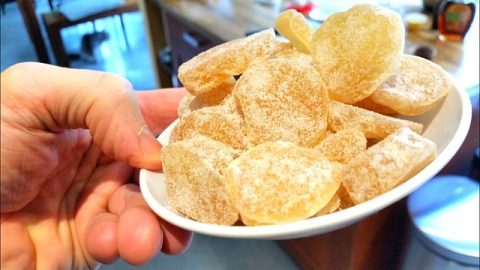
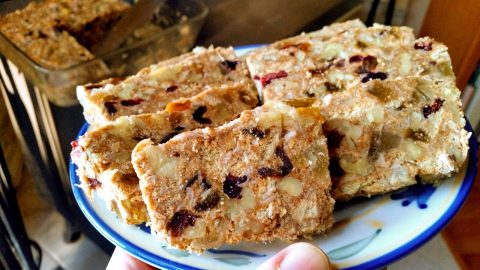
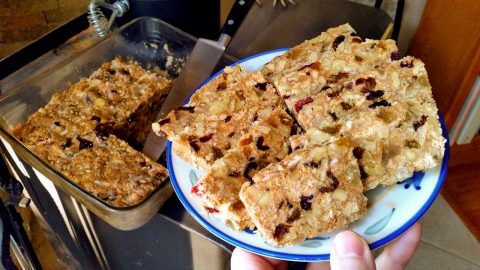
  • Then add the mixed ingredients into an ungreased dish and compress the mixture down into a dense loaf. You can do this with a spoon or spatula, or wax paper works very well, too. Use whatever size dish you like. The size of the dish will determine the shape of the cake. I generally use a flat dish, like an 8″ X 10″, then I cut the fruitcake pieces into nice cubes. My mother-in-law likes to use a loaf pan, and then cut the cake pieces into larger slices.
  • Put the dish in the refrigerator for at least a couple of hours, and then it’ll be ready to slice and serve.

This cake recipe is so simple to make, and it stores and travels very well, which makes it perfect for parties and gatherings and gifts. Fruit cake is the perfect gift for someone you like, but don’t really love, so definitely give this refrigerator fruit cake a try.

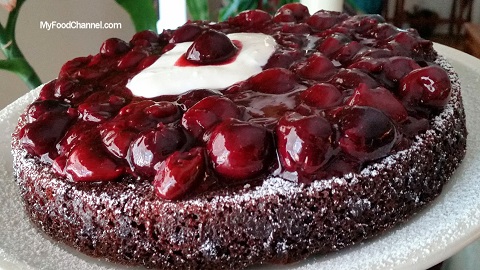
If you want a fancier cake that’s crazy delicious and still pretty easy to make, try this Chocolate Cherry Cake Recipe.

chocolate cherry cake

Thanks for Watching our Videos!

Thanks for checking outour fruit cake recipe, and all of our recipes. Sign up for our mailing list so you’ll never miss a new recipe. Also click a button below and share the dishes with your friends. You can also follow Chef Buck on Youtube. We appreciate all the kind comments and support, and we’ll see you next time in the kitchen!

If you like what CG and I do, support us on Patreon, or throw us a tip in our Paypal Tip Jar. We’ll happily enjoy a coffee on the road – Thanks! We appreciate all the support, and we’ll see you next time in the kitchen!

We include affiliate links for products on our website. Making a purchase after clicking on our links and we may earn a commission which helps us produce more videos and drink more coffee :^) We participate in the Amazon Services LLC Associates Program, which is an affiliate advertising program. It provides a means for us to earn fees by linking to Amazon.com and affiliated sites, so we can make more videos.

Share and Enjoy !

Share and Enjoy !

Pupusa Recipe for a Sweet Easy Dessert

pupusa recipe

Try this sweet twist on a pupusa recipe that turns gluten-free corn flour into a quick dessert treat. Pupusas are a traditional Latin American dish of corn tortilla filled with cheese, beans, peppers and meat, but you can use any combo of ingredients you like to cook pupusas, including sweet ingredients to make a variety of delicious dessert pupusas.

What you need for Dessert Pupusas

CORN FLOUR and warm water to create the dough
CINNAMON
BROWN SUGAR and/or POWDERED SUGAR
PEANUT BUTTER crunchy or creamy
CHOCOLATE CHIPS plus whatever other sweet filling you like!
OIL for cooking

for the creamy topping:
plain GREEK YOGURT
MAPLE SYRUP

and top the dessert pupusa with a sprinkling of
POWDERED SUGAR and
FRESH FRUIT

pupusa recipe

How to make a Dessert Pupusa Recipe

This pupusa dessert is super easy and almost foolproof. I’m not going to use ingredient amounts, because it’s really all to taste. Check here for current Corn Flour pricing on Amazon.

  • In a bowl, combine corn flour, sugar, and cinnamon. For measurements, it will be hard to make a bad ratio, just follow your heart. If you must have something to work with, try 1 cup of flour with 2 Tbsp of sugar and 1 Tbsp of cinnamon, but really, you can use twice as much sugar and cinnamon and it will still taste great. It’s dessert! Nobody wants to do math! The dough is easy to make, and the pupusas can be any size you like.
  • To make the corn dough you simply combine the corn flour mixture with warm water and mix by hand until you achieve a doughy consistency. If the dough is too dry, add more water, and if it’s too wet, add more flour.
  • Mix in a large ball and then divide into smaller golf ball sizes.
  • Flatten each ball into a flat disc shape and spread lightly with peanut butter.
  • Add chocolate chips, or any flavor chips, or meltable candies. Marshmallows? Sure! Although I find it to chewy with marshmallow, but you might love it!
  • Close the flat flour disc around the peanut butter and fillings and shape into a ball again.
  • Now flatten the ball, but with the fillings now inside. If some of the filling peeks through, it’s no big deal. A little leakage is fine.
  • Heat a skillet and about 1 Tbsp of coconut oil on medium low heat.
  • When the oil is heated, add each pupusa to the skillet and cook 1-2 minutes on each side. The longer they cook the crunchier the pupusa will get, because it’s corn flour just the same as used to make tortillas. Cook lightly to make a soft cookie consistency, or cook longer for a crunch.
  • After cooking, set pupusas aside on a paper towel.
  • For the creamy topping, I simply combine a rich Greek yogurt with Maple syrup, and sometimes I even use maple syrup to make the pupusa dough instead of sugar. Mix the yogurt and syrup well, and that’s it. Or simply use whipped cream!
  • To serve, place a dollop of cream on each pupusa. If desired, top with sliced fruit and a sprinkling of powdered sugar. This will make the desert look extra fancy pants with very little effort.

Give this sweet dessert pupusas recipe a try and let me know what you think, and bon appétit! And for a savory version, check out this Traditional Pupusa Recipe.

pupusas recipe
A pupusas recipe can be cooked quickly on a lightly greased skillet or griddle.

Thanks for checking out the pupusa recipe. Be sure and sign up for our mailing list so you’ll never miss a Chef Buck cooking video, and click a button below and share the dishes with your friends. We appreciate all the kind comments and support, and we’ll see you next time in the kitchen!
–Chef Buck

Share and Enjoy !


Lemon Meringue Pie Recipe … Best Pie Ever

lemon meringue pie

If you love fresh-baked homemade pie, you’ll want to try Mama Redbuck’s best lemon meringue pie recipe. The meringue recipe for this lemon pie is truly impressive and piles high and holds its shape and makes a great topping for any kind of pie you bake. My mom uses this perfect meringue recipe for chocolate cream pie as well, and I love it. This lemon pie is full of fresh lemon goodness, so give this dessert recipe a try, and you’ll be glad you did.

Lemon Meringue Pie Recipe

pie filling ingredients:
9″ DEEP DISH PIE CRUST
1 cup SUGAR
½ cup CORN STARCH …check cornstarch price on Amazon
¼ tsp SALT
2¼ cup WATER
1 Tbsp LEMON ZEST …current prices online for Kitchen Zesters
4 EGG YOLKS
3 Tbsp BUTTER
½ cup LEMON JUICE

meringue ingredients:
2 Tbsp SUGAR
1 Tbsp CORNSTARCH
½ cup WATER
4 EGG WHITES
1 tsp VANILLA
pinch of SALT
then another 4 Tbsp SUGAR

lemon meringue pie
Try Mama Redbuck’s best lemon meringue pie recipe ever!

How To Make Lemon Meringue Pie

Make your own pie crust from scratch, or to make the recipe super easy, just bake up a pre-made frozen pie crust.
Firstly, bake the crust and have it cooled and ready before beginning to make the pie filling.
Then break 4 eggs and separate the yolks from the whites in two separate bowls.
Zest two lemons, and then squeeze the juice to fill ½ cup.

To Make The Lemon Pie Filling:

In a saucepan, add the sugar, cornstarch, salt, and zest of two large lemons.
On medium heat, stir water into the saucepan and continue stirring the pan 15-20 minutes, or until the mixture thickens and begins to bubble.
Slowly spoon 5-6 Tbsp of the heated, thickened mixture in with the eggs yolks, stirring constantly so as not to cook the eggs.
Then stir the egg yolk mixture into the saucepan with the rest of the heated filling.
Stir in the lemon juice and butter and continue stirring until the butter is melted and the mixture is smooth.
Pour the filling into the pre-baked pie shell and set aside to cool.

To Make The Meringue:

In a small saucepan add 1 Tbsp of cornstarch, 2 Tbsp sugar, and ½ cup water.
Mix the three ingredients well and on the stovetop heat over medium heat, stirring until the mixture thickens and clears slightly.
Set saucepan aside to cool.
In a mixing bowl, beat the egg whites until frothy.  My mom uses a plain old hand held electric mixer.  You can check here for current hand mixer prices on Amazon if you need one for your kitchen.
Add in vanilla and a pinch of salt and beat again to mix.
Gradually beat in 4 Tbsp of sugar, 1 Tbsp at a time.
Then beat in the cooled cornstarch mixture.
Continue beating until stiff peaks form.

To Finish The Pie:

Take a spatula and spread the meringue evenly over the pie filling.
Lightly chop the top of the meringue to form peaks on top of the pie.
Slide the pie into an oven preheated to 400 degrees Fahrenheit and bake meringue for 10-12 minutes,
or until the top of the top of the meringue sets and shows a nice color.
Remove the pie from the oven and allow to cool completely before slicing.
When cooled, store pie in the refrigerator beneath a pie dome, do not wrap meringue in plastic wrap or foil.

lemon meringue pie
This meringue pie topping is tasty on all kinds of pies.

And that’s it! Give Mama Redbuck’s Lemon Meringue Pie Recipe a try and let us know what you think.

Or try Mama Redbuck’s step-by-step CHOCOLATE PIE RECIPE.

chocolate pie recipe


And for another simple dessert recipe idea, try this easy Chocolate Cake Recipe.

lemon meringue pie
Try this easy chocolate cake recipe…made with beans…wha!!!?

We appreciate you watching  our videos!

I hope you enjoy this lemon meringue pies recipe. Sign up for our mailing list so you’ll never miss a new recipe. Also click a button below and share the dishes with your friends. You can also follow Chef Buck on Youtube. We appreciate all the kind comments and support, and we’ll see you next time in the kitchen!

If you like what CG and I do, support us on Patreon, or throw us a tip in our Paypal Tip Jar. We’ll happily enjoy a coffee on the road – Thanks! We appreciate all the support, and we’ll see you next time in the kitchen!

We include affiliate links for products on our website. Making a purchase after clicking on our links and we may earn a commission which helps us produce more videos and drink more coffee :^) We participate in the Amazon Services LLC Associates Program, which is an affiliate advertising program. It provides a means for us to earn fees by linking to Amazon.com and affiliated sites, so we can make more videos.

Share and Enjoy !

Muffin Recipe with a Ginger Twist You’ll love

muffin recipe

Combine ginger, lemon, and cardamom to create an easy ginger muffin recipe that will blow your mind. Candied ginger is tasty all by itself, but baking it in a muffin is even better, and you’ll find it’s a perfect pairing with a nice cup of coffee or hot tea. Bake these muffins at home and feel like you’re lounging in your favorite coffee cafe, but without all those annoying hipsters. This muffin is chock full with the entire zest from 1 large lemon, which is a great accent to the ginger, and the ground cardamom adds a touch of the exotic that will transform these muffins a real bakery treat, so get out a muffin pan and get to work!

Ingredients for Ginger Muffin Recipe

(this recipe makes about 8 muffins)
Dry Ingredients:
2 cups ALMOND FLOUR
1 tbsp CINNAMON
1 Tbsp CARDAMOM
1 tsp BAKING SODA
¼ tsp SALT
‘Wet’ Ingredients:
3 regular EGGS
2 tsp VANILLA
1/3 cup MAPLE SYRUP
113g (3-4 oz) unsweetened APPLESAUCE
2 Tbsp refined melted COCONUT OIL

1 cup chopped CANDIED GINGER
zest of 1 large LEMON

Crumble Topping:
(this recipe makes enough for 2-3 batches of muffins)
5 Tbsp ALMOND FLOUR
3 Tbsp COCONUT SUGAR
1½ tsp CINNAMON
pinch of SALT
2 Tbsp refined COCONUT OIL (at temperature so oil is a solid consistency, cut into the other
ingredients like butter)
*Refined coconut oil does NOT have a coconut flavor; virgin coconut oil HAS a distinct coconut flavor

muffin recipe
Candied ginger is a terrific muffin ingredient; adds great texture, flavor, and zing.

How to make this Muffin Recipe

  • Prepare baking tins and have cooling rack ready.
  • Preheat oven to 375.
  • If using the crumble topping, make that first. The coconut oil should be in a solid state. Add coconut sugar, cinnamon, and salt into a small, sealable container and mix. Cut in the coconut oil like butter, and mix. This recipe will make enough crumble topping for 3-4 batches of muffins. Set crumble mix in the fridge until ready to use.
  • In a bowl, mix the other dry ingredients together and set aside.
  • Using another bowl for the wet ingredients, whisk the eggs together. Mix the vanilla, maple syrup, applesauce, and melted coconut oil in with the eggs.
  • Add the bowl of dry ingredients into the wet, mixing just until all ingredients are wet, no need to over mix.
  • Stir in the candied ginger and lemon zest and mix gently.
  • Divide the batter equally between muffin cups.
  • Top each muffin batter cup with some crumble topping, as much as you like.
  • Bake in preheated oven at 375 degrees for 10 minutes. Turn muffins around; bake for about another 10 minutes.
  • Test for doneness with a toothpick or knife. The muffins are ready to come out if have no batter on the toothpick. If not done, then test after 4 minute intervals of additional cooking, because there’s no reason to get this far and then burn your muffins!
  • Cool on rack for at least 5 minutes.

And that’s it!
Give this awesome gluten free candied ginger muffin recipe a try and let us know what you think.

muffin recipe
Add the zest of a lemon and ground cardamom to transform these muffins into a real treat.

More Great Gluten Free Options

For another muffin recipe, try this Gluten Free Cinnamon Apple Muffin. And for a crazy gluten free dessert option, check out this fantastic Chocolate Cake Recipe made from beans. what!? I know, it sounds crazy, but this cake made from garbanzo beans is super moist and one of my favorite desserts to bake, so take a chance and give it a try, I think you’ll be very happy with the results.

chocolate cake recipe
A flourless, gluten-free chocolate cake

Thanks for checking our recipe videos out, and if you like what you see, click a button or two below and share this muffin recipe with your friends and family. I appreciate it!
–Chef Buck

Share and Enjoy !


Gluten Free Muffins with Apple Cinnamon

gluten free muffins

Check out these moist and delicious gluten free muffins made with almond flour. CG has been baking muffins up the wazzoo lately, and apple-cinnamon almond flour muffins are some of my favorites, so give them a try. Don’t be put off by terms like gluten free and grain free, just focus on delicious. Also feel free to experiment with recipe substitutions as well, like maple syrup instead of coconut sugar, or ginger instead of apples, or using banana instead of apple sauce.  Muffins are great treats, and while gluten free options are generally underwhelming, this muffin recipe is a winner.

Ingredients for Gluten Free Muffins

Crumble Topping:
(this recipe makes enough for 2-3 batches of muffins)
5 Tbsp ALMOND FLOUR
3 Tbsp COCONUT SUGAR
1½ tsp CINNAMON
pinch of SALT
2 Tbsp refined COCONUT OIL

Dry Ingredients:
2 cups ALMOND FLOUR
1 heaping Tbsp CINNAMON
1 tsp BAKING SODA
¼ tsp SALT

‘Wet’ Ingredients:
3 regular EGGS
2 tsp VANILLA
4 Tbsp COCONUT SUGAR or use 1/3 cup maple syrup
113g (3-4 oz) unsweetened APPLESAUCE
2 Tbsp refined melted COCONUT OIL

1 medium APPLE, diced

(this recipe makes 6-8 muffins)

*Refined coconut oil does NOT have a coconut flavor; virgin coconut oil HAS a distinct coconut flavor

gluten free muffins
Gluten free apple-cinnamon muffins that are delicious? Oh, yeah.

How to Make Gluten Free Muffins with Apple Cinnamon

  • Prepare baking tins and have cooling rack ready.
  • Preheat oven to 375.
  • Combine crumble topping ingredients together. Coconut oil should be in a solid state in order to cut into the mixture like butter, then store the crumble in fridge while mixing together the rest of the batter.
  • Mix the dry ingredients together and set aside.
  • In a bowl, whisk eggs together. Add vanilla, coconut sugar, applesauce, and melted coconut oil, and mix well.
  • Then add dry ingredients to wet, combining just until all ingredients are wet, no need to over mix. Add apples and mix gently.
  • Divide batter equally between 6-8 muffin cups.
  • Top each muffin batter cup with crumble topping, as much as you like.
  • Bake in preheated oven at 375 degrees for 10 minutes. Turn muffins around; bake for another 10 minutes.
  • Test muffins with a toothpick or knife blade. The muffins are ready if no batter sticks on the toothpick or knife. If muffins need more cooking time, return to the oven and then test every 4 minutes, because there’s no reason to get this far and then burn your muffins!
  • When finished baking, cool muffins on rack for about 5 minutes, this will keep them from sticking to the muffin cup papers.

Muffin Time!

Now all you need is a hot cup of coffee or a cold glass of milk and you’ll be on your way to a perfect day! Give this gluten free muffins recipe a try and then let us know what you think. And for another dessert recipe, give this Gluten Free Chocolate Cake Recipe made from beans. wha!?

chocolate cake recipe
A flourless, gluten-free chocolate cake

Thanks for watching our recipe videos and then trying some out. If you like what you see, click a button or two below and share this gluten free muffins recipe with friends and family. I appreciate it!
–Chef Buck

Share and Enjoy !

Apple Crisp Recipe with Oats and Ginger

apple crisp

If you like homemade apple pie, then you’ll love this easy apple crisp recipe. And if you’re a fan of fresh ginger, adding minced ginger to the apple crisp will make it even better. This is a terrific dessert recipe that makes a whole heap of sweet apple goodness. The recipe makes plenty of servings to feed the family, and this dessert travels well, so it’s a perfect party treat to bring to a family gathering or function. Definitely top with ice cream or a rich creamy topping for best results.

What You Need to Make an Apple Crisp

apple part of recipe:
¼ cup BUTTER melted, browned
½ cup SUGAR
1 large EGG
1 tsp VANILLA
4-5 APPLES chopped
1 tsp CINNAMON
1-2 Tbsp minced GINGER

crisp part of recipe:
1¼ cups all-purpose FLOUR
3 cups QUICK OATS
1½ BROWN SUGAR
1 cup BUTTER
2 tsp CINNAMON
1 cup toasted PECANS
1 tsp minced GINGER

apple crisp
This apple crisp is like an apple pie, but heavier…which is better, right?

How to Make an Apple Crisp Recipe

  • In a sauce pan, melt ¼ cup BUTTER and simmer over med-low heat until butter begins to color, then set aside to cool.
  • In a large bowl, beat 1 EGG and ½ cup SUGAR together until smooth.
  • Add in VANILLA, cooled BUTTER and chopped APPLES. Mix well and set bowl aside.
  • In another bowl, combine FLOUR, 2 cups of the OATS (reserve 1 cup oats for later), CINNAMON, GINGER, BROWN SUGAR, and mix well.
  • Add in 1 cup unsoftened BUTTER and cut into the mixture until about pea-sized.
  • Add reserved OATS and toasted PECANS and mix.
  • Spread half the crisp mixture out in an ungreased 9 X 13 baking dish. Spread the apple mixture evenly over the bottom crisp layer. Then spread the remainder of the crisp mixture over the apple layer; this will create three layers in the dish: crisp/apple/crisp. If desired, dress the top of the crisp with a few apple slices for decoration.
  • Place into an oven preheated to 350 degrees Fahrenheit and bake for 45-50 minutes, until the top of the apple crisp is toasty.
  • Serve with ice cream or creamy whipped topping.

If you need a decent oven-safe baking dish, check out some current pricing for a Pyrex dish on Amazon.

And that’s it! Give this Apple Crisp Recipe a try and let us know what you think. And for another knock-out recipe idea, check out my mama’s Lemon Meringue Pie Recipe.

lemon meringue pie
This meringue pie topping is tasty on all kinds of pies.

Thanks for checking our recipe videos out. If you like what you see, click a button or two below and share the apple crisp recipe with your friends and family. I appreciate it!
–Chef Buck

Share and Enjoy !


Creme Fraiche – Great Homemade Sour Cream

creme fraiche recipe

This Crème Fraîche recipe is like a homemade sour cream but less tangy, and it’s easy to make, just heavy cream mixed with live cultures. Crème Fraîche is easy to make and can be 3-4 times cheaper than store-bought crème fraîche. It’s is a thickened cream, similar in consistency to sour cream, but without the sharp tanginess. 

Homemade Crème Fraîche Recipe

All you need to make crème fraîche is
HEAVY CREAM also called Heavy Whipping Cream
YOGURT or BUTTERMILK with live cultures A crème fraîche made with buttermilk has more tang.

A Crème Fraîche recipe practically makes itself. All you have to do is introduce the two parties, put them together in a warm environment around 70F, and then let them hang out for 12-24 hours. How long it takes for the cream to thicken will mostly depend on the room temperature; if it’s a bit warmer or cooler in the room, it might take a bit shorter or longer time to make crème fraîche.

I generally make 16oz of crème fraîche at a time. This is a convenient size for heavy whipping cream. Heavy whipping cream and heavy cream are similarly used names for the exact same product, so whichever label you buy will work fine. Heavy cream is cream with a milkfat content greater than 35%, by contrast, half and half is ½ milk and ½ cream, with a milkfat content around 12%. This higher fat content allows crème fraîche be added to simmering dishes without curdling, adding creaminess to soups and sauces, eggs, etc..

In a jar, combine 16oz of heavy cream with 2 Tbsp of cultured buttermilk or yogurt. It is essential that the yogurt or buttermilk contain live cultures, since this is the agent that will allow the heavy cream to thicken.

Need a jar? Check current prices for Mason Jars on Amazon.

Stir the ingredients together, and then top the jar with a loose fitting lid or mesh, a coffee filter works great. Set jar aside and allow to rest at room temperature for 12-24 hours.
The cream will thicken over time, stir occasionally if desired. Once the cream thickens to the consistency of yogurt, place the crème fraîche in the refrigerator. It will continue to thicken and
will keep 8 to 10 days in the refrigerator.

creme fraiche recipe
Delicious crème fraîche can be made at home simply and inexpensively.

What can you do with Crème Fraîche?

It makes an ideal topping for desserts; it is rich and velvety smooth and can transform whatever it tops into a dessert, especially fruit. Or it can add creaminess to savory dishes as well. Crème fraîche has a high fat content, so it can be added into dishes as they cook and the cream will resist curdling. Add crème fraîche to soups and sauces to create a smooth, creamy richness. Crème fraîche can be used in any way you might use a whipped topping or sour cream, but the simplicity and richness of this thickened cream can elevate a dish to something special.

Love Mexican food? You can use this recipe to make a fresh, delicious Mexican crema that is better than what you buy in the stores. Mexican crema is basically crème fraîche with a bit of lime juice and salt added after it has sat in the frig for a day. And for an extra tang, use cultured buttermilk instead of the yogurt. What you will get is thick, creamy goodness that is a great topping for chilaquiles, pozole, tacos …. the list is endless!

My Favorite Ways To Use Crème Fraîche

Use crème fraîche as a fruit topping. It turns fruit into dessert. An actual dessert if you top with powdered sugar as well.
Saute apples in butter and cinnamon and then top with crème fraîche. Holy cow it’s good.
Or just drop a dollop of crème fraîche on pie or cake.
Stir crème fraîche into pasta to add a decadent creaminess. Mac ‘n cheese!
Stir crème fraîche into soups and sauces, it will add creaminess without curdling.
Top oatmeal with crème fraîche to turn a bland breakfast into a better breakfast.
Add crème fraîche to scrambled eggs for the creamiest eggs ever.

If you’ve never tried crème fraîche then give it a go. And if you’ve only previously bought it from the store, definitely try this homemade crème fraîche recipe.

Here’s some desserts that would look nice under a dollop of crème fraîche!
Try a homemade Fruit Cobbler Recipe.

creme fraiche
homemade fruit cobbler

Or try crème fraîche on a fancy French Baked Pear Recipe.

pear salad

Thanks for checking out the crème fraîche recipe. If you liked the video, then click a button or two below and share it with your friends.

Thanks for watching our recipe videos!

We include affiliate links for products on our website, so if you make a purchase after clicking on our links, we may earn a commission which helps us produce more videos and drink more coffee :^) We participate in the Amazon Services LLC Associates Program, which is an affiliate advertising program providing a means for us to earn fees by linking to Amazon.com and affiliated sites, so we can make more videos.

Share and Enjoy !

Pear Salad Recipe — a Classic Southern Pear Dessert

pear salad

A pear salad recipe might be a dish you’re familiar with if you grew up in the South, but maybe not. Is this pear dessert familiar throughout the USA and abroad? My mom made canned pear salad quite often when I was a kid. It’s an super simple and surprisingly tasty pear dessert. This pear treat is cheap and quick, so ideal for kids. In this pear recipe video we’re matching a classic southern pear salad up against a fancy-pants hipster version of pear salad. Both pear recipes are winners in my book, but since I grew up eating the canned pear version, I have a slight bias. If you’ve never tried a pear salad, it might seem like a weird combination of ingredients, but trust me, it’s delicious.

Classic Southern Pear Salad Recipe

canned PEAR HALVES
a dollop of real MAYONNAISE
shredded CHEDDAR CHEESE
MARASCHINO CHERRIES
optional:
top with toasted nuts

pear salad
classic Southern style pear salad dessert

How to Make a Classic Pear Salad Recipe

  • Crack open a can of pear halves.
  • If your inner engineer craves stability, you can shave off the bottom of each pear so that the
    halves will sit flat on a plate.
  • Arrange pear halves on a plate.
  • Place a dollop of mayonnaise in the hollow of each pear half.
  • Sprinkle shedded cheese over the mayonnaise.
  • Top each pear with a maraschino cherry.
  • Serve immediately, or chill before serving. There’s never a wrong time to eat pear salad.

Is that too quick and easy? Are you a hipster? Or a fancy Wall Street big shot? Need something fancier?

How to Make a Pretentious Pear Salad Recipe

fresh PEARS (ripe, but firm; any kind of pear will do)
fancy-pants CREME FRAICHE
expensive CHEESE
toasted WALNUTS or PECANS
but still use MARASCHINO CHERRIES (because they’re easy, and perfect)

pear salad
pretentious pear salad with attitutde

  • Any pears will do for this dish, as long as they’re ripe, but firm. I don’t like my pears mushy, and I like to bake them with the skin on.
  • Halve the pears and remove the core.
  • Lightly grease a baking dish and place the pears cut side down.
  • Bake pears in a preheated oven at 350 degrees Fahrenheit for approximately 30 minutes.
  • Remove pears from oven and allow to cool.
  • Arrange pears on a plate and place a dollop of crème fraîche or small-batch vegan yogurt in each pear hollow.
  • Top each pear with finely shredded artisinal cheese.
  • Add a sprinkling of toasted walnuts of pecans.
  • And crown each with a maraschino cherry.

And Voilà! You’re a snob, but at least you’re a snob with a very tasty pear salad.

If you’ve never tried a pear salad recipe, definitely give one of these a go, there’s a 95% chance you will love it.

If you prefer pears with a European flair, try this French inspired creamy Baked Pears Recipe

pear salad
click pic for French-style baked pear dessert

Thanks for checking out the video and recipes. If you liked it, then click a button or two below and share it with your friends. I appreciate it!
–Chef Buck

Share and Enjoy !


Follow Me!