Pork Tenderloin Recipe with Beans

pork tenderloin

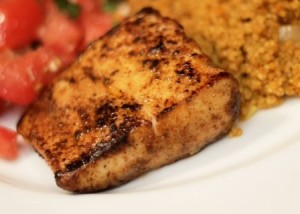
You’re gonna love this pork tenderloin recipe. As the name suggests, pork tenderloin is a very tender cut of meat. It’s super flavorful, moist, and delicious, and easy to prepare. Leftover tenderloin is perfect on a sandwich, so cook up enough to leave leftovers…you’ll be glad you did. I’m cooking this pork tenderloin with onions and beans and it’s a great dish –definitely give it a try.

Pork Tenderloin Recipe Ingredients:

2½ lbs PORK TENDERLOIN
1½ Lg ONION
15oz can PINTO BEANS
5-7 cloves GARLIC
fresh HOT PEPPERS to taste (or use red pepper flakes, or nothing…it’s all optional, baby!)
OLIVE OIL (as you like…I oil the meat, the skillet, and then throw a little olive oil on the onions)
SEASONING for meat
(1 tsp salt, ½ tsp black pepper, 1 tsp cumin, 1 tsp chili powder,
1 tsp Italian seasonings, etc…experiment, or use your own favorites)
½ cup dry WHITE WINE (optional)
½ cup CHICKEN BROTH

pork tenderloin
trim silver skin from tenderloin and sear 3 minutes each side before roasting in oven

Pork Tenderloin Recipe directions:

  • Trim the pork tenderloin of the sinewy silver skin.
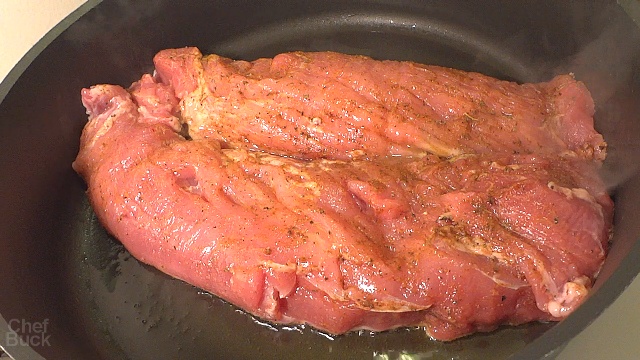
  • Coat the pork in olive oil and seasonings. I’m using a rub of chili powder, cumin, salt, pepper, and Italian seasonings…but use whatever flavors you like, or just keep it simple with basic salt and pepper–there’s no wrong way to do it; as long as you don’t overcook the pork, it’ll be awesome!
  • Pre-heat your oven to 425 F. Cooking the tenderloin at a high temperature for a short time will keep it from drying out.
  • While the oven heats, sear the tenderloin on the stove top. In a heavy, oven safe skillet, heat a little olive oil on medium high heat. After the skillet and oil are hot, add the tenderloin–it should sizzle and cook right away. Check current prices online for an oven safe skillet.
  • Sear for 3 minutes and then turn and sear the other side.
  • Add thick sliced onion to the skillet. Do this after the tenderloin has been turned.
  • Add a little oil and seasonings to the onion.
  • After 3 minutes, remove the skillet from the stove top and place in the oven at 425 F. (be sure to use an oven-safe skillet!)
  • Cook for approx. 20 minutes. If using a meat thermometer, cook until the internal temperature of the pork is 145 F.
  • Remove the skillet from the oven and return to the stove top.
  • Remove the pork loin from the skillet and set aside 10 minutes to rest. It is very important to rest the meat before slicing. This will preserve the juiciness and flavor of the pork. If you slice the tenderloin right away, the thin juices will run and much of the flavor and moisture will be lost!
pork tenderloin
let pork tenderloin rest before slicing

While the pork tenderloin rests, we’ll complete the onion and bean side dish.

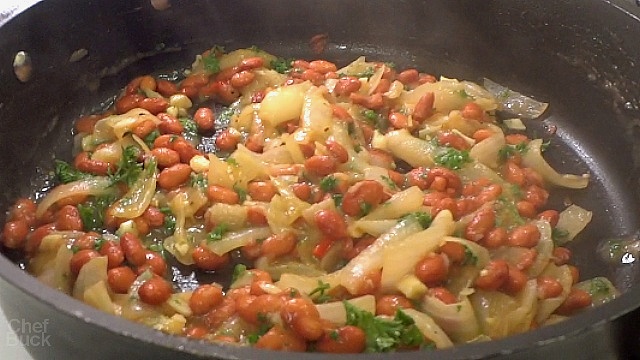
  • On medium heat, continue cooking the onions in the skillet. The liquid in the pan will reduce as it cooks. Add garlic–a lot is good!–and if desired, throw in a little fresh chopped hot peppers.
  • Add the pinto beans
  • After a few minutes, if you like, add a little wine. It’s optional, but adds a great flavor.
  • Simmer about 2 minutes and let the wine cook off.
  • Add chicken broth and continue simmering until the liquid cooks down. And that’s it!
pork tenderloin
pinto beans and caramalized onion

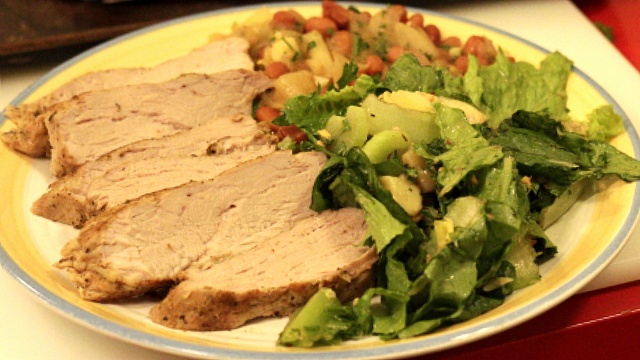
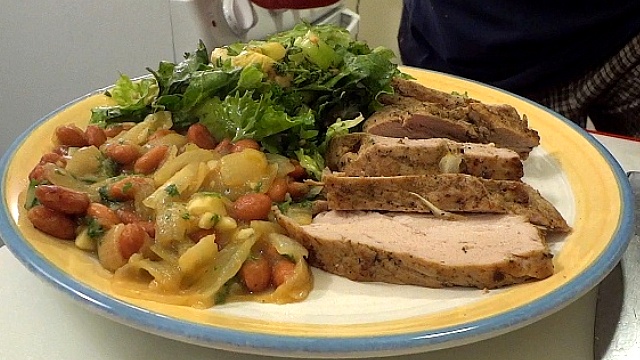
By now the pork tenderloin has rested enough and is ready to slice.
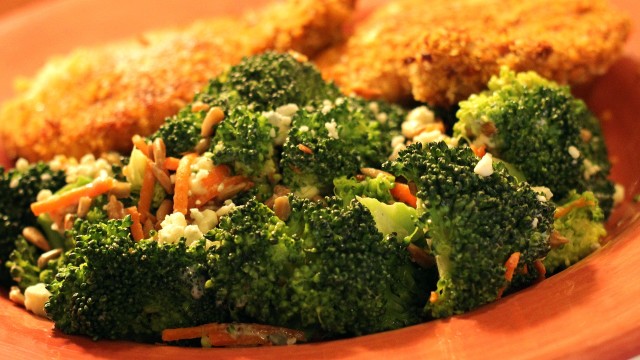
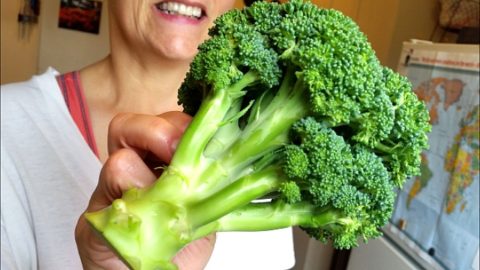
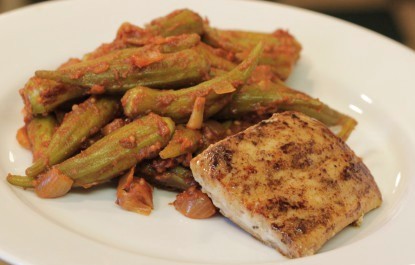
Serve the tenderloin with the beans and onion side, and maybe a little steamed broccoli or salad–and boom!–you got a complete fancy-pants pork tenderloin dinner!

pork tenderloin
Pork tenderloin dinner with caramelized onion and beans

Give this pork tenderloin recipe a try and let me know what you think, and bon appétit!

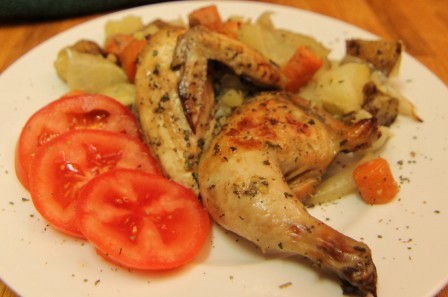
And for another great meal idea, try this Delicious Cornish Hen Dinner.

cornish game hen

Thanks for checking out our pork tenderloin recipe, and all of our recipes. Be sure and sign up for our mailing list and never miss a new Chef Buck cooking video, and also click a button below and share the dishes with your friends. We appreciate the kind comments and support, and we’ll see you next time in the kitchen!

Thanks for watching our recipe videos!

We include affiliate links for products on our website, so if you make a purchase after clicking on our links, we may earn a commission which helps us produce more videos and drink more coffee :^) We participate in the Amazon Services LLC Associates Program, which is an affiliate advertising program providing a means for us to earn fees by linking to Amazon.com and affiliated sites, so we can make more videos.

Share and Enjoy !

Beet Greens Great over Quinoa or Rice

beet greens recipe

Try this easy beet greens recipe. I almost always buy beets with the beet greens still attached–you’re getting two great ingredients in one! Beet greens are quick to cook up, full of nutrients, taste great, and look great, too. Serve this recipe over rice or quinoa as an entree, or serve it all on it’s lonesome as a side dish.

Beet Greens Recipe Ingredients:

1 bunch BEET GREENS
1 bunch GREEN ONIONS (chopped)
1 can diced TOMATOES
4-5 cloves GARLIC (finely chopped)
2 Tbsp VINEGAR
1-2 Tbsp OLIVE OIL
SALT and PEPPER to taste
HOT PEPPERS (chopped, to taste)
serve over QUINOA or RICE

beet greens

How to cook Beet Greens

Wash beet greens well and then separate the stalk from the leaves. Chop the stalk into bite-sized peices, and then rough chop the greens.
Heat olive oil in a skillet on medium heat. Check prices for a new skillet on Amazon.
Add garlic and, if desired, a little fresh hot pepper.

Let these ingredients cook for about a minute, and then add chopped green onion bottoms (reserve chopped green onion tops to add later)
Cook for 2 minutes and then add the chopped beet stalks.
Saute for 1-2 minutes and then add diced tomato. Bring the skillet back up to a simmer. Add salt and pepper and simmer for approx. 5 minutes.

Add in a little vinegar. I’m throwing in 2-3 Tbsp by the time the dish is complete, but adjust to taste. Add vinegar incrementally–it’s a lot easier to put in than to take out!
Simmer dish another 2 minutes.

Add in the leafy greens and most of the green onion tops–I reserve a little of the green onion tops for a garnish.
Cover and simmer 2 minutes.

And that’s it! Adjust the seasoning as desired, and get it off the heat. Serve the greens over rice or quinoa as an entree, or a side dish. Check current prices for quinoa on Amazon.

Give this beet greens recipe a try and let me know what you think, and bon appétit!

For another great greens dish, try this Creamed Kale Recipe.

kale
A lot of kale isn’t always a lot, kale contains a high water content and will cook down quite bit.

Thanks for checking out our beet greens recipe, and be sure and sign up for our mailing list so you’ll never miss a Chef Buck cooking video, and also click a button below and share the dishes with your friends. We appreciate all the kind comments and support, and we’ll see you next time in the kitchen!

We appreciate you watching our recipe videos!

We include affiliate links for products on our website, so if you make a purchase after clicking on our links, we may earn a commission which helps us produce more videos and drink more coffee :^) We are a participant in the Amazon Services LLC Associates Program, which is an affiliate advertising program that provides a means for us to earn fees by linking to Amazon.com and affiliated sites.

Share and Enjoy !

Cook Quinoa with Roasted Vegetables Recipe

how to cook quinoa

How to cook quinoa with beets; a simple recipe that pairs quinoa with delicious roasted root vegetables. For this quinoa recipe, I roasted beets, carrot, and onion, but any root vegetable will do. I also added a little RAW ginger and garlic, to provide a flavor punch along with excellent nutrition. A complete protein, quinoa makes this dish an ideal vegetarian recipe. It’s a perfect side dish or main course.

Quinoa and Root Vegetable Recipe Ingredients:

1 cup QUINOA
2 med. BEET ROOTS
1 med. ONION
1-2 Lg CARROTS
2 Tbsp GARLIC (minced)
2 Tbsp GINGER (minced)
½ cup PARSLEY (chopped)
HOT PEPPER (to taste)
2 Tbsp OLIVE OIL
4-6 Tbsp VINEGAR
SALT and PEPPER to taste

how to cook quinoa
Chop root veggies into bite-size pieces (but big bites!)

How to Cook Quinoa and Root Vegetable Recipe

Wash and then chop beet bulbs and carrots into roughly ½ inch pieces–bite size, but not too small.
Chop onion into similar sizes. Place chopped veggies in a bowl and toss with olive oil, salt and pepper.

On an ungreased baking sheet, spread veggies out into a single layer and then roast approx. 30 minutes in an oven pre-heated at 400 degrees Fahrenheit. Halfway through the roasting, give the veggies a stir and return to the oven.
While the root vegetables roast, prepare the quinoa.

If you’ve ever wondered how to cook quinoa …it’s just like rice: 1 part quinoa to 2 parts water. Most quinoa sold in stores throughout the USA has been pre-washed, but check packaging for details. (Check current prices for quinoa on Amazon.)

If desired, add a little chopped hot pepper in with the quinoa. Bring the pot to a boil, reduce heat, cover and simmer quinoa for about 15 minutes, or until all of the water is absorbed. Remove pot from the heat and set aside for 5 minutes. Fluff with a fork.

Transfer quinoa to a bowl and season with salt, pepper, and vinegar to taste. Mix well, and then add the roasted vegetables. Add the raw, minced ginger and garlic, and the parsley. Toss until all of the ingredients are well combined. Taste and adjust seasoning as needed.

This recipe makes an awesome side, but it also works well as an entree. Give this quinoa and beet recipe a try and let me know what you think, and bon appétit!

For another recipe featuring beets, Check out this Fresh Beet Greens Recipe.

beet greens recipe
Buy beet roots with the greens for two great ingredients.

Thanks For Watching Our Recipe Videos!

Thanks for checking out our beet and quinoa recipe, and all of our recipes. Be sure and sign up for our mailing list so you’ll never miss a new recipe. Also click a button below and share the dishes with your friends. You can also follow Chef Buck on Youtube. We appreciate all the kind comments and support, and we’ll see you next time in the kitchen!

If you like what CG and I do, you can also support us on Patreon, or throw us a tip in our Paypal Tip Jar. We’ll happily enjoy a coffee on the road – Thanks! We appreciate all the support, and we’ll see you next time in the kitchen!

We include affiliate links for products on our website. So, if you make a purchase after clicking on our links, we may earn a commission which helps us produce more videos and drink more coffee :^) We participate in the Amazon Services LLC Associates Program, which is an affiliate advertising program. It provides a means for us to earn fees by linking to Amazon.com and affiliated sites, so we can make more videos.

Share and Enjoy !

Biscuit Recipe – Best Southern Biscuits

It’s easy to make friends with this easy, awesome tasting biscuit recipe. You biscuits in all manner of meals. Serve them alone as a breakfast side, pile them up into the perfect breakfast sandwich, ladle them with gravy for a wholesome entree, or top them with whipped cream and strawberries for a decadent dessert!

Buttermilk Biscuit Recipe Ingredients

4 cups ALL PURPOSE FLOUR
1 Tbsp BAKING POWDER
1 tsp BAKING SODA
1 tsp SALT
1 Tbsp SUGAR
1 cup BUTTER (diced, chilled)
1½ cups BUTTERMILK (chilled)
(plus buttermilk for brushing biscuit tops)

Buttermilk Biscuit Recipe Directions

In a bowl, combine flour, baking powder, baking soda, salt, and sugar (optional). Mix ingredients together well. Add diced butter. For best results use chilled butter –keep the diced butter in the refrigerator until needed. Cut butter into the flour using a pastry cutter or knives. Check here for current prices for a pastry cutter on Amazon.

Butter should be cut into pea-sized bits, but there’s no reason to be militant about it…nice chunks of butter are nice. Once the butter is cut into the flour, add buttermilk. Keep the buttermilk chilled until you are ready to use it–cold butter and buttermilk are best for this recipe.

Pour the buttermilk into the bowl, and using a spatula (or your hand), roll the flour around the edge of the bowl until the buttermilk is absorbed and the dry flour begins sticking together. Roll until there is very little loose flour…add a drop more buttermilk if needed, but do so sparingly–you don’t want the flour to be “wet”.

On a lightly floured surface, empty the bowl and press the flour together, knead once or twice and then spread the dough out into a flat, ½ inch thickness. Do not knead or “handle” the dough too much.

Flour the edges of a biscuit cutter or drinking glass and cut out biscuits. I like my buttermilk biscuit about 2″-3″ across, but make whatever size you like. Giant biscuits can be fun :^) Cut the biscuits closely and get as many out of the first press as you can. Once all of the biscuits are cut from the first press, bring the dough together again and cut out remaining biscuits–again trying to handle the dough as little as possible.

Arrange the biscuits touching side by side on a lightly greased pan or on parchment paper. Lightly brush the tops of the biscuits with buttermilk or melted butter–this will help them to brown nicely. Place biscuits in the oven and bake at 425 degrees Fahrenheit for approximately 15 minutes, or until biscuits are golden brown to your liking.

Give these biscuit recipes a try and let me know what you think, and for another breakfast bread dish, try this Egg Bread Recipe.

egg bread
Fancy baked eggs to impress friends and family

Thanks for checking out our biscuit recipe, and all of our recipes. Be sure and sign up for our mailing list and never miss a new Chef Buck cooking video, and also click a button below and share the dishes with your friends. We appreciate all the kind comments and support, and we’ll see you next time in the kitchen!
–Chef Buck

Thanks for watching our recipe videos!

We include affiliate links for products on our website, so if you make a purchase after clicking on our links, we may earn a commission which helps us produce more videos and drink more coffee :^) We participate in the Amazon Services LLC Associates Program, which is an affiliate advertising program providing a means for us to earn fees by linking to Amazon.com and affiliated sites, so we can make more videos.

Share and Enjoy !

Baby Bok Choy Recipe with Quick and Easy Sauce

baby bok choy recipe

Try this simple baby bok choy recipe with a super tasty sauce that’s ready in minutes. This dinky cabbage can be steamed or sautéed to create many healthy and tasty dishes. Bok choy is easily found in markets and is sold in several shapes and sizes under the name bok choy, ranging from tiny baby bok choy to the larger size cabbages that are perfect for soups.

What You Need To Make A Baby Bok Choy Recipe

15-20 BABY BOK CHOY
HOT PEPPERS (finely chopped, to taste)
2 Tbsp GINGER (finely chopped)
5-7 cloves GARLIC (finely chopped)
½ cup HOISIN SAUCE
1-2 Tbsp OLIVE OIL for sauteing

baby bok choy recipe
fresh baby bok choy

How To Cook Baby Bok Choy

Wash the bok choy; bok choy tends to hold dirt around the stem bottoms, so soak and wash thoroughly.
Slice the bok choy lengthwise into even halves.

Steam bok choy for 3-4 minutes. Do not overcook. The stalks are fairly thin and do not require much steaming to soften them, and you don’t want the leafy tops to become overdone; by not
over cooking, you’ll preserve a crunchy texture in the stalk as well as more of the nutritional value.

In a skillet, heat olive oil on medium heat. Add hot peppers, ginger, and garlic and saute for 1-2 minutes. Add the hoisin sauce and mix well.

Add steamed bok choy to the skillet and toss with the sauce until well coated.

If desired, top with toasted sesame seeds or crushed peanuts–it’s very tasty that way–but I like it just as well without.
This dish makes a complete meal when served with a rice or quinoa side.

Hope you like it! It’s well worth giving baby bok choy recipe a try.
Give this dish a go and let me know what you think, and bon appétit!

And for another delicious bok choy dish, try this Bok Choy Soup Recipe.

bok choy recipe
Bok Choy Soup

Thanks for checking out the recipe! If you enjoyed it, click some of the buttons below and share it.
I appreciate it!
–Chef Buck

Share and Enjoy !


Pesto Recipe and Perfect Pesto Pasta

pesto recipe

This pesto recipe is crazy delicious, and makes a perfect sauce for pasta. I like my pesto pasta to have a thick sauce with lots of flavor!–a thin, watery pesto pasta is not for me; if you feel the same way, then give this pasta dish a go–and use a hearty pasta that will hold lots of pesto sauce, something like a penne or rotini pasta.

What You Need for Pesto Recipe

¾ cup PINE NUTS, toasted (or substitute almonds or walnuts)
2-3 cloves garlic
2 cups (packed) fresh BASIL leaves (or substitute 1 cup for SPINACH leaves)
[4oz grocery basil = approx 2 cups]
zest & juice from 1 small LEMON
½ – ¾ cup OLIVE OIL (darker the better)
½ tsp SALT and ¼ tsp PEPPER to taste
¼ tsp crushed RED PEPPER FLAKES
½ cup (to taste) freshly grated PARMESAN CHEESE (or asiago or Pecorino)

16oz PASTA (I prefer pene or rotini for this dish)

pesto recipe
Fresh ingredients make the best pesto

How to Make Pesto Recipe

Toast the pine nuts at 400 degrees Fahrenheit for approx 3 minutes–but watch them like a hawk!–they will toast fast and you DO NOT WANT TO OVER-TOAST OR BURN them ’cause they cost way TOO MUCH MONEY! Check here for current pine nut prices on Amazon.

Place pine nuts and garlic in a food processor and pulse/chop.
Season with salt and pepper and red pepper flakes.
Into the processor, add basil (when buying basil, choose basil that has NOT flowered yet–or only a little–basil loses sweetness as the plant flowers), spinach, lemon juice and zest.

Process until the greens are shredded.
Add olive oil incrementally and process until fully incorporated and to desired smoothness and consistency.

Transfer the pesto to a serving bowl and mix in the freshly grated Parmesan cheese.

And that’s it–your pesto sauce is complete! Use it however you see fit!

For pesto pasta:
In a pot, cook 16oz of pasta according to package directions.
I recommend a pasta that is thick and hearty, with lots of surface area for the pesto sauce to cling to; I lprefer a penne or rotini pasta.

When pasta is cooked to desired consistency–al dente is best, I think–reserve 1 cup of the pasta water, then drain the pasta–DO NOT RINSE!–this washes away flavor.

Immediately return drained pasta to the pot and add in the pesto. Mix with the noodles. Add some of the reserved pasta water until the sauce is as desired. Add pasta water SLOWLY! You DO NOT want to make your pesto sauce TOO THIN! Or at least I don’t–I like a lot of pesto flavor with my pasta.

Top with freshly grated Parmesan cheese and serve.

pesto recipe
Pesto Pasta Recipe

Give this pesto pasta recipe a go and let me know what you think, and bon appétit!

And for another fantastic pasta dish that’s incredibly healthy and NOT EVEN PASTA, try this Spaghetti Squash Pasta Recipe.

best spaghetti squash
just a few simple flavors and ingredients will make the best spaghetti squash recipe

Thanks for checking out the pesto pasta recipe. Be sure and sign up for our mailing list so you’ll never miss a Chef Buck cooking video, and click a button below and share the dishes with your friends. We appreciate all the kind comments and support, and we’ll see you next time in the kitchen!
–Chef Buck

Share and Enjoy !


Best Green Beans Recipe

green beans

I’m not a lover of green beans, but sometimes green beans insert themselves into your life and then you just have to deal with them. Seeds and garlic and ginger are 3 friends that will help in this fight. This is a quick recipe, very tasty, and an effective way to deal with the green bean “problem”.

Green Bean Recipe Ingredients:
1 lb. GREEN BEANS
3 ROMA TOMATOES (chopped, or substitute 15oz can diced tomatoes)
2 Tbsp GARLIC (finely chopped)
2 Tbsp GINGER (finely chopped)
HOT PEPPERS (finely chopped, to taste–sub chili paste, hot sauce, sriracha, etc.)
½ tsp FENNEL SEEDS
1 tsp CUMIN SEEDS
SALT and PEPPER to taste
2-3 Tbsp OLIVE OIL
1-2 Tbsp BALSAMIC VINEGAR

green beans
Choose green beans that are firm and crisp!

Check current prices for a Non-Stick Skillet on amazon.

Green Bean Recipe Directions:
When buying, choose green beans that are firm and crisp, meaning that when you snap off the ends, they’ll make an actual “snap”. Which is the first thing you’ll do–snap off the ends and discard them. Wash your beans–and then blanch them.
To blanch, place beans into a pot of salted, boiling water and let them cook for 3-4 minutes, then remove beans from the hot water and transfer to an ice bath. Blanching prepares the beans so that they will cook easier and more quickly in the skillet.
Drain the beans and set aside
In a skillet, heat olive oil on medium heat. Add cumin and fennel seeds and allow to cook for just a few moments (10-20 seconds). Seeds add great flavor and texture–do yourself a favor and stock your kitchen with seeds! Add garlic (lots of garlic!) and continue cooking. Add a little fresh, diced hot pepper if you like–jalapenos or chili peppers are nice–or if you like, just add some chili paste, or hot sauce later.
Cook garlic and peppers for about 1 minute and then add in the chopped tomatoes and ginger, and let cook another 2-3 minutes.
Stir green beans into the skillet.
Add salt and pepper to taste.
Cook 3-5 minutes until the green beans are cooked to your taste, and that’s it.
Add a splash of balsamic vinegar if you like–I do–the tang is quite nice with this dish.

Give these green beans a try and let me know what you think, and bon appétit!

And for a green beans with an Asian flair, try this Asian-style Green Bean Recipe.

Green Bean Recipe
Green Bean Recipe

Thanks for Watching our Bean Recipe Video!

Click a button below and share the dishes with your friends. You can also follow Chef Buck on Youtube. We appreciate all the kind comments and support, and we’ll see you next time in the kitchen!

If you like what CG and I do, support us on Patreon, or throw us a tip in our Paypal Tip Jar. We’ll happily enjoy a coffee on the road – Thanks! We appreciate all the support, and we’ll see you next time in the kitchen!

We include affiliate links for products on our website. Making a purchase after clicking on our links and we may earn a commission which helps us produce more videos and drink more coffee :^) We participate in the Amazon Services LLC Associates Program, which is an affiliate advertising program. It provides a means for us to earn fees by linking to Amazon.com and affiliated sites, so we can make more videos.

Share and Enjoy !

Watermelon Salad Recipe –or how to save a sad melon

watermelon salad

Watermelon Salad is simple to throw together and a tasty way to save a crappy melon. CG loves watermelon, but once in a while she brings home a dud that just doesn’t make the cut; so what does one do with an unsweet, flavorless melon? Turn it into a savory salad dish!

Watermelon Salad Recipe Ingredients:
6 cups crappy, unsweet, seedless WATERMELON
1-2 Tbsp fresh MINT (chopped)
¼ cup RED ONION (chopped)
¼ cup FETA CHEESE crumbles
½ cup toasted ALMOND SLIVERS

dressing:
¼ cup BALSAMIC VINEGAR
2 Tbsp OLIVE OIL
1 Tbsp DIJON MUSTARD
1 Tbsp MAPLE SYRUP (or substitute honey)
1 clove GARLIC (minced)
SALT and PEPPER to taste

watermelon salad
Turn crappy watermelon into happy watermelon! (sorry)

Watermelon Salad Directions:
This salad works best with a seedless melon–’cause it’s a salad–and no one wants to dig seeds out of a salad.
Wash your melon and cut away the rind. Slice the red flesh into hearty, but mouth-sized pieces. If it’s sweet–then you’re set! Chow down, because that’s what a melon is for! –but if it’s not sweet, if it’s a flavorless lump that sits in your mouth like play-doh, then don’t despair…it’s salad time.
First thing, make the dressing.
In a small bowl, combine the balsamic vinegar, olive oil, dijon mustard, maple syrup (or substitue honey), garlic, salt, and pepper. Mix together and set aside.
In a larger bowl combine cut watermelon pieces, mint, red onion, feta cheese, and almond slivers. I’ve suggested some ingredient measurements–but that’s just a loose guildeline, man. It’s a salad…follow your heart (and taste buds).
Add salad dressing to taste and toss.
Boom.
That’s it, dude.
Your crappy melon has been transformed into a delicious salad.

Give this Watermelon Salad recipe a try and let me know what you think, and bon appétit!

And for another tasty salad recipe, try this Black-eyed Pea Salad Recipe.

black eyed pea salad

Share and Enjoy !


Fried Quinoa Recipe — Quinoa Fried “Rice”

fried quinoa recipe

This fried quinoa recipe is a quick and tasty take on Chinese fried rice. Quinoa makes a great substitute for rice in many recipes, especially quinoa fried “rice”. Quinoa is a complete protein, which makes this dish a complete meal, even if you leave out the egg–which is an easy way to make this a vegetarian recipe. Of course you can go the other route and throw in a little diced pork chop or ham if you like, but I’m quite happy with just a couple scrambled eggs thrown in.

Fried Quinoa Recipe Ingredients:
1 cup QUINOA (before cooking)
1 cup PEAS
1 CARROT (diced)
4-6 GREEN ONIONS (chopped, tops separate)
3-5 cloves GARLIC (finely chopped)
2 Tbsp GINGER (finely chopped)
HOT PEPPERS (as desired, finely chopped)
2 EGGS (scrambled)
2-3 Tbsp OIL for sautéing
SOY SAUCE as desired
SESAME OIL 1-2 tsp
SALT and PEPPER to taste

fried quinoa recipe
Quinoa Fried “Rice”

Fried Quinoa Recipe Directions:
This is a great dish for leftover quinoa. The next time you’re making a pot of quinoa for another recipe, just make a little extra for this fried rice recipe knockoff! But if you don’t have any leftover
cooked quinoa handy, just prepare this quinoa a little ahead of time to give it time to cool down–this will keep the quinoa from easily overcooking and becoming mushy.

Quinoa is easy to prepare–just like rice, in fact! Rinse the quinoa if needed (many brands come pre-rinsed). In a pot, add 1 cup quinoa to 2 cups water. Bring the pot to a boil, reduce pot to a
simmer, and then cover and let cook 13 minutes (this will result in slightly al-dente quinoa, which is what you want for frying). Remove the quinoa from the heat and let sit for 10 minutes.
Then fluff with a fork and allow to cool completely (salt if desired).

For fried rice, I like to scramble my eggs first and then set aside. I Use two eggs for this recipe, but feel free to use 1, or 3, or none if you want a vegetarian fried quinoa. Whisk the eggs (add a
splash of milk if desired–makes scrambled eggs smoother). Heat oil in a skillet and quickly scramble eggs on med-high heat and then set aside for later.

In a large skillet, heat 2-3 Tbsp oil on medium.

Add raw, diced carrots (should be about pea size). Add chopped hot peppers, too–if desired. I like adding a little fresh red chili peppers for taste, but jalapenos would work just as well, or red
pepper flakes, or even just a little sriracha later, if desired–or no heat at all–it’s up to your tastes; follow your heart, but spicy food is good for you, right?

Sauté the carrot and peppers for a minute and then add the ginger, garlic, and chopped green onion bottoms (reserve the chopped tops for a flavorful garnish).

Continue sautéing another minute and then add in the quinoa. Stir fry until heated through, this won’t take very long.

Add sesame oil and peas. I like to use frozen peas (thawed), because they hold their texture better than canned peas. Stir until mixed. Add soy sauce to taste. Add fish sauce if desired. The
sauces will provide plenty of salt, but if you want a little black pepper, go ahead and throw that in now.

Mix up and then add the scrambled egg. Mix and fry for another minute and then remove from the heat.

That’s it.

This dish is ready pretty quick. Top the fried quinoa with chopped green onion, crushed peanuts, or both. Serve fried quinoa it’s own or with a veggie side (broccoli or bok choy or Thai eggplant
are nice).

Give this Fried Quinoa recipe a try and let me know what you think, and bon appétit!
And for more tasty quinoa dishes, check out my Quinoa Video Playlist.

quinoa salad

Share and Enjoy !


Buttermilk Biscuit Recipe with Country Gravy

Easy Homemade Buttermilk Biscuits Recipe

Buttermilk biscuit and gravy are pretty easy to make at home, and biscuits are great for any meal–not just for breakfast. I’m using mushrooms for this gravy recipe, but sausage can easily be substituted if you’re in a meaty mood.

What you need to make Biscuits

4 cups ALL PURPOSE FLOUR
1 Tbsp BAKING POWDER
1 tsp BAKING SODA
1 tsp SALT
1 Tbsp SUGAR
1 cup BUTTER (diced, chilled)
1½ cups BUTTERMILK (chilled)
(plus buttermilk for brushing biscuit tops)

Buttermilk Biscuit Recipe
Easy Buttermilk Biscuit Recipe

How to make a Buttermilk Biscuit

In a bowl, combine flour, baking powder, baking soda, salt, and sugar (optional). Mix ingredients together well.

Add diced butter. For best results use chilled butter –keep the diced butter in the refrigerator until needed. Cut butter into the flour using a pastry cutter or knives. Butter should be cut into pea-sized bits, but there’s no reason to be militant about it…nice chunks of butter are nice.

Once the butter is cut into the flour, add buttermilk. Keep the buttermilk chilled until you are ready to use it–cold butter and buttermilk are best for this recipe.

Pour the buttermilk into the bowl, and use a spatula (or your hand), roll the flour around the edge of the bowl until the buttermilk is absorbed and the dry flour begins sticking together. Roll until there is very little loose flour…add a drop more buttermilk if needed, but do so sparingly–you don’t want the flour to be “wet”.

On a lightly floured surface, empty the bowl and press the flour together, knead once or twice and then spread the dough out into a flat, ½ inch thickness.

Do not knead or “handle” the dough too much!

Flour the edges of a biscuit cutter or drinking glass and cut out biscuits. I like my buttermilk biscuit about 2″-3″ across, but make whatever size you like. Giant biscuits can be fun :^) Cut the biscuits closely and get as many out of the first press as you can.

Once all of the biscuits are cut from the first press, bring the dough together again and cut out remaining biscuits–again trying to handle the dough as little as possible.

Arrange the biscuits touching side by side on a lightly greased pan or on parchment paper. Check Parchment Paper prices on Amazon

Lightly brush the tops of the biscuits with buttermilk or melted butter–this helps them to brown nicely. Place biscuits in the oven and bake at 425 degrees Fahrenheit for approximately 15 minutes, or until biscuits are golden brown to your liking.

Easy Homemade Buttermilk Biscuits Recipe
Homemade Buttermilk Biscuits

Mushroom Gravy Recipe Ingredients

oil/butter for sauteeing onion/mushrooms
½ cup chopped ONION
8 oz sliced MUSHROOMS
½ cup BUTTER
½ cup ALL-PURPOSE FLOUR
2 cups MILK
about 2-3 tsp SALT (or to taste)
1 tsp BLACK PEPPER (or to taste)
½ tsp ground SAGE
2 tsp WORCESTERSHIRE SAUCE
1 tsp HOT SAUCE
1 tsp dried THYME
….experiment with whatever seasonings you like

Mushroom Gravy Recipe Directions

Heat 1-2 Tbsp oil in a skillet on medium high heat. Add onions and saute for 2 minutes. Add mushrooms and continue sauteeing until browned. Stir in a little salt and pepper. Remove onions and mushrooms from skillet and set aside for later.

Return skillet to the heat and add ½ cup butter and melt. Once melted, add in a little of the ½ cup flour. Stir until smooth, and then continue to slowly add and stir the flour into the butter until the entire ½ cup of butter and ½ cup of flour have been incorporated –this is a roux, a traditional thickener for sauces.

Continue stirring the roux and slowly add milk over several minutes until the the gravy is smooth and creamy. I use almond milk in this recipe, but most any kind of milk will work. Return the mushrooms and onion to the mix and continue stirring with the burner still on med to med-high heat.

Biscuits with Gravy
Biscuits with Mushroom Gravy

Add sage, thyme, worcestershire sauce, salt, pepper, and hot sauce –or anything else you’d like to try. Add more milk as needed to achieve the desired consistency. And that’s it.

If the gravy sits around for a bit, just heat and stir in more milk–you can do this the next day, too, if you have gravy leftover.

This gravy is great over a buttermilk biscuit, but it can also be used for many entrees.

This gravy is great on country fried steak or meatloaf. If you’d rather have sausage gravy than mushroom gravy, then make it exactly the same way, but substitute sausage for mushrooms, and be sure to thoroughly drain the grease from the cooked sausage before adding it back into the skillet.

Give this Buttermilk Biscuit and Gravy recipe a try and let me know what you think, and bon appétit!

And for another awesome breakfast dish, try this fancy-pants Omelet Recipe.

omelet recipe
Lamb and Cream Cheese Omelet

Thanks for Watching our Biscuit Recipe Video!

Click a button below and share the dishes with your friends. You can also follow Chef Buck on Youtube. We appreciate all the kind comments and support, and we’ll see you next time in the kitchen!

If you like what CG and I do, support us on Patreon, or throw us a tip in our Paypal Tip Jar. We’ll happily enjoy a coffee on the road – Thanks! We appreciate all the support, and we’ll see you next time in the kitchen!

We include affiliate links for products on our website. Making a purchase after clicking on our links and we may earn a commission which helps us produce more videos and drink more coffee :^) We participate in the Amazon Services LLC Associates Program, which is an affiliate advertising program. It provides a means for us to earn fees by linking to Amazon.com and affiliated sites, so we can make more videos.

Share and Enjoy !

Homemade Guacamole Classic Recipe

easy guacamole recipe

The guacamole you make at home from fresh ingredients will always be superior to store-bought guacamole–and it’s such a quick and easy dish to prepare!–so why wouldn’t you?

Classic Guacamole Recipe Ingredients

3 AVOCADO (ripe, pitted and skinned and diced)
1-2 Tbsp LIME JUICE (or sub lemon juice)
¼ cup ONION (chopped)
2 ROMA TOMATO (chopped)
1 clove GARLIC (minced)
1-2 Tbsp CILANTRO (chopped)
½ tsp CUMIN (optional)
dash of CAYENNE or HOT SAUCE as desired
½ tsp SALT …adjust to taste

How to make Homemade Guacamole

Choose ripe avocados!–an avocado is ripe if it’s soft (not too soft and not too firm–right in the middle) …a ripe avocado will give slightly when pressed. If it feels hard like a rock, then it’s not ripe…if it feels mushy, then it’s overripe. If the skin feels papery and dry (crackly)–then it’s too old. It’s not rocket science–just go through the avocados at the market and pick whichever one Goldilocks would pick.

Run a knife around the center of the avocado and pull it apart to reveal the pit. Remove the pit, cut the halves into quarters and peel away the skin. Dice the avocado and place in a bowl.
Quickly add the lime or lemon juice and toss well, coating the avocado–this will add a great flavor and more importantly keep the avocado from browning!

Add salt. If desired, add a little cumin, cayenne pepper, hot sauce for bite–but this is optional.

Mix the ingredients well and, with a fork, smash up the avocado–but not too much–the ideal guacamole is lumpy, not smooth.

Add chopped roma tomatoes, onion, cilantro, and garlic. Use fresh ingredients! –the key to a delicious guacamole is fresh ingredients.

Toss everything together and then cover and place the guacamole in the refrigerator until needed.

easy guacamole recipe
guacamole recipe

Give this guacamole recipe a try and let me know what you think, and bon appétit!

Guacamole is the perfect accompaniment for this fantastic Family Style Burrito recipe.

cauliflower pizza crust recipe
click pic for video recipe

If you’re new to home cooking, get a bunch of spices, pots and pans, and begin experimenting with different recipes. Cooking is a healthy hobby and skill that will save you money in the long run. Check out current prices for Complete Kitchenware Sets on Amazon as well as Complete Starter Spice Kits. Or go to a thrift store! I’ve found some of my favorite kitchen gear at second-hand stores.

Thanks for checking out the recipes. Be sure and sign up for our mailing list so you’ll never miss a Chef Buck cooking video, and click a button below and share the dishes with your friends. We appreciate all the kind comments and support, and we’ll see you next time in the kitchen!
–Chef Buck

Share and Enjoy !


Okra Curry Recipe – Spicy Indian Bhindi

okra curry

This okra curry makes a great side dish or awesome entree when served over rice. Okra is a hearty, tasty, versatile vegetable which is relatively cheap and usually found in markets year-round. I like to cook okra whole in the pod, but for spicier dishes, I like to cut up okra and saute it with tomato and onion. This Indian bhindi recipe is easy and delicious, so give it a try.

Okra Curry Ingredients:

1 lb. OKRA (cut)
4-5 ROMA TOMATOES (chopped)
½ ONION (sliced)
3 Tbsp OLIVE OIL
1 tsp FENNEL SEEDS
1 tsp CUMIN SEEDS
1 tsp HOT PEPPER (finely chopped)
5-7 cloves GARLIC (finely chopped)
2 Tbsp GINGER (finely chopped)
2 tsp CORIANDER
1 tsp TURMERIC
¼ CHILI PEPPER (or to taste)
SALT and PEPPER (to taste)

okra pods
Okra is a versatile vegetable and tasty whole or cut.

How to make Okra Curry

Select okra pods 1″ to 2″ in length. Okra gets huge if left overlong on the plant, but big okra can be woody and tough, so bigger isn’t always better. Choose firm, green pods–okra will blacken around the edges as it gets older, so use within a few days.

Wash and dry okra thoroughly. Slice off the ends and cut into uniform sizes for even cooking.
Heat oil in a skillet on medium high.

Once oil is hot, add cumin and fennel seeds. The seeds will begin to crack after about 30 seconds. Add garlic and ginger and saute another 1-2 minutes. Add onion slices and continue cooking another 2-3 minutes. If you want a little more spice, also add some fresh chopped chili peppers.

Add in coriander, turmeric, and chili powder. Stir well for 1 minute and add tomato. I use 4 cut roma tomatoes, but use 1 can diced tomatoes if preferred. Add salt to taste.
Reduce heat to medium. You can check prices for Indian Spices on amazon.

Let tomatoes cook about 5 minutes.
Add okra.
The acid in the tomato helps to cut down on the natural “gooeyness” of okra. Some folks call it slime, but it’s just the juices in the okra. The gooeyness will reduce the longer the okra is cooked, so cook uncovered another 5-10 minutes depending on how well you like your okra done.

I cook mine about 8 minutes.
Sometimes I finish off the dish with a little garam masala for a more “Indiany” flavor, but this time I didn’t. Garam masala adds a little sweetness.
Serve this okra curry on its own as a side dish or serve over rice as an entree. It makes a nice vegetarian meal with a salad.

Give this okra curry recipe a try and let me know what you think, and bon appétit!

And for another great Indian-style vegetarian dish, check out this meatless version of a “Chicken” Tikka Masala Recipe.

jackfruit recipe
Seasoned and baked Jackfruit makes a convincing faux chicken when added to this rich Indian inspired tikka masala.

If you crave okra info, here’s more in depth nutritional info than you’ll ever want about okra.

Thanks for checking out our okra recipes, and all of our cooking videos. Sign up for our mailing list and never miss a new Chef Buck cooking video, and click a button below and share the dishes with your friends. We appreciate all the kind comments and support, and we’ll see you next time in the kitchen!

Thanks for Watching our Okra Recipe

Sign up for our mailing list so you’ll never miss a new recipe. Also click a button below and share the dishes with your friends. You can also follow Chef Buck on Youtube. We appreciate all the kind comments and support, and we’ll see you next time in the kitchen!

If you like what CG and I do, support us on Patreon, or throw us a tip in our Paypal Tip Jar. We’ll happily enjoy a coffee on the road – Thanks! We appreciate all the support, and we’ll see you next time in the kitchen!

We include affiliate links for products on our website. Making a purchase after clicking on our links and we may earn a commission which helps us produce more videos and drink more coffee :^) We participate in the Amazon Services LLC Associates Program, which is an affiliate advertising program. It provides a means for us to earn fees by linking to Amazon.com and affiliated sites, so we can make more videos.

Share and Enjoy !

Edamame Brown Rice Recipe –A Great Vegetarian Dish

edamame

This edamame brown rice recipe is super flavorful, filling, a great side dish, and delicious hot or cold. If you buy frozen soy beans for this dish, make sure they are thawed before using –and shelled!– shelled edamame is called mukimame.

Edamame Brown Rice Recipe

2 inch GINGER, finely chopped
4-5 cloves GARLIC, finely chopped
16 oz bag MUKIMAME (shelled edamame)
¾ cup LONG-GRAIN BROWN RICE
2Tbsp fresh LIME JUICE
2 Tbsp RICE VINEGAR
2 tsp SOY SAUCE
2 tsp SESAME OIL
½-1 tsp SUGAR
3-4 GREEN ONIONS
5 Tbsp CILANTRO, chopped
2 Tbsp SESAME SEEDS, toasted
SALT and PEPPER to taste

edamame
Mukimame with Brown Rice Recipe

How to make Make Edamame with Brown Rice

  • In a saucepan, heat olive oil over medium-high heat. Check current prices for a sauce pan on amazon.
  • Sauté ginger and garlic for 1-2 minutes until fragrant.
  • Remove garlic and ginger from pan and set aside (I’ve tried skipping this step, and just continued cooking the garlic and ginger along with the rice, but it’s not as flavorful, so it’s definitely worth setting the garlic and ginger aside to add to the dish later).
  • In same pan (without rinsing), bring 1½ cups lightly salted water to a boil. Add rice, reduce to a low simmer; cover and cook, 30 minutes.
  • After 30 minutes, stir in thawed, shelled edamame (mukimame!); cover and cook until rice is tender and mukimame is heated through, about 15 to 20 minutes.
  • In a small bowl, combine lime juice, vinegar, soy sauce, sesame oil, and sugar and stir until sugar is dissolved.
  • Remove rice and beans from the stove and add ginger, garlic, lime juice mixture, scallions, cilantro and sesame seeds.
  • Mix well and add additional salt and pepper as desired.


Give this edamame brown rice recipe a try and let me know what you think, and bon appétit!

edamame
Frozen Mukimame (shelled edamame)

And for another great vegetarian dish, try this easy, awesome Quinoa Salad Recipe.

southwestern quinoa salad
a southwestern quinoa salad makes a tasty and healthy dinner choice.

Thanks For Watching Our Recipe Videos!

Thanks for checking out this edamame recipe, and all of our recipes. Be sure and sign up for our mailing list so you’ll never miss a new recipe. Also click a button below and share the dishes with your friends. You can also follow Chef Buck on Youtube. We appreciate all the kind comments and support, and we’ll see you next time in the kitchen!

If you like what CG and I do, you can also support us on Patreon, or throw us a tip in our Paypal Tip Jar. We’ll happily enjoy a coffee on the road – Thanks! We appreciate all the support, and we’ll see you next time in the kitchen!

We include affiliate links for products on our website. So, if you make a purchase after clicking on our links, we may earn a commission which helps us produce more videos and drink more coffee :^) We participate in the Amazon Services LLC Associates Program, which is an affiliate advertising program. It provides a means for us to earn fees by linking to Amazon.com and affiliated sites, so we can make more videos.

Share and Enjoy !

Baked Quinoa with Celery Root

Quinoa Vegetable Gratin

This baked quinoa recipe is tasty and versatile, and an terrific way to use celery root. I use zucchini and carrots in this video, but I’ve made the same dish using broccoli as the main veggie, so experiment with whatever you have on hand, just make sure to cut the veggies into smaller pieces to spread evenly.

Baked Quinoa Recipe Ingredients

1 cup QUINOA
1 CELERY ROOT (thinly sliced)
1 cup CARROT (shredded)
1 cup ZUCHINNI (diced well)
1-2 tsp HOT PEPPER (finely chopped)
½ ONION (chopped)
3-4 cloves GARLIC (finely chopped)
1 cup BLUE CHEESE
2 Tbsp BUTTER
½ cup ALMOND MILK (or Half N Half)
2 Tbsp ITALIAN SEASONING
1 tsp MUSTARD SEEDS
½ cup BREAD CRUMBS
1-2 Tbsp OLIVE OIL
SALT and PEPPER (to taste)

Quinoa Vegetable Gratin

How to make a Quinoa Bake

In a pot, heat olive oil on med. high heat. Add mustard seeds, garlic, and a little hot pepper, if desired. Give these ingredients about a 30 second head start, and then add the onion. Stir and let cook for 2-3 minutes until onions begin to soften. Stir in salt.

Add quinoa and water and stir. Cover pot and allow the ingredients to come to a boil. Reduce the heat to a simmer, and allow the pot to cook for about 10 minutes.

Remove pot from the heat, if there is a little water left, that’s okay. Add Italian seasonings (or experiment with different seasonings!). Add in the zucchini and carrot (or experiment with different veggies!). Stir in the milk and mix all ingredients together well.

Butter a deep 1.5 quart baking dish. Check here to see current prices for a casserole baking dish on Amazon.

Spoon in and spread a layer of the quinoa/veggie mix along the bottom of the dish, about a ½” to 1″ thick. Top this layer with a single layer of thinly sliced celery root (celeriac). Add a sprinkling of cheese–as cheesey as you like it. I use blue cheese in the video, but try feta cheese and ricotta cheese, too (I’ve used all and any crumbly/melty white cheese is gonna work well with this dish).

Add and spread another layer of the quinoa mixture, and continue building the quinoa, celery root, cheese layers until the dish is almost full. Make the top layer quinoa/veggie.

In a small bowl, combine bread crumbs w/ olive oil, Italian seasoning, salt, and pepper. Mix, and spread over the top of the quinoa dish.
Cover with aluminium foil and bake for about 55 minutes in an oven pre-heated to 375 degrees F.

After 55 minutes, remove the foil and continue to cook another 5 minutes or until the bread crumb topping is golden brown.

The dish is finished when a knife can pass easily through the sliced celerey root layers.
Let rest for 5-10 minutes, and then serve.
Give this baked quinoa vegetable recipe a try and let me know what you think, and bon appétit!

And for another casserole-style recipe idea, try this Broccoli Cheese and Cauliflower Gratin Recipe.

broccoli cheese
An easy, semi-healthy broccoli and cauliflower gratin recipe.

Thanks for Watching our Baked Quinoa Recipe Video

Sign up for our mailing list so you’ll never miss a new recipe. Also click a button below and share the dishes with your friends. You can also follow Chef Buck on Youtube. We appreciate all the kind comments and support, and we’ll see you next time in the kitchen!

If you like what CG and I do, support us on Patreon, or throw us a tip in our Paypal Tip Jar. We’ll happily enjoy a coffee on the road – Thanks! We appreciate all the support, and we’ll see you next time in the kitchen!

We include affiliate links for products on our website. Making a purchase after clicking on our links and we may earn a commission which helps us produce more videos and drink more coffee :^) We participate in the Amazon Services LLC Associates Program, which is an affiliate advertising program. It provides a means for us to earn fees by linking to Amazon.com and affiliated sites, so we can make more videos.

Share and Enjoy !

Home Fried Potatoes Crispy Breakfast Recipe

home fried potatoes recipe

This crispy home fried potatoes recipe makes a tasty breakfast side. I use onion and hot pepper in this video/recipe, but a little added green bell pepper is nice, too.

Home Fried Potatoes Recipe Ingredients

1 large POTATO
2-3 Tbsp BACON FAT
1/3 cup ONION (finely chopped)
¼ cup GREEN BELL PEPPER (finely chopped, optional)
HOT PEPPER (to taste, finely chopped)
1 tsp SMOKED PAPRIKA
SALT and PEPPER to taste

How to Make Home Fried Potatoes

  • In a skillet, fry up 4-5 pieces of fatty bacon, this will give you enough grease to cook up your potatoes.
  • Peel your potato, which is something I hate to say, ’cause potato skin is so delicious, but the breakfast home fries I grew up with were peeled, so that’s how I gotta roll.
  • Dice your potato into dinky cubes; they don’t have to be exactly the same same, but mostly they do, so cut them as uniformly as possible.
  • Add your diced potato to the skillet of hot grease–and by hot, I mean that your potatoes start to sizzle and cook when they hit the pan–but not overly hot, ’cause it will take 20-25 minutes to cook these potatoes up just right. Medium-low heat is a good temp, keep the potatoes sizzling, they need to crisp on the outside, but they also need to cook through on the inside, otherwise you’ll end up with a bunch of crispy, raw potato; so go slow, amigo.
  • Mix your potatoes with the grease and spread them out in the skillet and let them brown for about 5 minutes.
  • Add finely chopped onion and hot peppers; if desired, also add a little finely chopped green bell pepper for taste and color…I usually do, but if I don’t have it on hand, it’s not the end of the world–it’s just breakfast, man.
  • Mix the ingredients well and spread out in the skillet and let cook another 5 minutes.  If you don’t have a good pan, here are some current prices for cast iron skillets on Amazon.
  • Add paprika, stir and continue to cook for another 10 minutes, stirring occasionally, until the potatoes are cooked through and done to the desired crispness.
    The key is to not cook the potatoes too fast.

Give this home fried potatoes recipe a try and let me know what you think, and bon appétit!

And for a fancy pants breakfast dish, try this Baked Eggs Recipe.

baked eggs
Baked eggs are an easy way to impress folks for breakfast.

Thanks for checking out the home fried potatoes recipe, and all of our recipes. Be sure and sign up for our mailing list to never miss a new cooking video, and also click a button below and share the dishes with your friends, and follow Chef Buck on Youtube. We appreciate all the kind comments and support, and we’ll see you next time in the kitchen!

If you like what CG and I do, support us on Patreon, or throw a tip in our Paypal Tip Jar We’ll happily enjoy a coffee on the road, or maybe even pay a bill or two!–Thanks! We appreciate all the support, and we’ll see you next time in the kitchen!

Thanks for watching our recipe videos!

We include affiliate links for products on our website, so if you make a purchase after clicking on our links, we may earn a commission which helps us produce more videos and drink more coffee :^) We participate in the Amazon Services LLC Associates Program, which is an affiliate advertising program providing a means for us to earn fees by linking to Amazon.com and affiliated sites, so we can make more videos.

Share and Enjoy !

Broccoli Recipe – Best Blue Cheese Broccoli

Broccoli with Blue Cheese

Try this super-quick and awesome broccoli recipe. If you like blue cheese then you’ll love this dish, in fact, you’ll actually love broccoli if you only just liked it before …I know, kinda confusing, but trust me, this is a pretty damn tasty broccoli dish–and healthy, too. So make it.

Bad-ass Blue Cheese Broccoli Recipe Ingredients:
5 cups BROCCOLI FLORETS
¼ cup CARROT strings
2-3 oz BLUE CHEESE crumbled
¼ cup SUNFLOWER SEEDS (shelled and toasted)
SALT and PEPPER to taste

Broccoli with Blue Cheese
Broccoli with Blue Cheese Recipe

directions:
Toast the sunflower seeds (already shelled). This can be done quite quickly in a hot pan or skillet. Heat pan or skillet on medium/med-low heat; not too hot or seeds will burn. Add sunflower seeds and spread them into a single layer. Do not use any oil or spray in the pan. Stir the seeds in the skillet for a couple of minutes until they begin to brown, lightly browned is perfect; they’re easy to over-toast, so don’t leave them too long. It will only take 2 minutes on medium heat.
Remove seeds from heat and set aside.

Cover the bottom of a pot with about ¼ inch of water, just enough for steaming the broccoli and carrots. Add The broccoli florets to the pot and top with the carrot strings. Raise the heat, cover the pot, and allow the veggies to steam for approx. 5 minutes; ideally the florets will be cooked through, soft but not soggy!

Turn off the heat and drain any remaining water in the sink. Add salt, pepper, the toasted sunflower seeds, and 2-3 ounces of crumbled blue cheese.
Lightly toss ingredients together and serve while hot.
This dish is super-simple and amazingly delicious –as long as you like blue cheese.
Give this broccoli recipe a try and let me know what you think, and bon appétit!

And for another great veggie dish, try this tasty Beet Greens Recipe.
beet greens saute

Share and Enjoy !


Quinoa Salad Recipe – Vietnamese Bánh Mì Style

A quinoa salad recipe inspired by the tasty flavor combinations found in a Vietnamese bánh mì sandwich. Quinoa provides a complete protein, making this dish an ideal vegetarian recipe.

Quinoa Salad Recipe Ingredients

1 cup QUINOA (uncooked)
2 cups DAIKON/CARROT RELISH (chopped)
2-3 JALAPENOS (finely chopped)
2 cups SALAD CUCUMBER (diced)
1 cup chopped CILANTRO
3 Tbsp MAYONNAISE
1 small LEMON (zest and juice)
2 Tbsp rice VINEGAR
SALT and PEPPER to taste
SALAD GREENS (I use a combo of Spinach and Red Leaf Lettuce, but use your favorite)

How to make a Bánh Mì Quinoa Salad

Cook up the quinoa just like rice: 1 part quinoa to 2 parts water, bring to a boil, reduce heat, cover and simmer for 15 minutes or until the water is absorbed. Fluff the quinoa and then set aside uncovered to cool.

Prepare the veggies: Dice 1 large salad cucumber, also called an English cucumber; these are great in a salad because the skin is thin and quite enjoyable to eat, and also adds a nice texture. Finely chop 2-3 whole jalapeno peppers, seeds and all. Chop 1 bunch of cilantro, including the stems. Chop 2 cups of pickled daikon and carrot.

Quinoa Salad -- Banh Mi Style
Quinoa Salad — Banh Mi Style

Prepare the dressing: Remove and mince the zest from 1 small lemon and place in a small bowl. Add the juice from the lemon, rice vinegar, mayonnaise, and salt and pepper. Mix well until the dressing is smooth.

In a large bowl, place the cooled quinoa. Add ½ of the dressing, the jalapenos, cilantro, and daikon/carrot, and mix well. Add the diced cucumbers and toss. Add salt and pepper, and more dressing as desired. I also add a bit of the pickling solution from the daikon/carrot pickle.
Serve the quinoa salad over a bed of leafy greens and garnish with cilantro.

Give this banh mi quinoa salad recipe a try and let me know what you think!

If you’re new to home cooking, get a bunch of spices, pots and pans, and start experimenting with different recipes. It’s a healthy hobby that can save a lot of money in the long run. Check out current prices for Complete Kitchenware Sets on Amazon as well as Complete Starter Spice Kits. Or try a thrift store! I’ve found some of my favorite kitchen gear at second-hand stores.

For another Asian inspired vegetarian dish, try this Ramen Noodle Crunchy Slaw Recipe.

crunchy slaw
Crunchy coleslaw or noodle salad? What sounds tastier?

Thanks For Watching Our Recipe Videos!

Thanks for checking out this quinoa salad recipe, and all of our recipes. Be sure and sign up for our mailing list so you’ll never miss a new recipe. Also click a button below and share the dishes with your friends. You can also follow Chef Buck on Youtube. We appreciate all the kind comments and support, and we’ll see you next time in the kitchen!

If you like what CG and I do, you can also support us on Patreon, or throw us a tip in our Paypal Tip Jar. We’ll happily enjoy a coffee on the road – Thanks! We appreciate all the support, and we’ll see you next time in the kitchen!

We include affiliate links for products on our website. So, if you make a purchase after clicking on our links, we may earn a commission which helps us produce more videos and drink more coffee :^) We participate in the Amazon Services LLC Associates Program, which is an affiliate advertising program. It provides a means for us to earn fees by linking to Amazon.com and affiliated sites, so we can make more videos.

Share and Enjoy !

Pickled Daikon and Carrot Relish –Vietnamese Style

Vietnamese Pickled Daikon and Carrot Relish

Vietnamese-style pickled daikon and carrot make a handy relish than can be used with salads, sandwiches, and all kinds of recipes. It’s a must have for making a banh mi sandiwich and I use it quite often as a salad topper and also dice it up to add to tuna, chicken, and quinoa salads. Keep a jar of pickled daikon and carrot in your fridge and experiment adding it to some of your favorite dishes.

Pickled Daikon and Carrot Ingredients:
2 cups cut DAIKON
2 Cups Cut CARROT
1-2 tsp SALT
¼ SUGAR
½ cup WATER (hot from tap)
½ cup VINEGAR

pickled daikon
Pickled daikon and carrot is a tasty and versatile relish to have in the fridge–awesome on sandwiches and salads.

directions:
Daikon is a BIG radish. When buying, choose one that is firm–if the daikon has green tops attached, choose one without wilted leaves, but often the tops are not attached. The skin is thin and can be peeled off with a simple vegetable peeler. The same is true for carrots, although I generally leave the skin on the carrots, but follow your heart. Slice and cut the daikon and carrot into matchstick sizes and place into a bowl. Add salt to the bowl and mix well with the daikon and carrot so that the veggies are coated. This will draw water out of the vegetables and soften them. Set bowl aside.
In a smaller bowl, prepare the pickling solution. Combine warm tap water and sugar. Stir until dissolved and then add the vinegar. And that’s it!
In the larger bowl, the salt will have started drawing moisture from the daikon and carrot matchsticks. When they have softened enough, cram them into a storage container and add the pickling solution.
This pickled combo will keep in your fridge for 2-3 weeks. It’s a must have topping for Vietnamese banh mi sandwiches and works well in all kinds of sandwiches. Use this relish as a topping for salads or chop it up to incorporate in whatever dish you desire (it’s great in a coleslaw or quinoa salad).
Give this pickled daikon and carrot relish a try and let me know what you think, and bon appetit!

And if you wanna see this relish in action, check out this deconstruction of a Banh Mi Sandwich.
bahn mi

Share and Enjoy !


Stewed Prunes with Orange and Ginger

Stewed prunes are a tasty breakfast side or snack, and even a passable dessert. Orange and ginger make this stewed prune recipe naturally sweet and flavorful.

Ingredients for Stewing Prunes

2 cups pitted PRUNES
1 Tbsp ORANGE ZEST (minced)
juice from 1 large ORANGE
1-2 tsp minced fresh GINGER

stewed prunes

How to Make Stewed Prunes

Check current prices for prunes on Amazon.

  • Zest 1 large orange. Use approx. 1 tbsp of minced zest for this recipe.
  • Juice the orange.
  • In a small saucepan on medium heat, add the prunes and orange juice. Add just enough water to cover the tops of the prunes; don’t use too much water.
  • Stir in the orange zest and minced ginger. Some folks like to add a little brown sugar or maple syrup for added sweetness, but I don’t think it’s needed; prunes are sweet enough and the orange juice will add plenty of natural sugar.
  • Cover and allow the saucepan to come to a bubble. Reduce heat to low, and simmer gently for 25-30 minutes. The liquid will cook down and the prunes will plump up.

Eat them plain or serve stewed prunes with yogurt or cereals. They make a great breakfast side. Some people like to treat them like a dessert, even serving them with ice cream.

Stewed prunes make a tasty treat and are a great source of fiber and nutrition.
Prunes can be stewed up with all manner of flavors. Some popular additions to stewed prunes are cinnamon, cardamom, cloves, brown sugar, and maple syrup.
Pitted prunes make a great snack all on their own, and stewing them up makes them a little more versatile. Give this stewed prunes recipe a try and let me know what you think…and bon appétit!

stewed prunes

Prune Fun Facts

  • Prunes are high in fiber and a natural laxative.
  • The word “laxative” is not very appetizing.
  • Ounce for ounce, prunes contain more potassium than bananas.
  • Prunes are fat free.
  • Prunes can reverse bone loss and preserve bone structure, reducing the risk of brittle bone fracture.

Serve stewed prunes as a side for this healthy Tofu Breakfast Scramble.

tofu recipe
Delicious and Nutritious way to start the day

Thanks For Watching Our Recipe Videos!

Thanks for checking out this stewed prunes recipe, and all of our recipes. Sign up for our mailing list so you’ll never miss a new recipe. Also click a button below and share the dishes with your friends. You can also follow Chef Buck on Youtube. We appreciate all the kind comments and support, and we’ll see you next time in the kitchen!

If you like what CG and I do, support us on Patreon, or throw us a tip in our Paypal Tip Jar. We’ll happily enjoy a coffee on the road – Thanks! We appreciate all the support, and we’ll see you next time in the kitchen!

We include affiliate links for products on our website. Making a purchase after clicking on our links and we may earn a commission which helps us produce more videos and drink more coffee :^) We participate in the Amazon Services LLC Associates Program, which is an affiliate advertising program. It provides a means for us to earn fees by linking to Amazon.com and affiliated sites, so we can make more videos.

Share and Enjoy !

Kale Salad – Tips for Using Raw Kale Greens

fresh kale

Why eat raw kale salad? Kale is a so-called SUPERfood chock full of big-time nutrition and very fashionable in salad circles, so if you wanna be one of the cool kids, ya gotta eat it. If the Popeye franchise is ever re-booted, I’m sure our vegetable-friendly sailor will be shunning spinach and downing kale by the bunches–not that there’s anything wrong with spinach, but at the moment the kale lobby is a juggernaut.

Check out this video for tips on making a raw kale salad:

Kale Nutrition and Fun Facts

Kale belongs to the same family as cabbage, Brussels sprouts, and collards.
Kale is packed with antioxidants, which help neutralize harmful free radicals in the body.
One cup of chopped raw kale provides more than 100% of the daily value of vitamins A, C, and K.
In fact, Kale has more vitamin C than an orange.
Free Radicals are a thing scientists made up to sound smart.
Baked kale becomes crispy and can be substituted for potato chips.
Kale freezes well for future use.
Kale is a great addition to a soup.
Kale is believed to promote cell repair and may block the growth of cancer cells.

Wow…doesn’t that sound terrific? Who could pass up on that! Too bad kale doesn’t taste like a slice of coconut cream pie, but you can’t have everything. It is a tasty addition to a salad, though–and utilizing raw kale will insure the greatest health benefit from this leafy superfood.

kale salad
Raw kale salad with olives, artichoke, red leaf lettuce, and a carrot/daikon slaw.

Prepare fresh foods at home and have fun in the kitchen. Get a bunch of spices, pots and pans, and begin experimenting with different recipes. home cooking is a healthy hobby that will save you tons of money in the long run. Check out current prices for Complete Kitchenware Sets on Amazon as well as Complete Starter Spice Kits. Or go to a thrift store! I’ve found some of my favorite kitchen gear at second-hand stores.

Green is the way to go for a healthy lifestyle. Check out this simple recipe trick for Getting Raw Broccoli Into Your Diet.

raw broccoli
Raw broccoli is high in vitamins and nutrients and is great for digestive health.

Thanks for checking out the recipes. Be sure and sign up for our mailing list so you’ll never miss a Chef Buck cooking video, and click a button below and share the dishes with your friends. We
appreciate all the kind comments and support, and we’ll see you next time in the kitchen!
–Chef Buck

Share and Enjoy !


Cook Chinese Eggplant Recipe with General Tso’s Sauce

Chinese Eggplant Recipe with Sweet Sauce

Cook Chinese Eggplant for a terrific vegetarian meal that will not having you missing the meat. For this Chinese eggplant dish, I use a sauce similar to one I use making General Tso’s Chicken, so it’s a rich and filling eggplant dish, hearty and vegetarian at the same time.

ingredients to cook Chinese Eggplant Recipe

1½ lbs CHINESE EGGPLANT
4-6 Tbsp OLIVE OIL
3 cloves GARLIC (finely chopped)
1-2 RED CHILIES (thinly sliced)
½ cup whole CASHEW NUTS
1 bunch GREEN ONIONS
1 Tbsp SESAME OIL
sauce ingredients:
1/3 cup SOY SAUCE
2 Tbsp HOISIN SAUCE
1 tsp SESAME OIL
2 Tbsp RICE VINEGAR
2-3 Tbsp BROWN SUGAR
1 Tbsp GINGER (minced)
2 Tbsp CORN STARCH
1½ cups WATER

cook Chinese Eggplant
Chinese Eggplant with Cashew Nuts and Sweet Sauce

how to cook Chinese Eggplant Recipe with General Tso’s Sauce

In a small bowl, combine all of the sauce ingredients. The fresh minced ginger is optional, but if you love ginger, why not? I also use 2 heaping Tbsp of brown sugar, but you can use more or less sugar depending on how much sweet you like–but the sweet is good with this recipe. Mix the sauce ingredients well and then set aside.
Cut your Chinese eggplant. You should buy firm eggplant with glossy, unblemished skins. Cut into pieces approx. 2″ long and ½” wide.
In a skillet or wok, heat olive oil on med. high heat. When the oil is hot, add eggplant. Saute eggplant 5-7 minutes. The eggplant will soak up the oil, so add more oil as needed or desired. Saute until the eggplant colors and begins to soften and then remove eggplant from the skillet. In the same hot skillet, add sesame oil and heat. Add garlic, hot pepper, and cashew nuts (or sub peanuts). Saute for 1 minute or until garlic colors. Add sauce and green onion bottoms. Stir sauce slowly. Because of the added corn starch, the sauce will quickly heat through, darken, and thicken. When the sauce has thicken to a a gravy/syrup consistency, return the eggplant to the skillet. Mix well, then cover the skillet and allow to simmer until the eggplant has finished cooking, 3-5 minutes depending on the size of the eggplant pieces. Stir in green onion tops. Fresh chopped cilantro also adds an excellent taste and garnish.
And that’s a very tasty way to cook Chinese eggplant.
Serve with rice, or without rice…and enjoy.
And for a tasty General Tso’s Chicken Recipe, click the pic below.

general tso chicken
click pic for recipe

Thanks for checking the recipe out. If you liked it, click a few buttons below and share it with your friends, I appreciate it.
–Chef Buck

Share and Enjoy !


Green Bean Recipe for people who hate green beans

This green bean recipe reminds me of the green beans we sometimes get out at Chinese restaurants; I’m not a fan of green beans, but if I gotta eat them, I like them like this or in a green bean casserole.  This dish is pretty simple to make and has a lot of nice nutritional stuff in it–you can forego the butter if you want and just use oil–but you’re already eating green beans, so isn’t that punishment enough?

Green Bean Recipe ingredients

1 lb. GREEN BEANS
½ large ONION (sliced)
2 Tbsp GARLIC (finely chopped)
1 Tbsp GINGER (finely chopped)
CHILI PEPPERS to taste (finely chopped)
1 Tbsp BUTTER
1 Tbsp OLIVE OIL
2-3 Tbsp SOY SAUCE
½ tsp SESAME OIL …current sesame oil prices on Amazon
SALT and PEPPER to taste
garnish w/ toasted SESAME SEEDS

chinese green bean recipe
green beans

Green Bean Recipe Directions

I’m not a fan of green beans, but this recipe is a quick way to make them edible.
First, trim the green beans by “snapping” off the ends–fresh beans will snap easily, and if there is a fiborous, stringy seam along the bean, this can be pulled off as well.

Bring a pot of lightly salted water to a boil and add the green beans. Allow to cook 2-3 minutes, the longer the beans are in the water, the softer they will get, but why overcook them? They’re already awful green beans, so you might as well get some nutrition out of them.

Remove the beans from the hot water and place in an ice bath for 1 minute. This is called blanching–it stops the cooking process, keeps the beans crisp and maintains the bright, green color of the beans. After a minute, drain the beans.

While the beans drain, heat olive oil and butter in a skillet. Add sliced onion, garlic, ginger, and chili peppers and saute for 2 minutes. Add drained green beans and continue cooking another 2 minutes. To finish, add soy sauce and sesame oil and mix well, then remove skillet from the heat. Check here for current pricing for a non-stick skillet on Amazon.

That’s it! Serve them hot and garnish the dish with toasted sesame seeds for optimal flavor potential.
Enjoy.

For another nightmare ingredient from childhood, revisit a new and tasty way to eat raw The Horror That Is Broccoli!

raw broccoli
Raw broccoli is high in vitamins and nutrients and is great for digestive health.

Thanks for checking out our green bean recipe, and all of our recipes. Be sure and sign up for our mailing list and never miss a new Chef Buck cooking video, and also click a button below and share the dishes with your friends. We appreciate the kind comments and support, and we’ll see you next time in the kitchen!
–Chef Buck

Thanks for watching our recipe videos!

We include affiliate links for products on our website, so if you make a purchase after clicking on our links, we may earn a commission which helps us produce more videos and drink more coffee :^) We participate in the Amazon Services LLC Associates Program, which is an affiliate advertising program providing a means for us to earn fees by linking to Amazon.com and affiliated sites, so we can make more videos.

Share and Enjoy !

Spicy Crispy Chickpea Recipe -great salad topping!

Here’s a quick, spicy chickpea recipe that makes a great salad topping and a so-so snack; it’s a lot easier on your teeth than baked chickpea snacks, which I find to be almost inedible (they tend to turn into tiny rocks).

ingredients:
15 oz can CHICKPEAS
2-3 Tbsp OLIVE OIL
½ tsp CURRY POWDER
½ tsp CUMIN
½ tsp PAPRIKA
dash CAYENNE PEPPER
SALT to taste

chickpea recipe

Rinse and drain a 15oz can of chickpeas (garbanzo beans). In a skillet, heat olive oil on medium heat. When the oil is hot, add chickpeas–be sure that they are drained well, since water and hot oil definitely do not mix. Saute chickpeas for 10-15 minutes; obviously, the longer they’re in the skillet, the crispier they will get, but it’ll take about 15 minutes to get them “crispy”. Once the chickpeas get near the doneness you desire, add salt, pepper, and spices. The spice combo in the recipe works well, but experiment with whatever spices you have–and don’t be shy with the spices–spice really makes this recipe work, and a good deal of the spice you use will remain in the skillet when you remove the chickpeas. Saute chickpeas and spices another 2-3 minutes and then remove from the heat.
Use them as a salad topping instead of croutons for a healthy crunch, or a just tasty snack, something to nibble on besides potato chips.
Enjoy!

Ever try Chickpea Curry(chana masala)? It’s a terrific Indian chickpea dish.

Share and Enjoy !


Edamame Recipe –Roasted Snack and Salad Topping

Try this roasted edamame recipe for a quick semi-healthy snack. The toasted Parmesan cheese will almost make you forget that you’re eating soybeans.

Roasted Edamame Recipe Ingredients:
10 oz frozen shelled EDAMAME (green soybeans)
1 Tbsp OLIVE OIL
1 tsp GARLIC POWDER (also add or substitute onion powder, chili powder)
SALT and PEPPER to taste
¼ cup shredded PARMESAN CHEESE

directions:
Preheat oven to 425 degrees F.
Mix frozen edamame beans (no need to thaw), olive oil, fresh-cracked black pepper, salt, garlic powder, and Parmesan cheese together in a large bowl. Try experimenting with different seasonings; substitute onion powder or chili powder for the garlic–or add them all–this is an easy snack food to change up for a little variety.
Spread mixture onto an ungreased baking sheet.
Place in oven and bake for 8-10 minutes and then remove from oven and stir. Spread edamame out again and cook another 8-10 minutes, until the cheese is toasted crispy and golden.
Add additional salt or garlic powder if desired.

Roasted edamame makes a great salad topping.

Eat as a quick snack–it is delicious hot out of the oven–or use as a topping for salads and whatnot.

Tastes great hot out of the oven--perfect for snacking.  Try it as a movie treat instead of popcorn.
Tastes great hot out of the oven–perfect for snacking. Try it as a movie treat instead of popcorn.

Give this roasted edamame recipe a try and let me know what you think, and bon appetit!

And for another quick and healthy salad topper, try this Spicy Chickpea Recipe.

chickpea snack recipe

Roasted edamame or chickpeas are both great components in a salad. A super-flavorful and healthy salad ingredient is kale. It’s extremely versatile and can be eaten raw or cooked. Click on the video link below to discover some simple tips on using raw kale in your next salad.

avocado kale w/ chickpeas
raw avocado kale salad

Share and Enjoy !


Asparagus Recipe — Tangy Lemon Ginger Asparagus

Asparagus is one of those veggies you cook when you’re trying to impress–and this asparagus recipe will do the job. The lemon adds a nice zing while the whole fennel/mustard seeds add flavor and texture without overpowering the great taste of asparagus.

Asparagus Recipe Ingredients:
1½ lb. ASPARAGUS
1 small LEMON (zest and juice)
2 Tbsp OLIVE OIL
½ tsp FENNEL SEEDS
½ tsp MUSTARD SEEDS
3-4 cloves GARLIC (or more…go for it, dude)
1 inch GINGER (which should end up being between 1-2 Tbsp thinly sliced)
SALT and PEPPER to taste

When buying asparagus, thin is better than thick. Choose firm spears. Avoid asparagus that have a wrinkled skin, or tips that are wet and greasy looking. Rinse and drain the asparagus spears, then chop into 1 inch pieces. When slicing, leave the tops of the spears intact so they don’t fall apart while cooking. Heat olive oil on medium heat in a skillet. When oil is hot, add mustard and fennel seeds and stir for 20-30 seconds–not long at all. Add garlic and ginger–a lot of ginger; I use about 1 inch, thinly sliced–about the size of a fish scale. Stir skillet 1 minute, lower heat if necessary.
Stir in asparagus. Add salt and pepper to taste. I like my asparagus to retain a bit of crunch–who likes mushy asparagus?–so this dish doesn’t take long to cook. Saute for about 4 minutes and the dish will be done. From the time you add the seeds to completion, the cooking time will only be about 5 minutes–of course you can extend the cooking time if YOU DO like softer asparagus (crazy!)–but everybody likes what they like, so namaste, man. About a minute before the dish is done, add the lemon zest. When the asparagus is crunchy or soft the way you like it, and you’re ready to get it off the heat, add the lemon juice, stir, and serve.
It’s a tasty asparagus dish and a perfect side for a nice steak (or whatever).
Give this asparagus recipe a try and let me know what you think, and bon appétit!

If you enjoy asparagus, you likely love this Brussels Sprouts Recipe.
brussels sprouts

Share and Enjoy !


Coleslaw Recipe with a Curry Twist

coleslaw

Chickpea curry and coleslaw are two of my favorite foods, so combining them is a win-win. This dish makes a perfect side for a spicy meal or a fancy-pants hamburger, so give chickpea curry coleslaw a go and let me know what you think.

Curry Coleslaw Dressing Ingredients

1 tsp CORIANDER
½ tsp TURMERIC
½ tsp CUMIN
2 Tbsp SUGAR
1 tsp GINGER (minced)
1 tsp GARLIC (minced)
2 Tbsp VINEGAR (or substitute fresh lemon juice and zest–very tasty!)
¼ cup SOUR CREAM (or substitute plain yogurt)
¼ cup MAYONNAISE

Slaw:
14 oz can CHICKPEAS
½ small CABBAGE (shredded)
2 medium CARROTS (shredded)
½ cup CILANTRO (chopped)
SALT and PEPPER to taste

chickpea curry coleslaw

How to Make Coleslaw

In a small bowl, combine ingredients for dressing and whisk together until smooth. Be sure the ginger and garlic are minced well. I’ve sometimes substituted lemon juice for the vinegar and it tastes great; if using fresh lemon, also throw in a little (or a lot) of the zest.

In a larger bowl, combine cabbage, carrots, and a 14oz can of chickpeas (rinsed and drained). Add dressing and mix well. Add salt and pepper to taste (a dash of cayenne will add a little bite). Add cilantro.

Try this curry twist on a classic coleslaw, you’re going to love it.

For an Asian twist on slaw. try this Crunchy Ramen Noodle Slaw Recipe.

crunchy slaw
Crunchy coleslaw or noodle salad? What sounds tastier?

We Hope You like the Curry Coleslaw

Sign up for our mailing list so you’ll never miss a new recipe. Also click a button below and share the dishes with your friends. You can also follow Chef Buck on Youtube. We appreciate all the kind comments and support, and we’ll see you next time in the kitchen!

If you like what CG and I do, support us on Patreon, or throw us a tip in our Paypal Tip Jar. We’ll happily enjoy a coffee on the road – Thanks! We appreciate all the support, and we’ll see you next time in the kitchen!

We include affiliate links for products on our website. Making a purchase after clicking on our links and we may earn a commission which helps us produce more videos and drink more coffee :^) We participate in the Amazon Services LLC Associates Program, which is an affiliate advertising program. It provides a means for us to earn fees by linking to Amazon.com and affiliated sites, so we can make more videos.

Share and Enjoy !

Share and Enjoy !

Quinoa Curry Recipe meets Thai Curry

quinoa curry recipe

Try this quinoa curry recipe with a tasty Thai influence. This is a helpful quinoa recipe to make when you’ve got a lot of vegetable odds and ends to out of the fridge.

Quinoa Curry Recipe Ingredients

½ cup QUINOA …check quinoa prices on Amazon
1 15 oz can COCONUT MILK
1 lg ONION (chopped)
1 inch GINGER (thinly sliced)
2 cloves GARLIC (finely chopped)
1 Hot Pepper (chopped, as desired)
1 RED BELL PEPPER (sliced)
¼ cup fresh BASIL (or CILANTRO) (chopped)
2 CARROTS (sliced)
½ small CAULIFLOWER (florets)
1 cup CABBAGE (chopped)
2 Tbsp OLIVE OIL
1 tsp CORIANDER POWDER
½ tsp CUMIN
½ tsp CHILI POWDER
½ tsp TURMERIC
OR, INSTEAD OF THE ABOVE SPICE COMBINATION, USE 1-2 Tbsp OF A PRE-MIXED CURRY
SALT and PEPPER, to taste
…and garnish with finely chopped PEANUTS

quinoa curry recipe

How to make a Quinoa Curry Recipe

  • In a small pot, bring 1/2 cup quinoa and 1 cup water to a boil.
  • Reduce heat and allow to simmer 13-15 minutes until water is absorbed.
  • Remove from heat, fluff with fork, and set aside. Check here for current prices for quinoa on Amazon.
  • In a large skillet, heat olive oil on medium high heat and then add onion, garlic, and hot pepper and saute for 3-4 minutes.
  • Add spices and mix well, and if you are a slave to the spice, don’t be afraid to add a little more.
  • Add a can of coconut milk and stir thoroughly, mixing completely with the spices and onion.
  • Let the coconut milk heat through, and then add ginger, carrot, cauliflower, and bell peppers. Continue stirring, adding salt and pepper to taste.
  • Bring the ingredients to a bubble, then reduce heat, cover, and allow skillet to simmer for 5 minutes.
  • After 5 minutes, uncover and add in the cabbage.
  • Add in the cooked quinoa.
  • Stir and allow another minute or two until veggies are cooked to your liking.
  • Add in fresh basil or cilantro and remove the skillet from heat.
  • Garnish with ground peanuts and serve immediately.

And that’s a quinoa curry recipe with a little taste of Thai thrown in for good measure. Give the recipe a try and let me know what you think, and bon appetit!

For another tasty twist on a Thai recipe, try this Pad Thai Recipe made with spaghetti squash.

pad thai recipe
pad thai recipe with spaghetti noodles

Thanks for Watching our Quinoa Curry Recipe

Click a button below and share the dishes with your friends. You can also follow Chef Buck on Youtube. We appreciate all the kind comments and support, and we’ll see you next time in the kitchen!

If you like what CG and I do, support us on Patreon, or throw us a tip in our Paypal Tip Jar. We’ll happily enjoy a coffee on the road – Thanks! We appreciate all the support, and we’ll see you next time in the kitchen!

We include affiliate links for products on our website. Making a purchase after clicking on our links and we may earn a commission which helps us produce more videos and drink more coffee :^) We participate in the Amazon Services LLC Associates Program, which is an affiliate advertising program. It provides a means for us to earn fees by linking to Amazon.com and affiliated sites, so we can make more videos.

Share and Enjoy !

Pesto Bread Recipe with Parmesan Cheese

parmesan pesto bread

Bake a delicious homemade Pesto Bread Recipe following this step-by-step instruction with Mama Redbuck. Mama bakes the best homemade bread from scratch and this is a fancy braided bread recipe that will wow your family.

What you need to make Pesto Parmesan Bread

5 ½ cups unbleached BREAD FLOUR
2 cups WARM WATER (approx. 130 degrees F)
2-4Tbsp OLIVE OIL
2 Tbsp SUGAR
½ cup SKIM MILK POWDER
1 Tbsp KOSHER SALT
1 Tbsp INSTANT YEAST
PESTO (approx. 1 cup divided between loaves)
1 cup PARMESAN CHEESE (shredded and divided)
a sprinkle of CORN MEAL ……………..recipe makes 2 loaves

How to this Pesto Bread Recipe

Sift 5 ½ cups of unbleached bread flour. Bread flour has a higher gluten count than all-purpose flour; gluten holds in the gases released by the yeast, enabling the bread to rise.

In a bowl, add 2 cups of warm water (approx 130 degrees F). Add 2 Tbsp olive oil, sugar, milk powder, salt, and yeast. Mix well.

1 cup at a time, add the sifted flour into the bowl until the dough thickens. Do not add all of the dough into the bowl. As soon as the dough in the bowl reaches a density forming a sticky ball, remove dough from the bowl and place onto a surface coated with flour. Continue adding the sifted flour to the ball, turning and folding the flour into the dough ball.

Continue this kneading process for 8-10 minutes, adding dough as needed (the entire 5 ½ cups may not be needed). Kneading transforms the dough into a more elastic consistency, enabling the gluten in the dough to better trap the gases from the yeast.

After kneading, place the dough into a bowl coated with 1 Tbsp of olive oil. The bowl should be at least twice the size of the dough ball. Cover bowl and set aside for 45-60 minutes to allow the dough to rise. The dough will expand to approx. double in size.

pesto Bread recipe

When dough has risen, push a floured fist into the top of the dough—this will release the gas. Remove dough from bowl and divide into equal halves. Mama Redbuck uses a kitchen scale to weigh her dough and divide equally; size is important because you want equal-sized loaves that will bake evenly. If you don’t have a scale, just estimate the size, but make sure the loaves are fairly close in size.

With a rolling pin, spread one of the dough halves into a square approx. 9 X 14 inches. Spread ½ cup of prepared pesto evenly over the flattened dough. Sprinkle top with ½ cup shredded, parmesan cheese.

Roll up the dough and toppings into a 14 inch “burrito” shape, folding and pinching the ends shut. With a sharp knife, cut lengthwise down the center of the rolled bread, creating halves. Cut gingerly, being mindful not crush the layers of dough, and leave one of the very ends attached so as to not separate the halves completely. Fold the bread halves into a braid. Keep the cut sides of dough facing upward.

Coat a loaf pan with olive oil and sprinkle the bottom of the pan with a light dusting of corn meal; this will help keep the bread from sticking to the bottom of the pan as it bakes. Transfer braided bread “face-up” into pan and cover. Repeat this processes with the other dough half and then set the 2 loaf pans aside for 1 hour to allow them to continue to rise.

After the loaves have risen, place them in an oven pre-heated to 375 degrees F and bake approx. 35-40 minutes.

Remove bread from oven. Parmesan cheese and pesto may be melted to the inside of the pan and you may need to cut around the edges of the pan with a knife. Remove loaves and place on a cooling rack, but don’t let the bread cool for too long before cutting off a slice—it’s delicious warm.

Getting into baking? My mom uses a Danish Whisk in this recipe, and you can check here for current prices for a Danish Whisk on Amazon.

Give this Parmesan Pesto Bread Recipe a try and let me know what you think, and for another tasty bread dish, watch Mama Redbuck cook up a beautiful Rosemary Bread Recipe.

rosemary bread

Thanks for checking out our non-alcoholic Bananas Foster Recipe, and all of our recipes. Be sure and sign up for our mailing list and never miss a new Chef Buck cooking video, and also click a button below and share the dishes with your friends. We appreciate all the kind comments and support, and we’ll see you next time in the kitchen!

Thanks for watching our recipe videos!

Should you even eat bread? Of course! But what does the New Yorker say about gluten?

We include affiliate links for products on our website, so if you make a purchase after clicking on our links, we may earn a commission which helps us produce more videos and drink more coffee :^)

We participate in the Amazon Services LLC Associates Program, which is an affiliate advertising program providing a means for us to earn fees by linking to Amazon.com and affiliated sites, so we can make more videos.

Share and Enjoy !

Chinese Eggplant Recipe – healthy, low-fat dish

chinese eggplant

This Chinese eggplant recipe is awesome because it’s purple–not purple like a black eye–but purple like Barney the Dinosaur, which is nice.

Choose eggplants that are firm and have a glossy skin. The skin is thin and tasty, and Chinese eggplants have smaller seeds than the black, bowling ball eggplant you might be used to preparing. They’re a great ingredient for a stir-fry and can stand in for meat without being as awful as tofu. So give ’em a try.

What you need for this Chinese Eggplant Recipe

3 small CHINESE EGGPLANTS
3-4 Tbsp OLIVE OIL
5 cloves GARLIC (finely chopped)
1 inch GINGER (thinly sliced)
2 tsp MUSTARD SEEDS
1 Tbsp ground CORIANDER
1 bunch GREEN ONIONS (chopped)
1 JALEPENO or other hot pepper (sliced)
SALT to taste
— optional garnishes —
SOY SAUCE or CHILI GARLIC SAUCE

How to cook Chinese Eggplant

Heat oil in a skillet on medium high heat. If you need a nice skillet, you can check here for current pricing for a non-stick skillet on Amazon.

When oil is hot, add garlic and ginger. Add mustard seeds and coriander powder and sauté 2 minutes.

Add chopped green onion bottoms and reserve the chopped green onion tops for later. Add hot pepper and continue sautéing for a couple minutes.

Add sliced eggplant (with skin). Choose eggplants that are firm, glossy skinned, and heavy for their size. Slice into rounds no more than 1/4 inch thick. Add salt and stir eggplant. Stir for a few minutes.

Add water as needed, but not too much, the eggplant will release water as it cooks. Reduce heat, cover and cook 10-12 minutes, stiring as needed. The eggplant will be ready when it is soft, but not falling apart. Mix in green onion tops and remove from heat.

Add soy sauce or chili garlic sauce if desired. Serve as a main dish over pasta or rice (or on it’s own as a side dish). Give this Chinese eggplant recipe a try and let me know what you think, and bon appétit!

And for another Asian inspired recipe, try this Japanese-style Teriyaki Chicken Recipe.

chicken teriyaki recipe
teriyaki chicken recipe

Thanks for checking out the recipe, if you liked it, then click a button or two below and share it with your friends.
I really appreciate it, thanks!
–Chef Buck

Share and Enjoy !


Daikon Salad Recipe (mild, white radish)

daikon salad

This daikon salad recipe is crisp with loads natural flavors. Daikon radish has a mild flavor and adds great texture and crunch to a salad.

Daikon Salad Recipe Ingredients:
1 DAIKON RADISH (matchstick cuts, about 2 cups)
1 large CARROT (shredded)
3 salad CUCUMBERS (sliced)
1/2 SMALL CABBAGE (chopped)
1/2 cup rice wine VINEGAR
1/2 cup WATER
2-3 Tbsp SUGAR
3 GREEN ONIONS (chopped)
1 inch GINGER (finely chopped)
1/4 cup CILANTRO (chopped)
1 hot PEPPER (jalapeno, diced)
1/2 cup SLICED ALMONDS (toasted)
1 package RAMEN NOODLES (toasted)
SALT and PEPPER, to taste

Chop vegetables and place in 1 gallon size ziplock (except cilantro). Mix water, vinegar, sugar, and salt and pour over chopped veggies in ziplock. Seal and shake and then place in fridge, occasionally turning. On a baking sheet, spread out almond slices and broken ramen. Bake at 350 degrees F until toasted–watch carefully to avoid burning. Remove from oven and allow to cool. Remove ziplock from fridge and place vegetables in bowl. Toss with toasted nuts, ramen, and cilantro.

For another awesome Asian-inspired salad, try this Thai Beef Salad Recipe.

thai beef salad
thai beef salad recipe

Share and Enjoy !


Best Stuffed Squash Recipe –looks fancy, tastes great!

squash recipe

This stuffed squash recipe is easy to cook, yummy as hell, and looks pretty fancy-pants when you stuff it full of delectable goodies.

Try out the recipe below and let me know what you think. Hope you like it!

Stuffed Squash Recipe Ingredients:

2 ACORN SQUASH (halved, seeds removed)
2 tsp OLIVE OIL
3 cloves GARLIC (minced)
1/2 inch fresh GINGER (minced)
1 CARROT (peeled and chopped)
1 cup GARBANZO BEANS (drained)
1/3 cup RAISINS (or dried currants)
1 tsp ground CUMIN
1/2 tsp ground CINNAMON
[1/4 tsp ground GINGER, if didn’t use fresh]
SALT and freshly GROUND PEPPER, to taste
1 cup BROTH
3/4 cup instant COUSCOUS
1/2 cup SLIVERED ALMONDS (toasted)
2-3 GREEN ONIONS (white and green parts, chopped)
1/2 golden delicious APPLE (cored and chopped)

squash recipe
A squash recipe to impress!.

How to Make Stuffed Squash:

Preheat the oven to 400.
Toast the almonds.
Place the squash halves, cut side down, on a shallow pan with ¼ inch of water. Roast until the squash is easily pierced with a fork, about 30 – 40 minutes.
In a medium saucepan, heat the olive oil over medium heat. Stir in the garlic, ginger, and carrots, and cook 5 minutes. Mix in the garbanzo beans and raisins. Season with cumin, cinnamon, salt, and pepper, and continue stirring for another minute.
Add broth, simmer 5 minutes.
Stir in couscous, cover pot, and turn off heat. Allow couscous to absorb liquid for 5 minutes.
Stir in the almonds, green onions, and apple. Spoon the filling into the roasted squash, mounding generously and serve.
You can freeze leftovers (or make extras). Freeze by mashing the squash on the bottom of the container then adding the couscous mixture on top.
And that’s that.
Give this stuffed squash recipe a try and let me know what you think, and bon appétit!

Also, try this TERRIFIC SPAGHETTI SQUASH RECIPE!
stuffed squash recipe

Thanks for watching and sharing and subscribing, I appreciate it!

Share and Enjoy !


Wow! Healthy French Fries Recipe in the Oven

roasted vegetable fries

You can make French Fries without the guilt of eating French fries! Try this roasted vegetable fries recipe. It’s a super simple recipe that will maximize taste and nutrition.

Sweet potatoes, parsnips, and carrots make delicious fries, especially with a little mustard and maple syrup thrown into the mix. You’ll need a baking pan for this recipe, and you can check out current prices for baking pans on Amazon.

Roasted French Fries Ingredients:

4 Tbsp OLIVE OIL (extra virgin)
3 Tbsp MAPLE SYRUP
3 Tbsp DIJON MUSTARD
SALT and PEPPER to taste

2 med-sized SWEET POTATOES (steak fry-sized pieces)
4 PARSNIPS (peeled, steak fry-sized pieces)
4 CARROTS (steak fry-sized pieces)
1 ONION (sliced)
GARLIC cloves (sliced in halves or whole)
fresh ROSEMARY
french fries

How to Make Roasted French Fries:

  • Preheat the oven to 425 degrees Fahrenheit.
  • When slicing the root veggies, leave on the skins if desired; it will add excellent taste and nutritional value and is less wasteful.
  • Place the sliced veggies in bowl large enough to mix.
  • In a smaller bowl, mix together the syrup, mustard, oil, salt and pepper.
  • Toss the chopped veggies with the syrup mixture, coating the fries well.
  • Spread the fries out in a single layer onto a baking pan, or use two pans if necessary. Make sure the veggies are not piled up or jammed together.
  • Allow the veggies to roast, turning occasionally, until brown and cooked through, about 25 minutes, but it will depend on volume and size of veggies.  The longer you cook the fries, the crispier they will become.


These fries make a great side for chicken, beef, and pork entrees, or it’s a terrific way to transform a vegetarian meal into a hardy feast.
Give this roasted vegetable French fries recipe a try and let me know what you think, and bon appetit!

And for another tasty veggie side, try this Easy Okra Recipe.
french fries

Thanks for Watching our French Fries Recipe Video!

Click a button below and share the dishes with your friends. You can also follow Chef Buck on Youtube. We appreciate all the kind comments and support, and we’ll see you next time in the kitchen!

If you like what CG and I do, support us on Patreon, or throw us a tip in our Paypal Tip Jar. We’ll happily enjoy a coffee on the road – Thanks! We appreciate all the support, and we’ll see you next time in the kitchen!

We include affiliate links for products on our website. Making a purchase after clicking on our links and we may earn a commission which helps us produce more videos and drink more coffee :^) We participate in the Amazon Services LLC Associates Program, which is an affiliate advertising program. It provides a means for us to earn fees by linking to Amazon.com and affiliated sites, so we can make more videos.

Share and Enjoy !

Brussels Sprouts Recipe That Everyone Will Love

brussels sprouts

This is my absolute favorite Brussels Sprouts recipe. it’s super tasty, simple to make, and a healthy choice, too, so definitely give it a try.

Brussels Sprouts Recipe Ingredients

1½ lbs BRUSSELS SPROUTS
3-4 Tbsp OLIVE OIL
½ ONION (chopped)
4-5 cloves GARLIC (finely chopped)
1 LEMON zest and juice …current prices online for Kitchen Zesters
½ cup WATER
SALT and PEPPER, to taste

brussels sprouts recipe
Sear Brussels sprouts in a hot skillet for exceptional taste!

How to Cook Brussels Sprouts

  • Wash 1½ lbs sprouts. Cut off the ends and discard outer leaves. Slice sprouts into halves, or larger sprouts into 3rds.
  • Heat 3-4 Tbsp oil in a skillet on high heat–you want the skillet to be hot to sear the sprouts–and don’t be shy with the olive oil.
  • Add Brussels sprouts. They should start to sizzle and pop right away. Let set before stirring to get a seared edge. Turn sprouts and continue to sear.
  • After 4-5 minutes, stir in onion and garlic and continue to cook on high to med. high heat, searing and turning another 3-4 minutes.
  • Then reduce heat to medium and add water. Add seasoning.
  • Stir, cover, and let cook 4-5 minutes.
  • Then turn off heat, stir in lemon zest and lemon juice, and serve.

Need a nice skillet? Check current prices for skillets on Amazon.

Give this Brussels Sprouts Recipe a try and let me know what you think, and if you’re still in the mood for foods that start with “B”, try this Beet Recipe.
brussel sprouts recipe

Brussels Sprouts Fun Facts

  • 89% of all children despise Brussels Sprouts.
  • 3/4 of all convicted felons do not eat Brussels sprouts.
  • Albert Einstein considered the Brussels Sprout to be the most compact cabbage, relatively speaking.
  • Even children who dislike the taste of Brussels sprouts appreciate the vegetable for it’s “slingshotability”
  • Every U.S. president has loved Brussels sprouts and eaten them routinely.

Thanks for checking out our Brussels sprouts recipe, and all of our recipes. Be sure and sign up for our mailing list and never miss a new Chef Buck cooking video, and also click a button below and share the dishes with your friends. We appreciate the kind comments and support, and we’ll see you next time in the kitchen!
–Chef Buck

Thanks for watching our recipe videos!

We include affiliate links for products on our website, so if you make a purchase after clicking on our links, we may earn a commission which helps us produce more videos and drink more coffee :^) We participate in the Amazon Services LLC Associates Program, which is an affiliate advertising program providing a means for us to earn fees by linking to Amazon.com and affiliated sites, so we can make more videos.

Share and Enjoy !

Cheese Biscuits with Bacon and Jalapeno

cheese biscuits

This Cheese Biscuits recipe makes four good-size biscuits, which is plenty for two folks for breakfast (maybe even 4 people, if one of them isn’t me).

Ingredients for Cheese Biscuits

1 cup ALL-PURPOSE FLOUR
2 tsp BAKING POWDER
1/4 tsp SALT
1/2 cup MILK
1 JALAPENO pepper (chopped)
4 slices BACON (cooked crispy, crumbled)
1/2 cup CHEDDAR CHEESE (shredded)

The recipe doubles quite easily if you want to make a bigger batch.

How to make Cheese Bacon Biscuits

First thing, fry up your bacon and set aside to cool. You’ll want it crisp enough to crumble. Slice your jalapeno (seeds and all) and saute for a minute or two in the bacon grease, this’ll flavor it up, start to cook it up, and knock off a little of the heat. Set pepper aside on a paper towel to drain.

In a mixing bowl, combine flour, baking powder, and salt. Mix well and then cut in the shortening. Add shredded cheese, sauted pepper, and crumbled bacon and mix. Slowly add milk, turning the mixture, getting the loose flour to come together into clumps. On a floured surface, turn the clumped dough out of the bowl and knead gently approx. a dozen times.

Form into biscuits–I just make a big pie shape and cut it into four pieces cause I’m lazy (or brilliant). Brush biscuit tops with melted butter, if desired. I can take of leave this move–the biscuits will have plenty of color from the bacon, cheese, and jalapenos.

Place biscuits on an ungreased sheet and bake at 425 degrees F for 13-15 minutes. Check here for current prices for baking sheets on Amazon.
And there you have it. Give this Cheese Biscuits recipe a try and let me know what you think, and bon appetit!

For another delicious bread, try my mama’s Picture Perfect Focaccia Bread Recipe.

focaccia bread

Thanks for checking out the recipes. Be sure and sign up for our mailing list so you’ll never miss a Chef Buck cooking video, and click a button below and share the dishes with your friends. We appreciate all the kind comments and support, and we’ll see you next time in the kitchen!
–Chef Buck

Share and Enjoy !


BBQ Beans Recipe – Tangy and Tasty Barbecue Flavor

bbq beans

A BBQ Bean Recipe with a spicy kick. This recipe is tangy and delicious and using a variety of beans gives this dish the illusion of grandeur, but it’s just beans, yummy tasty beans.

What You Need for BBQ Beans Recipe

4 15oz cans BEANS
1 large ONION (coarsely chopped)
1 GREEN PEPPER (coarsely chopped)
4 cloves of GARLIC (chopped)
1/3 cup light BROWN SUGAR
28oz can CRUSHED TOMATOES
14oz can BROTH
1/3 cup APPLE CIDER VINEGAR
1 Tbsp fresh ROSEMARY (minced)
1 tsp WORCESTERSHIRE SAUCE
1/2 tsp RED PEPPER FLAKES
1 1/2 tsp dried THYME
1/4 cup stone ground MUSTARD
1 Tbsp SOY SAUCE
1 BAY LEAF
3 Tbsp OLIVE OIL
SALT & PEPPER, to taste

How To Make Easy BBQ Beans

Heat olive oil in large skillet over medium high heat. Add onion, green pepper and sauté about 2 minutes. Add garlic and continue sautéing on med heat until begins to brown (3-5 more minutes).
Add rosemary, thyme and red pepper flakes and stir 1 minute.
Add tomatoes, prepared mustard, brown sugar, soy sauce, worcestershire sauce, stock, vinegar. Mix well. Bring to a bubble.
Stir in beans, bay leaf. Season with salt and pepper. Reduce heat and simmer on low for 60 minutes, stirring as needed.
Serve as a side–or a main dish–if you want your main dish to be beans.
And that’s it. Give this BBQ Beans recipe a try and let me know what you think, and bon appetit!

Wanna try another bean recipe? This Vegetarian Chili recipe is awesome!
vegetarian chili

Beans

-6 to 11 percent of a cooked bean’s weight is protein.
-Beans are one of the best things to eat for improving the stability of blood sugar levels in diabetics.
-Beans are low fat, contain no cholesterol or saturated fat, and are an excellent source of fiber, protein, calcium, iron,
folic acid and potassium.
-North Dakota produces more beans than any other state in the USA.

Thanks for Watching our BBQ Bean Recipe Video!

Click a button below and share the dishes with your friends. You can also follow Chef Buck on Youtube. We appreciate all the kind comments and support, and we’ll see you next time in the kitchen!

If you like what CG and I do, support us on Patreon, or throw us a tip in our Paypal Tip Jar. We’ll happily enjoy a coffee on the road – Thanks! We appreciate all the support, and we’ll see you next time in the kitchen!

We include affiliate links for products on our website. Making a purchase after clicking on our links and we may earn a commission which helps us produce more videos and drink more coffee :^) We participate in the Amazon Services LLC Associates Program, which is an affiliate advertising program. It provides a means for us to earn fees by linking to Amazon.com and affiliated sites, so we can make more videos.

Share and Enjoy !

Spicy Spanish Spaghetti Squash Recipe w/ Sausage

spaghetti squash spanish

Spaghetti squash tastes great with a little Spanish chorizo thrown into the mix.

When buying, choose a firm spaghetti squash that seems heavy for its size. Avoid squash with overly glossy or with greenish rinds–this may indicate the squash is not quite ripe enough. The stem of a spaghetti squash should be dry. Moisture around the stem may mean the squash is not fresh.

Ingredients:
1 SPAGHETTI SQUASH
4-5oz Spanish style CHORIZO (diced)
1 lg ONION (chopped)
4-5 cloves GARLIC (finely chopped)
1/2 cup PARMESAN or ASIAGO CHEESE (shredded)
1/2 cup CILANTRO (chopped)
2 Tbsp OLIVE OIL
SALT and PEPPER, to taste

Preheat oven to 350 degrees F.
Slice 1 spaghetti squash lengthwise into halves. Remove seeds and place cut side down in a baking pan. Pour a small amout of water in the pan to keep the squash from sticking. Place in the oven and bake for 45 minutes. The squash is ready when a fork will slide easily into the flesh.
In a skillet, heat oil on medium high heat. Add onions and saute a few minutes (add red pepper flakes for heat, if desired). Add garlic and chorizo and continue sauteing. Add salt and pepper to taste. You don’t need a lot of seasoning for this dish–the chorizo will add plenty of flavor. Take a fork and scrape the squash away fromm its skin and into the skillet; the squash will separate easily in spaghetti-like strands…which is why it’s called what it’s called. The squash is already cooked, so this is more about mixing the ingredients than cooking them. Add cilantro and cheese, mix well, and remove the skillet from the heat. It’s a delicious dish, and hearty enough to make a terric main course. Serve with a salad and bread and you’ll have a more than enough.
Enjoy!

And try this delicious vegetarian Mediterranean-Style Spaghetti Squash Recipe

mediterrean spaghetti squash

Share and Enjoy !


Chana Masala Recipe w/ Quinoa -a High-Protein Meal

chana masala quinoa

A Chana masala recipe with a quinoa twist! It’s already a great tasting chickpea curry, and adding quinoa into the mix will turn this Indian favorite into a complete protein. This dish is easy to prepare and a perfect vegetarian entree.

Ingredients:
15oz can CHICKPEAS
15oz can DICED TOMATOES
1 lg ONION (chopped)
½ cup QUINOA
1 HOT PEPPER (finely chopped)
4-5 cloves GARLIC (finely chopped)
½ cup CILANTRO (chopped)
1 tsp CUMIN SEEDS
1 tsp CUMIN
1 tsp CORIANDER
½ tsp CHILI POWDER
½ tsp TURMERIC
1 tsp GARAM MASALA
2 Tbsp OLIVE OIL
1/8 tsp ASAFOETIDA (optional–really OPTIONAL!!!–don’t NOT make this dish because you don’t have this ingredient.)
SALT and PEPPER, to taste
1½ cups WATER
Check out current prices for Indian Spices on Amazon.

In a skillet, heat your oil on med. high heat. Add cumin seeds and asafoetida–the asoafoetida (also called “hing”) is OPTIONAL. Stir until seeds brown and crack–this will happen really fast, so don’t walk away from the skillet. Add garlic and continue stirring. Add chopped onions and hot pepper. Saute ingredients for 3-5 minutes.
Add turmeric, coriander, cumin, and chili powder. Stir thoroughly into onion mix.
Add quinoa and diced tomatoes.
Stir and allow skillet to come to a simmer.
Add chickpeas (rinsed and drained), salt to taste, and 1½ cups water. Bring skillet to a boil, then reduce heat to a simmer, cover and let simmer for 15 minutes (without stirring).
After the 15 minutes, stir in the garam masala. Using a fork, smash half the chickpeas in the skillet–this will add a nice texture to the dish.
Stir in the chopped cilantro.
And that’s it. Chana Masala with a quinoa twist.
Hope you like it.

And for another tasty Indian inspired dish, try this Eggplant Curry Recipe.

baingan bharta eggplant

Share and Enjoy !


Black Eyed Peas are a Healthy Salad Choice

black eyed peas

Try out this Black eyed peas recipe the next time you’re in the mood for a healthy and tasty salad. Black-eyed peas are beans, and beans are a great way to turn a salad into a meal, especially garbanzo and kidney beans, but give black eyed peas a try, I bet you’ll love them.

This salad is a nice complement to a spicy meal–in fact it’s based on a dish we get all the time at an Indian restaurant where it’s served to balance out the spiciness of other dishes.

What you need for a Black Eyed Peas Salad

2 15oz cans BLACK-EYED PEAS
3-4 GREEN ONIONS (chopped)
1 stalk CELERY (chopped)
1 CUCUMBER (sliced)
1 CARROT (shredded)
3 PLUM TOMATOES (cut)
zest and juice of 1 LEMON
1 cup CILANTRO (chopped)
4 Tbsp BALSAMIC VINEGAR
2 Tbsp OLIVE OIL
1 ½ tsp CUMIN
½ tsp CHILI POWDER
2-3 Tbsp HONEY
HOT SAUCE, to taste
SALT and PEPPER, to taste

black eyed peas

How to make Blacke Eyed Pea Salad

This is a super simple dish to prepare. You can check here for current Black-Eye Pea Prices on Amazon. Canned beans are already cooked, but dried black eyed peas will have to be cooked before adding to the salad, just prepare the beans according to the package directions.

  • In a small bowl, mix balsamic vinegar and olive oil. Season with spices.
  • Toss in the beans, onion, vegetables–EXCEPT the tomato!–tomato loses a lot of it’s flavor when refrigerated, so add tomato just before serving.
  • Gently toss the Ingredients.
  • Cover, and chill in the refrigerator at least 1 hour, or overnight. The longer the better.
  • Remove dish from fridge, mix in tomato, add additional seasonings if desired, and serve.

Folks traditionally eat black eyed peas on the first day of the new year for good luck, but these beans are pretty good on the other 364 days as well, so stock some blackeyed peas in your cupboard and try them out in some of your favorite bean dishes.

And for another great healthy beany salady kind of recipe, try this Hearty Black Bean Salsa Recipe it’s fantastic.

Black Bean Corn Salsa
Salsa is great on a chip, as a topping for fish or salad, in an omelet, on ice cream…well, maybe not ice cream.

Thanks for checking out the black eyed peas recipe. Be sure and sign up for our mailing list so you’ll never miss a Chef Buck cooking video, and click a button below and share the dishes with your friends. We appreciate all the kind comments and support, and we’ll see you next time in the kitchen!
–Chef Buck

Thanks for watching our recipe videos!

Thanks for watching. We include affiliate links for products. If you make a purchase after clicking on our links, we may earn a commission which helps us produce more videos and drink more coffee :^)
We are a participant in the Amazon Services LLC Associates Program, an affiliate advertising program designed to provide a means for us to earn fees by linking to Amazon.com and affiliated sites.

Share and Enjoy !


Pear Salad Recipe — a Classic Southern Pear Dessert

pear salad

A pear salad recipe might be a dish you’re familiar with if you grew up in the South, but maybe not. Is this pear dessert familiar throughout the USA and abroad? My mom made canned pear salad quite often when I was a kid. It’s an super simple and surprisingly tasty pear dessert. This pear treat is cheap and quick, so ideal for kids. In this pear recipe video we’re matching a classic southern pear salad up against a fancy-pants hipster version of pear salad. Both pear recipes are winners in my book, but since I grew up eating the canned pear version, I have a slight bias. If you’ve never tried a pear salad, it might seem like a weird combination of ingredients, but trust me, it’s delicious.

Classic Southern Pear Salad Recipe

canned PEAR HALVES
a dollop of real MAYONNAISE
shredded CHEDDAR CHEESE
MARASCHINO CHERRIES
optional:
top with toasted nuts

pear salad
classic Southern style pear salad dessert

How to Make a Classic Pear Salad Recipe

  • Crack open a can of pear halves.
  • If your inner engineer craves stability, you can shave off the bottom of each pear so that the
    halves will sit flat on a plate.
  • Arrange pear halves on a plate.
  • Place a dollop of mayonnaise in the hollow of each pear half.
  • Sprinkle shedded cheese over the mayonnaise.
  • Top each pear with a maraschino cherry.
  • Serve immediately, or chill before serving. There’s never a wrong time to eat pear salad.

Is that too quick and easy? Are you a hipster? Or a fancy Wall Street big shot? Need something fancier?

How to Make a Pretentious Pear Salad Recipe

fresh PEARS (ripe, but firm; any kind of pear will do)
fancy-pants CREME FRAICHE
expensive CHEESE
toasted WALNUTS or PECANS
but still use MARASCHINO CHERRIES (because they’re easy, and perfect)

pear salad
pretentious pear salad with attitutde

  • Any pears will do for this dish, as long as they’re ripe, but firm. I don’t like my pears mushy, and I like to bake them with the skin on.
  • Halve the pears and remove the core.
  • Lightly grease a baking dish and place the pears cut side down.
  • Bake pears in a preheated oven at 350 degrees Fahrenheit for approximately 30 minutes.
  • Remove pears from oven and allow to cool.
  • Arrange pears on a plate and place a dollop of crème fraîche or small-batch vegan yogurt in each pear hollow.
  • Top each pear with finely shredded artisinal cheese.
  • Add a sprinkling of toasted walnuts of pecans.
  • And crown each with a maraschino cherry.

And Voilà! You’re a snob, but at least you’re a snob with a very tasty pear salad.

If you’ve never tried a pear salad recipe, definitely give one of these a go, there’s a 95% chance you will love it.

If you prefer pears with a European flair, try this French inspired creamy Baked Pears Recipe

pear salad
click pic for French-style baked pear dessert

Thanks for checking out the video and recipes. If you liked it, then click a button or two below and share it with your friends. I appreciate it!
–Chef Buck

Share and Enjoy !


Kale Beet Salad – Healthy Super Food Recipe

kale beet salad

Doesn’t Kale Beet Salad sound like a dream come true? Beets are fun, kale is cool…very exciting stuff. Kale is a slightly rough and tough cabbagee-thingy that’s a little less than friendly in it’s natural state, but massaging salt into the raw leaves can turn Kale into a delicious salad green. Here’s a very tasty and nutritionally jam-packed raw kale recipe with beets.

What you need for Kale Beet Salad

8-10 KALE (leaves)
2 BEET ROOTS (medium-sized)
2 TOMATOES (small…I use plum tomatoes)
2 CARROTS
1/2 cup GOLDEN RAISINS
SALT (to taste…I use approx. 1 tsp.)
PEPPER (to taste)
1 Tbsp OLIVE OIL
2 tsp BALSAMIC VINEGAR

How to make a Kale and Beet Salad

Pre-heat oven to 350 degrees.
Remove greens from beets and cut root bulbs into smaller pieces, about 1/2 inch squares. Spread the beet pieces onto a baking pan and add enough water to cover the bottom of the pan. Cook for 25-35 minutes, remove and allow to cool.

While beets are cooking, remove the spine from the center of the kale leaves and tear kale into salad pieces. Kale is rough, but adding salt to the greens will draw out moisture and soften the leaves, making them darker. Gently massage salt into the kale until it achieves a desirable consistency, this may take several minutes.

Grate carrots into the greens, add raisins, then toss and divide portions into salad bowls. In a separate bowl, add diced tomatoes and cooled beets, then add olive oil, balsamic vinegar, and black pepper and mix together. Spoon beet/tomato mixture over kale greens and serve.

kale beet salad

This is a delicious way to enjoy and optimize the benefits of raw kale. I’m not usually a big raisin fan, but I find the raisins work really well in this salad. I’ve contemplated tossing minced ginger into the mix, but haven’t gotten around to doing so, although I might next time I whip this dish up. If you give it a try, let me know what you think.

This is one of the healthiest dishes I routinely prepare, but be aware, eating beets can cause some rosy changes when you answer “the call of nature”. (Don’t be alarmed, you probably won’t be dying…in fact, you’ll probably be doing a lot better.)
Give this kale beet salad a try and let me know what you think, and bon appétit!

Have fun in the kitchen. Get a bunch of spices, pots and pans, and begin experimenting with different recipes. home cooking is a healthy hobby that will save you tons of money in the long run.
Check out current prices for Complete Kitchenware Sets on Amazon as well as Complete Starter Spice Kits. Or go to a thrift store! I’ve found some of my favorite kitchen gear at second-hand stores.

And for another tasty salad idea, try this Black Eyed Pea Salad Recipe.

black eyed pea salad

Thanks for Checking Out Our Kale Beet Salad

Click a button below and share the dishes with your friends. You can also follow Chef Buck on Youtube. We appreciate all the kind comments and support, and we’ll see you next time in the kitchen!

If you like what CG and I do, support us on Patreon, or throw us a tip in our Paypal Tip Jar. We’ll happily enjoy a coffee on the road – Thanks! We appreciate all the support, and we’ll see you next time in the kitchen!

We include affiliate links for products on our website. Making a purchase after clicking on our links and we may earn a commission which helps us produce more videos and drink more coffee :^) We participate in the Amazon Services LLC Associates Program, which is an affiliate advertising program. It provides a means for us to earn fees by linking to Amazon.com and affiliated sites, so we can make more videos.

Share and Enjoy !

Waldorf Salad Recipe

waldorf salad

Chef Buck is back with a fancy, but easy waldorf salad recipe.

Ingredients:

1 cup diced CELERY
1-2 cups diced APPLES
½ cup chopped WALNUTS or PECANS
¾ cup MAYONNAISE
Optional: PICKLE, for redneck version

Mix and serve on lettuce bed.

Hell…it doesn’t get any easier than that.

Bon appetite!

Share and Enjoy !


Quinoa Salad Recipe for Vegetarian Protien

quinoa salad

Quinoa salad is vegetarian perfection. Quinoa is a versatile food, similar to rice, but with 9 essential amino acids, making it a complete protein. It’s easy to prepare and super tasty. The salad recipe below makes an excellent meal, a tasty side dish, or a light snack. Serves 2-4.

Quinoa Salad Ingredients:

1 cup QUINOA (check current prices for quinoa on Amazon)
3 medium TOMATOES (chopped)
¼ cup RED ONION (finely chopped)
3-5 GARLIC CLOVES (minced)
½ inch GINGER (minced)
1 CUCUMBER (chopped)
1/3 YELLOW BELL PEPPER (chopped)
1 CARROT (thinly sliced)
¼ cup PARSLEY or CILANTRO (chopped)
3 Tbsp APPLE CIDER VINEGAR
2-3 Tbsp OLIVE OIL
2 Tbsp LEMON JUICE
SALT (to taste)

Quinoa Salad Direections:

Add 1 cup quinoa to 2 cups water and bring to a boil. Reduce heat, cover, and simmer 10-15 minutes (I find it usually takes about 15 minutes). Place cooked quinoa in bowl and let cool—doesn’t have to cool completely—by the time you get your other ingredients prepped, the quinoa will be cool enough.

Add vinegar, olive oil, salt, and stir well. Add onion, ginger, and garlic. I usually chop the onion fine and MINCE the garlic and ginger VERY WELL. The raw garlic and ginger adds lots of flavor and nutrition. Give the bowl a good stir and get these ingredients mixed thoroughly.

Add yellow pepper (red pepper is fine, but yellow makes a nice color contrast), cucumber, carrot. Sometimes I also add green onions—or even diced jalapeños if I’m looking for a little kick—feel free to experiment with any vegetables you enjoy in a raw state.

Mix ingredients and then add the tomatoes. I like to add the tomatoes last so they don’t get too beat up by the spoon. If you’ve got some parsley or cilantro on hand, throw that in as well—I make sure I’ve got some cilantro on hand when I’m making this dish. A bit of lemon juice is a nice finish and will also help keep the colors of the dish vibrant.
Give this quinoa salad recipe a try and let me know what you think, and bon appetit!

We still use rice, but not nearly as often (if I have to choose between eating ribs and rice or ribs and quinoa, it’s really not a choice, I choose rice every time–and I’m talking white rice!) but for MANY dishes, I’m losing the rice and going with quinoa. White rice doesn’t stand a chance against quinoa, but even brown rice doesn’t provide as much nutritional value–plus with quinoa being a complete protein, it’s a lot less hassle to fashion a meatless meal.

I’ve always got quinoa on hand now, and before using rice in a dish, I ask myself “will quinoa work here?” Sometimes the answer is NO, because rice provides great texture for many dishes–but more often than not, I go with quinoa.

Thanks for checking the quinoa salad out. If you like it, click a button or two below and share it!
And for another delicious salad idea, try this Cauliflower Super Salad Recipe.

cauliflower salad
add sliced tomato for a quick splash of color

Share and Enjoy !


Asian Jicama Salad Recipe

asian jicama salad

Jicama is a root vegetable that can be served raw. It is similar in appearance to a potato, but tastes more like an apple, although not quite as sweet; I find it has an “earthier” taste. Many folks compare the crisp texture of Jicama to that of a water chestnut. Jicama is especially good in this recipe because it takes on the flavor of the dressing very well.

Ingredients:
1 cup JICAMA (cut into 1 inch sticks)
1 cup SNOW PEAS (cut into ¼ inch widths)
1 cup NAPA CABBAGE (torn into salad-size pieces)
2 CARROTS
¼ cup SESAME SEEDS (toasted)
2 Tbsp VINEGAR (wine or rice)
2 Tbsp SOY SAUCE
4 tsp HONEY (or 2 tsp sugar)
1 tsp SESAME OIL
1-2 Tbsp WATER

Peel jicama root and cut into matchstick shapes. Tear cabbage into salad-sized pieces (substitute romaine lettuce if preferred, but I find the cabbage holds up better in the dressing). Slice snow peas into ¼ inch widths. Shred carrots. Combine all in a bowl and mix.

In a smaller bowl, add vinegar (red or white wine vinegar or rice vinegar can be used), soy sauce, honey, sesame oil, and water (start with 1 Tbsp of water and add another if desired). Mix ingredients.

Combine dressing and vegetables and toss thoroughly. Serve as a side dish to add Asian flair to any meal—and it’s great with fish.

Bon Appétit!

Share and Enjoy !


Kale Recipe -Ginger Stir-fry w/ Tahini Sauce

sauted ginger kale

Try this easy stir-fry kale recipe. Kale is a cool cabbage that kicks broccoli’s ass (or at least in this recipe it does).

Kale Recipe Ingredients:
1 bunch KALE
1 inch piece fresh GINGER
1 medium ONION (cut into slices)
½ cup CARROT (thin cut or string cut)
1 hot PEPPER (finely chopped, optional)
1 Tbsp SESAME OIL
SALT (to taste)
1 Tbsp TAHINI
3-4 Tbsp SOY SAUCE

Divide a 1” piece of ginger into two halves. Finely chop one half to use in the sauce and thinly slice the other half and set aside to cook with the stir fry. In a small bowl, mix together the tahini and soy sauce until a thin peanut-buttery consistency is achieved. Mix the finely chopped ginger into the sauce and set aside.
Wash kale, remove spine, and cut or tear into mouth-manageable pieces. Heat the sesame oil on medium high and sauté onion slices and finely chopped pepper for 1 minute. Add a pinch of salt (not much salt will be needed because of the salt in the soy sauce). Add Ginger slices and cook for another minute. Reduce heat to medium and add the kale and carrots. Mix thoroughly with the onion, pepper, and ginger. Cover and allow to cook for 2 minutes. Turn off heat and add sauce. Toss well and serve hot (and it goes great with rice).
Give this healthy kale Recipe a try and let me know what you think, and…
Bon appétit!

Kale Fun Facts:
Kale belongs to the same family as cabbage, Brussels sprouts, and collards.
Kale is packed with antioxidants, which help neutralize harmful free radicals in the body.
One cup of chopped raw kale provides more than 100% of the daily value of vitamins A, C, and K.
Free Radicals are something scientists made up to sound smart.

Want more kale recipe ideas? Try this Kale and Beet Superfood salad Recipe.
kale beet salad

Share and Enjoy !


Spring Rolls with Peanut Dipping Sauce

spring rolls dipping sauces

Spring rolls are a nice appetizer when you go out to eat at a fancy-pants restaurant, and they’re just as nice when you eat them at home, and they’re easy to make. Briefly wetting the rice paper and placing it on a damp towel makes the delicate rice paper easier to handle. The rice paper softens while you place your filling–makes the process much easier–definitely give this technique a try!

All you need to make spring rolls are rice paper and some tasty ingredients to roll up inside. You can buy rice paper at any Asian food store, most health food markets, and in the ethnic foods section of many local grocery stores. It’s an economical buy. The last batch I bought was a package of 20 for $2.25 U.S. dollars. It comes in sheets, like paper, but usually round in shape; it doesn’t feel like paper, though—it feels more like plastic, almost like something you’d find at the hardware store, but don’t let that put you off, it softens quickly when wet. Despite its initial “plasticky” appearance, it’s not bad for you, or particularly good for you either—rice, tapioca, salt, and water are the prime components. How your spring rolls taste will be determined by the ingredients you roll up inside, and any dipping sauce you might like to serve them with. It’s a great vehicle for getting raw vegetables into your diet; I like to think of a spring roll as a cigar-shaped salad, but many pre-cooked meats and seafood work well in spring rolls, too.

What You Need to make Spring Rolls

Rice Paper and
Whatever the hell you wanna roll up in the rice paper.
Here are a few options I like to use:
cilantro (I ALWAYS USE CILANTRO), cucumber, basil leaves, lettuce, carrots, sprouts, rice noodles, steamed shrimp, stir-fried spicy pork, bell pepper, green onions, cabbage, and on and on and on…
there’s no end to what you can use.

spring rolls
Spring rolls make a great appetizer or entree

How to Make a Fresh Spring Roll

Prepare your filling ingredients—mainly making sure the ingredients are chopped or sliced in a manner which will make them rice paper-wrapping friendly—this is especially true if you plan on slicing the spring rolls in half—your filling ingredients will tumble out easily if they’re too loose and tiny.
Wet the rice paper with warm tap water. Just a few seconds under a warm tap is plenty. Place the rice paper on a damp towel and gently press down. The rice paper will quickly soften and become pliable. Arrange your filling ingredients at one end of the sheet and roll them up in the rice paper like a burrito. Using basil or lettuce or cabbage leaves as your base ingredient will make the rolls structurally sound and easier to roll. It’s very important that the first rollover be tight—compact the ingredients as much as possible—a loosely rolled spring roll is a sad sight, and will quickly fall apart if sliced. The rice paper will be your friend. It will help. It is very sticky and will seal almost like an envelope around your stuffings. If you want a tasty spring roll, it’s as easy as rolling up a tasty combo of ingredients—a yummy dipping sauce will help, and here are two:

Peanut Dipping Sauce:
1 Tbsp Peanut Butter
1 Tbsp Rice Wine Vinegar
1 Tbsp Toasted Sesame Oil

Chili Dipping Sauce:
2 Tbsp Chili-Garlic sauce
2 Tbsp Soy Sauce
1 tsp Sesame Seeds

And just plain old soy sauce works fine, too. Or maybe some hot mustard—I’ve never tried that, but it just popped into my head, so maybe next time I’ll give it a go.
Alright, that’s enough blabbing.
Give these spring rolls a try and bon appétit!

For another delicious Asian inspired dish, try a Seafood Pancake Recipe.
seafood pancake dipping sauce

Share and Enjoy !


Red Potato Recipe w/ Garlic

red potato recipe

If you like potato salad, then give this garlic red potato recipe a try. Is it potato salad? Or something better? If you’re looking for a tasty twist on a simple comfort food, then try this Red Potato Recipe.

Red Potato Recipe Ingredients

3 lbs petite RED POTATOES
3-5 cloves GARLIC (finely chopped)
½ cup GREEN ONIONS (chopped)
1 cup PARSLEY (chopped)
1 tsp DRY MUSTARD
2 tsp WORCESTERSHIRE SAUCE
½ cup OLIVE OIL
¼ cup VINEGAR
1 tsp PAPRIKA
SALT and PEPPER (to taste)

How to Make Red Potato Salad

Wash potatoes and remove any blemishes. Leave the skin on. Place in a large pot with water, add salt, cover and bring to a boil and allow potatoes to cook 20-25 minutes. They’ll be done as soon as a fork inserts easily into the potato center. DO NOT OVERCOOK the potatoes! –it will be a disaster if you do. “Disaster” might be too strong a word, but you do not want the potatoes to become too soft. As soon as the potatoes are cooked, pour the hot water off in the sink and refill the pot with cold water to stop the potatoes from overcooking and becoming mushy.
While the potatoes cool, finely chop the garlic and chop the green onions and parsley. I prefer using the hardier curly parsley over the leafier Italian parsley for this dish.
In a large bowl, add olive oil, vinegar, Worcestershire sauce, dry mustard, paprika, salt and pepper, and mix ingredients well. Add the garlic, onion, and parsley and mix into the dressing. Drain potatoes and cut into large pieces into the bowl.
Toss potatoes gently with the dressing until well covered. Serve right away or serve it later, it tastes great either way. Give this Red Potato Recipe a try and let me know what you think, and…
Bon appétit!
seasoned red potato
For more potato and root vegetable fun, try these Roasted Veggie Fries.
roasted vegetable fries

Thanks for Watching our Red Potato Recipe Video!

Click a button below and share the dishes with your friends. You can also follow Chef Buck on Youtube. We appreciate all the kind comments and support, and we’ll see you next time in the kitchen!

If you like what CG and I do, support us on Patreon, or throw us a tip in our Paypal Tip Jar. We’ll happily enjoy a coffee on the road – Thanks! We appreciate all the support, and we’ll see you next time in the kitchen!

We include affiliate links for products on our website. Making a purchase after clicking on our links and we may earn a commission which helps us produce more videos and drink more coffee :^) We participate in the Amazon Services LLC Associates Program, which is an affiliate advertising program. It provides a means for us to earn fees by linking to Amazon.com and affiliated sites, so we can make more videos.

Share and Enjoy !

Calamari Salad Recipe …easy squid dish!

calamari salad squid

Calamari salad makes a great addition to any potluck! Also, Dr. Freud theorized the squid to be the unconscious driver underlying all human action. This recipe builds on that theory, and adds carrots.

What you need for a Calamari Salad

1 lb SQUID
½ cup CARROT (strings)
½ cup CUCUMBER (sticks)
1/3 cup CILANTRO or BASIL LEAVES (chopped)
1 tsp GINGER (minced)
1 tsp SESAME OIL
1 Tbsp extra virgin OLIVE OIL
1 Tbsp RICE WINE VINEGAR
1 tsp CHILI GARLIC SAUCE (or sub hot sauce to taste)
1 Tbsp LEMON JUICE
SOY SAUCE (to taste)
½ tsp SESAME SEEDS
SALT (to taste)

How to make Calamari Salad

Start with 1 lb. of cleaned squid. I’ve used fresh and frozen squid for this recipe and both work well—and smaller squid work best for salad—which is something to think about when choosing your squid; buying them frozen and already cleaned is much nicer than cleaning a dozen dinky cephalopods.

Cut squid into thin rings (1/4 inch max) and boil in salted water for 25 seconds (yep—they’ll cook up that fast). Drain, then rinse under cold water to prevent overcooking (over-boiled squid can be quite rubbery).

In a large bowl, combine sesame oil, olive oil, vinegar, chili garlic sauce, and ginger (also salt to taste—or dress with soy sauce). Mix well.

Add squid, carrot, cucumber, and cilantro and toss with dressing.
Add lemon juice (or substitute lime juice). Add soy sauce to taste.

Mix all, top with sesame seeds, and serve over a bed of mixed greens.
It’s light, tasty, and suctioncupalicious.

Wanna try squid in another dish? One of my favorite uses for calamari is in a Seafood Pancake Recipe, which sounds weird, but try it, you’ll like it.

shrimp pancake
Korean style Haemul Pajeon seafood pancake

Thanks for checking out the calamari salad recipe. If you enjoyed it, click some of the clickables below to share the recipe with your friends. I appreciate it!
–Chef Buck

Share and Enjoy !


Cauliflower Recipe -quick cook in the skillet

skillet cauliflower

This quick cook cauliflower recipe is an easy way to get healthy veggies on your dinner plate–including lots of garlic, which is always a good idea, right? Lemon zest adds terrific flavor and nutrition to this dish. Cauliflower is a great ingredient because it brings tons of nutrition to the table without being overpowering, so it can be used in many different types of recipes.

Cauliflower Recipe Ingredients

1 head CAULIFLOWER (cut into florets)
1 bulb of GARLIC (finely chopped)
1 cup ONION (chopped)
½ cup PEPPERS (sliced)
3 Tbsp OLIVE OIL
zest of 1 LEMON …current prices online for Kitchen Zesters
2 Tbsp LEMON JUICE
SALT and PEPPER (to taste)
WATER (as needed)

How to Cook Cauliflower Recipe

  • In a large skillet, heat olive oil on medium high heat and add cauliflower florets. The oil should be hot enough to sizzle when the cauliflower hits the pan.
  • Sear the florets for 3-4 minutes —keep them moving enough not to burn, but let them rest long enough to get a nice seared edge where possible. The florets will soak up the oil pretty quick—add water sparingly when needed.
  • Reduce the heat to medium and add the onion. Mix and give the onion a minute head start before adding the garlic and peppers.
  • Add salt to taste and continue sautéing the vegetables for 1-2 minutes.
  • Then add ¼ cup of water, cover, and cook 2 minutes.
  • After 2 minutes, add black pepper, lemon zest and juice, mix, and remove from heat.

At this point, all of your cauliflower dreams will be coming true. Give this cauliflower recipe a try and let me know what you think, and…Bon appétit! Need a nice skillet? Check current prices for skillets on Amazon.

cauliflower potato salad
low carb cauliflower “potato” salad recipe

Cauliflower Fun Facts:

  • Cauliflower is a flower.
  • Cauliflower is very high in Vitamin C.
  • Kids pretend to hate cauliflower, but they actually love it.

If you like that cauliflower recipe, then maybe you’ll like a Brussels Sprouts Recipe, too.
brussels sprouts

Thanks for checking out this easy cauliflower recipe, and all of our recipes. Be sure and sign up for our mailing list and never miss a new Chef Buck cooking video, and also click a button below and share the dishes with your friends. We appreciate the kind comments and support, and we’ll see you next time in the kitchen!
–Chef Buck

Thanks for watching our recipe videos!

We include affiliate links for products on our website, so if you make a purchase after clicking on our links, we may earn a commission which helps us produce more videos and drink more coffee :^) We participate in the Amazon Services LLC Associates Program, which is an affiliate advertising program providing a means for us to earn fees by linking to Amazon.com and affiliated sites, so we can make more videos.

Share and Enjoy !

Okra Recipe with Tomato Gravy

tomato okra

This tomato okra recipe features whole pod okra in a tomato gravy. It’s a terrific southern style okra dish that tastes great without the dreaded okra slime!

Tomato Okra Recipe Ingredients

1 lb OKRA (whole pods)
1 medium ONION (chopped)
1 cup TOMATO PUREE (or 2 chopped tomatoes)
2 Tbsp OLIVE OIL
1 tsp MUSTARD SEEDS
1 Tbsp CORIANDER POWDER
1 tsp CHILI POWDER
1 Tbsp white wine VINEGAR
SALT and PEPPER (to taste)
¼ cup WATER

tomato okra

How to Cook Okra

  • Heat olive oil on medium heat and add onions.
  • Cook for 1 minute and add mustard seeds. Add coriander and chili powder and continue sauteing onions for another minute.
  • Stir in the tomato puree. Add salt. I like using puree because it’s thick and sweet and acts like a gravy. You can substitute fresh chopped tomato instead if you prefer a thinner consistency.
  • Add fresh okra. Fresh! Buy okra that’s bright green and firm, not soft and bendy. Small okra pods are best—1” to 2”. Okra won’t stay pretty in the fridge for too long, so use soon after buying (1-2 days). Trim the stems, but not too much—you don’t want to cut into the pod and release the watery goo. I say goo, but not in a bad way. Okra is a dry climate vegetable and stores a lot of moisture in its pod—it’s a kinda gooey moisture—that’s why cut okra is often used in soups and gumbos as a thickener. Mix the okra into the tomato gravy.
  • Add vinegar and continue sauteing another minute. The tomato and vinegar will cut the “slickness” of the okra.
  • Add ¼ water, cover pan and reduce heat to low. Let simmer for 5 minutes.
  • Add pepper and adjust salt as needed and serve.

That’s it! Give this tomato okra recipe a try and let me know what you think.

You know what goes great with this okra recipe? This crazy delicious Blackened Fish Recipe.

blackened fish mahi mahi

Have fun in the kitchen. Get a bunch of spices, pots and pans, and begin experimenting with different recipes. Home cooking is a healthy hobby that will save you tons of money in the long run. Check out current prices for Complete Kitchenware Sets on Amazon. Or go to a thrift store! I’ve found some of my favorite kitchen gear at second-hand stores.

If you crave okra info, here’s more in depth nutritional info than you’ll ever want about okra.

Thanks for checking out our okra recipes, and all of our cooking videos. Be sure and sign up for our mailing list and never miss a new Chef Buck cooking video, and also click a button below and share the dishes with your friends. We appreciate all the kind comments and support, and we’ll see you next time in the kitchen!
–Chef Buck

Thanks for watching our recipe videos!

We include affiliate links for products on our website, so if you make a purchase after clicking on our links, we may earn a commission which helps us produce more videos and drink more coffee :^) We participate in the Amazon Services LLC Associates Program, which is an affiliate advertising program providing a means for us to earn fees by linking to Amazon.com and affiliated sites, so we can make more videos.

Share and Enjoy !

Parsnip Soup with a curry twist…you’ll love it

curry parsnip soup

If you’ve never tried parsnips before, this parsnip soup recipe is an easy introduction.  Blended up, this dish is super creamy without a drop of cream, which is a healthy low-cal option and makes my belly happy on several levels. Parsnips are available year-round. They resemble carrots, but are paler and have a stronger flavour. Give this parsnip soup recipe a try—it’s guaranteed super delicious or your money back.

What You Need For This Parsnip Soup Recipe

1 lb PARSNIPS (chopped for soup)
1 large POTATO (chopped for soup)
1 medium ONION (chopped)
2 Tbsp OLIVE OIL
1 Tbsp CURRY POWDER
1 tsp CUMIN POWDER
1 tsp CORIANDER POWDER
2 cups BROTH (chicken or vegetable)
2 cups WATER
SALT (to taste)
CORIANDER LEAVES (chopped, garnish)

How to Make Parsnip Soup

  • In a soup pot, heat olive oil on medium high heat and add onions and cook for 1 minute.
  • Add parsnips and potatoes and continue cooking until the onions are soft.
  • Add curry, cumin, and coriander powder and mix well. Add 4 cups of liquid— ½ broth and ½ water .
  • Bring contents to a boil, add salt, then reduce heat to low, cover, and simmer for 30 minutes.
  • After a half hour the parsnips and potato should be quite tender. For a creamy texture, blend soup as desired—no milk or cream are needed. I like to leave a few chunks of potato unblended, and garnish with chopped coriander leaves.

And that’s it…give this parsnip soup recipe a try and let me know what you think!

If you’re new to home cooking, get a bunch of spices, pots and pans, and start experimenting with different recipes. It’s a healthy hobby that can save a lot of money in the long run. Check out current prices for Complete Kitchenware Sets on Amazon as well as Complete Starter Spice Kits. Or try a thrift store! I’ve found some of my favorite kitchen gear at second-hand stores.

Parsnip Fun facts:

In Roman times parsnips were believed to have been an aphrodisiac.
In Scotland parsnips are still known as White Carrots.
Are a favourite with gardeners because of the short growing season.
People used to believe that eating parsnips could relieve a toothache or tired feet.
Half of the carbohydrates in parsnips are sugar, and the rest is starch.
Parsnips were once used to sweeten jams and cakes before sugar was widely available.

For another super vegetarian recipe idea, try this No-Meat Vegetarian Chili Recipe.

Thanks For Watching Our Recipe Videos!

Thanks for checking out this quinoa salad recipe, and all of our recipes. Be sure and sign up for our mailing list so you’ll never miss a new recipe. Also click a button below and share the dishes with your friends. You can also follow Chef Buck on Youtube. We appreciate all the kind comments and support, and we’ll see you next time in the kitchen!

If you like what CG and I do, you can also support us on Patreon, or throw us a tip in our Paypal Tip Jar. We’ll happily enjoy a coffee on the road – Thanks! We appreciate all the support, and we’ll see you next time in the kitchen!

We include affiliate links for products on our website. So, if you make a purchase after clicking on our links, we may earn a commission which helps us produce more videos and drink more coffee :^) We participate in the Amazon Services LLC Associates Program, which is an affiliate advertising program. It provides a means for us to earn fees by linking to Amazon.com and affiliated sites, so we can make more videos.

Share and Enjoy !

Chana Masala Indian Chickpea Curry Recipe

chana masala chickpea curry

Chana masala is a delicious Indian chickpea curry. It’s easy to make and a great introduction to Indian cooking.

What You Need to Make the Best Chana Masala

1 15 oz can CHICK PEAS (or 2 cups)
1 15 oz can DICED TOMATOES (or 2 fresh diced)
1 tsp GARLIC (minced)
1 tsp GINGER (minced)
1 HOT PEPPER (minced)
1-2 Tbsp OLIVE OIL
1 Tbsp CHICK PEA FLOUR (also called besan)
1 tsp CUMIN SEEDS
1 tsp CHILI POWDER
1 tsp GARAM MASALA
1/8 tsp ASAFOETIDA (optional, also called hing)
½ tsp TUMERIC
SALT (to taste)
Check out current prices for Indian Spices on Amazon.

Many chana masala recipes include onion, but I think it’s fine with or without; I make so many Indian dishes with onions, it’s nice to have a few that are onion-free if desired. I do include asafoetida (hing) and besan (chick pea flour), but those can be optional, too.

Chana masala is a very flexible dish. If not using besan, just add ½ cup of water instead of 1 cup. The asafoetida is wonderful. It stinks, but it’s still wonderful. It’s also called “devil’s dung”, but that’s just when it’s raw, once you toss it into a simmering skillet, it transforms into a sharp, oniony weirdness that will pleasantly remind you of your favorite Indian restaurant.

I’ve only been able to find asafoetida at international food markets, but it’s worth acquiring—especially if you want to make a habit of cooking great Indian dishes at home. If skipping the asafoetida, try adding 1 finely chopped medium-sized onion between the cumin seeds and the tomatoes. Coriander powder is great in this dish, too. But the way I usually prepare it is like this:

chole masala
Make chana masala a side dish or your main meal

How to Make a Chana Masala Recipe

  1. In a skillet, heat oil on medium high heat.
  2. When the oil is heated, add the cumin seeds and asafoetida. Stir and allow to simmer for just a few moments.
  3. Once the seeds begin to crack, add the chick pea flour and continue stirring. The flour will absorb the oil.
  4. Stir for approx. 1 minute and then add the diced tomatoes. Mix well and allow the tomatoes to bubble.  As the tomatoes cook down, you can crush them with your stirrer for a smoother chana massala.
  5. Stir in the minced ginger and garlic and hot pepper.
  6. Add the chili powder and turmeric.
  7. After the tomatoes have cooked 4-5 minutes, add the chick peas, garam masala, and salt to taste.
  8. Mix well and add 1 cup of water. Bring the dish to a bubble, then reduce to a simmer, cover, and allow cooking for 10 minutes.
  9. After 10 minutes, the chick peas will be soft. Use a fork or potato masher to smash some of the chick peas, this will help thicken the chana masala along with the chick pea flour added earlier.
  10.  Simmer uncovered to the desired consistency, remove and serve.

Garnish with fresh coriander leaves. Serve with rice or on its own.
Give this chana masala recipe a try and let me know what you think, and bon appétit!

Want to make another easy Indian Recipe? Try Baingan Bharta, a delicious Eggplant Curry recipe.

baingan bharta eggplant

Thanks for checking out the chana masala recipe, and all of our recipes. Be sure and sign up for our mailing list to never miss a new cooking video, and also click a button below and share the dishes with your friends, and follow Chef Buck on Youtube. We appreciate all the kind comments and support, and we’ll see you next time in the kitchen!

If you like what CG and I do, support us on Patreon, or throw a tip in our Paypal Tip Jar We’ll happily enjoy a coffee on the road, or maybe even pay a bill or two!–Thanks! We appreciate all the support, and we’ll see you next time in the kitchen!

Thanks for watching our Chana Masala recipe

We include affiliate links for products on our website, so if you make a purchase after clicking on our links, we may earn a commission which helps us produce more videos and drink more coffee :^) We participate in the Amazon Services LLC Associates Program, which is an affiliate advertising program providing a means for us to earn fees by linking to Amazon.com and affiliated sites, so we can make more videos.

Share and Enjoy !

Spicy Couscous Recipe …how to make a quick side dish

spicy couscous

Anyone up for a spicy couscous recipe? Couscous is a quick and simple dish, so naturally I love it. It makes a great pairing with fish, and both can be cooked up quickly. I usually start with plain couscous and spice it up myself, it is simple to do and much yummier than any overpriced pre-made couscous mix you’ll buy at the market.

What You Need To Make This Spicy Couscous Recipe

1 cup COUSCOUS
2 Tbsp OLIVE OIL
1 medium ONION (chopped)
3 cloves GARLIC (finely chopped)
1 HOT PEPPER (finely chopped)
1 tsp MUSTARD SEEDS
1 tsp CHILI POWDER
1 tsp PAPRIKA
½ tsp TURMERIC POWDER
1 tsp TOMATO PASTE
1 ½ cup WATER (or broth)
SALT (to taste)

couscous recipe
Spicy couscous makes a tasty side dish, and it is fast and easy to prepare …and did I mention cheap?

How To Make Spicy Couscous

Heat olive oil on medium high heat and then add onions.
Stir for 1 minute and add mustard seeds, hot pepper, and garlic.
Continue sautéing for a couple more minutes.
Stir in chili powder, paprika, and turmeric.
Add salt and tomato paste and mix well.

Pour in 1 ½ cups of water, stir, cover pot and turn up the heat and bring the pot to a boil.
After ingredients come to a boil, stir in the couscous and mix well. Cover and remove from heat and allow pot to sit for 5 minutes.

After 5 minutes the couscous will have completely absorbed all the water.
Uncover and immediately fluff with a fork; this will keep the couscous for overcooking and becoming a sticky, starchy mess; couscous should be light and fluffy, and in this case, nice and spicy, too.
Give this spicy couscous recipe a try, and I hope you like it.
Bon appétit!

This couscous recipe goes great with this DELICIOUS BLACKENED FISH RECIPE!

blackened fish mahi mahi
Click image to watch this easy Blackened Fish recipe

Thanks for watching my couscous recipe video. If you liked it, then used the buttons below to share the recipe with your friends. Thanks!
-Chef Buck

Share and Enjoy !


Gobi Matar Cauliflower Curry Recipe

gobi matar

Try this flavorful Indian gobi matar recipe with cauliflower and green peas. I use a mix of spices to create my own masala for this vegetarian recipe, but you can substitute a store-bought pre-made curry spice mix. This spicy vegan cauliflower curry makes a great side dish or entrée.

What You Need To Make Gobi Matar

1 CAULIFLOWER (cut into florets)
1 15oz can DICED TOMATOES (or 2 med tomatoes)
1 8oz can GREEN PEAS
1 large ONION (chopped)
1 HOT PEPPER (finely chopped)
1 Tbsp GINGER (finely chopped)
5-7 GARLIC cloves (finely chopped)
1 Tbsp CHILI POWDER (sub cumin powder for less heat)
1 Tbsp CUMIN SEEDS
1 Tbsp TURMERIC POWDER
1 Tbsp CORIANDER POWDER
2 tsp GARAM MASALA (optional)
3 Tbsp OIL for cooking
¼ cup WATER
SALT (to taste)

Check out current prices for Indian Cooking Spices on Amazon.

gobi matar
Is it gobi matar or gobi mattar? However you want to spell it, it’s a delicious Indian dish.

How To Make Cauliflower Curry

  • In a skillet or pot, heat oil on medium high heat.
  • Add cumin seeds. Seeds will brown and crack quickly, so almost immediately add onion.
  • Add onion and stir.
  • Cook 1 minute and then add ginger, garlic, and hot pepper.
  • Continue cooking until onions are soft.
  • Add turmeric, chili, and coriander powder and mix well.
  • Stir in tomatoes and continue cooking 4-5 minutes.
  • Add salt to taste.
  • Add tomatoes. If using fresh tomato, as tomatoes cook down I like to crush them with a spoon.
  • Stir in cauliflower florets.
  • Add water and bring dish to a bubble, then reduce heat to a simmer, cover, and let cook 4-5 minutes. I don’t want to cook all the nutrients out of the cauliflower, and I like my florets to still have a bit of crunch to them, so I simmer my cauliflower for only a few minutes.
  • When the cauliflower is almost cooked to your liking, add garam masala and green peas.
  • Mix and continue cooking until peas are heated through.

And that’s it, your cauliflower and peas are transformed into a delicious vegetable curry.

Check out a variation on this Indian gobi matar recipe and watch me cook a complete Indian dinner.

how to cook indian food

Thanks for checking out our gobi matar recipe, and all of our recipes. Be sure and sign up for our mailing list and never miss a new Chef Buck cooking video, and also click a button below and share the dishes with your friends. We appreciate all the kind comments and support, and we’ll see you next time in the kitchen! Check out the Chef Buck Youtube Channel.

Thanks for watching our Indian curry recipe!

We include affiliate links for products on our website, so if you make a purchase after clicking on our links, we may earn a commission which helps us produce more videos and drink more coffee :^) We participate in the Amazon Services LLC Associates Program, which is an affiliate advertising program providing a means for us to earn fees by linking to Amazon.com and affiliated sites, so we can make more videos.

Share and Enjoy !

Chole Palak Chickpea and Spinach Recipe

chole palak

Chole Palak is an Indian-style spinach and chickpea recipe that’s super flavorful and a breeze to make.  With a few ingredients in the cabinet, this tasty dish is always just a few minutes away.

What You Need to Make Chole Palak

SPINACH  (13 oz can or frozen, or 3 cups chopped fresh)
CHICKPEAS  (15 oz can, rinsed and drained)
TOMATOES  (diced, 14 oz can—or 2 fresh tomatoes
HOT PEPPER  (1 or 2, minced)
GINGER  (1 Tbsp, minced)
OLIVE OIL  (2-3 Tbsp)
CUMIN SEEDS  (1 tsp)
ASAFOETIDA  (¼ tsp)
CORIANDER  (1 Tbsp)
CHILI POWDER  (1 tsp)
TURMERIC  (½ tsp)
GARAM MASALA  (1 tsp)
SALT (to taste)
Check out current prices for Indian Spices on Amazon.

chole palak chickpea spinach
Chole Palak is a popular Spinach and Chickpea dish

How to Make Chole Palak

Heat olive oil on medium high heat and add cumin seeds and asafoetida.  The seeds should sizzle when they hit the pan and will brown and crack quickly.  Add the tomatoes, ginger, and peppers.  Mix well and then add the coriander, chili, and turmeric powder. 

Mix and allow the tomatoes to cook down 3-4 minutes.  Add the spinach and salt and stir well.  Add ¼ – ½ cup water—I like less water, but add as desired throughout the recipe.  Cover and let cook 3-4 minutes. 

Uncover and mix in chickpeas (also called garbanzo beans).  Add another ¼ cup of water, reduce heat to simmer, cover and cook for 5-6 minutes.  At this point the chickpeas will be soft enough to smash easily with a fork, which you don’t have to do, but I prefer the consistency of the dish if I mush about half of them. 

Add the garam masala and stir another minute or two, also adding more water if desired.  And that’s it! Enjoy! When I prepare an Indian meal, I almost always serve this dish; it’s easy, healthy, and delicious, so why not? Give chole palak a try, let me know what you think, and bon appétit!

For another fantastic dish, try Baingan Bharta, an Indian-style Eggplant Recipe.

baingan bharta eggplant

Thanks for Watching our Chole Plak Recipe Video!

Click a button below and share the spinach curry with your friends. You can also follow Chef Buck on Youtube. We appreciate all the kind comments and support, and we’ll see you next time in the kitchen!

If you like what CG and I do, support us on Patreon, or throw us a tip in our Paypal Tip Jar. We’ll happily enjoy a coffee on the road – Thanks! We appreciate all the support, and we’ll see you next time in the kitchen!

We include affiliate links for products on our website. Making a purchase after clicking on our links and we may earn a commission which helps us produce more videos and drink more coffee :^) We participate in the Amazon Services LLC Associates Program, which is an affiliate advertising program. It provides a means for us to earn fees by linking to Amazon.com and affiliated sites, so we can make more videos.

Share and Enjoy !

Shrimp Remoulade Recipe …Best Shrimp Salad Ever!

shrimp remoulade salad
Shrimp remoulade salad is one of my all-time favorite dishes.  I used to eat this all the time when I lived in New Orleans—and I never go back without making a stop at the Gumbo Shop for a taste.  I don’t know exactly how the Gumbo Shop prepares shrimp remoulade sauce, but this recipe is how I throw it together.   A lot of ingredients go into the sauce, but it’s worth the effort.  Give it a try!

What You Need to Make Shrimp Remoulade

TOMATO PUREE (½ cup)
MUSTARD (¼ cup –creole, stone ground, or dijon)
HORSERADISH (2 tsp –prepared)
GREEN ONION (1 tsp, minced)
PARSLEY (1 Tbsp, finely chopped)
WORCESTERSHIRE SAUCE (½ tsp)
MAYONNAISE (3-5 Tbsp)
CELERY (1 Tbsp, minced)
GARLIC (1 clove, minced)
CHILI POWDER (1 tsp)
PAPRIKA (1 tsp, smoked)
SUGAR (1 tsp, optional
SALT (to taste)
HOT SAUCE (½ tsp)
LEMON JUICE (1 Tbsp)
OLIVE OIL (1 Tbsp)
VINEGAR (1 tsp)
Salad Ingredients:
SHRIMP (1 lb, boiled)
SALAD GREENS
TOMATO SLICES
GREEN ONION (chopped, optional)

shrimp remoulade
Shrimp Remoulade is a New Orleans classic

How to Make Shrimp Remoulade

The Remoulade Sauce:

To make the sauce, just mix all the sauce ingredients together (really?!).  I’m using tomato puree in this version, but I’ve also made this dish using ketchup or tomato sauce; it will be thinner if you use those two, but that can be a good thing, especially if you want to toss the greens in the remoulade sauce.  Sugar is optional and definitely not needed if you’re using ketchup, which is usually sweet enough.  Sometimes I’ll add a teaspoon of onion powder.  This is a great recipe to play with, but be judicious with the mayonnaise!  Using fresh ingredients like parsley, garlic, green onion, and celery will really make this sauce shine.  You can definitely make and serve the sauce immediately, but making it hours ahead or even the day before will embolden the flavors.  Embolden the flavors?  I’m not sure if that’s the right way to say that, but you know what I mean.

The Shrimp:

I’m using 1 pound of deveined shrimp in the shell. For this salad, the bigger the shrimp the better, but I usually get whatever’s on sale—any kind of shrimp is gonna be delish in this dish. Before boiling, prepare a bowl of ice water to cool the shrimp after cooking—this will keep the shrimp from becoming overdone (tough and rubbery).
Put a pot of water on the stove and add 2 bay leaves and a generous amount of salt. Bring the pot to a boil and add the shrimp. I find a pound of shrimp takes about 2 minutes, but this will vary depending on the size of the shrimp and the amount of water in the pot. For sure, they will cook fast. Do not ignore them—it’s not a good time to multi-task. When the shrimp turn pink, they’re done. Get ’em out of the hot water and into the ice bath—this will halt the cooking process, and your shrimp will be perfecto (and now that they’re cooked, they’ll be super easy to peel).
Toss the shrimp in the remoulade sauce and serve over a bed of fresh greens. I like to garnish the salad with green onion and fresh tomato. Serve with saltines or a loaf of French bread and soft butter. Let the salivating begin.
And bon appétit!

calamari salad squid
Be adventurous and TRY A CALAMARI SALAD!

Thanks for checking out the recipe. To never miss a video, subscribe to Chef Buck! Click some of the buttons below and share this awesome Shrimp Remoulade with your friends. Thanks!
–Chef Buck

Share and Enjoy !


Baingan Bharta Roasted Eggplant Curry Recipe

eggplant curry

Roasted eggplant curry is easy to prepare and super-flavorful with this simple, classic Indian dish. Give this Baingan Bharta eggplant curry a try and let me know what you think.

What You Need to Make Eggplant Curry

Ingredients:
1 large EGGPLANT (roasted)
1 med/lg ONION (chopped)
3-4 cloves GARLIC (finely chopped)
1 hot PEPPER (finely chopped)
1 14 oz can diced TOMATOES (or 2 fresh tomatoes)
1 cup chopped CILANTRO (coriander leaves)
1 tsp MUSTARD SEEDS
1 tsp CUMIN SEEDS
1 tsp CORIANDER POWDER
½ tsp TURMERIC
½ tsp GARAM MASALA
5-6 Tbsp OLIVE OIL
Check out current prices for Indian Spices on Amazon.

baingan bharta eggplant curry
Baingan bharta eggplant curry, a classic Indian dish.

How to Make Baingan Bharta

  • Slice the eggplant lengthwise down the middle into two halves, brush all surfaces with olive oil, place on a baking pan flat side down, and bake at 400 degrees F for 30 minutes.
  • Remove from oven. The eggplant will be very hot, so set aside to cool.
  • In a skillet, heat olive oil on medium high heat. Add mustard and cumin seeds and cook 20-30 seconds—not too long or they will overcook. A pinch of asafetida can be added as well, if desired.
  • When cumin seeds begin to open, add onions and sauté for a couple of minutes.
  • Add garlic and hot pepper and continue sautéing. Add coriander and turmeric powder and mix well. I like to go light on the spices, but feel free to add more if desired. If you like a spicier dish, add 1 tsp of chili powder. I like to take it easy on the spices so as not to overpower the flavor of the eggplant. Add salt to taste and continue cooking a couple more minutes.
  • Stir in tomatoes, reduce heat, and simmer 4-5 minutes. While tomatoes simmer, return to the eggplant.
  • At this point the roasted eggplant will be much easier to handle (although it may still be hot, so use care). Using a spoon, the meat of the eggplant can be easily scooped away from the skin. Discard the skin. Roughly chopped the eggplant and add to the skillet, mixing well with the tomato mixture. Cook for 3-4 minutes and then add garam masala. Mix and continue cooking another couple of minutes.
  • Add 1 cup of chopped cilantro (coriander leaves). Mix and remove from heat.

And that’s it. Give this eggplant curry recipe a try, let me know what you think.

And for another great indian dish, try this Chicken Tikka Masala Recipe.

chicken tikka masala
Click image to check out Chicken Tikka Masala

Thanks for Watching our Baingan Bharta Recipe

Click a button below and share the spinach curry with your friends. You can also follow Chef Buck on Youtube. We appreciate all the kind comments and support, and we’ll see you next time in the kitchen!

If you like what CG and I do, support us on Patreon, or throw us a tip in our Paypal Tip Jar. We’ll happily enjoy a coffee on the road – Thanks! We appreciate all the support, and we’ll see you next time in the kitchen!

We include affiliate links for products on our website. Making a purchase after clicking on our links and we may earn a commission which helps us produce more videos and drink more coffee :^) We participate in the Amazon Services LLC Associates Program, which is an affiliate advertising program. It provides a means for us to earn fees by linking to Amazon.com and affiliated sites, so we can make more videos.

Share and Enjoy !

Quinoa Recipe — Spicy Spanish Style Quinoa

spanish quinoa

Try this spicy Spanish-style quinoa recipe; it’s vegetarian heaven. Quinoa is a versatile ingredient and an excellent source of protein. Quinoa is a grain-like superfood and a great substitute for rice, and just as easy to prepare. I use it often as an alternative to rice–even in rice pudding. Give this quinoa recipe a try; I’m sure you’ll be eating a whole lot less rice in the future, and not missing it at all.

What You Need For This Quinoa Recipe

  • 1 Tbsp OLIVE OIL
  • 1 ½ cups QUINOA (check current prices for quinoa on Amazon)
  •  ½ cup RED ONION (minced, separated)
  • 3-5 cloves GARLIC (finely chopped)
  •  ½ large RED BELL PEPPER (minced, separated)
  • 1 14 oz can DICED TOMATO (reserve juice)
  • 1 15 oz can KIDNEY BEANS (drained, rinsed)
  • 1 tsp CUMIN powder
  • 1 tsp CHILI powder
  • 2 cups WATER, including drained tomato liquid
  • ½ cup CILANTRO (fresh, chopped)
  • 1 small CUCUMBER (diced, peeled if waxed)
  • 1 AVOCADO (seeded, peeled, diced)
  • 1/3 cup LIME JUICE (freshly squeezed)
  • SALT and PEPPER to taste

quinoa recipe
uncooked quinoa…looks like a grain, but it’s a seed.

How to Make Spanish Quinoa

  • Open the canned tomato and drain the tomato liquid into a measuring cup. Add enough water to equal 2 cups.
  • Heat oil on medium high. Saute garlic, 2/3 of the onion and 1/3 of the red pepper for 2-3 minutes. [the rest of the onion and red pepper will be added raw at the end.]
  • Add quinoa.
  • Stir in tomatoes with green chilies, kidney beans, cumin and chili powder and water/tomato juice mixture.  Bring the pot to a boil. Reduce to medium low and cook approx. 15 minutes. The liquid will be absorbed.
  • Remove from the heat and let sit for about 10 minutes and then fluff with a fork. Allow quinoa to cool some, you want it to be warm, not piping hot when you add the rest of the ingredients.
  • After quinoa has cooled some, add in the remaining onion and pepper pieces, and the chopped cilantro.  Mix. Then add cucumber and avocado and lime juice (or sub lemon juice). Toss gently.
  • And then serve.
  • Give this spicy Spanish quinoa recipe a try and let me know what you think, and…

Bon appétit!

For another tasty vegetarian recipe, try this Easy Eggplant Burger Recipe.

veggie burger recipe
Veggie burger recipe with blackened eggplant

Thanks for watching and subscribing –And hit those buttons below to share this recipe. I appreciate it!

Share and Enjoy !


Spaghetti Squash Recipe — Mediterranean Style

mediterrean spaghetti squash

I love this Mediterranean spaghetti squash recipe; its super tasty, and I can eat way too much without feeling too guilty. Watch the video and learn how to easily cook this squash. It’s a terrific ingredient; delicious and healthy. This Mediterranean style recipe is just one of many ways to use this versatile vegetable. Give it a try!

Spaghetti Squash Recipe Ingredients:

1 medium SPAGHETTI SQUASH
1 Tbsp OLIVE OIL
1 large ONION (chopped)
4-6 cloves GARLIC (finely chopped)
½ RED BELL PEPPER (sliced)
1 14 oz can ARTICHOKE HEARTS in water (chopped)
1 cup OLIVES, and olive juice to taste (chopped)
¾ to 1 cup PARMESAN CHEESE (shredded or grated)
1 tsp OREGANO
½ tsp THYME
1 tsp BASIL
SALT and PEPPER to taste

Mediterranean spaghetti squash recipe
Mediterranean spaghetti squash makes a great vegetarian meal

How to Make this Spaghetti Squash Recipe

Preheat oven to 350.
Cut spaghetti squash in half, lengthwise (a good, sharp knife will be nice).  Place each side, cut side down, in a shallow pan with about ¾ c water. Bake, uncovered for 45 minutes. Set aside to cool squash halves–enough to handle without causing death to the handler–but not completely cool.
You have time to chop up all your ingredients while the squash cooks.   For the artichoke, you may want to remove some of the outer, tougher leaves.
For each half, use a spoon to scrape out and discard the seeds and dark center strings.  Use a fork to scrape out the squash into ‘spaghetti-like’ strands.
Heat oil over medium high heat.  Saute onion and garlic 4-6 minutes.  Add bell pepper. Turn heat to low, stir and cover for 2-4 minutes.  Uncover, stir in spaghetti squash and remaining ingredients.  Cover and cook til all ingredients are warm, about 7-10 minutes
Add 1 Tbsp of olive juice and any other seasonings to taste. Serve warm. And a little toasted bread on the side won’t hurt.
Give this spaghetti squash recipe a try and let me know what you think, and…
Bon appétit!
And for another great spaghetti squash recipe, try this Spanish-style Spaghetti Squash.

spaghetti squash recipe
click image to check out this recipe

Thanks for watching, sharing, and subscribing to my videos, I appreciate it!

Share and Enjoy !


Best Homemade Focaccia Bread Recipe Ever

focaccia bread

Nothing beats the taste of homemade focaccia bread, and my mama bakes the best bread. In this video we get to see her make focaccia step by step. Give this Italian flatbread a try, your family and friends will love you for it.

Focaccia Bread Ingredients:

3 ½ cups all-purpose FLOUR
1 ¼ tsp KOSHER SALT
1 Tbsp INSTANT YEAST
1 ½ cup warm WATER (approx. 130 degrees F)
1 ½ large sweet ONION (diced)
4-6 cloves GARLIC (finely chopped)
¼ cup JALAPENO (diced)
1 cup OLIVES –black, green, or both (chopped)
¼ cup PEPPERONCINI (chopped)
1 cup CHEESE (grated parmesan, asiago, and romano)
1-2 Tbsp fresh ROSEMARY (finely chopped)
approx. 6-7 Tbsp OLIVE OIL

focaccia bread

How to Make Homemade Focaccia Bread

Sift 3½ cups of ALL-PURPOSE FLOUR and combine in a mixing bowl with SALT and YEAST.  Add WARM WATER (approx. 130 degrees F) and mix contents of bowl for 1 minute in mixer.  Remove dough. 

In a 9 x 13 baking pan greased with 1-2 Tbsp OLIVE OIL, spread dough flat.  Cover and allow dough to rise for 45-60 minutes. Check current prices for 9 x 13 Baking Pan on Amazon.

While dough rises, chop and prep topping ingredients. Take time to sauté the onions and garlic well.  Feel free to use more or less ingredients—this combo is terrific—but experiment according to your tastes (I bet a little sundried tomato would be awesome).

After bread has risen, uncover and drizzle the top of the dough with 2 Tbsp OLIVE OIL.  My mama sticks the end of her thumb into the dough all along the top to create an interesting (or not quite interesting) pattern; this is something you can do, too, if you’re retired with a lot of free time on your hands, but it’s not necessary.

Sprinkle and spread toppings evenly over the dough.
Place the bread in an oven pre-heated to 375 degrees F and bake approx. 35-40 minutes.
Remove bread from oven and let rest 5 minutes before transferring to a cooling rack.
Take care not to eat it all right away because you’ll want some for later.

Give this Focaccia bread recipe a try and let me know what you think!

For another great Mama Redbuck bread recipe, try this crazy delicious Pesto Parmesan Bread Recipe.

parmesan pesto bread

Thanks for checking out the recipes. Be sure and sign up for our mailing list so you’ll never miss a Chef Buck cooking video, and click a button below and share the dishes with your friends. We appreciate all the kind comments and support, and we’ll see you next time in the kitchen!
–Chef Buck

Share and Enjoy !


Quick Salad Recipe Ideas for Spicy Foods

tomato cucumber salads

Two quick and cool salad recipe ideas: tomato and cucumber salad. These salads make perfect sides for a spicy meal. The tomato basil goes great with any blackened fish, and I love the creamy cucumber with spicy Indian fare. No cooking is required; simply combine the raw ingredients for an easy accompaniment to your favorite spicy dishes.

Tomato Basil Salad Recipe

Ingredients:
2 fresh TOMATOES (diced)
½ cup BASIL (chopped)
¼ cup FETA CHEESE (crumbled)
1 Tbsp OLIVE OIL
1 tsp BALSAMIC VINEGAR
SALT and PEPPER, to taste

Creamy Cucumber Salad Recipe

Ingredients:
2 SALAD CUCUMBERS (diced)
½ LEMON (juice and zest)
¼ cup GREEK YOGURT
1 tsp DILL
SALT and PEPPER, to taste

Give these salad ideas a go and let me know what you think, and bon appétit!

Want another salad idea? Try this Jicama Salad Recipe.
salad recipe

Share and Enjoy !


Beet Greens Recipe — Easy, healthy Dish!

beet greens

This is a super simple beet greens recipe. If you purchase beets with the greens intact, don’t throw those greens away! You can cook up a tasty dish using the beet greens (and if you don’t buy beets with the greens, then you need to make an adjustment in your shopping habit).

Beet Greens Recipe Ingredients:

1 bunch BEET GREENS
½ RED ONION (chopped)
1/3 RED BELL PEPPER (chopped)
2 cloves GARLIC (thinly sliced)
2 Tbsp OLIVE OIL
SALT (to taste)
PEPPER (to taste)
LEMON JUICE or VINEGAR (optional)

beet greens recipe
Buy beet roots with the greens for two great ingredients.

How to make Beet Greens

Remove the greens from the root and wash thoroughly because greens always seem to need a good washing, especially beet greens. I like to separate the green leaf from the thicker stem since the leafy greens will need far less time to cook. Heat 2 Tbsp of olive oil on med-med high heat. When the oil is hot, add onions and garlic.

I chop the onion big and the garlic thin. Stir for a minute and then add the red bell pepper and stir for a few minutes more. I use about a third of a red pepper, not too much, because it’s more for color than to influence the taste of the dish. The stems are a nice contrast to the dark greens.

Add a little water if needed, but not too much, the greens will release plenty of water.
Add the beet green stems. These will soften pretty fast, so a minute or two will be plenty of time Remember, overcooked veggies are a drag, man! Add the leafy greens.

Initially, I don’t mix the greens with the ingredients. I just cover the skillet for a minute or two and give the greens time to wilt. Remove the lid and stir, then add salt and pepper to taste and stir a minute more. That’s about when they’re ready. Camera Girl likes to add a splash of lemon, and vinegar goes great with greens, too.
Remove from heat and serve hot.

Beet greens make a great side, especially with chicken or a cheap cut of meat. I like to serve greens as a main dish over quinoa, which is a seed that acts like a grain and is an excellent source of protein. (Check current prices for quinoa on Amazon.)

These quick beet greens make a perfect side dish for all kinds of meals, especially quick cook dishes like fish and kielbasa, or if you want to be a little less carnivorous, pair these greens with a side of beans and top with a soft-yolk egg. The yolk makes a great sauce!

Give these healthy beet greens recipes a try and let me know what you think, and bon appétit!

For another beet dish, try this Roasted Beet and Quinoa Recipe.

how to cook quinoa
Quinoa with roasted root vegetables.

Thanks For Watching Our Recipe Videos!

Thanks for checking out our beet green recipes, and all of our recipes. Be sure and sign up for our mailing list so you’ll never miss a new recipe. Also click a button below and share the dishes with your friends. You can also follow Chef Buck on Youtube. We appreciate all the kind comments and support, and we’ll see you next time in the kitchen!

If you like what CG and I do, you can also support us on Patreon, or throw us a tip in our Paypal Tip Jar. We’ll happily enjoy a coffee on the road – Thanks! We appreciate all the support, and we’ll see you next time in the kitchen!

We include affiliate links for products on our website. So, if you make a purchase after clicking on our links, we may earn a commission which helps us produce more videos and drink more coffee :^) We participate in the Amazon Services LLC Associates Program, which is an affiliate advertising program. It provides a means for us to earn fees by linking to Amazon.com and affiliated sites, so we can make more videos.

Share and Enjoy !

Follow Me!