Ramekin Egg Bake – Healthy Breakfast Idea

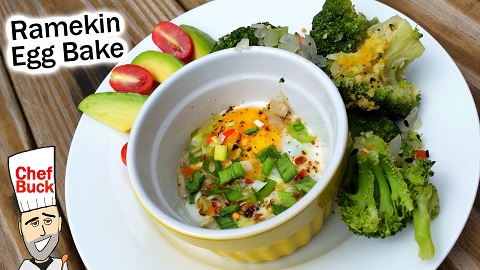
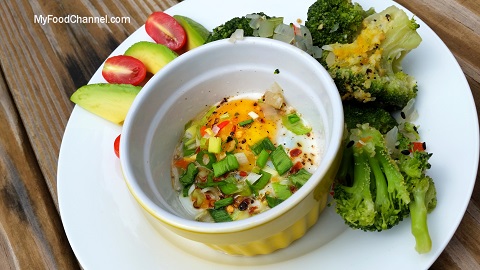
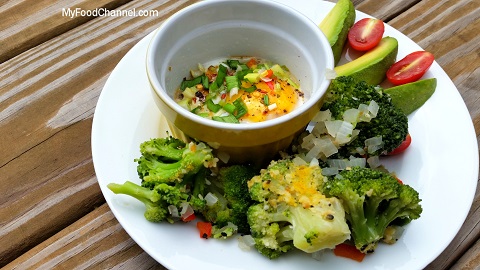
A ramekin egg bake recipe is not just fancy, it’s delicious, and comes with its own creamy sauce if you bake it just right. We add diced veggies and a quick broccoli side to make this breakfast egg dish ridiculously healthy. Chef Buck and I have the pleasure of house and pet sitting and caring for some chickens that provide great, fresh eggs.  It has inspired us to look for new ways to enjoy this perfect source of protein.

ramekin egg bake

Ingredients for a Ramekin Egg Bake

For Each Bake:
4 oz RAMEKIN* (oven safe)
1 – 2 EGGS
OIL (or spray)
1 tsp MILK (non-dairy or dairy options are fine)
SALT, BLACK PEPPER and your FAVORITE EGG SEASONINGS, to taste

*If you need ramekins for this recipe, you can check current prices for best sellers on Amazon.

Optional Ingredients:

Add up to 2 Tbsp minced herbs and/or minced veggies – mostly between the milk and the egg, although it’s fun to add a bit of color to the top

How To Bake Eggs in a Ramekin

  • Preheat oven to 350 degrees.  [This is for a convention oven – toaster- or regular-sized.  In the video, we are using the convection setting on a toaster oven, so we didn’t preheat it.]
  • OPTIONAL – Add extra flavor. If you want to add any minced herbs or veggies, get those chopped up now. We did in the video, and we’ve provided some other ingredient possibilities below, to tickle your taste buds. Yes, it takes a bit more time if you have to chop more ingredients but, for us, it’s worth the extra flavor. Plus, you can pat yourself on the back for getting in a partial veggie serving!
  • OPTIONAL – Have a ‘dipper’ handy for your runny egg yolk. If you plan to have a yummy runny egg, consider getting together a dipping side!  We did a side of broccoli in the video, and we’ve provided other dipping possibilities below.
  • Grease the bottom and side of each ramekin.  In the video we use a smidge of olive oil, but you can use another oil, or a cooking spray as well.
  • Pour your 1 tsp of milk over the oil in each ramekin.
  • If you have minced veggies, herbs, or other additions, sprinkle them over the milk in each ramekin. Save a couple pieces for the top – if you want to add some color to your finished egg.
  • Crack your egg into each ramekin. Watch that the eggshells don’t sneak in.
  • Top with a taste of pepper, salt …. and whatever other seasoning tickles your fancy. We use Olde Thompson Italian seasoning in the video. Optional, top with a couple veggie/herb pieces.
  • Bake for 8-10 minutes for runny yolks; the exact time will depend on your oven.  For doneness, CHECK the egg whites.  If you want a runny egg yolk (which provides a delicious, healthy sauce for a side dish), you want to take them out when the majority of the egg whites turn from clear to white, and you may see a bubble come up in one area of the egg white.  
ramekin egg bake

Additional Cooking Tips

Remember, the ramekin egg bake will keep cooking when you take it out of the oven, so if you want the yummy runny yolk – take them out of the oven when the there is still a tad of clear egg white.

And if you want a runny yolk, but you just seem to overcook them, try the French way.  Once you’ve prepared your individual dishes, place them in an oven-safe container that will allow you to add water to about halfway up the ramekins.  That keeps the eggs from getting any hotter than the water.

Feel free to cook the egg until the egg white is 100% white – your egg yolk will be solid too. You will basically have a couple of boiled eggs…..with some flavor from any seasonings, veggies, or herbs you added.  Or, you can scramble the eggs before you bake them.  Your choice.  Still a quick protein breakfast!

Experimenting With Individual Egg Bakes

Generally, I wouldn’t add more than 2 Tbsp of herbs or veggies.  In the video, we added the following minced ingredients to each bake: 2 tsp fresh summer squash, 1 tsp red bell pepper, 2 tsp yellow onion, 2 tsp green onion (green tops and white bottoms).Minced spinach, kale, garlic, artichoke, asparagus. Fresh herbs like thyme, sage, rosemary, dill. Cheese is a great addition as well. Crumbles of bacon, ham or sausage!  Add some tomatoes, black beans and seasonings you love on tacos for a Mexican version – top with sour cream. The options are endless!  

Each ramekin egg bake can include different ingredients and seasoning.  Warning: If you’re making 3 or more, you may not want to make an offer of individual egg bakes; folks may go wild and want not just very different ingredients but  want their eggs cooked to different levels of ‘doneness’ too.  You want to sit down and eat soon too!

Sides To Dip Into Your Egg Yolk

What can you dip into your warm, yummy, runny egg yolk?  In the video, we microwave frozen broccoli with minced onion and bell pepper  – enough for two people.  How? We put the broccoli, onion and bell pepper in a microwave-safe bowl, add a Tablespoon of water, cover and microwave it on full power for 2 minutes. Then we added some everything spice, salt and pepper, and cooked it on full power for another 5 minutes.  Because we can’t leave well enough alone, we add a taste of nutritional yeast and a taste of Italian blend cheese (parmesan, asiago, romano). Then it sat, covered, as we finished the egg bakes.  You can do something similar with a variety of fresh, frozen or even canned vegetables.

And there are other dipping side options for any lifestyle:  bread (toast, breadsticks, crackers), eggplant fries, sausage.

That’s it! If this recipe has you wanting to experiment with egg recipes, check out our egg-related video playlist on Youtube for inspiration, or our Korean pajeon recipe.

korean pajeon
A Korean pajeon recipe with green onions.

Thanks For Watching Our Recipe Videos!

Thanks for checking out the ramekin egg bake recipe, and all of our recipes. Be sure and sign up for our mailing list to never miss a new cooking video, and also click a button below and share the dishes with your friends, and follow Chef Buck on Youtube. We appreciate all the kind comments and support, and we’ll see you next time in the kitchen!

If you like what CG and I do, support us on Patreon, or throw a tip in our Paypal Tip Jar We’ll happily enjoy a coffee on the road, or maybe even pay a bill or two!–Thanks! We appreciate all the support, and we’ll see you next time in the kitchen!

We include affiliate links for products on our website, so if you make a purchase after clicking on our links, we may earn a commission which helps us produce more videos and drink more coffee :^) We participate in the Amazon Services LLC Associates Program, which is an affiliate advertising program providing a means for us to earn fees by linking to Amazon.com and affiliated sites, so we can make more videos.

Share and Enjoy !

Tofu Chocolate Pudding – Simple and Delicious

Does tofu and chocolate seem like strange bedfellows for pudding? I was skeptical too but, with a bit of experimenting, I’ve found a simple, delicious chocolate pudding recipe in which tofu provides a great creamy texture. And if you use a plant-based milk, it’s a non-dairy, vegan treat. Lastly, if you don’t have much soy in your diet, with this treat, you can pat yourself on the back that you’re serving your body some different nutrients. After all, food variety is the spice of life!

Intrigued?  Then let’s whip it up!

WHAT YOU NEED TO MAKE ORANGE COGNAC CHOCOLATE PUDDING

We suggest a MIXER (or FOOD PROCESSOR) to thoroughly blend the ingredients, to avoid a grainy feel (and tired arms).  Check current prices for a Kitchen Mixer on Amazon.

To make plain, but delicious, chocolate pudding: Use 2 Tbsp VANILLA EXTRACT instead of the COGNAC, ORANGE JUICE and ORANGE ZEST

16 oz SILKEN TOFU, drained and gently patted dry

2/3 cup unsweetened COCOA  ( I have NOT tried dark chocolate cocoa)

1 cup LIGHT BROWN SUGAR  

1/2 Cup MILK (I use unsweetened ALMOND MILK)

1 Tbsp COGNAC (we use Courvoisier in the video)

1 Tbsp ORANGE JUICE (we use freshly squeezed in the video)

1 Tbsp minced ORANGE ZEST

Potential Garnishes

Homemade crème fraîche or cool whip

Nuts (like toasted almond slivers or fancy-pants pistachios)

Berries

tofu chocolate pudding

HOW TO MAKE TOFU CHOCOLATE PUDDING

Drain your tofu, and gently pat dry.

Combine all your ingredients in a medium to large bowl. Mix at medium to high speed for 3-5 minutes, careful not to spatter precious pudding mix all over. Stir occasionally. When ready, it will still be soupy. And it’s okay that there are tiny tofu grains still visible in your pudding. Check out the video for a sample of what you can expect.

Spoon about 1/2 cup in small dishes – a full recipe makes 8 servings. I know, I know, a half a cup seems like a small serving. Trust me, this recipe is very chocolaty. Even if you are a chocoholic, you will want small portions.  Don’t add toppings to your pudding now, because they will become soggy.

Cover and chill overnight; a minimum of 4 hours. You are waiting for the tofu to ‘re-solidify’ to a pudding-y texture.

Enjoy your pudding ‘straight’, or with your favorite garnishes.

tofu chocolate pudding

EXPERIMENT WITH YOUR TOFU PUDDING RECIPE

Use the pudding to make a trifle!  Also, you can experiment with different flavor combinations.  We’ve divided a 16 oz container of SILKEN TOFU in half, then experimented with one half of the recipe.  That way, if your experiment results don’t excite you, you know you still have some delicious chocolate pudding. For easy reference, here is the recipe for 8 oz of tofu:

8 oz SILKEN TOFU, drained and gently patted dry

1/3 cup unsweetened COCOA

1/2 cup LIGHT BROWN SUGAR

1/2 cup ALMOND MILK

2 Tbsp of liquid flavoring

Here are some other things we have added to HALF the chocolate pudding recipe successfully:

1/4 cup PEANUT BUTTER, OR

1 tsp MARASCHINO CHERRY JUICE (subtract 1 tsp of the VANILLA EXTRACT), OR

1/2 tsp ESPRESSO POWDER, OR

Juice and minced zest from 1/2 large ORANGE, OR

1 Tbsp COGNAC, instead of 1 Tbsp of VANILLA EXTRACT

Remember, as you experiment, keep the liquid amount constant (no more than 1/2 cup + 2 Tbsp) so that it can set. Who wants soupy pudding?

Also, you will need a strong flavor combination to overcome the tofu flavor. We’ve tried lemon and berry varieties, but couldn’t quite disguise the tofu flavor. Of course, for those that enjoy the tofu flavor anyway, you will not have such worries. For the rest of us, it’s like using yogurt instead of mayo in a recipe – it sets up different expectations for your taste buds.

More Tofu Recipes!

And if tofu pudding has got you wanting to experiment with other soy options, take a look at our recipes for tofu scramble, garlic brown rice with mukimame, miso soup, and tofu lasagna (yep, you read that right!).

How healthy is Tofu? Check what institutions of higher learning have to say on the health benefits of soy.

tofu recipe
this tofu recipe makes a perfect breakfast, lunch, or dinner

Thanks for watching our recipe videos!

Be sure and sign up for our mailing list and never miss a new Chef Buck cooking video, and also click a button below and share the dishes with your friends. We appreciate all the kind comments and support, and we’ll see you next time in the kitchen!

We include affiliate links for products on our website, so if you make a purchase after clicking on our links, we may earn a commission which helps us produce more videos and drink more coffee :^) We participate in the Amazon Services LLC Associates Program, which is an affiliate advertising program providing a means for us to earn fees by linking to Amazon.com and affiliated sites, so we can make more videos.

Share and Enjoy !

Pupusa Recipe for a Sweet Easy Dessert

pupusa recipe

Try this sweet twist on a pupusa recipe that turns gluten-free corn flour into a quick dessert treat. Pupusas are a traditional Latin American dish of corn tortilla filled with cheese, beans, peppers and meat, but you can use any combo of ingredients you like to cook pupusas, including sweet ingredients to make a variety of delicious dessert pupusas.

What you need for Dessert Pupusas

CORN FLOUR and warm water to create the dough
CINNAMON
BROWN SUGAR and/or POWDERED SUGAR
PEANUT BUTTER crunchy or creamy
CHOCOLATE CHIPS plus whatever other sweet filling you like!
OIL for cooking

for the creamy topping:
plain GREEK YOGURT
MAPLE SYRUP

and top the dessert pupusa with a sprinkling of
POWDERED SUGAR and
FRESH FRUIT

pupusa recipe

How to make a Dessert Pupusa Recipe

This pupusa dessert is super easy and almost foolproof. I’m not going to use ingredient amounts, because it’s really all to taste. Check here for current Corn Flour pricing on Amazon.

  • In a bowl, combine corn flour, sugar, and cinnamon. For measurements, it will be hard to make a bad ratio, just follow your heart. If you must have something to work with, try 1 cup of flour with 2 Tbsp of sugar and 1 Tbsp of cinnamon, but really, you can use twice as much sugar and cinnamon and it will still taste great. It’s dessert! Nobody wants to do math! The dough is easy to make, and the pupusas can be any size you like.
  • To make the corn dough you simply combine the corn flour mixture with warm water and mix by hand until you achieve a doughy consistency. If the dough is too dry, add more water, and if it’s too wet, add more flour.
  • Mix in a large ball and then divide into smaller golf ball sizes.
  • Flatten each ball into a flat disc shape and spread lightly with peanut butter.
  • Add chocolate chips, or any flavor chips, or meltable candies. Marshmallows? Sure! Although I find it to chewy with marshmallow, but you might love it!
  • Close the flat flour disc around the peanut butter and fillings and shape into a ball again.
  • Now flatten the ball, but with the fillings now inside. If some of the filling peeks through, it’s no big deal. A little leakage is fine.
  • Heat a skillet and about 1 Tbsp of coconut oil on medium low heat.
  • When the oil is heated, add each pupusa to the skillet and cook 1-2 minutes on each side. The longer they cook the crunchier the pupusa will get, because it’s corn flour just the same as used to make tortillas. Cook lightly to make a soft cookie consistency, or cook longer for a crunch.
  • After cooking, set pupusas aside on a paper towel.
  • For the creamy topping, I simply combine a rich Greek yogurt with Maple syrup, and sometimes I even use maple syrup to make the pupusa dough instead of sugar. Mix the yogurt and syrup well, and that’s it. Or simply use whipped cream!
  • To serve, place a dollop of cream on each pupusa. If desired, top with sliced fruit and a sprinkling of powdered sugar. This will make the desert look extra fancy pants with very little effort.

Give this sweet dessert pupusas recipe a try and let me know what you think, and bon appétit! And for a savory version, check out this Traditional Pupusa Recipe.

pupusas recipe
A pupusas recipe can be cooked quickly on a lightly greased skillet or griddle.

Thanks for checking out the pupusa recipe. Be sure and sign up for our mailing list so you’ll never miss a Chef Buck cooking video, and click a button below and share the dishes with your friends. We appreciate all the kind comments and support, and we’ll see you next time in the kitchen!
–Chef Buck

Share and Enjoy !


Tostones Recipe for Crispy Plantains

tostones recipe

A crispy, crunchy tostones recipe is a tasty way to enjoy green, unripe plantains. If you like French fries, or tator tots, or waffle fries or any kind of fried potato, then you’ll want to give tostones a try. Ripe plantains are sweet just like dessert bananas, but unripe plantains are more like starchy potatoes. Green plantains are super savory, in fact, you can boil and mash them to make a dish similar to mashed potatoes. Tostones are a staple snack in latin American cuisine and easy to prepare, and especially tasty with a creamy dipping sauce. Tostones are twice-fried and not health nut friendly. For a healthier plantain recipe, stick to a plantain mash, but for a faux fry fix, try this crispy tostones recipe.

What you need for this Tostones Recipe

unripe, green PLANTAINS
OIL for frying
SALT
PEPPER
GARLIC POWDER

and a DIPPING SAUCE
…any sauce you enjoy with with fried potatoes will work with tostones,
a creamy AIOLI is great, or just RANCH dressing if you’re feeling lazy.
For my SEMI-AIOLI dressing I use:
1-2 cloves raw GARLIC minced
1 cup MAYONNAISE
1 Tbsp LEMON JUICE

tostones recipe
Use green, unripe plantains for crispy, crunchy tostones

How to Make Tostones

  • Choose firm, green, unripe plantains.
  • Slice off the very tips of the plantain.
  • Green plantains can be hard to peel. You can cut the peel lengthwise into thin strips and pull the peeling strips away, or slice the length of the peel and then work the peel away from the plantain using your thumbs or a spoon.
  • Cut the peeled plantain into discs about ¼ to ½ an inch thick. I prefer thinner slices, about ¼ inch thick.
  • Heat a skillet and oil on medium heat.  If you prefer deep frying, check current prices for a counter top Deep Fryer on Amazon.
  • Add in the sliced plantains.
  • Season the plantains in the skillet.
  • Fry 1-2 minutes and turn and fry 1-2 minutes more.
  • Remove plantains from skillet and drain on a paper towel.
  • Place on a flat surface and smash flat to desired thickness. There is no wrong size, whatever size you like is the right size. I prefer my tostones to be about the size and thickness of a silver dollar.
  • Return flattened plantains to the oil and fry until golden brown.
  • Remove and drain on a paper towel, salt to taste, and serve with a dipping sauce.
  • To make the dipping sauce, just combine aioli ingredients and mix well; the sauce, like any sauce, will be better if you make it a little ahead of time.
  • Enjoy!
tostones recipe
Tostones are a staple snack in latin American cuisine, easy to prepare, and especially tasty with a creamy dipping sauce.

Unripe green plantains are a terrific ingredient that you can use in all kinds of savory, starchy dishes. For another unripe plantain dish, try this MASHED PLANTAINS RECIPE. And for a sweeter option, try FRIED RIPE PLANTAINS. But no matter how you prepare them, pick up plantains at the grocery and give them a try; plantains are a great value and very versatile.

Thanks for Watching our Videos!

Thanks for checking out our tostones recipe. Sign up for our mailing list so you’ll never miss a new recipe. Also click a button below and share the dishes with your friends. You can also follow Chef Buck on Youtube. We appreciate all the kind comments and support, and we’ll see you next time in the kitchen!

If you like what CG and I do, support us on Patreon, or throw us a tip in our Paypal Tip Jar. We’ll happily enjoy a coffee on the road – Thanks! We appreciate all the support, and we’ll see you next time in the kitchen!

We include affiliate links for products on our website. Making a purchase after clicking on our links and we may earn a commission which helps us produce more videos and drink more coffee :^) We participate in the Amazon Services LLC Associates Program, which is an affiliate advertising program. It provides a means for us to earn fees by linking to Amazon.com and affiliated sites, so we can make more videos.

Share and Enjoy !

Mashed Plantains …easy green plantain recipe

mashed plantains

Mashed Plantains are a tasty twist on a mash potato recipe, and it’s my go-to recipe for green, unripe plantains. If you’re in a potato rut, give unripe plantains a try and surprise your family. Just boil and mash plantains with your favorite seasonings, plus garlic and onion if you want to really make a tasty mash. Cooking bananas are not sweet at all, they make a great savory starch you can use in a variety of recipes. Try substituting green plantains in some of your favorite potato recipes, it’s an easy way to put a twist on dinner.

What you need for this Mashed Plantains Recipe

2 unripe PLANTAINS
3-5 cloves GARLIC finely chopped
1 ONION chopped
SALT
PEPPER
in this recipe I also use:
GARLIC POWDER
CHILI POWDER
FENNEL SEEDS
PAPRIKA
…but experiment with seasonings you like
2 Tbsp BUTTER
MILK or CREAM
OIL for sauteing

mashed plantains

How to Make Plantain Mash

  • Choose firm, green, unripe plantains.
  • Slice off the very tips of the plantain, but leave on the peeling.
  • Cut the unpeeled plantain into about three sections.
  • Bring a pot of salted water to boil and add the plantain sections.
    Reduce the heat and let the plantains simmer for about 20 minutes, or until a knife passes easily into the plantain.
  • While plantains boil, heat a skillet and oil on medium heat.
  • Add onions and saute 2 minutes.
  • Add garlic and seasonings and continue to saute another 4-5 minutes.
  • Remove skillet from the heat and set aside until plantains have completed boiling.
  • Once a fork passes easily through the plantains, remove plantains from the water.
  • Make a slice along the length of the cooked plantain and remove the peeling.
  • Place cooked plantains into a bowl and mash.
  • Add butter.
  • Add sauteed onion/garlic and mix well.
  • Pour milk or cream 1-2 Tbsp at a time, mixing until the desired consistency is reached.

Whether you call this dish mashed plantains, mofongo, or mangu, it’s gonna be yummy. Serve just like mashed potatoes!

Unripe green plantains are a terrific ingredient that you can use in all kinds of savory, starchy dishes. Definitley give them a try, and for a sweeter option, try ripe plantains. The simple fried plantain recipe below is one of the best ways to use ripened plantains.

mashed plantains

How to cook Sweet Fried Plantains

Avoid green plantains for frying, and buy plantains that are yellow to black in color. Feel the plantains and select ones that are soft or only semi-firm, you can buy the super soft blacker plantains, but I prefer more texture.

  • Heat a skillet on medium heat and add oil.
  • Slice the tips off of the plantain and peel away the skin.
  • Cut the plantain in half through the middle, and then cut each half lengthwise into 3-4 planks.
  • Slide plantains into the hot skillet.
  • Season top half if desired, I like to use a mix of chili pepper and cinnamon.
  • Fry until the bottom begins to brown, then turn and brown other side.
  • Add more seasoning if desired, or even some sugar, if you’re crazy.
  • Once the plantains are cooked to desired color, remove and drain on a paper towel,
    Serve warm.

They are great alone as a snack, or a tasty side dish, especially with rice or a seasoned meat dish. Have you ever heard of the expression “a little sweet and some meat”? Plantains mare a perfect combo for this dining idea. I really enjoy fried plantains for breakfast with fried eggs.

Give fried plantains a try and let me know what you think, and try mashed plantains, as well. Depending on the ripeness of the plantain, you can use them for a wide variety of dishes.

Sign up for our Recipe Mailing List and receive our latest recipe video right in you inbox!

If you liked the idea of green plantains as a starchy alternative to potato, you might like trying a Delicious Rutabaga Recipe, too.

Thanks for checking out this Mashed Plantains Recipe and video, if you enjoyed the dish, click a button or two below and share it with your friends. And if you’re on Youtube often, subscribe to the Chef Buck Cooking Channel.

I appreciate it, thanks!
–Chef Buck

Share and Enjoy !


Cauliflower Cakes for LESS Carbs MORE Flavor

cauliflower cakes

Try this cauliflower cakes recipe if you’re into healthy, low carb, and delicious. Just ball your cauliflower into flavorful balls, press them out into cakes, and bake them in the oven. I like to top mine with a creamy sauce, but that’s optional. Serve these cauliflower cakes over a bed of spinach and you’ve got a low carb, light and delicious meal.

What You Need To Make Cauliflower Cakes

3 cups of grated CAULIFLOWER
½ cup of freshly grated CHEESE
2 EGGS beaten
1 Tbsp chopped JALAPENO
¼ cup finely chopped BELL PEPPER
2 finely chopped GREEN ONIONS
1-2 cloves minced GARLIC
1 tsp dried ITALIAN SEASONING
1 tsp TURMERIC POWDER
1 tsp GARLIC POWDER
1 tsp SMOKED PAPRIKA
1 tsp CHILI POWDER
PARCHMENT PAPER to line your baking sheet
MAYONNAISE and LEMON for dressing

cauliflower cakes
Try a cauliflower cakes recipe if you’re into healthy, low carb, and delicious.

How to Cook Cauliflower Cakes

  • Grate fresh cauliflower into granules resembling “poprocks”. I like to use a hand grater, but feel free to use a food processor, however, I think grating the cauliflower by hand actually makes the cauliflower cakes lighter and fluffier. If you do use a food processor, don’t over-process the cauliflower into a doughy consistency, unless you prefer a more dense cauliflower patty.
  • In a bowl, add the grated cauliflower and the rest of the ingredients.
  • Mix all ingredients well, then separate into individual portions for cakes.
  • Form each portion into a ball and squeeze out excess liquid.
  • Form the cauliflower ball into a ½ inch thick patty and place on the parchment paper lined baking sheet, and definitely USE PARCHMENT PAPER, or your cauliflower might stick after baking. The cakes will not hold together well before cooking, but you can adjust the shape and size of each patty while on the baking sheet. Check here for current pricing for parchment paper on Amazon.
  • Place baking sheet in an oven preheated to 400 degrees Fahrenheit, bake approx. 30-40 minutes, or until the cauliflower cakes color and firm up.
  • Remove cauliflower cakes from the oven and serve over a bed of greens.
cauliflower cakes
Cauliflower cakes made with a food processor can form heavier, denser patties. For lighter cakes, use a hand grater.

I like to top the cakes with a simple dressing of mayonnaise and lemon, and adding a dash of jalapeno pickling juice or horseradish isn’t a terrible idea!
And that’s it. Eat and enjoy!

Quick Dressing for Cauliflower Fritters

½ cup MAYONNAISE
2-3 Tbsp LEMON JUICE
minced LEMON ZEST
1 tsp finely chopped PICKLE, JALAPENO, or GARLIC

Mix ingredients in a small bowl, adjust to taste. Refrigerate until ready to serve.

And For More Cauliflower Recipes

Try this Cauliflower Crust Pizza Recipe, which can also make a pretty cool Cauliflower Burrito Recipe.

If you don’t have a baking sheet, use a big pizza pan. Big pizza pans make the best baking sheets for cauliflower pizza crusts, nachos, whatever…round is always better than square, right? If you need one in your kitchen, check out current Big Pizza Pan prices on Amazon.

white pizza
A white pizza is great on any kind of crust.

Give these beautiful cauliflower cakes a try and let me know what you think. Or would you call them cauliflower fritters? If you’re serving them to kids, I’d definitely call them “cakes”. And if you like the recipe, then click some of the buttons below to share it with friends and family. I appreciate it!
–Chef Buck

Share and Enjoy !

Rutabaga Recipe for a Low Carb Diet

rutabaga recipe

Here’s an easy Roasted Rutabaga Recipe that you will love, and it’s a great alternative to potato. Rutabaga is a low-carb root vegetable you can use just like a potato, but with less than half the calories and carbs of potato. In appearance rutabaga is like a larger version of a turnip, but it tastes a bit sweeter. It’s related to cabbage, so it has a very mild cabbage taste. It’s great baked in the oven, cooked in soups, and I love it shredded and cooked into breakfast hash browns. Like most produce, when buying rutabaga choose one that’s firm and seems heavy for it’s size. Give this rutabaga recipe a try and let me know what you think.

What You Need for a Roasted Rutabaga Recipe

RUTABAGA cubed
OLIVE OIL
SALT
CHILI PEPPER
BLACK PEPPER
ROSEMARY

rutabaga recipe
Roasted rutabaga makes a great alternative to a potato side dish.

How to Roast Rutabaga in the Oven

  • Buy a rutabaga that’s heavy for it’s size and not dried out.
  • Slice the end off the rutabaga and cut away the outer skin with a knife.
  • Cut into roughly 1/2″ square cubes.
  • Toss the rutabaga cubes in a bowl with olive oil.
  • Add seasoning and toss until cubes are well coated
  • Spread rutabaga on an ungreased baking sheet. Aluminium foil is a good idea.
  • Bake in a preheated oven at 400 degrees Fahrenheit for approximately 45 minutes.
  • Halfway through the cooking process, you can check on the rutabaga and give them a turn to prevent overcooking on one side.

And that’s it!
Roast some rutabaga in the oven let me know what you think.

rutabaga recipe
Don’t be scared of da rutabaga

Is Rutabaga Healthier than Potato?

  • Rutabaga has LESS THAN HALF the calories of potato.
  • It has 60% FEWER CARBS than potato.
  • Rutabaga contains about the same amount of Dietary Fiber as potato.
  • Potato wins the vitamin count; rutabaga provides more Vitamin C than potato,
    but overall, is less nutrient rich than potato.

So, don’t give up on potatoes, but add a rutabaga recipe into your menu rotation, it’ll make a great change-up from the regular potato routine. One of my favorite faux potato dishes is this Mock Potato Salad made with cauliflower.
And for another tasty rutabaga recipe idea, try Rutabaga Hash Browns.

hash browns recipe
click pic for recipe

Thanks for checking out this baked rutabag recipe and video, if you liked the dish, click a button or two below and share it with your friends.
I appreciate it, thanks!
–Chef Buck

Share and Enjoy !


Gluten Free Muffins with Apple Cinnamon

gluten free muffins

Check out these moist and delicious gluten free muffins made with almond flour. CG has been baking muffins up the wazzoo lately, and apple-cinnamon almond flour muffins are some of my favorites, so give them a try. Don’t be put off by terms like gluten free and grain free, just focus on delicious. Also feel free to experiment with recipe substitutions as well, like maple syrup instead of coconut sugar, or ginger instead of apples, or using banana instead of apple sauce.  Muffins are great treats, and while gluten free options are generally underwhelming, this muffin recipe is a winner.

Ingredients for Gluten Free Muffins

Crumble Topping:
(this recipe makes enough for 2-3 batches of muffins)
5 Tbsp ALMOND FLOUR
3 Tbsp COCONUT SUGAR
1½ tsp CINNAMON
pinch of SALT
2 Tbsp refined COCONUT OIL

Dry Ingredients:
2 cups ALMOND FLOUR
1 heaping Tbsp CINNAMON
1 tsp BAKING SODA
¼ tsp SALT

‘Wet’ Ingredients:
3 regular EGGS
2 tsp VANILLA
4 Tbsp COCONUT SUGAR or use 1/3 cup maple syrup
113g (3-4 oz) unsweetened APPLESAUCE
2 Tbsp refined melted COCONUT OIL

1 medium APPLE, diced

(this recipe makes 6-8 muffins)

*Refined coconut oil does NOT have a coconut flavor; virgin coconut oil HAS a distinct coconut flavor

gluten free muffins
Gluten free apple-cinnamon muffins that are delicious? Oh, yeah.

How to Make Gluten Free Muffins with Apple Cinnamon

  • Prepare baking tins and have cooling rack ready.
  • Preheat oven to 375.
  • Combine crumble topping ingredients together. Coconut oil should be in a solid state in order to cut into the mixture like butter, then store the crumble in fridge while mixing together the rest of the batter.
  • Mix the dry ingredients together and set aside.
  • In a bowl, whisk eggs together. Add vanilla, coconut sugar, applesauce, and melted coconut oil, and mix well.
  • Then add dry ingredients to wet, combining just until all ingredients are wet, no need to over mix. Add apples and mix gently.
  • Divide batter equally between 6-8 muffin cups.
  • Top each muffin batter cup with crumble topping, as much as you like.
  • Bake in preheated oven at 375 degrees for 10 minutes. Turn muffins around; bake for another 10 minutes.
  • Test muffins with a toothpick or knife blade. The muffins are ready if no batter sticks on the toothpick or knife. If muffins need more cooking time, return to the oven and then test every 4 minutes, because there’s no reason to get this far and then burn your muffins!
  • When finished baking, cool muffins on rack for about 5 minutes, this will keep them from sticking to the muffin cup papers.

Muffin Time!

Now all you need is a hot cup of coffee or a cold glass of milk and you’ll be on your way to a perfect day! Give this gluten free muffins recipe a try and then let us know what you think. And for another dessert recipe, give this Gluten Free Chocolate Cake Recipe made from beans. wha!?

chocolate cake recipe
A flourless, gluten-free chocolate cake

Thanks for watching our recipe videos and then trying some out. If you like what you see, click a button or two below and share this gluten free muffins recipe with friends and family. I appreciate it!
–Chef Buck

Share and Enjoy !

Pupusas Recipe — Gluten Free Corn Flour Pupusa

pupusas recipe

How to make a pupusas recipe.
This pupusas recipe is a traditional Latin American dish of corn tortilla filled with cheese, beans, peppers and meat, although you can use any combo of ingredients you like to cook pupusas. Corn flour is mixed with salt and water to make a corn dough, or masa, and wrapped around a center filling;
that filling can simply be cheese and peppers, but I like to make it a full meal by adding beans and meat as well.

What You Need To Make This Easy Pupusas Recipe

2 cups CORN FLOUR
about 1½ cups WATER
SALT and PEPPER to taste
1 tsp TURMERIC (optional)
here are some filling ideas…use any
combo, and substitute what you like:
leftover MEATS (minced)
REFRIED BEANS
CHEESE (grated)
pickled PEPPERS (like green chili or jalapeno)

pupusas recipe
Pupusas …inspired by a traditional Salvadorean recipe.

How To Make Pupusas

First thing, mix up your pupusa filling…this will allow time for the flavors to interact.
You can simply use cheese and peppers, but adding a little refried beans and leftover meat
into the mixture can turn your pupusas into a filling meal.
I often mince up leftover breakfast sausage to add into my filling, but any pork, beef, or chicken
will do, just be sure to use meat that is already cooked through; it’s a great way to use leftovers.
Combine the filling ingredients together in a bowl.
Mix well and set aside.
In another bowl, add corn flour (Maseca is a populer brand in the USA, but any corn flour will do).
Add in salt and pepper and turmeric.
Turmeric is not a traditional pupusa ingredient, but I find it adds a great color.
Mix dry ingredients together.
Add in warm tap water and mix into a dough …it mixes quite easily;
Use your hands to mix…this will give you a better sense of the dough consistency.
Mix until the dough is “doughy” and pliable–not too dry and not too wet–add additional water
or flour until reaches this consistency.
Tear off a handful of dough and roll it into a ball, then flatten the dough into a disc.
Place a ball of the cheese/bean/meat filling in the center of the disc, and then close up the edges
of the dough, sealing the filling inside a doughy ball.
Pinch off any excess dough from the top and return it to the bowl.
Flatten the dough filled ball into a disc shape, try to keep the disc intact, but if the filling leaks slightly,
it’s no big deal.
You can use more dough, or less filling, or be more careful folding the filling inside to make an absolutely
perfect pupusa…but why work that hard?
I like my pupusas to have a thin tortilla skin.
I like them to leak a little bit…I like the taste of the toasted cheese on the edges.
But that’s just me…follow your heart; but believe me, if your pupusas aren’t perfect,
they’ll taste just as good, or better.
Heat a lightly oiled griddle or skillet on med/med-high heat and cook the pupusas
about three minutes on each side.
And that’s it.
Serve as a snack or main meal. Top with sour cream, salsa, or even a cabbage slaw for a nicely balanced dish.

Give this pupusas recipe a try and let me know what you think, and bon appétit!

Ingredients For Curtido …pickled slaw topping for pupusas recipe

half a small CABBAGE (chopped)
2 CARROTS (shredded)
1 white ONION (sliced)
1 JALAPENO (thinly sliced)
1 Tbsp dried OREGANO
SALT and PEPPER to taste
mild VINEGAR (I like to use a rice or malt vinegar)

How to Make Curtido

Bring a pot of salted water to a boil; boil enough water to cover the veggies.
Once water is boiling, turn off and then add the veggies to the pot.
Add oregano and pepper.
Let soak for 3 minutes.
Drain the veggies from the pot, but reserve some of the water.
Put the strained veggies into a jar; ideally, use a size jar that will be completely filled.
Press the veggies into the jar until it is crammed full.
Add reserved water until the veggies are slightly more than halfway covered, then add
vinegar until the veggies are completely covered.
Allow to cool, and then cover jar with a lid and refrigerate.
The more ahead of time you make this, the more flavorful it will be.
It’s a simple and tasty topping or side for pupusas or sandwiches.

For more awesome recipes, take a look at my Chef Buck Recipe Playlists.

pupusas recipe
This is a fantastic Nachos Supreme dish, and a giant pizza pan makes a great dish for cooking and serving.

Thanks for checking out this pupusas recipe. If you like what you see, share it with your friends and family on social media, I appreciate it!
–Chef Buck

Share and Enjoy !


Tzatziki Sauce Recipe – Greek cucumber yogurt dressing

Tzatziki Sauce recipe

It’s super easy to make a healthy Greek tzatziki sauce recipe. It’s fairly quick to prepare tzatziki sauce, but it takes a little time to reach it’s full flavor potential, so make it a few hours ahead of time before serving. Tzatziki is a mild cucumber yogurt dressing that pairs very well with spicy falafel or lamb. The sauce can be used as a dressing or dip, especially for stuffed pitas, pita chips, or fresh veggies.

Ingredients You’ll Need for Tzatziki Sauce Recipe:

2 cups GREEK YOGURT
2 cups fresh CUCUMBER
3-4 cloves GARLIC (finely chopped)
1 small LEMON zest and juice
or substitute 1-2 Tbsp
WHITE WINE VINEGAR
½ cup (or more) chopped HERBS
…like dill, mint, or parsley
1-2 Tbsp OLIVE OIL
SALT and PEPPER (to taste)

tzatziki sauce recipe
Greek Tzatziki Sauce, a cucumber yogurt dressing

How To Make a Greek Tzatziki Sauce Recipe:

I prefer using English cucumbers (also called hothouse cucumbers), or using smaller, japanese cucumbers.
These cucumber types have a lot of flavor, are less watery, and the skin is thin enough to be eaten and enjoyed (although I generally peel them when making tzatziki).
When making a tzatziki sauce, start by preparing the cucumber; this will give the cucumber time to drain while you prepare the rest of the sauce ingredients.
Peel your cucumber and grate with a hand grater, or use a food processor if you enjoy cleaning appliances.
Chop the cucumber into smaller pieces, if desired, but don’t over-process, since chunks of cucumber make a tzatziki quite nice.
Place the grated cucumber into a strainer over a bowl to allow the cucumber to drain.
Mix a bit of salt to help draw out the water. Set bowl aside and prep the other ingredients.
Into a mixing bowl, add Greek yogurt, minced garlic, lemon zest and juice, and fresh chopped herbs.
If you don’t have a lemon on hand, substitute a mild rice or wine vinegar.
Mix ingredients well.
Return to the cucumber. Quite a bit of water will have drained into the straining bowl. Use a spatula or spoon to press out more water, and then add the strained cucumber to the yogurt mixture.
Mix well, and add additional salt and pepper to taste.
Cover and place in the fridge for at least 2+ hours before serving; this will give the flavors time to maximize.
Serve as a dip or dressing/sauce.
it’s great with pita chips or fresh sliced veggies; or serve with spicy lamb–especially as a sauce in stuffed pitas, or as a condiment on lamb burgers.
Or as a dressing for a fresh salad.
Greek tzatziki is healthy, versatile, and an easy recipe worth giving a go.
Give this Greek tzatziki sauce recipe try and let me know what you think, and bon appétit!
For another Greek inspired dish, check out this Hummus Recipe

hummus
click pic for video recipe

Or this very tasty Pita Chips Recipe …that goes great with tzatiki
spicy pita chips
Thanks for checking out the recipes. If you like what you see, share these dishes with your friends and family on social media, I appreciate it!
–Chef Buck

Share and Enjoy !


Potato Cake Recipe — How To Make Sweet Potato Latkes

potato cake recipe

Check out this simple potato cake recipe. Or do you call them potato pancakes? Or potato latkes? I like to use sweet potatoes because they are less starchy and cook up quicker than white potatoes, plus sweet potatoes just taste great, and they are a good nutrition and energy source.

Ingredients to Make A Sweet Potato Cake Recipe :

1 med SWEET POTATO
ONION (½ as much as potato)
Fresh HOT PEPPER (optional)
2 EGGS
2 Tbsp FLOUR
1 tsp CURRY POWDER
½ tsp CHILI POWDER (optional)
……or whatever seasonings you prefer!
SALT and PEPPER (to taste)
OIL for cooking

potato cake recipe
Are they potato latkes, potato pancakes, or potato cakes? What do you call them?

How to Make Sweet Potato Latkes :

    • Shred sweet potato into strings, and thinly slice onion into stringy lengths.
    • I like to also thinly slice a jalapeno pepper; the pepper adds a nice zing, flavor, and color, but you can skip the pepper if you’re a “fraidy cat”.
    • In a bowl, combine the potato, onion, and pepper with the flour until well coated.
    • Beat two eggs and add into the mix, stirring well.
    • Add seasonings as desired. I like a lot of seasoning, and the potato and onion like it, too, so be liberal with the salt, pepper, and flavors you prefer; it’ll make for tastier cakes.

potato cake recipe
thinly sliced sweet potato, onion, and pepper make for a sturdy, tasty, potato cake.

  • Heat oil in a skillet on medium-high heat and spoon the potato mixture into the skillet and press and shape into patties. The potato cakes should be about the size and thickness of a nice ¼lb burger, but not too thin.
  • Don’t crowd the skillet. I use a ten-inch skillet and get two batches of three patties each, which is a terrible sentence, and almost sounds like math, so sorry for that.
  • Cook patties for 3-4 minutes on each side, turning carefully.
  • Adjust the burner temperature as needed; reduce heat to cook each potato patty for 3-4 minutes without burning.
  • Cook until nicely colored, then remove potato cakes from the skillet and drain on a paper towel.

It’s a great dish for breakfast, lunch, or dinner.
Give this simple potato cakes recipe a try and let me know what you think, and bon appétit.

And for another yummy potato dish, check out this classic Home Fried Potatoes Recipe.

home fried potatoes recipe
home fried potatoes

Thanks for watching. If you like the potato cake recipe, use some of the share links below to share the dish with your friends and family.
I appreciate it!
–Chef Buck

Share and Enjoy !


Chocolate Cake Recipe – Gluten Free

chocolate cake recipe

This is a great gluten free chocolate cake recipe. It’s super easy, moist, and tasty; and kinda cool to bake, too, since the main ingredient is beans! What!? Garbanzo beans! Which are also called chick peas. So besides being a delicious cake, it’s a flour less, gluten-free cake. This cake is especially tasty with cream cheese frosting.

Chocolate Cake Recipe Ingredients:

2 15 oz cans GARBANZO BEANS
2 cups semi-sweet CHOCOLATE CHIPS
4 EGGS
1 cup SUGAR
¾ tsp BAKING POWDER
1 Tbsp VANILLA EXTRACT
2-3 Tbsp BUTTER
½ cup DRIED CHERRIES (or other dried fruit)
1 cup toasted NUTS (chopped)
POWDERED SUGAR (for dusting)
fresh BERRIES (for topping)

…or top with CREAM CHEESE frosting

Cream Cheese Frosting Ingredients:

8oz CREAM CHEESE, softened
¼ cup unsalted BUTTER, softened
2 cups POWDERED SUGAR
1 tsp VANILLA EXTRACT
1 Tbsp MILK

cream cheese frosting recipe
Cream cheese frosted cake

Chocolate Cake Recipe Directions:

  • Butter up a baking dish; 8X10 or 9X11…about the size of a human head. If you need a decent baking dish, check out some current pricing for a Pyrex dish on Amazon.
  • Rinse and drain garbanzo beans.
  • In a food processor, combine eggs and beans and blend until smooth.
  • Transfer beaten bean mixture to a large bowl and add baking powder and sugar and stir until well combined.
  • On the stove, set up a double boiler and melt the chocolate chips. Add butter to the chocolate as needed to keep the chocolate smooth.
  • Once melted, add the chocolate to the cake batter mix and stir until incorporated.
  • Stir in vanilla extract, your favorite dried fruit (I prefer cherries or cranberries), and chopped nuts.
  • Mix well and pour into buttered baking dish.
  • Bake for 45 minutes in an oven preheated to 350 degrees Fahrenheit.
  • After 45 minutes insert a knife or toothpick into the cake to check that it is done; if wet batter sticks to the toothpick, let it cook a few minutes longer.
  • Allow cake to set and firm up 10 minutes before removing from the baking dish.
  • After 10 minutes, turn cake onto a baking rack and continue to let cool.

Once the cake cools, it’s ready for the next step, whatever that is…
This chocolate cake recipe is a perfect match for a cream cheese frosting, but it tastes great with just a sprinkling of powdered sugar and fruit, or believe it or not,
it tastes great plain! It’s incredibly moist, and the nuts and fruit make it almost like a brownie.

Cream Cheese Frosting Directions:

  • About an hour ahead of time, set out the cream cheese and butter to soften.
  • In a bowl, combine cream cheese, butter, and vanilla extract and blend with hand mixer.
  • Once ingredients begin to come together, add in the powdered sugar. Add the sugar a bit at a time to avoid a sugary blending mess.
  • Mix until the frosting is smooth. To thin the frosting add a small amount of milk–no more than a Tablespoon at a time! For a thicker frosting, just add more powdered sugar.

And that’s it.
Spread on your dessert and eat away!

Give this flourless, chocolate cake recipe a go and let me know what you think!

And for another tasty dessert idea, check out my Death by Scone Recipe …it’s one of my favorite all-time treats.

scone recipe
best scone ever…really

Thanks for Watching our Chocolate Cake Recipe Video!

Click a button below and share the dishes with your friends. You can also follow Chef Buck on Youtube. We appreciate all the kind comments and support, and we’ll see you next time in the kitchen!

If you like what CG and I do, support us on Patreon, or throw us a tip in our Paypal Tip Jar. We’ll happily enjoy a coffee on the road – Thanks! We appreciate all the support, and we’ll see you next time in the kitchen!

We include affiliate links for products on our website. Making a purchase after clicking on our links and we may earn a commission which helps us produce more videos and drink more coffee :^) We participate in the Amazon Services LLC Associates Program, which is an affiliate advertising program. It provides a means for us to earn fees by linking to Amazon.com and affiliated sites, so we can make more videos.

Share and Enjoy !

Fried Quinoa Recipe — Quinoa Fried “Rice”

fried quinoa recipe

This fried quinoa recipe is a quick and tasty take on Chinese fried rice. Quinoa makes a great substitute for rice in many recipes, especially quinoa fried “rice”. Quinoa is a complete protein, which makes this dish a complete meal, even if you leave out the egg–which is an easy way to make this a vegetarian recipe. Of course you can go the other route and throw in a little diced pork chop or ham if you like, but I’m quite happy with just a couple scrambled eggs thrown in.

Fried Quinoa Recipe Ingredients:
1 cup QUINOA (before cooking)
1 cup PEAS
1 CARROT (diced)
4-6 GREEN ONIONS (chopped, tops separate)
3-5 cloves GARLIC (finely chopped)
2 Tbsp GINGER (finely chopped)
HOT PEPPERS (as desired, finely chopped)
2 EGGS (scrambled)
2-3 Tbsp OIL for sautéing
SOY SAUCE as desired
SESAME OIL 1-2 tsp
SALT and PEPPER to taste

fried quinoa recipe
Quinoa Fried “Rice”

Fried Quinoa Recipe Directions:
This is a great dish for leftover quinoa. The next time you’re making a pot of quinoa for another recipe, just make a little extra for this fried rice recipe knockoff! But if you don’t have any leftover
cooked quinoa handy, just prepare this quinoa a little ahead of time to give it time to cool down–this will keep the quinoa from easily overcooking and becoming mushy.

Quinoa is easy to prepare–just like rice, in fact! Rinse the quinoa if needed (many brands come pre-rinsed). In a pot, add 1 cup quinoa to 2 cups water. Bring the pot to a boil, reduce pot to a
simmer, and then cover and let cook 13 minutes (this will result in slightly al-dente quinoa, which is what you want for frying). Remove the quinoa from the heat and let sit for 10 minutes.
Then fluff with a fork and allow to cool completely (salt if desired).

For fried rice, I like to scramble my eggs first and then set aside. I Use two eggs for this recipe, but feel free to use 1, or 3, or none if you want a vegetarian fried quinoa. Whisk the eggs (add a
splash of milk if desired–makes scrambled eggs smoother). Heat oil in a skillet and quickly scramble eggs on med-high heat and then set aside for later.

In a large skillet, heat 2-3 Tbsp oil on medium.

Add raw, diced carrots (should be about pea size). Add chopped hot peppers, too–if desired. I like adding a little fresh red chili peppers for taste, but jalapenos would work just as well, or red
pepper flakes, or even just a little sriracha later, if desired–or no heat at all–it’s up to your tastes; follow your heart, but spicy food is good for you, right?

Sauté the carrot and peppers for a minute and then add the ginger, garlic, and chopped green onion bottoms (reserve the chopped tops for a flavorful garnish).

Continue sautéing another minute and then add in the quinoa. Stir fry until heated through, this won’t take very long.

Add sesame oil and peas. I like to use frozen peas (thawed), because they hold their texture better than canned peas. Stir until mixed. Add soy sauce to taste. Add fish sauce if desired. The
sauces will provide plenty of salt, but if you want a little black pepper, go ahead and throw that in now.

Mix up and then add the scrambled egg. Mix and fry for another minute and then remove from the heat.

That’s it.

This dish is ready pretty quick. Top the fried quinoa with chopped green onion, crushed peanuts, or both. Serve fried quinoa it’s own or with a veggie side (broccoli or bok choy or Thai eggplant
are nice).

Give this Fried Quinoa recipe a try and let me know what you think, and bon appétit!
And for more tasty quinoa dishes, check out my Quinoa Video Playlist.

quinoa salad

Share and Enjoy !


Baked Quinoa with Celery Root

Quinoa Vegetable Gratin

This baked quinoa recipe is tasty and versatile, and an terrific way to use celery root. I use zucchini and carrots in this video, but I’ve made the same dish using broccoli as the main veggie, so experiment with whatever you have on hand, just make sure to cut the veggies into smaller pieces to spread evenly.

Baked Quinoa Recipe Ingredients

1 cup QUINOA
1 CELERY ROOT (thinly sliced)
1 cup CARROT (shredded)
1 cup ZUCHINNI (diced well)
1-2 tsp HOT PEPPER (finely chopped)
½ ONION (chopped)
3-4 cloves GARLIC (finely chopped)
1 cup BLUE CHEESE
2 Tbsp BUTTER
½ cup ALMOND MILK (or Half N Half)
2 Tbsp ITALIAN SEASONING
1 tsp MUSTARD SEEDS
½ cup BREAD CRUMBS
1-2 Tbsp OLIVE OIL
SALT and PEPPER (to taste)

Quinoa Vegetable Gratin

How to make a Quinoa Bake

In a pot, heat olive oil on med. high heat. Add mustard seeds, garlic, and a little hot pepper, if desired. Give these ingredients about a 30 second head start, and then add the onion. Stir and let cook for 2-3 minutes until onions begin to soften. Stir in salt.

Add quinoa and water and stir. Cover pot and allow the ingredients to come to a boil. Reduce the heat to a simmer, and allow the pot to cook for about 10 minutes.

Remove pot from the heat, if there is a little water left, that’s okay. Add Italian seasonings (or experiment with different seasonings!). Add in the zucchini and carrot (or experiment with different veggies!). Stir in the milk and mix all ingredients together well.

Butter a deep 1.5 quart baking dish. Check here to see current prices for a casserole baking dish on Amazon.

Spoon in and spread a layer of the quinoa/veggie mix along the bottom of the dish, about a ½” to 1″ thick. Top this layer with a single layer of thinly sliced celery root (celeriac). Add a sprinkling of cheese–as cheesey as you like it. I use blue cheese in the video, but try feta cheese and ricotta cheese, too (I’ve used all and any crumbly/melty white cheese is gonna work well with this dish).

Add and spread another layer of the quinoa mixture, and continue building the quinoa, celery root, cheese layers until the dish is almost full. Make the top layer quinoa/veggie.

In a small bowl, combine bread crumbs w/ olive oil, Italian seasoning, salt, and pepper. Mix, and spread over the top of the quinoa dish.
Cover with aluminium foil and bake for about 55 minutes in an oven pre-heated to 375 degrees F.

After 55 minutes, remove the foil and continue to cook another 5 minutes or until the bread crumb topping is golden brown.

The dish is finished when a knife can pass easily through the sliced celerey root layers.
Let rest for 5-10 minutes, and then serve.
Give this baked quinoa vegetable recipe a try and let me know what you think, and bon appétit!

And for another casserole-style recipe idea, try this Broccoli Cheese and Cauliflower Gratin Recipe.

broccoli cheese
An easy, semi-healthy broccoli and cauliflower gratin recipe.

Thanks for Watching our Baked Quinoa Recipe Video

Sign up for our mailing list so you’ll never miss a new recipe. Also click a button below and share the dishes with your friends. You can also follow Chef Buck on Youtube. We appreciate all the kind comments and support, and we’ll see you next time in the kitchen!

If you like what CG and I do, support us on Patreon, or throw us a tip in our Paypal Tip Jar. We’ll happily enjoy a coffee on the road – Thanks! We appreciate all the support, and we’ll see you next time in the kitchen!

We include affiliate links for products on our website. Making a purchase after clicking on our links and we may earn a commission which helps us produce more videos and drink more coffee :^) We participate in the Amazon Services LLC Associates Program, which is an affiliate advertising program. It provides a means for us to earn fees by linking to Amazon.com and affiliated sites, so we can make more videos.

Share and Enjoy !

Rice Pudding –Try Quinoa Pudding instead

rice pudding

Quinoa for dessert? If you like rice pudding, then give this quinoa recipe version a try; it’s super sweet and easy to make and yet another great way to include quinoa in your diet. Quinoa cooks up just like rice: one part quinoa to two parts water, bring to a boil, reduce to a simmer, and then cook covered until water is absorbed. Quinoa acts like a grain, but it’s actually a seed–and a complete protein–so it’s a great addition to your diet if you’re trying to cut down on eating meats and rice.  Check current prices for quinoa on amazon.

Ingredients for Quinoa Rice Pudding

1 cup QUINOA
1 CINNAMON STICK
14oz can COCONUT MILK
2 tsp minced GINGER
¼ cup BROWN SUGAR
½ tsp CARDAMOM (or sub nutmeg)
1/3 cup RAISINS
1 tsp minced ORANGE PEEL
½ cup toasted COCONUT FLAKES and/or toasted ALMOND SLICES

rice pudding
Quinoa pudding makes a nice change-up from rice pudding–and it’s just as easy to make.

How to Make Rice Pudding with Quinoa

  • In a saucepan, combine 1 cup quinoa with 2 cups of water and a cinnamon stick.
  • Bring pot to a boil, then reduce heat to a simmer. Cover pot and let cook 12-15 minutes until the water is absorbed.
  • Fluff and remove cinnamon stick and set aside.
  • In a small saucepan, combine 14oz can coconut milk, minced ginger, and brown sugar.
  • Slowly bring contents to a bubble, then reduce heat and continue stirring 5 minutes.
  • Remove from heat.
  • Add raisins, orange peel, and cardamom to quinoa (can sub nutmeg for cardamom). Mix well and then add coconut milk mixture.  Stir, then cover and set aside to cool about 20-30 minutes.  
  • Serve warm or chill and serve cold. When serving, garnish with toasted almond slices or coconut, or both.  The crunchiness of the toasted topping adds a great texture and I highly recommend giving it a try.  

The next time you’re in the mood for rice pudding, make quinoa pudding instead.  Give this quinoa recipe a go and let me know what you think!

rice pudding
quinoa pudding recipe


Try another delicious quinoa recipe idea: Spanish-Style Quinoa Recipe

spanish quinoa

Thanks for trying our Quinoa Rice Pudding

Click a button below and share the quinoa recipe with your friends. You can also follow Chef Buck on Youtube. We appreciate all the kind comments and support, and we’ll see you next time in the kitchen!

If you like what CG and I do, support us on Patreon, or throw us a tip in our Paypal Tip Jar. We’ll happily enjoy a coffee on the road – Thanks! We appreciate all the support, and we’ll see you next time in the kitchen!

We include affiliate links for products on our website. Making a purchase after clicking on our links and we may earn a commission which helps us produce more videos and drink more coffee :^) We participate in the Amazon Services LLC Associates Program, which is an affiliate advertising program. It provides a means for us to earn fees by linking to Amazon.com and affiliated sites, so we can make more videos.

Share and Enjoy !

Tofu Lasagna Recipe — Gluten Free Edition

gluten free tofu lasagna

The only thing that sounds worse than a tofu lasagna recipe is a gluten-free tofu lasagna recipe. However, this recipe is actually pretty tasty, and still gluten-free.

Camera Girl whipped up this dish and it was damned tasty. I’m not ready to start driving the tofu train, but I am enjoying the ride.

Tofu Lasagna Recipe Ingredients

The sauce:
1 Tbsp OLIVE OIL
1/2 tsp RED PEPPER FLAKES (crushed)
1/2 large ONION (chopped)
3 cloves GARLIC (chopped)
15 oz can DICED TOMATOES
8 oz can TOMATO SAUCE
1 CARROT (chopped well)
1 stalk CELERY (chopped well)
2 tsp OREGANO
1/2 tsp BASIL
1 BAY LEAF
SALT & PEPPER, to taste
….or substitute 25 oz jar store-bought marinara sauce, but don’t do that :^(
The filling:
1 pkg gluten-free, rice LASAGNA NOODLES (you do not cook them prior to baking)
2 Tbsp extra-virgin OLIVE OIL
1/2 large ONION (chopped)
6 cloves GARLIC (minced)
16 ounce package EXTRA-FIRM, WATER-PACKED TOFU (not silken tofu)
3 cups fresh SPINACH (chopped)
1/2 cup PARMESAN CHEESE (shredded)
1/2 cup part-skim MOZZARELLA CHEESE (shredded)
2 Tbsp Kalamata OLIVES (finely chopped)
2 tsp dried OREGANO
1/2 tsp dried THYME
SALT & PEPPER, to taste

gluten free tofu lasagna

How to Make Tofu Lasagna

First thing, start making the sauce. Now, don’t buy pre-made sauce!–or do…maybe you’re busy, I don’t know.
Next, heat olive oil and red pepper in a saucepan over medium-high heat. Add onion and garlic and saute 2 to 4 minutes. Add carrot and celery and continue sauteing.
Mix in the remaining sauce ingredients and bring to a boil. Reduce heat to low and simmer 30 minutes or longer, until flavors are blended, stirring routinely.

While sauce is simmering, heat oil in a large skillet and saute garlic and onion for lasagna filling. Add tofu and spinach to skillet and stir until spinach wilts and the mixture is heated through (2 to 3 minutes). Transfer skillet contents to a bowl and stir in parmesan, olives, seasonings, and 2/3 of the marinara sauce.

Spread half of the remaining sauce on bottom of 9 x 13 baking pan. If you need a decent oven-safe baking dish, check out some current pricing for a Pyrex dish on Amazon. Next, place a layer of lasagna noodles over sauce–if using the gluten-free rice lasagna, the noodles will not have to be cooked before using. Spread half of the tofu mixture over noodles. Repeat layers of noodle and tofu mixture. Top with remaining marinara sauce and shredded mozzarella cheese.

Cover dish and bake in a 350 degree F oven for about an hour.
Remove from oven and allow to rest 10 minutes.

Give this tofu lasagna recipe a try and let me know what you think, and bon appetit!

If you like thinking outside of the box, try this vegetarian version of pulled pork Jackfruit BBQ Recipe

jackfruit pulled pork
Jackfruit BBQ is great over rice, on a sandwich, or all on its own.

Thanks for checking the recipes out! Click some of the buttons below and share it with your friends and family, I appreciate it.
–Buck

Share and Enjoy !


Follow Me!