Bolón Recipe Green Plantain Breakfast

bolon recipe

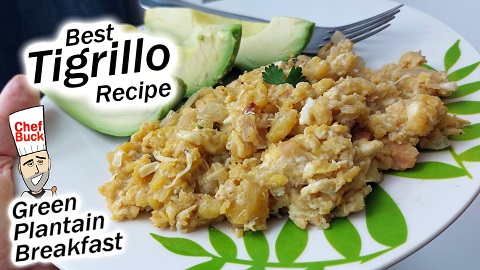
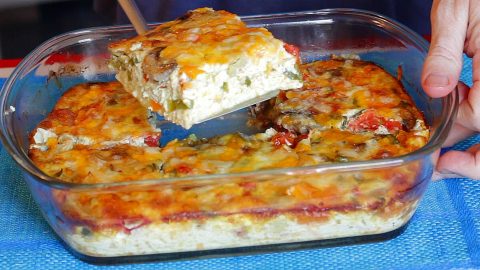
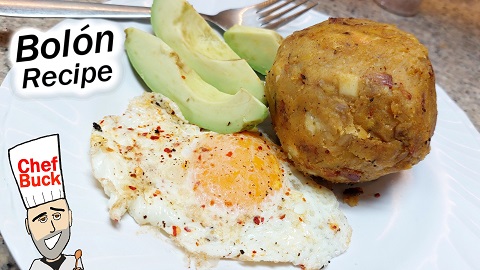
One of the best breakfast dishes in Ecuador is a Bolón recipe made with unripe green plantains and cheese. I prefer bolón mixto, which includes a bit of pork. In Ecuador, a traditional bolon mixto is made with chicharrón, but in my bolon recipe I use smoked rib meat. Bolon is a hearty breakfast comfort food, and along with Ecuadorian tigrillo, it’s a great way to cook green plantains.

Bolon Recipe Ingredients

2 banana-sized GREEN PLANTAIN
CHEESE ½ cup white cheese, cubed
ONION ¼ cup, chopped
2 cloves GARLIC finely chopped
OIL for cooking
SALT to taste
other seasonings
as desired…
I like a little
HOT PEPPER
and a little leftover MEAT, cubed (recommended!)

bolon recipe

How to Make Bolon

Use unripe, green plantains for this bolon recipe; it’s a very starchy ingredient, and green plantain can be used as a substitute in many potato recipes. This recipe is ideal for two hearty servings.

  • First, get a pot of salted water on the boil.
  • Peel your green plantains and slice into ½ inch pieces.
  • Add sliced plantain to the boiling water, reduce to a simmer, cover and cook for 15 to 20 minutes or until the plantain is tender enough to easily pass a fork into.
  • While the plantain simmers, chop the onion, cube white cheese, and cube a little pre-cooked meat to add later. You only need a little meat for flavor, maybe a ¼ cup; it’s optional, but highly recommended. If you’re in a meat-free mood, just leave it out and add more cheese.
  • Heat oil in a skillet on medium heat and add in the chopped onion and saute for 2 minutes.
  • Add in the meat and garlic and continue to saute.
  • Add salt to taste and any other desired seasoning. I like a little dried hot pepper.
  • Remove the cooked plantain from the pot, reserving some of the water.
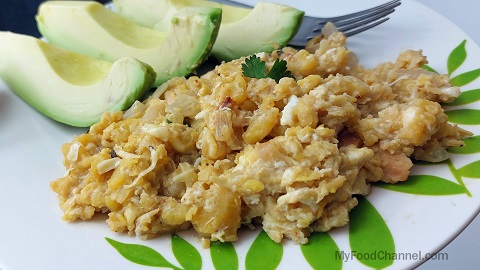
  • Mash the plantain, and then add it to the skillet with onion and meat and seasonings. Mix ingredients together well. Add a bit of the reserved water if needed, but not too much.
  • Remove mixture from the skillet into a bowl.
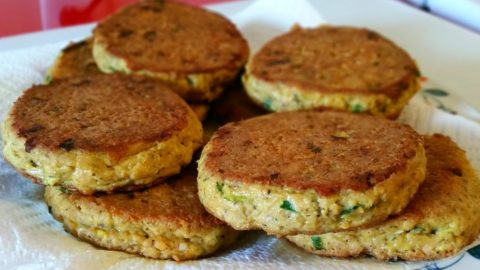
  • When plantain mixture is cool enough to handle, add in the cubed cheese and mix by hand, then form the mixture into balls, aka bolones. Now you’ve got bolones ready to fry and eat whenever you like.
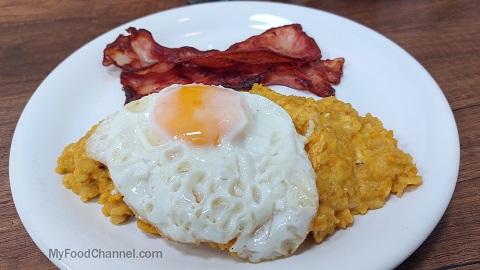
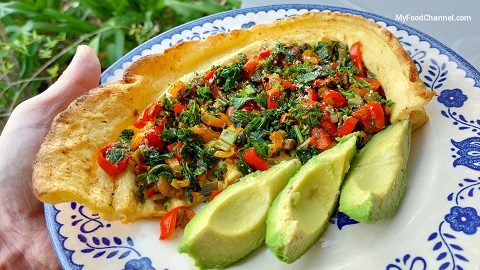
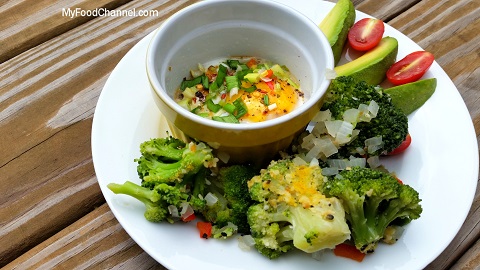
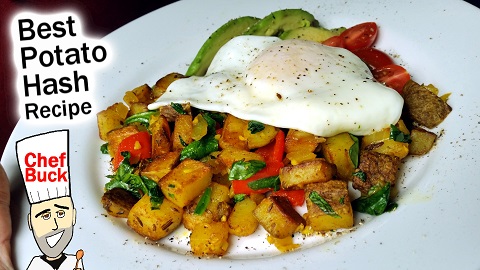
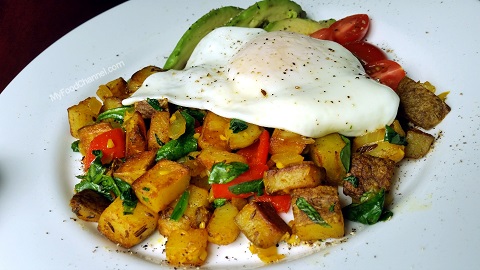
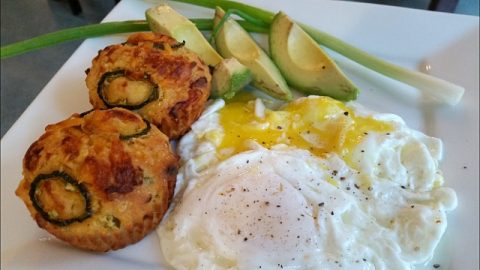
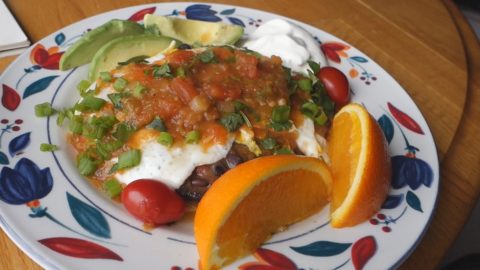
  • To fry, simply heat a little oil in a skillet on medium heat and turn the bolones in the skillet until fried to your liking. I love to serve this bolon recipe with a fried egg and avocado.

For another tasty green plantain dish, try this Ecuadorian Tigrillo Recipe. And find many more recipe ideas on our Plantain Video Recipe Playlist.

tigrillo recipe

What’s Healthier, Plantain or Potato? I found a potato vs. plantain nutrition article here that’s informative and easy to digest.

Check current prices for a new non-stick skillet on Amazon.

Thanks for Watching our Bolon Recipe Video!

Click a button below and share the dishes with your friends. You can also follow Chef Buck on Youtube. We appreciate all the kind comments and support, and we’ll see you next time in the kitchen!

If you like what CG and I do, support us on Patreon, or throw us a tip in our Paypal Tip Jar. We’ll happily enjoy a coffee on the road – Thanks! We appreciate all the support, and we’ll see you next time in the kitchen!

We include affiliate links for products on our website. Making a purchase after clicking on our links and we may earn a commission which helps us produce more videos and drink more coffee :^) We participate in the Amazon Services LLC Associates Program, which is an affiliate advertising program. It provides a means for us to earn fees by linking to Amazon.com and affiliated sites, so we can make more videos.

Share and Enjoy !

Best Tigrillo Recipe – Green Plantain Breakfast

tigrillo recipe

Use unripe green plantains to make a hearty tigrillo recipe. We’re currently traveling in Ecuador and enjoying many different plantain dishes. Tigrillo is a recipe made of unripe plantain, egg, cheese, and often a little meat added as well. Tigrillo is easy to prepare and makes a perfect meal to start the day, so follow along with our real-time How To Make Tigrillo Recipe and give this Ecuadorian breakfast dish a try.

Tigrillo Recipe Ingredients

1 PLANTAIN green, unripe plantain
2 EGGS
CHEESE ½ cup white cheese, shredded or cubed
ONION ½ cup chopped
OIL for cooking
SALT to taste
other seasonings
as desired…
I like a little
HOT PEPPER
and a little MEAT (recommended!)

tigrillo recipe

How to Make Tigrillo

Use unripe, green plantains for this recipe. Plantain is very starchy ingredient and can be used as a substitute in many potato recipes. This tigrillo recipe is ideal for two hearty servings.

  • First, get a pot of salted water on the boil.
  • Peel your green plantain and slice into ½ inch pieces.
  • Add sliced plantain to the boiling water, reduce to a simmer, cover and cook for 15 to 20 minutes or until the plantain is tender enough to easily pass a fork into.
  • While the plantain simmers, chop the onion, shred white cheese, and chop a little pre-cooked meat to add later. You only need a little meat for flavor, maybe a ¼ cup; it’s optional, but highly recommended. If you’re in a meat-free mood, just leave it out.
  • Heat oil in a skillet on medium heat and add in the chopped onion and saute for 2 minutes. Check Amazon for current prices on a non-stick skillet.
  • And in the meat and continue to saute.
  • Add salt to taste, and any other desired seasoning. I like a little dried hot pepper.
  • Remove the cooked plantain from the pot, reserving the water.
  • Add plantain to the skillet and mash into desired consistency, just like mashed potatoes.
  • Mix mashed plantain with onion and meat and seasonings and add a bit of the reserved water as needed for creaminess.
  • Mix in the cheese.
  • Break 2 eggs into a bowl and whisk until smooth.
  • Make a well in the center of the plantain skillet, and pour in the egg mixture.
  • Allow eggs to cook, and then fold into the plantains.
  • Add fresh herbs if desired, and adjust seasonings as needed.
  • Serve hot. Top with an over-easy egg to impress!

I love tigrillo. I’ve tried many variations of this dish, and I hope to try many more.
Give this Ecuadorian-style Tigrillo Recipe a try and let us know what you think, and for another tasty unripe plantain recipe, try crispy Tostones.

tostones recipe
Tostones are a staple snack in latin American cuisine, easy to prepare, and especially tasty with a creamy dipping sauce.

What’s Healthier, Plantain or Potato? I found a potato vs. plantain nutrition article here that’s informative and easy to digest.

tigrillo recipe

Thanks for Watching our Tigrillo Recipe Video!

Sign up for our mailing list so you’ll never miss a new recipe. Also click a button below and share the dishes with your friends. You can also follow Chef Buck on Youtube. We appreciate all the kind comments and support, and we’ll see you next time in the kitchen!

If you like what CG and I do, support us on Patreon, or throw us a tip in our Paypal Tip Jar. We’ll happily enjoy a coffee on the road – Thanks! We appreciate all the support, and we’ll see you next time in the kitchen!

We include affiliate links for products on our website. Making a purchase after clicking on our links and we may earn a commission which helps us produce more videos and drink more coffee :^) We participate in the Amazon Services LLC Associates Program, which is an affiliate advertising program. It provides a means for us to earn fees by linking to Amazon.com and affiliated sites, so we can make more videos.

Share and Enjoy !

German Pancake – Savory Recipe For Any Meal of the Day

A German Pancake, also called a Dutch baby pancake, is easy to learn and can be used with a variety of savory or sweet toppings. This recipe version easily serves 2 people – each person enjoying half a 10”, ½” thick pancake plus toppings. If you’ve never had a German pancake, it’s a delicious cross between an easy-to-make soufflé, and a bowl-shaped crepe. You may know it by another name: a Bismarck, a Dutch Puff, or as a variation of the English Yorkshire pudding.

How To Make a Successful German Pancake

  • Use a cast-iron skillet . In a pinch, you can use some other oven-safe dish like a Pyrex dish, but it’s convenient to have something that can go from the stove to the oven. Cast iron skillets can be pricey, but I use economical Lodge Cast Iron skillets, including the one in the video. You can check current prices for these skillets on Amazon.
  • Make sure your eggs and milk at room temperature  (In a pinch, you can use your microwave to knock the cold off….but don’t overcook either ingredient);
  • Make sure your butter or oil is sizzling hot, but not burnt, when the batter is poured into your pan;
  • You want your batter to be bubbly/frothy before you pour it into your pan with hot oil, AND your oven preheated to 425˚F so that as soon as the batter is poured, it is immediately placed into a hot oven.
  • Do NOT open the oven while the pancake is baking. This is where your oven light comes in handy.

Ingredients for a Savory German Pancake

3 large eggs
½ cup milk [can use non-dairy milk]
½ cup all-purpose flour 
½ tsp salt
½ tsp freshly ground black pepper
[1 tsp fresh herb e.g. thyme, optional ]
3 Tbsp unsalted butter or oil or combo

Sample Pancake Toppings:
8 cherry tomatoes, halved
2 Tbsp garlic, minced
3 kale leaves, stems and leaves chopped separately; stems minced
2 green onions, chopped
2-3 small red and/or yellow bell peppers, chopped
[In the video, we made a heaping amount of topping, using up some refrigerator items e.g. mushrooms.]

Optional Garnishes:
Sprinkle of parmesan cheese
Fresh chopped parsley, or chives, for garnish

German pancake
the same Savory German Pancake Recipe without Mushrooms

Directions for Making a Dutch Baby Pancake

Take eggs and milk out of frig. Room temperature ingredients yield more desired ‘puffiness’; also easier to blend.

Chop toppings. Sauté in 10 in cast-iron skillet. Remove toppings and keep warm. Wipe out skillet. Or use two separate skillets as I do in the video recipe.

Position an oven rack so that your pancake has at least 6 inches of space to rise. We simply remove one rack.

Preheat oven to 425°F. Place your skillet/dish in oven as it warms.

In a large bowl, whisk eggs and milk until blended. Whisk in flour, salt and pepper until smooth; stir in fresh herb – if adding.   Continue to whisk until smooth and fluffy.

If you forgot to heat the pan, you can Heat a 10-in. cast-iron or other ovenproof skillet over medium-high heat.

AFTER pan is heated, remove from oven,  add butter and heat until sizzling, but before it is browned . Watch to make sure butter doesn’t burn.  Pour batter into hot pan. Immediately place into preheated oven.  

Bake until top is puffed and sides are golden brown and crisp, 10-20 minutes, or until desired doneness. For savory dishes, I prefer a cooking time around 10 minutes, but for sweeter, more desert-like German Pancakes, I like to cook the cake for 15-20 minutes. Do not open oven while cooking – use oven light.

Set your table. Doublecheck your toppings.

Remove from oven. Immediately sprinkle with cheese, reserved toppings and garnishes. Serve hot.

Helpful Hints as you Experiment with German Pancakes

This recipe is scalable. The basic pancake ratio: 1 egg to ¼ cup flour, ¼ cup milk. You can add an extra egg to this ratio – like we did for this recipe.

You can also make the batter the night before, to save blending time. Start with all ingredients at room temperature. Refrigerate combined batter. Next morning, let come to room temperature. Beat the batter until light and foamy. Continue with recipe.

Instead of a single oven-proof dish or pan, you can use two 6” pans to make individual pancakes.

German pancake
Savory German Pancake with Mushroom, Kale, and Tomato

Other Savory Topping Combinations to Try

In the video, we packed our pancake with lots of things we found in the frig, that we thought needed to be used. You can be choosier with your German pancake experiments. Here’s some ideas to get your imagination cooking.

  • Chopped asparagus, capers and a squeeze of lemon
  • Cooked bacon or Canadian ham and your favorite cheese
  • Brown some diced portabella mushrooms, ½ onion with a ¼ lb ground turkey, flavored with your favorite seasonings
  • Mushrooms, garlic and Parmesan cheese
  • Roasted tomatoes, garlic, a splash of fresh greens and cheese once it’s finished baking

Potential Ingredients for Making a Sweet German Pancake

Stay tuned for a separate video and blog for making a sweet dutch baby pancake. But, in the meantime, you can experiment with some of these ingredients…

Sweet batter ingredients: ½ tsp vanilla, ¾ Tbsp brown sugar, ¼ tsp citrus zest (orange, lemon), 1 Tbsp minced candied ginger, cinnamon, ginger, cardamom.

Sweet Dutch Baby Pancake Topping Ideas:
Lemon curd and powdered sugar
Fresh berries and powdered sugar or a smidge of maple syrup and mint
Applesauce, yogurt, cinnamon, nuts (sliced almonds, chopped walnuts)
Cream and jam or jelly
Sauté sliced apples, 2 Tbsp brown sugar, 2 Tbsp butter and about quarter cup of brandied cranberries, rum apples or bananas.  For a fancy-pants occasion, flame ¼ cup brandy or rum over the fruit. Or maybe just add sliced toasted almonds or chopped walnuts.

For another delicious breakfast/brunch dish, check out our EGG BREAD RECIPE.

egg bread
Fancy baked eggs to impress friends and family

Thanks For Watching Our Recipe Videos!

Thanks for checking out this savory German pancake recipe, and all of our recipes. Sign up for our mailing list so you’ll never miss a new recipe. Also click a button below and share the dishes with your friends. You can also follow Chef Buck on Youtube. We appreciate all the kind comments and support, and we’ll see you next time in the kitchen!

If you like what CG and I do, support us on Patreon, or throw us a tip in our Paypal Tip Jar. We’ll happily enjoy a coffee on the road – Thanks! We appreciate all the support, and we’ll see you next time in the kitchen!

We include affiliate links for products on our website. Making a purchase after clicking on our links and we may earn a commission which helps us produce more videos and drink more coffee :^) We participate in the Amazon Services LLC Associates Program, which is an affiliate advertising program. It provides a means for us to earn fees by linking to Amazon.com and affiliated sites, so we can make more videos.

Share and Enjoy !

Easy Biscuits – No Butter Biscuit Recipe

easy biscuits

Bake easy biscuits in a matter of minutes and have hot, fresh biscuits on the table lickety split. This biscuit recipe has no butter and very little oil, so it’s a perfect comfort food if you’re cutting down on fats.

easy biscuits

Ingredients for Easy Biscuits

¾ cup MILK (we use almond milk in the video)
2 Tbsp OIL
up to 2 cups ALL PURPOSE FLOUR
2 tsp BAKING POWDER
1 tsp SALT
2-3 tsp SUGAR optional

Quick Biscuit Recipe

  • In a bowl, whisk together milk, oil, salt, and baking powder. You can also add a few tsp of sugar if you desire, but that’s optional.
  • Slowly add flour into the mix ¼ cup at a time. You’ll probably use between 1½ and 2 cups of flour. Turn the flour into the wet ingredients until a doughy ball forms, but do not overmix or overwork the dough.
  • Using your hand, pinch and divide the large dough ball into 6 equal sizes of dough and arrange on a lightly greased baking pan or parchment paper.
  • You can lightly flour your fingers while dividing the dough. Do not press or shape the dough more than needed. The biscuits might not win a beauty contest, but they’ll be light and fluffy if the biscuit dough is not handled overly much.
  • For darker biscuits, you can lightly brush the dough with milk, but this is optional.
  • Place the baking sheet in an oven preheated to 350˚F and bake for about 20 minutes.
  • Enjoy!

Stuff you might need for the Biscuit Recipe

Current prices for PARCHMENT PAPER on Amazon
Current prices for a BAKING PAN on Amazon
Current prices for BAKING POWDER

If you’re looking for a more decadent biscuit, then try this classic country Buttermilk Biscuit Recipe with plenty of butter and buttermilk.

Thanks For Watching Our Recipe Videos!

Thanks for checking out our easy biscuits recipe, and all of our recipes. Be sure and sign up for our mailing list so you’ll never miss a new recipe. Also click a button below and share the dishes with your friends. You can also follow Chef Buck on Youtube. We appreciate all the kind comments and support, and we’ll see you next time in the kitchen!

If you like what CG and I do, you can also support us on Patreon, or throw us a tip in our Paypal Tip Jar. We’ll happily enjoy a coffee on the road – Thanks! We appreciate all the support, and we’ll see you next time in the kitchen!

We include affiliate links for products on our website. So, if you make a purchase after clicking on our links, we may earn a commission which helps us produce more videos and drink more coffee :^) We participate in the Amazon Services LLC Associates Program, which is an affiliate advertising program. It provides a means for us to earn fees by linking to Amazon.com and affiliated sites, so we can make more videos.

Share and Enjoy !

Beans and Eggs One-Skillet Recipe

Try a delicious one-skillet breakfast recipe for beans and eggs. This egg recipe is easily adjustable for any family meal; just add as many eggs to the recipe as you have folks to feed! I like to spice up this bean dish with hot pepper and lots of seasoning, because beans and tomato can handle a lot of added flavor.

beans and eggs

Ingredients for Beans and Eggs

4 EGGS …add more eggs for more mouths!
15oz can BEANS …white beans are my favorite
15oz can diced TOMATOES
1 finely chopped ONION
2 cloves minced GARLIC
fresh chopped HOT PEPPER
or try La Costena Chipotle like I use in the video recipe
a little OIL for cooking
seasonings like:
½ tsp SALT
½ tsp BLACK PEPPER
1 tsp PAPRIKA
1 tsp GARLIC POWDER
…adjust seasonings to taste

Optional: fresh herbs or chopped green onion for garnish

How to Make One-Skillet Beans and Eggs

  • Heat about 1 Tbsp of oil in a skillet on medium heat.
  • When the skillet is hot, add chopped onion and saute for 2 minutes.
  • Add garlic and hot pepper and seasoning and continue cooking for 2 minutes more. I use La Costena Chipotle pepper in the recipe video. Check the current price for this Chipotle on Amazon.
  • Add canned beans and tomato and a little water. Stir, and bring the skillet up to a simmer, then cover and let simmer for about 10 minutes.
  • Uncover and stir until liquid reduces to saucey, but not too wet.
  • Crack eggs into the skillet, leaving space between them.
  • Cover and let cook 4-6 minutes more until the eggs are done to your liking…cook for a bit more than this if you like the yolks hard.
  • Turn off the heat, and serve the eggs and beans immediately. Garnish with fresh green herbs or green onion for a picture perfect meal.

If you like this egg recipe, check out another spicy favorite, Huevos Rancheros!

huevos rancheros
Huevos Rancheros is a flavorful, classic Mexican dish…delicious!

Thanks for checking out our beans and eggs recipe, and all of our recipes. Be sure and sign up for our mailing list to never miss a new cooking video, and also click a button below and share the dishes with your friends, and follow Chef Buck on Youtube. We appreciate all the kind comments and support, and we’ll see you next time in the kitchen!

If you like what CG and I do, support us on Patreon, or throw a tip in our Paypal Tip Jar We’ll happily enjoy a coffee on the road, or maybe even pay a bill or two!–Thanks! We appreciate all the support, and we’ll see you next time in the kitchen!

Thanks for watching our recipe videos!

We include affiliate links for products on our website, so if you make a purchase after clicking on our links, we may earn a commission which helps us produce more videos and drink more coffee :^) We participate in the Amazon Services LLC Associates Program, which is an affiliate advertising program providing a means for us to earn fees by linking to Amazon.com and affiliated sites, so we can make more videos.

Share and Enjoy !

Ramekin Egg Bake – Healthy Breakfast Idea

A ramekin egg bake recipe is not just fancy, it’s delicious, and comes with its own creamy sauce if you bake it just right. We add diced veggies and a quick broccoli side to make this breakfast egg dish ridiculously healthy. Chef Buck and I have the pleasure of house and pet sitting and caring for some chickens that provide great, fresh eggs.  It has inspired us to look for new ways to enjoy this perfect source of protein.

ramekin egg bake

Ingredients for a Ramekin Egg Bake

For Each Bake:
4 oz RAMEKIN* (oven safe)
1 – 2 EGGS
OIL (or spray)
1 tsp MILK (non-dairy or dairy options are fine)
SALT, BLACK PEPPER and your FAVORITE EGG SEASONINGS, to taste

*If you need ramekins for this recipe, you can check current prices for best sellers on Amazon.

Optional Ingredients:

Add up to 2 Tbsp minced herbs and/or minced veggies – mostly between the milk and the egg, although it’s fun to add a bit of color to the top

How To Bake Eggs in a Ramekin

  • Preheat oven to 350 degrees.  [This is for a convention oven – toaster- or regular-sized.  In the video, we are using the convection setting on a toaster oven, so we didn’t preheat it.]
  • OPTIONAL – Add extra flavor. If you want to add any minced herbs or veggies, get those chopped up now. We did in the video, and we’ve provided some other ingredient possibilities below, to tickle your taste buds. Yes, it takes a bit more time if you have to chop more ingredients but, for us, it’s worth the extra flavor. Plus, you can pat yourself on the back for getting in a partial veggie serving!
  • OPTIONAL – Have a ‘dipper’ handy for your runny egg yolk. If you plan to have a yummy runny egg, consider getting together a dipping side!  We did a side of broccoli in the video, and we’ve provided other dipping possibilities below.
  • Grease the bottom and side of each ramekin.  In the video we use a smidge of olive oil, but you can use another oil, or a cooking spray as well.
  • Pour your 1 tsp of milk over the oil in each ramekin.
  • If you have minced veggies, herbs, or other additions, sprinkle them over the milk in each ramekin. Save a couple pieces for the top – if you want to add some color to your finished egg.
  • Crack your egg into each ramekin. Watch that the eggshells don’t sneak in.
  • Top with a taste of pepper, salt …. and whatever other seasoning tickles your fancy. We use Olde Thompson Italian seasoning in the video. Optional, top with a couple veggie/herb pieces.
  • Bake for 8-10 minutes for runny yolks; the exact time will depend on your oven.  For doneness, CHECK the egg whites.  If you want a runny egg yolk (which provides a delicious, healthy sauce for a side dish), you want to take them out when the majority of the egg whites turn from clear to white, and you may see a bubble come up in one area of the egg white.  
ramekin egg bake

Additional Cooking Tips

Remember, the ramekin egg bake will keep cooking when you take it out of the oven, so if you want the yummy runny yolk – take them out of the oven when the there is still a tad of clear egg white.

And if you want a runny yolk, but you just seem to overcook them, try the French way.  Once you’ve prepared your individual dishes, place them in an oven-safe container that will allow you to add water to about halfway up the ramekins.  That keeps the eggs from getting any hotter than the water.

Feel free to cook the egg until the egg white is 100% white – your egg yolk will be solid too. You will basically have a couple of boiled eggs…..with some flavor from any seasonings, veggies, or herbs you added.  Or, you can scramble the eggs before you bake them.  Your choice.  Still a quick protein breakfast!

Experimenting With Individual Egg Bakes

Generally, I wouldn’t add more than 2 Tbsp of herbs or veggies.  In the video, we added the following minced ingredients to each bake: 2 tsp fresh summer squash, 1 tsp red bell pepper, 2 tsp yellow onion, 2 tsp green onion (green tops and white bottoms).Minced spinach, kale, garlic, artichoke, asparagus. Fresh herbs like thyme, sage, rosemary, dill. Cheese is a great addition as well. Crumbles of bacon, ham or sausage!  Add some tomatoes, black beans and seasonings you love on tacos for a Mexican version – top with sour cream. The options are endless!  

Each ramekin egg bake can include different ingredients and seasoning.  Warning: If you’re making 3 or more, you may not want to make an offer of individual egg bakes; folks may go wild and want not just very different ingredients but  want their eggs cooked to different levels of ‘doneness’ too.  You want to sit down and eat soon too!

Sides To Dip Into Your Egg Yolk

What can you dip into your warm, yummy, runny egg yolk?  In the video, we microwave frozen broccoli with minced onion and bell pepper  – enough for two people.  How? We put the broccoli, onion and bell pepper in a microwave-safe bowl, add a Tablespoon of water, cover and microwave it on full power for 2 minutes. Then we added some everything spice, salt and pepper, and cooked it on full power for another 5 minutes.  Because we can’t leave well enough alone, we add a taste of nutritional yeast and a taste of Italian blend cheese (parmesan, asiago, romano). Then it sat, covered, as we finished the egg bakes.  You can do something similar with a variety of fresh, frozen or even canned vegetables.

And there are other dipping side options for any lifestyle:  bread (toast, breadsticks, crackers), eggplant fries, sausage.

That’s it! If this recipe has you wanting to experiment with egg recipes, check out our egg-related video playlist on Youtube for inspiration, or our Korean pajeon recipe.

korean pajeon
A Korean pajeon recipe with green onions.

Thanks For Watching Our Recipe Videos!

Thanks for checking out the ramekin egg bake recipe, and all of our recipes. Be sure and sign up for our mailing list to never miss a new cooking video, and also click a button below and share the dishes with your friends, and follow Chef Buck on Youtube. We appreciate all the kind comments and support, and we’ll see you next time in the kitchen!

If you like what CG and I do, support us on Patreon, or throw a tip in our Paypal Tip Jar We’ll happily enjoy a coffee on the road, or maybe even pay a bill or two!–Thanks! We appreciate all the support, and we’ll see you next time in the kitchen!

We include affiliate links for products on our website, so if you make a purchase after clicking on our links, we may earn a commission which helps us produce more videos and drink more coffee :^) We participate in the Amazon Services LLC Associates Program, which is an affiliate advertising program providing a means for us to earn fees by linking to Amazon.com and affiliated sites, so we can make more videos.

Share and Enjoy !

Blueberry Scone Recipe NO eggs NO butter

A blueberry scone recipe is delicious and super easy to bake. You can prepare scones with butter, but safflower, sunflower, or coconut oil are great substitutes.

Ingredients for Blueberry Scone Recipe

2 cups ALL PURPOSE FLOUR
⅓ cup SUGAR
1 Tbsp BAKING POWDER
dash of SALT
½ cup SAFFLOWER OIL
1 cup HALF n HALF
⅓ cup chopped NUTS (pecans or walnuts are my favorites)
⅓ cup BLUEBERRIES, frozen

blueberry scone recipe

How to Make Blueberry Scones

  • Preheat oven to 425˚F
  • In a large bowl, combine flour, sugar, baking powder, and salt and mix well.
  • Make a well in the center of the dry ingredients and add in the oil and milk.
  • Gently mix the ingredients until they begin to combine, then fold in the blueberries and nuts. Mix lightly until the dry ingredients are wet, but do not overmix.
  • Roll the dough out of the bowl and shape into a wheel shape about ¾ to 1 inch thick.
  • Cut the dough wheel into 6 or 8 scone shapes, depending on how BIG you want your scones.
  • Arrange scones apart on parchment paper or a lightly greased baking sheet. Check current prices for Parchment Paper on amazon.
  • Brush the scone tops lightly with milk and then bake in the oven for 15 minutes.
  • When nicely colored, remove blueberry scones from the oven and transfer to a cooling rack.

Tips for a Perfect Scone Recipe

  • Add still frozen blueberries to the dough for less mess.
  • Make the scones as sweet as you like. I use ⅓ cup of sugar in the video recipe, but this measurement can be flexible. Use more sugar if you like, or NO SUGAR at all will also work. I’ve made this recipe without sugar, and it is still great, and the blueberries alone add quite a bit of sweetness. For a slightly more decadent scone recipe, check out this deadly but delicious Maple Scone Recipe.

For another baked treat, try this Easy Biscotti Recipe.

coffee biscotti

Thanks for checking out the blueberry scones recipe, and all of our recipes. Be sure and sign up for our mailing list to never miss a new cooking video, and also click a button below and share the dishes with your friends, and follow Chef Buck on Youtube. We appreciate all the kind comments and support, and we’ll see you next time in the kitchen!

If you like what CG and I do, support us on Patreon, or throw a tip in our Paypal Tip Jar We’ll happily enjoy a coffee on the road, or maybe even pay a bill or two!–Thanks! We appreciate all the support, and we’ll see you next time in the kitchen!

Thanks for watching our recipe videos!

We include affiliate links for products on our website, so if you make a purchase after clicking on our links, we may earn a commission which helps us produce more videos and drink more coffee :^) We participate in the Amazon Services LLC Associates Program, which is an affiliate advertising program providing a means for us to earn fees by linking to Amazon.com and affiliated sites, so we can make more videos.

Share and Enjoy !

Low Fat Oatmeal Recipe – Banana Bites with Oatmeal

For a healthy low-fat oatmeal recipe try Oatmeal Banana Bites. We’ve made a ton of oatmeal recipes this year and many of them are healthy snack options that have saved us from binging on too many empty calorie and carb treats. This old-fashioned oatmeal recipe is mostly oats, fresh banana, and dried fruit.

What you need for this Low-Fat Oatmeal Recipe

3 cups ROLLED OATS also called OLD FASHIONED OATS
2 cups BANANA
1 cup DRIED FRUIT
½ cup ALMOND BUTTER
1-2 Tbsp CINNAMON
optional:
8oz can crushed pineapple
2 Tbsp minced fresh ginger
(this recipe makes about 30 ping-pong ball-sized treats)

low fat oatmeal recipe

How to Make Oatmeal Banana Bites

  • In a large bowl, mash the bananas very well.
  • Add dried fruit. I use a mix of raisins and Craisins in the video recipe, but choose dried fruit to your liking, just be sure to chop whatever dried fruit you use into sizes similar to raisins. Here are current prices for Craisins on Amazon.
  • Add almond butter to the bowl, or substitute peanut butter, but realize that peanut butter will have a stronger flavor than the almond butter.
  • Then add 1-2 Tbsp of cinnamon powder. If desired, at this point you might add a few optional ingredients. I’ve experimented with crushed pineapple and fresh ginger. If you do add the crushed pineapple, just add an extra 10 minutes to the baking time.
  • Mix all the ingredients in the bowl together very well, and then fold in the old fashioned oats to form a thick batter. Check current prices for Rolled Oats on Amazon.
  • Mold the batter into shapes slightly smaller than a ping-pong ball and arrange them on a lightly greased baking sheet.
  • Place in an oven preheated to 350 degrees Fahrenheit and bake for about 20 minutes.
  • Remove from the oven and allow to cool.
  • This low-fat oatmeal recipe will keep fresh for a few days stored on the kitchen counter, but for longer storage keep them in the fridge.

These oatmeal treats are a great way to make oats a regular part of your diet, and for another oatmeal recipe idea, try this healthy Low-Fat Apple Crisp Recipe with oatmeal.

low fat apple crisp recipe

Thanks for checking out our oatmeal banana bite recipe. Be sure and sign up for our mailing list and never miss a new Chef Buck cooking video, and also click a button below and share the dishes with your friends. We appreciate all the kind comments and support, and we’ll see you next time in the kitchen!

Thanks for watching our oatmeal recipe video!

Oatmeal is one of the best foods for reducing cholesterol. Check here for more info on the health benefits of oatmeal.

We include affiliate links for products on our website, so if you make a purchase after clicking on our links, we may earn a commission which helps us produce more videos and drink more coffee :^) We participate in the Amazon Services LLC Associates Program, which is an affiliate advertising program providing a means for us to earn fees by linking to Amazon.com and affiliated sites, so we can make more videos.

Share and Enjoy !

Buttermilk Powder Pancakes Recipe

Try this easy buttermilk powder pancakes recipe. Powdered buttermilk has a very long shelf life, so it’s super convenient to have in the cupboard. Once opened, the buttermilk powder needs to be refrigerated, but it still lasts a long while for future buttermilk recipes.

buttermilk powder pancakes

Buttermilk Pancake Ingredients

4 Tbsp BUTTERMILK POWDER
1 cup all-purpose FLOUR
½ tsp BAKING SODA
1 tsp BAKING POWDER
1 Tbsp SUGAR (optional)
¼ tsp SALT (optional)
1 EGG
1 cup WATER (chilled)
2 Tbsp OIL
sprinkle of WALNUTS and/or FRUIT if desired

Check the current price for the Buttermilk Powder used in the video on Amazon

How to make Buttermilk Powder Pancakes

  • Mix and sift the dry ingredients into a large mixing bowl.
  • In another bowl prepare the wet ingredients: beat one egg, then mix in the chilled water and oil.
  • Gently mix the wet ingredients in with the dry ingredients until everything is wet. DO NOT OVERMIX! Your batter should be a bit lumpy!
  • Heat a lightly greased skillet on medium heat. In the video I use a Lodge cast iron skillet which is affordable and works great. Check the current price for a cast iron skillet on Amazon.
  • Once the skillet is hot, add batter into the skillet in whatever size cakes you prefer.
  • Bubbles will come up through the batter. Once the bubbles stop, take a peek under the cakes and give them one turn onto the other side.
  • Cook on the other side until done. Do not turn pancakes multiple times to cook because this makes pancakes dense and heavy.

That’s it! Serve buttermilk powder pancakes with syrup and your favorite fruit and nuts. And for a complete twist on traditional pancakes, try this gluten-free banana pancake recipe.

gluten free banana pancakes recipe

Banana pancakes are delicious, so definitely give them a try. Buttermilk pancakes are super delicious, too, but I’ve been eating much better these past few years, so I don’t have heavy flour pancakes nearly as often as I used to do. As I get older, I’m finding that a well-balanced breakfast makes a big difference in my energy levels and how I feel.

Thanks for watching our recipe videos!

Thanks for checking out this buttermilk powder pancakes recipe, and all of our recipes. Be sure and sign up for our mailing list so you’ll never miss a new recipe. Also click a button below and share the dishes with your friends. You can also follow Chef Buck on Youtube. We appreciate all the kind comments and support, and we’ll see you next time in the kitchen!

If you like what CG and I do, you can also support us on Patreon, or throw us a tip in our Paypal Tip Jar. We’ll happily enjoy a coffee on the road – Thanks! We appreciate all the support, and we’ll see you next time in the kitchen!

We include affiliate links for products on our website. So, if you make a purchase after clicking on our links, we may earn a commission which helps us produce more videos and drink more coffee :^) We participate in the Amazon Services LLC Associates Program, which is an affiliate advertising program. It provides a means for us to earn fees by linking to Amazon.com and affiliated sites, so we can make more videos.

Share and Enjoy !

Overnight Oats for a Healthy Oatmeal Habit

overnight oats

Overnight oats is one of the easiest ways to make oatmeal part of your dietary routine. Old fashioned oatmeal is nutritious, high in fiber, lowers cholesterol, and I credit oatmeal with helping me keep my weight down this year. I make this oatmeal recipe to last the week, and I pair it with fresh fruit, ginger, walnuts, and flax seed.

Overnight Oats Ingredients

OLD FASHIONED OATMEAL (aka Rolled Oats)
MILK (ALMOND or SOY MILK will store the best)

…those are really the only ingredients required, but
I like to add:

Fresh minced GINGER
CINNAMON POWDER
Dash of SALT

How to Make Overnight Oats

We generally make 3 to 5 cups of overnight oats at a time, which is enough for CG and I to have an oatmeal breakfast 2 to 3 times a week. I use old fashioned oats, but CG sometimes uses steel cut oats. I prefer the old fashioned kind, but either kind will work using the same method. Check current prices for oatmeal on Amazon.

You can simply use oats and milk (or any soaking liquid) for the ultimate “plain” oatmeal, but I also like to add fresh minced ginger, cinnamon, and a dash of salt to make my overnight oats base. I call it a base, because even though it is quite flavorful, I almost always add other ingredients when I’m ready to eat, depending on my mood and what’s available.

This is Truly the Easiest Oatmeal Recipe Ever

You really don’t have to measure any ingredients, just be sure to add a ratio of ginger and cinnamon to your tastes, and the liquid you add should be just enough to cover the oat mixture.

Fill a sealable container almost to the top with dry old fashioned oatmeal; leave about 1 inch at the top of the container. Mix in minced ginger and cinnamon to taste, plus a dash of salt if you like. You can see in the recipe video that I prefer quite a bit of fresh ginger. Raw fresh ginger can be quite strong, but soaking overnight with the oats mellows this healthy root considerably.

Once all the dry ingredients are mixed together well, pour in the liquid until the oats are just completely covered. I prefer to use almond milk or soy milk, which keeps quite well with the oats and lasts about 1 week in the fridge. You can use dairy milk, but it will not keep as long, so use almond or soy milk if making a batch of overnight oats for the week. You can also use just plain water. Sometimes I’ll use half water and half almond milk.

Seal the container and store in the fridge. You can do this late at night, and the oats will still be ready for an early breakfast. It only takes about 4 hours of soaking time for the oats to be perfect.

overnight oats

Fancy Overnight Oatmeal Additions

I like to use this overnight oat recipe as a vehicle for other healthy foods. Here is a list of some of my favorite additions that I add to this oatmeal base when I’m ready to eat:

  • WALNUTS (nuts add a much needed crunch, any nut will do, but walnuts pack nutrition)
  • FRESH FRUIT (blueberries and banana are my two favorite choices)
  • YOGURT (I try to use yogurt with live cultures for added benefit)
  • HONEY (just a spoonful to sneak in the health benefits of honey)
  • PEANUT BUTTER (if you made your oats with water, this is a way to add additional protein)
  • ALMOND BUTTER (same as peanut butter, but not as overpowering)
  • GROUND FLAX SEED (no one knows what this is, but you can add it to oatmeal)
  • PRUNES (add pitted prunes, but still be cautious!)
  • CHOCOLATE CHIPS (I do this sometimes, but I never feel good about it)

If you make overnight oats a regular part of your week, you’ll almost always have old fashioned oatmeal in the cupboards, here’s another great oatmeal treat No-Bake Oatmeal Fudge Bars.

Thanks for checking out this overnight oats recipe, and all of our video recipes. Be sure and sign up for our mailing list and never miss a new Chef Buck cooking video, and also click a button below and share the dishes with your friends. We appreciate all the kind comments and support, and we’ll see you next time in the kitchen!

Thanks for watching our recipe videos!

We include affiliate links for products on our website, so if you make a purchase after clicking on our links, we may earn a commission which helps us produce more videos and drink more coffee :^) We participate in the Amazon Services LLC Associates Program, which is an affiliate advertising program providing a means for us to earn fees by linking to Amazon.com and affiliated sites, so we can make more videos.

Share and Enjoy !

Corned Beef Hash Recipe with Canned Corned Beef

corned beef hash recipe

Today we prepare a classic corned beef hash recipe. You can mix your own leftover corned beef or use canned corned beef with diced potato and onion to create this hearty breakfast dish. I keep the seasoning simple with just salt, pepper, and Worcestershire sauce, so this recipe doesn’t require many ingredients.

Ingredients for a Corned Beef Hash Recipe

12 oz CANNED CORNED BEEF
2 medium-sized POTATOES
1 Lg ONION
2-3 Tbsp WORCESTERSHIRE SAUCE
1-2 tsp PAPRIKA
1 tsp CARAWAY SEEDS (optional)
OIL for the skillet
SALT and PEPPER to taste
…add a little fresh or dried HOT PEPPER if desired

corned beef hash recipe

How to make Corned Beef Hash

  • Heat oil in a skillet on medium heat.
  • I like to slice and sear my corned beef in the skillet while I prep the other ingredients for this dish. Corned beef in the can is already cooked, but that sear adds even more flavor to the recipe.
  • Remove seared beef from the skillet and set aside.
  • Add in diced potatoes. Cut potatoes uniformly, slightly smaller than a game die. You can skin the potatoes if you like, but why? It’s easier not to skin the potatoes, and the skin is good, so think about it, dude. Sauté potatoes for about five minutes. Give the dish an occasional stir, but not too much.
  • Mix in the chopped onion, and continue sautéing another 5 minutes.
  • Add in Worcestershire sauce, salt, and pepper and cook for another 5 minutes.
  • Shred corned beef into the skillet and mix well. Raise the skillet temperature to medium high and continue cooking 5-10 minutes more, or until the dish is done to your liking. Check current prices for a cast iron skillet on Amazon.

I love serving this classic corned beef hash recipe with toast and a couple of soft-yolked eggs. Maybe a splash of hot sauce? Check out current prices for canned Corned Beef on Amazon.

For another canned corned beef recipe idea try this Beef ‘n Pickle Dip.

canned corned beef recipe

Another traditional pairing is corned beef with cabbage. Simply sear up chopped onion, season as desired, add in chopped cabbage, shredded corned beef, a little water, and simmer until done. Canned corned beef is a versatile ingredient, so keeping a can in the cabinet for a rainy day is a smart idea. Check out the Complete Corned Beef and Cabbage Recipe.

corned beef cabbage recipe

Thanks for checking out our corned beef hash recipe, and all of our recipes. Be sure and sign up for our mailing list and never miss a new Chef Buck cooking video, and also click a button below and share the dishes with your friends. We appreciate all the kind comments and support, and we’ll see you next time in the kitchen!

Thanks for watching our cooking videos!

We include affiliate links for products on our website, so if you make a purchase after clicking on our links, we may earn a commission which helps us produce more videos and drink more coffee :^) We participate in the Amazon Services LLC Associates Program, which is an affiliate advertising program providing a means for us to earn fees by linking to Amazon.com and affiliated sites, so we can make more videos.

Share and Enjoy !

Potato Hash Recipe Real Time Cooking Lesson

A potato hash recipe is a perfect comfort dish, and it’s ideal for any meal anytime of the day. A hash recipe usually involves meat and potatoes, but this semi vegetarian recipe foregoes the meatiest of the meat for a simple egg topping. An over easy egg with a nice runny yolk makes a tasty topping, but any fried egg will do, or leave the egg off altogether for a vegan hash.

Ingredients for Potato Hash Recipe

1 medium POTATO
½ cup chopped ONION
3 cloves minced GARLIC
¼ cup chopped BELL PEPPER
2 EGGS
OIL for cooking
1 tsp SALT
½ tsp CHILI POWDER or BLACK PEPPER
½ tsp TURMERIC
½ tsp SMOKED PAPRIKA
Optional:
½ tsp CARAWAY SEEDS
¼ cup chopped SPINACH
Some chopped CILANTRO

potato hash recipe

The chopping knife I use in the video is a Satoku-style design, and you can check current prices for this knife on Amazon.

How to make Potato Hash Recipe

  • Heat 3 Tbsp oil in a skillet on medium heat.
  • Cube potato into uniform sizes about as big as a game die.
  • When oil is hot, add potatoes to the skillet and spread into a single layer and let fry undisturbed for 10 to 15 minutes. Sprinkle potatoes with ½ tsp of salt.
  • After 15 minutes, add in the rest of the seasonings then stir potatoes and let cook for another 5 minutes.
  • Mix in onion, bell pepper, and garlic and continue to fry the potatoes until done, stirring occasionally, about 10 more minutes.
  • If desired, add in fresh greens for added nutrition and color.
  • When potatoes are finished, plate and top with a fried egg. An over-easy egg with a rich yolk makes a great saucy topping for this recipe.

If you prefer home fried potatoes with a bacon twist, check out this Home Fried Breakfast Potato Recipe.

home fried potatoes recipe
home fried potatoes

Thanks for checking out our potato hash recipe video, and all of our recipes. Be sure and sign up for our mailing list and never miss a new Chef Buck cooking video, and also click a button below and share the dishes with your friends. We appreciate all the kind comments and support, and we’ll see you next time in the kitchen!
–Chef Buck

In the cooking video, I mention how we wash and sanitize our veggies after buying them. Here’s an article CG wrote about Sanitizing fresh produce while we were traveling in Mexico. Her article includes several options for cleaning and sanitizing.

Thanks for watching our recipe videos!

We include affiliate links for products on our website, so if you make a purchase after clicking on our links, we may earn a commission which helps us produce more videos and drink more coffee :^) We participate in the Amazon Services LLC Associates Program, which is an affiliate advertising program providing a means for us to earn fees by linking to Amazon.com and affiliated sites, so we can make more videos.

Share and Enjoy !

Avocado Recipe Tostada for a Low Fat Diet

avocado recipe

A healthy way to start the day is with an avocado tostada for breakfast, but this easy avocado recipe is perfect anytime. A tostada is simply a corn tortilla baked or fried to crispy deliciousness. I’m trying to reduce saturated fats, so baking tortillas in an oven is a smart option for me, and avocados are one of the best sources of beneficial fats.

Ingredients for this Avocado Recipe

1 ripe AVOCADO
1 or 2 toasted CORN TORTILLAS
1 GREEN ONION chopped
1 Tbsp SUN DRIED TOMATO chopped
1 Tbsp EVERYTHING SEASONING for Bagels
1 Tbsp LEMON JUICE if not eating right away; this will help keep the avocado from discoloring.

This recipe makes 1 or 2 servings depending on how much avocado topping you desire on each tostada. CG and I usually make 2 servings, although in the video recipe I pile on the topping for one large serving.

You can buy premade tostadas, but often they are fried. If you already have corn tortillas at home, you can simply bake them in the oven and create your own tostadas. This will work with either yellow or white corn tortillas.

How to Toast Tortillas to Make Tostadas

  • Preheat the oven to 350˚F.
  • Spread tortillas on a baking sheet.
  • Bake for 10 minutes, then turn and bake for 5 more minutes. This time is approximate, so keep an eye on them. If you remove the tortillas too early, they will be more chewy than crisp, so simply return them to the oven and bake a few minutes more if needed.
  • When crisp, remove tostadas from the oven and allow to cool.

How to Make an Avocado Tostada

avocado recipe

Buy a ripe avocado for this recipe, and choose avocados that still have the “nubbin” on the stem end. Often these ends are missing on avocados, and sometimes this can allow for an avocado to dry out, or to spoil more quickly, so keep this in mind when shopping.

For this recipe, I like to use a combination of regular and smoked sundried tomato, but use whatever you prefer.

  • In a bowl, combine the chopped green onion bottoms, Everything Seasoning, sundried tomato, and fruit of the avocado. Check current prices for Everything Seasoning Mix on Amazon.
  • Mix well to desired smoothness. Add Lemon juice if eating later.
  • Spoon the mixture evenly onto 1 or 2 crispy tostadas.
  • Top with the chopped green onion tops, and additional sundried tomato if desired.

And that’s it! Hope you enjoy this healthy avocado tostada. For another easy avocado dish, check out this Guacamole Recipe.

easy guacamole recipe
guacamole recipe

Here’s a little info about some of the health benefits of avocados. Thanks for checking out our avocado tostada recipe, and be sure and sign up for our mailing list so you’ll never miss a Chef Buck cooking video, and also click a button below and share the dishes with your friends. We appreciate all the kind comments and support, and we’ll see you next time in the kitchen!

Thanks for Watching our Recipe Videos!

We hope you enjoy this avocado recipe. Sign up for our mailing list so you’ll never miss a new recipe. Also click a button below and share the dishes with your friends. You can also follow Chef Buck on Youtube. We appreciate all the kind comments and support, and we’ll see you next time in the kitchen!

If you like what CG and I do, support us on Patreon, or throw us a tip in our Paypal Tip Jar. We’ll happily enjoy a coffee on the road – Thanks! We appreciate all the support, and we’ll see you next time in the kitchen!

We include affiliate links for products on our website. Making a purchase after clicking on our links and we may earn a commission which helps us produce more videos and drink more coffee :^) We participate in the Amazon Services LLC Associates Program, which is an affiliate advertising program. It provides a means for us to earn fees by linking to Amazon.com and affiliated sites, so we can make more videos.

Share and Enjoy !

Chilaquiles Recipe Mexican Breakfast Favorite

My favorite Mexican breakfast dish is a chilaquiles recipe. Chilaquiles are tortillas served with a delicious pepper sauce. For this recipe I use tomatoes and smoky ancho peppers, or dried poblanos, to create a rich, red, salsa topping. Another version of this dish is Chilaquiles verdes, which is tortillas topped with a green salsa. The recipe below will make 2-4 servings depending on your appetite.

Ingredients for this Chilaquiles Recipe

TORTILLA CHIPS
CHEESE (a crumbly white cheese)
CREMA (thickened cream)
Chopped raw ONIONS

Chilaquiles Sauce:
1-2oz ANCHO PEPPERS (dried poblano)
1 med ONION
3 med TOMATOES
1-2 cloves GARLIC
1 tsp SALT

Are You Ready for this Classic Mexican Breakfast?

You can buy a premade Mexican-style crema to top this chilaquiles recipe, or make your own creme fraiche at home. I’ll have a recipe video for creme fraiche posted below, and you’ll want to begin making this crema the day before you plan to use it.

I buy dried poblano peppers, aka ancho peppers, in the Latin foods section of my local grocery, or you can check current prices for Ancho Peppers on Amazon. Poblano peppers are relatively mild, so adding an additional type of hot pepper will be needed if you enjoy a spicy dish, or just add hot sauce.

Any cheese will do for this recipe, but I prefer a milder white cheese that melts easily. The cheese is there to add creaminess more than flavor.

You can make your own crispy tortillas by cutting fresh tortillas and frying them lightly in oil, or simply use premade chips. I like thicker tortillas for this recipe, but any kind will do, just be mindful that thinner chips will get mushier in the sauce faster.

There are different variations on chilaquiles. Some recipes call for the tortillas to be cooked for a while with the sauce making the chips very soft, even mushy. I prefer the chips to be topped with the sauce at the very end of the recipe, this way some of the chips will be softened, but some of the tortillas will retain a degree of crunchiness. There is no wrong way, whatever you prefer is the right way.

chilaquiles recipe

How to Make a Chilaquiles Recipe

  • Heat 5-6 cups of water in a heavy bottomed pot. Check current prices for a Kitchen Pot on Amazon.
  • Remove the stems and seeds from the dried peppers.
  • Into the pot add the roughly chopped onion, garlic, tomato, peppers, and salt.
  • Bring the pot to a boil, then reduce the heat and cover. Let the pot simmer for 30 minutes.
  • Pour away excess water from the pot and reserve if needed.
  • Add the contents of the pot into a blender and mix until smooth. I like to add about a ¼ cup of half and half into the blender for extra creaminess. If the sauce is too thick, thin with the reserved water.
  • Heat a skillet on medium heat and cover the bottom with some of the blended sauce.
  • Arrange the chips evenly across the skillet, as many as desired.
  • Top chips with half of the crumbled cheese and chopped onion.
  • Pour remaining sauce or as much as desired over the skillet contents.
  • Sprinkle with remaining chopped onion and cheese.
  • Drizzle with crema and serve immediately as a breakfast side or main dish.

I like to pair this chilaquiles recipe with softly cooked eggs. The runny yolks go great with this sauce, but any egg you like will work. And beans, too.

chilaquiles recipe

How to Make Homemade Crema for Chilaquiles

To make this cream topping into a Mexican style crema, just stir in a little lime juice. And visit our creme fraiche page for written details of this cream topping recipe.

For another Mexican breakfast favorite, try this spicy Huevos Rancheros Recipe.

huevos rancheros
Huevos Rancheros is a flavorful, classic mexican dish…delicious!

Thanks for Trying Our Chilaquiles Recipe

Click a button below and share the dishes with your friends. You can also follow Chef Buck on Youtube. We appreciate all the kind comments and support, and we’ll see you next time in the kitchen!

If you like what CG and I do, support us on Patreon, or throw us a tip in our Paypal Tip Jar. We’ll happily enjoy a coffee on the road – Thanks! We appreciate all the support, and we’ll see you next time in the kitchen!

We include affiliate links for products on our website. Making a purchase after clicking on our links and we may earn a commission which helps us produce more videos and drink more coffee :^) We participate in the Amazon Services LLC Associates Program, which is an affiliate advertising program. It provides a means for us to earn fees by linking to Amazon.com and affiliated sites, so we can make more videos.

If you’re new to home cooking, get a bunch of spices, pots and pans, and start experimenting with different recipes. It’s a healthy hobby that can save a lot of money in the long run. Check out current prices for Complete Kitchenware Sets on Amazon as well as Complete Starter Spice Kits. Or try a thrift store! I’ve found some of my favorite kitchen gear at second-hand stores.

Share and Enjoy !

Chorizo Verde and 3 Ways to Cook Sausage

I bought chorizo verde packed in sausage casing and cooked the sausage 3 different ways. Chorizo Verde is a Mexican ground sausage mixed with lots of seasoning plus blended cilantro and peppers, which gives the chorizo a wild green color. Raw link sausage packed in a sausage casing is easy to cook, and the casing is edible. The key to tasty link sausage is getting nice color and a crispy edge to the sausage, but if you don’t want to eat the casing, it’s easy to peel away and use the sausage just like any ground meat.

What is Chorizo Sausage?

Chorizo is a spicy ground sausage packed with lots of seasoning and flavor. Folks often expect chorizo to be hot, and sometimes it is, but not always. What makes chorizo is the abundance of spice and flavor, not the heat. Lots of garlic, cumin, ground peppers, salt, and often plenty of paprika go into the pork shoulder grind. Chorizo often has a rich reddish color because of added paprika.

Raw chorizo found in the meat case is generally thought of as Mexican chorizo, while chorizo sausage already cooked and dried is called Spanish chorizo. You can often find Spanish chorizo sold with the pepperoni, salami, and other dried meats, or you take a look at the price for Spanish Chorizo on Amazon.

What’s In Chorizo Verde?

Chorizo verde can have all the ingredients of its rich, red cousin, but it is defined by the green color. The color comes from an abundance of added cilantro and roasted chile peppers. Sometimes chorizo verde is extremely green because the cilantro and peppers are blended like a smoothie into the sausage. Sometimes it more closely resembles an Italian sausage, but flecked with the green of chopped cilantro and chile pepper. Chorizo verde ultimately has more greens and less sausage than the more common red chorizo, which makes for a different taste, and less fat.

chorizo verde in a skillet

But whether you’re preparing a paprika packed chorizo, a chorizo verde, or any raw sausage packed into link casings, here are two easy ways to prepare sausage on the stove.

How to Cook Chorizo Packed in a Casing

Firstly, you don’t have to cook sausage in a casing. If you like, you can simply cut the casing open and pull the ground sausage out and use it just like any ground meat in any dish you like. But sausage casing is edible, and can add a nice texture if cooked the right way.

How to Cook Link Sausage on the Stove top

  • Use a skillet or a heavy-bottom pot with a lid.
  • Place about ¼” of water in the bottom and bring the water to boil.
  • Add in the sausage and reduce to a simmer, then cover and let cook for about 10 minutes. You can adjust this time depending on the size of the sausage.
  • After 10 minutes, pour off the water and then continue to cook the sausage on the stove top, turning to get a good sear on each side.
  • Cut into the sausage to make sure it’s cooked through, and serve as desired.

How to Cook Link Sausage in the Oven

  • Preheat the oven to 350 degrees Fahrenheit.
  • Place sausages in a shallow roasting pan. Line with aluminum foil to speed cleanup.
  • Bake for 20-30 minutes, or until cooked through. Adjust the cooking time depending on the sausage size.
  • After 15 minutes, begin giving sausages an occasional turn to brown each side.

However you cook sausage in a casing, getting a nice sear on the sausage is key to great taste. I found chorizo verde did not brown as well as other sausage I’ve cooked, but even without getting a deep sear, crisping the sausage casing makes all the difference in taste. And if you find that sausage casing is too chewy, or not to your liking, then just peel it away, no problem.

If you’re still in a sausage mood, check out this Sausage Tomato Pie Recipe.

sausage tomato pie

Thanks for taking a look at Mexican chorizo verde, and checking out our other recipes. Sign up for our mailing list and never miss a new Chef Buck cooking video, and also click a button below and share the dishes with your friends. We appreciate all the kind comments and support, and we’ll see you next time in the kitchen!
–Chef Buck

We appreciate you watching our recipe videos …Thanks!

We include affiliate links for products on our website, so if you make a purchase after clicking on our links, we may earn a commission which helps us produce more videos and drink more coffee :^) We are participants in the Amazon Services LLC Associates Program, which is an affiliate advertising program that provides a means for us to earn fees by linking to Amazon.com and affiliated sites, so we can make more videos.

Share and Enjoy !

Egg in a Basket Recipe for Brunch

This Egg in a Basket Recipe is a fun way of serving up eggs and toast, and if you use fancy bread and colorful breakfast sides, you can even pass eggs in a basket off as an upscale brunch dish. I like to cook my egg toast with a lot of butter, because this makes the bread rich and crispy like a crouton.

What You Need for this Egg Recipe

1 large EGG
1 slice BREAD
1-2 Tbsp BUTTER

Egg in a basket is a super simple breakfast dish to prepare, and a fun way to cook up breakfast for kids. But if you jazz the egg recipe up a bit, it can easily transform into a fancy brunch meal for anytime of the day.

How to Make an Egg in a Basket

  • Use a nice bread. In the video, I use a Thyme and Olive loaf. It’s super tasty all on it’s own, so it’s naturally going to elevate a simple egg in a basket dish.
  • I like to buy a whole bread loaf and slice it myself. A nice rustic cut of bread makes a dish fancier.
  • Cut your bread slices about ½ an inch thick, and don’t cut the egg hole in the bread TOO BIG. You want the egg to fill the hole, and not stretch out too thin. And you want enough bread surface around the hole to toast up.
  • Heat a skillet on low-medium heat. Add butter and melt.
  • Add in the bread slice and coat butter on one side, then turn the slice and butter up the other side. Let the bread grill for a minute or so until it begins to brown, then flip and let the other side grill.
  • Break an egg into the hole in the toast. Let the egg cook long enough to set, then flip the toast and let the egg cook on the other side.
  • Once the egg is cooked to your desire, remove the egg bread from the skillet and serve hot.
egg in a basket

A good skillet is essential for this kind of egg dish. You can check current prices for a shiny new Non-Stick Skillet on Amazon.

This is a cool recipe to serve over a salad, or anything you like, especially if you’re like me and enjoy over-easy style eggs. A runny yolk makes a great sauce! Also garnish your egg bread with cilantro, parsley, or your favorite fresh herbs, and this simple childhood dish will instantly become a fancy treat.

Do you have a favorite salad dressing or sauce? Drizzle a bit over egg in a basket, because that’s what they’d do in a hipster restaurant, and then charge you $20 for “Eggs al Basquet”.

For another fancy egg and bread dish, try an Egg Bread Bake Recipe.

egg bread
Fancy baked eggs to impress friends and family

Thanks for checking out our Egg in a Basket brunch video, and all of our recipes. Be sure and sign up for our mailing list and never miss a new Chef Buck cooking video, and also click a button below and share the dishes with your friends. We appreciate all the kind comments and support, and we’ll see you next time in the kitchen!
–Chef Buck

We appreciate you watching our videos…Thanks!

We include affiliate links for products on our website, so if you make a purchase after clicking on our links, we may earn a commission which helps us produce more videos and drink more coffee :^) We are participants in the Amazon Services LLC Associates Program, which is an affiliate advertising program that provides a means for us to earn fees by linking to Amazon.com and affiliated sites, so we can make more videos.

Share and Enjoy !

Garlic Home Fries for Breakfast …or anytime

The key to great garlic home fries is cooking the potatoes on low heat. The total cooking time for this recipe will be about 15-20 minutes. You don’t want to rush the potatoes, because you want the home fries crispy outside, but you also want them cooked through on the inside.

What You Need for Garlic Home Fries

1 large POTATO
5-7 cloves GARLIC
2 Tbsp BUTTER
1 tsp SALT
2-3 Tbsp OIL

optional:
some HOT PEPPERS
1-2 tsp PAPRIKA (CG prefers smoked paprika)

garlic home fries

Make the Best Home Fried Potatoes

  • Dice a potato. Cubes half the size of a die are good, but any size will be fine as long as they are reasonably uniform and can cook evenly.
  • Heat oil in a non-stick skillet. Check current prices on Amazon for a shiny new non-stick skillet.
  • Add in the diced potato. You want the oil hot and the potatoes to sizzle when they hit the pan. Spread the potatoes out in an even layer. Reduce the heat to a low and let the potatoes sizzle away.
  • After 5 minutes, turn the potatoes.
  • After 10 minutes add in the seasoning and hot pepper, if desired. Turn the potatoes again. Adjust heat as needed.
  • Continue cooking for another 5 minutes, turning as needed.
  • When the potatoes are close to desired doneness, add in the butter and the finely chopped garlic.
  • Cook for a few more minutes and serve hot.

These garlic home fries are great for breakfast, but they are a happy addition to any meal, any time of the day.

And for another beautiful breakfast option, try your hand at The Best Biscuit Recipe.

Easy Homemade Buttermilk Biscuits Recipe
Homemade Buttermilk Biscuits

Thanks for checking out our garlic home fries video, and all of our recipes. Be sure and sign up for our mailing list and never miss a new Chef Buck cooking video, and also click a button below and share the dishes with your friends. We appreciate all the kind comments and support, and we’ll see you next time in the kitchen!
–Chef Buck

We appreciate you watching our videos…Thanks!

We include affiliate links for products on our website, so if you make a purchase after clicking on our links, we may earn a commission which helps us produce more videos and drink more coffee :^) We are participants in the Amazon Services LLC Associates Program, which is an affiliate advertising program that provides a means for us to earn fees by linking to Amazon.com and affiliated sites, so we can make more videos.

Share and Enjoy !

Bacon Wrapped Cheese Bread Recipe

If you love bacon you’ll love this bacon wrapped cheese bread recipe made with only three ingredients: Bacon, Bread, and Cheese …luckily it’s three of the best ingredients in the world. I first encountered this dish at a cafe in Guadalajara, Mexico and knew right away I wanted to make this dish at home. I prefer to use a white cheese, but of course any kind of cheese you love is the right cheese. Chopping up some pickled jalapeno peppers and adding them to the cheese is a good idea, too, if you want to spice it up a bit.

Ingredients for this Bacon Bread Recipe

BREAD …a crusty roll big enough to hide cheese inside
BACON …thin sliced for easy wrapping
CHEESE …whatever cheese you love, dude

bacon wrapped cheese bread

How to make the Best Bacon Wrapped Cheese Bread

This simple dish will suit any meal of the day. Choose a not overly large crusty bread roll for you bacon ball, since it will take several slices of bacon to wrap even a smallish chuck of bread. And be sure to choose bread that is thick enough to cut out the center for the cheese filling.

For the cheese I like to use a meltable white cheese, but use whatever you like. Bacon, bread, and cheese is a great combo of uncomplicated, simple, down home flavors. If you want a more complex flavor, add a bit of zing to the cheese filling. You can add sauteed onion, garlic, cilantro, or chopped pickled jalapeno to the filling for a bit more pizazz.

bacon wrapped cheese bread
  • With a sharp knife, cut an insert into the bread roll. Remove and reserve the bread cut out to make a stopper for the cheese.
  • Fill the bread with the cheese. There is no wrong amount of cheese, whatever you like is the right amount, but keep in mind that bread and bacon alone can be a bit dry, so the more cheese you add, the creamier the dish will be.
  • Once you’ve inserted the cheese, plug the opening with some of the bread you’ve taken out. Plug it up as best you can! You don’t want your cheese filling to melt and leak out of the bread.
  • Wrap the roll well in bacon. Use the first strip wrapped around the roll to help secure the bread plug to keep the cheese inside! Wrap the bacon in alternating criss cross strips to form a tight lattice until bread is completely covered. Try not to overlap the bacon more than twice so that the bacon ball will cook completely in a shorter time.
  • Place the bacon ball on a wire rack over a foil-lined tray in an oven preheated to 350 degrees F. Cook until the bacon is done as desired. I like to cook my bacon ball in a toaster oven for easier cleanup. To shorten the cooking time, you can start the bacon ball in a microwave for 2-3 minutes before placing in the oven.

Serve the bacon ball as an entree for any meal. You can also prep these bacon balls ahead of time by wrapping and storing them in the fridge until ready to cook.
Bacon wrapped cheese bread is such a hearty and filling dish, and pairs especially well with a salad for a fancy brunch-type meal. And it’s even good cold! What? Trust me.

A compact toaster oven is perfect for recipes like this cheesy bacon wrap. Check current prices on Amazon for a toaster oven.

I hope you like this cool looking bacon wrapped cheese thing-a-ma-bob. It’ll definitely impress family and friends, just take the time to plug up the cheese well. A bacon ball that leaks out all its cheese is just sad.

For another delicious bread dish twist, try this Fancy egg Bread Recipe.

egg bread
add extra bling for fancier egg bread, but don’t skimp on the seasoning

Thanks for checking out the bacon wrapped cheese bread and all of our recipes. Be sure and sign up for our mailing list and never miss a new Chef Buck cooking video, and also click a button below and share the dishes with your friends. We appreciate all the kind comments and support, and we’ll see you next time in the kitchen!
–Chef Buck

We appreciate you watching our videos…Thanks!

We include affiliate links for products on our website, so if you make a purchase after clicking on our links, we may earn a commission which helps us produce more videos and drink more coffee :^) We are participants in the Amazon Services LLC Associates Program, which is an affiliate advertising program that provides a means for us to earn fees by linking to Amazon.com and affiliated sites, so we can make more videos.

Share and Enjoy !

Poached Egg Recipe for Rich People

poached egg recipe

Try a fancy poached egg recipe with smoked salmon, spinach and fennel. This recipe looks great, and tastes even better, and is super quick to prepare. Breakfast doesn’t get much fancier than this–it’s like a 5-star breakfast in your own home.

Fancy Poached Egg Recipe (serves 2)

4 EGGS
2 Tbsp WHITE VINEGAR
2 cups SPINACH
½ cup FENNEL BULB thinly sliced
1 GREEN ONION chopped
3-4 oz SMOKED SALMON
1 TOMATO sliced
¼ tsp GARLIC minced
¼ tsp GINGER minced
¼ tsp LEMON ZEST minced
1 tsp LEMON JUICE
2 tsp OLIVE OIL
SALT and PEPPER to taste
And fancy-pants BREAD for toast

How to Make Poached Egg with Salmon and Greens

  • Firstly, make the dressing. In a bowl combine the lemon juice, olive oil, lemon zest, ginger, garlic, salt, and pepper and then mix well.
  • Add in the spinach leaves, chopped onion, and thinly sliced fennel and toss with dressing.
  • On two plates, arrange 1 to 2 oz of smoked salmon, and top with the greens. I like to serve toast as a side with this dish, but you can build the salmon and greens on toast if you prefer. Now your breakfast is mostly made, you just have to poach the eggs.

How to Poach Eggs

  • Fill a nonstick skillet almost to the top with water. You will want the water between 1 and 2 inches deep.
  • Place the skillet on the stove top and add in the vinegar and stir.
  • Now heat the water until it begins to form bubbles on the bottom, almost to a simmer.
  • Crack your eggs into a smaller cup, and gently add them to the water.
  • Cover and poach eggs for about 3 minutes, or a little more or less depending on how runny you like the yolk.
  • With a slotted spoon, loosen the eggs from the skillet and remove from the water.
  • Set eggs a paper towel to drain. And that’s how to poach an egg!
poached egg recipe

To finish your fancy breakfast, just top the salmon and greens with your poached eggs and that’s it! Garnish with a sprinkle of paprika or black pepper or chopped green onion and then serve hot while your yolks are saucy.

So, you love poached eggs but don’t want to poach them? Try steaming them, because it’s super easy and you can check out the current prices for a Rapid Egg Cooker on Amazon. I tried this gadget out and really liked it.

Give this fancy-pants salmon/fennel poached egg recipe a try and let me know what you think! And for another impressive breakfast/brunch idea, try this Fancy Oven-Baked Egg Recipe.

baked eggs
Baked eggs are an easy way to impress folks for breakfast.

Thanks for Watching our Videos!

Thanks for checking out our poached egg recipe, and all of our recipes. Sign up for our mailing list so you’ll never miss a new recipe. Also click a button below and share the dishes with your friends. You can also follow Chef Buck on Youtube. We appreciate all the kind comments and support, and we’ll see you next time in the kitchen!

If you like what CG and I do, support us on Patreon, or throw us a tip in our Paypal Tip Jar. We’ll happily enjoy a coffee on the road – Thanks! We appreciate all the support, and we’ll see you next time in the kitchen!

We include affiliate links for products on our website. Making a purchase after clicking on our links and we may earn a commission which helps us produce more videos and drink more coffee :^) We participate in the Amazon Services LLC Associates Program, which is an affiliate advertising program. It provides a means for us to earn fees by linking to Amazon.com and affiliated sites, so we can make more videos.

Share and Enjoy !

Cafellissimo Pour Over Coffee Review

cafellissimo pour over coffee

Is the Cafellissimo Pour Over Coffee Maker worth buying? I used this single-piece stainless steel paperless coffee filter daily over a 2 week period while we were house sitting and thought it worked great. The filter is well constructed and ideal for making a single cup of coffee.

Is the Cafellissimo Pour Over Coffee Maker a Good Buy?

Check current prices for the Cafellissimo Paperless Coffee Maker on Amazon, and here are some alternative paperless coffee filter options and comparison prices.
Rojoe Coffee Dripper
YesTree Pour Over Coffee Dripper

Pros:
Simply makes great coffee (of course, the right coffee bean is always key).
No need for paper filters, so no waste.
Made of stainless steel, not plastic; important if you think hot water and plastic are a poor match.
Perfect for a quick, single cup of coffee.
Compact, convenient coffee gadget ideal for travel.

Cons:
More expensive than other pour over coffee drippers.
The double-walled mesh filter must be cleaned well after each use.
Not the best option if making more than 1 or 2 cups of coffee at a time.

Cafellissimo Drip Test — One Year Later!

I used my Cafellissimo Pour Over Filter for 1 year and here is how it’s doing!

Simple and Compact Make the Cafellissimo Ideal for Travel

I love coffee, and I brew it at home almost every day. I also enjoy getting coffee out at coffee shops, but freshly brewed coffee at home is always best, and the Cafellissimo pour over coffee maker is ideal for travel, so I keep one in my “travel kitchen”.

cafellissimo pour over coffee

If you already have a better travel coffee system, feel free to comment on the youtube video and let me know. I really enjoy my French Press coffee, but a French press does not travel as well.

pour over coffee

Thanks for checking out my Cafellisimo Coffee Filter Review

Sign up for our mailing list so you’ll never miss a Chef Buck video, and also click a button below and share the video with your friends. We appreciate all the kind comments, and we’ll see you next time in the kitchen!
–Chef Buck

We appreciate you watching our videos…Thanks!

We include affiliate links for products on our website, so if you make a purchase after clicking on our links, we may earn a commission which helps us produce more videos and drink more coffee :^) We are a participant in the Amazon Services LLC Associates Program, which is an affiliate advertising program that provides a means for us to earn fees by linking to Amazon.com and affiliated sites.

Share and Enjoy !

Hard Boiled Eggs Steamed vs. Boiled

hard boiled eggs

Which hard boiled eggs are better, boiled eggs or steamed eggs? Both cooking methods work fine, but steaming eggs takes less time, and the shells peel off the eggs easier…maybe. Take a look.

Hard Boiled Eggs in a Steamer Basket

  • Place steamer basket in a pot.
  • Fill pot with water to just below the basket bottom.
  • Carefully place eggs in the steamer, and if there is extra room for the eggs to jostle during steaming, use a paper towel to stabilize the eggs.
  • Cover the pot and bring water to a boil.
  • Steam eggs for 12 minutes for a “hard boiled” egg.
  • Remove eggs from steam and place eggs directly in cold water to “shock” the eggs, drawing the inner membrane away from the shell and making them easier to peel. Check here for current prices for a Steamer Basket on Amazon.

How to Hard Boil Eggs

  • Place eggs in a pot and cover the eggs with cold water with about 1” of extra water over the eggs.
  • With the pot uncovered, bring the water to a boil, then remove the pot from the heat.
  • Cover, and allow the eggs to sit in the hot water for 12 minutes.
  • After 12 minutes, remove boiled eggs from the hot water and place in cold water to cool.
hard boiled eggs

Eggs are easier to peel under water, and using older eggs will make the eggs easier to peel, as well. I find that steamed eggs do not stick to the inner shell as much, so they are easier to peel than eggs boiled in water. What is your experience?

The shorter cooking time and ease of peeling makes steaming my choice for hard boiling eggs in the future. The steamer basket works fine for eggs and also has many other great uses in the kitchen, so I’ll forego buying a gadget specifically for egg steaming.

Is a Dash Go Any Good?

The Dash Go Egg Steamer takes a little less time to steam eggs than with a steamer basket because the design requires less water for cooking. You can take a look at the current price for the Dash Go on Amazon, and see our video review below.

So what do you prefer? Steaming or boiling Hard Boiled Eggs?

For egg salad with a twist, take a look at this Spicy Egg Salad Recipe.

egg salad recipe
Try a spicy egg salad recipe for a flavorful twist on a traditional boring, bland egg salad.

Thanks for Watching our Videos!

Thanks for checking out our hard boiled eggs video, and all of our recipes. Sign up for our mailing list so you’ll never miss a new recipe. Also click a button below and share the dishes with your friends. You can also follow Chef Buck on Youtube. We appreciate all the kind comments and support, and we’ll see you next time in the kitchen!

If you like what CG and I do, support us on Patreon, or throw us a tip in our Paypal Tip Jar. We’ll happily enjoy a coffee on the road – Thanks! We appreciate all the support, and we’ll see you next time in the kitchen!

We include affiliate links for products on our website. Making a purchase after clicking on our links and we may earn a commission which helps us produce more videos and drink more coffee :^) We participate in the Amazon Services LLC Associates Program, which is an affiliate advertising program. It provides a means for us to earn fees by linking to Amazon.com and affiliated sites, so we can make more videos.

Share and Enjoy !

Dash Egg Cooker Review and 3 ways to make Eggs

dash egg cooker

We tried the Dash Egg Cooker, which is basically an egg steamer. The rapid egg cooker model we reviewed can “boil” 1-6 eggs at a time. In addition to cooking soft, medium, or hard-boiled eggs, you can also make an easy omelet, which was really more like an egg scramble. The best feature of the egg cooker was its use as an egg poacher, since it can poach two perfect eggs faster than you can boil a pot of water.

Trying Out the Egg Cooker for the 1st Time

The Dash Go Egg Cooker model I tried didn’t have an alarm, but the newer model Dash egg cookers do, and they are also rated pretty well over on Amazon. Check out the current prices for a Rapid Egg Cooker on Amazon.

dash egg cooker
Complete Egg Cooker includes 3 distinct trays for different egg styles

Why buy this egg cooker?

  • Good for a quick egg dish for 1 to 2 people.
  • Great for poaching 2 eggs pretty fast.
  • Sturdy build for a kitchen gadget, and not too expensive.
  • No muss, no fuss boiled eggs soft, medium, or hard.
  • Easy clean up.

Why you don’t need this egg cooker:

  • Not practical for preparing eggs for more than 2 people at a time.
  • The omelets are more like egg scrambles.
  • Other than poaching 2 eggs, it’s not particularly “rapid”.
  • How hard is it to cook eggs? If you currently have a stove, a pot, and a pan, then you can already cook eggs any way you want…so do you need a new gadget taking up space in the kitchen?
dash egg cooker
Well constructed and pretty cheap last time I looked on amazon.

Cleaning Up the Dash Egg Cooker

It’s a pretty hassle free clean up. The base of the Dash Egg Cooker is electric and not safe to put in a dishwasher or submerge under water. You might get some stains on the heating pad from egg residue, but just add a splash of vinegar and it wipes right off. The plastic omelet tray, poaching tray, boiled-egg holder, and steaming dome are all dishwasher and sink safe, so wash accordingly.

Dash Egg Cooker Conclusion

I’m not a kitchen gadget guy, because I’d rather have free counter and cabinet space, but overall I have to give the Dash egg cooker a thumbs up. It’s not TOO big, it’s not overly junky in its construction, and it does a good job cooking eggs. If you like gadgets, then this device is not a total rip-off. I can see where it would be useful to someone wanting a quick egg without a lot of hassle. Here’s our affiliate link if you want to check out the egg cooker on Amazon.

And for a kitchen gadget that is a definite MUST-HAVE, see how easy it is to make Perfect Coffee with a French Press.

pour over coffee

Thanks for all the support!

We include affiliate links for products. If you make a purchase after clicking on our links, we may earn a commission which helps us produce more videos and drink more coffee.
We are a participant in the Amazon Services LLC Associates Program, an affiliate advertising program designed to provide a means for us to earn fees by linking to Amazon.com and affiliated sites.

Share and Enjoy !

Rosemary Bread Recipe without a Mixer

rosemary bread

You can make a delicious homemade rosemary bread recipe following step-by-step with Mama Redbuck. It takes very few ingredients, and just a little time–mostly waiting for the bread to rise–but it’s well worth it. The recipe below is for one loaf of bread, but bake two at a time and then freeze one for later!

Ingredients for Rosemary Bread Recipe

2 cups sifted ALL-PURPOSE FLOUR
2 Tbsp softened BUTTER
1 Tbsp SUGAR
1 Tbsp dry active YEAST
2-3 Tbsp freshly chopped ROSEMARY
1 tsp SALT
1 cup of WATER

How to Make a Rosemary Bread Loaf

Set the butter out to soften and come to room temperature.

In a bowl, add 1 cup of warm tap water, about 130 degrees–not too hot! Stir in the sugar until dissolved, and then add in the yeast and stir lightly. Allow the dish to sit for about 10 minutes to bubble up.

Into a small dish, sift ½ cup flour and set aside.
In a larger mixing bowl, add 2 cups of sifted flour, salt, the finely chopped rosemary, and about ⅔ of the softened butter. Mix.

Stir the yeast mixture into the bowl and combine with the flour to form a loose ball.

Flour a flat surface with some of the flour from your sifted ½ cup of flour. You will use this flour for kneading your dough, but don’t use more than this amount, in fact, use as little of the flour as you can, only as needed for working the bread. The less flour you use, the lighter and airier your bread will be.

Roll the dough from your bowl onto the floured surface and knead for about 10 minutes, using only as much flour as you need to keep the dough from sticking as you work it. Kneading warms and stretches the gluten strands in the dough which will make for a light and airy loaf of bread instead of a dense bread brick. Nobody likes a bread brick.

rosemary bread
Light and airy rosemary bread!

My mom uses a bread proofing bowl, and you can check here current prices for a Dough Basket on Amazon. Or you can just use a regular bowl, but lightly coat the bowl with olive oil before adding in the dough ball, and be sure to roll the ball around in the bowl to coat the dough with oil as well.

Place the dough bowl in a warm place and let the dough rise for about an hour, until the dough has roughly doubled in size.

Once the dough has risen, flour your knuckles and punch the dough down, then remove the dough from the bowl and flatten and roll up by hand, then set aside for 5 more minutes.

You can bake the bread in any oiled pan or cooking sheet, but for a nice loaf, use a loaf pan. My mom likes to lightly oil the sides of the pan with olive oil and then cut a rectangle of parchment paper for the bottom of the pan.

After 5 minutes, the dough will have risen a bit, so press the dough down again and shape into a loaf that fits well into the loaf pan. Return the dough to a warm area and let it rise again for about 45 minutes, or until the dough has once more doubled in size.

After rising, bake the bread in an oven preheated to 375 degrees Fahrenheit for about 30 minutes, until lightly brown.

Remove the rosemary bread from the oven and then remove the bread from the loaf pan and place the bread on a cooling rack. If you turn the rosemary bread over and tap the crusty bottom, it will feel hollow inside, which is great, because that means you have baked a wonderfully light loaf of bread.

While the bread is still warm, brush it with the remaining butter you set out earlier.

And that’s it, you are now the proud owner of the most delicious, light and airy rosemary bread on the planet. If you bake this bread for someone, they will become your slave for life…just saying.

For another tasty Mama Redbuck bread recipe, try this extra-fancy loaf of Homemade Pesto Parmesan…it’s pretty stellar, so check it out.

parmesan pesto bread

Thanks for checking out this rosemary bread recipe, and be sure and sign up for our mailing list so you’ll never miss a Chef Buck cooking video, and also click a button below and share the dishes with your friends. We appreciate all the kind comments and support, and we’ll see you next time in the kitchen!
–Chef Buck

We really appreciate you watching our videos…Thanks for the support!

We include affiliate links for products on our website, so if you make a purchase after clicking on our links, we may earn a commission which helps us produce more videos and drink more coffee :^)

We are a participant in the Amazon Services LLC Associates Program, which is an affiliate advertising program that provides a means for us to earn fees by linking to Amazon.com and affiliated sites.

Share and Enjoy !

Cornbread Recipe for Sweet Skillet Cornbread

cornbread recipe

You’ll love this sweet cornbread recipe. It’s a tasty pairing for a savory meal, but this skillet cornbread feels like a real treat, especially if you finish it off by grilling sliced cornbread in a skillet with butter.

Ingredients for Cornbread Recipe

2¼ cups ALL-PURPOSE FLOUR
1 cup SUGAR
¾ cup CORNMEAL
2 tsp SALT
2 tsp BAKING POWDER
5 EGGS
¾ cup CANOLA OIL
1¼ cup BUTTERMILK
1 tsp VANILLA EXTRACT

cornbread recipe

How to Make Skillet Cornbread

First thing, pre-heat your oven to 350 degrees Fahrenheit, and place a heavy, oven-safe skillet in the oven to heat as the stove warms. You’ll want the skillet to be hot when you add in the batter later. Check Amazon for current prices for a 10 inch cast iron skillet similar to the one used in the recipe video.

In a bowl, combine the flour, sugar, cornmeal, salt, and baking powder, then mix the ingredients together well. This recipe is SO GOOD with 1 cup of sugar, but you can reduce that amount to ¾ cup sugar and it’s still pretty fantastic. If you desire a cornier cornbread, use a coarsely ground cornmeal, although I prefer using a finer grind.

In another bowl, crack the eggs and whisk them smooth, then add in the buttermilk, oil, and vanilla extract and whisk well, until slightly frothy. Mix the wet ingredients into the dry, but don’t over mix, just turn the ingredients together until everything is wet, but still lumpy.

Now carefully remove the skillet from the pre-heated oven and then carefully coat the entire inside of the skillet with about 1 Tbsp of canola oil. Pour in the batter, which should fill a 10 inch skillet about ¾ full, because you’ll want to leave room for the cornbread batter to rise.

cornbread recipe

Bake at 350 degrees Fahrenheit for 25 minutes, then reduce the oven temperature to 200 degrees F and allow the cornbread to bake for an additional 15 minutes. After that time, the cornbread should have risen and formed a firm, golden dome.

Carefully remove the skillet from the oven and pierce the center of the cornbread with a toothpick or knife, which should draw clean when removed. If wet batter is visible, then return to the cornbread to the oven for another 5 minutes and check once more.

Once the cornbread is baked through, allow it to rest in the skillet for 10 to 15 minutes, then remove the bread from the skillet and place on a cooling rack. If the cornbread sticks in the skillet, you can give the skillet a good shake to free the bread from the bottom of the pan.

It’s ready to eat, maybe with a slather of cold butter, or maybe not, you’ll just have to follow your cornbread instincts. I love slicing this bread and then grilling the sides in a buttery skillet to add an extra dimension of cornbread decadence, but do this at your own risk, because it will likely spoil you for life.

I hope you enjoy this sweet cornbread recipe. For another corny bread dish, try this beautiful cheese and jalapeno Corn Muffin Recipe.

corn muffin recipe
Corn muffins are delicious, but adding cheese and jalapeno makes them irresistible.

Thanks for checking out our sweet skillet cornbread recipe, and all of our recipes. Be sure and sign up for our mailing list and never miss a new cooking video. Click a button below and share the dishes with your friends, and follow Chef Buck on Youtube. We appreciate all the kind comments and support, and we’ll see you next time in the kitchen!

Thanks for watching our recipe videos! 

We include affiliate links for products on our website, so if you make a purchase after clicking on our links, we may earn a commission which helps us produce more videos and drink more coffee :^).   We participate in the Amazon Services LLC Associates Program, which is an affiliate advertising program providing a means for us to earn fees by linking to Amazon.com and affiliated sites, so we can make more videos.

Share and Enjoy !

Egg Coffee for Perfect Coffee on the Stove

egg coffee

Here’s a simple way to make a smooth cup of coffee on the stove top. Try this Scandinavian Egg Coffee brewing technique. All you need is coffee, an egg, and a pot of water. You can brew a great cup of coffee super quick and with no fancy coffee gadgets. I love French press and Moka pot coffee, but when I find myself without those accessories, this egg coffee is my new go-to for brewing coffee.

What You Need To Make Stove Top Egg Coffee

COFFEE …Buy whole beans and grind them at home, fresh-ground coffee makes all the difference.
1 EGG …I use a large egg
WATER …We use cold tap water, ’cause we’re savages (I mean eco-friendly / cheap)
and then just a POT to brew the water and coffee,
and if you’re making extra, a COFFEE CARAFE or THERMOS

egg coffee
Make egg coffee for friends…they’ll love the coffee, and think you’re “interesting”

How to Make Egg Coffee

Use your favorite coffee beans. Shop around. Experiment. When brewing coffee, the beans make all the difference. Buy whole beans and grind them fresh at home.

I’ve made Egg Coffee with a course grind and a fine grind; it works either way, but a finer grind will make stronger coffee, just as leaving the brew to go longer will make the coffee stronger.
If you don’t want to use freshly ground beans, then this scandinavian Egg Coffee technique might be the ideal brewing system. Brewing coffee with egg shell will help smooth out a rough coffee.
It’s all about acids and bases and sciencey stuff like that.

I like to use a ratio of 1 Tbsp ground coffee to 6oz of water for a light roast, or 1 Tbsp coffee to 8oz of water for a dark roast, but this is very subjective,
so experiment and adjust to taste.

  • In a small bowl, crack an egg…leave the entire egg, shell and all.
  • Add ground coffee.
  • Mix well. Add a Tbsp or two of water, but not too much, you want the coffee and egg to form a gooey paste, not a muddy liquid.
  • On the stove top, heat a pot of water to a boil.
  • Turn off the heat and let the water sit for one minute, this will bring the temperature down so as to not overcook the coffee.
  • After one minute, add the coffee paste, and let sit for about 30 seconds, then stir.
  • Turn the burner back on, not to boil, but just enough to keep the coffee hot as it brews.
  • Remove from the heat after 3-4 minutes and strain into a coffee cup or carafe. The ground coffee beans will clump with the egg and make separating the brewed coffee much easier.
  • Enjoy that coffee, dude.

A coffee carafe or thermos is handy whenever you brew extra coffee, even if you have an electric coffee maker; leaving coffee on a burner is a recipe for bitter, burnt coffee. It’s easy to find a carafe at the thrift store–I’ve never bought a new one!–but if you’re a buy-new kinda person, here are some current online prices at amazon for coffee carafes.

Become a Coffee Nerd

Give egg coffee a try, and let me know what you think. Ever try Cold Brew Coffee? I love cold brew on a hot day, and for more ways to make a great cup of coffee anytime, check out our Coffee Playlist for Maximum Coffee Pleasure …sorta.

pour over coffee
click pic for how to make French Press Coffee

Thanks for checking out this weird but wonderful Scandinavian Egg Coffee, and if you give it a try, I think you will be happy you did. Imagine how much fun it will be to make this egg coffee for your friends! Thanks for watching, and be sure to sign up for our mailing list and never miss one of our video recipes. And if you know someone who might like our stuff, then click a button or two below and share it, we sure appreciate it! Thanks!
–Chef Buck

Share and Enjoy !


Corn Muffin Recipe with Jalapeno and Cheese

corn muffin recipe

Corn muffins are delicious, but adding cheese and jalapeno makes them irresistible. CG cooks up a tasty corn muffin recipe with whole kernel corn to make them super moist and flavorful. If you’re not a fan of hot jalapenos, then try substituting milder pickled jalapenos which are often sold right alongside jars of hotter peppers at the grocery store. Topping the muffins with sliced jalapeno makes them look so good!

What you need for this Corn Muffin Recipe

¾ cup CORNMEAL …we use a medium grind in this recipe
1¼ cup ALL-PURPOSE FLOUR
2½ tsp BAKING POWDER
½ tsp SMOKED PAPRIKA
½ tsp CHIPOTLE or regular chili powder
½ tsp SALT…unless the corn or butter already contains salt
1 cup MILK
2 Tbsp OIL or use melted butter instead
4 Tbsp HONEY
1 EGG
1 cup CANNED WHOLE KERNEL CORN drained
¼ cup PICKLED JALAPENOS, roughly chopped
¼ ONION, minced
1 cup freshly shredded CHEDDAR CHEESE plus ¼ cup for topping
fresh JALAPENO deseeded and sliced for topping…or you can use pickled slices for the topping

corn muffin recipe
Corn muffins are delicious, but adding cheese and jalapeno makes them irresistible.

How to make Corn Muffins

If you need a muffin tin for your kitchen, you can check current prices for a Cupcake and Muffin Pan on Amazon.

  • Place rack in middle of the oven.
  • Heat oven to 400 degrees Fahrenheit.
  • Grease 12 muffin pan cups or line with parchment paper baking cups and set aside.
  • Combine dry ingredients in bowl.
  • Combine remaining ingredients in another bowl and mix, but reserve fresh jalapeno slices and a little cheese for topping.
  • Add the dry ingredients to the wet and stir until ingredients are moistened.
  • Fill prepared muffin cups evenly.
  • Top with fresh jalapeno slices and a very light sprinkling of cheese.
  • Bake 20-30 minutes or until toothpick inserted into center comes out clean and muffins are golden brown.
  • Allow to cool for 5 minutes before removing from muffin tins.

And that’s it! Hope you like this cheesy jalapeno corn muffin recipe. You can serve them hot or cold for breakfast, lunch or dinner, and I especially love them in the morning with over easy eggs.

corn muffin recipe
broken eggs are less sad with corn muffins

Give this corn muffin recipe a try and let us know what you think, and for another bready treat, check out this perfect BUTTERMILK BISCUIT RECIPE. Both recipes go great with a big bowl of VEGETARIAN CHILI.

vegetarian chili
pot o’ meatless chili for good times

Thanks for checking out our corn muffin recipe, and all of our recipes. Be sure and sign up for our mailing list and never miss a new Chef Buck cooking video, and also click a button below and share the dishes with your friends. We appreciate all the kind comments and support, and we’ll see you next time in the kitchen!

Thanks for watching our recipe videos!

We include affiliate links for products on our website, so if you make a purchase after clicking on our links, we may earn a commission which helps us produce more videos and drink more coffee :^)                                                                                                We participate in the Amazon Services LLC Associates Program, which is an affiliate advertising program providing a means for us to earn fees by linking to Amazon.com and affiliated sites, so we can make more videos.

Share and Enjoy !

Must Try Egg Bread Bake Recipe

egg bread

Egg bread is a fancy dish for breakfast or brunch, and it’s an easy recipe to prepare. The recipe is a cross between baked eggs, bread pudding, and stove top stuffing. It’s a great way to use up old and stale bread. I go light on the cheese in this egg bread recipe, but adding more cheese and making a cheese bread is super tasty. One thing you don’t want to do is go light on the seasoning, especially if you’re using a plain loaf of bread; the more seasoning the better–especially rosemary!

What You Need for an Egg Bread Bake

crusty BREAD cubed
6 EGGS
about 1 cup MILK
2 GREEN ONION chopped
HOT PEPPER finely chopped
shredded CHEESE
1-2 Tbsp dried ROSEMARY
1 tsp dried OREGANO
PAPRIKA
BLACK PEPPER
GARLIC POWDER
CHILI POWDER (optional)
BUTTER/OIL to grease the baking dish

egg bread
Fancy baked eggs to impress friends and family

How to Make Baked Egg Bread

Any bread will do, but ideally use a hard and crusty loaf. If you’ve got a loaf of bread you’re thinking is to stale to eat, then this is a perfect recipe to save it.

  • Slice the bread into cubes and place in a large mixing bowl. I like using larger cube sizes for a rustic looking dish.
  • In a bowl, whisk 2 eggs and milk.
  • Add the egg/milk mixture in with the bread and toss, coating the bread.
  • Add in the herbs and spices, onion, hot pepper, and cheese and toss until the bread is well coated.
  • Lightly grease an oven safe baking dish and add the bread mix, spreading out evenly. Check current prices on a Pyrex Baking Dish on Amazon.
  • With a spoon, make an impression on the top of the bread mix for each egg serving.
  • Crack an egg into each depression.
  • Slide into a preheated oven and bake at 350 degrees Fahrenheit for 30-40 minutes, until the eggs are baked to desired doneness.
  • Slice into servings and serve hot or cold.
egg bread
add extra bling for fancier egg bread, but don’t skimp on the seasoning

That’s it! Takes a little while to bake, but otherwise this egg bread is a fairly quick dish to prepare, and a fancy way to use up stale bread.

Give this baked egg bread recipe a try and let me know what you think, and bon appétit!

And for a less bready baked egg dish, try this Fancy Egg Bake Recipe.

egg bake recipe
sliced egg bake on a salad is yummy!

Thanks For Watching Our Recipe Videos!

Thanks for checking out this Egg Bread recipe, and all of our recipes. Sign up for our mailing list so you’ll never miss a new recipe. Also click a button below and share the dishes with your friends. You can also follow Chef Buck on Youtube. We appreciate all the kind comments and support, and we’ll see you next time in the kitchen!

If you like what CG and I do, support us on Patreon, or throw us a tip in our Paypal Tip Jar. We’ll happily enjoy a coffee on the road – Thanks! We appreciate all the support, and we’ll see you next time in the kitchen!

We include affiliate links for products on our website. Making a purchase after clicking on our links and we may earn a commission which helps us produce more videos and drink more coffee :^) We participate in the Amazon Services LLC Associates Program, which is an affiliate advertising program. It provides a means for us to earn fees by linking to Amazon.com and affiliated sites, so we can make more videos.

Share and Enjoy !

Hash Browns Recipe w/ Rutabaga and Zero Potato

hash browns recipe

Try a no potato hash browns recipe with rutabaga. Rutabaga is a root vegetable you can use just like a potato, but it’s a healthier choice with less than half the calories and carbs of potato. Rutabaga is like a larger version of a turnip, but a bit sweeter. It’s related to cabbage, and has a very mild cabbage taste. Rutabaga is great in soups, and I love it simply seasoned and roasted in the oven. Rutabagas look sorta like turnips, but they’re usually bigger. Like most produce, when buying rutabaga choose one that’s firm and seems heavy for it’s size. Give rutabaga a try and let me know what you think.

What You Need for a Rutabaga Hash Browns Recipe

2 cups shredded RUTABAGA
2 chopped GREEN ONIONS (separate white bottoms from green tops)
some chopped HOT PEPPER
1 EGG
shredded CHEESE (optional)
SALT to taste, for flavor and drawing out the water
season to taste, I like:
SMOKED PAPRIKA, GARLIC POWDER,
CHIPOTLE, BLACK PEPPER, etc. …use flavors you like
OIL for sauteing

hash browns recipe
Top rutabaga hash browns with an over easy egg for instant sauce

How to make Hash Browns Recipe with Rutabaga

  • Slice the end off the rutabaga and cut away the outer skin with a knife.
  • Shred about 2 cups of rutabaga using a hand grater or food processor.
  • Place rutabaga in a colander and lightly sprinkle with salt. Mix and let sit for a few minutes while you prepare the other ingredients, this will give the salt time to draw out the water.
  • Squeeze excess water from the rutabaga and place in a bowl.
  • Add green onion bottoms, peppers, egg, and seasoning. Mix well.
  • Heat a skillet and oil on medium heat.
  • Add in the rutabaga mix and cook until browned, turning occasionally.
  • When near completion, stir in green onion bottoms and cheese.

hash browns recipe
Skip shredding and cut rutabaga into cubes for tasty breakfast hash.

That’s it!
Give an easy Rutabaga Hash Browns Recipe a try and let me know what you think, and bon appétit!

And for another breakfast hash recipe idea, try out this canned Jackfruit Breakfast Hash Recipe.

canned jackfruit
Jackfruit and potato hash topped with fried egg; the yolk makes a nice sauce.

Thanks for checking out this rutabaga hash brown recipe and video, if you liked the dish, click a button or two below and share it with your friends.
I appreciate it, thanks!
–Chef Buck

Share and Enjoy !


Egg Bake Italiano with Spinach and Tomato

egg bake

An egg bake recipe is one of the easiest and least expensive meals to prepare, and an Italian egg bake is one of the tastiest. I’ll often clean out the fridge and use odds and ends to make a random egg casserole recipe, but an egg bake doesn’t always have to be a random mishmash of ingredients. If I have fresh spinach and sun dried tomato on hand, then an Italian Egg Bake is a cinch to make. It’s almost like a lasagna, but a whole lot easier and less expensive to prepare. An egg bake is an easy way to feed a family or gathering, and a casserole travels very well, so it’s a perfect recipe for a potluck or dinner party or any event where you need to bring a dish.

What You Need to Make an Italian Egg Bake

(ideal ingredients for a 1½ quart baking dish)

7 EGGS
8-10 oz SPINACH
1 med ONION (chopped)
SUN DRIED TOMATOES (chopped) …smoked sun dried tomatoes are my favorite!
6-10 cloves GARLIC (minced)
½ tsp dried ITALIAN SEASONING
1 cup shredded PARMESAN
or ROMANO CHEESE
½ cup MILK or YOGURT
SALT and PEPPER and
seasonings to taste, like:
garlic powder
onion powder
chili powder
paprika
…add others, or leave some of
these out.
OIL for sauteing

egg bake
It’s like an easier, less expensive lasagna

How to Make an Italian Egg Bake

  • In a large bowl, crack the eggs, add milk and dried Italian seasonings, and whisk well. Set bowl aside.
  • Heat oil in a skillet on medium high heat.
  • Into the skillet add the onion, garlic, and sun dried tomatoes and saute 4-5 minutes.
  • Add in the seasoning and continue sauteing 3-4 minutes.
  • Add in spinach. Stir until spinach wilts and cooks down, which will happen quickly.
  • Lightly spray a 1½ quart baking dish and line the bottom with freshly shredded Romano or Parmesan cheese.
    You don’t need a lot of cheese, line the bottom of the dish and whatever is left reserve to melt on top of the dish later. Check here for current prices on a Pyrex Baking Dish set on Amazon.
  • Remove the sauteed skillet ingredients and spread them evenly over the cheese layer.
  • Gently pour over the whisked egg and milk.
  • Slide the baking dish into an oven preheated to 350 degrees Fahrenheit and bake about 20 minutes or until the egg is firm.
  • Remove from the oven. If desired, top with more shredded cheese and return dish to the oven for about 5 more minutes.
egg bake
I like to use smoked sundried tomatoes for this egg bake recipe…give them a try.

And that’s all there is to this egg casserole.
An Italian egg bake tastes great right out of the oven, but will taste even better the next day.
Serve hot or cold. I actually prefer it cold or at room temperature, so this egg bake recipe makes a great snack, or perfect breakfast, lunch, or dinner; or even brunch, if you’re one of those kinda people.

And that’s it! Give this easy Italian Egg Bake Recipe a try and let us know what you think. And for another breakfast or brunch recipe idea, check out this Fancy Oven-Baked Eggs Recipe.

baked eggs
Baked eggs are an easy way to impress folks for breakfast.

Thanks For Watching Our Recipe Videos!

Thanks for checking out this Egg Bake recipe, and all of our recipes. Sign up for our mailing list so you’ll never miss a new recipe. Also click a button below and share the dishes with your friends. You can also follow Chef Buck on Youtube. We appreciate all the kind comments and support, and we’ll see you next time in the kitchen!

If you like what CG and I do, support us on Patreon, or throw us a tip in our Paypal Tip Jar. We’ll happily enjoy a coffee on the road – Thanks! We appreciate all the support, and we’ll see you next time in the kitchen!

We include affiliate links for products on our website. Making a purchase after clicking on our links and we may earn a commission which helps us produce more videos and drink more coffee :^) We participate in the Amazon Services LLC Associates Program, which is an affiliate advertising program. It provides a means for us to earn fees by linking to Amazon.com and affiliated sites, so we can make more videos.

Share and Enjoy !

Tofu Recipe for Beginners – Breakfast Scramble

tofu recipe

Try a tofu recipe that makes a nice break from a typical breakfast egg scramble. This dish is a great introduction to tofu. I use firm tofu in this dish and lots of fresh greens. In this tofu scramble I’m using the leaves and stems of fresh kale, but we often use fresh spinach too, which will cook up quicker if you’re in a rush.

Ingredients for Tofu Recipe

6-8 oz Firm TOFU
2 cups chopped KALE
or substitute SPINACH
chopped GREEN ONIONS
chopped BELL PEPPER
finely chopped GARLIC
sliced CHERRY TOMATOES
and whatever seasonings
you like, like:
PAPRIKA, CURRY, dried HERBS,
CHILI POWDER, SALT, and PEPPER
OIL for cooking
….optional: SEEDS!…I use seeds in this video cause I had too much oil in my skillet and I wanted to take advantage of it. I added caraway seeds, but cumin or fennel seeds
would have added great flavor, too.

If you’re not used to using tofu in cooking, this tofu recipe is a good place to start. Tofu is a soy product and a meatless protein. It has almost no flavor, so tofu is very versatile. Tofu will take on whatever flavors you add, and it needs lots of flavor, so be generous. Bland tofu is terrible, but a well-seasoned tofu dish can be delicious. Give this version of a tofu scramble a try, or make your own with whatever fresh veggies you have on hand.

tofu recipe
Use firm tofu for this recipe

How to Make a Tofu Breakfast Scramble

  • Even firm tofu isn’t all that firm, so buy firm tofu.
  • Chop tofu into cubes or slices, but not too small.
  • Heat oil in a skillet on medium heat. Check here for current prices for a non-stick skillet on Amazon.
  • Season tofu well and saute about 5-10 minutes, turning as it cooks,until the tofu is browned on most sides.
  • In another skillet, heat oil on medium heat.
  • Add in chopped kale stems and cook 2-3 minutes.
  • Add onions, peppers, and garlic and continue sauteeing another 2-3 minutes.
  • Add seasoning and spices and mix ingredients well.
  • Add in the remaining ingredients–kale leaves, tomato, green onion tops–and continue cooking another 3-5 minutes.
  • Add in browned tofu. Mix well, and serve.

tofu recipe
this tofu recipe makes a perfect breakfast, lunch, or dinner

And that’s it. Experiment and use whatever ingredients you desire and have on hand. A breakfast scramble can be whatever you want, and tofu is a great way to add
protein to a meatless dish. And this tofu breakfast scramble makes a nice lunch and dinner, too!

And for another healthy breakfast dish, check out this Eggs Benedict on Salmon Recipe.

salmon cakes
use leftover salmon cakes to make a terrific variation of Eggs Benedict!

Thanks for checking the video and tofu recipe out. Be sure and sign up for our mailing list so you’ll never miss a Chef Buck cooking video, and click a button below and share the dishes with your friends. We appreciate all the kind comments and support, and we’ll see you next time in the kitchen!
–Chef Buck

Share and Enjoy !


Canned Jackfruit and Potato Hash Recipe

canned jackfruit

Make a tasty breakfast potato hash with canned jackfruit. Young, green jackfruit is a great meat substitute that works well in this classic breakfast recipe of potato and peppers. Canned jackfruit is easy to use, inexpensive, and a extremely versatile ingredient. Unripe jackfruit adds a nice texture when pulled apart, and its neutral flavor makes it ideal for many recipes.

Ingredients for Canned Jackfruit Potato Hash

1 20oz can young, green JACKFRUIT
1 cup chopped POTATO (any kind you like, sweet potato makes a nice change-up)
½ cup chopped ONION
chopped PEPPERS (I like using a combo of jalapeno and bell peppers, but use whatever you prefer)
finely chopped GARLIC (optional, but always a good idea)
1 tsp CUMIN POWDER
1 tsp PAPRIKA
1 tsp TURMERIC
2 Tbsp WORCERSTERSHIRE
some SALT and PEPPER

canned jackfruit
Breakfast hash with young green jackfruit with potato

How to Make Jackfruit Potato Hash

  • Rinse and drain canned jackfruit. You can buy jackfruit online. Check current canned jackfruit prices on Amazon.
  • Shred it. I do this by hand, it’s very easy, but you can use a knife, too.
  • Heat oil in a skillet on medium high heat.
  • Add chopped onion and peppers and saute 3-4 minutes.
  • Add garlic and cook 1 minute.
  • Add seasoning and mix well, continue sauteing for another minute.
  • Add in shredded jackfruit and Worcestershire sauce and mix well.
  • Raise skillet heat and add in potato. Add 1 can of water and mix.
  • Cover skillet and allow ingredients to come to a bubble.
  • Reduce heat to a simmer and continue cooking until potatoes are near done.
  • Remove cover and continue cooking hash until potatoes are done.
  • Serve as a breakfast side or the main dish.
    Top with eggs, if desired.
canned jackfruit
Jackfruit and potato hash topped with fried egg; the yolk makes a nice sauce.

What is Jackfruit?

Jackfruit is exactly what it sounds like, a fruit, but it’s HUGE. A 50 pound jackfruit is not uncommon. This giant tropical fruit grows on
trees and is very popular in Asia. Unripe, jackfruit can be treated like a starch, cooked and used in savory dishes. Ripened jackfruit can be eaten raw and is very
juicy and sweet; quite a combo. Buying and cleaning a fresh jackfruit is quite an endevour. For me, canned jackfruit is a perfect ingredient.

I prefer unripe, young, green jackfruit and find it to be a terrific ingredient to experiment with in a variety of recipes. The texture of unripe jackfruit makes it a fantastic faux meat,
and the mildness of its flavor allows it to be incredibly versatile.

I’ve used it as a meatless pulled pork BBQ, as a faux meat filling in tacos, in an Indian-style variation of Jackfruit Tikka Masala, and as a potato hash for breakfast.
Its super nutritious, readily available at Asian markets, and well worth giving a try.

No canned jackfruit on hand, but still want a tasty potato dish for breakfast? Try this classic Crispy Potato Breakfast Recipe.

home fried potatoes recipe
home fried potatoes

Thanks for watching our recipe videos!

Thanks for checking out the canned jackfruit recipe, and all of our recipes. Be sure and sign up for our mailing list to never miss a new cooking video, and also click a button below and share the dishes with your friends, and follow Chef Buck on Youtube. We appreciate all the kind comments and support, and we’ll see you next time in the kitchen!

If you like what CG and I do, support us on Patreon, or throw a tip in our Paypal Tip Jar We’ll happily enjoy a coffee on the road, or maybe even pay a bill or two!–Thanks! We appreciate all the support, and we’ll see you next time in the kitchen!

We include affiliate links for products on our website, so if you make a purchase after clicking on our links, we may earn a commission which helps us produce more videos and drink more coffee :^) We participate in the Amazon Services LLC Associates Program, which is an affiliate advertising program providing a means for us to earn fees by linking to Amazon.com and affiliated sites, so we can make more videos.

Share and Enjoy !

Biscotti Recipe – Chocolate Biscotti with a Coffee Twist

biscotti recipe

A homemade biscotti recipe is easy to make, and adding a little cocoa powder and ground coffee makes a rich, tasty twist for this Italian twice-baked cookie treat. If you’re not in the mood for
chocolate biscotti just leave out the cocoa powder and coffee and make a simple almond biscotti; it’s a nice cookie either way you bake it. A biscotti is a twice-baked cookie that makes a perfect pairing with a nice cup of coffee or tea.

What You Need for Chocolate Biscotti Recipe

1 cup sliced ALMONDS
2 cups FLOUR
¼ COCOA POWDER
2 Tbsp GROUND COFFEE
1 cup SUGAR
1 tsp BAKING POWDER
1/8 tsp SALT
3 large EGGS
2 tsp VANILLA EXTRACT
1 tsp ALMOND EXTRACT
3 Tbsp RUM or COFFEE LIQUOR
or other BOOZE

biscotti recipe
This twice-baked chocolate biscotti is perfect for dunking.

How to Make Chocolate Biscotti Recipe

  • Preheat oven to 350 degrees Fahrenheit.
  • Toast almond slices; watch them closely, it only takes about 2 minutes to toast.
  • In a bowl, combine flour, sugar, cocoa powder, coffee, baking powder, and salt; mix and set aside.
  • In another bowl, Whisk the eggs, rum, and extracts until blended well.
  • Add the wet ingredients to the dry ingredients, including the toasted almond slices, and mix until combined.
    Dough will be sticky at this point.
  • Scrape the dough out onto a baking sheet lined with parchment paper.
  • Quickly shape into a long flat loaf.
  • Bake about 20-30 minutes at 350 degrees F.
  • Remove from the oven and cool 10-15 minutes.
  • Lower oven heat to 300 degrees F.
  • Slice loaf into 1/2″ wide slices.
  • Lay the slices cut side down on the baking sheet and bake another 10-15 minutes.
  • Turn the slices over and bake 10 minutes more.
  • Cool the biscotti on a rack.
    Cool completely before storing, or they’ll lose crunchiness!

Serve this biscotti recipe with coffee or hot tea for a tasty, dunkable cookie treat.
And that’s it, man.
Give this chocolate biscotti recipe a try and let me know what you think, and bon appétit!

And for another fancy pants baked treat, try this deadly SCONE RECIPE.

maple pecan scones
best scone ever…really

Thanks For Watching Our Biscotti Recipe!

Thanks for checking out our biscotti, and all of our recipes. Be sure and sign up for our mailing list so you’ll never miss a new recipe. Also click a button below and share the dishes with your friends. You can also follow Chef Buck on Youtube. We appreciate all the kind comments and support, and we’ll see you next time in the kitchen!

If you like what CG and I do, you can also support us on Patreon, or throw us a tip in our Paypal Tip Jar. We’ll happily enjoy a coffee on the road – Thanks! We appreciate all the support, and we’ll see you next time in the kitchen!

We include affiliate links for products on our website. So, if you make a purchase after clicking on our links, we may earn a commission which helps us produce more videos and drink more coffee :^) We participate in the Amazon Services LLC Associates Program, which is an affiliate advertising program. It provides a means for us to earn fees by linking to Amazon.com and affiliated sites, so we can make more videos.

Share and Enjoy !

Egg Salad Recipe …spicy like you likey

egg salad recipe

Try a spicy egg salad recipe for a flavorful twist on a traditional boring, bland egg salad. Most egg salads are a snooze fest, but sauteing up a little onion, pepper, and spices will put a little zing in your thing, and added nuts will give your egg salad a sorely needed crunch.

Spicy Egg Salad Recipe Ingredients

8 BOILED EGGS [link to Best Way to Boil Eggs ]
3-5 cloves GARLIC finely chopped
chopped HOT PEPPER as desired (I generally use a whole jalapeno pepper with the ribs and seeds removed)
2 tsp GINGER minced
½ to 1 cup CASHEWS (or if nuts ain’t your thang, sub some chopped celery)
1 small RED ONION chopped
¼ cup MAYONNAISE
½ cup chopped CILANTRO
½ cup chopped PARSLEY
10-12 CHERRY TOMATOES cut into quarters
LEMON zest and juice
1 tsp CHILI POWDER
1 Tbsp PAPRIKA
1 tsp TURMERIC
SALT and PEPPER to taste
OIL for sauteing

egg salad recipe
Perfectly boiled eggs make the best egg salad

How to Make This Egg Salad Recipe

The key to any egg salad are the eggs; you don’t want overdone boiled eggs that are dried out with that tell-tell greenish tint. But no fear! Fool proof boiled eggs are super easy to prepare.
HOW TO MAKE PERFECT HARD BOILED EGGS:

  • In a pot, cover the eggs with cold water.
  • Cover and bring the pot to a boil.
  • Once boiling, remove the pot from the heat and allow the eggs to sit in the hot water for 10 minutes.
  • After 10 minutes, transfer the eggs to an ice water bath.
  • Peel eggs when cooled.
  • In a skillet, heat a little oil on medium high heat.
  • Add in the garlic and hot peppers and cook for 1 minute then
  • add in the onion and ginger and continue cooking until onions begin to soften.
  • Stir in the spices and then the cashews. Substitute peanuts if you prefer, or if you’re not into nuts, add chopped celery; a little crunchiness makes for a more interesting egg salad dish.
  • Saute ingredients for 2-3 more minutes, then set skillet aside to cool.
  • In a bowl, combine the peeled eggs and mayonnaise and mash into a lumpy mixture.
  • Add in the cooled ingredients from the skillet, and mix well.
  • Add lemon juice and zest, and stir in some fresh herbs, like parsley, cilantro, or dill.
  • And finally, stir in some quartered cherry tomatoes; cherry tomatoes are best because the tomato skin will help keep them from falling apart.
    And that’s it!–serve warm or cold, all by itself or as a salad or bread topping or a hearty egg salad sandwich.

egg salad recipe
Top egg salad on a green salad, use as a sandwich filling, or spread on a crostini or cracker

Give this spicy egg salad recipe a try and let me know what you think, and bon appétit!

And for another tasty salad idea, try this Southwestern Quinoa Salad Recipe.

southwestern quinoa salad
a southwestern quinoa salad makes a tasty and healthy dinner choice.

Thanks for checking the egg salad recipe out. If you liked the dish, then click a button or two below and share it with friends…I appreciate it!
–Chef Buck

Share and Enjoy !


Scrambled Eggs with Curry and Spinach

scrambled eggs

A little curry is a simple way to add a nice twist to scrambled eggs, and adding a bit of fresh greens into the mix will elevate the eggs to a slightly healthier plane. Scrambled eggs are always a good idea for a quick, hot breakfast, and this curry egg scramble cooks up quick. We often add spinach to egg dishes; it doesn’t effect the cooking time at all. I’m more of a runny yolk guy myself, and plain-jane scrambled eggs are never a good idea, but curry makes all things wonderful…and if the idea of mayonnaise on eggs sounds awful…well…just give this curry mayo a try.

What You Need for a Quick Scrambled Egg Curry

2-4 EGGS
2 cups fresh SPINACH
2 GREEN ONIONS
1 clove GARLIC
1 tsp DRIED ONION FLAKES
¼ tsp GARLIC POWDER
½ tsp CURRY POWDER
1 tsp BUTTER
SALT and PEPPER to taste
splash of OIL for cooking

2 Tbsp MAYONNAISE
½ tsp CURRY POWDER
(add additional CUMIN or TURMERIC if desired)

scrambled eggs
adding spinach to scrambled egg dishes is a quick way to add color and nutrition

How To Make a Scrambled Eggs Curry

In a bowl, whisk eggs with salt, pepper, onion flakes, garlic powder, and ½ the curry.
In a smaller dish, mix the rest of the curry with the mayonnaise (add additional seasonings as desired).
On a medium burner, heat oil in a skillet. Check here for current prices for a non-stick skillet on Amazon.
When oil is hot, add garlic and chopped green onion bottoms and saute for 1 minute.
Add butter and spread garlic and onion on the pan bottom.
Top with the spinach, spreading the leaves evenly across the pan.
Add in the egg mixture and let cook for about 2 minutes keeping the burner on medium heat.
Turn the eggs (or flip them…it’s more fun to flip) and turn off the heat.
The pan will be hot enough to finish the eggs.
Plate the eggs and top with a dollop of the Curry Mayonnaise.
And that’s it!

scrambled eggs
scrambled egg curry with curry mayo

Give this scrambled egg recipe a try and let me know what you think, and bon appétit!

For another quick breakfast recipe idea, try this easy Fancy Herb Omelet Recipe.

How to make an omelette
omelet recipe

Thanks for checking out the recipes. Be sure and sign up for our mailing list so you’ll never miss a Chef Buck cooking video, and click a button below and share the dishes with your friends. We appreciate all the kind comments and support, and we’ll see you next time in the kitchen!
–Chef Buck

Share and Enjoy !


Huevos Rancheros Recipe From Scratch

huevos rancheros

Huevos rancheros is a tasty way to add zing to your standard egg recipe. If you love beans and salsa for breakfast, then this dish is definitely your jam*. It’s a bit of upfront work, but once you’ve got the basic components prepared, it’s a quick and easy recipe to put together, so huevos rancheros is a smart idea if you’re feeding a crowd of folks for breakfast or brunch.

Ingredients for Huevos Rancheros Beans

2 15 oz cans BLACK BEANS
1 15 oz can REFRIED BEANS
2 cups BROTH or water
2-3 cloves chopped GARLIC
½ cup chopped ONION
½ chopped BELL PEPPER
chopped HOT PEPPER to taste
SALT and PEPPER (to taste)
1-2 Tbsp WORCESTERSHIRE
OIL for sauteing
a little MAPLE SYRUP if you like
…plus whatever spices you like

How to Make the Beans

  • Heat oil in a pot and then add the onions, peppers, and garlic and saute for 2-3 minutes.
  • While sauteing, add salt, pepper, and any other dried spices you like (I often add some chipotle powder).
  • Add 2 cans of black beans (rinsed and drained) and 1 can of refried beans.
  • Mix ingredients well and then stir in two cups of broth (or water).
  • Add in Worcestershire sauce (and a little maple syrup if you like sweet beans).
  • Bring the pot to a boil, and then reduce the heat to a simmer and let the beans cook down (uncovered).
  • Adjust seasonings to taste and cook until the beans reach a nice consistency for huevos rancheros (I like my beans runny, but not watery)
huevos rancheros
The key to the best huevos rancheros is well-seasoned beans

Ingredients for Huevos Ranchero Sauce

1 15 oz can DICED TOMATO
or 3 peeled ROMA TOMATO
1 15 oz can BROTH or water
1-2 cloves chopped GARLIC
½ cup chopped ONION
some GREEN CHILI PEPPERS
and chopped HOT PEPPER to taste
SALT and PEPPER to taste
…plus whatever spices you like

How to Make a Ranchero Sauce Recipe

(disclaimer…the easiest thing to do is just heat some salsa and add water or broth to thin it a bit…but for the ultimate huevos rancheros dish, you’ll want to make your own.)

  • In a pot, heat one 15oz can of diced tomatoes (or 3 skinned and chopped roma tomatoes)
  • Add onion, garlic, peppers and seasonings.
  • As the tomatoes begin to cook down, add in broth or water.
  • Bring pot to a boil and then reduce to a simmer.
  • Simmer for about 10 minutes, then turn off the heat.
  • Smooth out the ranchero sauce with a hand blender–this is optional, but it looks nice
huevos rancheros
Once you’ve got the components ready, huevos rancheros can be
put together quickly

How to Make Tortillas for Huevos Rancheros

(disclaimer…the easiest thing to do is buy a cheap pack of premade tortillas and heat them in a skillet,
but uglier and thicker homemade tortillas actually taste a little better in huevos rancheros)

  • Ugly tortillas are easy to make.
  • Mix an amount of corn flour with slightly less warm water to form a dough.
  • Half a cup of corn flour makes 4 small tortillas.
  • Form dough into a flat, palm sized tortilla shape.
  • Heat the tortillas in an ungreased non-stick skillet on medium high heat for about 90 seconds, turning several times.
  • And that’s it…corn tortillas cook fast.
  • Hold the tortillas in a covered container, or cover the tortillas on a plate until you’re ready to build the huevos rancheros.
Huevos rancheros
Huevos rancheros is an easy way to
impress your family in the morning

How to Make Huevos Rancheros

Once you’ve got the beans, tortillas, and ranchero sauce prepared, the rest of the dish is a breeze.
You’ve just got to cook the eggs and build the huevos rancheros.
Use whatever kind of eggs you like.
Some folks use poached eggs (too much trouble), and some folks like to use scrambled
eggs (crazy), but I prefer over easy eggs.
On a plate, place the tortilla. Top the tortilla with enough beans to cover the tortilla. Top the beans with the egg.
And then top the egg with the ranchero sauce.
I like to garnish the top of my huevos rancheros with chopped green onion tops and cilantro; it adds terrific flavor
and a nice look to the dish.
Serve your huevos rancheros with a side of sour cream and avocado slices (or guacamole).

huevos rancheros
Huevos Rancheros is a flavorful, classic mexican dish…delicious!

And that’s it. It can be a bit of work if you’re making the meal from scratch, but if you’re in a hurry, using a pre-made salsa and tortillas can save a lot of time.
Don’t skimp on the beans, though…well-seasoned beans make for a terrific huevos rancheros dish. And topping the dish with fresh green onion and cilantro will knock your breakfast out of the park!

If you’re new to home cooking, get a bunch of spices, pots and pans, and start experimenting with different recipes. It’s a healthy hobby that will save you money in the long run. Check current prices for Complete Kitchenware Sets on Amazon as well as Complete Starter Spice Kits. Or go to a thrift store! I’ve found some of my favorite kitchen gear at second-hand stores.

And for another fancy-pants breakfast idea, check out this SALMON EGG BENEDICT RECIPE.

salmon cakes
use leftover salmon cakes to make a terrific variation of Eggs Benedict!

Thanks for checking out our beans and eggs recipe, and all of our recipes. Be sure and sign up for our mailing list to never miss a new cooking video, and also click a button below and share the dishes with your friends, and follow Chef Buck on Youtube. We appreciate all the kind comments and support, and we’ll see you next time in the kitchen!

If you like what CG and I do, support us on Patreon, or throw a tip in our Paypal Tip Jar We’ll happily enjoy a coffee on the road, or maybe even pay a bill or two!–Thanks! We appreciate all the support, and we’ll see you next time in the kitchen!

Thanks for watching our recipe videos!

We include affiliate links for products on our website, so if you make a purchase after clicking on our links, we may earn a commission which helps us produce more videos and drink more coffee :^) We participate in the Amazon Services LLC Associates Program, which is an affiliate advertising program providing a means for us to earn fees by linking to Amazon.com and affiliated sites, so we can make more videos.

(*If you like jam, then this isn’t your jam…there’s no jam in huevos rancheros)

Share and Enjoy !

Salmon Cakes Benedict w/ Hollandaise Sauce

salmon cakes

Canned salmon is perfect for making delicious salmon cakes. You can use salmon cakes for a variety of dishes, including salmon burgers. I generally make extra patties when I cook up salmon cakes, and one of my favorite uses for these leftover salmon cakes is in a variation of Eggs Benedict. Check out the recipe video below to see how to make this super tasty breakfast recipe.

Ingredients for Salmon Cakes Eggs Benedict

leftover SALMON CAKES
fresh SPINACH
thick sliced TOMATO
EGGS
HOLLANDAISE SAUCE

How to Make Salmon Cakes Eggs Benedict

This is a terrific way to use leftover salmon cakes (detailed salmon cake recipe below), in fact, it’s best to use leftover salmon cakes for this recipe; no sane person wants to open a can of salmon first thing in the morning.
On a plate, arrange a bed of spinach and top with a thick slice of tomato.
In a skillet, re-heat a leftover salmon cake.
While the salmon cake heats through, whip together a quick blender Hollandaise sauce (recipe below).
In another skillet, fry an over easy egg (or poach an egg, if you prefer).
Top the sliced tomato with the heated salmon cake, and then top the salmon with the fried egg.
Cover the egg with Hollandaise sauce and serve immediately.

salmon cakes
use leftover salmon cakes to make a terrific variation of Eggs Benedict!

How to Make a Quick Hollandaise Sauce

¼ cup melted BUTTER
2 EGG YOLKS
1 Tbsp LEMON JUICE (or substitute vinegar)
½ tsp DIJON MUSTARD (or substitute creamy wasabi or a little hot sauce)

In a bowl, combine two egg yolks, lemon juice, and mustard…also add a sprinkling of black pepper if you like. Melt the butter until it is bubbling, then slowly add the butter into the egg mixture while blending the eggs with a hand blender. Be sure to add the hot butter slowly, so the eggs don’t harden.
Blend for about 5-10 seconds. Use the sauce immediately, or hold in a bath of hot water until ready to use. This recipe makes just enough for two servings; when I want lots of Hollandaise sauce, I’ll double this recipe, with the exception of the egg yolks…instead of 4 yolks, I’ll just use 3 yolks.

Salmon Cakes Ingredients:

14oz canned SALMON (red or pink)
¼ – ½ cup ONION (finely chopped)
HOT PEPPER (finely chopped, to taste)
1 to 2 EGGS (beaten) …I generally use 1 egg for a fancy salmon cake entree and 2 eggs when
making salmon cakes for sandwiches.
SALT and PEPPER to taste
OIL for sauteing (3-4 Tbsp…salmon will soak up the oil)
1 Tbsp CURRY POWDER (optional)

salmon cakes
I make 4 salmon cakes from one can of salmon, and often prepare 8 cakes at a time so that I’ll have leftover salmon cakes for sandwiches and salmon Benedicts.

How to Make Salmon Cakes:

Traditional canned salmon will come with skin and bones still intact . The skin and bones are soft and edible. You can remove the skin and bones if you like; I used to remove them, but now I’m too cheap, and I don’t want to miss out on the extra nutrition, either.

  • Place drained salmon in a bowl.
  • Add ¼ – ½ cup onion depending on how much you like onion. Make sure the onion is finely chopped; smaller pieces will help keep the patties from falling apart. If desired, add some finely chopped hot pepper. If you don’t have fresh pepper, add a little chili powder or hot sauce.
  • Add salt and pepper to taste.
  • Add one or two beaten eggs. I like to use two beaten eggs because it helps to keep the patties together better; I don’t like my burgers to fall apart while I’m eating them.
  • Mix all the ingredients together well.
  • Shape into patties. I usually get 4 patties out of a 14oz can, but make as many as you like–bigger or smaller–depending on how big you want your burger to be. Here’s some current prices for canned salmon if you like to do your fishing on the internet.
  • Heat oil in a skillet. I like medium heat. You want the oil to be hot enough to sizzle when you add the patties, but not so hot that the patties will cook too quickly; you want the patties to get a nice cooked side before turning them, this will keep then from breaking apart.
  • Cook 5-7 minutes and then turn gently when the patties are golden brown.
  • Cook another 3-4 minutes and then remove from skillet and drain salmon patties on a paper towel.

I like to serve salmon patties on a toasted bun with sliced tomato, onion, lettuce and mayo.
It’s a nice break from hamburgers, and just as tasty.
Sometimes I’ll add a Tbsp of curry powder into the mix to make Curried Salmon Burgers, which you should definitely try sometime.

Give this canned salmon recipe a try and let me know what you think, and bon appétit!

And for another canned salmon recipe, check out this Salmon Meatballs Recipe.

canned salmon
Salmon meatballs in a rich curry sauce.

Thanks for checking out our salmon cakes recipe, and all of our recipes. Be sure and sign up for our mailing list to never miss a new cooking video, and also click a button below and share the dishes with your friends, and follow Chef Buck on Youtube. We appreciate all the kind comments and support, and we’ll see you next time in the kitchen!

If you like what CG and I do, support us on Patreon, or throw a tip in our Paypal Tip Jar We’ll happily enjoy a coffee on the road, or maybe even pay a bill or two!–Thanks! We appreciate all the support, and we’ll see you next time in the kitchen!

Thanks for watching our recipe videos!

We include affiliate links for products on our website, so if you make a purchase after clicking on our links, we may earn a commission which helps us produce more videos and drink more coffee :^) We participate in the Amazon Services LLC Associates Program, which is an affiliate advertising program providing a means for us to earn fees by linking to Amazon.com and affiliated sites, so we can make more videos.

Share and Enjoy !

Omelet Recipe with Cream Cheese and Lamb

omelet recipe

For this fancy-pants omelet recipe I’m using lamb, garlic, and cream cheese, which is the perfect hipster omelette combination, but there are no end to the ingredients that can be used to make an omelet. Do you spell it omelet or omelette? However you spell it, it’s the perfect egg dish for breakfast, brunch or a lazy man’s dinner.

Omelet Recipe Ingredients

2 EGGS
GROUND LAMB
GARLIC finely chopped
WHIPPED CREAM CHEESE or grated cheese of choice
OIL or BUTTER for cooking
SALT and PEPPER to taste

omelet recipe
Important!! –let the omelet cook and set on the first side before turning!

How to Make the Best Omelet Recipe

Pre-cook any ingredients that need to be cooked: onions, peppers, meat…anything that takes longer than an egg to cook should be pre-cooked.

In a skillet, heat oil or butter on medium heat. Use enough oil to coat the bottom of the skillet. You can check here for current pricing for a non-stick skillet on Amazon.

Medium is a good heat–not too hot, not too cold–enough to allow the eggs to cook and set without overcooking; an omelet should be soft, not crusty and overcooked–avoid too high a heat and browning the eggs!–that’s my preference of course, but give it a try. Don’t rush an omelet!–hell, it doesn’t take long anyway.

In a small bowl, crack two eggs and whisk well. The more you whisk, the fluffier the omelet.
Pour eggs into the skillet. Give the skillet a shake to spread the egg out.
And then leave it alone. The eggs should cook gently. Sprinkle salt and pepper to taste.

Let the eggs set and cook around the edges until the eggs move easily in the pan–this will take 1-2 minutes depending on how hot your skillet is.

Once the omelet can be moved easily, flip or turn the eggs over gently with a spatula. Immediately turn off the heat, the pan will be hot enough to finish off the omelet.

Add cream cheese or a little shredded cheese to one side along with other omelet fillings. Fold eggs over omelet fillings, making a half moon, and then slide your omelet onto a plate.
And that’s it–a super easy and delicious omelet!

And for another fancy pants breakfast dish, try this Egg and Onion Korean Pajeon Pancake Recipe.

green onion pancake
A Korean style green onion pancake can be made quick and easy –give it a try!

Thanks for checking out the video and recipe. If you found it helpful, click the links below to share it with friends and family …I appreciate it!
–Chef Buck

Share and Enjoy !


Banana Pancakes – Flourless Gluten Free Recipe

banana pancakes

This Banana Pancakes recipe tastes great! These banana pancakes are flourless and gluten free and cook up fluffy and filling for a healthy, easy to make breakfast alternative to traditional pancakes. And pancakes are especially tasty when you add in some nuts, chocolate chips, or fresh berries.

What You Need to Make Banana Pancakes

(makes 6 good-size pancakes or 8-10 sissy cakes)

2 BANANAS
2 EGGS
½ tsp BAKING POWDER
½ tsp CINNAMON POWDER
splash of VANILLA EXTRACT
sprinkle of WALNUTS and/or FRUIT if desired
SALT to taste (optional)

banana pancakes
Banana pancakes are flourless and gluten free and cook up fluffy and filling for a healthy, easy to make breakfast alternative to traditional pancakes.

How to Make Banana Pancakes

  • In a bowl, mash up 2 bananas; the riper the bananas, the more banana-ee your pancakes will be!
  • Add eggs.
  • Add cinnamon, baking powder, salt, and vanilla extract.
  • Mix ingredients well. The batter should be the consistency of a traditional pancake batter–add more mashed banana if needed.
  • Let batter sit for a few minutes.
  • Heat a greased skillet or griddle on medium low heat. In the video I use a Lodge cast iron skillet which works great and is pretty affordable for a cast iron skillet. Check the current price for a cast iron skillet on Amazon.
  • Once skillet is heated, spoon batter to form pancakes; whatever size you like.
  • Cook undisturbed about 3-4 minutes or until the pancake begins to brown.
  • If desired, sprinkle nuts or berries or chocolate chips on the cakes.
  • Flip pancakes with a spatula and cook on the other side until brown. Unlike traditional flour pancakes, you can flip these cakes over and over until they are cooked and colored to your liking.
  • Serve hot off the grill with maple syrup.
banana pancakes
Banana Pancake Recipe

Give these flourless banana pancakes a try and let me know what you think, and bon appétit!

And for another healthy breakfast idea, try a Tofu Scramble Recipe.

tofu recipe
this tofu recipe makes a perfect breakfast, lunch, or dinner

Thanks for checking out this banana pancakes recipe, and all of our recipe videos. Be sure and sign up for our mailing list and never miss a new Chef Buck cooking video, and also click a button below and share the dishes with your friends. We appreciate all the kind comments and support, and we’ll see you next time in the kitchen!

Thanks for watching our recipe videos!

We include affiliate links for products on our website, so if you make a purchase after clicking on our links, we may earn a commission which helps us produce more videos and drink more coffee :^) We participate in the Amazon Services LLC Associates Program, which is an affiliate advertising program providing a means for us to earn fees by linking to Amazon.com and affiliated sites, so we can make more videos.

Share and Enjoy !

Potato Cake Recipe — How To Make Sweet Potato Latkes

potato cake recipe

Check out this simple potato cake recipe. Or do you call them potato pancakes? Or potato latkes? I like to use sweet potatoes because they are less starchy and cook up quicker than white potatoes, plus sweet potatoes just taste great, and they are a good nutrition and energy source.

Ingredients to Make A Sweet Potato Cake Recipe :

1 med SWEET POTATO
ONION (½ as much as potato)
Fresh HOT PEPPER (optional)
2 EGGS
2 Tbsp FLOUR
1 tsp CURRY POWDER
½ tsp CHILI POWDER (optional)
……or whatever seasonings you prefer!
SALT and PEPPER (to taste)
OIL for cooking

potato cake recipe
Are they potato latkes, potato pancakes, or potato cakes? What do you call them?

How to Make Sweet Potato Latkes :

    • Shred sweet potato into strings, and thinly slice onion into stringy lengths.
    • I like to also thinly slice a jalapeno pepper; the pepper adds a nice zing, flavor, and color, but you can skip the pepper if you’re a “fraidy cat”.
    • In a bowl, combine the potato, onion, and pepper with the flour until well coated.
    • Beat two eggs and add into the mix, stirring well.
    • Add seasonings as desired. I like a lot of seasoning, and the potato and onion like it, too, so be liberal with the salt, pepper, and flavors you prefer; it’ll make for tastier cakes.

potato cake recipe
thinly sliced sweet potato, onion, and pepper make for a sturdy, tasty, potato cake.

  • Heat oil in a skillet on medium-high heat and spoon the potato mixture into the skillet and press and shape into patties. The potato cakes should be about the size and thickness of a nice ¼lb burger, but not too thin.
  • Don’t crowd the skillet. I use a ten-inch skillet and get two batches of three patties each, which is a terrible sentence, and almost sounds like math, so sorry for that.
  • Cook patties for 3-4 minutes on each side, turning carefully.
  • Adjust the burner temperature as needed; reduce heat to cook each potato patty for 3-4 minutes without burning.
  • Cook until nicely colored, then remove potato cakes from the skillet and drain on a paper towel.

It’s a great dish for breakfast, lunch, or dinner.
Give this simple potato cakes recipe a try and let me know what you think, and bon appétit.

And for another yummy potato dish, check out this classic Home Fried Potatoes Recipe.

home fried potatoes recipe
home fried potatoes

Thanks for watching. If you like the potato cake recipe, use some of the share links below to share the dish with your friends and family.
I appreciate it!
–Chef Buck

Share and Enjoy !


Egg Bake Recipe … or giant oven omelette!

egg bake recipe

Give this easy Egg Bake Recipe a try. Or is it an oven omelette recipe? Or just a fancy-pants egg casserole? Whatever you want to call it, it’s delicious and nutritious and super easy to prepare.
The leftovers make a terrific breakfast on the go, and it’s a great recipe for using up odds and ends in your refrigerator, so definitely give this brunch / breakfast dish a try.

Egg Bake Recipe Ingredients:

10 EGGS
1 cup MILK
1 cup GREEN ONION chopped
3-5 cloves GARLIC finely chopped
1-2 cups shredded CHEESE …I like gruyere and monterey jack best
1 cup MUSHROOMS sliced
½ cup BELL PEPPERS chopped
½ cup ARTICHOKE HEARTS chopped
½ cup TOMATOES
HOT PEPPERS chopped, to taste
SALT and PEPPER to taste
OIL for cooking
add CILANTRO, PARSLEY,
or any chopped HERBS
you like!

Egg Bake Recipe Directions:

My favorite part of this dish is the leftovers. It’s great cold for a tasty and nutritious breakfast on the go, so make a batch at the beginning of your week, and you’ll have a quick snack whenever you like.

Step 1:
Saute your veggies. Use the suggestions in my recipe, or better yet, use whatever you have on hand. I NEVER make this dish with the same ingredients, because it’s the perfect opportunity to clean out the refrigerator. Add salt and pepper as desired.

egg bake recipe
use lots of fresh veggies –and ham or cooked sausage if you’re feeling carnivorous.

Step 2:
In a bowl, whisk together the eggs and milk. Add some fresh herbs if you like. Chives and basil are awesome in this mix.

Step 3:
Lightly grease an oven safe baking dish, about 8 X 10. Check here for current prices on a Pyrex Baking Dish on Amazon.

Step 4:
Line the bottom of the dish with freshly shredded cheese. I like gruyere and monterey jack the best, but use your favorite cheese.

egg bake recipe
layer a lightly greased baking dish with cheese

Step 5:
Evenly spread the sauteed veggies over the cheesy bottom. If you have extra cheese, sprinkle on top.

egg bake recipe
spread sauteed veggies evenly over cheesy bottom.

Step 6:
Pour the egg/milk mix gently over the veggies. The egg will soak to the bottom and cover the top.

egg bake recipe
Completely cover dish with egg mix.

Step 7:
Bake in an oven preheated to 350 degrees Fahrenheit for 40-50 minutes. Add a sprinkling of cheese to the top during the last 10 minutes, if desired.
Remove from the oven and allow the egg bake to rest 10 minutes before slicing.

egg bake recipe
Serve hot or cold, and make a bunch, because the leftovers are twice as good!

This dish makes a terrific breakfast for a family gathering, it’s awesome over salad greens, and the leftovers are perfect for a quick snack or breakfast on the go.

Give this easy egg bake recipe a try and let me know what you think…and bon appétit!

And for another tasty breakfast recipe, check out this Complete Huevos Rancheros from Scratch Recipe.

huevos rancheros
Huevos Rancheros is a flavorful, classic mexican dish…delicious!

Thanks for checking out the recipes. Be sure and sign up for our mailing list so you’ll never miss a Chef Buck cooking video, and click a button below and share the dishes with your friends. We appreciate all the kind comments and support, and we’ll see you next time in the kitchen!
–Chef Buck

Share and Enjoy !


French Toast with Cream Cheese Filling

french toast

Why have Plain French Toast when you can have French Toast with a cream cheese filling? A little creamy cheese and cinnamon ginger apples can transform your breakfast into a 10-year old’s dream breakfast.

French Toast Ingredients:

BREAD (sliced, stale)
1½ cups MILK
4 EGGS
BUTTER for frying, and apples
APPLES (peeled, sliced)
CANDIED GINGER (sliced)
WALNUTS (toasted)
8 oz CREAM CHEESE (soft)
15 oz RICOTTA CHEESE
CINNAMON (to taste)
optional: sugar and vanilla

french toast
Stale bread makes the best french toast! –slice ahead of time!

French Toast Directions:

Stale bread makes great French toast, so slicing bread ahead of time is a great idea; at least a few hours ahead of time, but ideally overnight. Stale bread will soak up the French toast batter without becoming overly soggy and falling apart, especially if you’re using thinner slices of bread, and the thinner or thicker the slices will depend on your particular tastes. This French toast recipe doesn’t need thicker slices, since you’re basically building a French toast sandwich; I’m using thicker slices of challa bread for this video, but I often use regular slices of Hawaiian sweet bread, which works great.

Mix the cream cheese and ricotta cheese together. Be sure to set your cream cheese out ahead of time to soften, this will make mixing it with the ricotta cheese much easier. I’ll often mix these ingredients ahead of time. If making a smaller amount, the cheese mix is about a 2 to 1 ratio of ricotta to cream cheese. I sometimes add a tsp. or two of sugar to the cheese mix, but this is optional; I prefer it without the added sugar, since the apple mix will be quite sweet.

Any leftover cream/ricotta mix can be used as dessert topping, and makes a tasty filling for omelets. I generally make too much apple mix, but that’s a good thing, too. I’m generous with the apple topping, and any leftover apple mix is a perfect topping for oatmeal or ice cream.

french toast
Creamy cheese filled French Toast

To make the apple mix, peel, slice, and remove the cores of the apples. Apples vary quite a bit in size, but I usually end up with about 4-6 cups of apple slices, and I generally use gala or Fuji apples, which take little time to cook down.

Melt about 2 Tbsp of butter in a pot and add apples. Mix with butter and cook over medium heat. Add candied ginger slices; I think ½ to 1 cup is a good amount of candied ginger, but there is no wrong amount, follow your gut. Add 1-2 Tbsp of sugar and cinnamon to taste, Mix and cover and cook about 20 minutes, until apples soften and get juicy. For extra liquidy goodness, stir in about ¼ cup water. You want the apples to be a little syrupy, that way you won’t have to use any maple syrup with the French toast. Once the apples are cooked to your liking, cover and set aside.

Mix the French toast batter. A basic batter is eggs and milk, and I’m also adding cinnamon, but often folks will add a little sugar or vanilla extract. I don’t add vanilla or sugar to the batter with this particular dish, because the creamy cheese center and apple-ginger topping will add more than enough flavor. In a bowl, combine the milk, eggs, and cinnamon to taste (½ tsp is a good amount). Whisk together well and then pour some into a shallow bowl–or all–it depend on the size of your shallow bowl; you don’t want the batter to be so deep that it runs into the cheesy part of your French toast sandwich.

To build the French toast sandwich, simply spread the cheese mixture onto a slice of bread and top with another slice, making a basic cheese sandwich.

You can also add toasted walnuts into the sandwich for a nice crunch, or simply top the toast later with toasted nuts, but definitely add nuts at some point, cause the crunchy contrast makes the dish perfect, and toasted walnuts are awesome.
To toast the walnuts: spread walnuts on a baking sheet and roast at 350 degrees Fahrenheit for 5-7 minutes. It won’t take long. As soon as the nuts begin to color up, remove them from the oven; they will burn if ignored, so set a timer and watch them closely. Taking the time to toast the walnuts is well worth the effort…it’s a great taste.

Once you’ve constructed the cheesy French toast sandwich, heat a little butter in a non-stick skillet on medium heat. Check current prices for a Non-Stick Skillet on Amazon.
Place the sandwich in the batter and let soak a moment and then turn and batter the other side.
Place sandwich in the skillet and cook on medium heat until golden brown, turn and cook other side and remove from the heat.
Slice French toast and then top with apples and walnuts (a dusting of powdered sugar is optional). For a splash of color, add fresh berries or mint.

Serve this cheese stuffed French toast with maple syrup, or without–I find the cooked apples to be syrupy enough, and the warm cheesy center keeps the French toast from being too dry.

It’s a super delicious dish and a great treat for company.

Give this fancy pants Cream Cheese French Toast recipe a try and let me know what you think, and bon appétit!

And for another fancy pants breakfast dish, try this Pancake Recipe.

Fancy pancakes are easy to make.
Fancy pancakes are easy to make, and better looking, too.

Thanks for Watching our French Toast Recipe Video!

Click a button below and share the dishes with your friends. You can also follow Chef Buck on Youtube. We appreciate all the kind comments and support, and we’ll see you next time in the kitchen!

If you like what CG and I do, support us on Patreon, or throw us a tip in our Paypal Tip Jar. We’ll happily enjoy a coffee on the road – Thanks! We appreciate all the support, and we’ll see you next time in the kitchen!

We include affiliate links for products on our website. Making a purchase after clicking on our links and we may earn a commission which helps us produce more videos and drink more coffee :^) We participate in the Amazon Services LLC Associates Program, which is an affiliate advertising program. It provides a means for us to earn fees by linking to Amazon.com and affiliated sites, so we can make more videos.

Share and Enjoy !

Biscuit Recipe – Best Southern Biscuits

It’s easy to make friends with this easy, awesome tasting biscuit recipe. You biscuits in all manner of meals. Serve them alone as a breakfast side, pile them up into the perfect breakfast sandwich, ladle them with gravy for a wholesome entree, or top them with whipped cream and strawberries for a decadent dessert!

Buttermilk Biscuit Recipe Ingredients

4 cups ALL PURPOSE FLOUR
1 Tbsp BAKING POWDER
1 tsp BAKING SODA
1 tsp SALT
1 Tbsp SUGAR
1 cup BUTTER (diced, chilled)
1½ cups BUTTERMILK (chilled)
(plus buttermilk for brushing biscuit tops)

Buttermilk Biscuit Recipe Directions

In a bowl, combine flour, baking powder, baking soda, salt, and sugar (optional). Mix ingredients together well. Add diced butter. For best results use chilled butter –keep the diced butter in the refrigerator until needed. Cut butter into the flour using a pastry cutter or knives. Check here for current prices for a pastry cutter on Amazon.

Butter should be cut into pea-sized bits, but there’s no reason to be militant about it…nice chunks of butter are nice. Once the butter is cut into the flour, add buttermilk. Keep the buttermilk chilled until you are ready to use it–cold butter and buttermilk are best for this recipe.

Pour the buttermilk into the bowl, and using a spatula (or your hand), roll the flour around the edge of the bowl until the buttermilk is absorbed and the dry flour begins sticking together. Roll until there is very little loose flour…add a drop more buttermilk if needed, but do so sparingly–you don’t want the flour to be “wet”.

On a lightly floured surface, empty the bowl and press the flour together, knead once or twice and then spread the dough out into a flat, ½ inch thickness. Do not knead or “handle” the dough too much.

Flour the edges of a biscuit cutter or drinking glass and cut out biscuits. I like my buttermilk biscuit about 2″-3″ across, but make whatever size you like. Giant biscuits can be fun :^) Cut the biscuits closely and get as many out of the first press as you can. Once all of the biscuits are cut from the first press, bring the dough together again and cut out remaining biscuits–again trying to handle the dough as little as possible.

Arrange the biscuits touching side by side on a lightly greased pan or on parchment paper. Lightly brush the tops of the biscuits with buttermilk or melted butter–this will help them to brown nicely. Place biscuits in the oven and bake at 425 degrees Fahrenheit for approximately 15 minutes, or until biscuits are golden brown to your liking.

Give these biscuit recipes a try and let me know what you think, and for another breakfast bread dish, try this Egg Bread Recipe.

egg bread
Fancy baked eggs to impress friends and family

Thanks for checking out our biscuit recipe, and all of our recipes. Be sure and sign up for our mailing list and never miss a new Chef Buck cooking video, and also click a button below and share the dishes with your friends. We appreciate all the kind comments and support, and we’ll see you next time in the kitchen!
–Chef Buck

Thanks for watching our recipe videos!

We include affiliate links for products on our website, so if you make a purchase after clicking on our links, we may earn a commission which helps us produce more videos and drink more coffee :^) We participate in the Amazon Services LLC Associates Program, which is an affiliate advertising program providing a means for us to earn fees by linking to Amazon.com and affiliated sites, so we can make more videos.

Share and Enjoy !

Buttermilk Biscuit Recipe with Country Gravy

Easy Homemade Buttermilk Biscuits Recipe

Buttermilk biscuit and gravy are pretty easy to make at home, and biscuits are great for any meal–not just for breakfast. I’m using mushrooms for this gravy recipe, but sausage can easily be substituted if you’re in a meaty mood.

What you need to make Biscuits

4 cups ALL PURPOSE FLOUR
1 Tbsp BAKING POWDER
1 tsp BAKING SODA
1 tsp SALT
1 Tbsp SUGAR
1 cup BUTTER (diced, chilled)
1½ cups BUTTERMILK (chilled)
(plus buttermilk for brushing biscuit tops)

Buttermilk Biscuit Recipe
Easy Buttermilk Biscuit Recipe

How to make a Buttermilk Biscuit

In a bowl, combine flour, baking powder, baking soda, salt, and sugar (optional). Mix ingredients together well.

Add diced butter. For best results use chilled butter –keep the diced butter in the refrigerator until needed. Cut butter into the flour using a pastry cutter or knives. Butter should be cut into pea-sized bits, but there’s no reason to be militant about it…nice chunks of butter are nice.

Once the butter is cut into the flour, add buttermilk. Keep the buttermilk chilled until you are ready to use it–cold butter and buttermilk are best for this recipe.

Pour the buttermilk into the bowl, and use a spatula (or your hand), roll the flour around the edge of the bowl until the buttermilk is absorbed and the dry flour begins sticking together. Roll until there is very little loose flour…add a drop more buttermilk if needed, but do so sparingly–you don’t want the flour to be “wet”.

On a lightly floured surface, empty the bowl and press the flour together, knead once or twice and then spread the dough out into a flat, ½ inch thickness.

Do not knead or “handle” the dough too much!

Flour the edges of a biscuit cutter or drinking glass and cut out biscuits. I like my buttermilk biscuit about 2″-3″ across, but make whatever size you like. Giant biscuits can be fun :^) Cut the biscuits closely and get as many out of the first press as you can.

Once all of the biscuits are cut from the first press, bring the dough together again and cut out remaining biscuits–again trying to handle the dough as little as possible.

Arrange the biscuits touching side by side on a lightly greased pan or on parchment paper. Check Parchment Paper prices on Amazon

Lightly brush the tops of the biscuits with buttermilk or melted butter–this helps them to brown nicely. Place biscuits in the oven and bake at 425 degrees Fahrenheit for approximately 15 minutes, or until biscuits are golden brown to your liking.

Easy Homemade Buttermilk Biscuits Recipe
Homemade Buttermilk Biscuits

Mushroom Gravy Recipe Ingredients

oil/butter for sauteeing onion/mushrooms
½ cup chopped ONION
8 oz sliced MUSHROOMS
½ cup BUTTER
½ cup ALL-PURPOSE FLOUR
2 cups MILK
about 2-3 tsp SALT (or to taste)
1 tsp BLACK PEPPER (or to taste)
½ tsp ground SAGE
2 tsp WORCESTERSHIRE SAUCE
1 tsp HOT SAUCE
1 tsp dried THYME
….experiment with whatever seasonings you like

Mushroom Gravy Recipe Directions

Heat 1-2 Tbsp oil in a skillet on medium high heat. Add onions and saute for 2 minutes. Add mushrooms and continue sauteeing until browned. Stir in a little salt and pepper. Remove onions and mushrooms from skillet and set aside for later.

Return skillet to the heat and add ½ cup butter and melt. Once melted, add in a little of the ½ cup flour. Stir until smooth, and then continue to slowly add and stir the flour into the butter until the entire ½ cup of butter and ½ cup of flour have been incorporated –this is a roux, a traditional thickener for sauces.

Continue stirring the roux and slowly add milk over several minutes until the the gravy is smooth and creamy. I use almond milk in this recipe, but most any kind of milk will work. Return the mushrooms and onion to the mix and continue stirring with the burner still on med to med-high heat.

Biscuits with Gravy
Biscuits with Mushroom Gravy

Add sage, thyme, worcestershire sauce, salt, pepper, and hot sauce –or anything else you’d like to try. Add more milk as needed to achieve the desired consistency. And that’s it.

If the gravy sits around for a bit, just heat and stir in more milk–you can do this the next day, too, if you have gravy leftover.

This gravy is great over a buttermilk biscuit, but it can also be used for many entrees.

This gravy is great on country fried steak or meatloaf. If you’d rather have sausage gravy than mushroom gravy, then make it exactly the same way, but substitute sausage for mushrooms, and be sure to thoroughly drain the grease from the cooked sausage before adding it back into the skillet.

Give this Buttermilk Biscuit and Gravy recipe a try and let me know what you think, and bon appétit!

And for another awesome breakfast dish, try this fancy-pants Omelet Recipe.

omelet recipe
Lamb and Cream Cheese Omelet

Thanks for Watching our Biscuit Recipe Video!

Click a button below and share the dishes with your friends. You can also follow Chef Buck on Youtube. We appreciate all the kind comments and support, and we’ll see you next time in the kitchen!

If you like what CG and I do, support us on Patreon, or throw us a tip in our Paypal Tip Jar. We’ll happily enjoy a coffee on the road – Thanks! We appreciate all the support, and we’ll see you next time in the kitchen!

We include affiliate links for products on our website. Making a purchase after clicking on our links and we may earn a commission which helps us produce more videos and drink more coffee :^) We participate in the Amazon Services LLC Associates Program, which is an affiliate advertising program. It provides a means for us to earn fees by linking to Amazon.com and affiliated sites, so we can make more videos.

Share and Enjoy !

How to make a Fancy Herb Omelet

How to make an omelette

This is how to make an omelette recipe the easy way…it’s simple and cheap, and throwing in a few chopped herbs makes it super delicious –a fancy-pants omelette! Do you spell it omelet or omelette ? it’s a perfect egg dish for breakfast, brunch or a lazy man’s dinner. I like to use tarragon, parsley, and chives, but sage and basil are great choices, too.

Omelette Recipe Ingredients:

2 EGGS
1 Tbsp PARSLEY (chopped)
1 tsp CHIVES (chopped)
½ tsp TARRAGON (chopped)
¼ cup HAVARTI CHEESE (shredded)
BUTTER enough to cover the bottom of the pan
SALT and PEPPER to taste
—the cheese and herb measurements are
just suggestions…follow your heart.

Omelette Recipe Directions:

In a skillet, heat butter on medium heat. Check here for current pricing for a non-stick skillet on Amazon. Use enough butter to coat the bottom of the skillet. Medium is a good heat–not too hot, not too cold–enough to allow the eggs to cook and set without overcooking; an omelet should be soft, not crusty and overcooked–avoid too high a heat and browning the eggs!–that’s my preference of course, but give it a try. Don’t rush an omelet!–hell, it doesn’t take long anyway.

In a small bowl, crack two eggs. Add chopped herbs. I like to use tarragon, parsley, and chives, but sage and basil are great choices, too. Mix and match herbs and amounts and find your favorite combo. Adding fresh herbs to an omelet is great way to add flavor without adding complication to the omelet making process, which is especially nice if you’re making multiple omelets for hungry folks looking for breakfast.

How to make an omelette
omelet recipe

Whisk the herbs and eggs together and pour into the skillet. Give the skillet a shake to spread the egg out.
And then leave it alone.
The eggs should cook gently.
Sprinkle salt and pepper to taste.
Let the eggs set and cook around the edges until the eggs move easily in the pan–this will take 1-2 minutes depending on how hot your skillet is.

Once the omelet can be moved easily, flip or turn the eggs over gently with a spatula. Immediately turn off the heat, the pan will be hot enough to finish off the omelet.

Add a little shredded cheese to one side and fold the eggs in half over the cheese, making a half moon. I prefer havarti cheese, but any creamy, easily meltable cheese will be ideal.
And that’s it–a super easy and delicious omelet!

Give this omelette recipe a try and let me know what you think, and bon appétit!

And for another eye-popping breakfast dish, try this Fancy-Pants Baked Eggs Recipe.

baked eggs
Baked eggs are an easy way to impress folks for breakfast.

Thanks for checking out the recipes. Be sure and sign up for our mailing list so you’ll never miss a Chef Buck cooking video, and click a button below and share the dishes with your friends. We
appreciate all the kind comments and support, and we’ll see you next time in the kitchen!
–Chef Buck

Share and Enjoy !


Pancake Recipe for Fancy-Pants Pancakes

pancakes!

Pancakes are easily made from scratch and can be transformed into a fancy pancake recipe by adding a few favorite fillings. Some of my favorite combos are cranberry / walnut, chocolate chip / pecan, and banana / walnut. Nuts are always a great addition – they make a great bite!

Pancake Recipe Ingredients

(makes 5 good-size cakes or 8-10 sissy cakes):
1 EGG
3 Tbsp BUTTER
1¼ cup MILK
1½ cups ALL PURPOSE FLOUR
3½ tsp BAKING POWDER
1 Tbsp SUGAR
1 tsp SALT
CRANBERRIES
CHOCOLATE CHIPS
WALNUTS
PECANS

pancake recipe
Fancy Pancakes are yummier than regular pancakes, and better looking, too.

How to Make Pancakes

In a bowl, combine melted butter, milk, and egg. Stir until well blended. In another bowl, combine and mix flour, baking powder, sugar, and salt. Add the dry ingredients to the wet, or the wet ingredients to the dry (who cares? it’s no big deal either way), and stir until smoothish…if there are a few lumps, it doesn’t matter.

Heat a lightly oiled skillet or griddle on medium to medium high heat. Pour or ladle batter onto the skillet. Try not to make the first pancake too big, since often the first cake is the least pretty–although it wil still taste pretty good. Add pancake toppings into the batter–as much or as little as you like–a lot of folks use blueberries, but I prefer cranberries, chocolate chips, or bananas with nuts. Nuts are a great addition to a pancake–makes for a much better bite.

It will only take a minute or two for the pancake to be ready to flip. Once air begins bubbling and opening tiny holes into the top of your cake, flip. It will only take half as much time for the other side to cook. Just peek under the cake and remove it when you’re happy. Serve with syrup and butter…and bacon is always a good idea, too.

Give this fancy-pants pancake recipe a try and let me know what you think, and bon appétit!

And if you enjoy this fancy pancake recipe, then try this fancy-pants Salmon and Poached Eggs Recipe.
poached egg salmon spinach
Thanks for checking out the video and recipe. If you liked it, why not share it? All the cool kids are!
Thanks.
–Chef Buck

Share and Enjoy !


Home Fried Potatoes Crispy Breakfast Recipe

home fried potatoes recipe

This crispy home fried potatoes recipe makes a tasty breakfast side. I use onion and hot pepper in this video/recipe, but a little added green bell pepper is nice, too.

Home Fried Potatoes Recipe Ingredients

1 large POTATO
2-3 Tbsp BACON FAT
1/3 cup ONION (finely chopped)
¼ cup GREEN BELL PEPPER (finely chopped, optional)
HOT PEPPER (to taste, finely chopped)
1 tsp SMOKED PAPRIKA
SALT and PEPPER to taste

How to Make Home Fried Potatoes

  • In a skillet, fry up 4-5 pieces of fatty bacon, this will give you enough grease to cook up your potatoes.
  • Peel your potato, which is something I hate to say, ’cause potato skin is so delicious, but the breakfast home fries I grew up with were peeled, so that’s how I gotta roll.
  • Dice your potato into dinky cubes; they don’t have to be exactly the same same, but mostly they do, so cut them as uniformly as possible.
  • Add your diced potato to the skillet of hot grease–and by hot, I mean that your potatoes start to sizzle and cook when they hit the pan–but not overly hot, ’cause it will take 20-25 minutes to cook these potatoes up just right. Medium-low heat is a good temp, keep the potatoes sizzling, they need to crisp on the outside, but they also need to cook through on the inside, otherwise you’ll end up with a bunch of crispy, raw potato; so go slow, amigo.
  • Mix your potatoes with the grease and spread them out in the skillet and let them brown for about 5 minutes.
  • Add finely chopped onion and hot peppers; if desired, also add a little finely chopped green bell pepper for taste and color…I usually do, but if I don’t have it on hand, it’s not the end of the world–it’s just breakfast, man.
  • Mix the ingredients well and spread out in the skillet and let cook another 5 minutes.  If you don’t have a good pan, here are some current prices for cast iron skillets on Amazon.
  • Add paprika, stir and continue to cook for another 10 minutes, stirring occasionally, until the potatoes are cooked through and done to the desired crispness.
    The key is to not cook the potatoes too fast.

Give this home fried potatoes recipe a try and let me know what you think, and bon appétit!

And for a fancy pants breakfast dish, try this Baked Eggs Recipe.

baked eggs
Baked eggs are an easy way to impress folks for breakfast.

Thanks for checking out the home fried potatoes recipe, and all of our recipes. Be sure and sign up for our mailing list to never miss a new cooking video, and also click a button below and share the dishes with your friends, and follow Chef Buck on Youtube. We appreciate all the kind comments and support, and we’ll see you next time in the kitchen!

If you like what CG and I do, support us on Patreon, or throw a tip in our Paypal Tip Jar We’ll happily enjoy a coffee on the road, or maybe even pay a bill or two!–Thanks! We appreciate all the support, and we’ll see you next time in the kitchen!

Thanks for watching our recipe videos!

We include affiliate links for products on our website, so if you make a purchase after clicking on our links, we may earn a commission which helps us produce more videos and drink more coffee :^) We participate in the Amazon Services LLC Associates Program, which is an affiliate advertising program providing a means for us to earn fees by linking to Amazon.com and affiliated sites, so we can make more videos.

Share and Enjoy !

Baked Eggs Recipe with Spinach and Tomato

baked eggs

This baked eggs recipe is a delicious treat for breakfast or brunch, and it’s easy to prepare even though it looks super fancy. I’m throwing spinach, tomato, and Roman cheese in this baked eggs recipe, but it’s a versatile dish, and anything that’ll work in an omelet will work in this preparation. For a spicier version, add a dash or two of hot sauce as the tomatoes cook.

What you need for a Baked Eggs Recipe

(this recipe serves 2)
4 EGGS
OIL for sauteing
2 cup fresh SPINACH
2-4 GREEN ONIONS (chopped)
2 small ROMA TOMATOES (chopped)
3-4 GARLIC cloves (finely chopped)
1-2 tsp dried ITALIAN SEASONING
chopped JALAPENO (optional)
freshly grated PARMESAN or ROMANO CHEESE
4 Tbsp HALF N HALF
SALT and PEPPER to taste
½ cup chopped PARSLEY (optional)
sprinkle of PAPRIKA and fresh herb for GARNISH (optional)

baked eggs
Baked eggs are an easy way to impress folks for breakfast.

How to Make Oven Baked Eggs

  • Heat oil on medium high heat in a small saute pan.
  • Add garlic and chopped bottoms of the green onion. Saute for 1 minute and then add the tomato.
  • Continue to saute for 2 minutes and then add salt, pepper, and Italian seasoning. Mix and cook for 1 minute.
  • Add green onion tops and spinach, and any fresh herbs you desire.
  • Saute until spinach is wilted.
  • Lightly grease an oven-safe dish. If you like the dishes I used in the video, you can check out current prices for au gratin baking dishes on Amazon.
  • Add a layer of cheese to bottom of the if you like, but this is optional.
  • Spoon and spread the spinach and tomato mixture into the bottom of the dish.
  • Drizzle Half n Half or cream over top and then sprinkle shredded Parmesan or Romano cheese.
  • Carefully crack eggs and top the dish with them.
  • Place in an oven preheated to 375 degrees Fahrenheit. If the baking dish/ramekins are small, place on a baking sheet for easy handling
  • Bake 15-20 minutes, or until the eggs are set and cooked as desired.
  • When eggs are finished baking, top with additional cheese if desired. Sprinkle with paprika or garnish with fresh parsley, or basil, or cilantro, or whatever, but a touch of freshly chopped green will make this dish quite lovely.

Serve right away, because eggs are best hot, dude.
Give this baked eggs recipe a try and let me know what you think, and bon appétit!

For another fancy pants breakfast dish, try this tasty Huevos Rancheros Recipe.

huevos rancheros
Huevos Rancheros is a flavorful, classic mexican dish…delicious!

Thanks for checking out his baked eggs recipe. If you liked it, then click a button or two below and share it with friends and family. I appreciate it!
–Chef Buck

Share and Enjoy !


Pesto Bread Recipe with Parmesan Cheese

parmesan pesto bread

Bake a delicious homemade Pesto Bread Recipe following this step-by-step instruction with Mama Redbuck. Mama bakes the best homemade bread from scratch and this is a fancy braided bread recipe that will wow your family.

What you need to make Pesto Parmesan Bread

5 ½ cups unbleached BREAD FLOUR
2 cups WARM WATER (approx. 130 degrees F)
2-4Tbsp OLIVE OIL
2 Tbsp SUGAR
½ cup SKIM MILK POWDER
1 Tbsp KOSHER SALT
1 Tbsp INSTANT YEAST
PESTO (approx. 1 cup divided between loaves)
1 cup PARMESAN CHEESE (shredded and divided)
a sprinkle of CORN MEAL ……………..recipe makes 2 loaves

How to this Pesto Bread Recipe

Sift 5 ½ cups of unbleached bread flour. Bread flour has a higher gluten count than all-purpose flour; gluten holds in the gases released by the yeast, enabling the bread to rise.

In a bowl, add 2 cups of warm water (approx 130 degrees F). Add 2 Tbsp olive oil, sugar, milk powder, salt, and yeast. Mix well.

1 cup at a time, add the sifted flour into the bowl until the dough thickens. Do not add all of the dough into the bowl. As soon as the dough in the bowl reaches a density forming a sticky ball, remove dough from the bowl and place onto a surface coated with flour. Continue adding the sifted flour to the ball, turning and folding the flour into the dough ball.

Continue this kneading process for 8-10 minutes, adding dough as needed (the entire 5 ½ cups may not be needed). Kneading transforms the dough into a more elastic consistency, enabling the gluten in the dough to better trap the gases from the yeast.

After kneading, place the dough into a bowl coated with 1 Tbsp of olive oil. The bowl should be at least twice the size of the dough ball. Cover bowl and set aside for 45-60 minutes to allow the dough to rise. The dough will expand to approx. double in size.

pesto Bread recipe

When dough has risen, push a floured fist into the top of the dough—this will release the gas. Remove dough from bowl and divide into equal halves. Mama Redbuck uses a kitchen scale to weigh her dough and divide equally; size is important because you want equal-sized loaves that will bake evenly. If you don’t have a scale, just estimate the size, but make sure the loaves are fairly close in size.

With a rolling pin, spread one of the dough halves into a square approx. 9 X 14 inches. Spread ½ cup of prepared pesto evenly over the flattened dough. Sprinkle top with ½ cup shredded, parmesan cheese.

Roll up the dough and toppings into a 14 inch “burrito” shape, folding and pinching the ends shut. With a sharp knife, cut lengthwise down the center of the rolled bread, creating halves. Cut gingerly, being mindful not crush the layers of dough, and leave one of the very ends attached so as to not separate the halves completely. Fold the bread halves into a braid. Keep the cut sides of dough facing upward.

Coat a loaf pan with olive oil and sprinkle the bottom of the pan with a light dusting of corn meal; this will help keep the bread from sticking to the bottom of the pan as it bakes. Transfer braided bread “face-up” into pan and cover. Repeat this processes with the other dough half and then set the 2 loaf pans aside for 1 hour to allow them to continue to rise.

After the loaves have risen, place them in an oven pre-heated to 375 degrees F and bake approx. 35-40 minutes.

Remove bread from oven. Parmesan cheese and pesto may be melted to the inside of the pan and you may need to cut around the edges of the pan with a knife. Remove loaves and place on a cooling rack, but don’t let the bread cool for too long before cutting off a slice—it’s delicious warm.

Getting into baking? My mom uses a Danish Whisk in this recipe, and you can check here for current prices for a Danish Whisk on Amazon.

Give this Parmesan Pesto Bread Recipe a try and let me know what you think, and for another tasty bread dish, watch Mama Redbuck cook up a beautiful Rosemary Bread Recipe.

rosemary bread

Thanks for checking out our non-alcoholic Bananas Foster Recipe, and all of our recipes. Be sure and sign up for our mailing list and never miss a new Chef Buck cooking video, and also click a button below and share the dishes with your friends. We appreciate all the kind comments and support, and we’ll see you next time in the kitchen!

Thanks for watching our recipe videos!

Should you even eat bread? Of course! But what does the New Yorker say about gluten?

We include affiliate links for products on our website, so if you make a purchase after clicking on our links, we may earn a commission which helps us produce more videos and drink more coffee :^)

We participate in the Amazon Services LLC Associates Program, which is an affiliate advertising program providing a means for us to earn fees by linking to Amazon.com and affiliated sites, so we can make more videos.

Share and Enjoy !

Scone Recipe — Pecan Maple Biscuit Treat

scone recipe

This is a delicious pecan maple scone recipe, but not a good idea for folks with sugar/carb addictions and questionable degrees of willpower…which is pretty much everyone.

The only reason I’m even putting this up is because The Devil assured me that if I did I would one day win an Oscar and live in a luxury beach house in Malibu (which IS going to happen ’cause I was smart enough to get the deal in writing).

Scone Recipe Ingredients

Scones:
2 cups FLOUR
1/2 cup SUGAR
1 Tbsp BAKING POWDER
1/2 tsp SALT
5 Tbsp BUTTER
1/2 cup PECANS (chopped)
1/4 cup RAISINS
1 cup SOUR CREAM
1/4 cup MAPLE SYRUP
1 tsp VANILLA

Icing for Scone Recipe

1 cup POWDERED SUGAR
splash of WATER
2 Tbsp MAPLE SYRUP

scone recipe
best scone ever…really

In a large bowl, combine flour, sugar, baking powder, and salt. Cut butter into flour mixture (freezing the butter and grating it into the mix is an easy trick to get this done). Add pecans and raisins into the mix.

In a separate bowl, combine sour cream, vanilla, and 1/4 cup maple syrup. Whisk together until smooth.
Pour the sour cream mixture into the flour mix and gently turn for a few minutes until the flour begins to form into clumps. Most of the loose flour will adhere into these clumps, but it’s okay if all of it doesn’t.

On a sheet of parchment paper or floured surface, pour the contents of the bowl. Press the clumps together into a mound–it’ll want to brake apart somewhat, but that’s okay. Flatten the mix into a circular cookie shape about 1 inch thick and cut like a pizza into 8 slices. Check here for current pricing for parchment paper on Amazon.

Arrange onto a flat baking sheet and bake in a 400 degree F oven for 20-25 minutes, until baked through and golden brown.

While scones cool, add powdered sugar into a small bowl. Add 1-2 Tbsp of warm tap water–add water slowly and whisk into a syrup; be conservative, it’s easy to add too much water. Then whisk 2 Tbsp of maple syrup into the powdered sugar syrup. Why? I don’t know, just crazy.

Drizzle the syrup glaze over the scones and allow the icing to harden (approx 10-15 min).

And there you go…a very sweet and healthy-free combo of questionable ingredients combined to put on the pounds and take potentially vibrant years off of the back-end of your life.
But this scone recipe is delicious.
Enjoy, if possible.
I usually really like the first two, and then I begin to question my motivations.

For a less decadent, less lethal treat, try this Homemade Biscotti Recipe.

biscotti recipe
Adding a little cocoa powder and ground coffee makes a nice biscotti twist.

Thanks For Watching Our Scone Recipe!

Thanks for checking out our scones, and all of our recipes. Be sure and sign up for our mailing list so you’ll never miss a new recipe. Also click a button below and share the dishes with your friends. You can also follow Chef Buck on Youtube. We appreciate all the kind comments and support, and we’ll see you next time in the kitchen!

If you like what CG and I do, you can also support us on Patreon, or throw us a tip in our Paypal Tip Jar. We’ll happily enjoy a coffee on the road – Thanks! We appreciate all the support, and we’ll see you next time in the kitchen!

We include affiliate links for products on our website. So, if you make a purchase after clicking on our links, we may earn a commission which helps us produce more videos and drink more coffee :^) We participate in the Amazon Services LLC Associates Program, which is an affiliate advertising program. It provides a means for us to earn fees by linking to Amazon.com and affiliated sites, so we can make more videos.

Share and Enjoy !

Cheese Biscuits with Bacon and Jalapeno

cheese biscuits

This Cheese Biscuits recipe makes four good-size biscuits, which is plenty for two folks for breakfast (maybe even 4 people, if one of them isn’t me).

Ingredients for Cheese Biscuits

1 cup ALL-PURPOSE FLOUR
2 tsp BAKING POWDER
1/4 tsp SALT
1/2 cup MILK
1 JALAPENO pepper (chopped)
4 slices BACON (cooked crispy, crumbled)
1/2 cup CHEDDAR CHEESE (shredded)

The recipe doubles quite easily if you want to make a bigger batch.

How to make Cheese Bacon Biscuits

First thing, fry up your bacon and set aside to cool. You’ll want it crisp enough to crumble. Slice your jalapeno (seeds and all) and saute for a minute or two in the bacon grease, this’ll flavor it up, start to cook it up, and knock off a little of the heat. Set pepper aside on a paper towel to drain.

In a mixing bowl, combine flour, baking powder, and salt. Mix well and then cut in the shortening. Add shredded cheese, sauted pepper, and crumbled bacon and mix. Slowly add milk, turning the mixture, getting the loose flour to come together into clumps. On a floured surface, turn the clumped dough out of the bowl and knead gently approx. a dozen times.

Form into biscuits–I just make a big pie shape and cut it into four pieces cause I’m lazy (or brilliant). Brush biscuit tops with melted butter, if desired. I can take of leave this move–the biscuits will have plenty of color from the bacon, cheese, and jalapenos.

Place biscuits on an ungreased sheet and bake at 425 degrees F for 13-15 minutes. Check here for current prices for baking sheets on Amazon.
And there you have it. Give this Cheese Biscuits recipe a try and let me know what you think, and bon appetit!

For another delicious bread, try my mama’s Picture Perfect Focaccia Bread Recipe.

focaccia bread

Thanks for checking out the recipes. Be sure and sign up for our mailing list so you’ll never miss a Chef Buck cooking video, and click a button below and share the dishes with your friends. We appreciate all the kind comments and support, and we’ll see you next time in the kitchen!
–Chef Buck

Share and Enjoy !


Biscotti Recipe – Big Almond Biscotti

biscotti

Wanna make some big biscotti? This twice-baked biscuit is an awesome accompaniment to your favorite hot beverage.

Biscotti is a twice-baked sweet biscuit that goes great with a hot cup of coffee or tea–it’s an easy way to start the day feeling like a real fancy-pants dude or dudette, especially if you’re drinking your hot beverage out of a tiny cup with a tiny spoon to stir in your milk and a cloth napkin to wipe your very satisfied mouth. And there is zero butter or oil in this recipe, just a little rummy goodness.

Biscotti Recipe Ingredients

1 cup ALMOND SLICES
2 cups all-purpose FLOUR
3/4 cup SUGAR
1 teaspoon BAKING POWDER
1/8 teaspoon SALT
3 large EGGS
2 tsp VANILLA EXTRACT
1 tsp ALMOND EXTRACT
2 Tbsp RUM

How to Make Almond Biscotti Recipe

Preheat oven to 350 degrees F.
Toast almond slices–watch them, it only takes about 2 minutes to toast, just want a few to begin turning.
Combine flour, sugar, baking powder, salt then mix and set aside.
Whisk the eggs, rum and extracts until blended well.
Add the dry ingredients, including nuts, and mix until combined.

Dough will be sticky at this point.
Scrape the dough out onto a parchment lined sheet pan.
Quickly shape with wooden spoon into a long flat loaf.

Bake about 30 minutes at 350 degrees F.
Remove from the oven and cool 10-15 minutes.
Lower oven heat to 300 degrees F.

Slice loaf into 1/2″ to 1″ wide slices.
Lay the slices cut side down on the baking sheet and bake another 15-20 minutes.
Turn the slices over and bake 15 minutes more, or until the cookies are a light golden brown.
Cool the biscotti on a rack.
Cool completely before storing.
And that’s it, man. Serve them up with some coffee or hot tea and you’ll feel
like a real fancy-pants Italian lawyer.
Give this big biscotti recipe a try and let me know what you think, and bon appetit!

And for another tasty breakfast treat, try this Deadly Scone Recipe.
maple pecan scones

Share and Enjoy !


Chicken Quiche Recipe with a Perfect Crust

chicken pecan quiche

Camera Girl is cooking up one of my favorites, a pecan chicken quiche recipe! It’s super easy and super delicious. Definitely take the time to make this crust, because it’s not much time at all, and well worth the effort! This is a great way to use leftover chicken (for best results, avoid canned chicken with this recipe—why would you want to do that to yourself?))

What you need for this Chicken Quiche Recipe

Quiche crust:
1 cup ALL PURPOSE FLOUR
1 cup CHEDDAR CHEESE (shredded)
3/4 cup PECANS (chopped)
1/2 tsp SALT
1/4 tsp PAPRIKA
1/3 cup OIL

Quiche filling:
1 cup SOUR CREAM
1/2 cup CHICKEN BROTH
1/4 cup MAYONNAISE
3 Lg EGGS (lightly beaten)
2 cups CHICKEN (cooked, chopped)
1/2 cup CHEDDAR CHEESE (shredded)
1/4 cup ONION (minced)
1/4 tsp DILLWEED (dried)
HOT SAUCE (to taste)
1/4 cup PECANS (chopped)

How to Make Chicken-Pecan Quiche

Make the crust first. Combine all the dry ingredients and mix well. Add vegetable oil and mix thoroughly. Press into a 9” pie plate and bake at 350 degrees Fahrenheit for 12 minutes. Check current prices for pie plates on Amazon.

After baking, remove from the oven and allow the crust to cool completely. While the crust takes its sweet time, whip up the quiche filling.

In a bowl, combine the sour cream, mayonnaise, chicken broth, and eggs and mix together until smooth. Add the chicken (already cooked and chopped well). This is a great way to use leftover chicken, or simply cook up and chop 3-4 thighs, which is what we usually do.

Add shredded cheese, dried dill weed, minced onion, and hot sauce to taste. Mix well and pour into cooled pie crust. Top with chopped pecans and bake at 350 degrees F for 50-60 minutes. The pie will set and be golden brown when finished. Remove from heat and allow to rest 10-15 minutes before serving.

Give this awesome pecan chicken quiche recipe a try and let me know what you think, and bon appétit!

For another baked bird in the oven, try this Turkey Pot Pie Recipe.

turkey pot pie casserole

Thanks for checking out the quiche recipe. Be sure and sign up for our mailing list so you’ll never miss a Chef Buck cooking video, and click a button below and share the dishes with your friends. We appreciate all the kind comments and support, and we’ll see you next time in the kitchen!
–Chef Buck

Share and Enjoy !


Best Homemade Focaccia Bread Recipe Ever

focaccia bread

Nothing beats the taste of homemade focaccia bread, and my mama bakes the best bread. In this video we get to see her make focaccia step by step. Give this Italian flatbread a try, your family and friends will love you for it.

Focaccia Bread Ingredients:

3 ½ cups all-purpose FLOUR
1 ¼ tsp KOSHER SALT
1 Tbsp INSTANT YEAST
1 ½ cup warm WATER (approx. 130 degrees F)
1 ½ large sweet ONION (diced)
4-6 cloves GARLIC (finely chopped)
¼ cup JALAPENO (diced)
1 cup OLIVES –black, green, or both (chopped)
¼ cup PEPPERONCINI (chopped)
1 cup CHEESE (grated parmesan, asiago, and romano)
1-2 Tbsp fresh ROSEMARY (finely chopped)
approx. 6-7 Tbsp OLIVE OIL

focaccia bread

How to Make Homemade Focaccia Bread

Sift 3½ cups of ALL-PURPOSE FLOUR and combine in a mixing bowl with SALT and YEAST.  Add WARM WATER (approx. 130 degrees F) and mix contents of bowl for 1 minute in mixer.  Remove dough. 

In a 9 x 13 baking pan greased with 1-2 Tbsp OLIVE OIL, spread dough flat.  Cover and allow dough to rise for 45-60 minutes. Check current prices for 9 x 13 Baking Pan on Amazon.

While dough rises, chop and prep topping ingredients. Take time to sauté the onions and garlic well.  Feel free to use more or less ingredients—this combo is terrific—but experiment according to your tastes (I bet a little sundried tomato would be awesome).

After bread has risen, uncover and drizzle the top of the dough with 2 Tbsp OLIVE OIL.  My mama sticks the end of her thumb into the dough all along the top to create an interesting (or not quite interesting) pattern; this is something you can do, too, if you’re retired with a lot of free time on your hands, but it’s not necessary.

Sprinkle and spread toppings evenly over the dough.
Place the bread in an oven pre-heated to 375 degrees F and bake approx. 35-40 minutes.
Remove bread from oven and let rest 5 minutes before transferring to a cooling rack.
Take care not to eat it all right away because you’ll want some for later.

Give this Focaccia bread recipe a try and let me know what you think!

For another great Mama Redbuck bread recipe, try this crazy delicious Pesto Parmesan Bread Recipe.

parmesan pesto bread

Thanks for checking out the recipes. Be sure and sign up for our mailing list so you’ll never miss a Chef Buck cooking video, and click a button below and share the dishes with your friends. We appreciate all the kind comments and support, and we’ll see you next time in the kitchen!
–Chef Buck

Share and Enjoy !


Follow Me!