Boneless Pork Chops – Super Easy Recipe

boneless pork chops

This boneless pork chops recipe is super fast and flavorful and a perfect dish to prepare when you don’t have a ton of time to spend in the kitchen. If you’ve ever wondered the best way to cook up a thick pork chop, then give this technique a try, you’ll end up with a juicy delicious pork chop every time.

What You Need to Cook Boneless Pork Chops

BONELESS PORK LOIN CHOPS
SEASONING to taste…but use lots of it!
SALT and BLACK PEPPER for sure
And I also like:
GARLIC POWDER
ONION POWDER
PAPRIKA
HOT PEPPER
….but use whatever you prefer
OIL for cooking (not too much)

How to Cook a Boneless Pork Loin Chop

Remove the boneless pork loin chops from the fridge about 30 minutes before cooking, this will allow the pork to cook more evenly.

Preheat your oven to 350 degrees Fahrenheit.

Season both sides of chops before cooking–and don’t be timid with the seasoning–it’ll make all the difference! I often use just salt and pepper (black pepper AND cayenne), but experiment with your favorite seasonings, too.

Heat the oil in a skillet. The skillet should be suitable for cooking on the stove top and in the oven. Check current prices on Amazon for a Cast Iron Skillet like the one used in the recipe video.

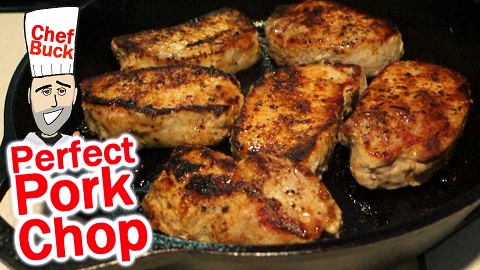
When the skillet is hot enough, add the boneless pork chops. The chops should sizzle and begin to cook immediately because you want to sear the pork and seal in the flavor.

boneless pork chops

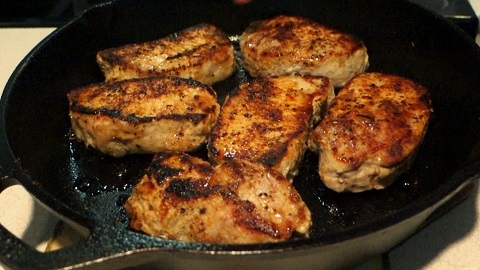
Cook chops 3-4 minutes on one side and then turn. This is for chops approx. 1″ thick, so adjust cooking times according to the size of the chop you use, but definitely use a thick chop for this cooking technique.

Cook chops 2-3 minutes on second side, then remove skillet from stove top and slide skillet into oven preheated to 350 degrees Fahrenheit and cook another 5-7 minutes, or until desired doneness.

Once done, remove the chops from the oven and then from the hot skillet. Place chops on a plate to rest the meat for 5-10 minutes. Chops hot from the oven are still cooking inside, and the juices are thin, so avoid cutting the chops too soon, or juices and flavor will be lost from inside the meat.

That’s all there is to cooking up a super quick and flavorful boneless pork loin chop. These pork chops make a great entree when you want a hearty meal, but don’t have a lot of free time for making dinner.

Give these boneless pork chops try and let me know what you think, and for a beefy version of this recipe, take a peek at How to Cook a Perfect Steak.

american kobe top sirloin steak
Cook a thick steak filet on high heat. Sear the outside for awesome taste and color, and then finish to desired doneness in the oven.

Thanks for checking out this pork chop recipe, and be sure and sign up for our mailing list so you’ll never miss a Chef Buck cooking video, and also click a button below and share the dishes with your friends.  We appreciate all the kind comments and support, and we’ll see you next time in the kitchen!

We appreciate you watching our videos…Thanks for the support!

We include affiliate links for products on our website. So, if you make a purchase after clicking on our links, we may earn a commission. That helps us produce more videos and drink more coffee :^)  We are a participant in the Amazon Services LLC Associates Program.It is an affiliate advertising program that provides a means for us to earn fees by linking to Amazon.com and affiliated sites.

Share and Enjoy !

Cranberry Brie Bites Recipe

cranberry brie bites

Cranberry Brie Bites are a tasty treat for parties. It’s an easy snack recipe you can make even easier by substituting canned cranberry sauce for the filling. The creaminess of the cheese and the tartness of the cranberry are a great combination. We use chopped pecans for this party recipe, but use whatever kind of nuts you like.

What you Need for Cranberry Brie Bites

CRANBERRY SAUCE, Homemade (recipe follows) or Canned
CRESCENT DOUGH SHEETS
BRIE CHEESE
PECANS, or try other NUTS
ROSEMARY
OIL or BUTTER

This cranberry brie cheese recipe is super simple and adjustable. We use homemade cranberry sauce, but you can easily substitute canned cranberry sauce if you like.

For Homemade Cranberry Sauce you will Need

2 8oz bags CRANBERRIES (fresh or frozen)
½ cup SUGAR
1-2 ORANGES (entire zest and juice)
2 CINNAMON sticks

To make cranberry sauce, add all ingredients into a sauce pot. If you don’t feel like zesting the orange, you can cut the peel into strips and add the entire peel into the simmer. Simmer over medium low heat until cranberries burst and the sauce thickens, about 20 minutes. Remove the cinnamon sticks and orange peels before serving.

How to Make Cranberry Brie Bites

These cranberry brie bites are mini bites, so you will need a mini-muffin tin. A muffin pan is not hard to find at a thrift store, or check here for current mini-muffin tin prices on Amazon.

cranberry brie bites
  • Lightly grease the cups of your muffin tin with butter or oil.
  • Finely chop fresh rosemary. You can use whole sprigs of rosemary for a more decorative look, but we prefer to chop the rosemary for easier eating and flavor distribution.
  • Chop the nuts. Use pecans, walnuts, cashews, or whatever nut you prefer.
  • Open the crescent dough and spread dough out on a floured surface.
  • Lightly roll the dough out and cut into as many squares as your mini-muffin tin will accommodate.
  • Place a dough square into each muffin cup and mold into the tin.
  • Cut and place your brie cheese into squares that will fit comfortably into each dough cup.
  • Add a dollop of cranberry sauce into each cup.
  • Top with a sprinkling of chopped nuts and rosemary.
  • Place the muffin tin into an oven preheated to 350 degrees Fahrenheit.
  • Bake 15-20 minutes until the pastry is golden brown around the edges.
  • Remove from the oven and promptly devour.

Thanks for watching our videos!

fruit cake recipe

For another party treat, try serving bite-sized bars of this easy No-Bake Fruit Cake Recipe.

Thanks for checking out the cranberry brie bites recipe. Be sure and sign up for our mailing list so you’ll never miss a Chef Buck cooking video, and click a button below and share the dishes with your friends. We appreciate all the kind comments and support, and we’ll see you next time in the kitchen!
–Chef Buck

We include affiliate links for products on our website. If you make a purchase after clicking on our links, we may earn a commission which helps us produce more videos and drink more coffee :^)
We are a participant in the Amazon Services LLC Associates Program, an affiliate advertising program designed to provide a means for us to earn fees by linking to Amazon.com and affiliated sites.

Share and Enjoy !

Creme Fraiche – Great Homemade Sour Cream

creme fraiche recipe

This Crème Fraîche recipe is like a homemade sour cream but less tangy, and it’s easy to make, just heavy cream mixed with live cultures. Crème Fraîche is easy to make and can be 3-4 times cheaper than store-bought crème fraîche. It’s is a thickened cream, similar in consistency to sour cream, but without the sharp tanginess. 

Homemade Crème Fraîche Recipe

All you need to make crème fraîche is
HEAVY CREAM also called Heavy Whipping Cream
YOGURT or BUTTERMILK with live cultures A crème fraîche made with buttermilk has more tang.

A Crème Fraîche recipe practically makes itself. All you have to do is introduce the two parties, put them together in a warm environment around 70F, and then let them hang out for 12-24 hours. How long it takes for the cream to thicken will mostly depend on the room temperature; if it’s a bit warmer or cooler in the room, it might take a bit shorter or longer time to make crème fraîche.

I generally make 16oz of crème fraîche at a time. This is a convenient size for heavy whipping cream. Heavy whipping cream and heavy cream are similarly used names for the exact same product, so whichever label you buy will work fine. Heavy cream is cream with a milkfat content greater than 35%, by contrast, half and half is ½ milk and ½ cream, with a milkfat content around 12%. This higher fat content allows crème fraîche be added to simmering dishes without curdling, adding creaminess to soups and sauces, eggs, etc..

In a jar, combine 16oz of heavy cream with 2 Tbsp of cultured buttermilk or yogurt. It is essential that the yogurt or buttermilk contain live cultures, since this is the agent that will allow the heavy cream to thicken.

Need a jar? Check current prices for Mason Jars on Amazon.

Stir the ingredients together, and then top the jar with a loose fitting lid or mesh, a coffee filter works great. Set jar aside and allow to rest at room temperature for 12-24 hours.
The cream will thicken over time, stir occasionally if desired. Once the cream thickens to the consistency of yogurt, place the crème fraîche in the refrigerator. It will continue to thicken and
will keep 8 to 10 days in the refrigerator.

creme fraiche recipe
Delicious crème fraîche can be made at home simply and inexpensively.

What can you do with Crème Fraîche?

It makes an ideal topping for desserts; it is rich and velvety smooth and can transform whatever it tops into a dessert, especially fruit. Or it can add creaminess to savory dishes as well. Crème fraîche has a high fat content, so it can be added into dishes as they cook and the cream will resist curdling. Add crème fraîche to soups and sauces to create a smooth, creamy richness. Crème fraîche can be used in any way you might use a whipped topping or sour cream, but the simplicity and richness of this thickened cream can elevate a dish to something special.

Love Mexican food? You can use this recipe to make a fresh, delicious Mexican crema that is better than what you buy in the stores. Mexican crema is basically crème fraîche with a bit of lime juice and salt added after it has sat in the frig for a day. And for an extra tang, use cultured buttermilk instead of the yogurt. What you will get is thick, creamy goodness that is a great topping for chilaquiles, pozole, tacos …. the list is endless!

My Favorite Ways To Use Crème Fraîche

Use crème fraîche as a fruit topping. It turns fruit into dessert. An actual dessert if you top with powdered sugar as well.
Saute apples in butter and cinnamon and then top with crème fraîche. Holy cow it’s good.
Or just drop a dollop of crème fraîche on pie or cake.
Stir crème fraîche into pasta to add a decadent creaminess. Mac ‘n cheese!
Stir crème fraîche into soups and sauces, it will add creaminess without curdling.
Top oatmeal with crème fraîche to turn a bland breakfast into a better breakfast.
Add crème fraîche to scrambled eggs for the creamiest eggs ever.

If you’ve never tried crème fraîche then give it a go. And if you’ve only previously bought it from the store, definitely try this homemade crème fraîche recipe.

Here’s some desserts that would look nice under a dollop of crème fraîche!
Try a homemade Fruit Cobbler Recipe.

creme fraiche
homemade fruit cobbler

Or try crème fraîche on a fancy French Baked Pear Recipe.

pear salad

Thanks for checking out the crème fraîche recipe. If you liked the video, then click a button or two below and share it with your friends.

Thanks for watching our recipe videos!

We include affiliate links for products on our website, so if you make a purchase after clicking on our links, we may earn a commission which helps us produce more videos and drink more coffee :^) We participate in the Amazon Services LLC Associates Program, which is an affiliate advertising program providing a means for us to earn fees by linking to Amazon.com and affiliated sites, so we can make more videos.

Share and Enjoy !

Veggie Burger Recipe with Blackened Eggplant

veggie burger recipe

I love a great burger, especially if it’s a healthy veggie burger recipe that also just happens to taste terrific. A thick slice of blackened eggplant makes a perfect sandwich filling, and if you dress
sliced eggplant up like a hamburger, eggplant makes one of the easiest, quickest, and tastiest veggie burger recipes you’ll ever eat. Portabello mushrooms make a nice veggie burger substitute, but can sometimes be a bit soggy. I’m a big fan of black bean burgers, but a bean burger can be a bit of work to make and hold together into a burger patty shape that satisfies. A blackened eggplant sandwich is super easy to prepare and definitely satisfies.

What You Need to Make a Great Veggie Burger Recipe

1 globe EGGPLANT also called an aubergine eggplant
some OIL to lightly coat the eggplant and skillet
a variety of spices like
CHILI POWDER, CHIPOTLE,
PAPRIKA, GARLIC POWDER,
GINGER POWDER, etc., but experiment and try your favorite spices
Burger Fixings such as
badass BUN
crunchy ONION
crisp LETTUCE
cool TOMATO
CHEESE, maybe?

How to Make a Blackened Eggplant Veggie Burger

Use an aubergine eggplant, also known as a globe eggplant. The skin has a dark purplish color and is edible, in fact the skin and meat of the eggplant can be eaten raw,
but for faux burger patties, I like to remove the skin.

  • Remove the skin.
  • Cut eggplant into thick slices, ¾” to 1″ thick.
  • Coat the eggplant lightly in oil.
  • Generously season both sides of the eggplant with your favorite spices, including salt.
  • Heat a lightly oiled skillet on medium-medium high heat. If you need a skillet that’s great on the stove top and in the oven, you can check current prices for a cast iron skillet on Amazon.
  • Cook the eggplant for 2 minutes on each side.
  • If you like cheese on your faux burger, add a slice over the eggplant during it’s last miunte in the skillet.
  • Remove the eggplant from the skillet and build your burger while it’s hot.

And that’s it.
Super tasty, meat-free, and probably the easiest veggie burger recipe you’ll ever make.

veggie burger recipe
Veggie burger recipe with blackened eggplant

What to Look for When Choosing an Eggplant

  • Buy an eggplant that seems heavy for its size.
  • A larger eggplant will sometimes have a slight bitterness, so choose a smaller eggplant.
  • Look for a bright green stem top and a smooth shiny skin.
  • The flesh of the eggplant should be firm, and bounce back when lightly pressed.

Give this super easy an very tasty blackened eggplant veggie burger recipe a try and let me know what you think, and bon appétit!

And for another great veggie dish, try this fantastic faux pasta recipe made with Zucchini Zoodles.

zoodles recipe
Handmade zoodles are easy to make and a nice change from a heavy pasta dish.

Thanks For Watching Our Recipe Videos!

Thanks for checking out our eggplant recipe, and all of our recipes. Be sure and sign up for our mailing list so you’ll never miss a new recipe. Also click a button below and share the dishes with your friends. You can also follow Chef Buck on Youtube. We appreciate all the kind comments and support, and we’ll see you next time in the kitchen!

If you like what CG and I do, you can also support us on Patreon, or throw us a tip in our Paypal Tip Jar. We’ll happily enjoy a coffee on the road – Thanks! We appreciate all the support, and we’ll see you next time in the kitchen!

We include affiliate links for products on our website. So, if you make a purchase after clicking on our links, we may earn a commission which helps us produce more videos and drink more coffee :^) We participate in the Amazon Services LLC Associates Program, which is an affiliate advertising program. It provides a means for us to earn fees by linking to Amazon.com and affiliated sites, so we can make more videos.

Share and Enjoy !

Salmon Cakes Benedict w/ Hollandaise Sauce

salmon cakes

Canned salmon is perfect for making delicious salmon cakes. You can use salmon cakes for a variety of dishes, including salmon burgers. I generally make extra patties when I cook up salmon cakes, and one of my favorite uses for these leftover salmon cakes is in a variation of Eggs Benedict. Check out the recipe video below to see how to make this super tasty breakfast recipe.

Ingredients for Salmon Cakes Eggs Benedict

leftover SALMON CAKES
fresh SPINACH
thick sliced TOMATO
EGGS
HOLLANDAISE SAUCE

How to Make Salmon Cakes Eggs Benedict

This is a terrific way to use leftover salmon cakes (detailed salmon cake recipe below), in fact, it’s best to use leftover salmon cakes for this recipe; no sane person wants to open a can of salmon first thing in the morning.
On a plate, arrange a bed of spinach and top with a thick slice of tomato.
In a skillet, re-heat a leftover salmon cake.
While the salmon cake heats through, whip together a quick blender Hollandaise sauce (recipe below).
In another skillet, fry an over easy egg (or poach an egg, if you prefer).
Top the sliced tomato with the heated salmon cake, and then top the salmon with the fried egg.
Cover the egg with Hollandaise sauce and serve immediately.

salmon cakes
use leftover salmon cakes to make a terrific variation of Eggs Benedict!

How to Make a Quick Hollandaise Sauce

¼ cup melted BUTTER
2 EGG YOLKS
1 Tbsp LEMON JUICE (or substitute vinegar)
½ tsp DIJON MUSTARD (or substitute creamy wasabi or a little hot sauce)

In a bowl, combine two egg yolks, lemon juice, and mustard…also add a sprinkling of black pepper if you like. Melt the butter until it is bubbling, then slowly add the butter into the egg mixture while blending the eggs with a hand blender. Be sure to add the hot butter slowly, so the eggs don’t harden.
Blend for about 5-10 seconds. Use the sauce immediately, or hold in a bath of hot water until ready to use. This recipe makes just enough for two servings; when I want lots of Hollandaise sauce, I’ll double this recipe, with the exception of the egg yolks…instead of 4 yolks, I’ll just use 3 yolks.

Salmon Cakes Ingredients:

14oz canned SALMON (red or pink)
¼ – ½ cup ONION (finely chopped)
HOT PEPPER (finely chopped, to taste)
1 to 2 EGGS (beaten) …I generally use 1 egg for a fancy salmon cake entree and 2 eggs when
making salmon cakes for sandwiches.
SALT and PEPPER to taste
OIL for sauteing (3-4 Tbsp…salmon will soak up the oil)
1 Tbsp CURRY POWDER (optional)

salmon cakes
I make 4 salmon cakes from one can of salmon, and often prepare 8 cakes at a time so that I’ll have leftover salmon cakes for sandwiches and salmon Benedicts.

How to Make Salmon Cakes:

Traditional canned salmon will come with skin and bones still intact . The skin and bones are soft and edible. You can remove the skin and bones if you like; I used to remove them, but now I’m too cheap, and I don’t want to miss out on the extra nutrition, either.

  • Place drained salmon in a bowl.
  • Add ¼ – ½ cup onion depending on how much you like onion. Make sure the onion is finely chopped; smaller pieces will help keep the patties from falling apart. If desired, add some finely chopped hot pepper. If you don’t have fresh pepper, add a little chili powder or hot sauce.
  • Add salt and pepper to taste.
  • Add one or two beaten eggs. I like to use two beaten eggs because it helps to keep the patties together better; I don’t like my burgers to fall apart while I’m eating them.
  • Mix all the ingredients together well.
  • Shape into patties. I usually get 4 patties out of a 14oz can, but make as many as you like–bigger or smaller–depending on how big you want your burger to be. Here’s some current prices for canned salmon if you like to do your fishing on the internet.
  • Heat oil in a skillet. I like medium heat. You want the oil to be hot enough to sizzle when you add the patties, but not so hot that the patties will cook too quickly; you want the patties to get a nice cooked side before turning them, this will keep then from breaking apart.
  • Cook 5-7 minutes and then turn gently when the patties are golden brown.
  • Cook another 3-4 minutes and then remove from skillet and drain salmon patties on a paper towel.

I like to serve salmon patties on a toasted bun with sliced tomato, onion, lettuce and mayo.
It’s a nice break from hamburgers, and just as tasty.
Sometimes I’ll add a Tbsp of curry powder into the mix to make Curried Salmon Burgers, which you should definitely try sometime.

Give this canned salmon recipe a try and let me know what you think, and bon appétit!

And for another canned salmon recipe, check out this Salmon Meatballs Recipe.

canned salmon
Salmon meatballs in a rich curry sauce.

Thanks for checking out our salmon cakes recipe, and all of our recipes. Be sure and sign up for our mailing list to never miss a new cooking video, and also click a button below and share the dishes with your friends, and follow Chef Buck on Youtube. We appreciate all the kind comments and support, and we’ll see you next time in the kitchen!

If you like what CG and I do, support us on Patreon, or throw a tip in our Paypal Tip Jar We’ll happily enjoy a coffee on the road, or maybe even pay a bill or two!–Thanks! We appreciate all the support, and we’ll see you next time in the kitchen!

Thanks for watching our recipe videos!

We include affiliate links for products on our website, so if you make a purchase after clicking on our links, we may earn a commission which helps us produce more videos and drink more coffee :^) We participate in the Amazon Services LLC Associates Program, which is an affiliate advertising program providing a means for us to earn fees by linking to Amazon.com and affiliated sites, so we can make more videos.

Share and Enjoy !

Best Southwestern Quinoa Salad Recipe

southwestern quinoa salad

Everywhere you turn, there’s a Southwestern quinoa salad, and for good reason.  It’s delicious, easy to make, and a great choice for a healthy meal. Since quinoa is a complete protein, this Southwestern inspired salad makes an ideal vegetarian recipe, doubly so since this quinoa is paired with black beans.

What you need to make a Southwestern Quinoa Salad

2 cups COOKED QUINOA (check current prices for quinoa on Amazon)
1 15 oz can BLACK BEANS
10-15 sliced CHERRY TOMATOES
1 AVOCADO
½ diced YELLOW BELL PEPPER
3-5 chopped GREEN ONIONS
¼ cup chopped, pickled JALAPENO
½ cup chopped CILANTRO
1 LEMON …juice and zest
2 Tbsp OLIVE OIL
SALT and PEPPER to taste

southwestern quinoa salad
southwest quinoa salad recipe

How to make a Southwest Quinoa Salad

Cook up the quinoa just like rice: 1 part quinoa to 2 parts water, bring to a boil, reduce heat, cover and simmer for 15 minutes or until the water is absorbed. Fluff the quinoa and then set aside uncovered to cool.

While the quinoa cools, prepare the veggies:

Dice ½ a yellow bell pepper, or any color pepper, but if you’re like me and you’re making a corn-free southwest quinoa salad, then using a yellow pepper will make your quinoa salad more lovely to look at. Slice some cherry tomatoes. Cherry tomatoes have a great flavor, and the hardiness of the tiny tomato makes it the perfect choice for a salad.

Remove and mince the zest from 1 small lemon, and then slice the lemon in half. Check current prices for a lemon zester on Amazon.

Chop up some green onions, and cilantro. If you like a little heat, chop up some pickled jalapeno, too, and reserve a Tbsp of the jalapeno pickling juice for added kick and flavor.

When the quinoa cools:

Add 2 cups of the cooked quinoa to a large mixing bowl.
Rinse and drain the black beans and add them to the bowl.
Add the yellow pepper, jalapeno pepper, onion, cilantro, lemon zest, olive oil, juice from half the lemon, and salt and pepper.
Mix ingredients thoroughly.
Add tomato.
Slice avocado and add to salad.
Take the remaining lemon half and squeeze its juice over the cut avocado, this will preserve the vibrancy of the avocado.

Gently mix the salad and serve.

This Southwestern quinoa tastes great on it’s own, as a healthy side dish, or served over a bed of fresh greens for a super salad topping.

Give healthy southwest quinoa salad recipe a try and let me know what you think, and bon appétit!

For another healthy option with a southwestern flair, check out out this meat-free Vegetarian Chili Recipe that even carnivores will love.

vegetarian chili
pot o’ meatless chili for good times

Thanks for checking out our Southwestern quinoa salad recipe, and all of our recipes. Be sure and sign up for our mailing list and never miss a new Chef Buck cooking video, and also click a button below and share the dishes with your friends. We appreciate all the kind comments and support, and we’ll see you next time in the kitchen!

Thanks for watching our cooking videos!

We include affiliate links for products on our website, so if you make a purchase after clicking on our links, we may earn a commission which helps us produce more videos and drink more coffee :^)                                                                                                We participate in the Amazon Services LLC Associates Program, which is an affiliate advertising program providing a means for us to earn fees by linking to Amazon.com and affiliated sites, so we can make more videos.

Share and Enjoy !

Cashew Coconut Energy Balls — Power Bars in a Ball!

Cashew Coconut energy Balls

Cashew Coconut Lemon Bites! or Balls! A quick energy bar in a ball snack recipe! Very easy to make, and super flavorful.  These power balls are like a mini desert, but full of semi-healthy stuff that will put a little pep in your step.  And you get the extra energy without the drastic sugar crash.

Cashew Coconut Energy Balls Ingredients:

2 cups raw CASHEWS
1 cup pitted DATES
1 Tbsp COCONUT OIL
1 Tbsp MAPLE SYRUP
1 tsp VANILLA EXTRACT
¼ tsp SALT
½ cup SHREDDED COCONUT
juice and zest of 1 small LEMON

energy snack
power snack in a yummy treat!

Cashew Coconut Energy Balls Directions:

You’ll need a food processor for this recipe. In fact, you can do the entire recipe in a food processor.  However, my processor is pretty small, so I just use it for chopping up the cashews and dates.  I do the rest of the mixing in another bowl.

Place the raw cashews in a food processor and chop for a few moments. Your cashews should be chopped fine. Then, add pitted dates and chop to same size.
Add coconut oil, maple syrup, vanilla extract, and salt to the cashew/date mixture.
Zest one small lemon. Now, mince the zest and add it to the mixture.
Slice the lemon and squeeze all of the juice into the mix.
Mix thoroughly.
Shape the mixture into ball shapes. Make whatever size you like for snacking! I think grape size is best.
Next, roll the balls in shredded coconut to coat the outside.
And that’s it! Snack away!
The balls can be stored in the fridge until desired.  In fact, they taste best right out of the fridge!

This super easy recipe makes a tasty treat. And it’s a great alternative to sugary candy bars and ice cream.

Keep Checking Back For New Recipe Ideas:

So, give this Cashew Coconut Energy Balls recipe a try and let me know what you think, and bon appétit!

And for another tasty, sweet treat, try this semi-healthy and awesome BERRY COBBLER RECIPE

blackberry cobbler
blackberry cobbler

Share and Enjoy !

Kale Beet Salad – Healthy Super Food Recipe

kale beet salad

Doesn’t Kale Beet Salad sound like a dream come true? Beets are fun, kale is cool…very exciting stuff. Kale is a slightly rough and tough cabbagee-thingy that’s a little less than friendly in it’s natural state, but massaging salt into the raw leaves can turn Kale into a delicious salad green. Here’s a very tasty and nutritionally jam-packed raw kale recipe with beets.

What you need for Kale Beet Salad

8-10 KALE (leaves)
2 BEET ROOTS (medium-sized)
2 TOMATOES (small…I use plum tomatoes)
2 CARROTS
1/2 cup GOLDEN RAISINS
SALT (to taste…I use approx. 1 tsp.)
PEPPER (to taste)
1 Tbsp OLIVE OIL
2 tsp BALSAMIC VINEGAR

How to make a Kale and Beet Salad

Pre-heat oven to 350 degrees.
Remove greens from beets and cut root bulbs into smaller pieces, about 1/2 inch squares. Spread the beet pieces onto a baking pan and add enough water to cover the bottom of the pan. Cook for 25-35 minutes, remove and allow to cool.

While beets are cooking, remove the spine from the center of the kale leaves and tear kale into salad pieces. Kale is rough, but adding salt to the greens will draw out moisture and soften the leaves, making them darker. Gently massage salt into the kale until it achieves a desirable consistency, this may take several minutes.

Grate carrots into the greens, add raisins, then toss and divide portions into salad bowls. In a separate bowl, add diced tomatoes and cooled beets, then add olive oil, balsamic vinegar, and black pepper and mix together. Spoon beet/tomato mixture over kale greens and serve.

kale beet salad

This is a delicious way to enjoy and optimize the benefits of raw kale. I’m not usually a big raisin fan, but I find the raisins work really well in this salad. I’ve contemplated tossing minced ginger into the mix, but haven’t gotten around to doing so, although I might next time I whip this dish up. If you give it a try, let me know what you think.

This is one of the healthiest dishes I routinely prepare, but be aware, eating beets can cause some rosy changes when you answer “the call of nature”. (Don’t be alarmed, you probably won’t be dying…in fact, you’ll probably be doing a lot better.)
Give this kale beet salad a try and let me know what you think, and bon appétit!

Have fun in the kitchen. Get a bunch of spices, pots and pans, and begin experimenting with different recipes. home cooking is a healthy hobby that will save you tons of money in the long run.
Check out current prices for Complete Kitchenware Sets on Amazon as well as Complete Starter Spice Kits. Or go to a thrift store! I’ve found some of my favorite kitchen gear at second-hand stores.

And for another tasty salad idea, try this Black Eyed Pea Salad Recipe.

black eyed pea salad

Thanks for Checking Out Our Kale Beet Salad

Click a button below and share the dishes with your friends. You can also follow Chef Buck on Youtube. We appreciate all the kind comments and support, and we’ll see you next time in the kitchen!

If you like what CG and I do, support us on Patreon, or throw us a tip in our Paypal Tip Jar. We’ll happily enjoy a coffee on the road – Thanks! We appreciate all the support, and we’ll see you next time in the kitchen!

We include affiliate links for products on our website. Making a purchase after clicking on our links and we may earn a commission which helps us produce more videos and drink more coffee :^) We participate in the Amazon Services LLC Associates Program, which is an affiliate advertising program. It provides a means for us to earn fees by linking to Amazon.com and affiliated sites, so we can make more videos.

Share and Enjoy !

Lentil Soup Recipe with Ginger

lentil ginger soup

A lentil soup recipe! Doesn’t that sound like all of your dreams are coming true? Pick up some brightly colored lentils and give this lentil soup recipe a try.

What you Need for this Lentil Soup Recipe:

1 ½ cups LENTILS
5-6 cups WATER (or ½ water ½ broth)
1 large ONION (finely chopped)
2 Tbsp fresh GINGER (finely chopped)
1 hot PEPPER (finely chopped)
2 Tbsp OLIVE OIL
1 tsp CUMIN SEEDS
½ tsp TUMERIC POWDER
1 tsp CORIANDER POWDER
1 14 oz can DICED TOMATOES (or 2 Lg tomatoes, diced)
SALT and BLACK PEPPER to taste
CILANTRO LEAVES for garnish (coriander leaves)

How to Make the Soup:

If you need a nice soup pot for your kitchen, you can check here for current pricing for a soup pot on Amazon.

  • In a large pot, heat olive oil on medium heat. When oil is hot, add the cumin seeds and allow cooking for about 1 minute. After a minute the seeds will begin to open, at this point add the onion and hot pepper and allow cooking until the onions soften and become translucent.
  • Now, add ginger, coriander, and turmeric and continue mixing ingredients over medium heat.
    Add tomatoes, mix, and cook with ingredients for 2 minutes.
  • Add lentils (be sure to wash and rinse first). Red or yellow lentils will make this dish look extra yummy. Darker lentils will taste equally as good—the dish just won’t win a beauty contest—but use whatever kind you have, ultimately, your stomach won’t know the difference.
  • Add water, or a combination of water/broth.
  • Next, bring the pot to a boil, reduce heat, then cover the pot loosely and allow ingredients to simmer for 30 minutes.
  • After 30 minutes, add salt and pepper to taste. Add more water as needed, but sparingly—you don’t want your soup to be too thin. Cover pot loosely and continue cooking another 15-20 minutes.

Final Steps:

  • When the lentils are soft and completely cooked, lightly blend the soup to add a creamy consistency. A hand-held stick blender works great—a few quick pulses and voilà! If a stick blender is not handy (rim shot), simply remove a few cups of the soup to a table top blender, smooth, and return to the pot. This step isn’t necessary, but do it; just do it.
  • If the soup is thinner than you like, continue to simmer briefly—but remember, the lentils, like rice, will continue to absorb water and thicken the soup on their own.
  • Garnish with cilantro (coriander leaves) and serve with French bread for optimal taste satisfaction.

Keep Coming Back To See What’s New!

Bon appétit!

And, if you like bread with your soup, you might love trying this Fancy Egg Bread Recipe, it’s one of my favorites.

egg bread
baked egg bread with rosemary seasoning

Thanks for checking the recipes out! If you liked it, click some of the buttons below and share it with your friends and family, I appreciate it.
–Buck

Share and Enjoy !

Follow Me!